

When I think of German cuisine, hearty meats often come to mind, but there’s so much more to explore. I’ve discovered a treasure trove of vegetarian dishes that are just as satisfying and full of flavor. From creamy mushroom spaetzle to zesty zwiebelkuchen, these recipes celebrate the richness of vegetables and grains. Curious about how these traditional dishes can shine without meat? Let’s take a closer look at these delightful creations.
Creamy Mushroom Spaetzle
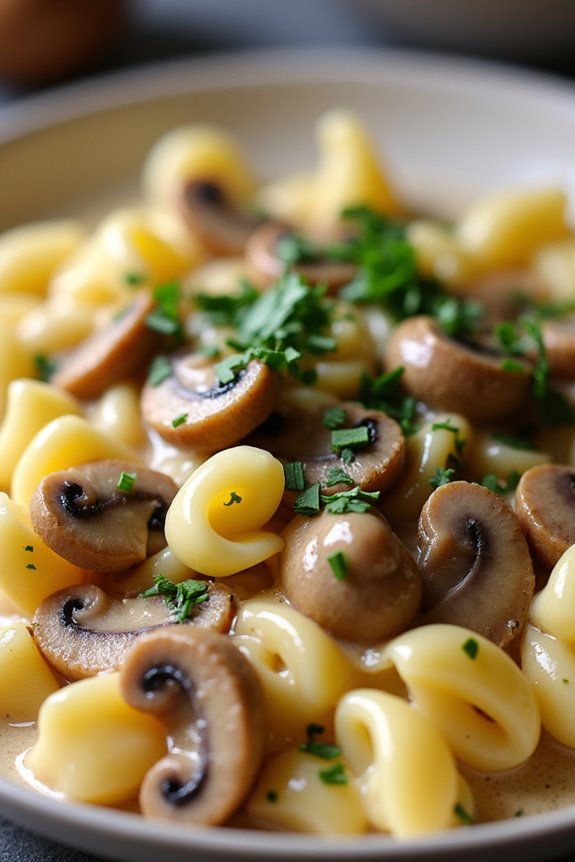
Creamy Mushroom Spaetzle is a delightful vegetarian dish that brings together the heartiness of traditional German spaetzle with the rich, earthy flavors of mushrooms. Spaetzle, a type of soft egg noodle, serves as the perfect base for the creamy sauce, allowing the dish to be both filling and comforting. This recipe is ideal for a family dinner or a special gathering, showcasing the versatility of mushrooms while providing a satisfying meal without meat.
The combination of sautéed mushrooms, fresh herbs, and a luscious cream sauce creates a dish that’s both indulgent and wholesome. It’s a perfect representation of German vegetarian cuisine, making use of simple ingredients to create something extraordinary. With its rich flavors and velvety texture, Creamy Mushroom Spaetzle is sure to become a favorite in your household.
Ingredients (Serves 4-6)
- 2 cups all-purpose flour
- 4 large eggs
- 1/2 cup water
- 1 teaspoon salt
- 2 tablespoons butter
- 1 medium onion, finely chopped
- 3 cups mushrooms (such as cremini or button), sliced
- 2 cloves garlic, minced
- 1 cup heavy cream
- 1 teaspoon fresh thyme, chopped (or 1/2 teaspoon dried thyme)
- Salt and pepper, to taste
- Fresh parsley, chopped (for garnish)
Cooking Instructions
- Prepare the Spaetzle Dough: In a large mixing bowl, combine the flour and salt. Create a well in the center and crack in the eggs. Gradually add the water while mixing until a thick, sticky batter forms. The dough should be somewhat elastic and thick enough to hold its shape. Let it rest for about 20 minutes.
- Cook the Spaetzle: Bring a large pot of salted water to a boil. Using a spaetzle maker or a colander with large holes, press the dough into the boiling water in small batches. Cook until the spaetzle floats to the surface, which should take about 2-3 minutes. Remove with a slotted spoon and set aside. Repeat until all the dough has been cooked.
- Sauté the Vegetables: In a large skillet, melt the butter over medium heat. Add the chopped onions and sauté until they become translucent, about 5 minutes. Stir in the sliced mushrooms and cook until they’ve released their moisture and are golden brown, approximately 7-10 minutes. Add the minced garlic and thyme, and cook for an additional minute.
- Make the Cream Sauce: Pour the heavy cream into the skillet with the sautéed mushrooms and stir to combine. Let it simmer for about 5 minutes to thicken slightly. Season with salt and pepper to taste.
- Combine Spaetzle and Sauce: Gently fold the cooked spaetzle into the creamy mushroom sauce, ensuring that all the noodles are coated. Allow it to heat through for an additional 2-3 minutes, mixing occasionally.
- Serve: Remove from heat and garnish with fresh parsley. Serve immediately, enjoying the rich and comforting flavors of your Creamy Mushroom Spaetzle.
Extra Tips
For a variation on this dish, consider adding other vegetables such as spinach or kale for added nutrition and color. If you prefer a lighter version, you can substitute half of the heavy cream with vegetable broth or use a plant-based cream alternative.
Additionally, experimenting with different types of mushrooms can enhance the flavor profile, so feel free to mix and match your favorites. Always taste and adjust the seasoning as needed to suit your palate!
Savory Kartoffelsalat (Potato Salad)
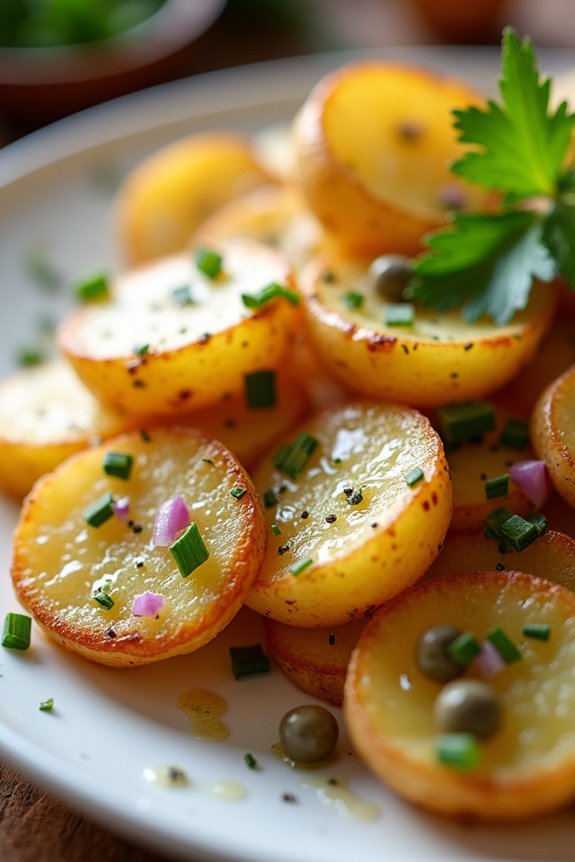
Kartoffelsalat, or German potato salad, is a beloved dish that varies widely throughout Germany. This savory rendition is typically made with warm potatoes, a tangy dressing, and fresh herbs, offering a delightful combination of flavors and textures. Traditionally served at gatherings, barbecues, and family dinners, this dish not only highlights the humble potato but also showcases the simplicity and richness of German cuisine.
The key to a delicious Kartoffelsalat lies in the quality of the ingredients and the method of preparation. Using freshly boiled potatoes that are still warm allows them to absorb the flavors of the dressing better, resulting in a dish that’s both hearty and invigorating. This savory potato salad can be enjoyed as a side dish or even as a light main course, making it a versatile addition to any meal.
Ingredients (Serves 4-6):
- 1 kg waxy potatoes (such as Yukon Gold or Red Bliss)
- 1 medium red onion, finely chopped
- 200 ml vegetable broth
- 3 tablespoons apple cider vinegar
- 3 tablespoons Dijon mustard
- 4 tablespoons olive oil
- Salt and pepper, to taste
- 2 tablespoons fresh parsley, chopped
- 2 tablespoons fresh chives, chopped
- 1 tablespoon capers (optional)
Cooking Instructions:
1. Prepare the Potatoes: Begin by washing the potatoes thoroughly to remove any dirt. Place them in a large pot, cover with cold water, and add a generous pinch of salt. Bring the pot to a boil over medium-high heat and cook the potatoes until they’re tender but still firm, about 15-20 minutes, depending on their size.
Once cooked, drain the potatoes and let them cool slightly before peeling.
2. Slice the Potatoes: Once the potatoes are cool enough to handle, slice them into thick rounds (about 1 cm thick). It’s important to do this while they’re still warm, as they’ll absorb the flavors of the dressing better.
3. Make the Dressing: In a small saucepan, combine the vegetable broth, apple cider vinegar, Dijon mustard, and olive oil. Heat the mixture over low heat until warmed through, ensuring the oil and vinegar blend well. Season with salt and pepper to taste.
4. Mix the Salad: In a large mixing bowl, add the warm potato slices along with the finely chopped red onion. Pour the warm dressing over the potatoes and gently toss until all the potatoes are well coated. Be careful not to break the potato slices.
5. Add Fresh Herbs: Finally, sprinkle the chopped parsley, chives, and capers (if using) over the potato salad. Toss gently once more to combine all the ingredients.
6. Serve: Allow the Kartoffelsalat to sit for about 15-30 minutes at room temperature to let the flavors meld together. Serve warm or at room temperature as a side dish.
Extra Tips:
When preparing your Kartoffelsalat, consider using different types of vinegar for a unique twist on flavor; white wine vinegar or even balsamic vinegar can add depth.
Make sure to taste and adjust the seasoning before serving, as potato salads can vary based on personal preferences. If you’re looking for a heartier version, feel free to add ingredients like diced pickles or boiled eggs. Enjoy this classic dish as a perfect accompaniment to any meal or as a standalone treat!
Zwiebelkuchen (Onion Tart)
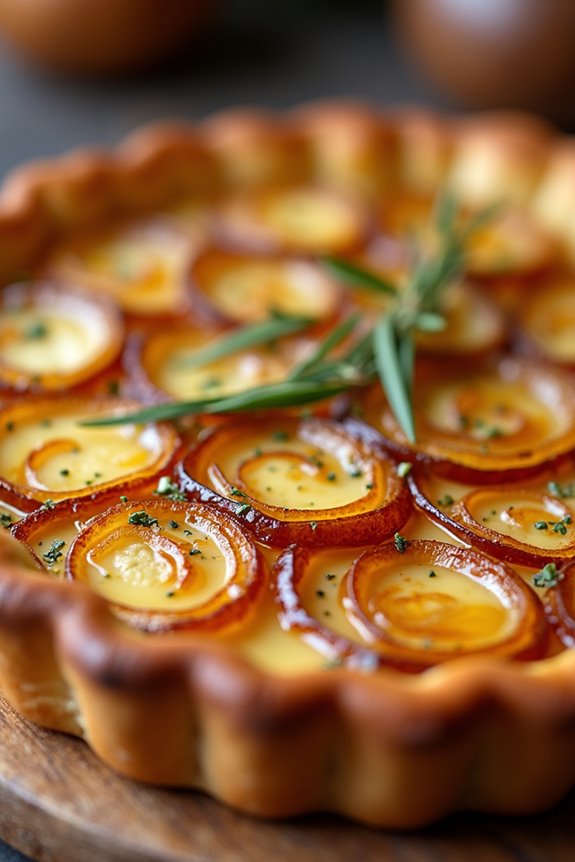
Zwiebelkuchen, a traditional German onion tart, is a delightful dish that combines a flaky pastry crust with a savory filling of caramelized onions, cream, and spices. This dish is particularly popular in the fall, often enjoyed alongside a glass of new wine during harvest season. Its rich, comforting flavors make it a perfect choice for gatherings or as a hearty family meal.
Whether served warm or at room temperature, Zwiebelkuchen is sure to please both vegetarians and meat-lovers alike. The versatility of Zwiebelkuchen allows for variations in the recipe, with some adding ingredients like bacon or cheese. However, this vegetarian version focuses on the natural sweetness of the onions, enhanced by a creamy custard-like filling.
The tart crust is simple to prepare and provides the perfect base to hold all the delicious flavors together. Pair it with a fresh salad for a complete meal that celebrates the beautiful simplicity of German vegetarian cuisine.
Ingredients (serving size: 4-6 people):
- 1 pre-made pie crust (or homemade, if preferred)
- 4 large onions, thinly sliced
- 2 tablespoons olive oil
- 1 teaspoon salt
- 1/2 teaspoon black pepper
- 1/2 teaspoon ground nutmeg
- 3 large eggs
- 1 cup sour cream
- 1 cup heavy cream
- 1 tablespoon fresh chives, chopped (optional)
- 1 tablespoon fresh thyme, chopped (optional)
Cooking Instructions:
- Prepare the Pie Crust: Preheat your oven to 375°F (190°C). If using a pre-made pie crust, roll it out and fit it into a 9-inch tart pan. Prick the bottom with a fork to prevent bubbling. If making your own, prepare the dough and press it into the pan, then refrigerate while you prepare the filling.
- Sauté the Onions: In a large skillet, heat the olive oil over medium heat. Add the sliced onions and sprinkle with salt. Cook, stirring occasionally, until the onions are soft and translucent, about 15-20 minutes. Allow them to cool slightly once cooked.
- Make the Filling: In a mixing bowl, whisk together the eggs, sour cream, and heavy cream. Add the black pepper, nutmeg, and any fresh herbs you’re using, and mix until well combined.
- Combine Ingredients: Once the onions have cooled, spread them evenly over the prepared pie crust. Pour the egg and cream mixture over the onions, ensuring they’re evenly coated.
- Bake the Tart: Place the tart in the preheated oven and bake for 35-40 minutes or until the top is set and lightly golden. The tart should be firm to the touch but not dry.
- Cool and Serve: Allow the Zwiebelkuchen to cool for about 10-15 minutes before slicing. Serve warm or at room temperature, garnishing with additional fresh herbs if desired.
Extra Tips:
When making Zwiebelkuchen, the key to achieving the best flavor lies in caramelizing the onions properly; take your time to cook them slowly to develop their natural sweetness. If you’re short on time, you can speed up the process, but be careful not to burn them.
Additionally, consider adding a sprinkle of grated cheese on top before baking for a richer flavor. This dish can be made a day in advance and reheated, making it a convenient option for entertaining.
Roasted Beet and Goat Cheese Salad
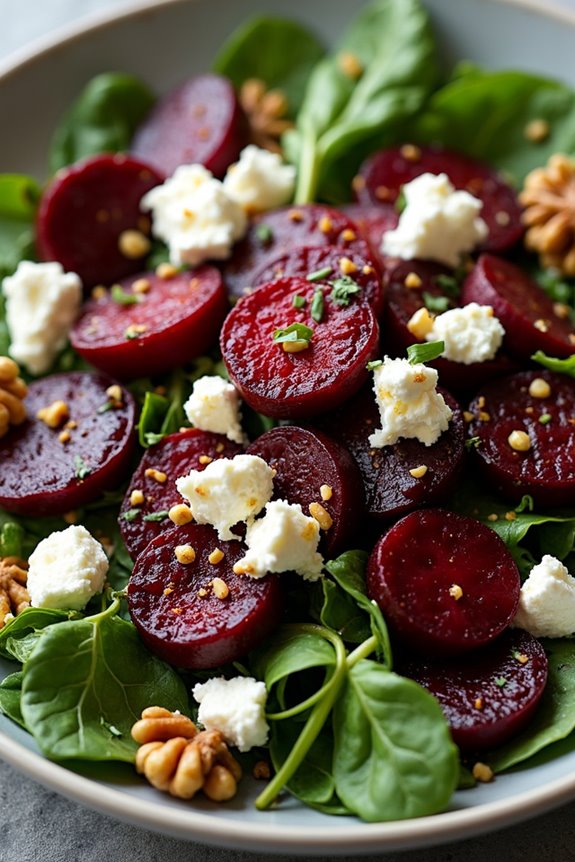
Roasted Beet and Goat Cheese Salad is a delightful dish that beautifully combines earthy flavors with creamy textures. This salad isn’t only a feast for the eyes with its vibrant colors but also a healthy option packed with nutrients. Beets are rich in vitamins and minerals, and when roasted, they develop a sweet and rich flavor that pairs perfectly with the tanginess of goat cheese.
This dish is perfect as a starter or a light meal, making it a versatile addition to any vegetarian menu. The salad can be served warm or at room temperature, allowing the flavors to meld beautifully. With a simple dressing of olive oil and balsamic vinegar, the salad is elevated with a touch of sweetness and acidity.
Whether you’re hosting a dinner party or looking for a nutritious lunch option, Roasted Beet and Goat Cheese Salad is sure to impress.
Ingredients for 4-6 servings:
- 4 medium-sized beets
- 4 cups mixed salad greens (like arugula, spinach, or romaine)
- 6 oz goat cheese, crumbled
- 1/2 cup walnuts, toasted and roughly chopped
- 1/4 cup balsamic vinegar
- 1/3 cup extra virgin olive oil
- 1 tablespoon honey
- Salt and freshly ground black pepper, to taste
Cooking Instructions:
- Preheat the Oven: Begin by preheating your oven to 400°F (200°C). This temperature is ideal for roasting the beets, allowing them to cook through while developing a nice caramelization on the outside.
- Prepare the Beets: Rinse the beets under cold water to remove any dirt. Trim the tops and tails, but leave the skin on to retain moisture during roasting. Wrap each beet individually in aluminum foil and place them on a baking sheet.
- Roast the Beets: Place the baking sheet with the wrapped beets in the preheated oven. Roast for about 45-60 minutes, or until a fork easily pierces through the beets. The cooking time may vary depending on the size of the beets. Once done, remove them from the oven and let them cool slightly.
- Peel and Slice the Beets: Once the beets are cool enough to handle, unwrap them and peel off the skins using your hands or a paper towel. Cut the beets into wedges or slices, depending on your preference.
- Prepare the Dressing: In a small bowl, whisk together the balsamic vinegar, olive oil, honey, salt, and pepper until well combined. This dressing adds a wonderful balance of sweetness and acidity to the salad.
- Assemble the Salad: In a large bowl, combine the mixed salad greens with the roasted beet slices. Gently toss in the crumbled goat cheese and toasted walnuts. Drizzle the dressing over the salad just before serving, and toss lightly to coat all the ingredients.
- Serve: Transfer the salad to a serving platter or individual plates. Enjoy the salad warm or at room temperature.
Extra Tips: When roasting beets, consider roasting a larger batch to use in other dishes throughout the week, as they store well in the refrigerator. Additionally, feel free to experiment with different types of nuts or cheeses, such as feta or blue cheese, to give the salad your own unique twist.
Finally, if you prefer a bit more sweetness, add sliced apples or pears for a revitalizing complement to the earthy beets.
Cabbage and Carrot Slaw With Dill
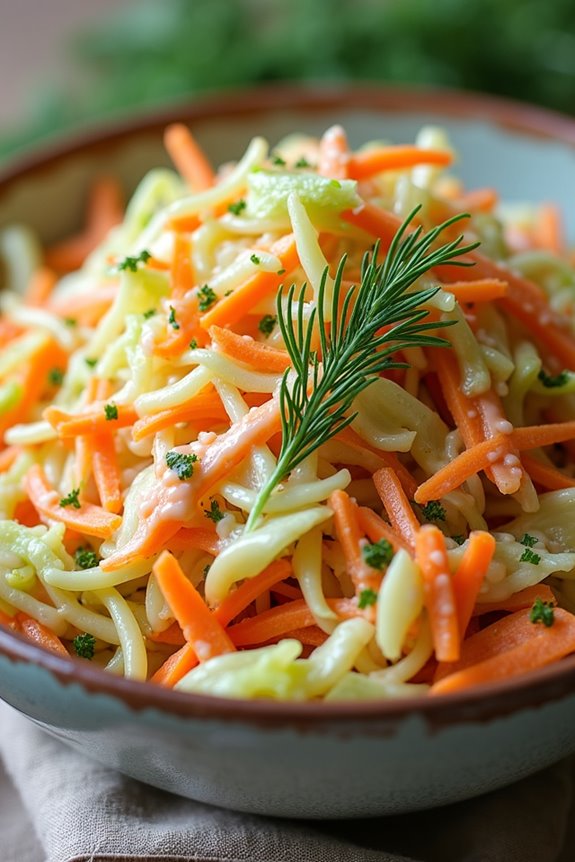
Cabbage and Carrot Slaw with Dill is a revitalizing and vibrant side dish that beautifully complements a variety of main courses. This German-inspired slaw combines the crunchiness of fresh cabbage and the sweetness of carrots, all tossed together with a zesty dressing that highlights the bright flavor of dill.
It’s perfect for summer barbecues, picnics, or as a crisp accompaniment to heartier winter meals. This slaw not only brings texture and flavor to the table but is also packed with nutrients, making it a healthy choice for those looking to add more vegetables to their diet.
The bright colors and fresh ingredients are sure to entice even the pickiest eaters, and it can be prepared ahead of time, allowing the flavors to meld beautifully before serving.
Ingredients (Serves 4-6):
- 4 cups green cabbage, finely shredded
- 2 cups carrots, grated
- 1/4 cup fresh dill, chopped
- 1/4 cup mayonnaise
- 2 tablespoons apple cider vinegar
- 1 tablespoon Dijon mustard
- 1 tablespoon honey (or maple syrup for a vegan option)
- Salt and pepper to taste
Cooking Instructions:
- Prepare the Vegetables: Start by washing your cabbage and carrots thoroughly. Remove the outer leaves of the cabbage and then cut it into quarters. Remove the core and finely shred the cabbage using a sharp knife or a mandoline slicer. Grate the carrots using a box grater or a food processor. Place both the cabbage and carrots in a large mixing bowl.
- Mix the Dressing: In a separate bowl, prepare the dressing by combining the mayonnaise, apple cider vinegar, Dijon mustard, and honey. Whisk these ingredients together until smooth. The honey adds a touch of sweetness that balances the tanginess of the vinegar and mustard.
- Combine Ingredients: Pour the dressing over the shredded cabbage and grated carrots. Add the chopped dill to the bowl. Using clean hands or salad tongs, gently mix everything together until the cabbage and carrots are evenly coated with the dressing.
- Season and Chill: After mixing, taste the slaw and add salt and pepper according to your preference. Cover the bowl with plastic wrap or a lid and refrigerate for at least 30 minutes. This chilling time allows the flavors to meld together and the slaw to become even more flavorful.
- Serve: Once chilled, give the slaw another gentle toss before serving. Transfer it to a serving platter or individual bowls, and garnish with a sprinkle of fresh dill if desired.
Extra Tips:
When making Cabbage and Carrot Slaw with Dill, feel free to experiment with additional ingredients such as sliced bell peppers or a handful of raisins for added sweetness.
For a nutty flavor, consider adding sunflower seeds or chopped nuts. If you prefer a lighter dressing, you can substitute Greek yogurt for half of the mayonnaise. This dish can be made a day in advance, allowing the flavors to deepen, making it an excellent choice for meal prep or gatherings.
German Potato Pancakes (Reibekuchen)

German Potato Pancakes, known as Reibekuchen, are a delicious and crispy treat that highlights the humble potato in a delightful way. Traditionally served during the festive season, these pancakes have become a beloved dish enjoyed year-round. The blend of grated potatoes, onions, and a few basic seasonings creates a savory flavor that pairs perfectly with applesauce or sour cream, making them a versatile addition to any meal.
Making Reibekuchen is straightforward, and they can be a fun dish to prepare with family and friends. The key to achieving the perfect texture is to guarantee that the grated potatoes aren’t too watery, allowing them to fry up golden and crispy rather than soggy. With a little patience and the right technique, you can create a plate of these delightful potato pancakes that will transport you straight to a German kitchen.
Ingredients (Serves 4-6):
- 1 kg (2.2 lbs) potatoes (preferably starchy)
- 1 medium onion
- 2 large eggs
- 4 tablespoons all-purpose flour
- 1 teaspoon salt
- 1/4 teaspoon black pepper
- Oil for frying (such as vegetable or canola oil)
- Applesauce or sour cream for serving (optional)
Cooking Instructions:
- Prepare the Potatoes: Start by peeling the potatoes and rinsing them under cold water to remove excess starch. This step helps guarantee that the pancakes have the right texture. Using a grater or food processor, grate the potatoes into a large bowl.
- Grate the Onion: Next, peel and grate the onion. You can add it directly to the bowl with the grated potatoes. The onion not only adds flavor but also helps with the moisture content in the mixture.
- Drain Excess Moisture: To avoid soggy pancakes, it’s important to drain excess moisture from the potato and onion mixture. Place a clean kitchen towel over a bowl and pour the grated mixture onto the towel. Gather the corners of the towel and twist to squeeze out as much liquid as possible.
- Combine Ingredients: In a mixing bowl, combine the drained potato and onion mixture with eggs, flour, salt, and pepper. Mix until everything is well incorporated. The flour will help bind the mixture together for frying.
- Heat the Oil: In a large frying pan, heat about 1/4 inch of oil over medium-high heat. You’ll know it’s ready when a small amount of batter sizzles immediately upon contact with the oil.
- Fry the Pancakes: Using a spoon or your hands, scoop out portions of the potato mixture and gently flatten them into pancakes (about 1/2 inch thick). Carefully place them in the hot oil, making sure not to overcrowd the pan. Fry for about 4-5 minutes on each side, or until they’re golden brown and crispy.
- Drain Excess Oil: Once cooked, remove the pancakes from the pan and place them on a plate lined with paper towels to absorb any excess oil.
- Serve: Serve the Reibekuchen hot, accompanied by applesauce or sour cream for dipping. Enjoy your delicious homemade German Potato Pancakes!
Extra Tips:
For the best results, use starchy potatoes like Russets or Yukon Golds, as they yield a crispier pancake.
Make sure to keep the oil hot but not smoking, adjusting the heat as necessary. If you find that the pancakes are browning too quickly, lower the heat slightly.
Additionally, you can add a pinch of nutmeg or fresh herbs like chives for an extra layer of flavor in your potato mixture. Enjoy your cooking!
Stuffed Bell Peppers With Quinoa

Stuffed bell peppers are a colorful and nutritious dish that brings together the vibrant flavors of fresh vegetables, wholesome quinoa, and aromatic spices. This German-inspired vegetarian recipe not only makes for a stunning presentation but also packs a punch regarding flavor and nutrition. Quinoa, a superfood grain, serves as the perfect base for this filling, providing a good source of protein and fiber while being naturally gluten-free. The combination of bell peppers stuffed with a savory medley of herbs, vegetables, and cheese creates a delightful meal that will satisfy both vegetarians and meat-lovers alike.
Preparing stuffed bell peppers is a straightforward process, making it an excellent choice for family dinners or gatherings. By roasting the peppers and then filling them with a mixture of cooked quinoa, sautéed vegetables, and spices, you create a dish that isn’t only hearty but also visually appealing. Topped with cheese and baked until golden and bubbly, these stuffed peppers will surely become a family favorite. Let’s explore the recipe and learn how to prepare these delicious stuffed bell peppers with quinoa.
Ingredients (serves 4-6):
- 4 large bell peppers (any color)
- 1 cup quinoa
- 2 cups vegetable broth or water
- 1 medium onion, diced
- 2 cloves garlic, minced
- 1 medium zucchini, diced
- 1 medium carrot, diced
- 1 cup diced tomatoes (canned or fresh)
- 1 teaspoon dried oregano
- 1 teaspoon paprika
- Salt and pepper to taste
- 1 cup shredded cheese (cheddar or mozzarella)
- Fresh parsley for garnish (optional)
Cooking Instructions:
- Prepare the Quinoa: Rinse the quinoa under cold water to remove any bitterness. In a medium saucepan, combine the rinsed quinoa and vegetable broth or water. Bring to a boil, then reduce heat to low, cover, and simmer for about 15 minutes or until the quinoa is fluffy and all the liquid is absorbed. Remove from heat and let it sit, covered, for 5 minutes before fluffing with a fork.
- Preheat the Oven: While the quinoa is cooking, preheat your oven to 375°F (190°C). This will guarantee that the stuffed peppers bake evenly and develop a nice golden top.
- Sauté the Vegetables: In a large skillet over medium heat, add a drizzle of olive oil. Once hot, add the diced onion and garlic, and sauté for about 2-3 minutes until the onion becomes translucent. Next, add the diced zucchini and carrot, cooking for an additional 5 minutes until they’re tender.
- Combine Ingredients: In the skillet with the sautéed vegetables, add the cooked quinoa, diced tomatoes, oregano, paprika, salt, and pepper. Stir well to combine all the ingredients, allowing the mixture to heat through for about 2-3 minutes. Taste and adjust seasonings as necessary.
- Prepare the Bell Peppers: While the filling is heating, slice the tops off the bell peppers and remove the seeds and membranes. You can choose to retain the tops for presentation or discard them.
- Stuff the Peppers: Carefully spoon the quinoa and vegetable mixture into each bell pepper, packing it down gently. Place the stuffed peppers upright in a baking dish. If desired, sprinkle the tops with shredded cheese for an extra layer of flavor.
- Bake the Peppers: Cover the baking dish with aluminum foil and bake in the preheated oven for 25 minutes. After 25 minutes, remove the foil and bake for an additional 10-15 minutes, or until the peppers are tender and the cheese is melted and bubbly.
- Serve and Enjoy: Once the peppers are done baking, remove them from the oven and let them cool for a few minutes. Garnish with fresh parsley if desired, and serve warm.
Extra Tips: When choosing bell peppers, look for firm ones with vibrant colors, as they tend to be sweeter and more flavorful. You can also customize the filling by adding other vegetables or beans, such as black beans or corn, to suit your taste. For an added kick, consider incorporating some diced jalapeños or a splash of hot sauce into the mixture.
Leftovers can be stored in the refrigerator for a few days and make for an easy lunch option; simply reheat before serving.
Vegetable Strudel With Spinach and Feta
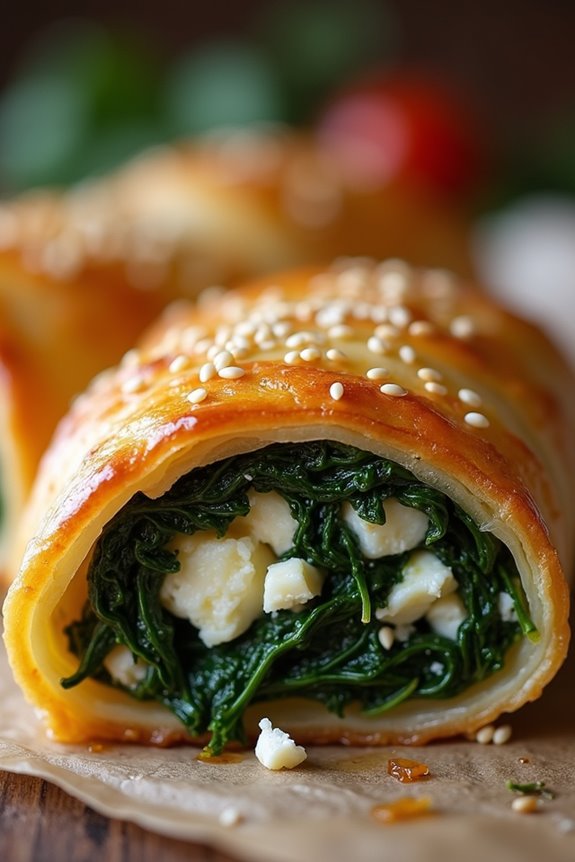
Vegetable Strudel With Spinach and Feta is a delicious and hearty dish that combines flaky pastry with a savory filling of fresh spinach and creamy feta cheese. This traditional German recipe is perfect for both a cozy family dinner and entertaining guests, showcasing the vibrant flavors of vegetables while remaining vegetarian. The strudel is beautifully golden and crisp on the outside, with a warm, flavorful center that’s sure to please even non-vegetarians.
Making strudel can seem a bit intimidating, but with a little patience and some simple ingredients, it’s an achievable and rewarding dish. The key to a successful strudel lies in the layering of the filling and the careful rolling of the pastry. This recipe serves 4-6 people, making it an excellent option for a gathering or as a satisfying main course.
Ingredients
- 1 package of phyllo pastry (about 16 oz)
- 2 tablespoons olive oil
- 1 large onion, finely chopped
- 2 cloves garlic, minced
- 10 oz fresh spinach, washed and chopped
- 8 oz feta cheese, crumbled
- 1 teaspoon dried oregano
- 1 teaspoon salt
- ¼ teaspoon black pepper
- 1 egg, beaten (for egg wash)
- Sesame seeds (optional, for topping)
Cooking Instructions
1. Preheat the Oven: Begin by preheating your oven to 375°F (190°C). This will guarantee that your strudel cooks evenly and achieves a lovely golden color.
2. Sauté the Vegetables: In a large skillet, heat the olive oil over medium heat. Add the chopped onion and sauté for about 5 minutes until it becomes translucent.
Then, add the minced garlic and cook for an additional 1-2 minutes until fragrant.
3. Add Spinach: Gradually add the chopped spinach to the skillet, stirring occasionally until it wilts down, which should take about 3-4 minutes.
Once wilted, remove the skillet from heat and allow the mixture to cool slightly.
4. Combine Filling Ingredients: In a mixing bowl, combine the sautéed spinach mixture with crumbled feta cheese, dried oregano, salt, and black pepper.
Mix well to guarantee all ingredients are evenly distributed.
5. Prepare Phyllo Dough: On a clean, dry surface, lay out a sheet of phyllo pastry. Brush it lightly with olive oil, then place another sheet on top.
Repeat this process until you have 4-5 layers of phyllo, brushing each layer with oil as you go.
6. Add the Filling: Spoon the spinach and feta mixture along one edge of the prepared phyllo layers, leaving a border of about 2 inches.
7. Roll the Strudel: Carefully roll the phyllo pastry over the filling, starting from the edge with the filling and rolling it tightly.
Tuck in the sides as you roll to seal in the filling.
8. Prepare for Baking: Once rolled, transfer the strudel to a baking sheet lined with parchment paper.
Brush the top with the beaten egg for a golden finish, and sprinkle sesame seeds if desired.
9. Bake: Place the strudel in the preheated oven and bake for 25-30 minutes, or until the pastry is golden brown and crispy.
10. Serve: Allow the strudel to cool for a few minutes before slicing.
Serve warm, either on its own or with a side salad for a complete meal.
Extra Tips
When working with phyllo pastry, keep the sheets covered with a damp cloth to prevent them from drying out while you assemble the strudel.
You can also customize the filling by adding other vegetables like mushrooms or bell peppers, or even incorporating herbs like dill or parsley for extra flavor.
For a more substantial meal, consider serving the strudel with a dollop of yogurt or a side of tomato sauce for dipping. Enjoy your cooking adventure!
Lentil Soup With Smoked Paprika
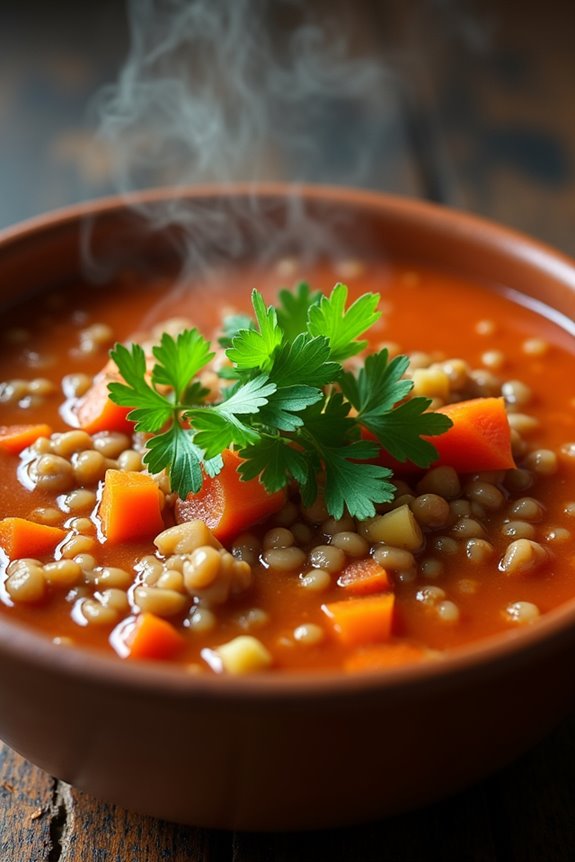
Lentil Soup with Smoked Paprika is a hearty and flavorful dish that’s perfect for any vegetarian meal. This traditional German recipe combines the earthy taste of lentils with the smoky notes of paprika, creating a comforting soup that warms the soul. Packed with nutrients and full of flavor, this soup isn’t only satisfying but also easy to prepare, making it an excellent option for weeknight dinners or meal prep.
The soup features a blend of fresh vegetables, spices, and lentils, simmered to perfection to allow the flavors to meld together beautifully. Ideal for serving 4 to 6 people, this recipe invites you to enjoy a taste of Germany in a simple yet delightful way. Whether served with crusty bread or on its own, this lentil soup is sure to become a favorite in your home.
Ingredients:
- 1 cup green or brown lentils, rinsed
- 1 medium onion, diced
- 2 carrots, diced
- 2 celery stalks, diced
- 3 cloves garlic, minced
- 1 teaspoon smoked paprika
- 1 teaspoon ground cumin
- 4 cups vegetable broth
- 2 cups diced tomatoes (canned or fresh)
- 2 tablespoons olive oil
- Salt and pepper to taste
- Fresh parsley, chopped (for garnish)
Cooking Instructions:
- Sauté the Vegetables: In a large pot, heat the olive oil over medium heat. Add the diced onion, carrots, and celery, and sauté for about 5-7 minutes until the vegetables are softened and the onion is translucent. Stir occasionally to prevent sticking.
- Add Garlic and Spices: Once the vegetables are softened, add the minced garlic, smoked paprika, and ground cumin to the pot. Stir well and cook for an additional 1-2 minutes, allowing the spices to release their aroma and flavor.
- Incorporate Lentils and Broth: Add the rinsed lentils to the pot, followed by the vegetable broth and diced tomatoes. Stir to combine all the ingredients. Bring the mixture to a boil.
- Simmer the Soup: Once boiling, reduce the heat to low and let the soup simmer uncovered for about 30-35 minutes, or until the lentils are tender. Stir occasionally and add more broth or water if the soup becomes too thick.
- Season and Serve: Once the lentils are cooked, taste the soup and season with salt and pepper as needed. Remove from heat and ladle the soup into bowls. Garnish with fresh chopped parsley before serving.
Extra Tips:
For added depth of flavor, consider incorporating a splash of balsamic vinegar or a squeeze of lemon juice just before serving. You can also customize the soup by adding other vegetables, such as spinach or kale, for additional nutrition.
If you prefer a creamier texture, use an immersion blender to puree a portion of the soup before serving. This lentil soup keeps well in the refrigerator for a few days, making it a great option for meal prep or leftovers.
Traditional German Bread (Brot)

Traditional German bread, or “Brot,” is a cornerstone of German cuisine, characterized by its hearty texture and rich flavors. This bread is typically made from a combination of whole grains, which not only provide a robust taste but also contribute to its nutritional value.
The variety of breads in Germany is astounding, ranging from rye to spelt to wheat, each showcasing the unique regional ingredients and baking techniques. This traditional recipe will guide you through making a classic German bread that’s perfect for enjoying with soups, stews, or simply with butter.
Making German bread may seem intimidating, but with a little patience and the right ingredients, anyone can achieve a delicious loaf at home. The dough requires some time to rise, allowing the flavors to develop fully. The result is a beautifully crusty bread with a soft, chewy interior that will have your family and friends asking for seconds.
Ingredients (Serves 4-6)
- 500g bread flour (or a mix of whole wheat and white flour)
- 300ml lukewarm water
- 10g salt
- 7g active dry yeast
- 1 teaspoon sugar
- 2 tablespoons olive oil (optional)
- 1 tablespoon vinegar (optional, for added flavor)
- Additional flour for dusting
Cooking Instructions
- Activate the Yeast: In a small bowl, combine the lukewarm water, sugar, and active dry yeast. Stir gently and let it sit for about 5-10 minutes until it becomes frothy. This step is essential as it activates the yeast, guaranteeing your bread will rise properly.
- Mix the Dry Ingredients: In a large mixing bowl, combine the bread flour and salt. Mix well to make sure that the salt is evenly distributed throughout the flour, as direct contact between salt and yeast can inhibit the yeast’s activity.
- Combine Wet and Dry Ingredients: Once the yeast is activated, make a well in the center of the flour mixture and pour in the yeast mixture along with the olive oil and vinegar if using. Stir with a wooden spoon or your hand until the dough starts to come together.
- Knead the Dough: Transfer the dough onto a floured surface and knead it for about 10 minutes. The goal is to develop the gluten, which gives the bread its structure. The dough should be smooth and elastic when done. If it feels too sticky, sprinkle a little more flour as needed.
- First Rise: Place the kneaded dough in a lightly oiled bowl, cover it with a damp cloth, and leave it in a warm place for about 1-2 hours or until it has doubled in size. This is called the first rise.
- Shape the Dough: After the dough has risen, punch it down to release the air. Lightly flour your work surface again and shape the dough into a round or oval loaf. Place it on a baking sheet lined with parchment paper.
- Second Rise: Cover the shaped dough with a cloth and let it rise again for about 30-45 minutes until it has puffed up.
- Preheat the Oven: While the dough is rising, preheat your oven to 220°C (430°F). Place a shallow pan filled with water on the bottom of the oven to create steam, which helps develop a crispy crust.
- Score and Bake: Just before baking, use a sharp knife to make a few shallow slashes on top of the loaf. This allows the bread to expand while baking. Bake the bread for about 25-30 minutes or until it sounds hollow when tapped on the bottom.
- Cool Before Slicing: Once baked, remove the bread from the oven and let it cool on a wire rack. This cooling phase is important as it allows the steam to escape, resulting in better texture.
Extra Tips
When making traditional German bread, the quality of your flour can greatly impact the final product. If possible, use high-protein bread flour for better gluten development.
Additionally, feel free to experiment with different grains such as rye or spelt for a unique flavor profile. If you’re looking for more moisture in your bread, consider adding a small amount of mashed potatoes or yogurt to the dough.
Finally, patience is key; allowing the bread to rise thoroughly will result in a lighter and airier loaf. Enjoy your homemade German bread with a slather of butter or as part of a hearty meal!
Black Forest Cake (Vegetarian Version)

Black Forest Cake, or Schwarzwälder Kirschtorte, is a classic German dessert that’s loved for its rich chocolate layers, luscious whipped cream, and tart cherries. Traditionally, this cake features layers of chocolate sponge cake soaked in cherry liqueur, but for this vegetarian version, we’ll substitute the liqueur with cherry juice while keeping the essence of this delightful treat intact.
The combination of deep chocolate flavors and the invigorating taste of cherries makes it a perfect dessert for celebrations or a sweet indulgence after dinner. Making a Black Forest Cake isn’t only about following a recipe but also about creating a beautiful centerpiece that will impress your family and friends.
With a few simple ingredients and steps, you can recreate this decadent dessert that’s sure to be a hit. Whether you’re celebrating a special occasion or simply want to treat yourself, this vegetarian Black Forest Cake is a delightful choice that brings a touch of German culinary tradition to your kitchen.
Ingredients (Serves 4-6)
- 1 ¾ cups all-purpose flour
- 1 ½ cups granulated sugar
- ¾ cup unsweetened cocoa powder
- 1 ½ teaspoons baking powder
- 1 teaspoon baking soda
- ½ teaspoon salt
- 1 cup milk (or plant-based milk)
- ½ cup vegetable oil
- 2 large eggs (or egg substitute)
- 2 teaspoons vanilla extract
- 1 cup boiling water
- 2 cups heavy whipping cream
- 2 tablespoons powdered sugar
- 1 teaspoon vanilla extract (for cream)
- 1 jar (about 15 oz) pitted cherries in syrup (drained, juice reserved)
- Chocolate shavings (for decoration)
Cooking Instructions
1. Preheat the Oven: Begin by preheating your oven to 350°F (175°C). This guarantees that your cake will bake evenly and rise properly.
2. Prepare Cake Batter****: In a large mixing bowl, sift together the flour, granulated sugar, cocoa powder, baking powder, baking soda, and salt. Mix well to combine all dry ingredients.
In a separate bowl, whisk together the milk, vegetable oil, eggs (or egg substitute), and vanilla extract until well blended. Gradually add the wet ingredients to the dry ingredients, mixing until just combined. Finally, carefully stir in the boiling water to thin the batter; it will be quite runny.
3. Bake the Cake: Pour the batter evenly into two greased 9-inch round cake pans. Bake in the preheated oven for about 30-35 minutes, or until a toothpick inserted into the center comes out clean.
Once baked, allow the cakes to cool in the pans for about 10 minutes before transferring them to a wire rack to cool completely.
4. Prepare Whipped Cream: While the cakes are cooling, prepare the whipped cream. In a large mixing bowl, beat the heavy cream on medium-high speed until it begins to thicken. Gradually add powdered sugar and vanilla extract, continuing to whip until soft peaks form.
Be careful not to overwhip, as you want the cream to remain light and fluffy.
5. Assemble the Cake: Once the cakes are completely cool, place one layer on a serving plate. Generously drizzle the reserved cherry juice over the layer to soak it. Spread half of the whipped cream over the soaked cake layer, then add half of the drained cherries on top.
Place the second cake layer on top, repeating the soaking process with the cherry juice, and then spreading the remaining whipped cream over the top and sides of the cake.
6. Decorate: Finish by decorating the top of the cake with chocolate shavings and any remaining cherries. You can also pipe some additional whipped cream around the edges for a more elegant finish.
Extra Tips
When making Black Forest Cake, verify that the chocolate cake layers are completely cooled before assembling; this prevents the whipped cream from melting.
For an even richer flavor, consider adding a layer of cherry preserves between the cake layers along with the whipped cream and cherries. If you prefer a non-dairy version, you can use coconut cream or a plant-based whipped topping.
Finally, feel free to adjust the sweetness of the whipped cream to your liking by adding more or less powdered sugar. Enjoy your delicious homemade Black Forest Cake!
Apfelstrudel (Apple Strudel)

Apfelstrudel, a traditional German dessert, is a delicious pastry filled with spiced apples, raisins, and cinnamon, all encased in a thin, flaky dough. This delightful treat dates back to the 18th century and has become a beloved staple in German cuisine.
While it may seem intimidating to make, with a little patience, you can create a homemade version that rivals any bakery. Perfect for special occasions or as a comforting dessert, Apfelstrudel is sure to please everyone at the table.
The beauty of Apfelstrudel lies not only in its taste but also in its versatility. You can serve it warm or at room temperature, paired with a scoop of vanilla ice cream or a dollop of whipped cream.
The combination of sweet and tart apples, complemented by the rich spices, creates a symphony of flavors that will transport you to a cozy café in Germany. Gather your ingredients and get ready to impress your family and friends with this delightful dish!
Ingredients (Serving Size: 4-6 people)
- 4 medium-sized apples (such as Granny Smith or Honeycrisp)
- 1 cup raisins
- 1 teaspoon ground cinnamon
- 1 tablespoon lemon juice
- 1/2 cup granulated sugar
- 1/4 cup unsalted butter (melted)
- 1 package of phyllo dough (about 16 oz)
- 1/2 cup breadcrumbs
- Powdered sugar (for dusting)
- 1 egg (for egg wash, optional)
Cooking Instructions
- Prepare the Apples: Begin by peeling, coring, and slicing the apples into thin pieces. In a large mixing bowl, combine the sliced apples with the raisins, ground cinnamon, lemon juice, and granulated sugar. Toss everything together until the apples are evenly coated. Set aside to allow the flavors to meld.
- Prepare the Phyllo Dough: Preheat your oven to 375°F (190°C). Lay out a clean kitchen towel on your countertop and place the phyllo dough on top. Carefully unroll the dough, keeping the unused sheets covered with another towel to prevent them from drying out. You’ll need about 6-8 sheets for a sturdy strudel.
- Assemble the Strudel: Brush a sheet of phyllo dough with melted butter, then layer another sheet on top and brush it again. Sprinkle a thin layer of breadcrumbs over the phyllo, leaving a border around the edges. Spoon the apple filling along one edge of the dough, forming a log shape. Be careful not to overfill.
- Roll the Strudel: Using the kitchen towel, carefully lift the edge of the phyllo and start rolling it over the apple filling, tucking in the sides as you go to seal in the filling. Once rolled, place the strudel seam-side down on a baking sheet lined with parchment paper.
- Bake the Strudel: If desired, beat an egg and brush it over the top of the strudel for a beautiful golden finish. Bake in the preheated oven for about 30-35 minutes, or until the phyllo is crispy and golden brown.
- Cool and Serve: Once baked, remove from the oven and allow the strudel to cool slightly. Dust with powdered sugar before slicing. Serve warm with a side of vanilla ice cream or whipped cream.
Extra Tips
When making Apfelstrudel, don’t rush the rolling process; the dough should be thin and delicate, which adds to the flakiness of the pastry.
Additionally, feel free to customize the filling by adding nuts, such as walnuts or almonds, for extra texture. If you want to make the preparation even easier, consider using store-bought puff pastry instead of phyllo dough.
Finally, always serve the strudel fresh for the best experience, as the pastry tends to lose its crispness over time. Enjoy your homemade Apfelstrudel!