

When I think of comfort food, German bread always comes to mind. There’s something special about those crusty loaves, each one tempting me to slather on some butter. From the tangy notes of sourdough to the hearty richness of rye, these breads offer a taste of tradition that feels both familiar and exciting. If you’re curious about which recipes can elevate your baking game, you might just find your next favorite loaf here.
Traditional German Rye Bread (Roggenbrot)
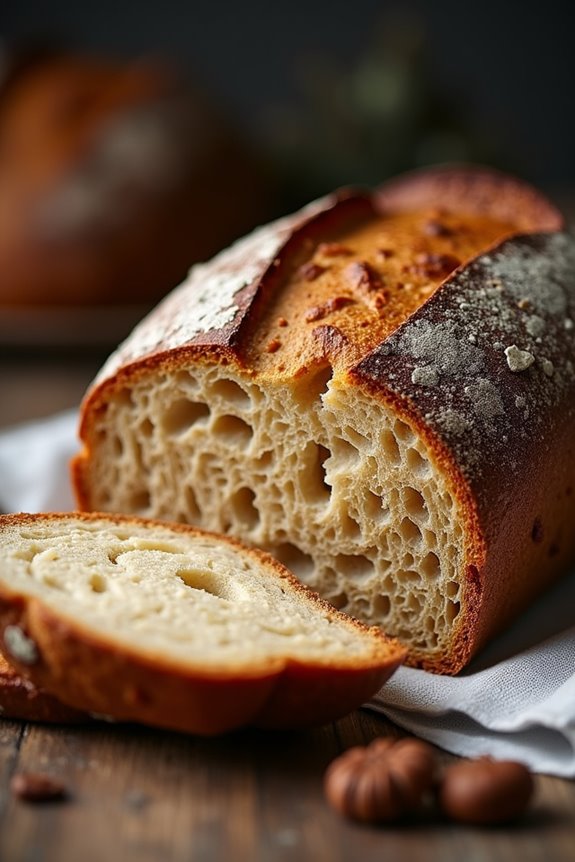
Roggenbrot, or traditional German rye bread, is a staple in many households throughout Germany. Known for its dense texture and rich, earthy flavor, this bread is made primarily from rye flour, which gives it a unique taste and a dark color. It’s often enjoyed with hearty toppings such as cold cuts, cheese, or simply butter, making it a versatile choice for any meal.
Baking Roggenbrot at home not only fills your kitchen with an irresistible aroma but also allows you to experience a piece of German culinary tradition. Making Roggenbrot does require some time due to the fermentation process, but the result is well worth the wait. The bread benefits from a sourdough starter, which enhances its flavor and prolongs its shelf life.
This recipe will guide you through the steps to create your own Roggenbrot, capturing the authentic taste of this beloved German bread. With a serving size suitable for 4-6 people, it’s perfect for family gatherings or a cozy evening at home.
Ingredients
- 500g rye flour
- 300g all-purpose flour
- 400ml warm water
- 150g sourdough starter
- 10g salt
- 1 tablespoon caraway seeds (optional)
- 1 tablespoon honey (optional)
- 7g active dry yeast (optional, for quicker rising)
Cooking Instructions
- Prepare the Sourdough Starter: If you’re using a sourdough starter, verify it’s active and bubbly. Feed it 8-12 hours before you plan to bake, allowing it to ferment at room temperature. If you don’t have a starter, you can mix 150g of rye flour with 150ml of warm water and a pinch of yeast, allowing it to sit for 12 hours until bubbly.
- Mix the Dough: In a large mixing bowl, combine the rye flour, all-purpose flour, salt, and caraway seeds (if using). In a separate bowl, mix the warm water, sourdough starter, and honey (if using). Gradually add the wet mixture to the dry ingredients, stirring until combined. The dough will be quite sticky.
- Knead the Dough: Transfer the dough onto a floured surface. With floured hands, knead the dough for about 10 minutes until it becomes smooth and elastic. If the dough is too sticky, add a little more flour, but be careful not to overdo it as it may affect the texture.
- First Rise: Place the kneaded dough into a lightly greased bowl and cover it with a damp cloth or plastic wrap. Allow it to rise in a warm place for about 1.5 to 2 hours or until it has doubled in size.
- Shape the Dough: Once the dough has risen, gently punch it down to release the air. Shape it into a round or oval loaf, depending on your preference. Place the shaped dough on a baking sheet lined with parchment paper or in a greased loaf pan.
- Second Rise: Cover the shaped loaf with a damp cloth and let it rise again in a warm place for another 30-60 minutes until it has puffed up noticeably.
- Preheat the Oven: While the dough is rising, preheat your oven to 220°C (430°F). Place a small oven-safe dish with water at the bottom of the oven to create steam, which helps develop a good crust.
- Bake the Bread: Once the loaf has risen, make a few shallow slashes across the top with a sharp knife to allow steam to escape. Place the loaf in the preheated oven and bake for 30-35 minutes or until the crust is dark and sounds hollow when tapped on the bottom.
- Cool the Bread: Remove the bread from the oven and allow it to cool on a wire rack. This cooling period is important; it allows the interior to set properly.
Extra Tips
When baking Roggenbrot, patience is key. Allowing adequate time for both rising stages guarantees a well-developed flavor and texture. If you prefer a slightly tangier flavor, let the dough ferment longer during the first rise.
Additionally, consider experimenting with different seeds or grains mixed into the dough for added texture and flavor. Store your Roggenbrot in a cool, dry place, wrapped in a cloth or in a bread box, to keep it fresh for several days.
Bavarian Pretzel Bread (Brezn)

Bavarian Pretzel Bread, known as Brezn in Germany, is a delightful twist on the classic pretzel shape. This traditional bread is characterized by its soft, chewy texture and distinctive dark brown crust, achieved through a unique boiling process before baking. The savory flavor of the pretzel bread pairs perfectly with a variety of dips, cheeses, or can be enjoyed on its own.
Making Brezn at home can be a fun and rewarding experience, allowing you to savor the authentic taste of Bavaria right in your kitchen. The process may seem intimidating at first, but with a little patience and practice, you’ll soon master the art of crafting these delicious pretzel breads. The ingredients are straightforward, and the steps are easy to follow.
Once you’ve baked your first batch, you’ll likely find yourself making them regularly for family gatherings or simply to enjoy as a snack. Let’s explore the ingredients and instructions for creating this delicious Bavarian treat.
Ingredients (Serves 4-6):
- 4 cups all-purpose flour
- 1 packet (2 ¼ teaspoons) active dry yeast
- 1 ½ cups warm water (110°F)
- 1 tablespoon granulated sugar
- 1 teaspoon salt
- ⅓ cup baking soda
- 1 large egg, beaten (for egg wash)
- Coarse sea salt (for topping)
Cooking Instructions:
- Activate the Yeast: In a mixing bowl, combine the warm water, sugar, and active dry yeast. Stir gently and let it sit for about 5-10 minutes until it becomes frothy. This indicates that the yeast is active and ready to be used.
- Make the Dough: In a large mixing bowl, combine the flour and salt. Once the yeast mixture is frothy, pour it into the bowl with the flour. Mix until a dough begins to form. Knead the dough on a floured surface for about 8-10 minutes until it’s smooth and elastic.
- First Rise: Place the kneaded dough in a lightly oiled bowl, cover it with a damp cloth, and let it rise in a warm place for about 1 hour or until it has doubled in size.
- Shape the Pretzels: Once the dough has risen, punch it down to release the air. Divide the dough into 8 equal pieces. Roll each piece into a long rope, about 24 inches long. Form each rope into a pretzel shape by creating a U-shape, crossing the ends, and twisting them before pressing the ends into the bottom of the U.
- Prepare the Baking Soda Bath: In a large pot, bring 4 cups of water to a boil and add the baking soda. Carefully add each shaped pretzel to the boiling water for about 30 seconds. This step is essential for achieving that signature pretzel crust.
- Bake the Pretzels: Preheat your oven to 450°F (232°C). Place the boiled pretzels on a parchment-lined baking sheet. Brush each pretzel with the beaten egg and sprinkle coarse sea salt on top. Bake in the preheated oven for about 12-15 minutes until they’re golden brown.
- Cool and Serve: Once baked, remove the pretzels from the oven and let them cool on a wire rack. Serve warm with your favorite dips, mustards, or cheeses.
Extra Tips: To achieve the best results, make sure that your water temperature is just right when activating the yeast—too hot can kill the yeast, while too cold can prevent it from activating. If you prefer a richer flavor, consider adding a tablespoon of melted butter to the dough before kneading.
Additionally, for added crunch, you can experiment with different toppings such as sesame seeds or poppy seeds before baking. Enjoy your homemade Bavarian Pretzel Bread fresh out of the oven!
Dark German Pumpernickel Bread
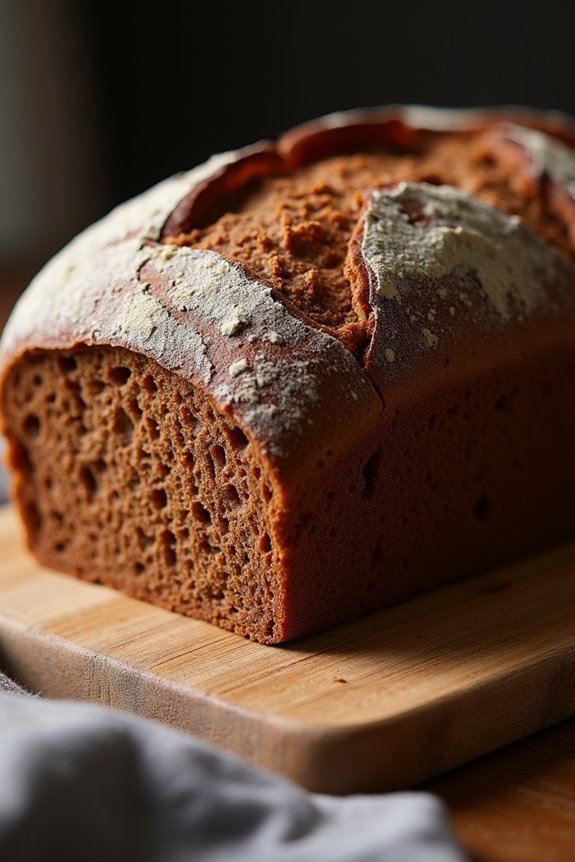
Dark German Pumpernickel Bread is a traditional staple that’s rich in flavor and history. Characterized by its dense texture and deep, dark color, this bread is made primarily from coarsely ground rye flour, which gives it a unique taste and nutritional benefits.
Pumpernickel is often enjoyed with various toppings, such as butter, cheeses, or cold cuts, making it a versatile addition to any meal. The slow baking process that defines pumpernickel allows the natural sugars in the rye to caramelize, resulting in a subtly sweet and earthy flavor profile.
Baking your own Pumpernickel Bread at home can be a rewarding experience. The aroma of freshly baked bread wafting through your kitchen is truly irresistible. While the process is somewhat involved, the end result is a hearty bread that can be enjoyed for days. This recipe yields a loaf that serves 4-6 people, perfect for a family meal or a gathering with friends.
Ingredients:
- 1 ½ cups coarsely ground rye flour
- 1 cup whole wheat flour
- 1 cup water (room temperature)
- ½ cup molasses
- 1 tablespoon caraway seeds
- 1 teaspoon salt
- 1 teaspoon instant yeast
- ½ cup sourdough starter (optional for flavor)
- 1 tablespoon cocoa powder (for color)
Cooking Instructions:
1. Prepare the Dough: In a large mixing bowl, combine the coarsely ground rye flour, whole wheat flour, cocoa powder, and salt. Mix these dry ingredients well to guarantee an even distribution of flavors.
In a separate bowl, combine the water, molasses, and instant yeast, stirring gently until the yeast is dissolved.
2. Combine Wet and Dry Ingredients: Pour the wet mixture into the dry ingredients. If using a sourdough starter, add it at this stage. Mix everything together until a sticky dough forms. You may need to use your hands to incorporate the flour completely.
3. Knead the Dough: Transfer the dough onto a lightly floured surface and knead it for about 5-7 minutes. The dough will remain somewhat sticky, but try to develop some gluten structure. If the dough is too wet, sprinkle a little more flour as needed.
4. First Rise: Place the kneaded dough in a lightly greased bowl, cover it with a damp cloth or plastic wrap, and let it rise in a warm place for about 1 to 2 hours, or until it has doubled in size.
5. Shape the Loaf: After the dough has risen, punch it down gently to release the air. Form the dough into a tight loaf shape, tucking in the edges. Place it in a greased loaf pan or on a baking sheet lined with parchment paper.
6. Second Rise: Cover the shaped loaf again and allow it to rise for another 30-60 minutes until it has puffed up noticeably.
7. Preheat the Oven: About 20 minutes before baking, preheat your oven to 350°F (175°C).
8. Bake the Bread: Once the loaf has risen, place it in the preheated oven. Bake for approximately 45-50 minutes, until the bread is firm and has a deep brown color. You can check for doneness by tapping the bottom of the loaf; it should sound hollow.
9. Cool: After baking, remove the loaf from the oven and let it Cool in the pan for about 10 minutes. Then transfer it to a wire rack to cool completely before slicing.
Extra Tips:
When making Dark German Pumpernickel Bread, patience is key. The longer you allow the dough to rise, the better the flavor will develop.
If you prefer a more pronounced sour flavor, consider adding a bit more sourdough starter or letting the dough ferment longer. Additionally, Pumpernickel Bread can be stored wrapped in plastic or in a bread bag for several days, and it also freezes well for longer storage.
Enjoy it toasted or fresh, and experiment with various toppings to find your favorite combination!
Classic German Sourdough Bread (Sauerteigbrot)
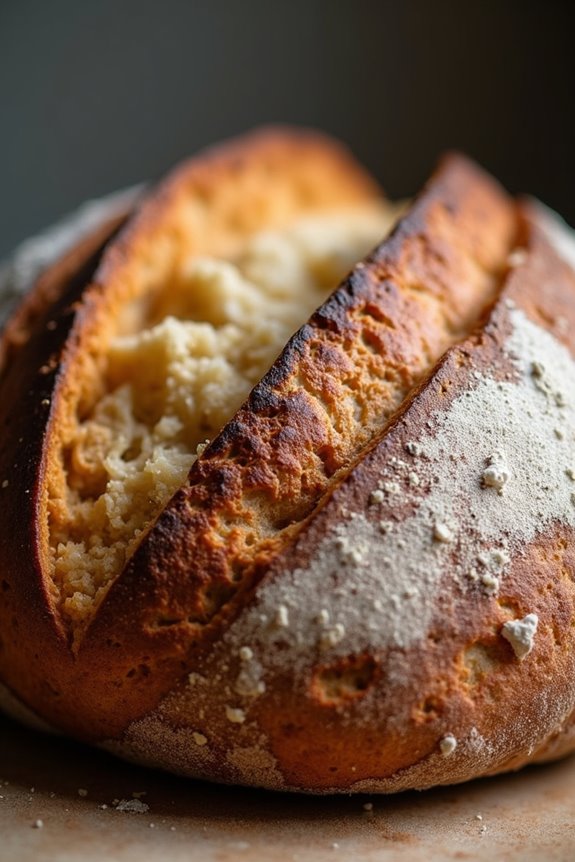
Classic German sourdough bread, known as Sauerteigbrot, is a staple in many German households and is cherished for its deep flavor, crusty exterior, and chewy interior. The unique tanginess of this bread comes from the natural fermentation process that occurs when using a sourdough starter. This traditional recipe not only nurtures the body but also the soul, as the process of making it connects you to generations of bakers who’ve used similar methods for centuries.
The aroma of freshly baked sourdough wafting through your kitchen is simply irresistible.
Making Sauerteigbrot at home requires a bit of patience, as the fermentation process can take time, but the results are well worth the effort. With just a few key ingredients—flour, water, salt, and your sourdough starter—you can create a delicious loaf that will impress your family and friends.
Whether enjoyed with butter and jam or served alongside hearty soups and stews, this bread is a versatile addition to any meal.
Ingredients (Serves 4-6)
- 500g bread flour
- 350g water (room temperature)
- 100g active sourdough starter
- 10g salt
Cooking Instructions
- Prepare the Dough: In a large mixing bowl, combine the bread flour and water. Mix until there are no dry flour patches. Allow the mixture to rest for about 30 minutes to 1 hour. This process is called autolyse and helps to develop gluten.
- Add Starter and Salt: After the autolyse, add the active sourdough starter and salt to the dough. Mix thoroughly until all ingredients are well combined. The dough will be sticky and shaggy at this stage.
- Knead the Dough: Turn the dough out onto a lightly floured surface and knead it for about 10-15 minutes. You can also use the stretch-and-fold technique: stretch the dough, fold it over itself, and repeat. This helps to build strength in the dough.
- First Rise: Place the kneaded dough back into the mixing bowl and cover it with a damp cloth or plastic wrap. Let it rise at room temperature for 4-6 hours, or until it has doubled in size. You can also perform a series of stretch and folds every 30 minutes during the first 2 hours to help improve the dough’s structure.
- Shape the Dough: Once the dough has risen, gently deflate it and turn it out onto a floured surface. Shape it into a round loaf or a batard (oval shape). Place the shaped dough seam side down in a well-floured proofing basket or bowl.
- Second Rise: Cover the shaped dough with a cloth and let it rise for another 2-3 hours at room temperature, or you can refrigerate it overnight for a slower rise which enhances flavor.
- Preheat the Oven: About 30 minutes before baking, preheat your oven to 230°C (450°F) with a Dutch oven or bread stone inside to heat up.
- Score the Bread: Once the oven is preheated, carefully turn the dough out onto a piece of parchment paper. Use a sharp knife or a bread lame to score the top of the loaf; this allows for expansion during baking.
- Bake the Bread: Carefully transfer the loaf into the hot Dutch oven (or onto the heated stone), cover it with the lid, and bake for 30 minutes. Then, remove the lid and bake for an additional 15-20 minutes until the crust is deep golden brown.
- Cool the Bread: Once baked, remove the bread from the oven and let it cool on a wire rack for at least an hour before slicing. This cooling time allows the crumb to set properly for the best texture.
Extra Tips
For best results, verify your sourdough starter is active and bubbly before using it in the recipe. You can feed your starter the night before to give it a good boost.
Additionally, consider using a kitchen scale for measuring your ingredients to guarantee accuracy, which is essential in bread making. If you want to experiment with flavors, you can add seeds, nuts, or herbs to the dough during the mixing stage.
Enjoy your baking adventure, and don’t hesitate to try different variations of this classic recipe!
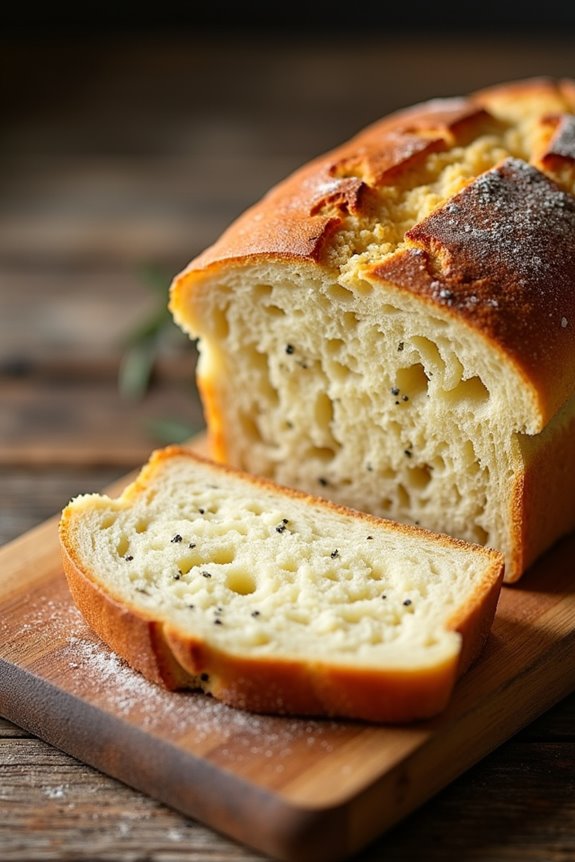
German Seeded Bread (Saatbrot)
German Seeded Bread, or Saatbrot, is a delightful and hearty loaf that showcases the rich baking traditions of Germany. Characterized by its nutty flavor and crunchy texture, this bread is a wonderful addition to any meal. Packed with a variety of seeds such as sunflower, pumpkin, and flaxseeds, it not only offers a satisfying chew but also brings a plethora of health benefits to your table.
Whether served with butter on a breakfast spread or as a base for a robust sandwich, this bread is bound to impress. Making German Seeded Bread is a rewarding process that combines wholesome ingredients and time-honored techniques. The dough requires a bit of kneading and rising time, but the result is well worth the effort.
This recipe yields a loaf that’s perfect for 4-6 people, making it an ideal choice for family gatherings or casual get-togethers. Let’s plunge into the ingredients and instructions needed to craft this delicious bread.
Ingredients:
- 500g whole wheat flour
- 200g bread flour
- 100g sunflower seeds
- 100g pumpkin seeds
- 50g flaxseeds
- 10g salt
- 10g sugar
- 10g instant yeast
- 500ml warm water
- 2 tablespoons olive oil
- Extra seeds for topping (optional)
Cooking Instructions:
- Prepare the Dough: In a large mixing bowl, combine the whole wheat flour, bread flour, sunflower seeds, pumpkin seeds, flaxseeds, salt, sugar, and instant yeast. Mix the dry ingredients thoroughly to make certain the yeast is evenly distributed.
- Add Wet Ingredients: Make a well in the center of the dry mixture and add the warm water and olive oil. Using a wooden spoon or your hands, mix the ingredients until a shaggy dough forms. Confirm that all flour is incorporated.
- Knead the Dough: Transfer the dough to a lightly floured surface. Knead the dough for about 10 minutes until it becomes smooth and elastic. If the dough is too sticky, sprinkle a little more flour as needed to maintain a manageable texture.
- First Rise: Place the kneaded dough in a greased bowl, cover it with a damp cloth or plastic wrap, and let it rise in a warm place for approximately 1 to 1.5 hours or until it has doubled in size.
- Shape the Loaf: Once the dough has risen, punch it down to release the air. Turn it out onto a floured surface and shape it into a loaf. If desired, you can sprinkle extra seeds on top of the loaf at this stage for added texture.
- Second Rise: Place the shaped loaf into a greased loaf pan or onto a parchment-lined baking sheet. Cover again and let it rise for about 30-45 minutes, or until it has puffed up.
- Preheat the Oven: While the dough is rising, preheat the oven to 220°C (428°F).
- Bake the Bread: Once the loaf has risen, place it in the preheated oven and bake for 30-35 minutes. The bread should sound hollow when tapped on the bottom and have a golden-brown crust.
- Cool the Bread: Remove the bread from the oven and let it cool in the pan for about 10 minutes. Then transfer it to a wire rack to cool completely before slicing.
Extra Tips:
For best results, be sure to use fresh seeds as they provide excellent flavor and nutrition. You can also experiment by adding different types of seeds or grains, such as sesame seeds or oats, to create your own unique variation of this bread.
Additionally, if you prefer a softer crust, you can brush the top of the loaf with melted butter just after baking. Enjoy your homemade German Seeded Bread fresh or toasted!
Quark Bread With Herbs
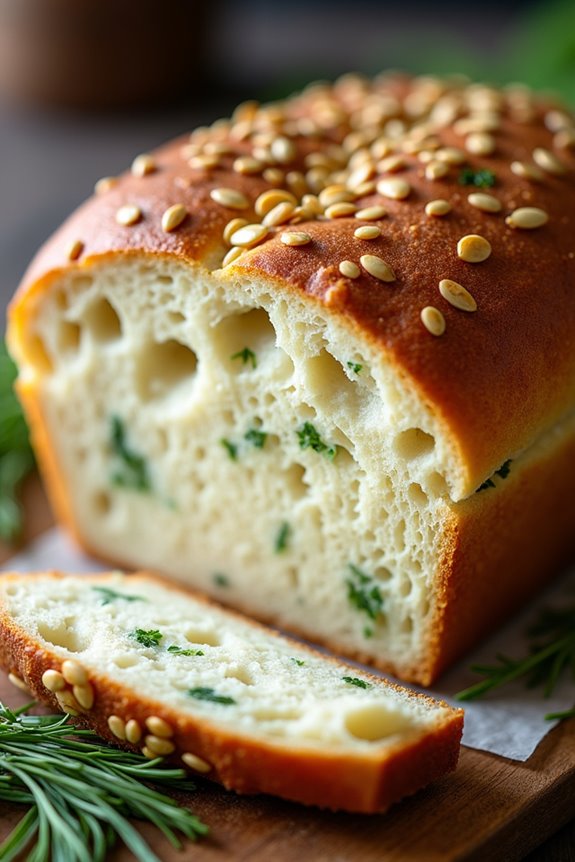
Quark Bread With Herbs is a delightful German recipe that brings together the tangy flavor of quark cheese and the freshness of herbs to create a deliciously moist and flavorful bread. This bread isn’t only easy to make but also incredibly versatile, perfect for serving alongside soups, salads, or simply enjoyed with butter. The addition of herbs such as chives, parsley, or dill elevates the flavor profile, making it a delightful addition to any meal.
This bread is particularly popular in Germany for its light texture and rich taste. Quark, a fresh dairy product similar to yogurt or cottage cheese, is the star ingredient that keeps the bread tender. This recipe yields a loaf that serves 4-6 people, making it an excellent choice for family gatherings or casual brunches with friends.
Ingredients:
- 250g quark
- 250g all-purpose flour
- 1 tsp baking powder
- 1/2 tsp baking soda
- 1/2 tsp salt
- 1 tsp sugar
- 2 tbsp olive oil
- 2 large eggs
- 3 tbsp fresh herbs (such as chives, parsley, or dill), chopped
- 1 tbsp sunflower seeds (optional)
Cooking Instructions:
- Preheat the Oven: Begin by preheating your oven to 180°C (350°F). This guarantees that your bread will bake evenly once you put it in the oven.
- Prepare the Dry Ingredients: In a large mixing bowl, combine the all-purpose flour, baking powder, baking soda, salt, and sugar. Whisk these ingredients together until they’re well mixed. This step is essential as it helps to evenly distribute the leavening agents throughout the flour.
- Mix Wet Ingredients: In another bowl, blend the quark, olive oil, and eggs until you achieve a smooth consistency. The quark should be integrated well with the other wet ingredients, creating a creamy mixture that will add moisture to the bread.
- Combine Wet and Dry Ingredients: Gradually add the wet mixture to the dry ingredients, stirring gently until just combined. Be careful not to overmix; a few lumps are perfectly fine. Overmixing can lead to a dense bread texture.
- Add Herbs: Fold in the chopped fresh herbs gently into the batter, making certain that they’re evenly distributed throughout the mixture. This is where your bread gets its signature flavor, so feel free to adjust the amount of herbs according to your taste preference.
- Transfer to a Loaf Pan: Grease a loaf pan with a little olive oil or line it with parchment paper. Carefully pour the batter into the prepared loaf pan, smoothing the top with a spatula. If you’re using sunflower seeds, sprinkle them on top for added crunch and flavor.
- Bake the Bread: Place the loaf pan in the preheated oven and bake for 40-45 minutes, or until the top is golden brown and a toothpick inserted into the center comes out clean. Keep an eye on the bread to avoid overbaking.
- Cool and Serve: Once baked, remove the bread from the oven and let it cool in the pan for about 10 minutes. Then, transfer it to a wire rack to cool completely. Slice and serve warm or at room temperature.
Extra Tips:
For added flavor, you can experiment with different types of herbs or even incorporate cheese like feta or grated Parmesan into the batter.
If you prefer a slightly sweeter bread, consider adding a tablespoon of honey to the wet ingredients.
This Quark Bread With Herbs can also be stored in an airtight container for a few days, making it a great option for meal prep. Enjoy it fresh, or toast slices for a delightful breakfast or snack!
Sweet German Brioche (Hefezopf)
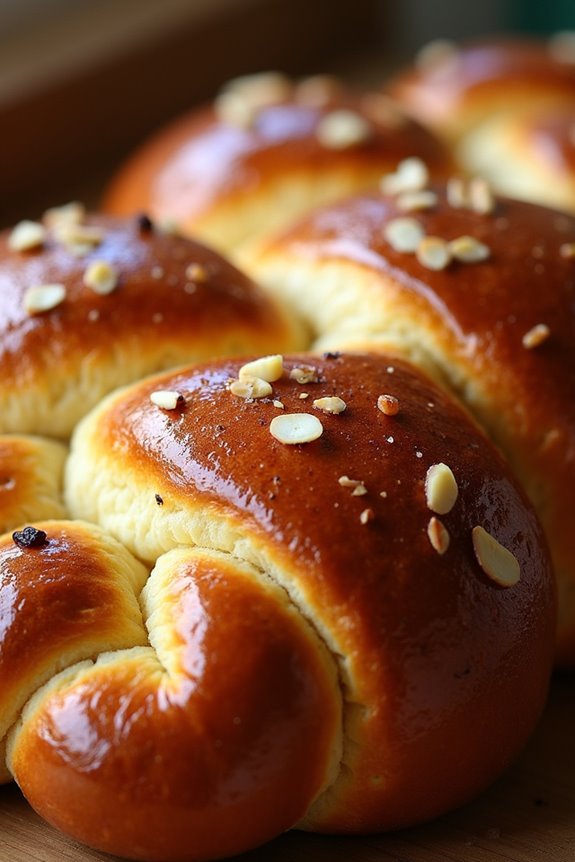
Sweet German Brioche, known as Hefezopf, is a deliciously soft and fluffy bread that’s typically enjoyed during special occasions such as Easter or family gatherings. This traditional yeast bread is slightly sweetened and enriched with butter and eggs, giving it a rich flavor and tender crumb.
The braiding technique used in shaping the loaf not only enhances its visual appeal but also contributes to its delightful texture. Serve it warm, sliced, with butter, or as a delightful accompaniment to coffee or tea.
Baking Hefezopf is a rewarding experience that fills your kitchen with the warm, inviting aroma of freshly baked bread. While the recipe may seem a bit intimidating at first, it’s actually quite simple when broken down into manageable steps.
Once you master the art of braiding, you’ll find that this beautiful loaf is perfect for any occasion and can easily become a beloved staple in your home.
Ingredients (serving size: 4-6 people)
- 500g all-purpose flour
- 75g granulated sugar
- 10g salt
- 10g active dry yeast
- 250ml warm milk
- 2 large eggs
- 100g unsalted butter, softened
- 1 egg (for egg wash)
- Optional: sliced almonds, raisins, or candied fruit for topping
Cooking Instructions
- Activate the Yeast: In a small bowl, combine the warm milk and active dry yeast. Allow it to sit for about 5-10 minutes until it becomes frothy. This indicates that the yeast is active and ready to be used in the dough.
- Mix Dry Ingredients: In a large mixing bowl, whisk together the flour, sugar, and salt. Creating a well in the center, add the frothy yeast mixture and the eggs.
- Combine Wet and Dry Ingredients: Using a wooden spoon or spatula, slowly mix the ingredients together until they begin to form a dough. Once it starts to come together, add the softened butter and mix until fully incorporated.
- Knead the Dough: Transfer the dough to a floured surface and knead it for about 10 minutes until it’s smooth and elastic. If the dough is too sticky, sprinkle a little more flour as needed.
- First Rise: Place the kneaded dough in a lightly greased bowl, cover it with a clean kitchen towel or plastic wrap, and let it rise in a warm place for about 1 to 1.5 hours or until it has doubled in size.
- Shape the Dough: Once the dough has risen, gently punch it down to release any air bubbles. Divide the dough into three equal portions. Roll each portion into long strands, approximately 30cm long.
- Braid the Dough: Lay the three strands next to each other and pinch the top ends together. Braid the strands together, crossing the outer strands over the middle one, and continue until you reach the end. Pinch the ends together to seal.
- Second Rise: Place the braided loaf onto a lined baking sheet. Cover it with a kitchen towel and allow it to rise again for about 30-45 minutes, until it has puffed up.
- Preheat the Oven: While the dough is rising for the second time, preheat your oven to 180°C (350°F).
- Egg Wash and Bake: Brush the risen loaf with a beaten egg for a shiny finish. If desired, sprinkle sliced almonds or raisins on top for added texture. Bake the Hefezopf in the preheated oven for 25-30 minutes, or until it’s golden brown and sounds hollow when tapped on the bottom.
- Cool and Serve: Remove the loaf from the oven and let it cool on a wire rack for at least 10 minutes before slicing. Enjoy your Sweet German Brioche warm or at room temperature.
Extra Tips
When making Hefezopf, patience is key, so allow the dough enough time to rise properly for the best texture.
If you prefer a sweeter loaf, you can increase the sugar slightly or add a drizzle of icing on top after baking. Additionally, feel free to customize your Hefezopf by adding spices such as cinnamon or nutmeg, or incorporating chocolate chips for a delicious twist.
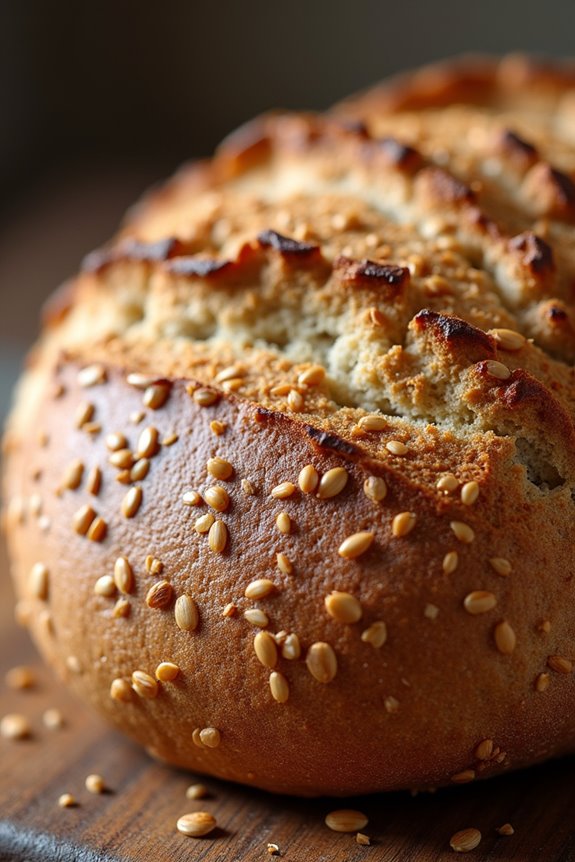
Rustic German Farmer’s Bread (Bauernbrot)
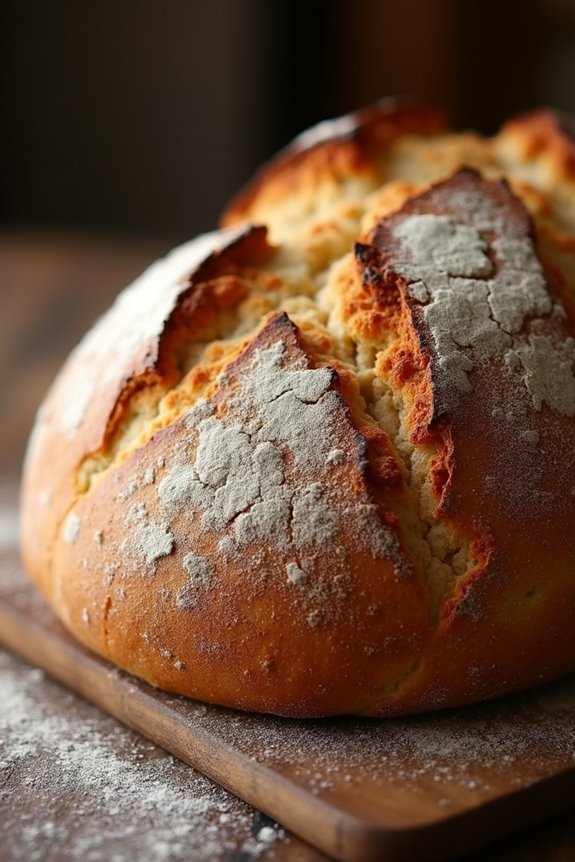
Rustic German Farmer’s Bread, or Bauernbrot, is a hearty and flavorful bread that captures the essence of traditional German baking. This bread is typically made with a blend of whole wheat and rye flours, which gives it a dense texture and a slightly nutty flavor. The use of a sourdough starter adds a tangy depth and helps create a wonderfully crusty crust. Perfect for slathering with butter, serving alongside soups, or making delicious sandwiches, this bread is a staple in many German households.
Making Bauernbrot requires a bit of time and patience, especially if you’re cultivating your own sourdough starter. However, the end result is well worth the effort. The bread is best enjoyed fresh out of the oven, but it also stores well for several days, making it a fantastic choice for batch baking. Gather your ingredients and get ready to knead your way to a delicious loaf that will impress family and friends alike.
Ingredients (Serves 4-6)
- 500g (4 cups) whole wheat flour
- 250g (2 cups) rye flour
- 1 ½ cups warm water (about 110°F/43°C)
- 2 teaspoons active dry yeast
- 1 tablespoon honey
- 1 ½ teaspoons salt
- 1 tablespoon caraway seeds (optional)
- Extra flour for dusting
Cooking Instructions
- Prepare the Sourdough Starter: If you have a sourdough starter, feed it 4-6 hours before you plan to bake. If using commercial yeast, dissolve 2 teaspoons of active dry yeast in warm water along with 1 tablespoon of honey. Let it sit for about 10 minutes until frothy.
- Mix the Dough: In a large mixing bowl, combine the whole wheat flour, rye flour, and salt. Slowly pour in the yeast mixture (or fed sourdough starter) and the remaining warm water. Stir with a wooden spoon until a shaggy dough forms.
- Knead the Dough: Transfer the dough onto a lightly floured surface. Knead for about 10-15 minutes, adding extra flour as needed, until the dough is smooth and elastic. You can also use a stand mixer with a dough hook for this step.
- First Rise: Place the kneaded dough in a lightly greased bowl, cover it with a damp cloth or plastic wrap, and let it rise in a warm place for about 1-2 hours, or until it has doubled in size.
- Shape the Loaf: After the dough has risen, punch it down to release the air. Turn it out onto a floured surface, and shape it into a round or oval loaf. If desired, sprinkle the caraway seeds onto the dough and knead them in.
- Second Rise: Place the shaped loaf onto a parchment-lined baking sheet or a floured proofing basket. Cover it again and let it rise for another 30-60 minutes.
- Preheat the Oven: While the dough is rising, preheat your oven to 425°F (220°C). Place a shallow pan filled with water on the bottom rack of the oven to create steam, which will help develop a crusty exterior.
- Bake the Bread: Once the loaf has risen, score the top with a sharp knife to allow for expansion. Bake in the preheated oven for about 30-35 minutes or until the bread sounds hollow when tapped on the bottom and has a deep golden-brown crust.
- Cool: Remove the bread from the oven and let it cool on a wire rack for at least 30 minutes before slicing to allow the crumb to set.
Extra Tips
When making Rustic German Farmer’s Bread, using a high-quality flour will greatly impact the flavor and texture of the bread. Don’t rush the rising times; allowing the dough to rise adequately will develop the flavor and improve the overall texture.
If you prefer a more intense sourdough flavor, you can let the shaped loaf rise in the refrigerator overnight before baking. This slow fermentation process enhances the taste and can be a great option for scheduling your baking around your day. Enjoy your freshly baked Bauernbrot with a variety of toppings or simply with butter!
German Potato Bread (Kartoffelbrot)
German Potato Bread, or Kartoffelbrot, is a delightful and hearty loaf that combines the earthy flavors of potatoes with the robust texture of traditional bread. This unique recipe is perfect for those who enjoy a rustic and satisfying loaf that pairs beautifully with soups, stews, or simply buttered with a sprinkle of salt.
As the potatoes provide moisture and a slight sweetness, the resulting bread is soft on the inside with a crispy crust, making it a favorite among bread enthusiasts.
The process of making Kartoffelbrot involves boiling, mashing, and then incorporating potatoes into a traditional bread dough. This not only adds flavor but also enhances the bread’s ability to stay fresh longer.
Whether served warm from the oven or toasted the next day, this bread is sure to be a hit at your dining table. Let’s explore the ingredients and procedures to create this scrumptious bread for 4-6 people.
Ingredients:
- 2 medium-sized potatoes (about 250g)
- 500g all-purpose flour
- 1 packet (7g) dry yeast
- 1 teaspoon sugar
- 1 teaspoon salt
- 250ml warm water
- 2 tablespoons olive oil
- 1 teaspoon dried rosemary (optional)
- 1 teaspoon black pepper (optional)
Cooking Instructions:
1. Prepare the Potatoes: Begin by peeling the two medium-sized potatoes and cutting them into chunks. Place them in a pot of cold, salted water and bring to a boil. Cook for about 15-20 minutes or until they’re tender when pierced with a fork.
Drain the potatoes and let them cool slightly before mashing them until smooth.
2. Activate the Yeast: In a small bowl, combine the warm water (make sure it’s around 110°F/43°C) with the sugar and dry yeast. Stir gently and let it sit for about 5-10 minutes until it becomes frothy. This indicates that the yeast is active and ready to use.
3. Mix the Dough: In a large mixing bowl, combine the flour, salt, and optional dried rosemary and black pepper, mixing well. Make a well in the center and add the mashed potatoes, the activated yeast mixture, and the olive oil.
Stir with a wooden spoon until a rough dough begins to form.
4. Knead the Dough: Transfer the dough onto a lightly floured surface. Knead the Dough for about 10 minutes, or until it becomes smooth and elastic. If the dough is too sticky, sprinkle a little extra flour as needed.
5. First Rise: Place the kneaded dough in a lightly oiled bowl, cover it with a clean kitchen towel, and let it rise in a warm place for about 1-2 hours, or until it has doubled in size.
6. Shape the Bread: Once the dough has risen, punch it down to release the air. Turn it out onto a floured surface and shape it into a round or oval loaf, depending on your preference.
Place the shaped dough onto a baking sheet lined with parchment paper.
7. Second Rise: Cover the loaf with the kitchen towel again and let it rise for another 30-45 minutes, until it has puffed up.
8. Preheat the Oven: While the dough is rising for the second time, preheat your oven to 220°C (425°F).
9. Bake the Bread: Once the oven is hot, place the loaf in the oven and bake for 25-30 minutes, or until the crust is golden brown and the bread sounds hollow when tapped on the bottom.
10. Cool and Serve: Remove the bread from the oven and let it cool on a wire rack for at least 10 minutes before slicing. Enjoy your freshly baked German Potato Bread warm or at room temperature.
Extra Tips:
For an even more flavorful bread, consider adding herbs or spices to the dough, such as garlic powder or thyme.
You can also experiment with different types of flour, such as whole wheat or rye, to give the bread a unique twist.
Remember to store any leftover bread wrapped in a cloth or in a bread box to maintain its freshness. If you want to enjoy your Kartoffelbrot later, slice it and freeze the pieces; just toast slices directly from the freezer for a quick treat!
Soft German Dinner Rolls (Brötchen)
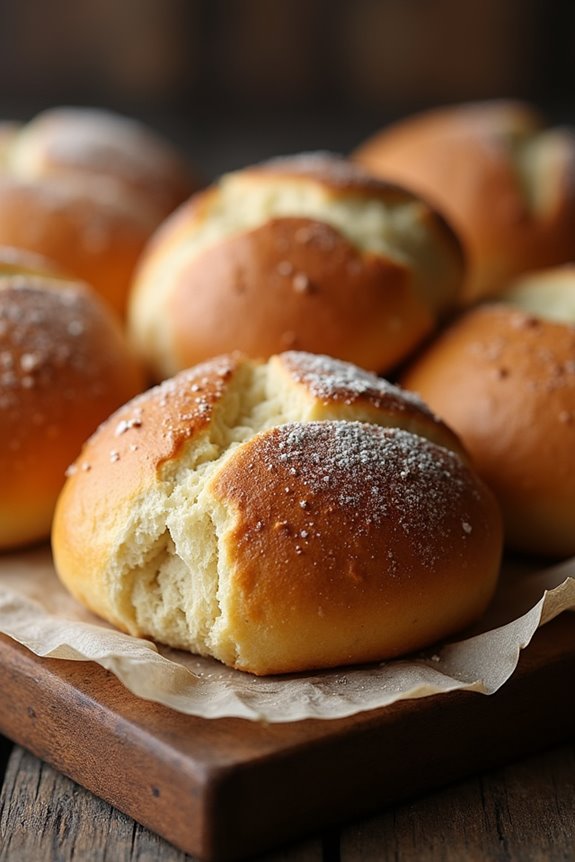
Soft German Dinner Rolls, known as Brötchen, are a delightful addition to any meal. These rolls are known for their crusty exterior and soft, fluffy interior, making them perfect for serving with butter, dipping in soups, or enjoying alongside your favorite dishes.
Traditionally, Brötchen are crafted with a simple combination of basic ingredients, but the key lies in the technique that gives them their unique texture and flavor.
Making Brötchen at home is an enjoyable project that can be shared with family and friends. This recipe yields 4-6 servings, perfect for a cozy dinner or a festive gathering. With a little patience and attention to detail, you can create these delicious rolls that will impress everyone at your table.
Ingredients:
- 500g all-purpose flour
- 300ml lukewarm water
- 10g salt
- 10g sugar
- 7g instant yeast
- 30g unsalted butter, melted
- 1 egg (for egg wash)
- Additional flour for dusting
Cooking Instructions:
- Prepare the Dough: In a large mixing bowl, combine the flour, salt, sugar, and instant yeast. Make sure to keep the salt and yeast on opposite sides of the bowl at this stage, as direct contact can deactivate the yeast. Gradually add the lukewarm water and melted butter to the dry ingredients while mixing with a wooden spoon or your hands until a shaggy dough forms.
- Knead the Dough: Transfer the dough to a floured surface and knead it for about 10 minutes until it becomes smooth and elastic. The dough should spring back when gently poked. If it’s too sticky, add a little more flour as needed.
- First Rise: Place the kneaded dough into a lightly greased bowl, cover it with a damp cloth, and let it rise in a warm place for about 1 hour, or until it has doubled in size.
- Shape the Rolls: After the dough has risen, punch it down to release the air. Divide the dough into 8 equal pieces. Shape each piece into a round ball, tucking the edges underneath to create a smooth surface. Place the shaped rolls on a baking sheet lined with parchment paper, leaving some space between them.
- Second Rise: Cover the rolls with a damp cloth and let them rise for another 30 minutes. This step is vital for achieving the soft texture of the rolls.
- Preheat the Oven: While the rolls are rising, preheat your oven to 220°C (430°F).
- Prepare for Baking: Once the rolls have risen, beat the egg in a small bowl and brush the tops of the rolls with the egg wash for a golden finish. Optional: You can also sprinkle a little flour on top for texture.
- Bake the Rolls: Bake the rolls in the preheated oven for 15-20 minutes or until they’re golden brown and sound hollow when tapped on the bottom.
- Cool and Serve: Remove the rolls from the oven and let them cool on a wire rack for a few minutes before serving. Enjoy them warm with butter or your favorite spread!
Extra Tips:
For an extra crusty exterior, place a small oven-safe dish with water at the bottom of your oven while the rolls are baking. This will create steam in the oven, which helps achieve that desirable crust.
Additionally, if you want to experiment with flavors, consider adding herbs or spices to the dough, or topping the rolls with seeds like sesame or poppy before baking. Enjoy your homemade Brötchen fresh out of the oven!
Spiced Christmas Bread (Stollen)
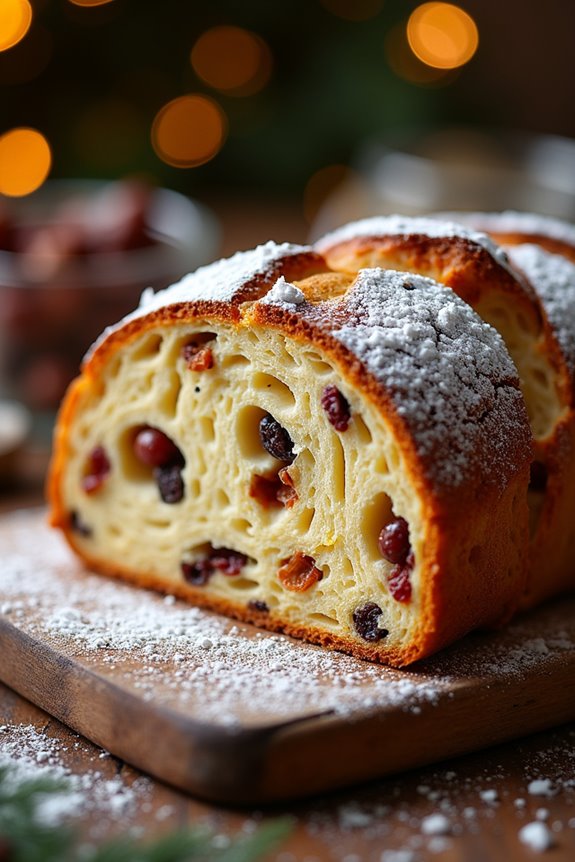
Stollen is a traditional German bread that’s often enjoyed during the Christmas season. This delightful bread is rich with spices, dried fruits, and nuts, creating a festive flavor that pairs perfectly with a warm cup of tea or coffee.
Its distinctive shape, often resembling a baby Jesus wrapped in swaddling clothes, makes it a unique centerpiece for holiday gatherings. The process of making stollen can be a bit involved, but the end result is a wonderfully aromatic and delicious treat that can be enjoyed for weeks, as it matures in flavor over time.
The best stollen is made with a mix of high-quality ingredients and a touch of love. This recipe will guide you through the steps to create your own spiced Christmas bread, perfect for sharing with family and friends or as a sweet gift. With a little patience and attention, you’ll be able to bring the festive spirit of Germany into your kitchen.
Ingredients (Serves 4-6)
- 500g all-purpose flour
- 100g sugar
- 10g salt
- 10g active dry yeast
- 200ml milk, lukewarm
- 150g unsalted butter, melted
- 2 large eggs
- 1 teaspoon ground cinnamon
- 1 teaspoon ground nutmeg
- 1 teaspoon ground cardamom
- 200g mixed dried fruits (raisins, currants, and candied citrus peel)
- 100g chopped nuts (almonds and hazelnuts)
- Zest of one lemon
- Zest of one orange
- Powdered sugar (for dusting)
Cooking Instructions
- Prepare the Yeast Mixture: In a small bowl, combine the lukewarm milk and active dry yeast. Stir gently and let it sit for about 5-10 minutes until it becomes frothy. This indicates that the yeast is active and ready to use.
- Mix the Dry Ingredients: In a large mixing bowl, combine the all-purpose flour, sugar, salt, ground cinnamon, ground nutmeg, and ground cardamom. Mix well to guarantee that the spices and salt are evenly distributed throughout the flour.
- Combine Wet Ingredients: Once the yeast has activated, add the melted butter and eggs to the yeast mixture. Whisk together until well combined.
- Make the Dough: Pour the wet ingredients into the bowl with the dry ingredients. Mix until a dough starts to form. You may need to use your hands to knead the dough in the bowl or on a lightly floured surface until it becomes smooth and elastic, about 10 minutes.
- Add Fruits and Nuts: Incorporate the mixed dried fruits, chopped nuts, lemon zest, and orange zest into the dough. Knead gently until the fruits and nuts are evenly distributed.
- First Rise: Shape the dough into a ball and place it in a greased bowl, covering it with a clean kitchen towel. Let it rise in a warm place for about 1-2 hours, or until it has doubled in size.
- Shape the Stollen: Once the dough has risen, punch it down to release the air. Turn it out onto a floured surface and shape it into an oval loaf, folding one side over to create the classic stollen shape.
- Second Rise: Place the shaped loaf on a baking sheet lined with parchment paper. Cover it again with the kitchen towel and let it rise for another 30-60 minutes until it has puffed up.
- Bake the Stollen: Preheat your oven to 180°C (350°F). Bake the stollen for 30-35 minutes, or until it’s golden brown and sounds hollow when tapped on the bottom.
- Cool and Dust: Once baked, remove the stollen from the oven and let it cool on a wire rack. Once completely cooled, dust generously with powdered sugar before serving.
Extra Tips
For the best flavor, consider making your stollen a few days in advance. The flavors deepen and improve as it sits, making it even more delectable.
Additionally, wrapping the cooled stollen in plastic wrap and storing it in a cool, dry place will help retain its moisture. Feel free to customize the mix of dried fruits and nuts to your liking, and don’t hesitate to experiment with different spices for a unique twist on this classic recipe!