

I adore bringing the vibrant flavors of the Mediterranean into my kitchen, where fresh ingredients truly shine. These 11 healthy recipes are not just nutritious but also bring a lovely burst of sunshine to the table. From zesty salads to hearty stews, each dish showcases the goodness of vegetables, legumes, and aromatic herbs. If you’re ready to savor these delightful flavors, let’s explore some delicious options that will transform your meals and elevate your cooking game.
Mediterranean Quinoa Salad

Mediterranean Quinoa Salad is a vibrant and nutritious dish that beautifully combines the flavors of the Mediterranean with the wholesome goodness of quinoa. This salad isn’t only packed with protein and fiber, but it also bursts with color from fresh vegetables and herbs. Perfect as a light lunch, a side dish for dinner, or even as a meal prep option, it’s incredibly versatile and easy to make.
The combination of zesty lemon, tangy feta cheese, and crisp vegetables makes it an irresistible option for those looking to embrace healthy eating without sacrificing flavor. This salad is a great way to incorporate more whole grains and vegetables into your diet, and it can easily be customized to suit your taste preferences.
You can add grilled chicken or chickpeas for extra protein, or swap out vegetables based on what you have on hand. The Mediterranean Quinoa Salad is sure to impress at gatherings or simply to enjoy at home on a warm day.
Ingredients (Serves 4-6):
- 1 cup quinoa
- 2 cups water or vegetable broth
- 1 cup cherry tomatoes, halved
- 1 cucumber, diced
- 1 bell pepper (red or yellow), diced
- 1/4 red onion, finely chopped
- 1/2 cup Kalamata olives, pitted and sliced
- 1/2 cup feta cheese, crumbled
- 1/4 cup fresh parsley, chopped
- 1/4 cup fresh mint, chopped
- 1/4 cup olive oil
- 2 tablespoons lemon juice
- Salt and pepper to taste
Cooking Instructions:
1. Rinse the Quinoa: Begin by rinsing the quinoa under cold water in a fine mesh strainer. This step is essential as it removes the saponins, which can give a bitter taste to the quinoa. Once rinsed, set it aside to drain.
2. Cook the Quinoa: In a medium saucepan, combine the rinsed quinoa and water (or vegetable broth) and bring it to a boil over medium-high heat. Once boiling, reduce the heat to low, cover, and let it simmer for about 15 minutes or until the quinoa has absorbed all the liquid.
Once done, remove it from heat and let it sit, covered, for another 5 minutes to fluff the grains.
3. Prepare the Vegetables: While the quinoa is cooking, chop the cherry tomatoes, cucumber, bell pepper, and red onion. Slice the Kalamata olives and crumble the feta cheese. This step allows all the fresh ingredients to be ready to mix seamlessly with the quinoa.
4. Mix the Dressing: In a small bowl, whisk together the olive oil, lemon juice, salt, and pepper. This dressing will enhance the flavors of the salad and bring all the ingredients together.
5. Combine Everything: In a large mixing bowl, add the cooked quinoa, chopped vegetables, olives, feta cheese, parsley, and mint. Pour the dressing over the top and gently toss until all ingredients are evenly coated and combined.
Be careful not to mash the feta; you want to keep its crumbly texture.
6. Taste and Adjust: Before serving, taste the salad and adjust the seasoning with additional salt, pepper, or lemon juice if needed. This step guarantees that the flavors are balanced and to your liking.
7. Serve or Chill: You can serve the Mediterranean Quinoa Salad immediately, or for enhanced flavors, cover and refrigerate it for at least 30 minutes to allow the ingredients to meld together.
Extra Tips:
For added nutrition and flavor, consider incorporating other ingredients such as roasted vegetables, chickpeas, or even avocado. You can also substitute the feta cheese with a dairy-free alternative if you’re looking for a vegan option.
This salad is best enjoyed fresh but can be stored in an airtight container in the refrigerator for up to 3 days. Just give it a good toss before serving again to refresh the flavors!
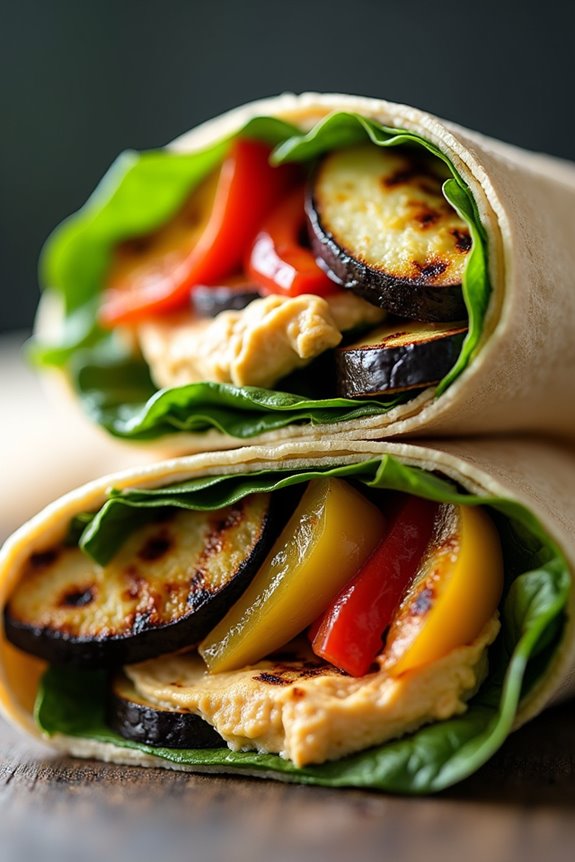
Grilled Vegetable and Hummus Wrap
Healthy Mediterranean Recipes
Grilled Vegetable and Hummus Wrap
Grilled Vegetable and Hummus Wrap is a vibrant and nutritious meal that perfectly embodies the essence of Mediterranean cuisine. This dish combines seasonal vegetables, smoky grilled flavors, and creamy hummus, all wrapped in a soft tortilla. It’s not only easy to prepare but also a great option for a light lunch or a quick dinner, making it ideal for busy days when you still want to eat healthily.
The beauty of this wrap lies in its versatility; you can mix and match your choice of vegetables based on what’s in season or what you have on hand. Bell peppers, zucchini, and eggplant work beautifully, but feel free to add or substitute with your favorites. Paired with a spread of hummus, this wrap makes for a satisfying and wholesome meal that’s packed with flavor and nutrients.
Ingredients (serves 4-6):
- 2 medium zucchini, sliced
- 1 red bell pepper, sliced
- 1 yellow bell pepper, sliced
- 1 medium eggplant, sliced
- 1 red onion, sliced
- 3 tablespoons olive oil
- Salt and pepper, to taste
- 4-6 large whole wheat tortillas
- 1 cup hummus (store-bought or homemade)
- Fresh spinach leaves or mixed greens
- Optional: Feta cheese, crumbled (for garnish)
Cooking Instructions:
- Prepare the Vegetables: Start by washing and slicing all your vegetables into uniform sizes to guarantee even grilling. Aim for strips of zucchini, bell peppers, and eggplant, along with thin slices of red onion for added flavor.
- Season the Vegetables: In a large bowl, combine the sliced vegetables with olive oil, salt, and pepper. Toss well until the vegetables are evenly coated. This step is essential as it enhances the flavor of the vegetables and helps them grill beautifully.
- Preheat the Grill: While the vegetables are marinating, preheat your grill or grill pan to medium-high heat. This will provide a nice char on the vegetables, adding to their overall flavor.
- Grill the Vegetables: Once the grill is hot, add the seasoned vegetables in a single layer. Grill for about 5-7 minutes on each side, or until they’re tender and have nice grill marks. Keep an eye on them to prevent burning, and remove them once done.
- Warm the Tortillas: While the vegetables are grilling, you can warm the tortillas. You can do this on the grill for about 30 seconds on each side or in a microwave for about 15 seconds, just enough to make them pliable.
- Assemble the Wraps: Lay a warm tortilla flat on a clean surface. Spread a generous layer of hummus over the tortilla, leaving some space around the edges. Layer the grilled vegetables on top, followed by fresh spinach or mixed greens.
- Roll the Wrap: Carefully roll the tortilla tightly from one end to the other, making sure the fillings are enclosed. You can secure the wrap with a toothpick if needed or cut it in half for easier handling.
- Serve: Arrange the wraps on a platter and, if desired, sprinkle crumbled feta cheese on top for added flavor. Serve immediately and enjoy your delicious Grilled Vegetable and Hummus Wraps!
Extra Tips: For added flavor, consider marinating the vegetables in a mix of lemon juice, garlic, and herbs before grilling. Additionally, you can try adding other toppings like sliced olives or roasted red peppers for extra Mediterranean flair. If you have leftovers, they can be stored in an airtight container in the refrigerator for up to two days, but the wraps are best enjoyed fresh!
Lemon Herb Chicken Skewers

Lemon Herb Chicken Skewers are a delightful Mediterranean dish that combines the bright, zesty flavors of lemon with the aromatic essence of fresh herbs. This recipe is perfect for summer barbecues or a quick weeknight dinner, bringing a taste of the Mediterranean directly to your table. The skewers aren’t only easy to prepare but also packed with flavor, making them a favorite for both adults and children.
To achieve the best results, marinating the chicken is key. The marinade infuses the meat with a revitalizing blend of lemon juice, garlic, and herbs, making certain each bite is juicy and flavorful. Once grilled to perfection, these skewers can be served with a side of tzatziki sauce or a fresh salad, making them a versatile option for any meal.
Ingredients (serving size: 4-6 people):
- 1.5 pounds boneless, skinless chicken breasts
- 1/4 cup olive oil
- 1/4 cup fresh lemon juice
- 3 cloves garlic, minced
- 2 tablespoons fresh parsley, chopped
- 2 tablespoons fresh oregano, chopped
- 1 tablespoon fresh thyme, chopped
- Salt and pepper to taste
- Wooden or metal skewers (if using wooden skewers, soak them in water for 30 minutes prior to grilling)
Cooking Instructions:
- Prepare the Marinade: In a large bowl, combine the olive oil, lemon juice, minced garlic, chopped parsley, oregano, thyme, salt, and pepper. Whisk together until well blended. This marinade will help tenderize the chicken and infuse it with vibrant flavors.
- Marinate the Chicken: Cut the chicken breasts into 1-inch cubes and add them to the marinade. Make sure that all pieces are well coated. Cover the bowl with plastic wrap and refrigerate for at least 30 minutes, or up to 2 hours for deeper flavor.
- Preheat the Grill: While the chicken is marinating, preheat your grill to medium-high heat. This guarantees that the chicken will cook evenly and develop a nice char.
- Assemble the Skewers: Once marinated, thread the chicken pieces onto the skewers, leaving a little space between each piece to allow for even cooking. If you’d like, you can also add vegetables like bell peppers or zucchini for added color and flavor.
- Grill the Skewers: Place the skewers on the preheated grill and cook for about 10-12 minutes, turning occasionally, until the chicken is cooked through and has nice grill marks. The internal temperature should reach 165°F (75°C).
- Serve: Once cooked, remove the skewers from the grill and let them rest for a few minutes. Serve them warm with your choice of sides, such as a fresh salad or tzatziki sauce.
Extra Tips: To enhance the flavor of your Lemon Herb Chicken Skewers, consider adding a pinch of red pepper flakes for a subtle kick. You can also experiment with different herbs like basil or dill for a unique twist.
If grilling outdoors isn’t an option, you can also cook the skewers on a grill pan or in the oven at 400°F (200°C) for about 15-20 minutes, turning halfway through. Enjoy your delicious Mediterranean creation!
Greek Tzatziki Sauce With Pita Chips
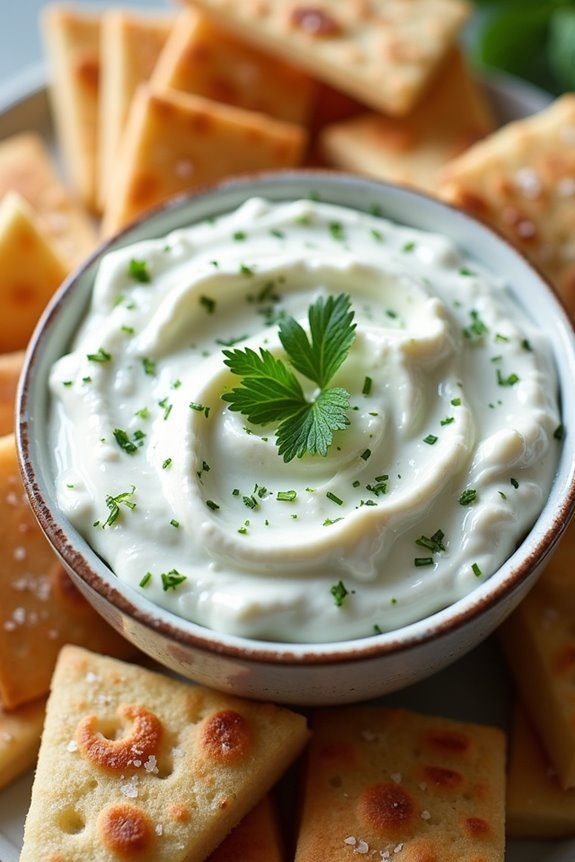
Greek Tzatziki Sauce is a revitalizing and tangy yogurt-based dip that perfectly complements crispy pita chips, making it a delightful appetizer or snack for any occasion.
Originating from Greece, tzatziki is made with creamy Greek yogurt, cucumbers, garlic, and herbs, resulting in a flavor profile that’s both cooling and vibrant. When paired with warm, homemade pita chips, this dish becomes an irresistible combination of textures and tastes that can be enjoyed by everyone.
Making tzatziki sauce is a straightforward process, and with a few fresh ingredients, you can whip up this healthy dip in no time. Whether you’re hosting a gathering, looking for a light snack, or simply craving Mediterranean flavors, this recipe is sure to impress.
The pita chips can be baked to achieve a crispy texture, providing a healthier alternative to store-bought options. Let’s explore the ingredients and cooking instructions for this delicious dish, perfect for serving 4-6 people.
Ingredients
- 2 cups Greek yogurt
- 1 medium cucumber, grated and excess moisture squeezed out
- 2 cloves garlic, minced
- 2 tablespoons olive oil
- 1 tablespoon fresh dill, chopped (or 1 teaspoon dried dill)
- 1 tablespoon fresh lemon juice
- Salt and pepper to taste
- 4 large pita bread
- Olive oil for brushing
- Sea salt for sprinkling
Cooking Instructions
1. Prepare the Tzatziki: In a mixing bowl, combine the Greek yogurt, grated cucumber, minced garlic, olive oil, fresh dill, lemon juice, salt, and pepper. Mix all the ingredients thoroughly until well combined.
Taste and adjust the seasoning as needed, adding more salt, pepper, or lemon juice to suit your palate.
2. Chill the Sauce: Cover the tzatziki sauce with plastic wrap or transfer it to an airtight container. Refrigerate for at least 30 minutes to allow the flavors to meld together and the sauce to chill.
This step enhances the taste and makes the tzatziki even more revitalizing.
3. Prepare the Pita Chips: Preheat your oven to 400°F (200°C). Cut the pita bread into wedges, then arrange them in a single layer on a baking sheet.
Brush each wedge lightly with olive oil and sprinkle with a pinch of sea salt.
4. Bake the Pita Chips: Place the baking sheet in the preheated oven and bake for about 10-12 minutes, or until the pita chips are golden brown and crispy.
Keep an eye on them to prevent burning, and flip them halfway through the baking time for even crispiness.
5. Serve: Once the pita chips are done baking, remove them from the oven and let them cool slightly.
Serve the tzatziki sauce in a bowl accompanied by the warm pita chips for dipping. Enjoy this delicious Mediterranean treat!
Extra Tips
For an extra burst of flavor, consider adding some fresh mint to the tzatziki sauce along with the dill.
Mint pairs beautifully with cucumber and garlic for a revitalizing twist. Additionally, if you prefer a thicker tzatziki, you can strain the yogurt through a cheesecloth or fine mesh sieve for a few hours to remove excess moisture.
This will give you an even creamier texture. Finally, feel free to experiment with different spices or herbs, such as oregano or parsley, to personalize your tzatziki to your taste!
Chickpea and Spinach Stew
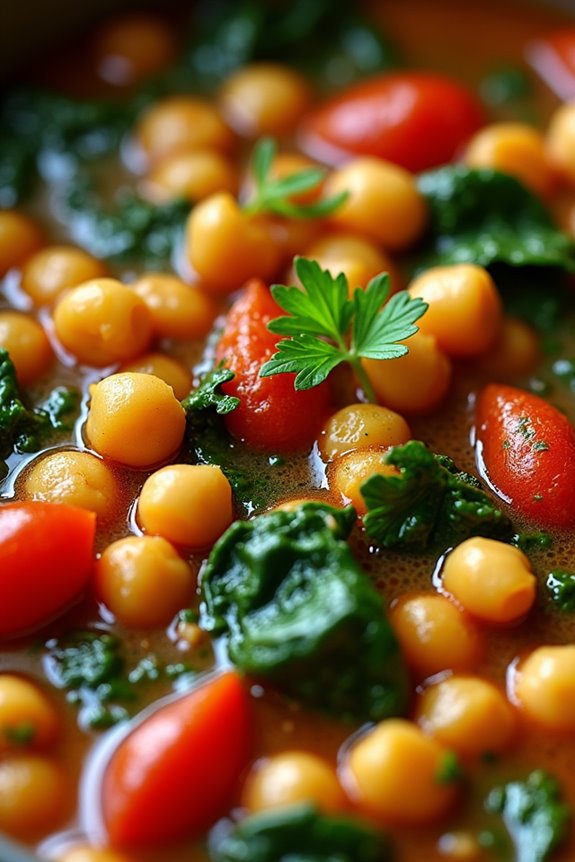
Chickpea and Spinach Stew is a delightful, hearty dish that embodies the essence of Mediterranean cuisine. Packed with protein-rich chickpeas and nutrient-dense spinach, this stew isn’t only delicious but also a comforting meal perfect for any day of the week.
The combination of aromatic spices, fresh vegetables, and a touch of olive oil creates a warm and inviting flavor that’s sure to please the whole family. This dish is vegan, making it an excellent choice for those seeking plant-based options without sacrificing flavor.
Making this stew is straightforward and can be prepared in under an hour. It offers a wonderful balance of flavors and textures, making it a satisfying option for both lunch and dinner. Serve it alongside crusty whole-grain bread or over a bed of fluffy quinoa for a complete meal that will keep you nourished and energized throughout the day.
Ingredients (Serves 4-6)
- 2 tablespoons olive oil
- 1 onion, chopped
- 3 cloves garlic, minced
- 1 teaspoon ground cumin
- 1 teaspoon ground coriander
- 1/2 teaspoon smoked paprika
- 1 can (14 oz) diced tomatoes
- 2 cans (15 oz each) chickpeas, drained and rinsed
- 4 cups vegetable broth
- 5 cups fresh spinach, roughly chopped
- Salt and pepper to taste
- Fresh lemon juice, for serving
- Fresh parsley, chopped (for garnish)
Cooking Instructions
- Sauté the Aromatics: Begin by heating the olive oil in a large pot over medium heat. Add the chopped onion and sauté for about 5 minutes, or until the onion becomes translucent. This step builds the base flavors of the stew.
- Add Garlic and Spices: Stir in the minced garlic, cumin, coriander, and smoked paprika. Cook for an additional 2-3 minutes until the garlic is fragrant, being careful not to burn it. This will enhance the aromatic profile of the stew.
- Incorporate Tomatoes and Chickpeas: Pour in the diced tomatoes along with their juices and the drained chickpeas. Stir well to combine all the ingredients. The tomatoes will add acidity and depth to the stew.
- Add Vegetable Broth: Pour in the vegetable broth and bring the mixture to a gentle boil. Reduce the heat to low and let it simmer for about 20 minutes. This allows the flavors to meld together beautifully.
- Stir in Spinach: After simmering, add the chopped spinach to the pot. Stir until the spinach wilts and is incorporated into the stew, which should take about 3-4 minutes. The spinach not only adds nutrition but also a vibrant color to the dish.
- Season and Serve: Taste the stew and season with salt and pepper as desired. Serve hot, drizzled with fresh lemon juice and garnished with chopped parsley for a burst of freshness.
Extra Tips
When cooking Chickpea and Spinach Stew, feel free to customize it by adding other vegetables such as bell peppers or zucchini for added nutrition and flavor.
If you prefer a thicker stew, let it simmer uncovered for a longer period to reduce the liquid. Additionally, this stew can be made ahead of time and stored in the refrigerator for a few days, or even frozen for future meals, making it a convenient option for busy weekdays.
Enjoy the robust flavors this Mediterranean dish has to offer!
Tomato Basil Bruschetta

Tomato Basil Bruschetta is a delightful Italian appetizer that showcases the fresh flavors of tomatoes and basil. This dish isn’t only simple to prepare, but it also captures the essence of Mediterranean cuisine, making it an ideal starter for any gathering or dinner party.
The combination of crispy toasted bread topped with a vibrant mixture of ripe tomatoes, aromatic basil, and a drizzle of olive oil creates a symphony of flavors that’s certain to impress your guests.
Bruschetta, originating from Central Italy, is versatile and can be customized with various toppings. However, the classic version with tomatoes and basil remains a favorite. Perfect for summer, when tomatoes are at their peak, this dish is a celebration of fresh, wholesome ingredients.
Serve it as an appetizer or a light snack, and watch as it quickly disappears from the table!
Ingredients (Serves 4-6):
- 1 French baguette or ciabatta loaf
- 4 ripe medium tomatoes, diced
- 1 cup fresh basil leaves, chopped
- 2 cloves garlic, minced
- 1/4 cup extra virgin olive oil
- Salt and pepper to taste
- Balsamic glaze (optional, for drizzling)
Cooking Instructions:
- Preheat the Oven: Begin by preheating your oven to 400°F (200°C). This will guarantee that your bread gets perfectly toasted and crispy, providing a great base for your toppings.
- Prepare the Bread: Slice the French baguette or ciabatta loaf into 1/2-inch thick slices. Arrange the slices on a baking sheet in a single layer. This will allow them to toast evenly in the oven.
- Toast the Bread: Drizzle the sliced bread with a little olive oil and place it in the preheated oven. Toast for about 5-7 minutes or until golden brown. Keep an eye on them to prevent burning. Once toasted, remove them from the oven and set aside.
- Make the Tomato Mixture: In a medium-sized bowl, combine the diced tomatoes, chopped basil, and minced garlic. Drizzle with the remaining olive oil and season with salt and pepper to taste. Toss gently to confirm all the ingredients are well combined and the flavors meld together.
- Assemble the Bruschetta: Spoon the tomato mixture generously onto each slice of toasted bread. Make sure to distribute the mixture evenly so that every bite is filled with that fresh tomato and basil goodness.
- Serve: Arrange the assembled bruschetta on a serving platter. If desired, drizzle a bit of balsamic glaze over the top for added flavor and a beautiful presentation. Serve immediately while the bread is still warm.
Extra Tips:
For the best results, use fresh, high-quality ingredients, especially tomatoes and basil, as they’re the stars of this dish. If you can, opt for heirloom tomatoes for a more robust flavor.
You can also personalize your bruschetta by adding toppings such as crumbled feta cheese or a sprinkle of red pepper flakes for a kick. Additionally, if you have leftover tomato mixture, it makes a great salad or can be used as a topping for grilled chicken or fish!
Roasted Eggplant and Tomato Pasta
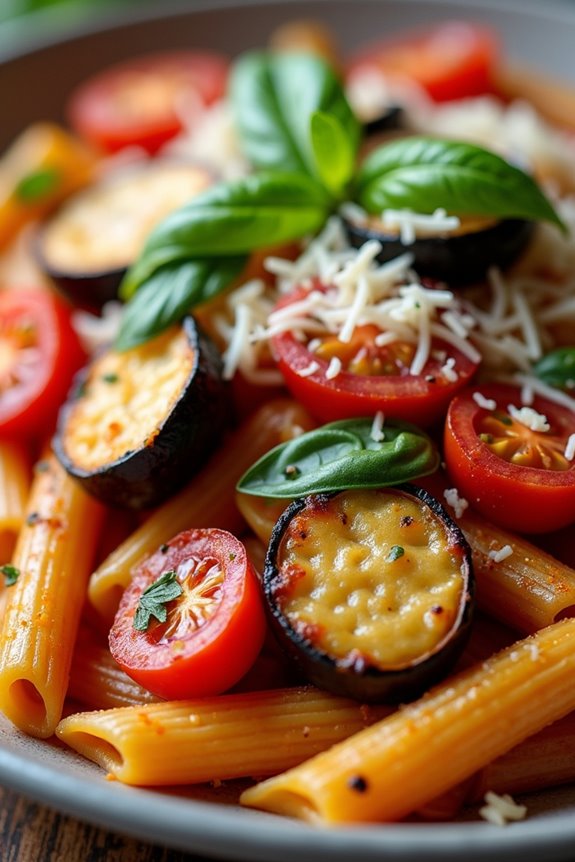
Roasted Eggplant and Tomato Pasta is a delightful dish that captures the essence of Mediterranean cooking with its rich flavors and healthy ingredients. This recipe brings together the smokiness of roasted eggplant, the sweetness of ripe tomatoes, and the heartiness of pasta, creating a satisfying meal that’s both nutritious and delicious. Perfect for a family dinner or a gathering with friends, this dish is sure to impress even the most discerning palates.
The beauty of this recipe lies in its simplicity and the vibrant flavors that come from fresh ingredients. Roasting the eggplant enhances its natural sweetness, while the tomatoes become succulent and juicy, creating a lovely sauce that clings to the pasta. With a touch of garlic and a sprinkle of fresh herbs, this Roasted Eggplant and Tomato Pasta will transport you straight to the Mediterranean coast with every bite.
Ingredients (Serving size: 4-6 people):
- 2 medium eggplants, diced
- 4 ripe tomatoes, chopped
- 3 tablespoons olive oil
- 3 cloves garlic, minced
- 1 teaspoon dried oregano
- Salt and pepper to taste
- 12 ounces pasta (spaghetti or penne works well)
- 1/4 cup fresh basil, chopped
- Grated Parmesan cheese for serving (optional)
Cooking Instructions:
- Preheat the oven: Start by preheating your oven to 400°F (200°C). This guarantees that the eggplants roast evenly and develop a nice caramelized flavor as they cook.
- Prepare the eggplant: In a large bowl, toss the diced eggplant with 2 tablespoons of olive oil, salt, and pepper. Spread the eggplant evenly on a baking sheet and roast in the preheated oven for about 25-30 minutes, or until golden brown and tender, stirring halfway through to guarantee even cooking.
- Cook the pasta: While the eggplant is roasting, bring a large pot of salted water to a boil. Add the pasta and cook according to package instructions until al dente. Reserve about 1 cup of pasta water, then drain the pasta and set it aside.
- Prepare the sauce: In a large skillet, heat 1 tablespoon of olive oil over medium heat. Add the minced garlic and sauté for about 1 minute until fragrant. Then, add the chopped tomatoes and dried oregano, stirring to combine. Cook for about 5-7 minutes until the tomatoes break down and create a sauce, adding a pinch of salt and pepper to taste.
- Combine everything: Once the eggplant is roasted, add it to the skillet with the tomato sauce. Stir to combine, then add the cooked pasta, tossing everything together. If the mixture seems dry, add some reserved pasta water a little at a time until you reach your desired consistency.
- Serve: Remove the skillet from heat and stir in the fresh basil. Serve the pasta hot, topped with grated Parmesan cheese if desired.
Extra Tips: When roasting the eggplant, you can sprinkle a little sea salt over it before cooking to draw out excess moisture, which helps in achieving a better texture.
Feel free to customize this dish by adding other vegetables like zucchini or bell peppers, or even a protein such as chickpeas or grilled chicken for a heartier meal. Enjoy your Mediterranean culinary adventure!
Mediterranean Lentil Salad
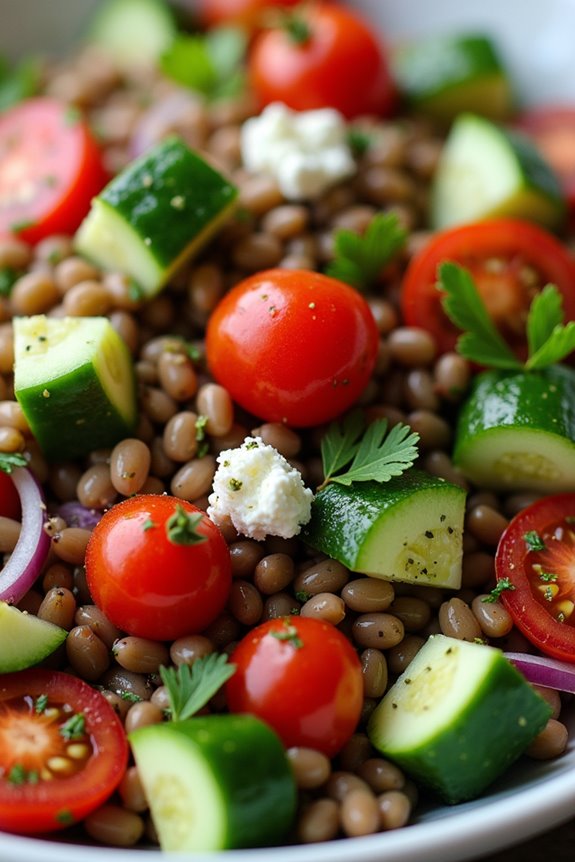
Mediterranean Lentil Salad is a vibrant and nutritious dish that embodies the flavors of the Mediterranean region. Lentils aren’t only a great source of plant-based protein but also packed with fiber, making this salad a healthy and filling option. The colorful combination of fresh vegetables, herbs, and a zesty dressing elevates this salad, making it perfect as a side dish or a light main course.
With its satisfying texture and rich flavors, this salad can easily become a staple in your weekly meal rotation. This recipe isn’t only simple to prepare but can also be customized to suit your taste. You can add different vegetables or adjust the seasoning, making it versatile for any occasion. Perfect for a picnic, potluck, or a quick weeknight dinner, Mediterranean Lentil Salad is bound to impress both you and your guests.
Let’s explore the ingredients and the steps to create this delicious and healthy dish!
Ingredients (Serves 4-6)
- 1 cup dry lentils (green or brown)
- 2 cups water
- 1 medium cucumber, diced
- 1 bell pepper (red or yellow), diced
- 1 cup cherry tomatoes, halved
- 1/2 red onion, finely chopped
- 1/4 cup fresh parsley, chopped
- 1/4 cup feta cheese, crumbled (optional)
- 1/4 cup olive oil
- 2 tablespoons red wine vinegar
- 1 tablespoon lemon juice
- 1 teaspoon dried oregano
- Salt and pepper to taste
Cooking Instructions
- Cook the Lentils: Rinse the lentils under cold water in a fine mesh strainer. In a medium saucepan, combine the rinsed lentils and water. Bring to a boil over high heat, then reduce to a simmer. Cover and cook for about 20-25 minutes, or until the lentils are tender but still hold their shape. Drain any excess water and set aside to cool.
- Prepare the Vegetables: While the lentils are cooking, prepare the vegetables. Dice the cucumber and bell pepper, halve the cherry tomatoes, and finely chop the red onion and parsley. If using, crumble the feta cheese. This step allows the flavors to meld together beautifully in the final salad.
- Make the Dressing: In a small bowl, whisk together the olive oil, red wine vinegar, lemon juice, dried oregano, and a pinch of salt and pepper. This dressing will enhance the flavors of the salad and bring all the ingredients together.
- Combine the Ingredients: In a large mixing bowl, add the cooled lentils, diced cucumber, bell pepper, cherry tomatoes, red onion, and parsley. Pour the dressing over the mixture and gently toss to combine. If using, add the feta cheese at this point and fold it in carefully to avoid breaking it down too much.
- Taste and Adjust: After mixing, taste the salad and adjust the seasoning if necessary by adding more salt, pepper, or lemon juice according to your preference. Let the salad sit for about 10-15 minutes to allow the flavors to develop further before serving.
Extra Tips
When making Mediterranean Lentil Salad, feel free to experiment with the ingredients based on what you have on hand. You can add other vegetables like carrots or zucchini, or even incorporate some olives for an extra Mediterranean touch.
This salad can be stored in the refrigerator for up to three days, making it an excellent option for meal prep. Just be sure to keep the dressing separate until you’re ready to serve to maintain the freshness of the ingredients!
Spinach and Feta Stuffed Peppers

Spinach and Feta Stuffed Peppers are a delightful and healthy Mediterranean dish that brings together fresh ingredients and vibrant flavors. These stuffed peppers aren’t only visually appealing but also packed with nutrients, making them an excellent choice for a light lunch or a satisfying dinner. The combination of sautéed spinach, creamy feta cheese, and aromatic herbs creates a filling that perfectly complements the sweetness of the roasted peppers.
This dish is versatile and can be served warm or at room temperature, making it ideal for meal prep or entertaining guests. You can also customize the stuffing by adding extra vegetables, grains, or proteins according to your preference. Whether you’re looking to impress your family at the dinner table or simply treat yourself to a healthy meal, Spinach and Feta Stuffed Peppers are sure to delight.
Ingredients (serving size: 4-6 people):
- 4 large bell peppers (any color)
- 2 cups fresh spinach, chopped
- 1 cup feta cheese, crumbled
- 1 cup cooked quinoa or rice
- 1 small onion, finely chopped
- 2 cloves garlic, minced
- 2 tablespoons olive oil
- 1 teaspoon dried oregano
- 1 teaspoon dried basil
- Salt and pepper to taste
- 1/4 cup pine nuts (optional)
- Fresh parsley, chopped for garnish
Cooking Instructions:
- Preheat the Oven: Begin by preheating your oven to 375°F (190°C). This allows the peppers to roast perfectly, becoming tender and flavorful as they cook.
- Prepare the Peppers: While the oven is heating, wash the bell peppers and slice the tops off. Remove the seeds and membranes inside. If necessary, trim the bottom slightly so they can stand upright. Place the prepared peppers in a baking dish.
- Sauté the Vegetables: In a large skillet, heat the olive oil over medium heat. Add the chopped onion and sauté for about 3-4 minutes until translucent. Then, add the minced garlic and chopped spinach, cooking for an additional 2-3 minutes until the spinach is wilted.
- Mix the Filling: In a large mixing bowl, combine the sautéed spinach and onion mixture with the cooked quinoa or rice, crumbled feta cheese, dried oregano, dried basil, and salt and pepper to taste. If you’re using pine nuts, add them at this stage. Mix everything thoroughly until well combined.
- Stuff the Peppers: Carefully spoon the filling into each of the prepared bell peppers, packing it down lightly to guarantee they’re full.
- Bake the Peppers: Cover the baking dish with aluminum foil and place it in the preheated oven. Bake for 25 minutes, then remove the foil and bake for an additional 10-15 minutes until the peppers are tender and the tops are slightly golden.
- Garnish and Serve: Once done, remove the stuffed peppers from the oven and let them cool for a few minutes. Garnish with freshly chopped parsley before serving. Enjoy your healthy Mediterranean meal!
Extra Tips: When cooking Spinach and Feta Stuffed Peppers, feel free to experiment with the filling by incorporating other ingredients such as sun-dried tomatoes or olives for added flavor.
Also, consider using a mix of different colored peppers for a more vibrant presentation. If you have leftovers, these stuffed peppers can be stored in an airtight container in the fridge for up to three days, making them great for meal prep or quick lunches.
Citrus and Olive Oil Cake

Citrus and Olive Oil Cake is a delightful dessert that beautifully embodies the essence of Mediterranean cuisine, showcasing the vibrant flavors of fresh citrus fruits combined with the rich, fruity notes of high-quality olive oil. This cake is moist, fragrant, and surprisingly light, making it a perfect ending to any meal.
The use of olive oil not only lends a unique flavor but also contributes to the cake’s tender crumb, while the citrus adds a revitalizing zing that brightens every bite. This cake is incredibly easy to prepare and can be enjoyed on its own or served with a dollop of whipped cream or a scoop of yogurt for added indulgence.
It’s a great option for gatherings, as it serves 4-6 people, making it perfect for family dinners or a small celebration. The combination of citrus zest and juice gives the cake a delightful aroma and taste that will leave your guests asking for seconds.
Ingredients (Serves 4-6 People)
- 1 cup olive oil
- 1 cup granulated sugar
- 3 large eggs
- Zest of 1 lemon
- Zest of 1 orange
- 1/2 cup fresh orange juice
- 1/2 cup fresh lemon juice
- 2 cups all-purpose flour
- 2 teaspoons baking powder
- 1/2 teaspoon sea salt
- Powdered sugar (for dusting, optional)
Cooking Instructions
1. Preheat the Oven: Begin by preheating your oven to 350°F (175°C). This guarantees that the cake bakes evenly and achieves the perfect texture.
2. Prepare the Cake Pan: Grease a 9-inch round cake pan with olive oil and line the bottom with parchment paper. This will help prevent the cake from sticking to the pan and make it easier to remove once baked.
3. Mix Wet Ingredients: In a large mixing bowl, combine the olive oil and granulated sugar. Whisk them together until the mixture is well combined and slightly frothy.
Then, add the eggs one at a time, whisking well after each addition. Incorporate the lemon and orange zest, followed by the fresh orange and lemon juice, mixing until smooth.
4. Combine Dry Ingredients: In a separate bowl, whisk together the all-purpose flour, baking powder, and sea salt. This helps to evenly distribute the baking powder and salt throughout the flour before combining it with the wet ingredients.
5. Combine Mixtures: Gradually add the dry mixture to the wet ingredients, stirring gently with a spatula or wooden spoon until just combined. Be careful not to overmix, as this can lead to a dense cake.
6. Pour into Pan: Pour the batter into the prepared cake pan, smoothing the top with a spatula. Give the pan a gentle tap on the counter to remove any air bubbles.
7. Bake the Cake: Place the cake pan in the preheated oven and bake for about 30-35 minutes, or until a toothpick inserted into the center comes out clean. Keep an eye on the cake towards the end of the baking time to prevent overbaking.
8. Cool the Cake: Once baked, remove the cake from the oven and allow it to cool in the pan for about 10 minutes.
Then, gently run a knife around the edges, invert the cake onto a wire rack, and let it cool completely.
9. Serve: Once cooled, dust the top of the cake with powdered sugar if desired, and cut into slices to Serve. Enjoy this revitalizing dessert on its own or with a side of whipped cream or yogurt.
Extra Tips
For the best flavor, use high-quality extra virgin olive oil, as it will greatly enhance the taste of the cake. Additionally, feel free to experiment with different citrus fruits like grapefruit or lime for a unique twist.
If you prefer a sweeter cake, you can increase the sugar slightly, or for added texture, consider folding in some chopped nuts or dried fruits into the batter. This cake also keeps well in an airtight container for several days, making it a great make-ahead dessert!
Tabouli Salad With Fresh Herbs
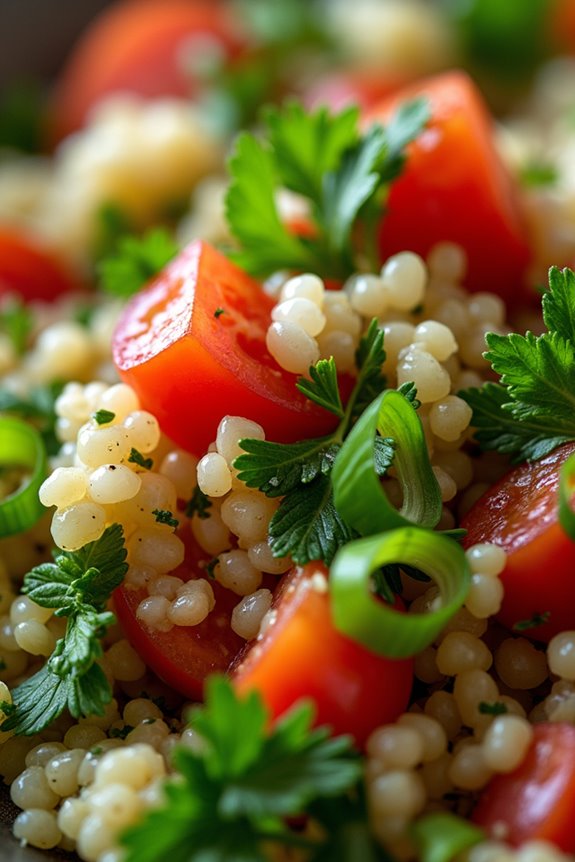
Tabouli salad is a vibrant and invigorating dish that originates from the Mediterranean region, particularly Lebanon and Syria. This salad isn’t only packed with flavor but also loaded with nutrients from fresh herbs, tomatoes, and the wholesome goodness of bulgur wheat.
Often served as a side dish or a light meal, tabouli is perfect for warm weather gatherings and can be easily prepared in advance, making it a versatile addition to your meal prep.
The key to a great tabouli salad lies in the quality and freshness of the ingredients used. The combination of parsley, mint, and lemon juice creates a bright flavor profile that’s both revitalizing and satisfying.
This salad is high in fiber and vitamins, making it a healthy choice for anyone looking to incorporate more plant-based meals into their diet. Enjoy it as a side with grilled meats, or savor it on its own with some pita bread for a delightful and nutritious meal.
Ingredients (Serves 4-6)
- 1 cup bulgur wheat
- 2 cups boiling water
- 1 large bunch of parsley, finely chopped
- 1/2 cup fresh mint leaves, finely chopped
- 2 medium tomatoes, diced
- 1/4 cup green onions, chopped
- 1/4 cup olive oil
- 1/4 cup freshly squeezed lemon juice
- Salt and pepper to taste
Cooking Instructions
1. Prepare the Bulgur: Start by placing the bulgur wheat in a large mixing bowl. Pour the boiling water over the bulgur and cover the bowl with a lid or plastic wrap. Allow it to sit for about 20-30 minutes until the bulgur absorbs the water and becomes tender.
Once done, fluff the bulgur with a fork to separate the grains.
2. Chop the Fresh Herbs: While the bulgur is soaking, rinse and dry the parsley and mint. Using a sharp knife, finely chop the parsley, making sure to remove any thick stems.
Do the same with the mint leaves. Aim for a fine chop to release their flavors into the salad.
3. Dice the Vegetables: Next, wash the tomatoes and green onions. Dice the tomatoes into small cubes and chop the green onions, keeping both the white and green parts for added flavor and color.
Set the chopped vegetables aside.
4. Combine Ingredients: In the bowl with the fluffed bulgur, add the chopped parsley, mint, diced tomatoes, and green onions. This combination of ingredients will create a colorful and appetizing salad.
5. Dress the Salad: In a separate small bowl, whisk together the olive oil, lemon juice, salt, and pepper. Pour this dressing over the bulgur and vegetable mixture.
Gently toss everything together until all ingredients are well combined and coated with the dressing.
6. Chill and Serve: For the best flavor, cover the salad and let it chill in the refrigerator for at least 30 minutes before serving. This allows the flavors to meld together.
Serve chilled or at room temperature, and enjoy your healthy tabouli salad!
Extra Tips
When making tabouli, it’s important to use fresh herbs for the best flavor. If you can’t find bulgur wheat, quinoa or couscous can be used as alternatives, though the texture will differ slightly.
Additionally, feel free to adjust the lemon juice and olive oil according to your taste preferences. For a more colorful twist, consider adding diced cucumber or bell peppers.
Leftovers can be stored in an airtight container in the fridge for a couple of days, making this dish not only delicious but also convenient for meal planning.