

Flaky Mediterranean appetizers are the ultimate crowd-pleasers that every gathering needs. They’re those bite-sized delights that disappear as quickly as they’re served. With recipes like spanakopita and tiropita, you can’t go wrong. Their enchanting mix of textures and flavors is always a hit. Let’s explore these irresistible recipes that will make your next event unforgettable.
Spanakopita
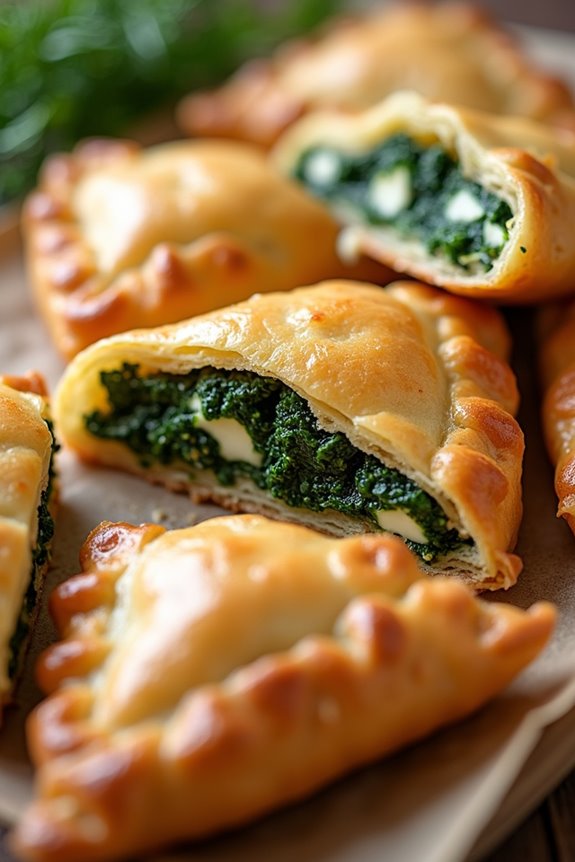
Spanakopita, a delicious Greek pastry, is a fantastic appetizer that showcases the flavors of the Mediterranean. This dish is primarily made with phyllo dough, fresh spinach, and a mix of herbs and cheese, creating a savory filling that’s both light and satisfying. The crispy, flaky texture of the phyllo contrasts beautifully with the creamy filling, making spanakopita a favorite in many households and restaurants alike.
Whether served at a gathering or as a delightful snack, these little triangles are bound to impress. Making spanakopita can be a rewarding experience, allowing you to enjoy the process of layering phyllo and crafting the perfect filling. The key to achieving that signature crunch is to guarantee the phyllo is adequately brushed with olive oil or melted butter before baking.
This recipe serves 4-6 people, making it perfect for sharing with friends and family at your next Mediterranean-themed gathering or simply as a delightful treat for yourself.
Ingredients:
- 1 package of phyllo dough (16 oz), thawed
- 1 pound fresh spinach, washed and chopped
- 1 cup ricotta cheese
- 1 cup feta cheese, crumbled
- 1/2 cup grated Parmesan cheese
- 1 medium onion, finely chopped
- 2 cloves garlic, minced
- 1/4 cup fresh dill, chopped (or 1 tablespoon dried dill)
- 1/4 cup fresh parsley, chopped
- 2 large eggs, beaten
- 1/2 cup olive oil or melted butter, for brushing
- Salt and pepper to taste
Cooking Instructions:
- Preheat the Oven: Begin by preheating your oven to 375°F (190°C). This guarantees that the spanakopita will bake evenly and become golden brown and crispy.
- Prepare the Filling: In a large skillet, heat a drizzle of olive oil over medium heat. Add the chopped onion and sauté until translucent, about 5 minutes. Stir in the minced garlic and cook for an additional minute. Add the chopped spinach and cook until wilted, about 3-4 minutes. Remove from heat and let it cool slightly.
- Combine the Ingredients: In a large mixing bowl, combine the sautéed spinach mixture with ricotta cheese, crumbled feta, grated Parmesan, chopped dill, parsley, and beaten eggs. Season with salt and pepper to taste. Mix well until all ingredients are evenly incorporated.
- Layer the Phyllo Dough: Unroll the phyllo dough and cover it with a damp kitchen towel to prevent it from drying out. Take one sheet of phyllo and place it on a clean surface. Brush the sheet lightly with olive oil or melted butter. Place another sheet on top and brush it again. Repeat this process for 4-5 sheets to create a sturdy base.
- Add the Filling: Spoon a portion of the spinach filling onto the edge of the layered phyllo, forming a line. Fold the sides over the filling, then roll the phyllo tightly to form a triangle. Brush the top with more olive oil or melted butter to promote browning. Repeat this with the remaining filling and phyllo sheets.
- Bake the Spanakopita: Arrange the filled triangles on a baking sheet lined with parchment paper. Bake in the preheated oven for about 25-30 minutes, or until golden brown and crispy.
- Serve: Once baked, remove the spanakopita from the oven and let them cool slightly before serving. They can be enjoyed warm or at room temperature.
Extra Tips:
When working with phyllo dough, it’s essential to keep the sheets covered with a damp towel to prevent them from drying out, which can make them brittle and difficult to work with.
If you have leftover filling, consider making mini spanakopita or using it in other dishes such as omelets or stuffed peppers. For added flavor, feel free to experiment with spices like nutmeg or add other greens such as Swiss chard or kale to the filling. Enjoy your delicious homemade spanakopita!
Baklava Bites
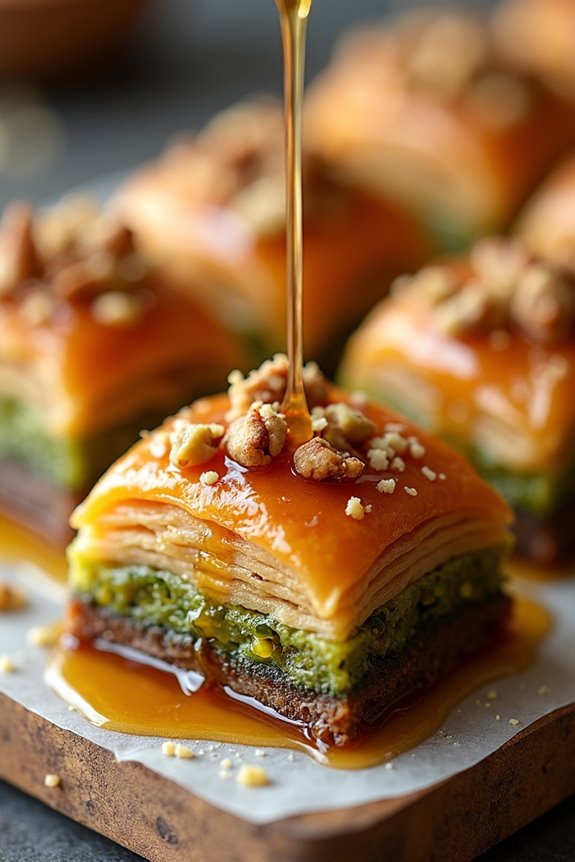
Baklava is a classic Mediterranean dessert that consists of layers of flaky phyllo pastry filled with a mixture of chopped nuts and sweetened with syrup or honey. While traditional baklava is often made in large sheets and cut into diamond shapes, these Baklava Bites offer a delightful twist on the classic recipe. Perfect for parties or gatherings, these bite-sized treats are easy to make and even easier to enjoy. With their sweet and nutty flavors, they’re bound to impress your guests and leave them craving more.
These Baklava Bites capture the essence of traditional baklava but with a fun, modern presentation. The delicate layers of phyllo pastry are filled with a rich mixture of nuts and spices, then baked until golden and crisp. Finally, they’re drizzled with a fragrant honey syrup that adds a touch of sweetness and a beautiful sheen. Follow this simple recipe to create a delicious Mediterranean appetizer that’s both elegant and satisfying.
Ingredients (Serves 4-6):
- 1 package (16 oz) phyllo dough, thawed
- 1 cup unsalted butter, melted
- 1 cup walnuts, finely chopped
- 1 cup pistachios, finely chopped
- 1 teaspoon ground cinnamon
- 1 cup honey
- ½ cup granulated sugar
- 1 cup water
- 1 teaspoon vanilla extract
- 1 tablespoon lemon juice
Cooking Instructions:
- Prepare the Phyllo Dough: Begin by preheating your oven to 350°F (175°C). Take the phyllo dough out of the package and carefully unroll it. Cover the sheets with a damp kitchen towel to prevent them from drying out while you work. You’ll need to layer several sheets for the base of your Baklava Bites.
- Make the Nut Filling: In a mixing bowl, combine the finely chopped walnuts, pistachios, and ground cinnamon. Mix well to ascertain that the nuts are evenly coated with the cinnamon. This nut mixture will give your Baklava Bites a flavorful and crunchy filling.
- Assemble the Baklava Bites: Take one sheet of phyllo dough and brush it lightly with melted butter. Place another sheet on top and brush it again with butter. Repeat this process with 4-5 sheets to create a sturdy base. Cut the layered phyllo into squares or rectangles (about 3 inches each). Place a spoonful of the nut mixture in the center of each square, then fold the corners over to form a pocket. Brush the top with more melted butter and place the bites on a baking sheet lined with parchment paper.
- Bake the Bites: Once all the Baklava Bites are assembled, place the baking sheet in the preheated oven. Bake for 20-25 minutes or until the bites are golden brown and crispy. Keep an eye on them to guarantee they don’t burn.
- Prepare the Honey Syrup: While the Baklava Bites are baking, prepare the honey syrup. In a small saucepan, combine honey, granulated sugar, water, vanilla extract, and lemon juice. Bring the mixture to a boil, then reduce the heat and let it simmer for about 10 minutes, stirring occasionally until the sugar has dissolved and the syrup thickens slightly.
- Drizzle the Syrup: Once the Baklava Bites are done baking, remove them from the oven and let them cool slightly. Drizzle the warm honey syrup generously over the bites, allowing it to soak in for a few minutes before serving.
Extra Tips: To elevate the flavor of your Baklava Bites, consider adding a pinch of nutmeg to the nut filling or using a mix of different nuts such as almonds or hazelnuts. Additionally, you can garnish the bites with a sprinkle of chopped nuts or a dusting of powdered sugar for an elegant presentation. Be sure to store any leftovers in an airtight container to keep them fresh and delicious!
Stuffed Grape Leaves
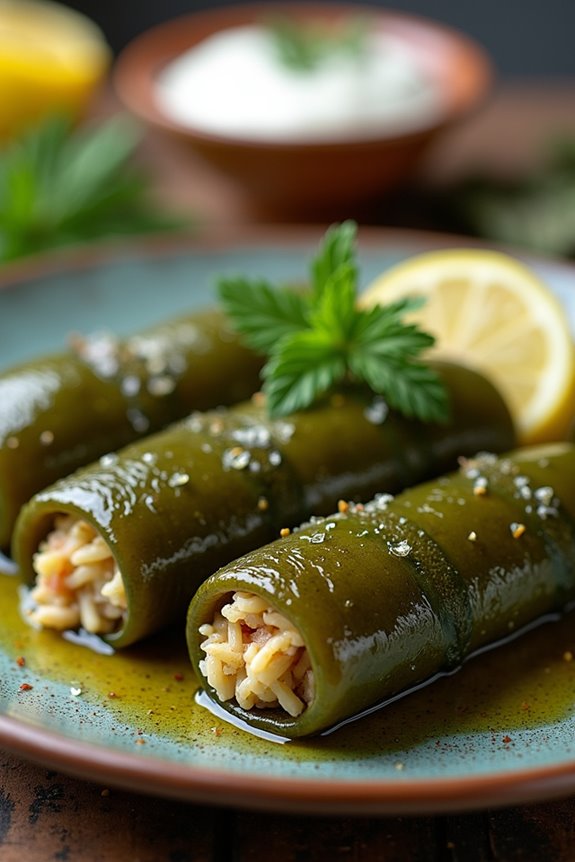
Stuffed grape leaves, also known as Dolmas, are a delightful Mediterranean appetizer that brings a burst of flavor and a touch of tradition to your dining experience. These delicious parcels are typically filled with a mixture of rice, herbs, and spices, all wrapped snugly in tender grape leaves. They can be served warm or cold and are often accompanied by a drizzle of lemon juice or a side of yogurt for dipping. Perfect for gatherings, they aren’t only a treat for the taste buds but also a feast for the eyes.
Making stuffed grape leaves may seem intimidating, but with a little patience, you can create a dish that’s sure to impress your family and friends. The balance of flavors from the lemon, herbs, and spices meld wonderfully with the rice, making each bite a delightful experience. This recipe yields enough for 4-6 people, making it an ideal choice for a small gathering or as part of a larger Mediterranean spread.
Ingredients (Serves 4-6):
- 1 jar (16 oz) grape leaves, drained and rinsed
- 1 cup long-grain rice
- 1 large onion, finely chopped
- 2 cloves garlic, minced
- 1/4 cup fresh parsley, chopped
- 1/4 cup fresh dill, chopped
- 1/4 cup fresh mint, chopped
- 1/4 cup olive oil
- 1 lemon, juiced
- 1 teaspoon salt
- 1/2 teaspoon black pepper
- 1/2 teaspoon cinnamon
- 2 cups vegetable broth or water
- Optional: 1/2 cup pine nuts or currants for added flavor
Cooking Instructions:
- Prepare the Filling: In a large skillet, heat 2 tablespoons of olive oil over medium heat. Add the chopped onion and sauté until soft and translucent, about 5-7 minutes. Stir in the minced garlic and cook for an additional minute until fragrant.
- Add Rice and Herbs: Add the rice to the skillet and stir to coat it in the oil. Then, add the parsley, dill, mint, salt, black pepper, and cinnamon. Mix thoroughly and cook for another 2-3 minutes, allowing the rice to toast slightly. Remove the skillet from heat and let the mixture cool for a few minutes.
- Prepare the Grape Leaves: Lay a grape leaf on a flat surface, vein side up. Place about 1 tablespoon of the rice mixture at the base of the leaf. Fold the sides over the filling and then roll it up tightly from the bottom to the top, creating a small bundle. Repeat this process until all the filling is used.
- Arrange in Pot: Place the stuffed grape leaves seam side down in a large pot. Pack them closely together to prevent them from unrolling during cooking. If desired, you can layer leftover grape leaves on top of the stuffed ones.
- Cook the Grape Leaves: In a separate bowl, combine the remaining olive oil, lemon juice, and vegetable broth or water. Pour this mixture over the stuffed grape leaves, ensuring they’re mostly covered. Place a heavy plate on top to keep them submerged and bring the liquid to a boil over medium-high heat. Once boiling, reduce to low heat, cover, and simmer for about 45 minutes to 1 hour, or until the rice is tender.
- Serve: Once cooked, let the grape leaves cool slightly before serving. They can be enjoyed warm or at room temperature. Drizzle with additional lemon juice or serve with a side of yogurt for dipping.
Extra Tips:
When making stuffed grape leaves, make sure to choose tender grape leaves that aren’t too thick, as they’ll be easier to roll. If you can’t find fresh grape leaves, jarred ones work perfectly fine; just be sure to rinse them well to remove excess salt.
For added flavor, consider incorporating some pine nuts or currants into the filling. Finally, if you have leftovers, they store well in the refrigerator and can be enjoyed cold the next day, making them a fantastic make-ahead appetizer.
Cheese Bougatsa

Cheese Bougatsa is a delectable pastry that hails from the rich culinary traditions of the Mediterranean, particularly Greece. This delightful dish features a flaky phyllo pastry enveloping a creamy cheese filling, making it the perfect appetizer for any occasion.
Whether served warm or at room temperature, Cheese Bougatsa is guaranteed to impress your guests with its irresistible texture and flavor.
Making Cheese Bougatsa is a straightforward process that allows you to experience the joy of working with phyllo pastry. While it may seem intimidating at first, once you get the hang of layering the delicate sheets, you’ll appreciate how rewarding it’s to create this dish.
Ideal for gatherings or as a special treat, Cheese Bougatsa brings a taste of the Mediterranean to your table.
Ingredients (Serves 4-6)
- 1 package of phyllo dough (about 16 oz), thawed
- 1 cup ricotta cheese
- 1 cup feta cheese, crumbled
- 1 large egg
- 1/4 cup grated Parmesan cheese
- 1/4 cup fresh parsley, chopped
- Salt and pepper to taste
- 1/2 cup unsalted butter, melted
- Powdered sugar (optional, for serving)
Cooking Instructions
1. Prepare the Filling: In a large mixing bowl, combine the ricotta cheese, crumbled feta cheese, egg, grated Parmesan cheese, chopped parsley, salt, and pepper. Mix well until all the ingredients are thoroughly combined and the mixture is creamy.
This filling will provide a rich, savory flavor that complements the flaky pastry.
2. Preheat the Oven: Preheat your oven to 375°F (190°C). This will guarantee that your Cheese Bougatsa bakes evenly and reaches a perfect golden-brown color.
3. Prepare the Phyllo Dough: Carefully unroll the thawed phyllo dough and cover it with a damp kitchen towel to prevent it from drying out.
Take one sheet of phyllo dough and place it on a clean work surface. Brush the sheet lightly with melted butter. Layer another sheet on top and brush it with butter again. Repeat this process until you have about 6-8 layers.
4. Assemble the Bougatsa: Place a generous amount of the cheese filling along one edge of the layered phyllo dough, leaving some space at the sides. Fold the edges over the filling and then roll the phyllo tightly to form a cylinder.
Brush the top of the rolled bougatsa with more melted butter to help it crisp up during baking.
5. Repeat the Process: Continue this process with the remaining phyllo sheets and cheese filling until all the filling is used. Arrange the bougatsa on a baking sheet lined with parchment paper, ensuring they’re spaced evenly.
6. Bake: Place the baking sheet in the preheated oven and Bake for approximately 25-30 minutes, or until the Bougatsa is golden brown and crispy.
Keep an eye on them to avoid burning, and rotate the sheet halfway through baking if necessary.
7. Serve: Once baked, remove the Bougatsa from the oven and let them cool for a few minutes. If desired, sprinkle with powdered sugar before serving for an added touch of sweetness.
Cut into pieces and enjoy warm or at room temperature.
Extra Tips
When working with phyllo dough, it’s essential to keep it covered with a damp towel as it dries out quickly and becomes difficult to work with.
Also, feel free to experiment with different cheeses or add herbs and spices to the filling to customize the flavor according to your preference.
Cheese Bougatsa can also be made ahead of time and frozen before baking; just adjust the baking time if baking from frozen, adding a few extra minutes until golden and crisp.
Enjoy this delightful Mediterranean dish with friends and family for a truly memorable appetizer!
Zucchini Fritters

Zucchini fritters are a delightful Mediterranean appetizer that showcases the fresh flavors of summer. These crispy, golden-brown bites aren’t only easy to prepare but also versatile enough to serve as a side dish or a light snack. Made with grated zucchini, herbs, and a touch of cheese, these fritters are guaranteed to impress your family and guests alike.
Whether paired with a tangy yogurt dip or enjoyed on their own, zucchini fritters bring a burst of flavor to any meal. To make the perfect zucchini fritters, it’s important to choose fresh, firm zucchinis. The key to achieving a crispy texture lies in removing excess moisture from the grated zucchini before mixing it with the other ingredients.
This recipe isn’t only gluten-free but also packed with nutrients, making it a guilt-free indulgence that can be enjoyed any time of the year.
Ingredients (Serves 4-6)
- 2 medium zucchinis
- 1 teaspoon salt
- 1 cup all-purpose flour (or gluten-free flour)
- 1/2 cup grated Parmesan cheese
- 2 large eggs
- 1/4 cup chopped fresh parsley
- 2 cloves garlic, minced
- 1/4 teaspoon black pepper
- 1/4 teaspoon red pepper flakes (optional)
- Olive oil for frying
Cooking Instructions
1. Prepare the Zucchini: Start by washing the zucchinis thoroughly. Grate them using a box grater or a food processor. Place the grated zucchini in a clean kitchen towel or cheesecloth and sprinkle with salt. Let it sit for about 10-15 minutes to draw out excess moisture.
Afterward, wring out the towel to remove as much liquid as possible.
2. Mix Ingredients: In a large mixing bowl, combine the drained zucchini, flour, grated Parmesan cheese, eggs, chopped parsley, minced garlic, black pepper, and red pepper flakes if using. Stir everything together until well combined. The mixture should be thick enough to hold its shape when formed into patties.
3. Heat the Oil: In a large skillet, pour enough olive oil to cover the bottom of the pan (about 1/4 inch deep) and heat it over medium heat until it’s shimmering. You can test if the oil is ready by dropping a small amount of the fritter mixture into the pan; it should sizzle immediately.
4. Form the Fritters: Using a tablespoon or your hands, scoop out portions of the mixture and form them into patties about 1/2 inch thick. Carefully place them in the hot oil, making sure not to overcrowd the pan. Fry in batches if necessary.
5. Cook Until Golden Brown: Fry the fritters for about 3-4 minutes on each side, or until they’re golden brown and crispy. Adjust the heat as needed to prevent burning. Once cooked, transfer the fritters to a paper towel-lined plate to absorb excess oil.
6. Serve: Serve the zucchini fritters warm, with a dollop of Greek yogurt or a tangy dipping sauce on the side. Enjoy!
Extra Tips
To enhance the flavor of your zucchini fritters, feel free to experiment with adding different herbs or spices such as dill, oregano, or even feta cheese for a Mediterranean twist.
Additionally, if you find the mixture too wet, you can add a bit more flour until you reach the desired consistency. For a healthier option, you can bake the fritters in the oven at 400°F (200°C) for about 20-25 minutes, flipping them halfway through to guarantee even browning. Enjoy your delicious homemade zucchini fritters!
Puff Pastry Pinwheels

Puff Pastry Pinwheels are a delightful Mediterranean appetizer that combines the flaky, buttery texture of puff pastry with a savory filling, making them a crowd-pleaser for any gathering.
These pinwheels are versatile and can be filled with a variety of ingredients, such as cheese, spinach, sun-dried tomatoes, or olives, allowing you to customize them to suit your taste. They’re easy to prepare, and their elegant presentation will impress your guests, making them perfect for parties, picnics, or casual family dinners.
To achieve the perfect pinwheel, the quality of your puff pastry is key. You can either use store-bought puff pastry for convenience or make your own if you have the time. The filling can be tailored to your liking, whether you prefer a classic combination or something more adventurous.
These Puff Pastry Pinwheels can be served warm or at room temperature, making them a versatile addition to your Mediterranean appetizer repertoire.
Ingredients (serving size: 4-6 people):
- 1 sheet of puff pastry (thawed if frozen)
- 1 cup fresh spinach, chopped
- ½ cup feta cheese, crumbled
- ½ cup sun-dried tomatoes, chopped (drained if packed in oil)
- ¼ cup black olives, pitted and sliced
- 1 egg (beaten, for egg wash)
- 1 teaspoon dried oregano
- Salt and pepper, to taste
Cooking Instructions:
- Preheat the Oven: Begin by preheating your oven to 400°F (200°C). This will guarantee that your pinwheels bake evenly and achieve a golden, flaky texture.
- Prepare the Puff Pastry: On a lightly floured surface, roll out the thawed puff pastry sheet to smooth it out. Make sure it’s approximately 12 inches by 12 inches. This will provide a nice base for your filling and guarantee even cooking.
- Mix the Filling: In a mixing bowl, combine the chopped spinach, crumbled feta cheese, chopped sun-dried tomatoes, sliced black olives, dried oregano, salt, and pepper. Stir until all ingredients are well mixed, creating a flavorful filling for your pinwheels.
- Spread the Filling: Evenly spread the filling mixture over the surface of the rolled-out puff pastry, leaving about a ½-inch border along the edges. This will help guarantee that the filling stays inside when you roll the pastry.
- Roll the Pastry: Starting from one edge, carefully roll the puff pastry tightly to form a log shape. Make sure to roll it evenly to avoid gaps in the filling. Once rolled, pinch the edges to seal them.
- Slice the Pinwheels: Using a sharp knife, slice the rolled pastry into 1-inch thick pieces. You should get about 10-12 pinwheels. Arrange them cut side up on a parchment-lined baking sheet.
- Apply Egg Wash: Brush the tops of the pinwheels with the beaten egg using a pastry brush. This will give them a beautiful golden color when baked.
- Bake the Pinwheels: Place the baking sheet in the preheated oven and bake for 15-20 minutes, or until the pinwheels are puffed and golden brown. Keep an eye on them to prevent burning.
- Cool and Serve: Once done, remove the pinwheels from the oven and let them cool for a few minutes before serving. Enjoy them warm or at room temperature.
Extra Tips: When preparing Puff Pastry Pinwheels, feel free to experiment with different fillings based on your preferences. You can add cooked meats, different cheeses, or even herbs for added flavor.
Additionally, if you have leftover pinwheels, they can be stored in an airtight container in the refrigerator for up to two days. Reheat them in a warm oven to regain their flakiness before serving again.
Feta and Spinach Rolls
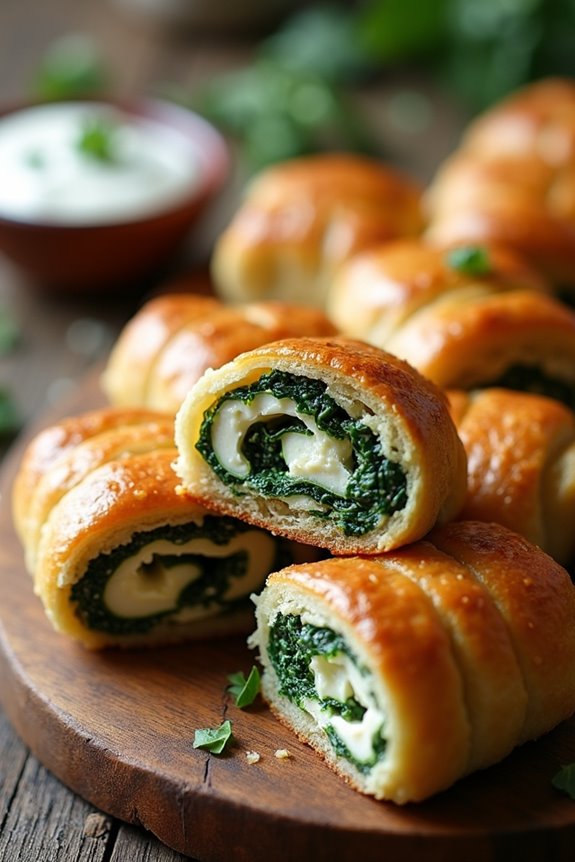
Feta and Spinach Rolls are a delightful Mediterranean appetizer that brings together the rich flavors of feta cheese and the vibrant taste of spinach, all wrapped in a crispy pastry shell. These rolls are perfect for entertaining guests or as a snack for a cozy night in. The combination of creamy feta and fresh spinach makes for a delectable filling that’s both savory and satisfying.
Whether served warm or at room temperature, these rolls are guaranteed to be a hit at any gathering. This dish isn’t only delicious but also simple to prepare, making it an excellent choice for both novice cooks and experienced chefs alike. The flaky texture of the pastry, paired with the rich, cheesy filling, creates a delightful contrast that will leave everyone wanting more.
Serve them with a side of tzatziki sauce or a drizzle of olive oil for an extra burst of flavor!
Ingredients (Serves 4-6):
- 1 package of phyllo dough (approximately 16 oz)
- 1 cup fresh spinach, chopped
- 1 cup feta cheese, crumbled
- 1/2 cup ricotta cheese
- 1/4 cup grated Parmesan cheese
- 2 tablespoons olive oil
- 1 egg, beaten (for egg wash)
- 1 teaspoon dried oregano
- Salt and pepper to taste
Cooking Instructions:
1. Prepare the Filling: In a large mixing bowl, combine the chopped spinach, crumbled feta cheese, ricotta cheese, grated Parmesan cheese, dried oregano, salt, and pepper. Mix well until all ingredients are fully combined. This filling is the heart of the rolls, so make sure the flavors are well balanced.
2. Thaw the Phyllo Dough: If using frozen phyllo dough, be sure to thaw it overnight in the refrigerator or at room temperature for a few hours. Once thawed, carefully unroll the dough and cover it with a damp kitchen towel to prevent it from drying out while you work.
3. Assemble the Rolls: Take one sheet of phyllo dough and brush it lightly with olive oil using a pastry brush. Lay another sheet on top and brush it with olive oil as well. Cut the layered phyllo into strips approximately 3 inches wide. Place a tablespoon of the spinach and feta filling at one end of a strip. Fold the side edges over the filling and roll it up tightly to form a roll.
Repeat this process until all the filling is used.
4. Preheat the Oven: Preheat your oven to 375°F (190°C). This will guarantee that the rolls bake evenly and become golden and crispy.
5. Prepare for Baking: Place the assembled rolls on a baking sheet lined with parchment paper. Brush the tops of the rolls with the beaten egg to give them a beautiful golden color as they bake.
6. Bake the Rolls: Bake the Rolls in the preheated oven for 20-25 minutes, or until they’re golden brown and crispy. Keep an eye on them to avoid burning, as oven temperatures can vary.
7. Serve: Once baked, remove the rolls from the oven and let them cool slightly before serving. They can be enjoyed warm or at room temperature.
Extra Tips:
For added flavor, consider incorporating herbs such as dill or fresh parsley into the filling. You can also experiment with different types of cheese if feta isn’t your preference.
When working with phyllo dough, be mindful of its delicate nature; if it tears, simply patch it with another piece of dough. Additionally, these rolls freeze well, so you can prepare a batch ahead of time and bake them straight from the freezer, adding a couple of extra minutes to the baking time.
Enjoy your Feta and Spinach Rolls!
Tomato and Feta Tart
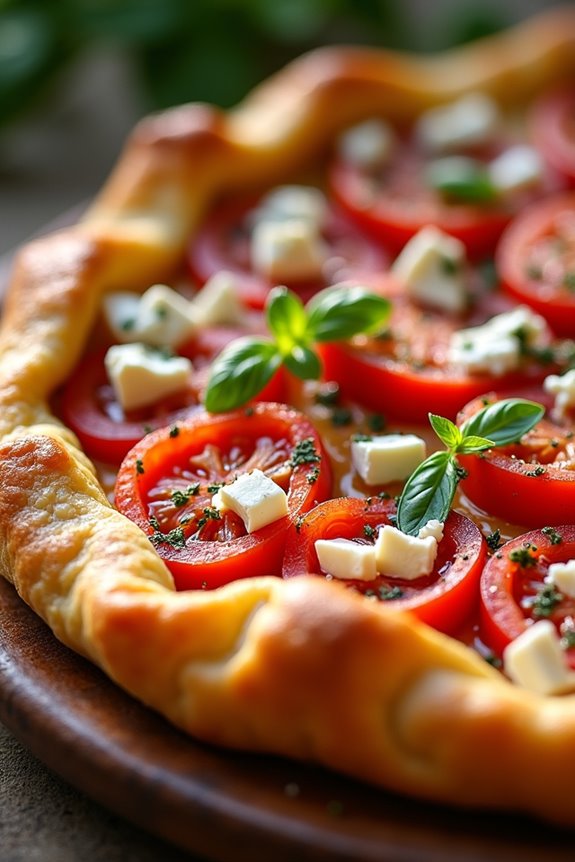
Tomato and Feta Tart is a delightful Mediterranean appetizer that combines the rich flavors of ripe tomatoes and tangy feta cheese encased in a flaky pastry. This dish not only captures the essence of summer with its vibrant colors and fresh ingredients but also makes for an elegant addition to any gathering or dinner party.
The tart is easy to prepare, yet its impressive presentation will leave your guests thinking you spent hours in the kitchen. This savory tart is perfect for serving as an appetizer or a light lunch, paired with a crisp salad. The combination of buttery pastry, juicy tomatoes, and creamy feta creates a delicious balance of flavors that will have everyone coming back for seconds.
Whether you use store-bought pastry or make your own, this Tomato and Feta Tart is bound to impress.
Ingredients (Serves 4-6):
- 1 sheet of puff pastry (thawed)
- 4 medium ripe tomatoes, sliced
- 200g feta cheese, crumbled
- 1 tablespoon olive oil
- 1 teaspoon dried oregano
- 1 tablespoon fresh basil, chopped (optional)
- Salt and pepper to taste
- 1 egg (for egg wash)
Cooking Instructions:
- Preheat the Oven: Begin by preheating your oven to 200°C (400°F). This guarantees that the pastry will puff up beautifully and become golden brown while baking.
- Prepare the Pastry Base: Roll out the thawed puff pastry on a lightly floured surface to fit a tart pan (approximately 9 inches in diameter). Transfer the pastry into the tart pan, pressing it gently into the edges. Trim any excess pastry hanging over the edges. This will form the base of your tart.
- Prick the Pastry: Using a fork, prick the base of the pastry several times. This prevents the pastry from puffing up too much during baking and helps it cook evenly.
- Add the Feta Cheese: Spread the crumbled feta cheese evenly over the pastry base. The feta will provide a creamy, rich flavor that complements the tomatoes.
- Layer the Tomatoes: Arrange the sliced tomatoes over the feta cheese in a circular pattern or any design you prefer. Overlap the slices slightly for a beautiful presentation. Sprinkle with salt, pepper, and dried oregano.
- Drizzle with Olive Oil: Drizzle the olive oil over the top of the tart. This adds moisture and richness, enhancing the flavors of the tomatoes and feta.
- Prepare the Egg Wash: In a small bowl, beat the egg and brush the edges of the pastry with it. This will give the tart a lovely golden finish as it bakes.
- Bake the Tart: Place the tart in the preheated oven and bake for about 25-30 minutes, or until the pastry is golden brown and the tomatoes are slightly roasted.
- Garnish and Serve: Once baked, remove the tart from the oven and let it cool for a few minutes. Before serving, sprinkle with fresh basil if desired. Slice into wedges and serve warm or at room temperature.
Extra Tips:
For an added layer of flavor, consider roasting the tomatoes beforehand to intensify their sweetness. Simply toss them in olive oil, salt, and pepper, and roast them at 180°C (350°F) for about 20 minutes before adding them to the tart.
You can also experiment with different types of cheese, such as goat cheese or mozzarella, for a unique twist on this classic dish. Enjoy your Tomato and Feta Tart!
Savory Meat Pies

Savory meat pies are a delightful Mediterranean appetizer that showcases a perfect blend of spices and flavors, wrapped in a flaky pastry. These pies aren’t only delicious but also versatile, allowing you to experiment with various types of meat, vegetables, and seasonings according to your preferences.
Traditionally, they’re enjoyed warm and can be served at gatherings, parties, or as a satisfying snack any time of day.
This recipe for savory meat pies will guide you through the process of creating these delectable treats from scratch. With a rich filling of spiced ground meat enveloped in golden, flaky pastry, these pies are sure to impress your family and friends.
Whether you’re hosting a Mediterranean-themed dinner or simply craving a savory snack, this dish is a perfect choice that brings the taste of the Mediterranean right to your table.
Ingredients (Serves 4-6):
- 1 pound ground beef or lamb
- 1 medium onion, finely chopped
- 2 cloves garlic, minced
- 1 teaspoon ground cumin
- 1 teaspoon ground coriander
- 1 teaspoon paprika
- 1/2 teaspoon cinnamon
- Salt and pepper to taste
- 1/4 cup fresh parsley, chopped
- 1/4 cup pine nuts (optional)
- 1 package of puff pastry (2 sheets)
- 1 egg, beaten (for egg wash)
Cooking Instructions:
1. Prepare the Filling: In a large skillet over medium heat, add a drizzle of olive oil and sauté the finely chopped onion until translucent, about 5 minutes.
Add the minced garlic and cook for an additional minute until fragrant. Incorporate the ground meat into the skillet and cook, breaking it apart with a spoon, until browned and cooked through, about 8-10 minutes. Drain excess fat if necessary.
2. Season the Mixture: Stir in the ground cumin, ground coriander, paprika, cinnamon, salt, and pepper to the meat mixture. Cook for another 2-3 minutes, allowing the spices to blend and release their flavors.
Remove from heat, and mix in the chopped parsley and pine nuts if using. Allow the filling to cool slightly.
3. Prepare the Pastry: Preheat your oven to 400°F (200°C). Roll out the puff pastry sheets on a lightly floured surface, and cut them into circles or squares, depending on the desired shape of the pies.
Each piece should be about 4-6 inches in diameter.
4. Assemble the Pies: Place a spoonful of the meat filling in the center of each pastry piece. Be careful not to overfill. Fold the pastry over to create a pocket, and use a fork to crimp the edges securely.
Transfer the assembled pies onto a parchment-lined baking sheet.
5. Brush and Bake: Brush the tops of the pies with the beaten egg to give them a golden color while baking. Bake in the preheated oven for 20-25 minutes or until the pastry is puffed and golden brown.
Remove from the oven and allow them to cool slightly before serving.
Extra Tips: For an authentic Mediterranean flavor, consider adding spices such as sumac or za’atar to the filling.
You can also experiment with different meats, such as chicken or turkey, or even make a vegetarian version using mushrooms and spinach. Serve the savory meat pies with a side of yogurt or tzatziki sauce for dipping, which complements the spices beautifully.
Enjoy the culinary journey as you savor these delicious bites!
Mediterranean Bruschetta

Mediterranean Bruschetta is a delightful and vibrant appetizer that perfectly captures the essence of the Mediterranean diet. This dish features toasted bread topped with a revitalizing mixture of tomatoes, garlic, basil, and olive oil, making it an ideal starter for any gathering. Not only is it simple to prepare, but it also bursts with flavor and color, appealing to both the eyes and the palate.
Whether you’re hosting a casual get-together or a more formal dinner party, Mediterranean Bruschetta is sure to impress your guests and leave them wanting more. The beauty of this dish lies in its versatility; you can adjust the toppings to suit your preferences or even add different ingredients such as feta cheese or olives for a unique twist.
Perfectly paired with a glass of red wine or a revitalizing cocktail, this bruschetta is both satisfying and light. It’s a classic Italian antipasto that has made its way into Mediterranean cuisine, celebrating the use of fresh, high-quality ingredients. Now, let’s explore the recipe and bring this delicious appetizer to your table!
Ingredients (Serves 4-6)
- 1 French baguette or Italian bread
- 4 medium ripe tomatoes, diced
- 3 cloves garlic, minced
- 1/4 cup fresh basil leaves, chopped
- 1/4 cup extra virgin olive oil
- 1 tablespoon balsamic vinegar
- Salt and pepper to taste
- Optional: Grated Parmesan cheese for topping
Cooking Instructions
- Prepare the Bread: Preheat your oven to 400°F (200°C). Slice the baguette or Italian bread into 1/2-inch thick slices. Arrange them on a baking sheet in a single layer. Brush lightly with olive oil on both sides, which will help achieve a crispy texture. Bake in the preheated oven for about 8-10 minutes, or until they’re golden brown and crispy. Remove from the oven and let them cool slightly.
- Make the Topping: In a medium bowl, combine the diced tomatoes, minced garlic, and chopped basil. These fresh ingredients are the highlight of the bruschetta and will provide a burst of flavor. Drizzle in the extra virgin olive oil and balsamic vinegar, then gently toss everything together. Season with salt and pepper to taste. Allow the mixture to sit for about 10 minutes to let the flavors meld.
- Assemble the Bruschetta: Once the bread has cooled slightly, it’s time to assemble your bruschetta. Spoon a generous amount of the tomato mixture onto each toasted slice of bread. Be sure to include some of the olive oil and juices from the bowl for extra flavor. If desired, sprinkle grated Parmesan cheese on top for an added touch of richness.
- Serve: Arrange the bruschetta on a serving platter and serve immediately while the bread is still warm. This dish is best enjoyed fresh, allowing the crunch of the bread to contrast with the juicy topping.
Extra Tips
For an enhanced flavor profile, consider grilling the bread instead of baking it for a smoky taste. You can also experiment with different toppings, such as adding diced cucumbers, sun-dried tomatoes, or even a drizzle of pesto for a unique twist.
To keep the bruschetta fresh, avoid assembling it too far in advance, as the bread can become soggy from the toppings. Enjoy this Mediterranean delight as a perfect start to any meal or as a standalone snack!
Eggplant Cigars
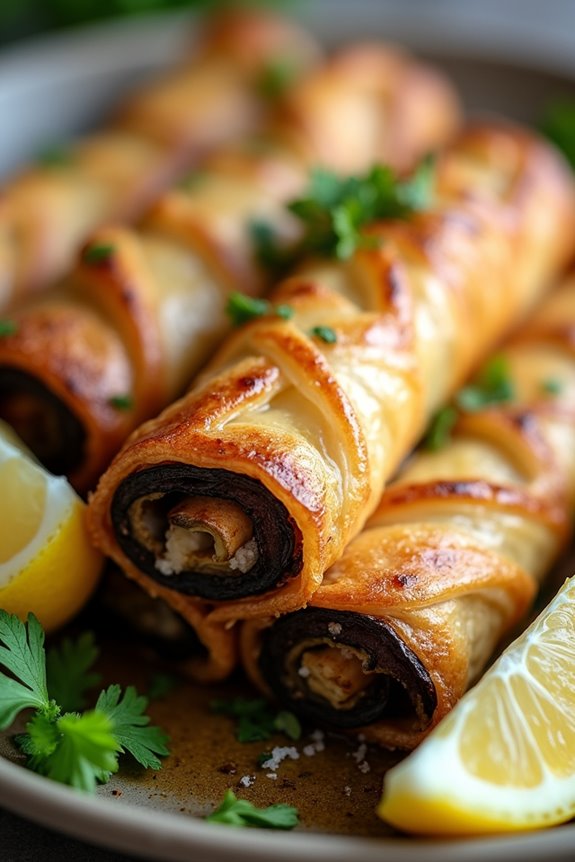
Eggplant Cigars are a delightful Mediterranean appetizer that combines the rich, smoky flavor of roasted eggplant with a savory filling, all wrapped up in a crispy shell. This dish isn’t only delicious but also visually appealing, making it a perfect addition to any gathering or meal. The combination of spices and herbs used in the filling brings out the eggplant’s natural sweetness while providing a burst of flavor in every bite.
These flavorful bites can be served hot or at room temperature, making them a versatile option for parties, picnics, or family dinners. With a crispy exterior and a soft, flavorful filling, Eggplant Cigars are sure to impress your guests and leave them wanting more. Follow the recipe below to create this Mediterranean delight that’s both simple and satisfying.
Ingredients (Serves 4-6):
- 2 medium eggplants
- 1 cup cooked quinoa or rice
- 1 small onion, finely chopped
- 2 cloves garlic, minced
- 1 teaspoon ground cumin
- 1 teaspoon ground coriander
- ½ teaspoon paprika
- ½ teaspoon salt
- ¼ teaspoon black pepper
- ½ cup feta cheese, crumbled
- ¼ cup fresh parsley, chopped
- 8-10 sheets of phyllo dough
- ½ cup olive oil, for brushing
- Lemon wedges, for serving (optional)
Cooking Instructions:
1. Prepare the Eggplants: Preheat your oven to 400°F (200°C). Slice the eggplants in half lengthwise and score the flesh with a knife in a crisscross pattern. Drizzle with olive oil and sprinkle with salt. Place them cut side down on a baking sheet and roast for about 25-30 minutes, or until the flesh is tender and slightly caramelized.
Once done, allow them to cool slightly before scooping out the flesh.
2. Make the Filling: In a skillet over medium heat, add a drizzle of olive oil and sauté the chopped onion until it becomes translucent. Add the minced garlic and cook for an additional minute until fragrant.
In a bowl, combine the roasted eggplant flesh, cooked quinoa or rice, sautéed onion and garlic, cumin, coriander, paprika, salt, black pepper, feta cheese, and parsley. Mix well to combine all the ingredients.
3. Assemble the Cigars: Lay out a sheet of phyllo dough on a clean surface and brush it lightly with olive oil. Place another sheet on top and brush with olive oil again. Cut the phyllo dough into strips (about 4 inches wide).
Take a tablespoon of the filling and place it at one end of each strip. Fold the sides over the filling and roll it up tightly to form a cigar shape. Repeat this process until all the filling is used.
4. Bake the Cigars: Preheat the oven to 375°F (190°C). Place the assembled eggplant cigars on a parchment-lined baking sheet, seam side down. Brush the tops with olive oil to guarantee they become golden and crispy.
Bake for about 20-25 minutes, or until they’re golden brown and crispy.
5. Serve: Remove from the oven and let cool slightly. Serve warm with lemon wedges on the side for an extra burst of flavor.
Extra Tips:
When making Eggplant Cigars, feel free to customize the filling to your taste preferences. You can add other vegetables like spinach or bell peppers, or substitute the feta cheese with another cheese of your choice.
If you’re looking for a gluten-free option, consider using corn tortillas instead of phyllo dough. Make sure to keep the phyllo covered with a damp cloth while you work to prevent it from drying out. Enjoy your cooking adventure!
Roasted Red Pepper Hummus Cups
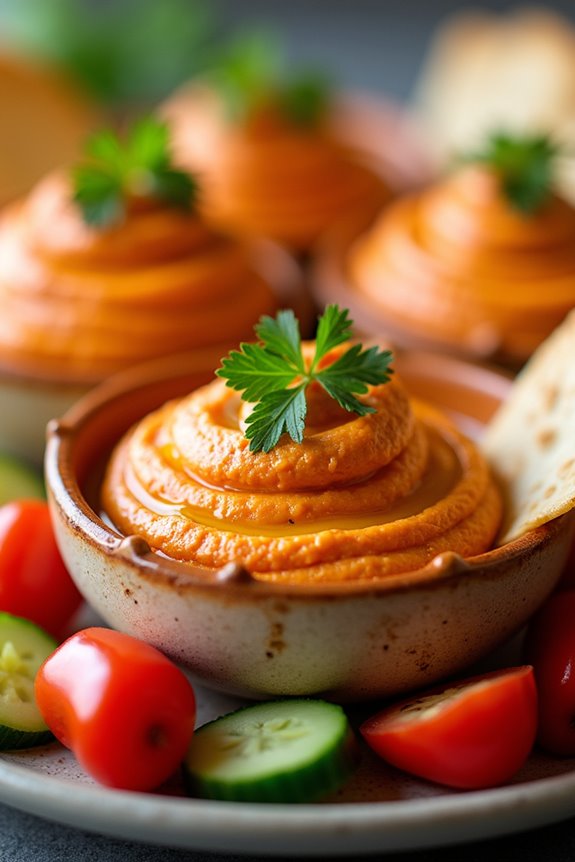
Roasted Red Pepper Hummus Cups are a vibrant and flavorful appetizer that perfectly embodies the essence of Mediterranean cuisine. This dish features a creamy hummus base made from roasted red peppers, tahini, garlic, and chickpeas, all beautifully served in individual cups or on bite-sized crackers.
They aren’t only easy to prepare but also make for an impressive presentation at any gathering, be it a festive dinner party or a casual get-together with friends.
The charm of these hummus cups lies in their versatility. You can customize them by adding your favorite toppings, such as fresh herbs, olives, or a drizzle of olive oil. They’re a healthy option, packed with nutrients, and are suitable for various dietary preferences, making them a fantastic choice for your next Mediterranean-themed feast.
Ingredients (Serves 4-6):
- 1 can (15 oz) chickpeas, drained and rinsed
- 1 cup roasted red peppers, jarred or homemade
- 1/4 cup tahini
- 2 tablespoons olive oil
- 2 cloves garlic, minced
- 1 tablespoon lemon juice
- 1/2 teaspoon ground cumin
- Salt and pepper to taste
- Pita chips or vegetable sticks, for serving
- Fresh parsley or cilantro, for garnish
Cooking Instructions:
- Prepare the Ingredients: Gather all the ingredients and verify they’re ready for use. Rinse the chickpeas under cold water and drain them to remove any excess liquid. If you’re using jarred roasted red peppers, drain the liquid and pat them dry with a paper towel.
- Blend the Hummus: In a food processor, combine the chickpeas, roasted red peppers, tahini, olive oil, minced garlic, lemon juice, ground cumin, salt, and pepper. Blend the mixture until smooth and creamy. You may need to stop and scrape down the sides of the bowl to confirm everything is mixed well.
- Taste and Adjust Seasoning: After blending, taste the hummus and adjust the seasoning if necessary. You can add more salt, pepper, or lemon juice to enhance the flavor according to your preference.
- Chill the Hummus: Transfer the hummus to a bowl or airtight container and refrigerate for at least 30 minutes. Chilling helps the flavors meld together and improves the overall taste.
- Assemble the Cups: Once the hummus is chilled, scoop it into individual serving cups or bowls. You can also serve it on a platter with pita chips or vegetable sticks arranged around the hummus.
- Garnish and Serve: Finish off the presentation by garnishing each cup with a sprinkle of fresh parsley or cilantro. Drizzle a little olive oil on top for an extra touch of flavor. Serve immediately and enjoy!
Extra Tips:
For an added layer of flavor, consider roasting your own red peppers by charring them over an open flame or in the oven until the skin is blistered. This enhances their sweetness and smokiness.
Additionally, if you prefer a thinner consistency for your hummus, you can add a tablespoon or two of cold water or extra olive oil while blending. Don’t hesitate to experiment with toppings like crumbled feta cheese, diced olives, or a dusting of paprika for a colorful and tasty finish.
Herb and Cheese Flatbreads
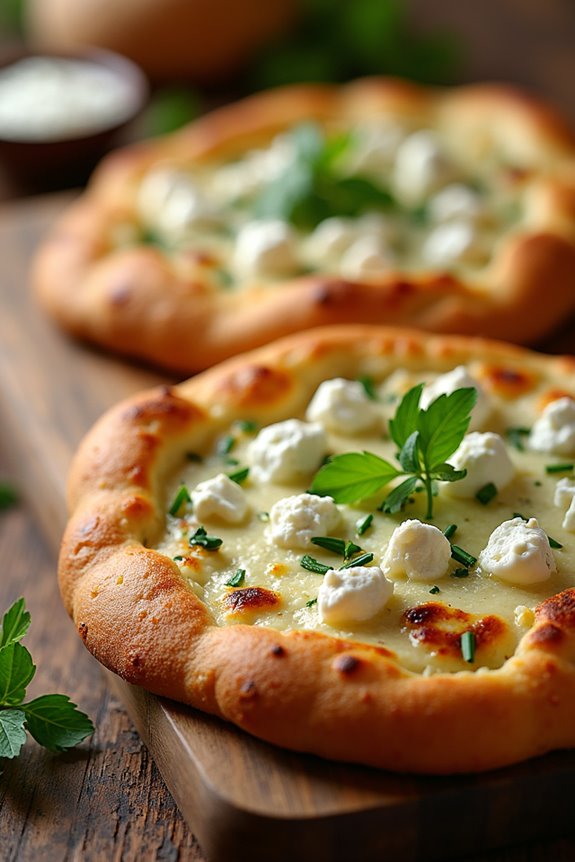
Herb and Cheese Flatbreads are a delightful and savory addition to any Mediterranean appetizer spread. These flatbreads are soft, chewy, and infused with aromatic herbs, making them perfect for dipping, spreading, or enjoying on their own. With a combination of fresh herbs and a blend of cheeses, they offer a burst of flavor that pairs wonderfully with olives, hummus, or a variety of dips. Ideal for gatherings or a cozy night in, these flatbreads are simple to make and sure to impress.
Making Herb and Cheese Flatbreads is a straightforward process that requires minimal ingredients, yet results in a dish that feels decadent. The dough comes together quickly, incorporating fresh herbs like rosemary and thyme, which elevate the flavor profile.
Once baked, the flatbreads achieve a lovely golden-brown crust, while the melted cheese creates a delightful gooey texture. Serve them warm for the best experience, and watch as they disappear from the table.
Ingredients (Serves 4-6)
- 2 cups all-purpose flour
- 1 teaspoon salt
- 1 teaspoon sugar
- 1 packet (2 ¼ teaspoons) active dry yeast
- ¾ cup warm water (about 110°F)
- 2 tablespoons olive oil
- 1 teaspoon dried oregano
- ½ teaspoon garlic powder
- 1 cup shredded mozzarella cheese
- ½ cup crumbled feta cheese
- 2 tablespoons fresh parsley, chopped
- 2 tablespoons fresh chives, chopped
Cooking Instructions
- Activate the Yeast: In a small bowl, combine the warm water, sugar, and yeast. Stir gently and let it sit for about 5-10 minutes until it becomes frothy. This indicates that the yeast is active and ready to be used.
- Prepare the Dough: In a large mixing bowl, combine the flour, salt, dried oregano, and garlic powder. Make a well in the center and pour in the activated yeast mixture along with the olive oil. Mix until the dough starts to come together.
- Knead the Dough: Transfer the dough onto a floured surface and knead for about 5-7 minutes until it’s smooth and elastic. If the dough is sticky, sprinkle a little more flour as needed. This step helps develop the gluten, resulting in a chewy flatbread.
- Let the Dough Rise: Place the kneaded dough in a greased bowl, cover it with a damp cloth or plastic wrap, and let it rise in a warm place for about 1 hour or until it doubles in size.
- Preheat the Oven: While the dough is rising, preheat your oven to 475°F (245°C). If you have a pizza stone, place it in the oven to heat as well, which will help create a crispy bottom for the flatbreads.
- Shape the Flatbreads: After the dough has risen, punch it down to release any air bubbles. Divide the dough into 4-6 equal pieces. Roll each piece out on a floured surface into a thin, oval shape.
- Add Cheese and Herbs: Place the rolled-out flatbreads on a baking sheet lined with parchment paper or directly on the hot pizza stone. Evenly sprinkle the shredded mozzarella and crumbled feta on top, along with the chopped parsley and chives.
- Bake: Bake the flatbreads in the preheated oven for about 10-12 minutes, or until the edges are golden brown and the cheese is melted and bubbly.
- Serve: Remove the flatbreads from the oven and let them cool for a minute. Cut into slices and serve warm with your favorite dips or as part of a Mediterranean appetizer spread.
Extra Tips
For an extra layer of flavor, consider brushing the flatbreads with a mixture of olive oil and minced garlic before baking. You can also experiment with different herbs and cheeses based on your preferences or what you have on hand.
If you’re preparing these flatbreads in advance, you can make the dough ahead of time and refrigerate it for up to 24 hours; just allow it to come to room temperature before rolling it out. Enjoy your Herb and Cheese Flatbreads fresh out of the oven for the best taste and texture!
Olive Tapenade Pastry Twists

Olive Tapenade Pastry Twists are a delightful way to bring the flavors of the Mediterranean to your appetizer table. This dish combines the rich, briny taste of olives with the flaky, buttery texture of puff pastry, making it a perfect finger food for gatherings or as a starter for a dinner party. The tapenade, which is a spread made from finely chopped olives, capers, and olive oil, adds a burst of flavor that pairs beautifully with the crispiness of the pastry twists.
Creating these twists isn’t only simple but also allows for a creative presentation that will impress your guests. The key to achieving the perfect pastry twist lies in the rolling technique and guaranteeing the dough is cold before baking. Serve them warm right out of the oven for an irresistible appetizer that will have everyone coming back for more.
Ingredients (Serves 4-6)
- 1 sheet of puff pastry, thawed
- 1 cup olive tapenade (store-bought or homemade)
- 1 egg, beaten (for egg wash)
- Flour, for dusting
- Sea salt, for sprinkling
- Fresh herbs (optional, for garnish)
Cooking Instructions
- Preheat the Oven: Begin by preheating your oven to 400°F (200°C). This guarantees that the pastry will puff up nicely and achieve a golden-brown color while baking.
- Prepare the Puff Pastry: On a lightly floured surface, roll out the thawed puff pastry sheet to smooth out any creases. Aim to maintain a rectangular shape, roughly 10×12 inches in size. If the dough is too warm and becomes difficult to work with, place it back in the refrigerator for a few minutes to chill.
- Spread the Tapenade: Evenly spread the olive tapenade over the entire surface of the puff pastry, leaving about a half-inch border around the edges. This helps prevent the tapenade from spilling out when twisting the pastry.
- Cut the Pastry: Using a sharp knife or a pizza cutter, slice the pastry into strips about 1 inch wide. You should have approximately 8-10 strips depending on the size of your pastry.
- Twist the Strips: Take each strip and hold both ends. Gently twist the strip in opposite directions to form a spiral shape. Place each twisted strip onto a baking sheet lined with parchment paper, leaving some space between each for expansion.
- Apply Egg Wash: Brush each twisted pastry with the beaten egg. This will give them a beautiful golden color as they bake. If desired, sprinkle a pinch of sea salt on top for added flavor.
- Bake the Pastry Twists: Place the baking sheet in the preheated oven and bake for 15-20 minutes, or until the twists are puffed and golden brown. Keep an eye on them to avoid over-baking.
- Serve Warm: Once baked, remove the pastry twists from the oven and let them cool slightly. Serve them warm, garnished with fresh herbs if desired.
Extra Tips
For an added twist to your Olive Tapenade Pastry Twists, consider mixing in some grated cheese, such as Parmesan or feta, into the tapenade for an extra layer of flavor.
Additionally, you can experiment with different types of olives to create your own unique tapenade blend. These pastry twists are best enjoyed fresh, but if you have leftovers, they can be reheated in the oven for a few minutes to regain their crispiness.