

I’ve been on a delightful journey exploring low carb Mediterranean recipes, and the flavors are truly amazing. Think of zucchini noodles with fresh pesto or a crisp Greek salad with juicy grilled chicken. These dishes are so flavorful that you won’t even miss the traditional carbs. I’m excited to share some of my favorite recipes that could transform your mealtime. Let’s get inspired and enjoy these delicious creations together!
Zucchini Noodles With Pesto and Cherry Tomatoes
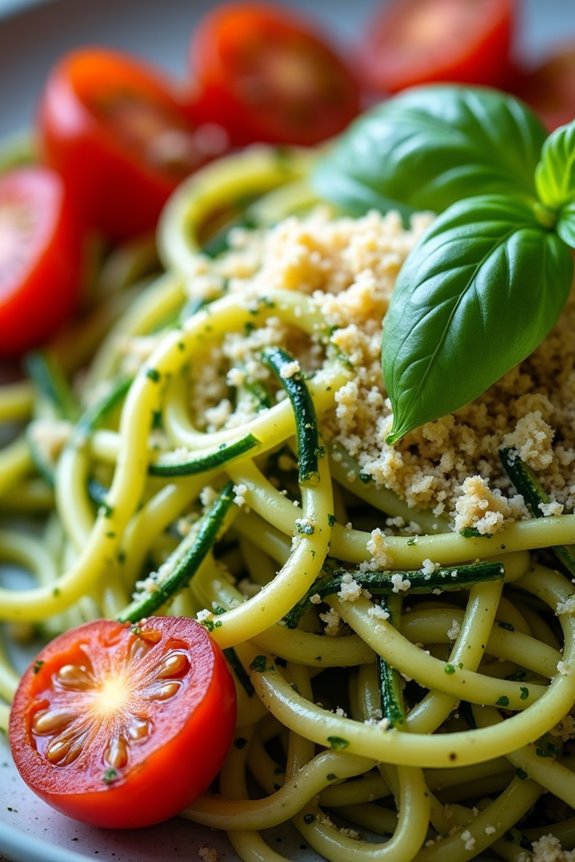
Zucchini Noodles with Pesto and Cherry Tomatoes is a delightful dish that captures the essence of Mediterranean flavors while keeping it low-carb. This recipe is perfect for those looking to enjoy a light yet satisfying meal that doesn’t compromise on taste. The combination of fresh zucchini noodles, vibrant cherry tomatoes, and a rich, homemade pesto creates a colorful and nutritious plate that isn’t only easy to prepare but also full of health benefits.
Zucchini noodles, or “zoodles,” are a fantastic alternative to traditional pasta. They’re low in calories and carbohydrates, making them an excellent choice for anyone following a low-carb or keto diet. Tossing them with a fragrant basil pesto and juicy cherry tomatoes adds a burst of flavor that elevates this dish to a whole new level. Whether you’re serving it as a main course or a side dish, Zucchini Noodles with Pesto and Cherry Tomatoes is sure to impress.
Ingredients (serving size: 4-6 people)
- 4 medium zucchinis
- 2 cups cherry tomatoes, halved
- 1 cup fresh basil leaves
- 1/4 cup pine nuts (or walnuts)
- 1/4 cup grated Parmesan cheese
- 2 garlic cloves
- 1/2 cup extra-virgin olive oil
- Salt and pepper, to taste
- Optional: red pepper flakes for a kick
Cooking Instructions
- Prepare the Zucchini Noodles: Using a spiralizer, julienne peeler, or mandoline, turn the zucchinis into noodles. Aim for long, thin strands, resembling spaghetti. If you prefer a softer texture, you can briefly sauté them in a pan with a drizzle of olive oil for about 2-3 minutes until they’re slightly tender. Set them aside.
- Make the Pesto: In a food processor, combine the fresh basil leaves, pine nuts, grated Parmesan cheese, and garlic cloves. Pulse these ingredients together until they’re finely chopped. Slowly drizzle in the olive oil while the processor is running, until the mixture is smooth and creamy. Season with salt and pepper to taste. If you’d like a little heat, add a pinch of red pepper flakes.
- Cook the Cherry Tomatoes: In a large skillet over medium heat, add a little olive oil and toss in the halved cherry tomatoes. Sauté them for about 5-7 minutes until they’re softened and slightly caramelized. Season with salt and pepper to enhance their natural sweetness.
- Combine the Ingredients: Add the prepared zucchini noodles to the skillet with the sautéed cherry tomatoes. Pour the prepared pesto over the top and gently toss everything together until the noodles are well-coated with the pesto and heated through, about 2-3 minutes.
- Serve: Plate the zucchini noodles with pesto and cherry tomatoes, garnishing with additional Parmesan cheese, fresh basil, or a sprinkle of red pepper flakes if desired. Enjoy immediately while warm.
Extra Tips
When preparing this dish, it’s important to avoid overcooking the zucchini noodles, as they can become mushy.
If you’re looking for a more robust flavor, feel free to experiment with adding other ingredients like grilled chicken or shrimp for protein.
Additionally, making the pesto ahead of time can save you preparation time on busy days, and it can also be stored in the refrigerator for up to a week.
Enjoy this fresh and vibrant meal that captures the Mediterranean spirit!
Greek Salad With Grilled Chicken
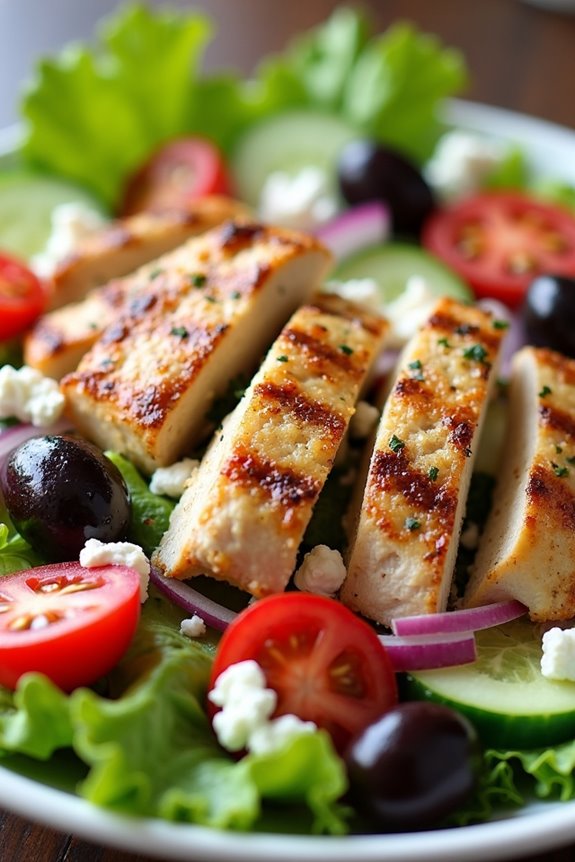
Greek Salad With Grilled Chicken is a delightful and invigorating dish that perfectly embodies the essence of Mediterranean cuisine. This salad isn’t only low in carbohydrates but also packed with vibrant flavors and nutritious ingredients. The combination of fresh vegetables, creamy feta cheese, and juicy grilled chicken makes it a satisfying meal that can be enjoyed any time of the year.
Grilling the chicken adds a smoky flavor that complements the crispness of the salad, while the tangy dressing enhances the overall taste. This recipe is perfect for a healthy lunch, a light dinner, or even as a side dish for a summer barbecue. With its colorful presentation and wholesome ingredients, Greek Salad With Grilled Chicken is sure to impress your family and friends.
Ingredients (Serves 4-6):
- 2 large boneless, skinless chicken breasts
- 4 cups romaine lettuce, chopped
- 1 cup cherry tomatoes, halved
- 1 cucumber, diced
- 1 red onion, thinly sliced
- 1 cup Kalamata olives, pitted and halved
- 1 cup feta cheese, crumbled
- 1/4 cup extra-virgin olive oil
- 2 tablespoons red wine vinegar
- 1 teaspoon dried oregano
- Salt and pepper to taste
Cooking Instructions:
- Prepare the Chicken: Start by marinating the chicken breasts. In a bowl, mix together 2 tablespoons of olive oil, salt, pepper, and half of the oregano. Coat the chicken breasts with this mixture and let them marinate for at least 30 minutes. This step infuses the chicken with flavor and helps keep it juicy while grilling.
- Grill the Chicken: Preheat your grill to medium-high heat. Once hot, place the marinated chicken breasts on the grill. Cook for about 6-7 minutes on each side, or until the internal temperature reaches 165°F (75°C). Once cooked, remove the chicken from the grill and let it rest for about 5 minutes before slicing it into strips. Resting allows the juices to redistribute throughout the meat, ensuring a moist bite.
- Prepare the Salad Base: While the chicken is resting, prepare the salad. In a large bowl, combine the chopped romaine lettuce, cherry tomatoes, cucumber, red onion, and Kalamata olives. Toss these ingredients together gently to mix them without bruising the vegetables.
- Make the Dressing: In a small bowl, whisk together the remaining olive oil, red wine vinegar, the rest of the oregano, and additional salt and pepper to taste. This simple vinaigrette will complement the salad beautifully and add a zesty kick.
- Assemble the Salad: Drizzle the prepared dressing over the salad and toss to coat all the ingredients evenly. Then, add the crumbled feta cheese and toss gently to combine. Finally, top the salad with the sliced grilled chicken.
- Serve: Plate the Greek Salad With Grilled Chicken in individual bowls or a large serving dish. This dish can be served immediately, or it can be chilled for a short time in the refrigerator for an invigorating cold salad.
Extra Tips:
To elevate the flavors of your Greek Salad With Grilled Chicken, consider adding fresh herbs like parsley or basil for a burst of freshness. You can also customize the salad by including other vegetables such as bell peppers or avocado.
For added crunch, sprinkle some roasted sunflower seeds or pine nuts on top. If you prefer a bit of spice, a pinch of red pepper flakes can add a nice kick to the dressing. Enjoy this versatile dish as a meal prep option, as it keeps well in the fridge and can be enjoyed for lunch or dinner throughout the week.
Cauliflower Rice Tabbouleh

Cauliflower Rice Tabbouleh is a revitalizing and healthy twist on the traditional Middle Eastern salad, perfect for those following a low-carb lifestyle. This vibrant dish substitutes the bulgur wheat typically used in tabbouleh with cauliflower rice, allowing you to enjoy the classic flavors without the carbs. Packed with fresh herbs, vegetables, and a zesty dressing, it’s not only nutritious but also incredibly flavorful.
It makes a fantastic side dish for grilled meats or can be enjoyed on its own as a light lunch. This recipe is simple to prepare and can be made in advance, allowing the flavors to meld beautifully. The star of the dish, cauliflower rice, is easy to make using fresh or frozen cauliflower.
With a colorful mix of parsley, mint, tomatoes, and cucumbers, this dish is as visually appealing as it’s delicious. Whether you’re hosting a Mediterranean-themed dinner or just want a healthy meal prep option, Cauliflower Rice Tabbouleh will surely impress.
Ingredients (Serves 4-6):
- 1 medium head of cauliflower (or 4 cups of cauliflower rice)
- 1 cup fresh parsley, finely chopped
- ½ cup fresh mint, finely chopped
- 1 cup cherry tomatoes, diced
- 1 cucumber, diced
- ¼ cup red onion, finely chopped
- ¼ cup extra virgin olive oil
- 3 tablespoons fresh lemon juice
- Salt and pepper to taste
Cooking Instructions:
- Prepare the Cauliflower Rice: If using a whole head of cauliflower, remove the leaves and stem, and cut it into florets. Place the florets in a food processor and pulse until they reach a rice-like consistency. If using pre-packaged cauliflower rice, skip this step.
- Cook the Cauliflower Rice (Optional): For a softer texture, you can lightly steam the cauliflower rice for about 3-5 minutes until tender. Alternatively, you can use it raw for a crunchier texture. Allow it to cool completely before mixing with other ingredients.
- Chop the Vegetables: While the cauliflower is cooling, chop the parsley, mint, tomatoes, cucumber, and red onion. Make sure they’re finely chopped to guarantee even distribution in the salad.
- Combine Ingredients: In a large mixing bowl, combine the cooled cauliflower rice, chopped parsley, mint, tomatoes, cucumber, and red onion.
- Make the Dressing: In a small bowl, whisk together the olive oil, lemon juice, salt, and pepper until well combined.
- Dress the Salad: Pour the dressing over the cauliflower mixture and toss everything together until well coated. Taste and adjust the seasoning if necessary.
- Chill and Serve: For the best flavor, let the tabbouleh sit in the refrigerator for at least 30 minutes before serving. This allows the flavors to meld together beautifully.
Extra Tips:
For an extra burst of flavor, consider adding a pinch of cumin or a dash of crushed red pepper flakes to the dressing. You can also customize your tabbouleh by adding other vegetables like bell peppers or radishes.
If you prefer a nuttier flavor, try toasting the cauliflower rice lightly before mixing it with the other ingredients. Additionally, this dish keeps well in the fridge for a couple of days, making it a great option for meal prep!
Eggplant Parmesan Stacks
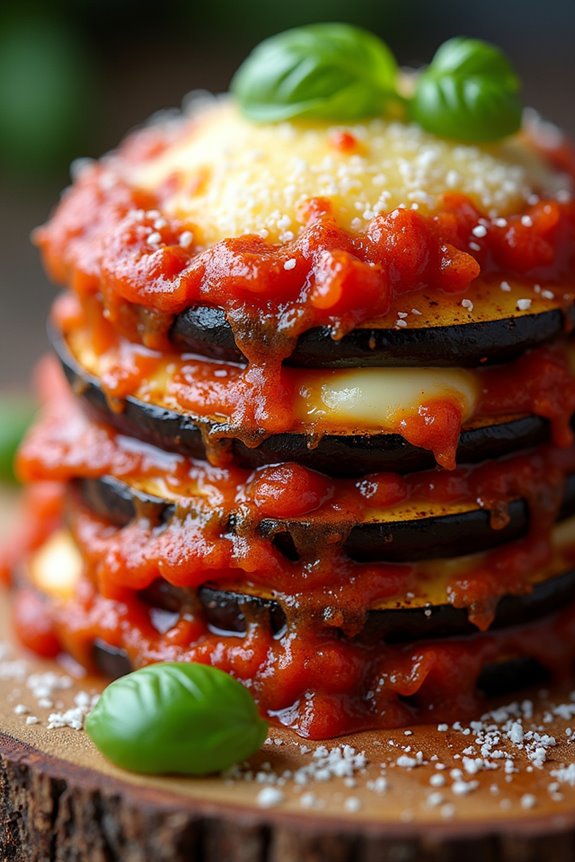
Eggplant Parmesan Stacks are a delightful twist on the traditional Italian dish that highlights the rich flavors of Mediterranean cuisine while being low in carbohydrates. This dish layers crispy, baked eggplant slices with a luscious marinara sauce and gooey mozzarella cheese, creating a satisfying meal that’s both healthy and indulgent. Perfect for family dinners or gatherings, these stacks are sure to impress anyone at the table, making it a great option for those following a low-carb lifestyle.
To prepare Eggplant Parmesan Stacks, fresh, ripe eggplants are sliced and baked until golden brown, providing a delicious base for the dish. The layers are then assembled with homemade or store-bought marinara sauce and a generous sprinkle of Parmesan and mozzarella cheese. The stacks are baked again until the cheese is bubbly and golden, resulting in a dish that’s as visually appealing as it’s scrumptious. This recipe serves 4-6 people, making it perfect for sharing.
Ingredients
- 2 medium eggplants
- 1 teaspoon salt
- 1 cup marinara sauce (homemade or store-bought)
- 1 ½ cups shredded mozzarella cheese
- ½ cup grated Parmesan cheese
- 1 teaspoon dried oregano
- 1 teaspoon dried basil
- ¼ teaspoon black pepper
- 2 tablespoons olive oil
- Fresh basil leaves (for garnish, optional)
Cooking Instructions
- Prepare the Eggplants: Begin by preheating your oven to 375°F (190°C). Wash the eggplants, then slice them into ½-inch thick rounds. Sprinkle the slices with salt and let them sit for about 20-30 minutes. This process helps to draw out excess moisture and bitterness from the eggplants.
- Bake the Eggplant Slices: After the eggplants have rested, rinse off the salt and pat them dry with paper towels. Arrange the slices on a baking sheet lined with parchment paper. Drizzle olive oil over the slices and use a brush or your hands to coat them evenly. Bake in the preheated oven for about 25-30 minutes, flipping halfway through, until the eggplant is tender and golden brown.
- Assemble the Stacks: Once the eggplant slices are baked, it’s time to assemble the stacks. In a baking dish, spread a thin layer of marinara sauce on the bottom. Place one eggplant slice on top, followed by a spoonful of marinara sauce, a sprinkle of mozzarella, and a bit of Parmesan. Repeat this layering process until all the eggplant slices are used, finishing with a layer of marinara sauce and a generous topping of mozzarella and Parmesan cheese.
- Bake the Stacks: Once assembled, cover the baking dish with aluminum foil and bake for 20 minutes. Then, remove the foil and bake for an additional 10-15 minutes, or until the cheese is melted and bubbly and starts to turn golden brown.
- Garnish and Serve: After removing the dish from the oven, allow it to cool for a few minutes. Garnish with fresh basil leaves if desired, then slice and serve warm. Enjoy your delicious Eggplant Parmesan Stacks!
Extra Tips
When making Eggplant Parmesan Stacks, consider using different types of cheese for added flavor, such as provolone or Fontina. If you’re looking for an even lower-carb option, you can substitute the marinara sauce with a homemade tomato sauce that has no added sugars.
Additionally, for a crunchier texture, you can lightly bread the eggplant slices before baking them by dipping them in beaten egg and then coating them with almond flour or crushed pork rinds. Enjoy experimenting with flavors and textures to make this dish your own!
Mediterranean Stuffed Peppers
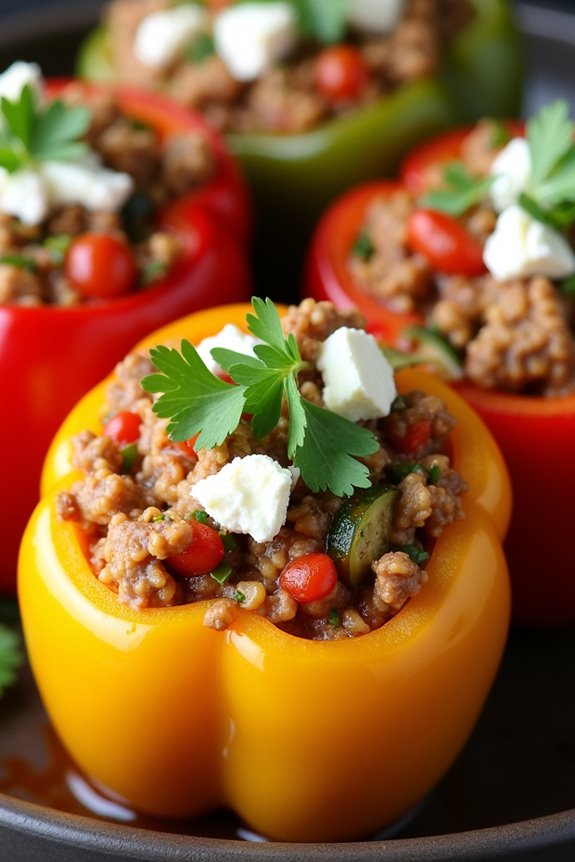
Mediterranean Stuffed Peppers are a vibrant and flavorful dish that brings the essence of the Mediterranean right to your dining table. This low-carb version is perfect for those looking to enjoy a healthy meal without sacrificing taste. The combination of fresh vegetables, aromatic herbs, and savory ingredients makes these stuffed peppers a delightful option for lunch or dinner.
They aren’t only packed with nutrients but are also visually appealing, making them an excellent choice for impressing guests or indulging in a family meal.
These stuffed peppers can easily be customized based on your preferences or what you have on hand. You can choose to use ground turkey, chicken, or even a plant-based protein for a vegetarian twist. The use of herbs like oregano and basil infuses the dish with a Mediterranean flair, while ingredients like feta cheese add a creamy texture and tangy flavor that perfectly complements the sweetness of the peppers.
Whether served warm or at room temperature, these stuffed peppers are sure to become a staple in your low carb recipe repertoire.
Ingredients (Serves 4-6)
- 4 large bell peppers (any color)
- 1 lb ground turkey or chicken
- 1 cup diced zucchini
- 1 cup diced tomatoes (fresh or canned)
- 1/2 cup onion, finely chopped
- 2 cloves garlic, minced
- 1 cup cooked quinoa (optional for added texture)
- 1/2 cup feta cheese, crumbled
- 2 tablespoons olive oil
- 1 teaspoon dried oregano
- 1 teaspoon dried basil
- Salt and pepper to taste
- Fresh parsley, chopped (for garnish)
Cooking Instructions
- Prepare the Peppers: Preheat your oven to 375°F (190°C). While the oven is heating, cut the tops off the bell peppers and remove the seeds and membranes. If needed, you can slightly trim the bottoms so they stand upright. Place the prepared peppers in a baking dish.
- Cook the Filling: In a large skillet, heat the olive oil over medium heat. Add the chopped onion and minced garlic, sautéing until they become translucent and fragrant, about 3-4 minutes. Next, add the ground turkey or chicken, cooking until fully browned and cooked through, approximately 7-10 minutes.
- Add Vegetables and Seasonings: Once the meat is cooked, stir in the diced zucchini, tomatoes, dried oregano, dried basil, salt, and pepper. If you’re using quinoa, add it at this stage as well. Cook for an additional 5 minutes until the vegetables are tender and the flavors meld together.
- Incorporate Cheese: Remove the skillet from the heat and stir in the crumbled feta cheese until evenly distributed. This will add a creamy texture and rich flavor to the filling.
- Stuff the Peppers: Carefully spoon the filling into each bell pepper, packing it down gently to guarantee they’re filled well. Top each pepper with a sprinkle of additional feta cheese if desired.
- Bake: Pour a little water into the bottom of the baking dish to help steam the peppers while they cook. Cover the dish with aluminum foil and bake in the preheated oven for 25-30 minutes. Remove the foil and bake for an additional 10-15 minutes, or until the peppers are tender and slightly charred.
- Serve: Once done, remove the stuffed peppers from the oven and let them cool for a few minutes. Garnish with fresh chopped parsley before serving.
Extra Tips
For added flavor, consider marinating the ground meat in Mediterranean spices or using a homemade tomato sauce as a base for the filling.
You can also experiment with different types of cheese; goat cheese or mozzarella work wonderfully as alternatives. If you’re looking to reduce the carbs even further, you can skip the quinoa altogether or substitute it with cauliflower rice.
Enjoy the versatility of this dish by serving it with a side salad or as part of a larger Mediterranean-themed meal.
Shrimp Souvlaki With Tzatziki Sauce
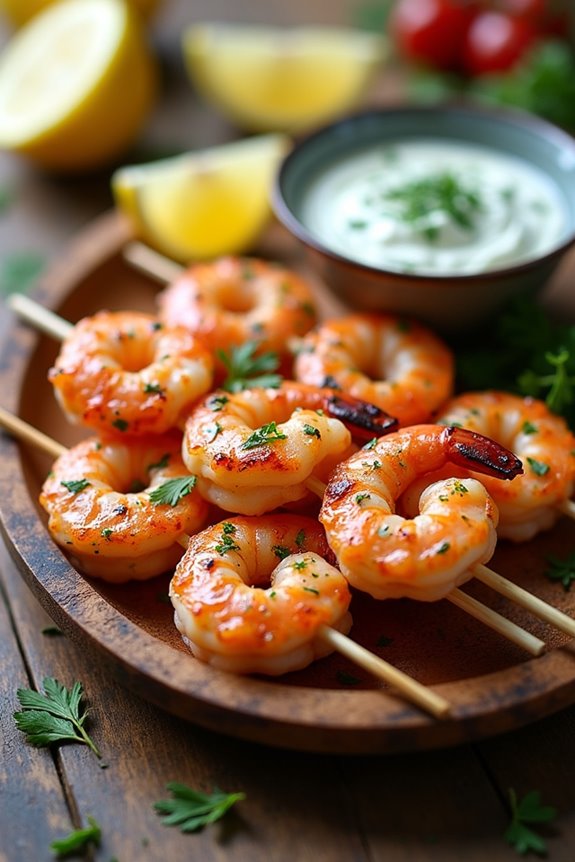
Shrimp souvlaki is a delightful Mediterranean dish that showcases the fresh flavors of shrimp marinated in a blend of herbs and spices, then grilled to perfection. This dish isn’t only low in carbs but also packed with protein, making it a fantastic option for a healthy meal.
The accompanying tzatziki sauce, a cool and creamy yogurt-based dip, adds a revitalizing touch that complements the shrimp perfectly. Together, they create a dish that’s both satisfying and full of flavor.
This shrimp souvlaki with tzatziki sauce is perfect for gatherings or a casual family dinner. It can be served on skewers, making it fun to eat, and is great for those following a low-carb lifestyle.
Pair it with a simple salad or some grilled vegetables for a complete meal that will impress your guests while keeping your dietary goals in check.
Ingredients (serves 4-6):
- 1.5 lbs large shrimp, peeled and deveined
- 3 tablespoons olive oil
- 2 tablespoons lemon juice
- 3 cloves garlic, minced
- 1 teaspoon dried oregano
- 1 teaspoon paprika
- Salt and pepper, to taste
- 1/4 cup fresh parsley, chopped (for garnish)
For the Tzatziki Sauce:
- 1 cup plain Greek yogurt
- 1/2 cucumber, grated and excess moisture squeezed out
- 1 garlic clove, minced
- 1 tablespoon lemon juice
- 1 tablespoon fresh dill, chopped (or 1 teaspoon dried dill)
- Salt, to taste
Cooking Instructions:
- Marinate the Shrimp: In a large bowl, combine the olive oil, lemon juice, minced garlic, dried oregano, paprika, salt, and pepper. Add the peeled and deveined shrimp to the marinade, ensuring they’re well coated. Cover the bowl and let it marinate in the refrigerator for at least 30 minutes, or up to 2 hours for more flavor.
- Prepare the Tzatziki Sauce: While the shrimp is marinating, make the tzatziki sauce. In a medium bowl, mix the Greek yogurt, grated cucumber, minced garlic, lemon juice, fresh dill, and a pinch of salt. Stir well to combine all the ingredients. Cover and refrigerate until ready to serve, allowing the flavors to meld.
- Preheat the Grill: If using a grill, preheat it to medium-high heat. If you’re using an oven, preheat the broiler. Make sure to oil the grill grates or a baking sheet to prevent sticking.
- Skewer the Shrimp: Thread the marinated shrimp onto skewers, leaving a little space between each shrimp for even cooking. If using wooden skewers, soak them in water for 30 minutes prior to use to prevent burning.
- Grill the Shrimp: Place the skewers on the grill and cook for 2-3 minutes on each side, or until the shrimp turn pink and opaque. If using the broiler, place the skewers on a baking sheet and broil for about 2-3 minutes on each side.
- Serve: Once cooked, remove the shrimp from the skewers and arrange them on a serving platter. Drizzle with extra olive oil and sprinkle with chopped fresh parsley. Serve with the chilled tzatziki sauce on the side.
Extra Tips:
For a delightful twist, feel free to add bell peppers, cherry tomatoes, or zucchini to the skewers along with the shrimp for added flavor and color.
Additionally, adjusting the marinade ingredients to your personal taste can enhance the depth of flavor. Always keep a close eye on the shrimp while grilling, as they cook quickly and can become overcooked if left unattended.
Enjoy your meal with a side of fresh salad or grilled vegetables for a wholesome experience!
Spinach and Feta Stuffed Chicken Breasts
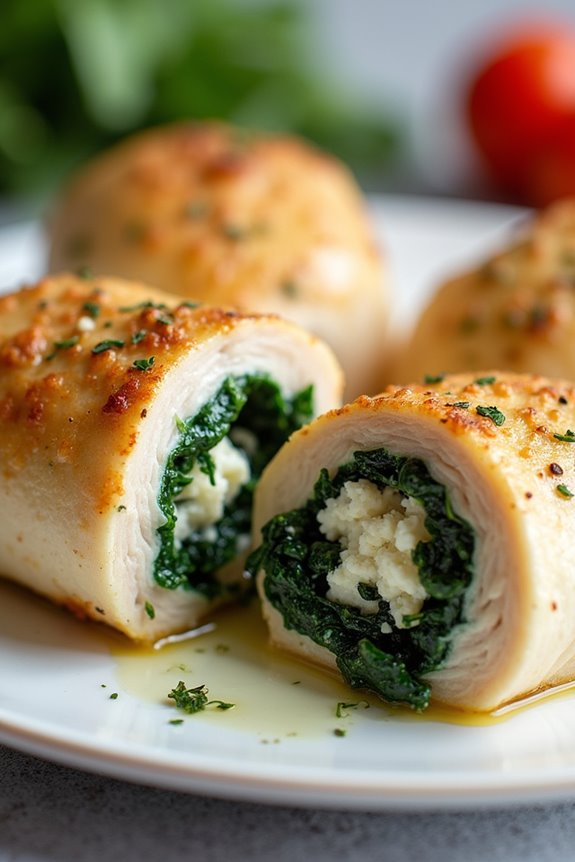
Spinach and Feta Stuffed Chicken Breasts are a delectable and healthy option that perfectly embodies Mediterranean flavors while keeping the carb count low. This dish features juicy chicken breasts filled with a savory mixture of fresh spinach, creamy feta cheese, and aromatic herbs. It’s not only packed with protein and nutrients, but it also delivers a burst of flavor that will leave your taste buds dancing.
Perfect for a family dinner or a special occasion, this recipe is sure to impress anyone at your table.
Preparing these stuffed chicken breasts is a straightforward process that yields mouthwatering results. The key lies in making sure that the chicken is tender and the filling is well-seasoned. With just a few simple steps, you can create a satisfying meal that pairs beautifully with a side of roasted vegetables or a fresh salad.
Let’s explore the ingredients and cooking instructions to bring this delightful dish to life.
Ingredients (serves 4-6):
- 4-6 boneless, skinless chicken breasts
- 2 cups fresh spinach, chopped
- 1 cup feta cheese, crumbled
- 1/4 cup cream cheese, softened
- 2 cloves garlic, minced
- 1 teaspoon dried oregano
- 1 teaspoon dried basil
- Salt and pepper to taste
- 2 tablespoons olive oil
- 1 tablespoon lemon juice
- Toothpicks or kitchen twine for securing chicken
Cooking Instructions:
- Preheat the Oven: Begin by preheating your oven to 375°F (190°C). This step guarantees that your chicken will cook evenly and thoroughly once it’s placed in the oven.
- Prepare the Filling: In a mixing bowl, combine the chopped spinach, crumbled feta cheese, cream cheese, minced garlic, dried oregano, dried basil, and a pinch of salt and pepper. Mix well until all the ingredients are thoroughly combined into a cohesive filling.
- Prepare the Chicken: Take each chicken breast and carefully slice a pocket into the side, making sure not to cut all the way through. You want to create enough space to hold the filling without compromising the integrity of the chicken.
- Stuff the Chicken: Generously spoon the spinach and feta filling into the pocket of each chicken breast. Use toothpicks or kitchen twine to secure the openings of the stuffed chicken breasts, making sure the filling stays inside while cooking.
- Sear the Chicken: In a large oven-safe skillet, heat the olive oil over medium-high heat. Once the oil is hot, carefully place the stuffed chicken breasts in the skillet. Sear each side for about 3-4 minutes, or until golden brown. This step adds flavor and helps to seal in moisture.
- Bake the Chicken: After searing, drizzle the lemon juice over the chicken and transfer the skillet to the preheated oven. Bake for 20-25 minutes, or until the chicken is cooked through and reaches an internal temperature of 165°F (75°C).
- Rest and Serve: Once cooked, remove the skillet from the oven and let the chicken rest for about 5 minutes before slicing. This resting period allows the juices to redistribute, guaranteeing a moist and flavorful dish. Serve warm, garnished with fresh herbs if desired.
Extra Tips:
For an extra layer of flavor, consider adding sun-dried tomatoes or fresh herbs like dill or parsley to the filling mixture.
If you want to enhance the presentation, serve the stuffed chicken breasts on a bed of sautéed zucchini or alongside a light Mediterranean salad.
Always verify that the chicken is fully cooked by using a meat thermometer, and feel free to adjust the seasoning to suit your taste preferences!
Roasted Ratatouille
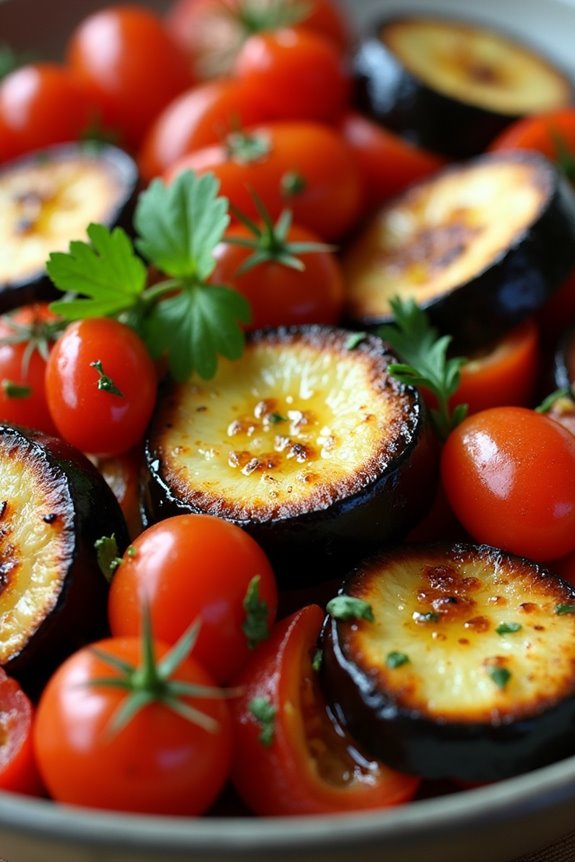
Roasted Ratatouille is a vibrant and hearty dish that embodies the flavors of the Mediterranean while adhering to a low-carb lifestyle. This dish is a beautiful medley of vegetables, including zucchini, eggplant, bell peppers, and tomatoes, all roasted to perfection, which brings out their natural sweetness and enhances their flavor.
It can be served as a main course or as a flavorful side dish, making it versatile for various meals throughout the week. What makes this Roasted Ratatouille particularly special isn’t only its colorful presentation but also its simplicity. With just a handful of fresh ingredients and minimal effort, you can create a wholesome, nutritious dish that’s both satisfying and delicious.
It pairs wonderfully with grilled meats, fish, or can be enjoyed on its own, making it an excellent option for family dinners or meal prep.
Ingredients (Serves 4-6)
- 1 medium eggplant, diced
- 2 medium zucchinis, sliced
- 1 red bell pepper, chopped
- 1 yellow bell pepper, chopped
- 1 medium onion, diced
- 3 cloves garlic, minced
- 4 medium tomatoes, diced
- 1/4 cup olive oil
- 1 teaspoon dried thyme
- 1 teaspoon dried basil
- Salt and pepper to taste
- Fresh parsley for garnish (optional)
Cooking Instructions
- Preheat the Oven: Start by preheating your oven to 425°F (220°C). This high temperature is vital for roasting the vegetables, allowing them to caramelize and develop rich flavors.
- Prepare the Vegetables: In a large mixing bowl, combine the diced eggplant, sliced zucchinis, chopped bell peppers, diced onion, minced garlic, and diced tomatoes. Confirm the vegetables are cut into roughly equal sizes to allow for even cooking.
- Season and Toss: Drizzle the olive oil over the mixed vegetables. Add dried thyme, dried basil, salt, and pepper. Toss everything together until the vegetables are evenly coated in oil and seasonings. This step is essential for guaranteeing that each piece is flavorful.
- Spread on a Baking Sheet: Transfer the seasoned vegetable mixture onto a large baking sheet in a single layer. Avoid overcrowding the pan, as this will lead to steaming instead of roasting.
- Roast the Vegetables: Place the baking sheet in the preheated oven and roast for 25-30 minutes, stirring halfway through. The vegetables should be tender and slightly charred at the edges, which adds depth to the dish.
- Garnish and Serve: Once roasted, remove the baking sheet from the oven. Allow the Ratatouille to cool for a few minutes before garnishing with fresh parsley if desired. Serve warm as a main course or side dish.
Extra Tips
When preparing Roasted Ratatouille, consider using seasonal vegetables for the best flavor and freshness. Feel free to customize the recipe by adding your favorite vegetables, such as squash or mushrooms.
If you prefer a more robust flavor, you can also add a splash of balsamic vinegar or a sprinkle of feta cheese before serving. Finally, this dish can be made ahead of time and reheated, making it perfect for meal prep!
Lemon Garlic Grilled Salmon

Lemon Garlic Grilled Salmon is a delightful dish that perfectly embodies the vibrant flavors of the Mediterranean. This low-carb meal isn’t only light and invigorating, but also packed with healthy omega-3 fatty acids. The zesty lemon and aromatic garlic create a beautifully balanced marinade that infuses the salmon with delicious flavors while keeping it moist and tender when grilled.
Perfect for a weeknight dinner or a weekend gathering, this dish is sure to impress both family and friends.
Grilling salmon is a quick and easy way to prepare this nutritious fish. With just a few simple ingredients, you can have a gourmet meal on the table in no time. Pair this dish with a fresh salad or grilled vegetables for a complete and satisfying low-carb Mediterranean experience. So fire up your grill and get ready to savor the tangy goodness of Lemon Garlic Grilled Salmon!
Ingredients (Serves 4-6)
- 4-6 salmon fillets (about 6 ounces each)
- 1/4 cup olive oil
- 3 tablespoons fresh lemon juice
- 4 cloves garlic, minced
- 1 teaspoon dried oregano
- 1 teaspoon salt
- 1/2 teaspoon black pepper
- Lemon slices, for garnish
- Fresh parsley, chopped (optional, for garnish)
Cooking Instructions
- Prepare the Marinade: In a small bowl, whisk together the olive oil, fresh lemon juice, minced garlic, dried oregano, salt, and black pepper. This marinade will enhance the flavors of the salmon and keep it moist while grilling.
- Marinate the Salmon: Place the salmon fillets in a shallow dish or a resealable plastic bag. Pour the marinade over the salmon, making sure each fillet is well-coated. Allow the salmon to marinate in the refrigerator for at least 30 minutes to 1 hour for prime flavor.
- Preheat the Grill: While the salmon is marinating, preheat your grill to medium-high heat. If using a gas grill, turn on the burners and allow the grill to heat up for about 10-15 minutes. For a charcoal grill, confirm the coals are evenly distributed and glowing.
- Grill the Salmon: Once the grill is hot, lightly oil the grill grates to prevent sticking. Remove the salmon from the marinade and place it skin-side down on the grill. Grill the salmon for about 4-6 minutes per side, depending on the thickness of the fillets. The salmon is done when it flakes easily with a fork and has reached an internal temperature of 145°F.
- Serve: Carefully remove the grilled salmon from the grill and transfer it to a serving platter. Garnish with lemon slices and chopped fresh parsley if desired. Serve immediately with your choice of low-carb sides.
Extra Tips
For an extra layer of flavor, consider adding fresh herbs like dill or basil to the marinade. You can also experiment with adding a pinch of red pepper flakes for a bit of heat.
If you don’t have a grill, this recipe can also be prepared in a grill pan or under the broiler in your oven. Just be sure to watch the cooking time closely, as the fish can cook quickly. Enjoy your delicious Lemon Garlic Grilled Salmon!
Caprese Salad Skewers

Caprese Salad Skewers are a delightful, low-carb Mediterranean dish that combines the fresh flavors of ripe tomatoes, creamy mozzarella, fragrant basil, and a drizzle of balsamic glaze. Perfect as an appetizer or a light snack, these skewers aren’t only visually appealing but also incredibly simple to prepare. Their vibrant colors and invigorating taste make them a great addition to any gathering, whether it’s a summer barbecue, a picnic, or a holiday party.
The beauty of Caprese Salad Skewers lies in their versatility. You can customize them by using different types of tomatoes or adding extra ingredients like olives or avocados. They’re naturally gluten-free and fit perfectly into a low-carb diet, allowing you to enjoy a taste of the Mediterranean without the extra carbs. With just a few fresh ingredients and minimal preparation, you can impress your guests with this elegant and healthy option.
Ingredients (Serving Size: 4-6 people)
- 1 pint of cherry or grape tomatoes
- 8 oz fresh mozzarella balls (bocconcini or ciliegine)
- Fresh basil leaves (about 20-24 leaves)
- 2 tablespoons extra virgin olive oil
- 2 tablespoons balsamic glaze
- Salt and pepper, to taste
- Skewers (6-inch or 8-inch)
Cooking Instructions
- Prepare the Ingredients: Rinse the cherry or grape tomatoes under cold water and pat them dry with a paper towel. Drain the mozzarella balls from their liquid and set them aside. If the basil leaves are large, you may want to tear them in half to make them easier to skewer.
- Assemble the Skewers: Take a skewer and begin threading the ingredients onto it. Start with a cherry tomato, followed by a basil leaf, then a mozzarella ball. Repeat this process until the skewer is filled, leaving a little space at each end for handling. You can alternate the order or add more ingredients as desired.
- Season the Skewers: Once all the skewers are assembled, lay them on a serving platter. Drizzle the extra virgin olive oil over the skewers and then drizzle the balsamic glaze for added flavor. Sprinkle with salt and pepper to taste.
- Serve: Allow the skewers to sit for a few minutes to let the flavors meld. Serve them fresh as a light appetizer or snack, and enjoy the delightful burst of flavors in every bite.
Extra Tips
When preparing Caprese Salad Skewers, it’s best to use the freshest ingredients you can find, as the quality of the tomatoes and mozzarella will greatly enhance the flavor of the dish.
If you want to make them ahead of time, you can assemble the skewers a few hours in advance and store them in the refrigerator until ready to serve. Just be sure to drizzle the olive oil and balsamic glaze right before serving to keep the skewers looking fresh and vibrant.
Enjoy the Mediterranean sunshine in every bite!
Chickpea and Avocado Salad

Chickpea and Avocado Salad is a vibrant, nutrient-packed dish that perfectly embodies the flavors of the Mediterranean diet. Loaded with protein from chickpeas and healthy fats from avocados, this salad isn’t only satisfying but also great for anyone looking to maintain a low-carb lifestyle. The combination of fresh vegetables, herbs, and a zesty dressing makes it a revitalizing choice for lunch or dinner.
Plus, it’s quick to prepare, making it an ideal option for busy weeknights or meal prep. This salad is highly versatile, allowing you to incorporate seasonal vegetables or whatever you have on hand. The creamy avocado melds beautifully with the crunchy cucumbers and the earthy flavor of chickpeas, while the lemon juice adds a delightful brightness.
With this Chickpea and Avocado Salad, you can enjoy a delicious, wholesome meal that’s sure to please even the pickiest eaters.
Ingredients (serving size: 4-6 people)
- 1 can (15 oz) chickpeas, rinsed and drained
- 2 ripe avocados, diced
- 1 medium cucumber, diced
- 1 cup cherry tomatoes, halved
- 1/4 red onion, finely chopped
- 1/4 cup fresh parsley, chopped
- 1/4 cup olive oil
- 2 tablespoons lemon juice
- Salt and pepper to taste
- Optional: Feta cheese, crumbled (for garnish)
Cooking Instructions
- Prepare the Ingredients: Begin by rinsing and draining the chickpeas. Dice the avocados, cucumber, and tomatoes, and finely chop the red onion and fresh parsley. Having all your ingredients prepped will streamline the assembly of the salad.
- Mix the Salad Base: In a large mixing bowl, combine the chickpeas, diced avocados, cucumber, cherry tomatoes, red onion, and parsley. Gently toss the ingredients together to guarantee even distribution without mashing the avocados.
- Make the Dressing: In a small bowl, whisk together the olive oil, lemon juice, and a pinch of salt and pepper. This dressing will bring all the flavors together and enhance the freshness of the salad.
- Combine and Toss: Pour the dressing over the salad mixture in the large bowl. Using a spatula or wooden spoon, gently toss the salad until the dressing is well incorporated and coats all the ingredients. Be careful not to overmix to preserve the integrity of the avocado.
- Taste and Adjust: Before serving, taste the salad and adjust the seasoning with more salt, pepper, or lemon juice as needed. This is the perfect moment to customize the flavors to your liking.
- Serve: Transfer the salad to a serving bowl or individual plates. If desired, sprinkle crumbled feta cheese on top for an extra layer of flavor. Enjoy your Chickpea and Avocado Salad right away, or let it chill in the refrigerator for about 30 minutes to enhance the flavors.
Extra Tips
When making Chickpea and Avocado Salad, choose ripe avocados for the best flavor and creaminess. To prevent the avocados from browning, you can squeeze a little extra lemon juice over them before mixing.
Additionally, this salad can be made ahead of time; just keep the dressing separate until you’re ready to serve to maintain the freshness of the ingredients. Feel free to experiment with other Mediterranean elements like olives, bell peppers, or a sprinkle of sumac for an added twist!