

As the sun shines brighter and the days grow longer, I find myself dreaming of delightful outdoor feasts. These 12 charming European picnic recipes are not only easy to prepare but also bursting with flavor. Picture yourself enjoying a buttery quiche or fresh Caprese skewers in the great outdoors. Let’s explore these enticing dishes that promise to elevate your picnic experience.
Classic French Quiche Lorraine

Quiche Lorraine is a delectable dish that hails from the beautiful region of Lorraine in northeastern France. This savory tart is a classic choice for any picnic, combining a flaky pastry crust with a rich filling of eggs, cream, cheese, and smoky bacon. Its versatility allows it to be served warm or at room temperature, making it a perfect addition to your picnic spread.
The quiche can be customized with various ingredients, making it a delightful canvas for different flavors. Traditional Quiche Lorraine features lardons or bacon, but feel free to add onions, herbs, or even vegetables to suit your taste. The creamy filling is simple to prepare, and once baked to perfection, it becomes a golden-brown masterpiece that will impress your family and friends.
Ingredients (Serves 4-6)
- 1 pre-made pie crust (9-inch)
- 6 slices of bacon, chopped
- 1 cup heavy cream
- 3 large eggs
- 1 cup grated Gruyère cheese
- 1/4 cup chopped yellow onion (optional)
- Salt and pepper to taste
- Fresh parsley for garnish (optional)
Cooking Instructions
- Preheat the Oven: Begin by preheating your oven to 375°F (190°C). This guarantees that the quiche cooks evenly and achieves a golden crust.
- Prepare the Pie Crust: Place the pre-made pie crust in a 9-inch pie dish. Press it gently against the sides and bottom, then trim any excess dough hanging over the edges. Use a fork to poke small holes in the bottom of the crust, preventing it from puffing up while baking.
- Cook the Bacon: In a skillet over medium heat, cook the chopped bacon until it’s crispy. Once cooked, use a slotted spoon to transfer the bacon to a paper towel-lined plate to drain excess fat. If using onions, sauté them in the remaining bacon grease until they become translucent.
- Mix the Filling: In a mixing bowl, whisk together the heavy cream and eggs until well combined. Add in the grated Gruyère cheese, cooked bacon, and sautéed onions (if using). Season with salt and pepper to taste. Mix everything together until evenly blended.
- Fill the Pie Crust: Carefully pour the filling mixture into the prepared pie crust. Use a spatula to spread it evenly, ensuring that the bacon and cheese are distributed throughout.
- Bake the Quiche: Place the quiche in the preheated oven and bake for 30-35 minutes, or until the filling is set and the top is lightly browned. You can check doneness by inserting a knife into the center; it should come out clean.
- Cool and Serve: Once baked, remove the quiche from the oven and let it cool for about 10-15 minutes before slicing. This allows the filling to set further and makes for cleaner slices. Garnish with fresh parsley if desired.
Extra Tips
When making Quiche Lorraine, consider letting your pie crust rest in the refrigerator for about 30 minutes before baking to prevent shrinking.
Additionally, for a richer flavor, you can use half-and-half instead of heavy cream. Feel free to experiment with different cheeses like cheddar or feta for a unique twist.
Always allow the quiche to cool slightly before serving, as this will enhance the flavor and texture. Enjoy your delightful French creation at your next picnic!
Italian Caprese Salad Skewers
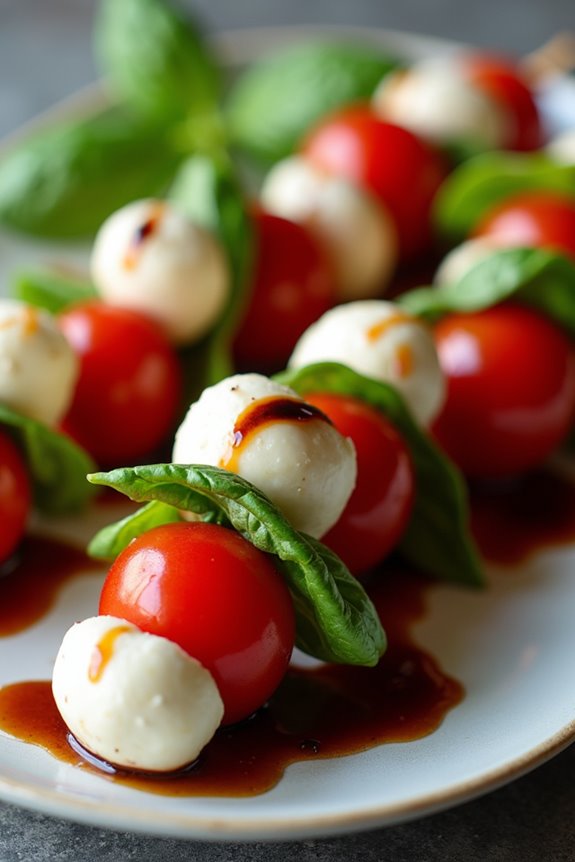
Italian Caprese Salad Skewers are a delightful and vibrant dish that brings together the classic flavors of Italy in a convenient and portable format. Perfect for picnics or gatherings, these skewers combine fresh mozzarella, ripe tomatoes, and fragrant basil, all drizzled with balsamic glaze for that extra touch of flavor. Not only are they visually appealing, but they also provide a revitalizing taste that embodies the essence of Italian cuisine.
The beauty of Caprese Salad Skewers lies in their simplicity and the quality of ingredients. When preparing this dish, it’s crucial to use the freshest produce available to guarantee the best flavor in every bite. These skewers aren’t just a great appetizer; they can also serve as a light meal or a side dish that complements various main courses. Gather your ingredients, and let’s create this delicious and easy-to-make Italian treat!
Ingredients (serving size: 4-6 people):
- 16 oz fresh mozzarella balls (bocconcini)
- 2 cups cherry tomatoes
- 1 bunch fresh basil leaves
- 1/4 cup balsamic glaze
- Salt and pepper to taste
- 12-15 skewers or toothpicks
Cooking Instructions:
- Prepare the Ingredients: Start by rinsing the cherry tomatoes and fresh basil leaves under cold water. Pat them dry with a paper towel to remove excess moisture. Drain the fresh mozzarella balls if they’re packed in water. This step guarantees that the skewers don’t become watery and maintains the integrity of the flavors.
- Assemble the Skewers: Take a skewer or toothpick and thread a cherry tomato onto it, followed by a basil leaf and then a mozzarella ball. Repeat this process until you have filled the skewer with 2-3 sets of tomatoes, basil, and mozzarella, depending on the size of your skewers. This layering not only looks appealing but also balances the flavors in each bite.
- Season the Skewers: Once all your skewers are assembled, lightly sprinkle them with salt and pepper to enhance the flavors. Be cautious not to over-season, as the balsamic glaze will add additional flavor.
- Drizzle with Balsamic Glaze: Arrange the assembled skewers on a serving platter and drizzle the balsamic glaze evenly over them. The glaze adds a sweet and tangy finish that complements the freshness of the ingredients beautifully.
- Serve and Enjoy: These skewers can be served immediately or refrigerated for a short while to chill before serving. Enjoy them as a revitalizing appetizer or part of your picnic spread!
Extra Tips:
For the best results, consider using heirloom tomatoes for a variety of colors and flavors. If you can’t find fresh mozzarella balls, you can cut a larger ball of mozzarella into bite-sized pieces. Additionally, feel free to customize the skewers by adding other ingredients like olives or pepperoni for a twist.
Make sure to prepare them shortly before serving to maintain freshness, and consider packing the balsamic glaze separately if taking them to a picnic to prevent sogginess. Enjoy your Italian Caprese Salad Skewers!
Spanish Tortilla Española

Spanish Tortilla Española, often simply referred to as “tortilla,” is a classic dish that embodies the heart of Spanish cuisine. This delicious omelette is made with eggs, potatoes, and onions, creating a hearty and satisfying meal that can be served hot or at room temperature.
It’s a versatile dish perfect for picnics, gatherings, or even as a light dinner, showcasing the simplicity and flavor of Spanish cooking.
Preparing a Tortilla Española is an art that combines the right ingredients and technique. The key to a fabulous tortilla lies in the texture of the potatoes and the perfect balance of flavors.
Whether you’re enjoying it as a main dish or a tapas-style appetizer, this dish is sure to impress your family and friends with its rich flavor and satisfying bite.
Ingredients (Serves 4-6)
- 6 large eggs
- 4 medium potatoes (about 2 pounds)
- 1 medium onion (optional)
- Salt, to taste
- Black pepper, to taste
- Olive oil (for frying)
Cooking Instructions
- Prepare the Potatoes: Peel the potatoes and slice them thinly (about 1/8 inch thick). You can use a mandoline for uniform slices. If using onion, slice it thinly as well. Rinse the potatoes in cold water to remove excess starch, then drain well.
- Cook the Potatoes and Onion: In a large skillet, heat a generous amount of olive oil over medium heat. Once hot, add the sliced potatoes and onion (if using), ensuring they’re well-coated in oil. Cook gently for about 20 minutes, stirring occasionally, until the potatoes are tender but not browned.
- Beat the Eggs: While the potatoes are cooking, crack the eggs into a large mixing bowl. Season with salt and pepper and whisk until well combined.
- Combine Potatoes and Eggs: Once the potatoes are cooked, drain them from the oil (you can reserve the oil for later use). Let them cool for a few minutes, then gently fold them into the bowl with the beaten eggs, making sure the potatoes are well-coated.
- Cook the Tortilla: In the same skillet, add a bit more olive oil if needed and heat over medium-low heat. Pour the potato and egg mixture into the skillet, spreading it evenly. Cook for about 5-7 minutes, or until the edges begin to set.
- Flip the Tortilla: To flip the tortilla, place a large plate over the skillet. Carefully invert the skillet to transfer the tortilla onto the plate. Then, slide the tortilla back into the skillet to cook the other side for another 5-7 minutes, until fully set and lightly browned.
- Serve: Once cooked, slide the tortilla onto a serving platter. Allow it to cool slightly before slicing into wedges. Serve warm or at room temperature.
Extra Tips
For the best flavor, use a good quality olive oil and be sure to cook the potatoes slowly to achieve the perfect tender texture.
Don’t rush the cooking process; this allows the flavors to meld beautifully. You can also experiment by adding other ingredients like bell peppers or herbs to customize your tortilla to your liking.
Enjoying it the next day can enhance the flavors even further, making it a fantastic dish to prepare in advance!
German Pretzel Bites With Mustard

German Pretzel Bites are a delightful snack perfect for gatherings or casual picnics. These soft, chewy bites are inspired by the classic German pretzel, but made bite-sized for easy sharing and dipping. The combination of the pretzel’s warm, golden-brown exterior and soft interior, paired with a tangy mustard dip, is sure to be a hit with friends and family alike.
Making these pretzel bites isn’t only simple but also a fun activity to do with loved ones. The process involves creating a dough, boiling the bites briefly in a baking soda bath, and baking them to perfection. Serve them warm with your favorite mustard, and you’re in for a treat that brings a taste of Germany right to your picnic basket.
Ingredients (serves 4-6):
- 1 ½ cups warm water (110°F)
- 1 packet active dry yeast (2 ¼ teaspoons)
- 1 tablespoon granulated sugar
- 4 cups all-purpose flour
- 1 teaspoon kosher salt
- ½ cup baking soda (for the boiling bath)
- 1 large egg (for egg wash)
- Coarse sea salt (for sprinkling)
- Mustard (for dipping)
Cooking Instructions:
- Prepare the Dough: In a large mixing bowl, combine the warm water, yeast, and sugar. Let it sit for about 5 minutes until it becomes frothy. This indicates that the yeast is active. Next, add the flour and kosher salt to the bowl and mix until a dough forms.
- Knead the Dough: Transfer the dough to a floured surface and knead it for about 5-7 minutes until it becomes smooth and elastic. If the dough is sticky, sprinkle a little more flour as needed. Once kneaded, shape it into a ball.
- Let the Dough Rise: Place the dough ball in a greased bowl, cover it with a damp cloth, and let it rise in a warm place for about 1 hour, or until it has doubled in size.
- Preheat the Oven: While the dough is rising, preheat your oven to 425°F (220°C). Line a baking sheet with parchment paper for easy cleanup.
- Shape the Pretzel Bites: Once the dough has risen, punch it down and transfer it to a floured surface. Divide the dough into sections and roll each section into a rope about ½ inch thick. Cut the ropes into 1-inch pieces to create bite-sized pretzel pieces.
- Boil the Pretzel Bites: In a large pot, bring 10 cups of water to a boil and add the baking soda. Carefully drop the pretzel bites into the boiling water (in batches if necessary) for about 30 seconds. This step gives the pretzels their characteristic flavor and texture. Remove the bites with a slotted spoon and place them on the prepared baking sheet.
- Egg Wash and Season: Beat the egg in a small bowl and brush it over the pretzel bites to give them a shiny finish. Sprinkle coarse sea salt on top for added flavor.
- Bake: Place the baking sheet in the preheated oven and bake for 12-15 minutes or until the pretzel bites are golden brown.
- Serve with Mustard: Allow the pretzel bites to cool slightly before serving. Arrange them on a plate and serve with your choice of mustard for dipping.
Extra Tips:
For an extra flavorful twist, consider adding spices like garlic powder or onion powder to the dough before kneading. If you enjoy a bit of sweetness, you can sprinkle some cinnamon sugar on top after brushing with the egg wash.
These pretzel bites are best enjoyed fresh from the oven, but you can also store them in an airtight container for a day or two. Reheat them in the oven to restore their soft texture before serving!
Greek Tzatziki and Pita Bread

Greek Tzatziki is a revitalizing yogurt-based dip that perfectly complements the warm, fluffy pita bread, making it a staple in Mediterranean cuisine. Tzatziki is made with fresh cucumbers, garlic, and herbs, creating a delightful balance of flavors that’s both cooling and savory.
This dish isn’t only delicious but also incredibly versatile, serving as an appetizer, a side dish, or even a light meal, especially during picnics or summer gatherings.
Pita bread, soft and slightly chewy, pairs beautifully with tzatziki, providing a perfect vessel for scooping up the creamy dip. Making your own pita bread can elevate this dish even further, allowing you to enjoy it warm and fresh out of the oven.
Whether you opt for store-bought or homemade, the combination of Greek Tzatziki and pita bread is sure to impress your family and friends at your next picnic.
Ingredients (serving size: 4-6 people)
- 2 cups Greek yogurt
- 1 medium cucumber
- 2 cloves garlic, minced
- 2 tablespoons extra virgin olive oil
- 1 tablespoon white wine vinegar
- 1 tablespoon fresh dill, chopped (or 1 teaspoon dried dill)
- Salt and pepper to taste
- 4-6 pita breads
Cooking Instructions
- Prepare the Cucumber: Start by washing the cucumber thoroughly. Then, using a box grater or a food processor, grate the cucumber. After grating, place the cucumber in a clean kitchen towel or cheesecloth and squeeze out excess moisture. This step is essential as it prevents the tzatziki from becoming watery.
- Mix the Yogurt Base: In a large mixing bowl, combine the Greek yogurt, minced garlic, olive oil, and white wine vinegar. Stir well until all the ingredients are fully incorporated. Greek yogurt provides a creamy texture, while garlic adds a punchy flavor.
- Incorporate the Cucumber and Herbs: Add the drained cucumber to the yogurt mixture along with the chopped dill. Season with salt and pepper to taste. Gently fold the ingredients together until evenly mixed. The dill not only adds flavor but also enhances the freshness of the tzatziki.
- Chill the Tzatziki: Cover the bowl with plastic wrap or a lid and refrigerate the tzatziki for at least 30 minutes. This chilling time allows the flavors to meld together beautifully, enhancing the overall taste of the dip.
- Prepare the Pita Bread: If you’re making homemade pita, preheat your oven to 475°F (245°C). Roll out the dough into circles and bake for about 5-7 minutes until they puff up and are lightly golden. If using store-bought, simply warm them in a dry skillet or wrap them in foil and heat them in the oven for a few minutes.
- Serve: Once the tzatziki has chilled and the pita is warmed, arrange them on a serving platter. Serve the tzatziki in a bowl alongside the pita bread, allowing guests to dip and enjoy at their leisure.
Extra Tips
For an added twist, you can experiment with different herbs such as mint or parsley to create unique flavor profiles in your tzatziki.
Additionally, consider serving it with sliced vegetables like carrots or bell peppers for a colorful platter. If you’re preparing this for a picnic, remember to pack the tzatziki in a sealed container and keep it refrigerated until you’re ready to serve to maintain its freshness.
Enjoy your Greek-inspired picnic treat!
British Cheese and Charcuterie Platter

A British Cheese and Charcuterie Platter is an indulgent and delightful way to enjoy a picnic or a casual gathering with friends and family. This platter showcases the rich diversity of British cheeses alongside a selection of cured meats, pickles, and accompanying elements that enhance the flavors. It’s not just about putting together food; it’s about creating an experience where each bite reflects the essence of British culinary traditions.
To create a successful cheese and charcuterie platter, it’s vital to select a range of textures and flavors. Consider including a creamy blue cheese, a sharp cheddar, and a mild goat cheese, complemented by a variety of cured meats such as prosciutto, salami, and chorizo.
Don’t forget the accompaniments; they play a significant role in elevating the dish. Fresh bread, crackers, seasonal fruits, and artisanal condiments will round out your platter beautifully and guarantee that your guests will be raving about it long after the last bite.
Ingredients (Serves 4-6)
- 200g mature cheddar cheese
- 200g blue cheese (such as Stilton)
- 200g goat cheese
- 150g prosciutto
- 150g salami
- 150g chorizo
- 1 baguette or ciabatta loaf
- 100g assorted crackers
- 150g pickled onions
- 150g assorted olives
- Fresh fruits (such as grapes, figs, or apple slices)
- 100g chutney (such as Branston pickle)
- Fresh herbs (such as rosemary or thyme) for garnish
Instructions
1. Prepare the Cheeses: Start by taking the cheeses out of the refrigerator about 30 minutes before serving. This allows them to come to room temperature, enhancing their flavors. Cut the cheddar into small cubes, the blue cheese into wedges, and the goat cheese into slices or rounds.
Arrange them on a large serving board or platter.
2. Slice the Meats: Use a sharp knife to slice the prosciutto, salami, and chorizo into thin pieces. You can roll the slices for an appealing presentation or arrange them flat on the platter. Position the meats around the cheeses to create a balanced look.
3. Add Accompaniments: Place your selection of crackers and slices of the baguette or ciabatta loaf in a separate section of the platter. This prevents them from getting soggy and allows guests to choose their preferred base.
4. Incorporate Pickles and Olives: Fill small bowls with pickled onions and assorted olives, and place them on the platter. These tangy elements are perfect for cleansing the palate between bites of cheese and meat.
5. Garnish with Fresh Fruit: Scatter fresh fruits like grapes, figs, or apple slices around the cheeses and meats. The sweetness of the fruit contrasts beautifully with the savory flavors of the platter.
6. Finish with Chutney and Herbs: Add a small bowl of chutney to the platter for a sweet and tangy element. Finally, sprinkle fresh herbs over the platter for a touch of color and aroma.
Extra Tips
When assembling your British Cheese and Charcuterie Platter, consider the seasonality of the ingredients. Opt for local cheeses and meats when possible to support regional producers and enhance the freshness of your platter.
Additionally, don’t hesitate to mix and match different textures and flavors; the key is variety! Encourage guests to create their combinations and enjoy the experience of tasting the different elements together.
Finally, if you want to elevate the presentation, consider using a wooden board or slate for a rustic, appealing look.
Portuguese Pasteis De Nata

Pasteis de Nata, also known as Portuguese custard tarts, are a delightful treat that embodies the rich culinary tradition of Portugal. These crispy pastry shells filled with a creamy, sweet custard are often enjoyed fresh from the oven, dusted with a sprinkle of cinnamon or powdered sugar.
Originating from the Jerónimos Monastery in Lisbon, these pastries have become a beloved dessert around the world, perfect for a picnic or a sweet ending to any meal.
Making Pasteis de Nata may seem intimidating, but with the right ingredients and steps, you can recreate this iconic dessert in your own kitchen. The combination of flaky pastry and smooth custard is sure to impress your friends and family.
Whether you serve them warm or at room temperature, these tarts are a delightful addition to any gathering, evoking the sunny streets of Lisbon with every bite.
Ingredients (Servings: 4-6)
- 1 package of puff pastry (thawed)
- 1 cup heavy cream
- 1 cup whole milk
- 3/4 cup granulated sugar
- 3 tablespoons all-purpose flour
- 6 large egg yolks
- 1 teaspoon vanilla extract
- 1 cinnamon stick
- Ground cinnamon (for dusting)
Cooking Instructions
- Prepare the Puff Pastry: Preheat your oven to 475°F (245°C). Roll out the thawed puff pastry on a lightly floured surface until it’s thin. Cut the pastry into circles that are about 4 inches in diameter, and then press them into the wells of a muffin tin, making sure to create a small edge around the top.
- Make the Custard Base: In a saucepan, combine the heavy cream, whole milk, sugar, flour, and the cinnamon stick. Whisk the mixture over medium heat until it begins to simmer. Remove it from the heat and let it cool slightly while you prepare the egg yolks.
- Combine Egg Yolks and Vanilla: In a separate bowl, whisk together the egg yolks and vanilla extract. Once the milk mixture has cooled down a bit (but is still warm), slowly pour it into the egg yolks while constantly whisking to avoid cooking the eggs.
- Strain the Custard Mixture: Pass the custard mixture through a fine mesh strainer into a clean bowl to remove any lumps and the cinnamon stick. This will guarantee a smooth custard filling.
- Fill the Pastry Shells: Carefully fill each puff pastry shell with the prepared custard mixture, filling them about three-quarters full to allow for rising during baking.
- Bake the Tarts: Place the muffin tin in the preheated oven and bake for about 15-20 minutes, or until the pastry is golden brown and the custard is set with a slightly caramelized top. Keep an eye on them to prevent burning.
- Cool and Serve: Once baked, remove the tarts from the oven and allow them to cool in the tin for a few minutes before transferring them to a wire rack. Dust with ground cinnamon before serving, either warm or at room temperature.
Extra Tips
When making Pasteis de Nata, using high-quality puff pastry will greatly enhance the texture and flavor of the tarts.
If you want to add a special touch, consider using a blow torch to caramelize the tops of the custard for an authentic finish.
Additionally, these tarts can be stored in an airtight container in the refrigerator for a couple of days, though they’re best enjoyed fresh.
For a unique twist, try incorporating flavors such as orange zest or almond extract into the custard for a different taste experience.
Danish Open-Faced Sandwiches
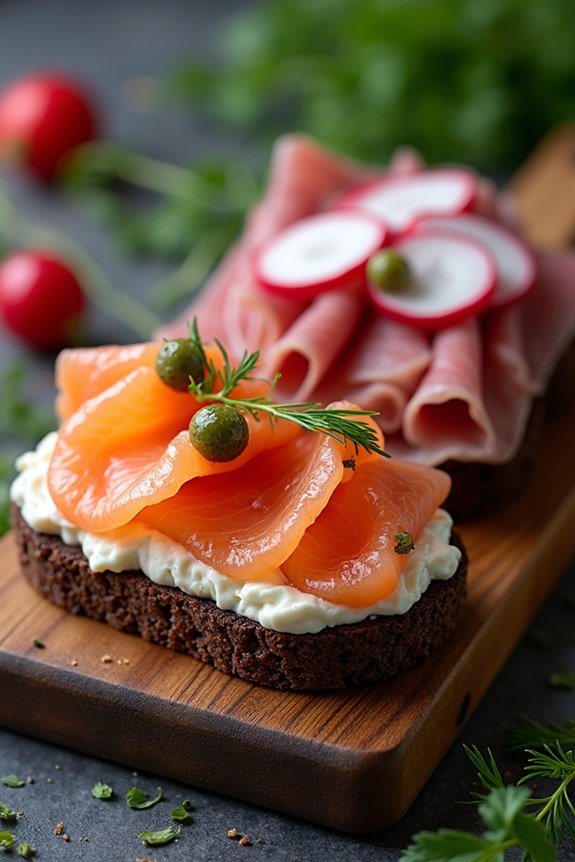
Danish open-faced sandwiches, known as “smørrebrød,” are a traditional and beloved part of Danish cuisine. These delightful sandwiches consist of a single slice of rye bread topped with a variety of ingredients, ranging from pickled herring to roast beef, and often include colorful garnishes such as fresh herbs, radishes, or pickles.
The beauty of smørrebrød lies in its versatility; you can mix and match toppings according to your preferences, making it a perfect dish for picnics or casual gatherings.
To prepare Danish open-faced sandwiches, it’s crucial to start with high-quality rye bread, which serves as the sturdy base for the toppings. Each layer should be thoughtfully chosen to create a balanced flavor profile and appealing presentation. The sandwiches can be made ahead of time, allowing the flavors to meld, but be sure to add any delicate garnishes just before serving to keep them fresh and vibrant.
Ingredients (Serving Size: 4-6 people)
- 4-6 slices of dense rye bread
- 200g pickled herring (or smoked salmon)
- 200g roast beef (thinly sliced)
- 100g cream cheese
- 2 tablespoons horseradish sauce
- 1 small red onion (thinly sliced)
- 4-6 radishes (thinly sliced)
- Fresh dill (for garnish)
- Capers (for garnish)
- Lettuce leaves (optional, for serving)
Cooking Instructions
- Prepare the Bread: Begin by slicing the rye bread into pieces about 1-inch thick if not pre-sliced. Lay the slices on a clean cutting board or serving platter. You may lightly toast them if you prefer a firmer texture, but traditionally, they’re served soft.
- Cream Cheese Spread: In a small bowl, mix the cream cheese with horseradish sauce until well combined. Spread a generous layer of this mixture on each slice of rye bread, creating a creamy base that enhances the overall flavor.
- Layer the Toppings: For the first topping, arrange the pickled herring or smoked salmon over half of the bread slices. For the remaining slices, layer the roast beef. Confirm that the toppings are evenly distributed and cover the majority of the bread surface.
- Add Garnishes: Top the herring with thin slices of red onion and a few capers for added flavor. On the roast beef, you can place fresh dill sprigs and radish slices for a pop of color and freshness.
- Final Presentation: If using lettuce leaves, place them on the serving platter as a decorative bed for the sandwiches. Arrange the open-faced sandwiches neatly on the platter, ensuring they’re visually appealing.
- Serve: Serve the sandwiches immediately, or cover them with plastic wrap and refrigerate if you’re preparing them ahead of time. Just remember to add delicate garnishes right before serving to maintain their freshness.
Extra Tips
When making Danish open-faced sandwiches, consider personalizing your toppings based on seasonal ingredients or your guests’ preferences. Feel free to experiment with different spreads, such as mustard or a remoulade, and try various meats or vegetarian options like roasted vegetables or cheese.
Presentation is key, so take the time to arrange your ingredients beautifully and consider adding a splash of color with fresh herbs or edible flowers. Enjoy the process and savor the delightful flavors of this traditional dish!
Hungarian Stuffed Peppers

Hungarian Stuffed Peppers, or “Töltött Paprika,” is a classic dish that showcases the vibrant flavors of Hungarian cuisine. This hearty meal consists of sweet bell peppers filled with a savory mixture of ground meat, rice, and spices, all simmered in a rich tomato sauce. Not only is this dish delicious, but it also makes for a visually appealing centerpiece at any picnic or family gathering. The combination of flavors melds beautifully during cooking, making each bite a delightful experience.
Preparing Hungarian Stuffed Peppers is a straightforward process that can be enjoyed by cooks of all skill levels. The peppers can be prepared in advance and heated up right before serving, making them an excellent option for meals on the go or outdoor dining. With a few simple ingredients and some time, you can create a comforting dish that brings a taste of Hungary to your table.
Ingredients (serving size: 4-6 people):
- 4-6 large bell peppers (any color)
- 1 pound ground beef or pork (or a combination)
- 1 cup uncooked rice
- 1 medium onion, finely chopped
- 2 cloves garlic, minced
- 1 can (14 oz) diced tomatoes
- 2 cups tomato sauce
- 1 teaspoon paprika (preferably Hungarian)
- 1 teaspoon salt
- 1/2 teaspoon black pepper
- 1 teaspoon dried oregano
- 1 tablespoon fresh parsley, chopped (for garnish)
- Olive oil (for sautéing)
Cooking Instructions:
- Prepare the Peppers: Start by preheating your oven to 350°F (175°C). While the oven heats, wash the bell peppers thoroughly. Slice the tops off the peppers and remove the seeds and membranes. Set the cleaned peppers aside.
- Cook the Filling: In a large skillet, heat about 2 tablespoons of olive oil over medium heat. Add the chopped onion and minced garlic, and sauté until the onions are translucent, approximately 3-5 minutes. Add the ground meat to the skillet, breaking it apart with a spoon, and cook until browned. Drain any excess fat.
- Mix the Filling: In a large bowl, combine the browned meat mixture with uncooked rice, diced tomatoes (with juice), paprika, salt, black pepper, and oregano. Stir the mixture until well combined, ensuring the rice and spices are evenly distributed throughout the filling.
- Stuff the Peppers: Carefully fill each bell pepper with the meat and rice mixture, pressing down slightly to pack the filling. Leave a little space at the top as the rice will expand while cooking.
- Prepare for Baking: In a large baking dish, spread a thin layer of tomato sauce on the bottom. Place the stuffed peppers upright in the dish and pour the remaining tomato sauce over the top. Cover the dish with aluminum foil to keep the moisture in.
- Bake the Peppers: Place the baking dish in the preheated oven and bake for approximately 45-60 minutes, or until the peppers are tender and the rice is fully cooked. Remove the foil during the last 15 minutes to slightly brown the tops.
- Serve and Garnish: Once cooked, take the stuffed peppers out of the oven and let them cool for a few minutes. Serve warm, garnished with fresh parsley for an added touch of flavor.
Extra Tips: When choosing your bell peppers, opt for ones that are firm and free of blemishes for the best results. You can also experiment with different types of meat or even make a vegetarian version by using lentils or quinoa.
For added flavor, consider incorporating spices like cayenne pepper for a kick or fresh herbs for a burst of freshness. This dish can be made ahead of time, stored in the refrigerator, and reheated, making it a convenient option for busy days.
Czech Koláče Pastries

Czech Koláče are delightful pastries filled with sweet or savory fillings, popular throughout the Czech Republic and other Central European countries. These pastries are typically made from a soft, yeast-based dough that’s rolled out and filled with a variety of ingredients such as fruit preserves, sweet cheese, or poppy seeds.
They’re often served at celebrations, family gatherings, or simply enjoyed with a cup of coffee or tea. Making Koláče is a rewarding experience, as the process involves both baking and crafting, allowing you to get creative with your fillings.
Whether you choose to fill them with traditional plum jam or opt for a more modern twist with chocolate, these pastries are sure to be a hit at your next picnic or gathering. The light, fluffy texture of the dough combined with the rich flavors of the filling makes for a perfect treat that everyone will enjoy.
Ingredients (Serves 4-6):
- 2 cups all-purpose flour
- 1/2 cup milk, warmed
- 2 tablespoons granulated sugar
- 1/2 teaspoon salt
- 1 packet (2 1/4 teaspoons) active dry yeast
- 1/4 cup unsalted butter, softened
- 1 large egg
- 1/2 cup fruit preserves (plum, apricot, or cherry)
- 1/2 cup farmer’s cheese or sweetened cream cheese (optional)
- 1 egg yolk (for egg wash)
- Poppy seeds or powdered sugar (for garnish, optional)
Cooking Instructions:
- Activate the Yeast: In a small bowl, combine the warmed milk, sugar, and yeast. Let it sit for about 5-10 minutes until it becomes frothy. This indicates that the yeast is active and ready to be used in the dough.
- Make the Dough: In a large mixing bowl, combine the flour and salt. Make a well in the center and add the yeast mixture, softened butter, and egg. Mix until a dough begins to form. If the dough is too sticky, add a little more flour, one tablespoon at a time.
- Knead the Dough: On a lightly floured surface, knead the dough for about 5-7 minutes until it becomes smooth and elastic. This step is essential for developing the gluten which gives the pastries their light texture.
- First Rise: Place the kneaded dough in a lightly greased bowl, cover it with a clean kitchen towel, and let it rise in a warm place for about 1-1.5 hours or until it has doubled in size.
- Shape the Koláče: Once the dough has risen, punch it down to release the air. Roll it out to about 1/4 inch thickness on a floured surface. Use a round cutter or a glass to cut out circles of dough (about 3 inches in diameter).
- Fill and Fold: Place a teaspoon of your chosen filling (fruit preserves or cheese) in the center of each circle. Fold the edges of the dough slightly over the filling, pinching them together to form a pocket, leaving some of the filling exposed.
- Second Rise: Place the filled Koláče on a greased baking sheet. Cover with a towel and let them rise again for about 30 minutes.
- Preheat the Oven: While the Koláče are rising, preheat your oven to 375°F (190°C).
- Egg Wash: In a small bowl, beat the egg yolk and brush it over the tops of the Koláče. This will give them a beautiful golden color as they bake.
- Bake: Bake the Koláče in the preheated oven for 15-20 minutes or until they’re golden brown. Keep an eye on them to make sure they don’t overbake.
- Cool and Serve: Once baked, remove from the oven and let them cool slightly on a wire rack. If desired, sprinkle with poppy seeds or powdered sugar before serving.
Extra Tips:
When making Czech Koláče, feel free to experiment with various fillings to suit your taste preferences. You can use seasonal fruits for a fresh twist or even savory fillings like cheese and herbs.
Confirm that the dough is well-kneaded for the best texture, and consider letting it rise in a slightly warm oven or near a heat source to speed up the rising process. If you want to make them ahead of time, Koláče can also be frozen after baking; simply reheat them in the oven when you’re ready to serve. Enjoy your baking!
Swedish Meatballs With Lingonberry Sauce

Swedish Meatballs, or Köttbullar, are a beloved classic in Swedish cuisine that have gained popularity worldwide. These savory, tender meatballs are traditionally served with a creamy gravy and a sweet-tart lingonberry sauce, making for a delightful combination of flavors that are bound to please any palate.
Perfect for a picnic or a cozy family dinner, this dish captures the essence of Scandinavian comfort food, bringing warmth and satisfaction with every bite.
The meatballs are made from a mixture of ground meat, typically a combination of beef and pork, along with breadcrumbs soaked in milk to create a moist texture. Seasoned with classic spices such as allspice and nutmeg and served alongside creamy gravy and tart lingonberry sauce, this dish is a true representation of Swedish culinary tradition.
Prepare to impress your friends and family with this easy-to-follow recipe that will transport you straight to a charming Swedish kitchen.
Ingredients (Serves 4-6)
- 1 lb ground beef
- 1 lb ground pork
- 1 cup breadcrumbs
- 1/2 cup milk
- 1/2 onion, finely chopped
- 1 egg
- 1 tsp salt
- 1/2 tsp black pepper
- 1/2 tsp ground allspice
- 1/2 tsp ground nutmeg
- 3 tbsp butter (for frying)
For the Gravy:
- 3 tbsp all-purpose flour
- 2 cups beef broth
- 1 cup heavy cream
- 1 tbsp soy sauce
- Salt and pepper to taste
For Serving:
– Lingonberry sauce (store-bought or homemade)
Cooking Instructions
1. Prepare the Meatball Mixture: In a large bowl, combine the ground beef and ground pork. In a separate bowl, soak the breadcrumbs in milk for about 5 minutes, allowing them to absorb the liquid.
Add the soaked breadcrumbs to the meat mixture, along with the finely chopped onion, egg, salt, black pepper, allspice, and nutmeg. Mix everything thoroughly until well combined, but be careful not to overmix, as this can lead to tough meatballs.
2. Shape the Meatballs: Once the mixture is ready, wet your hands slightly to prevent sticking, and shape the mixture into small meatballs, about 1 inch in diameter. Place the formed meatballs on a baking sheet lined with parchment paper.
3. Cook the Meatballs: In a large skillet, melt the butter over medium heat. Add the meatballs in batches to avoid overcrowding and cook them until they’re browned on all sides, about 8-10 minutes. Ascertain they’re cooked through (internal temperature should reach 165°F).
Once cooked, remove the meatballs from the skillet and set aside on a plate.
4. Make the Gravy: In the same skillet, add the flour to the remaining drippings and whisk continuously to form a roux, cooking for about 1-2 minutes until golden. Gradually pour in the beef broth while whisking to prevent lumps.
Add the heavy cream and soy sauce, continuing to whisk until the gravy thickens, about 5 minutes. Season with salt and pepper to taste.
5. Combine and Serve: Return the meatballs to the skillet with the gravy, gently coating them in the sauce. Allow them to simmer for a couple of minutes to absorb the flavors.
Serve the Swedish meatballs warm alongside lingonberry sauce for a delightful contrast.
Extra Tips
For an authentic touch, serve your Swedish meatballs with boiled potatoes or creamy mashed potatoes, as they pair beautifully with the gravy.
If you want to add a bit of depth to the flavor, consider sautéing the onions until they’re caramelized before adding them to the meat mixture. Additionally, if you can’t find lingonberry sauce, cranberry sauce can be a suitable substitute, providing a similar sweet-tart flavor.
Enjoy your delicious Swedish Meatballs with Lingonberry Sauce!
Belgian Waffles With Fresh Berries

Belgian waffles are a delicious treat that can elevate any picnic to a gourmet experience. Their light and fluffy texture, combined with a crispy exterior, makes them the perfect canvas for a variety of toppings. In this recipe, we’ll focus on fresh berries, which not only add a burst of color but also a revitalizing sweetness that pairs beautifully with the rich flavor of the waffles. This dish is ideal for serving 4-6 people, making it perfect for a family outing or a gathering with friends.
The best part about Belgian waffles is their versatility. While this recipe highlights fresh berries, you can easily swap them out for other toppings like whipped cream, chocolate sauce, or even a sprinkle of powdered sugar. This makes them a fantastic choice for any occasion, allowing everyone to customize their waffle to their liking.
Let’s plunge into the ingredients and get started on making these delightful Belgian waffles with fresh berries!
Ingredients (serving size: 4-6 people):
- 2 cups all-purpose flour
- 2 tablespoons sugar
- 1 tablespoon baking powder
- 1/2 teaspoon salt
- 2 large eggs
- 1 3/4 cups milk
- 1/2 cup vegetable oil
- 1 teaspoon vanilla extract
- Fresh berries (strawberries, blueberries, raspberries) for topping
- Whipped cream (optional)
- Maple syrup (optional)
Cooking Instructions:
- Preheat the Waffle Iron: Begin by preheating your Belgian waffle iron according to the manufacturer’s instructions. This makes certain that your waffles cook evenly and become crispy on the outside.
- Mix Dry Ingredients: In a large mixing bowl, combine the flour, sugar, baking powder, and salt. Use a whisk to mix them thoroughly, making sure there are no lumps. This mixture will provide the base for your waffle batter.
- Combine Wet Ingredients: In another bowl, beat the eggs and then mix in the milk, vegetable oil, and vanilla extract. Whisk these ingredients together until they’re well combined and smooth.
- Combine Wet and Dry Mixtures: Pour the wet ingredients into the bowl of dry ingredients. Gently fold the mixtures together using a spatula or a wooden spoon until just combined. Be careful not to overmix; a few lumps are perfectly fine.
- Cook the Waffles: Lightly grease the waffle iron with cooking spray or a brush of oil. Pour an appropriate amount of batter onto the center of the preheated waffle iron (usually about 1 cup, but refer to your waffle iron’s instructions). Close the lid and cook until the waffles are golden brown and crisp, usually about 4-5 minutes.
- Serve with Fresh Berries: Carefully remove the waffle from the iron and place it on a plate. Top with a generous helping of fresh berries. If desired, add whipped cream or a drizzle of maple syrup for extra sweetness.
Extra Tips: To enhance the flavor of your waffles, consider adding a pinch of cinnamon or nutmeg to the dry ingredients. If you have leftover batter, you can store it in the refrigerator for up to 24 hours or freeze it for later use.
Also, feel free to experiment with different types of berries or even mix in some chocolate chips for a fun twist! Enjoy your Belgian waffles with fresh berries at your picnic for a delightful and satisfying meal.