

Cooking with kids can be such a joyful experience. Picture flour-dusted counters and little hands eager to contribute. Simple European recipes like mini pizzas or sweet crepes are perfect for this. They taste delightful and inspire creativity and teamwork. Plus, they’re easy enough for your little chefs to take the lead.
Easy Spaghetti Aglio E Olio
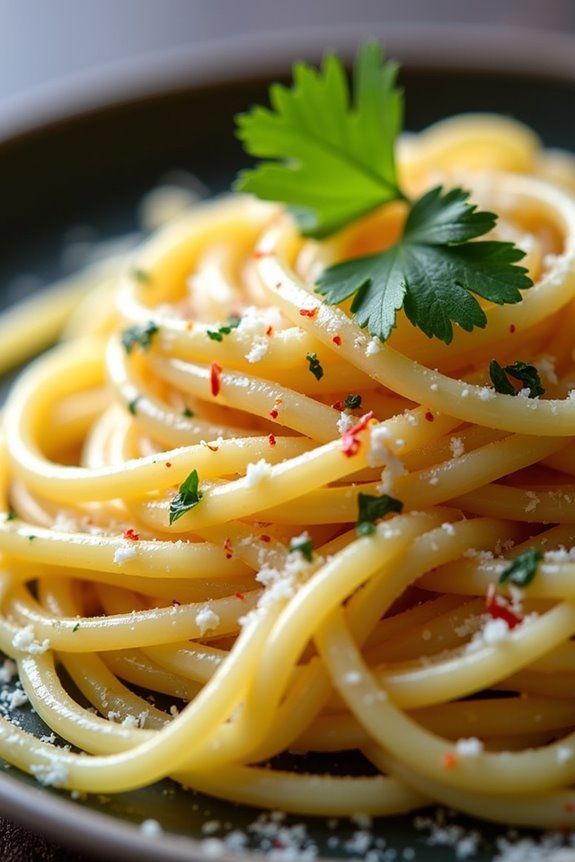
Easy Spaghetti Aglio E Olio is a classic Italian pasta dish that embodies simplicity and flavor, making it an ideal choice for kids and beginner cooks. With its minimal ingredients and straightforward cooking method, this dish isn’t only quick to prepare but also provides an opportunity for children to learn fundamental cooking techniques. The combination of garlic, olive oil, and parsley creates a delightful aroma and taste that’s sure to please young palates while introducing them to the joys of Italian cuisine.
Cooking Easy Spaghetti Aglio E Olio can be a fun activity for the whole family. Kids can help with tasks like measuring ingredients, stirring, and garnishing the dish. This recipe is perfect for a weeknight dinner or a weekend cooking project, allowing kids to take pride in their meal preparation. Plus, it can easily be customized by adding vegetables or proteins of your choice, making it a versatile dish for the whole family to enjoy.
Ingredients (serving size: 4-6 people):
- 1 pound (450g) spaghetti
- 6 cloves garlic, thinly sliced
- 1/2 cup (120ml) extra virgin olive oil
- 1/4 teaspoon red pepper flakes (adjust to taste)
- Salt, to taste
- 1/4 cup (15g) fresh parsley, finely chopped
- Grated Parmesan cheese (optional, for serving)
Cooking Instructions:
- Boil the Pasta: In a large pot, bring salted water to a boil. Add the spaghetti and cook according to the package instructions until al dente, typically around 8-10 minutes. Stir occasionally to prevent sticking.
- Prepare the Garlic Oil: While the pasta cooks, heat the olive oil in a large skillet over medium heat. Add the sliced garlic and red pepper flakes. Sauté gently, stirring frequently, until the garlic is golden and fragrant, about 2-3 minutes. Be careful not to burn the garlic as it can become bitter.
- Drain the Pasta: Once the spaghetti is cooked, reserve about a cup of the pasta water, then drain the pasta using a colander. Avoid rinsing the pasta, as you want to keep the starch that helps the sauce adhere.
- Combine Pasta and Sauce: Add the drained spaghetti directly to the skillet with the garlic oil. Toss the pasta in the oil, ensuring each strand is well coated. If the pasta seems dry, gradually add some reserved pasta water until you achieve a silky consistency.
- Add Finishing Touches: Stir in the chopped parsley and season with salt to taste. Mix everything thoroughly to combine the flavors.
- Serve: Divide the spaghetti among serving plates. If desired, sprinkle with grated Parmesan cheese for an extra touch of flavor. Serve immediately and enjoy your delicious Easy Spaghetti Aglio E Olio!
Extra Tips: When making Easy Spaghetti Aglio E Olio, be sure to use high-quality extra virgin olive oil for the best flavor. You can also experiment with the amount of garlic and red pepper flakes to suit your family’s taste preferences.
For a fun twist, consider adding sautéed vegetables like spinach or cherry tomatoes, or even cooked shrimp or chicken for added protein. Finally, encourage kids to help with plating, as it’s a great way to make them feel involved and proud of their culinary creation!
Mini Pizzas With Toppings Galore

Mini pizzas are a delightful treat that kids absolutely love! They aren’t only fun to eat but also encourage creativity in the kitchen. With a variety of toppings to choose from, children can customize their own mini pizzas, making it an enjoyable activity for the whole family. This recipe is suitable for 4-6 people, making it perfect for a family dinner or a gathering with friends.
In this recipe, we’ll use simple ingredients that you can find in your pantry or local grocery store. The beauty of mini pizzas lies in their versatility; you can mix and match toppings to suit everyone’s tastes. From classic pepperoni to vibrant vegetables, the options are endless. So, roll up your sleeves, and let’s get started on creating these delicious mini pizzas!
Ingredients (Serves 4-6):
- 1 package of pre-made pizza dough (or homemade dough)
- 1 cup pizza sauce
- 2 cups shredded mozzarella cheese
- 1/2 cup sliced pepperoni
- 1/2 cup sliced bell peppers (red, green, or yellow)
- 1/2 cup sliced black olives
- 1/2 cup diced onions
- 1/2 teaspoon dried oregano
- 1/2 teaspoon garlic powder
- Olive oil (for brushing)
- Flour (for dusting)
Cooking Instructions:
- Preheat the Oven: Start by preheating your oven to 425°F (220°C). A hot oven is essential for achieving a crispy crust for your mini pizzas.
- Prepare the Dough: On a clean surface dusted with flour, roll out the pre-made pizza dough to about 1/4 inch thick. Use a round cookie cutter or a glass to cut out small circles of dough, about 3-4 inches in diameter. This will be the base for your mini pizzas.
- Place on Baking Sheet: Line a baking sheet with parchment paper or lightly grease it with olive oil. Arrange the dough circles on the baking sheet, leaving some space between each one for expansion.
- Add Sauce: Using a spoon, spread a tablespoon of pizza sauce on each mini pizza base, leaving a small border around the edge for the crust.
- Sprinkle Cheese: Generously sprinkle shredded mozzarella cheese over the sauce on each mini pizza. This will give your pizzas that gooey, melty texture everyone loves.
- Add Toppings: Now comes the fun part! Let each child (or adult) add their favorite toppings to their mini pizza. Be creative with combinations! You can mix and match pepperoni, bell peppers, olives, onions, or any other toppings you desire.
- Season: Sprinkle a little dried oregano and garlic powder on top of the assembled pizzas for added flavor.
- Bake the Pizzas: Carefully place the baking sheet in the preheated oven. Bake for about 10-12 minutes or until the cheese is bubbly and the crust is golden brown. Keep an eye on them to prevent burning.
- Cool and Serve: Once baked, remove the mini pizzas from the oven and let them cool for a few minutes. Serve them warm and enjoy!
Extra Tips:
When making mini pizzas, don’t hesitate to get creative with your toppings. Leftover vegetables, meats, or cheeses can all be fantastic additions.
Also, consider offering a variety of sauces, such as barbecue or pesto, alongside the traditional pizza sauce. Encourage kids to experiment with flavors and combinations; this not only makes the cooking process more enjoyable but also helps them develop a taste for different ingredients.
Finally, remember that presentation is key—let kids arrange their toppings in fun patterns to make their mini pizzas even more appealing!
Simple French Crepes

French crepes are a delightful treat that can be enjoyed for breakfast, dessert, or even as a savory meal. These thin, delicate pancakes are incredibly versatile and can be filled with a variety of delicious ingredients. From sweet fillings like Nutella and fresh fruit to savory options such as ham and cheese, crepes are a fun way to get kids involved in the kitchen. They can help mix the batter, fill the crepes, and, of course, enjoy the tasty results!
Making crepes is a straightforward process that requires just a few simple ingredients. With a little practice, you’ll be flipping these light and airy pancakes in no time. This recipe will yield enough crepes to serve 4-6 people, perfect for a family breakfast or a fun weekend brunch with friends. Let’s get started on making some delicious Simple French Crepes!
Ingredients:
- 1 cup all-purpose flour
- 2 large eggs
- 1 ½ cups milk
- 2 tablespoons melted butter
- 1 tablespoon sugar (optional)
- 1 teaspoon vanilla extract (optional)
- A pinch of salt
- Extra butter or oil for cooking
Cooking Instructions:
- Prepare the Batter: In a mixing bowl, combine the flour and salt. Make a well in the center and add the eggs. Gradually whisk in the milk, mixing until smooth. Add the melted butter and sugar (if using), and whisk until fully combined. If you prefer a sweeter flavor, you can add vanilla extract at this stage. Let the batter rest for at least 30 minutes at room temperature; this helps to create a more tender crepe.
- Heat the Pan: Place a non-stick skillet or crepe pan over medium heat. Add a small amount of butter or oil to coat the bottom of the pan. Allow it to heat up until the butter is melted and bubbly but not browned.
- Cook the Crepes: Pour about ¼ cup of the batter into the center of the hot pan. Immediately tilt and swirl the pan in a circular motion to spread the batter thinly and evenly across the bottom. Cook for about 1-2 minutes or until the edges look set and the bottom is lightly golden.
- Flip the Crepe: Using a spatula, gently lift the edge of the crepe to check if it’s ready to flip. Once it’s golden, carefully slide the spatula underneath and flip it over. Cook for another 1-2 minutes on the other side until lightly golden. Repeat this process with the remaining batter, adding more butter to the pan as needed.
- Serve and Fill: Once all the crepes are cooked, stack them on a plate. You can fill the crepes with your favorite ingredients such as fresh fruits, whipped cream, chocolate spread, or savory fillings like cheese and ham. Fold or roll the crepes as desired and serve warm.
Extra Tips: To make your crepes even more enjoyable, consider experimenting with different fillings and toppings. Fresh berries, sliced bananas, or a sprinkle of powdered sugar can add a delightful sweetness to your crepes.
If you’re making savory crepes, try filling them with sautéed vegetables, cheese, and herbs for a delicious meal. Additionally, verify your pan is at the right temperature; if it’s too hot, the crepes may burn, and if it’s too cool, they won’t cook properly.
Practice makes perfect, so don’t worry if your first few crepes don’t turn out perfectly!
Classic Italian Risotto
Risotto is a quintessential Italian dish known for its creamy texture and rich flavor. It’s made by slowly cooking rice in broth, allowing it to absorb all the delicious flavors. This dish can be customized with a variety of ingredients such as vegetables, seafood, or meats, making it a versatile option for families. Kids will love the fun of stirring and watching the rice transform into a creamy delight, and they can even help with some of the simpler steps!
Making risotto from scratch might seem intimidating, but it’s actually quite straightforward. The key is to use Arborio rice, which is high in starch and provides the creaminess that risotto is famous for. With a little patience and attention, you can create a delicious Classic Italian Risotto that the whole family will enjoy. Let’s jump into the ingredients and cooking instructions to get started on this delightful dish.
Ingredients (Serves 4-6):
- 1 ½ cups Arborio rice
- 4 cups chicken or vegetable broth
- 1 cup dry white wine
- 1 medium onion, finely chopped
- 2 cloves garlic, minced
- ½ cup grated Parmesan cheese
- 2 tablespoons olive oil
- 2 tablespoons unsalted butter
- Salt and pepper to taste
- Fresh parsley, chopped (for garnish)
Cooking Instructions:
- Prepare the Broth: In a saucepan, heat the chicken or vegetable broth over medium heat until it’s simmering. Keep it warm on the stove, as you’ll be adding it gradually to the rice.
- Sauté Onion and Garlic: In a large, heavy-bottomed pot, heat the olive oil over medium heat. Add the chopped onion and sauté for about 3-4 minutes until it becomes translucent. Stir in the minced garlic and cook for another minute until fragrant.
- Toast the Rice: Add the Arborio rice to the pot with the onions and garlic. Stir the rice for about 2-3 minutes, making sure that each grain is coated with oil and lightly toasted. This step enhances the nutty flavor of the rice.
- Add the Wine: Pour in the dry white wine and stir continuously until the wine is mostly absorbed by the rice. This should take about 2-3 minutes. The acidity from the wine complements the creamy texture of the risotto.
- Incorporate the Broth Gradually: Begin adding the warm broth, one ladleful at a time, to the rice. Stir constantly and wait until the liquid is mostly absorbed before adding more broth. This process will take about 18-20 minutes, and the rice should be creamy and al dente when finished.
- Finish with Cheese and Butter: Once the rice is cooked, remove the pot from heat. Stir in the grated Parmesan cheese and butter until melted and well combined. Season with salt and pepper to taste.
- Serve: Spoon the risotto into bowls and garnish with chopped fresh parsley. Serve immediately while it’s warm and creamy.
Extra Tips:
For an added flavor boost, consider incorporating seasonal vegetables like peas, asparagus, or mushrooms into your risotto. You can sauté them along with the onions for a delicious variation.
Additionally, always taste the risotto as you cook; this will help you achieve the perfect consistency and seasoning. Remember, the key to a great risotto is patience—stirring and adding broth gradually guarantees a creamy and delightful dish that everyone will love!
Easy Spanish Tortilla

The Easy Spanish Tortilla, also known simply as a tortilla de patatas, is a classic Spanish dish that brings together the comforting flavors of potatoes and eggs. This dish isn’t only delicious but also simple enough for kids to help in the kitchen. It makes for a great meal any time of the day, whether as a hearty breakfast, a light lunch, or a satisfying dinner.
The tortilla can also be served warm or at room temperature, making it a versatile dish for family gatherings or picnics. This recipe is perfect for serving 4-6 people, making it ideal for family meals. With its soft texture and delightful flavor, the Easy Spanish Tortilla will surely become a favorite among both kids and adults.
So gather your ingredients and let’s get cooking!
Ingredients:
- 4 medium-sized potatoes
- 1 medium onion (optional)
- 6 large eggs
- 1/2 cup olive oil
- Salt to taste
- Pepper to taste
Cooking Instructions:
1. Prepare the Potatoes and Onion: Begin by peeling the potatoes and slicing them thinly, about 1/8 inch thick. If you choose to use onion, slice it thinly as well. The thin slices will cook evenly and contribute to a tender texture in the final dish.
2. Fry the Potatoes and Onion: In a large frying pan, heat the olive oil over medium heat. Once hot, add the sliced potatoes (and onion, if using) to the pan. Cook them gently, stirring occasionally, for about 15-20 minutes until the potatoes are soft but not browned.
Drain the potatoes and onions from the oil and let them cool slightly.
3. Whisk the Eggs: In a large bowl, crack the eggs and whisk them until they’re well combined. Season with salt and pepper to taste. This will create a fluffy base for your tortilla.
4. Combine Ingredients: Once the potatoes and onions have cooled, gently fold them into the beaten eggs until fully incorporated. Make sure the potatoes are coated evenly, as this will help bind the tortilla together.
5. Cook the Tortilla: In the same frying pan, remove excess oil, leaving just a thin layer. Heat the pan back on medium-low. Pour the potato-egg mixture into the pan. Cook for about 5-7 minutes, or until the edges start to set and the bottom is golden brown.
6. Flip the Tortilla: To Flip the Tortilla, place a large plate over the frying pan, carefully invert the pan, and let the tortilla slide onto the plate. Then, gently slide the tortilla back into the pan to cook the other side for an additional 5 minutes until it’s fully cooked and golden brown on both sides.
7. Serve: Once cooked, slide the tortilla onto a serving plate. Allow it to cool for a few minutes before slicing it into wedges. Serve warm or at room temperature.
Extra Tips:
When making an Easy Spanish Tortilla, feel free to get creative with your ingredients! You can add various vegetables like bell peppers or spinach for added color and nutrition.
If you prefer a creamier texture, you can whisk in a splash of milk or cream into the eggs. Remember to keep an eye on the heat; cooking it too quickly can lead to an uneven cook and a burnt bottom. Enjoy your homemade tortilla, and don’t hesitate to get the kids involved in the preparation process!
Kid-Friendly Beef Stroganoff
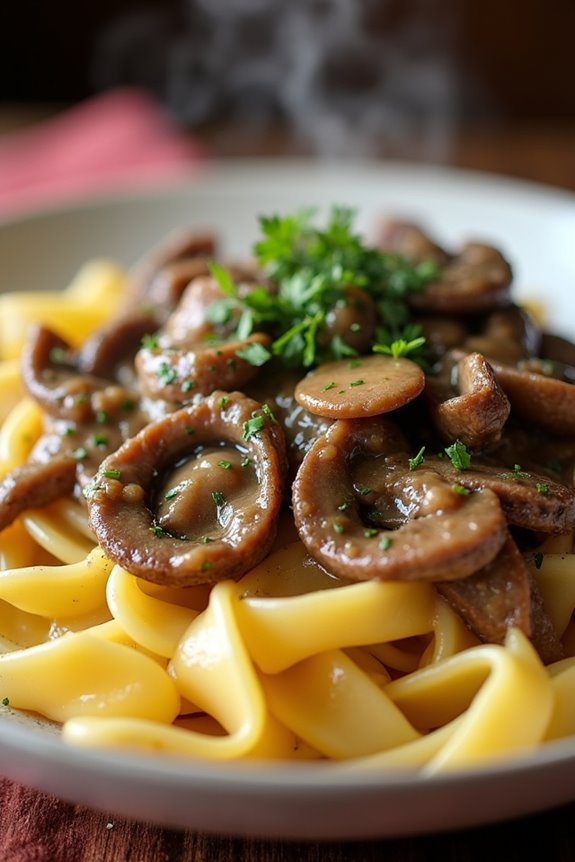
Beef Stroganoff is a classic European dish that combines tender pieces of beef with a creamy sauce, making it a favorite among kids and adults alike. This kid-friendly version is simplified to guarantee it’s easy to prepare while still delivering all the delicious flavors that make this dish so beloved.
With a few adjustments, you can create a meal that your children will enjoy, and even help you make! Serve it over egg noodles or rice for a complete meal that’s sure to satisfy.
This recipe isn’t only quick to whip up, but it also allows for some fun in the kitchen with your little ones. Involving them in the cooking process can spark their interest in trying new foods and learning about different cuisines.
Let’s plunge into this delightful dish that promises a hearty family dinner without the fuss!
Ingredients (Serves 4-6)
- 1 pound beef sirloin, thinly sliced
- 2 tablespoons olive oil
- 1 medium onion, chopped
- 2 cloves garlic, minced
- 8 ounces mushrooms, sliced
- 1 cup beef broth
- 1 tablespoon Worcestershire sauce
- 1 teaspoon dijon mustard
- 1 cup sour cream
- Salt and pepper to taste
- 12 ounces egg noodles or rice, for serving
- Fresh parsley, chopped (for garnish)
Cooking Instructions
- Prepare the Ingredients: Start by slicing the beef sirloin into thin strips. Chop the onion and garlic, and slice the mushrooms. Having all ingredients prepped will make the cooking process smoother and more enjoyable.
- Cook the Beef: In a large skillet, heat the olive oil over medium-high heat. Add the sliced beef sirloin to the skillet and season with salt and pepper. Cook for about 3-4 minutes, stirring frequently, until the beef is browned but not fully cooked through. Remove the beef from the skillet and set it aside on a plate.
- Sauté the Vegetables: In the same skillet, add the chopped onion and sauté for about 2-3 minutes until it becomes translucent. Next, add the minced garlic and sliced mushrooms, cooking for another 3-4 minutes until the mushrooms are tender and any liquid has evaporated.
- Create the Sauce: Pour in the beef broth, Worcestershire sauce, and dijon mustard to the skillet. Stir well to combine, scraping up any bits stuck to the bottom of the pan. Bring the mixture to a simmer and let it cook for about 5 minutes.
- Combine Everything: Lower the heat to medium-low and return the browned beef to the skillet. Stir in the sour cream, mixing everything until well combined. Allow it to cook for another 2-3 minutes, just until the beef is heated through and coated in the creamy sauce.
- Serve: While the stroganoff is finishing, cook the egg noodles or rice according to package instructions. Once ready, serve the beef stroganoff over the noodles or rice. Garnish with chopped parsley for a fresh touch.
Extra Tips
When making Kid-Friendly Beef Stroganoff, consider letting your kids participate in simple tasks like stirring the sauce or adding ingredients to the skillet.
You can also swap out the beef for chicken or even mushrooms for a vegetarian option. If you want to make it even creamier, feel free to add a bit more sour cream or a splash of heavy cream.
Finally, don’t hesitate to customize the dish with your kids’ favorite vegetables or seasonings to make it even more appealing to their tastes!
Homemade Swedish Meatballs

Swedish meatballs are a beloved comfort food that kids and adults alike will enjoy. These small, savory meatballs are typically served with creamy gravy and are perfect for a family dinner or a cozy gathering with friends. They can be served with mashed potatoes, lingonberry sauce, or even over egg noodles, making them a versatile dish that can please any palate.
Plus, they’re simple enough for kids to help make, making it a fun cooking activity to do together!
In this recipe, we’ll guide you through making homemade Swedish meatballs from scratch. With a blend of ground meat, breadcrumbs, and spices, these meatballs are tender and full of flavor. The accompanying gravy takes just minutes to prepare, ensuring that your homemade Swedish meatballs will be a hit at the dinner table. Let’s get started!
Ingredients (Serving Size: 4-6 People)
- 1 pound ground beef
- 1/2 pound ground pork
- 1/2 cup breadcrumbs
- 1/4 cup grated onion
- 1/4 cup milk
- 1 large egg
- 1 teaspoon ground allspice
- 1 teaspoon salt
- 1/2 teaspoon black pepper
- 1 tablespoon fresh parsley, chopped
- 2 tablespoons butter
- 2 tablespoons flour
- 2 cups beef broth
- 1 cup heavy cream
- Lingonberry sauce (optional, for serving)
Cooking Instructions
1. Prepare the Meatball Mixture: In a large bowl, combine the ground beef and ground pork. Add the breadcrumbs, grated onion, milk, egg, allspice, salt, pepper, and parsley. Mix everything together using your hands or a spoon until well combined.
Be careful not to overmix, as this can make the meatballs tough.
2. Form the Meatballs: Once the mixture is well combined, wet your hands slightly to prevent sticking and form small meatballs, about 1 inch in diameter. Place them on a baking sheet or plate as you go. This should yield about 20-24 meatballs.
3. Cook the Meatballs: In a large frying pan, melt 2 tablespoons of butter over medium heat. Once the butter is melted and sizzling, add the meatballs to the pan in batches. Cook for about 6-8 minutes, turning occasionally until they’re browned on all sides and cooked through.
Remove the meatballs from the pan and set them aside on a plate.
4. Make the Gravy: In the same pan, sprinkle the flour over the remaining fat in the pan and whisk to combine. Cook for 1-2 minutes until the flour is lightly browned. Gradually pour in the beef broth while whisking constantly to prevent lumps.
Bring the mixture to a simmer and cook until it thickens, about 3-4 minutes.
5. Finish the Gravy: Stir in the heavy cream and return the meatballs to the pan. Simmer for an additional 5 minutes to allow the meatballs to absorb some of the gravy flavor.
Taste and adjust seasoning if necessary.
6. Serve: Serve the meatballs hot, drizzled with gravy, and accompanied by mashed potatoes or noodles. If desired, add a dollop of lingonberry sauce on the side for a traditional touch.
Extra Tips
When making Swedish meatballs, consider using a mixture of meats for a richer flavor; turkey or chicken can also be great alternatives.
Keep an eye on the cooking time; overcooking can dry them out. For added fun, let your kids shape the meatballs – it’s a great way to get them involved in the kitchen!
If you have leftovers, they can be stored in the fridge for up to 3 days or frozen for later enjoyment. Enjoy your cooking adventure!
No-Bake Biscuit Cake

No-Bake Biscuit Cake is a delightful dessert that’s simple to make and perfect for kids. This easy recipe requires no baking, making it an excellent choice for young chefs enthusiastic to get involved in the kitchen.
With layers of creamy chocolate and crunchy biscuits, this cake is sure to be a hit at any gathering or family dinner. Plus, it’s adaptable, allowing you to add your favorite fruits or nuts for a personalized touch.
Creating this dessert is a fun and interactive experience for kids, as they can help with mixing, layering, and decorating. The biscuit cake can be made ahead of time, making it convenient for busy parents. Just remember to let it chill in the fridge before serving to achieve the right consistency.
Get ready to indulge in a delicious treat that everyone will love!
Ingredients (serving size: 4-6 people):
- 200g digestive biscuits
- 100g unsalted butter
- 150g dark chocolate (or milk chocolate, if preferred)
- 100g sweetened condensed milk
- 1 teaspoon vanilla extract
- Optional toppings: chocolate sprinkles or crushed nuts
Instructions:
- Prepare the Biscuits: Start by breaking the digestive biscuits into small pieces. You can place them in a zip-lock bag and crush them with a rolling pin or simply break them by hand. Aim for a mix of small chunks and finer crumbs for texture.
- Melt the Chocolate and Butter: In a heatproof bowl, combine the dark chocolate and unsalted butter. Place the bowl over a pot of simmering water (double boiler method) to melt the ingredients gently. Stir occasionally until both are completely melted and combined. Remove from heat and let it cool slightly.
- Mix in Condensed Milk and Vanilla: Once the chocolate and butter mixture has cooled a bit, add the sweetened condensed milk and vanilla extract. Stir well until everything is fully combined and smooth.
- Combine with Biscuits: Add the crushed biscuits to the chocolate mixture. Gently fold the biscuits into the chocolate until they’re fully coated. Confirm that all the biscuit pieces are covered with the chocolate mixture.
- Shape the Cake: Line a loaf pan or a round cake tin with parchment paper for easy removal. Pour the biscuit mixture into the prepared pan and press it down firmly with the back of a spoon or your hands to create an even layer.
- Chill the Cake: Cover the pan with plastic wrap and place it in the refrigerator for at least 4 hours or overnight. This will help the cake firm up and hold its shape when sliced.
- Serve: Once the cake has chilled and set, remove it from the refrigerator. Carefully lift it out of the pan using the parchment paper. Slice it into pieces and serve as is or sprinkle with chocolate sprinkles or crushed nuts for extra decoration.
Extra Tips: When making No-Bake Biscuit Cake, feel free to get creative! You can add dried fruits, mini marshmallows, or even a layer of whipped cream between the biscuit layers for added flavor.
If you prefer a sweeter cake, you can adjust the amount of sweetened condensed milk according to your taste. Always confirm the cake is well-chilled before serving for the best texture. Enjoy this fun and delicious dessert with friends and family!
Quick and Easy Goulash

Goulash is a hearty and flavorful dish that originated in Hungary but has found its way into many kitchens across Europe and beyond. This quick and easy version is perfect for families and is especially appealing to kids, thanks to its comforting texture and savory taste.
With tender beef, macaroni, and a rich tomato sauce, this dish can come together in approximately 30 minutes, making it an ideal weeknight dinner option.
This goulash recipe isn’t only simple but also versatile, allowing you to incorporate any leftover vegetables you might’ve in your refrigerator. The key to a great goulash lies in allowing the flavors to meld together while ensuring that the pasta is cooked just right.
Get ready to serve up a delicious meal that your kids will love and ask for again!
Ingredients (Serves 4-6):
- 1 pound ground beef
- 1 medium onion, chopped
- 2 cloves garlic, minced
- 1 bell pepper, chopped
- 1 can (15 oz) diced tomatoes
- 2 cups beef broth
- 1 tablespoon paprika
- 1 teaspoon dried oregano
- 1 teaspoon salt
- ½ teaspoon black pepper
- 2 cups elbow macaroni
- 1 cup shredded cheddar cheese (optional for topping)
Instructions:
- Cook the Ground Beef: In a large skillet or pot, heat a tablespoon of oil over medium heat. Add the ground beef and cook until browned, breaking it up with a wooden spoon as it cooks. This should take about 5-7 minutes. Make sure to drain any excess fat before proceeding to the next step.
- Sauté the Vegetables: Once the beef is cooked, add the chopped onion, minced garlic, and bell pepper to the skillet. Stir them in and sauté for about 3-4 minutes until the vegetables are softened and the onions are translucent.
- Add the Remaining Ingredients: Stir in the canned diced tomatoes (with juice), beef broth, paprika, oregano, salt, and black pepper. Bring the mixture to a boil, then reduce the heat to low and simmer for about 5 minutes to let the flavors combine.
- Cook the Pasta: Add the elbow macaroni to the skillet, stirring it into the sauce. Cover the pot and let it simmer for about 10-12 minutes or until the pasta is tender and has absorbed some of the liquid. Stir occasionally to prevent sticking.
- Serve and Garnish: Once the pasta is cooked, taste and adjust seasoning if necessary. Serve the goulash in bowls, and if desired, sprinkle with shredded cheddar cheese on top for added flavor.
Extra Tips:
When cooking goulash, feel free to customize it by adding your children’s favorite vegetables or spices to enhance the flavor profile.
If you want to make it even quicker, consider using pre-cooked beef or rotisserie chicken instead of ground beef. Additionally, leftovers can be stored in an airtight container in the refrigerator for up to 3 days, making it a great meal to prepare in advance or for lunch the next day!
Fun Fruit Tarts

Fun Fruit Tarts are a delightful and colorful dessert that kids will love to help make and even more to eat! These tarts aren’t only visually appealing but also allow for creativity in choosing the fruits, making them a perfect way to get kids involved in the kitchen.
The buttery crust is filled with a luscious custard or cream, and then topped with their favorite fruits, making each tart a mini masterpiece.
This recipe for Fun Fruit Tarts is simple and easy to follow, ensuring that kids can participate safely and enjoyably. The tarts can be made in advance and refrigerated until you’re ready to serve, making them a great option for parties or family gatherings.
With a variety of fruits to choose from, you can customize the toppings to suit everyone’s taste, creating a fun and delicious treat that’s sure to impress!
Ingredients (serving size: 4-6 people)
- 1 pre-made tart shell or pie crust
- 1 cup heavy cream
- 1/4 cup powdered sugar
- 1 teaspoon vanilla extract
- 1 cup vanilla pudding mix
- 2 cups milk
- 1 cup mixed fresh fruits (such as strawberries, blueberries, kiwi, and bananas)
- Fresh mint leaves (for garnish, optional)
Cooking Instructions
1. Prepare the Tart Shell: If you’re using a pre-made tart shell, follow the instructions on the package for baking. If using pastry dough, roll it out to fit a tart pan and prick the base with a fork to prevent bubbling.
Bake according to the recipe or package instructions until golden brown, then allow it to cool completely.
2. Make the Cream Filling: In a mixing bowl, combine the heavy cream and powdered sugar. Using a hand mixer or whisk, whip the mixture until soft peaks form.
Add the vanilla extract and continue to whip until well combined and fluffy.
3. Prepare the Pudding: In another bowl, whisk together the vanilla pudding mix and milk until it thickens. This usually takes about 2-3 minutes.
Once thickened, gently fold in half of the whipped cream mixture into the pudding until fully incorporated.
4. Assemble the Tarts: Carefully spoon the pudding mixture into the cooled tart shell, spreading it evenly.
Then, top with the remaining whipped cream, creating a nice layer on top of the pudding.
5. Add the Fruit Toppings: Arrange your choice of mixed fresh fruits artistically on top of the whipped cream.
You can get creative with the arrangement—try different patterns or colors to make it even more fun!
6. Chill and Serve: Once assembled, place the tarts in the refrigerator for at least 30 minutes to set.
When ready to serve, garnish with fresh mint leaves if desired. Slice into wedges and enjoy!
Extra Tips
When making Fun Fruit Tarts, consider using seasonal fruits for the best flavor and quality.
You can also experiment with different flavored pudding or whipped cream options, such as chocolate or strawberry, to switch things up.
If you want to get a little adventurous, try adding a drizzle of honey or a sprinkle of cinnamon over the fruits for an extra layer of flavor.
Enjoy the process with your kids and let them pick their favorite fruits for a personalized touch!
Simple Greek Tzatziki With Pita
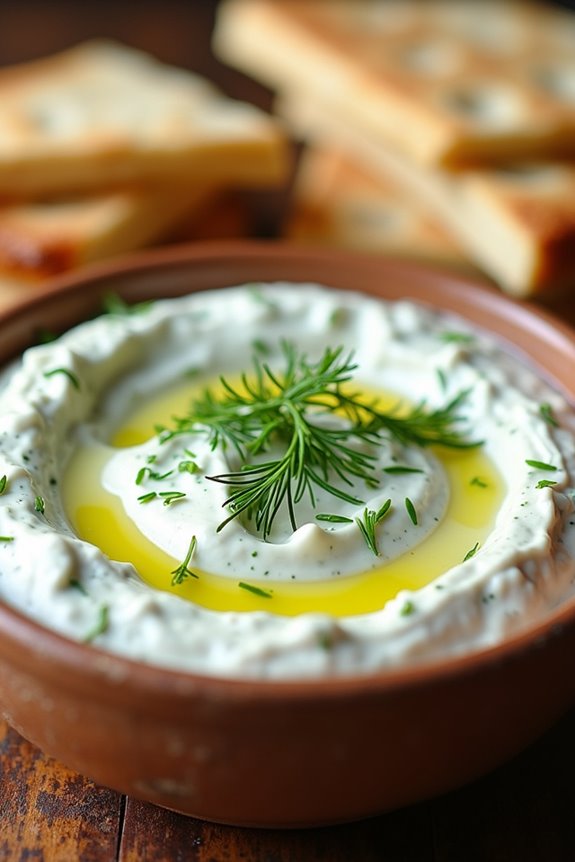
Tzatziki is a classic Greek dip that isn’t only invigorating but also packed with flavor. It combines creamy yogurt with crisp cucumber, aromatic garlic, and a hint of dill, making it a perfect accompaniment for warm pita bread. This dish is particularly great for kids, as it offers a delightful way to enjoy vegetables while introducing them to Mediterranean flavors.
Pair it with pita for a fun and engaging snack that can be enjoyed at any time of the day.
Making tzatziki is simple and requires minimal cooking, making it an ideal recipe for young chefs. The combination of tangy yogurt and cool cucumber is both satisfying and nutritious. Plus, the act of dipping pita into the tzatziki can make for a fun and interactive meal for kids.
Let’s explore the ingredients and cooking instructions so you can whip up this delicious dish for a serving size of 4-6 people.
Ingredients:
- 2 cups Greek yogurt
- 1 medium cucumber
- 2 cloves garlic, minced
- 1 tablespoon fresh dill, chopped (or 1 teaspoon dried dill)
- 1 tablespoon olive oil
- 1 tablespoon lemon juice
- Salt and pepper to taste
- 4-6 pita breads
Cooking Instructions:
- Prepare the Cucumber: Start by washing the cucumber thoroughly. Peel it if you prefer a smoother texture, then cut it in half lengthwise. Use a spoon to scoop out the seeds. Grate the cucumber using a box grater or a food processor, then place the grated cucumber in a clean kitchen towel or cheesecloth and squeeze out excess moisture. This step is essential to prevent the tzatziki from becoming watery.
- Mix the Ingredients: In a medium-sized mixing bowl, add the Greek yogurt, the grated cucumber, minced garlic, chopped dill, olive oil, and lemon juice. Stir the mixture until all the ingredients are well combined. The yogurt should be creamy and smooth with flecks of green from the cucumber and dill.
- Season the Tzatziki: Taste your tzatziki and season it with salt and pepper according to your preference. Start with a small pinch of salt and pepper, mix well, and adjust as necessary. Remember, the flavors will meld together as it sits, so don’t over-salt it initially.
- Chill: Cover the bowl with plastic wrap or transfer the tzatziki into an airtight container. Refrigerate for at least 30 minutes to allow the flavors to develop and for a cooler, invigorating taste.
- Serve with Pita: While the tzatziki is chilling, warm the pita bread in a dry skillet over medium heat for a minute on each side or wrap them in aluminum foil and warm them in the oven at 350°F (175°C) for about 5-10 minutes. Cut the pita into wedges and serve alongside the tzatziki dip.
Extra Tips:
When making tzatziki, using full-fat Greek yogurt will give you the best texture and flavor. If you want a bit of a kick, consider adding a dash of cayenne pepper or a sprinkle of paprika for a subtle heat.
This dip can also be made ahead of time and stored in the refrigerator for up to 3 days. Serve it at parties, picnics, or as a healthy after-school snack to keep kids excited about eating their veggies!
Delicious German Pretzels

German pretzels, known as “Brezn” in Germany, are a beloved snack that can be enjoyed at any time of the day. These soft, chewy treats are typically characterized by their signature twisted shape and golden-brown crust. Making pretzels at home can be a fun activity for kids and adults alike, allowing everyone to get their hands doughy and creative while learning about this iconic German food.
The beauty of homemade pretzels lies not only in their flavor but also in their versatility. You can enjoy them plain, sprinkled with coarse salt, or even topped with your favorite cheeses and dips.
Plus, making pretzels together can be a delightful way to spend time as a family, and the end result is a delicious snack that everyone will love. Get ready to impress your friends and family with these homemade German pretzels that are perfect for parties, movie nights, or simply as an afternoon treat.
Ingredients (Serves 4-6):
- 4 cups all-purpose flour
- 1 packet (2 ¼ teaspoons) active dry yeast
- 1 ½ cups warm water (about 110°F)
- 2 tablespoons granulated sugar
- 1 tablespoon salt
- ½ cup baking soda
- 1 egg (for egg wash)
- Coarse salt (for sprinkling)
Cooking Instructions:
- Activate the Yeast: In a small bowl, combine the warm water, granulated sugar, and yeast. Let it sit for about 5-10 minutes until it becomes frothy. This step is important as it activates the yeast, which helps the dough rise.
- Make the Dough: In a large mixing bowl, combine the flour and salt. Once the yeast mixture is frothy, pour it into the bowl with the flour. Mix until a rough dough forms. If you have a stand mixer, you can use the dough hook attachment for this step.
- Knead the Dough: Transfer the dough to a floured surface and knead for about 5-7 minutes until the dough is smooth and elastic. This step develops the gluten, which gives the pretzels their chewy texture.
- Let the Dough Rise: Place the kneaded dough in a greased bowl, cover it with a clean kitchen towel, and let it rise in a warm area for about 1 hour or until it has doubled in size.
- Shape the Pretzels: Preheat your oven to 450°F (230°C) and line two baking sheets with parchment paper. Punch down the risen dough and divide it into 8 equal pieces. Roll each piece into a long rope (about 24 inches long) and twist it into a pretzel shape, making sure the ends are securely pressed onto the dough.
- Prepare the Baking Soda Bath: In a large pot, bring 8 cups of water and the baking soda to a boil. Gently place each pretzel into the boiling water for about 30 seconds. This step is essential as it helps achieve that classic pretzel flavor and texture.
- Egg Wash and Bake: Remove the pretzels from the water and place them on the prepared baking sheets. Beat the egg in a small bowl and brush it over each pretzel. Sprinkle with coarse salt. Bake in the preheated oven for 12-15 minutes or until they’re golden brown.
- Cool and Enjoy: Remove the pretzels from the oven and let them cool on a wire rack for a few minutes. Serve warm with mustard, cheese, or your favorite dipping sauce.
Extra Tips:
When making pretzels, feel free to get creative with toppings! In addition to coarse salt, you can experiment with toppings like sesame seeds, poppy seeds, or even grated cheese before baking.
If you find the dough too sticky, add a little more flour while kneading. To achieve that perfect golden-brown color, make sure your egg wash is evenly applied.
Finally, for a fun twist, try creating mini pretzel bites instead of traditional pretzels for easy snacking!
Easy Chocolate Croissants

Chocolate croissants, or “pains au chocolat,” are a delightful French pastry that kids will love to help make and eat! With their flaky, buttery layers and rich chocolate filling, they’re perfect for breakfast or as a sweet treat. This recipe simplifies the traditional method, making it accessible for budding young chefs to create these delicious pastries at home with minimal fuss.
These easy chocolate croissants require just a few ingredients and can be made using store-bought puff pastry, saving time and effort. Gather your little ones in the kitchen for a fun baking adventure, and watch as they transform simple dough into delightful pastries. With each warm, gooey bite, everyone will appreciate the taste of homemade goodness.
Ingredients (Serves 4-6):
- 1 package (17.3 oz) frozen puff pastry (2 sheets), thawed
- 1 cup semi-sweet chocolate chips or chocolate bars, chopped
- 1 egg, beaten (for egg wash)
- 1 tablespoon all-purpose flour (for dusting)
- Powdered sugar (for dusting, optional)
Cooking Instructions:
- Preheat the Oven: Start by preheating your oven to 400°F (200°C). This is important as it guarantees the croissants will bake evenly and become golden brown and flaky.
- Prepare the Puff Pastry: Lightly dust a clean surface with flour and roll out the thawed puff pastry sheets. If they’re too thick, roll them out gently with a rolling pin until they’re about 1/8 inch thick. This helps in creating a flakier texture.
- Cut the Pastry: Using a sharp knife or pizza cutter, cut each pastry sheet into triangles. For each sheet, cut it into 6 triangles (you should have a total of 12 triangles). The base of each triangle should be about 4 inches wide.
- Add the Chocolate: Place a tablespoon of chocolate chips or a piece of chocolate bar near the base of each triangle. Be careful not to overfill, as this can lead to messy baking!
- Roll the Croissants: Starting from the base of the triangle, gently roll the pastry up towards the tip. Make sure to tuck in the sides as you roll to create a crescent shape. Place the rolled croissants seam-side down on a baking sheet lined with parchment paper.
- Egg Wash: Brush the tops of the croissants with the beaten egg using a pastry brush. This will give them a beautiful, shiny golden finish when baked.
- Bake: Place the baking sheet in the preheated oven and bake for 15-20 minutes or until the croissants are puffed and golden brown. Keep an eye on them to prevent burning.
- Cool and Serve: Once baked, remove the croissants from the oven and allow them to cool on a wire rack for a few minutes. If desired, dust with powdered sugar before serving for an extra touch of sweetness.
Extra Tips:
For best results, make sure your puff pastry is fully thawed but still cold when rolling out; this helps maintain its flakiness.
You can also experiment with different types of chocolate, such as dark or white chocolate, or even add a sprinkle of sea salt on top before baking for a gourmet twist.
If you’re feeling adventurous, try adding a slice of almond or hazelnut along with the chocolate for a delightful surprise.
Enjoy your baking time with the kids and savor the delicious results together!
Simple Ratatouille
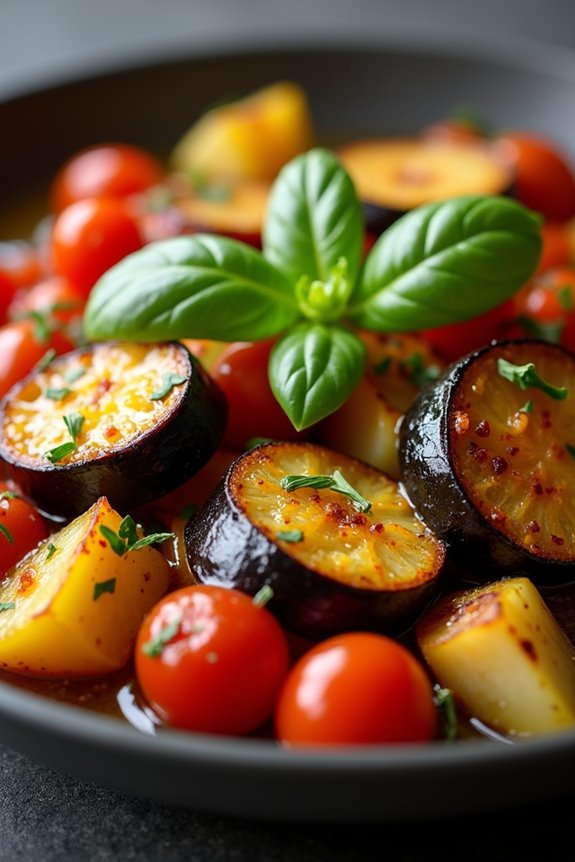
Ratatouille is a classic French dish that beautifully showcases the flavors of fresh vegetables, making it a perfect recipe for kids to enjoy. This vibrant stew isn’t only delicious but also a colorful way to introduce children to healthy eating. With its combination of zucchini, eggplant, peppers, and tomatoes, ratatouille is packed with nutrients while also being easy to prepare. The best part? It’s a dish that can be customized to suit your family’s taste preferences.
Making ratatouille together can be a fun and engaging cooking experience for kids. They can help wash the vegetables, stir the pot, and even sprinkle in the herbs. It’s a fantastic way to teach them about different vegetables and how they can be combined to create a flavorful meal. Whether served as a main dish or a side, simple ratatouille is a dish that brings everyone together at the table.
Ingredients (Serves 4-6)
- 1 medium eggplant, diced
- 2 medium zucchini, sliced
- 1 bell pepper (red or yellow), chopped
- 1 medium onion, chopped
- 3 cloves garlic, minced
- 4 medium tomatoes, chopped
- 1 teaspoon dried thyme
- 1 teaspoon dried basil
- Salt and pepper to taste
- 2 tablespoons olive oil
- Fresh basil leaves for garnish (optional)
Cooking Instructions
- Prepare the Vegetables: Begin by washing all the vegetables thoroughly. Dice the eggplant, slice the zucchini, chop the bell pepper, and onion, and mince the garlic. Each vegetable will add its unique flavor, so be sure to cut them into similar sizes for even cooking.
- Sauté the Aromatics: In a large pot or skillet, heat the olive oil over medium heat. Add the chopped onion and minced garlic. Sauté for about 3-4 minutes until the onions are translucent and fragrant. This step builds a flavorful base for your ratatouille.
- Cook the Eggplant: Add the diced eggplant to the pot. Sauté for another 5-7 minutes. The eggplant will absorb some of the oil and start to soften. Stir occasionally to prevent it from sticking to the bottom of the pot.
- Add the Remaining Vegetables: Next, stir in the sliced zucchini and chopped bell pepper. Continue to cook for another 5 minutes, allowing the vegetables to soften and meld together.
- Incorporate the Tomatoes and Spices: Add the chopped tomatoes, dried thyme, and dried basil to the pot. Season with salt and pepper to taste. Stir everything together and bring the mixture to a gentle simmer.
- Simmer the Ratatouille: Reduce the heat to low and cover the pot. Let the ratatouille simmer for about 20-25 minutes, stirring occasionally. This cooking time allows the flavors to develop and the vegetables to become tender.
- Serve and Garnish: Once the ratatouille is cooked through and the vegetables are tender, remove it from heat. You can serve it warm, garnished with fresh basil leaves if desired. It pairs well with crusty bread or over a bed of rice.
Extra Tips
When making ratatouille, feel free to experiment with different vegetables based on what’s in season or available in your pantry. Adding ingredients like mushrooms or carrots can provide additional flavors and textures.
Additionally, ratatouille can be made ahead of time and stored in the refrigerator, as the flavors tend to improve after a day. It can be served hot or cold, making it a versatile dish for any meal. Enjoy your cooking adventure with this delightful and healthy recipe!
Sweet Italian Panna Cotta

Panna Cotta, which translates to “cooked cream” in Italian, is a delightful dessert known for its creamy texture and subtle sweetness. It’s a perfect treat for kids and adults alike, offering a wonderful balance of flavor that can be easily enhanced with different toppings, such as fresh fruits, chocolate sauce, or berry coulis.
This simple yet elegant dessert can be prepared ahead of time, making it an excellent choice for parties or family gatherings.
Making Panna Cotta is a fun and interactive experience for kids in the kitchen. The recipe involves minimal ingredients and simple techniques, allowing young chefs to participate in every step. With the right guidance, they can learn how to measure ingredients, heat mixtures, and even experiment with flavors, turning cooking time into a delicious learning experience.
Ingredients (Serves 4-6):
- 2 cups heavy cream
- 1 cup whole milk
- 1/2 cup granulated sugar
- 1 packet (2 1/4 teaspoons) unflavored gelatin
- 1 teaspoon vanilla extract
- A pinch of salt
Cooking Instructions:
- Prepare the Gelatin: In a small bowl, sprinkle the unflavored gelatin over 3 tablespoons of cold water. Allow it to sit for about 5-10 minutes until it becomes soft and gelatinous. This process is called blooming, and it helps the gelatin dissolve smoothly into the cream mixture.
- Combine Cream and Sugar: In a medium saucepan, combine the heavy cream, whole milk, granulated sugar, and a pinch of salt. Heat the mixture over medium heat, stirring gently until the sugar dissolves and the mixture is warm, but not boiling. This step is vital as it helps incorporate the flavors into the cream.
- Add the Gelatin: Once the cream mixture is warm, remove the saucepan from the heat. Add the bloomed gelatin to the warm cream mixture, stirring continuously until the gelatin is completely dissolved. This guarantees that the panna cotta will set properly once chilled.
- Flavor with Vanilla: Stir in the vanilla extract into the mixture. This adds a lovely flavor to your panna cotta. If you want to experiment, you can replace vanilla with other extracts or infusions like almond or coffee.
- Pour and Chill: Carefully pour the mixture into individual molds or serving cups. Let the panna cotta cool at room temperature for about 30 minutes. After that, refrigerate for at least 4 hours, or until fully set. The cooling process is essential for achieving the right texture.
- Serve: Once set, gently run a knife around the edges of the panna cotta if using molds, and invert onto a plate if desired. Alternatively, serve directly in the cups. Top with fresh fruits, chocolate sauce, or your favorite toppings before serving.
Extra Tips:
When making panna cotta, it’s important to verify that the gelatin is fully dissolved to avoid any lumps in your dessert.
You can also experiment with flavors by adding fruit purees or citrus zest to the cream mixture before chilling. For a dairy-free version, try using coconut milk instead of heavy cream and milk.
Remember to let it chill overnight for the best texture, as this allows the flavors to meld beautifully. Enjoy your sweet Italian creation!