

Hosting gatherings is such a joy, especially when you have a lineup of delicious appetizers that look as good as they taste. European cuisine is a goldmine for delightful, bite-sized wonders that make any event special. Think crispy Spanish bites and creamy Italian treats that are simply irresistible. These fun recipes will keep your guests reaching for more. Trust me, they’re too good to miss!
Spanish Patatas Bravas
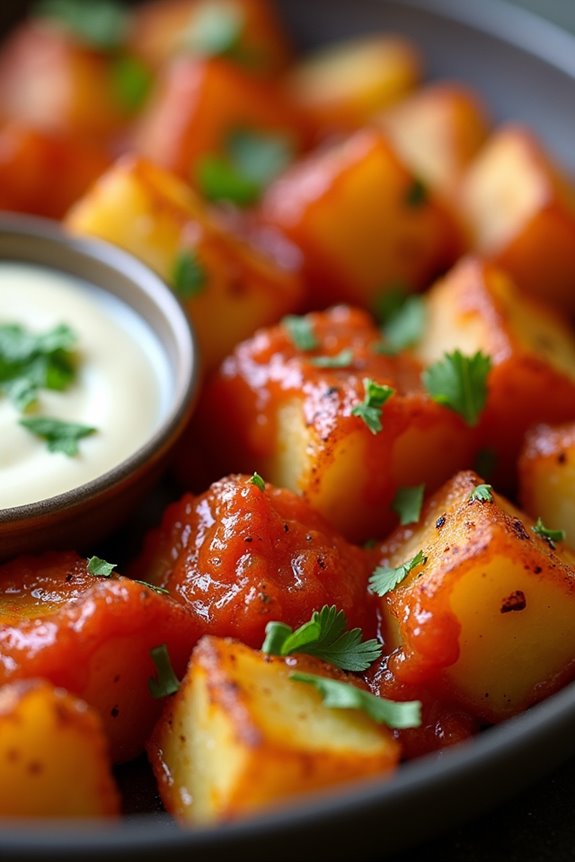
Spanish Patatas Bravas is a beloved tapas dish that hails from the heart of Spain. This dish features crispy fried potatoes served with a spicy tomato sauce and a creamy aioli, making it a perfect appetizer for sharing or enjoying on your own. The combination of textures and flavors creates a delightful experience that’s both comforting and exciting, ideal for any gathering or casual dinner.
Whether you’re hosting a party or simply craving a taste of Spain, Patatas Bravas is sure to impress your guests and leave them wanting more.
Preparing Patatas Bravas at home is a fun and rewarding process. The key to achieving the perfect dish lies in the quality of the ingredients and the cooking technique. By frying the potatoes until they’re golden and crispy and pairing them with a homemade dipping sauce, you’ll be able to replicate the authentic flavor of this classic Spanish appetizer.
Follow the recipe below for a delicious serving size of 4-6 people, and get ready to initiate a culinary adventure.
Ingredients:
- 1.5 lbs (about 700g) of medium-sized potatoes
- 1/4 cup olive oil
- Salt, to taste
- 1 teaspoon smoked paprika
- 1/2 teaspoon cayenne pepper (adjust for spice preference)
- 1 cup canned crushed tomatoes
- 2 cloves garlic, minced
- 1 tablespoon red wine vinegar
- 1 tablespoon sugar
- Fresh parsley, chopped (for garnish)
For the aioli:
- 1/2 cup mayonnaise
- 1 clove garlic, minced
- 1 tablespoon lemon juice
- Salt and pepper, to taste
Cooking Instructions:
- Prepare the Potatoes: Begin by peeling the potatoes and cutting them into 1-inch cubes. This size guarantees they’ll cook evenly and become crispy on the outside while remaining fluffy on the inside. Rinse the cut potatoes under cold water to remove excess starch, which helps achieve a crispier texture.
- Boil the Potatoes: Place the diced potatoes in a large pot and cover them with cold water. Add a generous pinch of salt and bring the water to a boil over medium-high heat. Cook the potatoes for about 5-7 minutes, just until they’re slightly tender but not fully cooked. Drain the potatoes and let them cool for a few minutes.
- Fry the Potatoes: In a large skillet or frying pan, heat the olive oil over medium-high heat. Once hot, carefully add the boiled potatoes to the pan in a single layer. Fry them for about 10-15 minutes, turning occasionally, until they’re golden brown and crispy on all sides. You may need to do this in batches to avoid overcrowding the pan.
- Make the Bravas Sauce: While the potatoes are frying, prepare the bravas sauce. In a separate saucepan, heat a tablespoon of olive oil over medium heat. Add the minced garlic and sauté for about 30 seconds until fragrant. Then, stir in the crushed tomatoes, smoked paprika, cayenne pepper, red wine vinegar, and sugar. Simmer the sauce for about 10 minutes, allowing the flavors to meld. Adjust seasoning with salt to taste.
- Prepare the Aioli: In a small bowl, combine the mayonnaise, minced garlic, lemon juice, salt, and pepper. Mix well until smooth and creamy. Adjust the seasoning according to your taste preferences.
- Serve: Once the potatoes are crispy and the sauces are ready, place the fried potatoes on a serving platter. Drizzle with the bravas sauce and offer the aioli on the side for dipping. Garnish with freshly chopped parsley for an added touch of color and flavor.
Extra Tips:
For an added twist, feel free to customize your Patatas Bravas by incorporating additional spices or herbs into the sauces. If you prefer a milder flavor, reduce the amount of cayenne pepper or adjust the garlic in the aioli to suit your taste.
It’s also a great idea to serve these potatoes alongside other Spanish tapas like chorizo or olives for a complete Mediterranean experience. Don’t forget to enjoy your Patatas Bravas with a glass of Spanish wine for the full experience!
Italian Arancini

Italian Arancini, also known as rice balls, are a delicious and playful appetizer that can elevate any gathering. These golden, crispy balls are made from risotto, typically filled with cheese, meat, or vegetables. Originating from Sicilian cuisine, Arancini are a beloved street food that offers a delightful balance of textures and flavors. The outer layer is crisp and crunchy, while the inside is creamy and savory, making them an irresistible treat.
Making Arancini can be a fun activity for family or friends, as everyone can get involved in shaping and frying the rice balls. They’re perfect for serving at parties, as a starter before a meal, or even as a snack. Pair them with a tangy marinara sauce for dipping, and you have a dish that’s bound to impress your guests.
Ingredients (serving size: 4-6 people)
- 1 cup Arborio rice
- 4 cups chicken or vegetable broth
- 1 small onion, finely chopped
- 2 tablespoons olive oil
- 1/2 cup grated Parmesan cheese
- 1 cup mozzarella cheese, diced
- 1/2 cup frozen peas (optional)
- 1 egg, beaten
- 1 cup all-purpose flour
- 2 cups breadcrumbs
- Salt and pepper, to taste
- Oil for frying
Cooking Instructions
- Prepare the Risotto: In a saucepan, heat the olive oil over medium heat. Add the chopped onion and sauté until translucent. Add the Arborio rice and stir for a couple of minutes until the rice is coated with oil. Gradually add the warm chicken or vegetable broth, one ladle at a time, stirring frequently. Allow the rice to absorb the liquid before adding more. Cook until the rice is al dente, about 18-20 minutes. Season with salt and pepper to taste, and stir in the grated Parmesan cheese. Remove from heat and let it cool.
- Form the Arancini: Once the risotto is cool, take a handful of rice (about the size of a golf ball) and flatten it in your palm. Place a few pieces of mozzarella cheese and peas (if using) in the center, then fold the rice around the filling to form a ball. Make sure it’s tightly packed and the filling is completely enclosed. Repeat this process until all the risotto is used.
- Coat the Arancini: Set up a breading station with three shallow dishes: one with flour, one with the beaten egg, and one with breadcrumbs. Roll each rice ball first in the flour, then dip it in the egg, and finally coat it with breadcrumbs. Confirm each ball is evenly coated for a crispy texture.
- Fry the Arancini: In a deep frying pan or pot, heat oil over medium-high heat until it reaches 350°F (175°C). Carefully add a few Arancini at a time, making sure not to overcrowd the pan. Fry for about 3-4 minutes or until golden brown, turning occasionally for even cooking. Once cooked, transfer them to a paper towel-lined plate to drain excess oil.
- Serve and Enjoy: Serve the Arancini warm with a side of marinara sauce for dipping. Enjoy your delicious, homemade Italian appetizer!
Extra Tips
For an even more flavorful Arancini, consider adding herbs such as basil or parsley to the risotto mixture. You can also experiment with different fillings like sautéed mushrooms or spicy sausage for a unique twist.
If you prefer a lighter option, you can bake the Arancini instead of frying them; just spray them with a little olive oil and bake at 375°F (190°C) for about 20-25 minutes until golden and crispy. Don’t be afraid to get creative with your fillings and sauces!
French Gougères

French Gougères are delightful cheese puffs made from choux pastry, known for their airy texture and rich flavor. Originating from the Burgundy region of France, these savory bites are typically flavored with Gruyère cheese, which provides a nutty and creamy taste. They make an excellent appetizer, perfect for parties or as an elegant addition to any meal.
The beauty of gougères lies in their versatility; you can experiment with various cheeses and seasonings to create a personalized touch.
Making gougères may seem intimidating at first, but with a little patience and the right technique, you’ll be whipping up these delectable treats in no time. The dough is relatively simple to prepare, and once baked, these golden puffs will impress your guests with their lightness and flavor.
Serve them warm, straight from the oven, for the best experience, and watch as they vanish from the platter!
Ingredients (serving size: 4-6 people):
- 1 cup water
- 1/2 cup unsalted butter
- 1 cup all-purpose flour
- 4 large eggs
- 1 cup grated Gruyère cheese
- 1/2 teaspoon salt
- 1/4 teaspoon freshly ground black pepper
- 1/4 teaspoon garlic powder (optional)
- 1/4 teaspoon cayenne pepper (optional)
- 1 egg (for egg wash)
Cooking Instructions:
1. Prepare the Oven and Baking Sheet**: Preheat your oven** to 425°F (220°C). Line a baking sheet with parchment paper to prevent the gougères from sticking.
2. Make the Choux Pastry: In a medium saucepan, combine the water, unsalted butter, salt, black pepper, garlic powder, and cayenne pepper. Bring the mixture to a boil over medium heat, stirring until the butter is melted.
Once it reaches a rolling boil, remove it from the heat.
3. Incorporate the Flour: Immediately add the flour to the saucepan, stirring vigorously with a wooden spoon until the mixture forms a ball and pulls away from the sides of the pan. This should take about 1-2 minutes.
4. Add the Eggs: Allow the mixture to cool for a few minutes, then add the eggs one at a time, mixing well after each addition. The dough should become smooth and glossy.
After incorporating all the eggs, fold in the grated Gruyère cheese.
5. Pipe the Dough: Transfer the dough to a piping bag fitted with a large round tip. Pipe small mounds (about the size of a golf ball) onto the prepared baking sheet, spacing them about 2 inches apart to allow for expansion.
6. Prepare for Baking: Beat the additional egg in a small bowl and use it to brush the tops of the piped dough. This will give the gougères a beautiful golden color when baked.
7. Bake the Gougères: Place the baking sheet in the preheated oven and bake for 20-25 minutes or until the gougères are puffed up and golden brown.
Avoid opening the oven door during the first 15 minutes to make certain they rise properly.
8. Cool and Serve: Once baked, remove them from the oven and let them cool slightly on a wire rack. Serve warm or at room temperature.
Extra Tips:
To guarantee your gougères turn out perfectly, make sure to measure your ingredients accurately and allow the dough to cool slightly before adding the eggs to prevent them from scrambling.
For added flavor, consider mixing in herbs like thyme or chives, or try using different cheeses such as cheddar or blue cheese.
Finally, serve them fresh and warm, as gougères are best enjoyed straight from the oven for the ultimate cheesy experience!
German Pretzel Bites

German Pretzel Bites are a delightful appetizer that offers the perfect combination of chewy texture and savory flavor. These bite-sized treats are inspired by the beloved traditional German pretzel, but they’re made smaller for easy sharing and snacking.
Whether you’re hosting a party or just looking for a fun starter for dinner, these pretzel bites are sure to impress your guests with their golden brown crust and soft, warm insides. Pair them with a tangy mustard or a rich cheese dip for an added burst of flavor.
Making German Pretzel Bites isn’t as complicated as it may seem. With just a few simple ingredients, you can create these delicious bites that will have everyone reaching for more. The process involves creating a simple dough, shaping it into small bites, and then boiling them briefly in a baking soda solution to achieve that perfect pretzel flavor and texture.
Let’s explore this delightful recipe that serves 4-6 people.
Ingredients:
- 1 ½ cups warm water (110°F)
- 1 packet (2 ¼ teaspoons) active dry yeast
- 1 tablespoon granulated sugar
- 4 cups all-purpose flour
- 1 teaspoon salt
- ⅓ cup baking soda
- 1 large egg, beaten (for egg wash)
- Coarse sea salt (for sprinkling)
Cooking Instructions:
- Prepare the Yeast Mixture: In a large mixing bowl, combine the warm water, active dry yeast, and granulated sugar. Stir gently and let it sit for about 5-10 minutes until the mixture becomes frothy. This step is vital as it activates the yeast, making sure your pretzel bites rise properly.
- Make the Dough: Once the yeast mixture is frothy, add the all-purpose flour and salt to the bowl. Mix until a shaggy dough forms. Turn the dough out onto a lightly floured surface and knead it for about 5-7 minutes, or until it becomes smooth and elastic.
- Let the Dough Rise: Place the kneaded dough into a greased bowl, cover it with a clean kitchen towel, and let it rise in a warm place for about 1 hour, or until it has doubled in size. This rising time is essential for developing the flavor and texture of the dough.
- Shape the Pretzel Bites: Once the dough has risen, punch it down to release the air. Turn it out onto a floured surface and divide it into small pieces, about 1-inch each. Roll each piece into a small ball and place them on a parchment-lined baking sheet.
- Prepare the Baking Soda Bath: In a large pot, bring 10 cups of water to a boil and carefully add the baking soda. This creates a simple alkaline bath that will give the pretzel bites their signature color and flavor.
- Boil the Pretzel Bites: Gently drop the pretzel bites into the boiling baking soda bath, cooking them for about 30 seconds on each side. Use a slotted spoon to remove them and place them back on the baking sheet.
- Brush and Sprinkle: Preheat your oven to 425°F (220°C). Brush each boiled pretzel bite with the beaten egg, and sprinkle with coarse sea salt for added flavor.
- Bake: Bake the pretzel bites in the preheated oven for 12-15 minutes, or until they’re golden brown. Keep an eye on them to make sure they don’t overbake.
- Cool and Serve: Once out of the oven, allow the pretzel bites to cool for a few minutes before serving. They’re best enjoyed warm with your choice of dipping sauces.
Extra Tips:
For the best results, make sure your water temperature is just right for activating the yeast—too hot can kill it, and too cold won’t activate it properly.
Additionally, you can experiment with various toppings beyond coarse sea salt, such as everything bagel seasoning or grated cheese, to give your pretzel bites a unique twist.
Finally, if you have leftovers, they can be reheated in the oven for a few minutes to restore their softness and crunchiness!
Greek Spanakopita

Greek Spanakopita is a delightful pastry dish that’s both savory and satisfying. This traditional Greek appetizer features flaky layers of phyllo dough filled with a delicious mixture of spinach, feta cheese, and aromatic herbs.
Spanakopita is perfect for entertaining, as it can be served hot or at room temperature, making it an ideal addition to any gathering or dinner party. The contrast of the crispy exterior with the creamy filling is sure to impress your guests and keep them coming back for more.
Making Spanakopita at home might seem intimidating due to the use of phyllo dough, but with a little patience and practice, you’ll be able to whip up these delicious pastries effortlessly. The key is to guarantee that the phyllo dough remains moist and to layer it properly, creating that signature flaky texture.
Serve Spanakopita alongside dips like tzatziki or hummus for a complete Mediterranean experience.
Ingredients (serving size: 4-6 people):
- 1 pound fresh spinach, washed and chopped
- 1 cup feta cheese, crumbled
- 1/2 cup ricotta cheese
- 1/4 cup fresh dill, chopped (or 1 tablespoon dried dill)
- 1/4 cup green onions, chopped
- 2 cloves garlic, minced
- 1 large egg, beaten
- Salt and pepper, to taste
- 1 package phyllo dough (16 oz), thawed
- 1/2 cup unsalted butter, melted
- Olive oil, for brushing
Cooking Instructions:
1. Prepare the Filling: In a large skillet over medium heat, add the chopped spinach and cook until wilted, about 5 minutes. Drain any excess moisture and let it cool slightly.
In a mixing bowl, combine the cooked spinach, crumbled feta, ricotta cheese, dill, green onions, garlic, and the beaten egg. Season with salt and pepper to taste. Mix until well combined and set aside.
2. Prepare the Phyllo Dough: Preheat your oven to 375°F (190°C). On a clean countertop, lay out your thawed phyllo dough. Keep the phyllo sheets covered with a damp kitchen towel to prevent them from drying out.
Take one sheet of phyllo and brush it lightly with melted butter. Layer another sheet on top and brush again with butter. Repeat this process until you have about 6-8 layers stacked.
3. Assemble the Spanakopita: Place about 1/4 cup of the spinach filling along one edge of the phyllo layers, leaving some space on the sides. Fold the sides of the phyllo over the filling and then roll it up tightly from the edge to create a log shape.
Place the rolled Spanakopita seam-side down on a parchment-lined baking sheet. Brush the top with more melted butter.
4. Bake the Spanakopita: Repeat the layering and filling process with the remaining phyllo sheets and filling until you have used it all. Bake the assembled Spanakopita in the preheated oven for 25-30 minutes, or until golden brown and crispy.
Remove from the oven and let cool slightly before serving.
5. Serve: Cut the Spanakopita into bite-sized pieces and serve warm or at room temperature. You can garnish with a sprinkle of fresh herbs or a squeeze of lemon juice for added flavor.
Extra Tips: When working with phyllo dough, it’s essential to keep it covered with a damp cloth as it dries out quickly.
If you’re short on time, consider using store-bought filling or pre-made Spanakopita. For a richer flavor, you can sauté the garlic and green onions before adding them to the filling.
Finally, for a twist, try mixing in other ingredients like artichokes or sun-dried tomatoes to customize your Spanakopita!
Swedish Meatballs

Swedish meatballs are a delightful appetizer that brings together the comforting flavors of seasoned beef and pork, enriched with creamy gravy and served alongside lingonberry sauce. This dish is a staple in Swedish cuisine and is perfect for gatherings or as a cozy family meal.
They’re tender, juicy, and packed with flavor, making them a crowd-pleaser at any event. The best part about Swedish meatballs is how versatile they are; they can be served as an appetizer or a main dish, accompanied by mashed potatoes or a fresh salad.
To make these delightful meatballs, you’ll need to gather some simple ingredients that blend together beautifully. The combination of breadcrumbs soaked in milk, onions, and spices gives these meatballs their unique taste and texture.
Once prepared, they’re typically pan-fried to achieve a golden-brown exterior, then simmered in a rich, creamy sauce that takes them to the next level of deliciousness. Get ready to impress your guests with this classic Swedish dish!
Ingredients (Serves 4-6)
- 1 pound ground beef
- 1 pound ground pork
- 1 cup breadcrumbs
- ½ cup milk
- 1 small onion, finely chopped
- 1 egg
- 1 teaspoon salt
- ½ teaspoon black pepper
- ½ teaspoon ground nutmeg
- ½ teaspoon ground allspice
- 2 tablespoons butter (for frying)
- 2 tablespoons all-purpose flour
- 2 cups beef broth
- 1 cup heavy cream
- Lingonberry sauce (for serving)
Cooking Instructions
1. Prepare the Meatball Mixture****: In a large bowl, combine the ground beef and pork. In a separate bowl, soak the breadcrumbs in milk for about 5 minutes until soft. Add the soaked breadcrumbs, chopped onion, egg, salt, pepper, nutmeg, and allspice to the meat mixture. Mix everything together gently until well combined.
Be careful not to overmix, as this can make your meatballs tough.
2. Form the Meatballs: With wet hands, take a portion of the meat mixture and roll it into 1-inch balls. Place the formed meatballs on a baking sheet or plate. Repeat until all the mixture is used. This should yield approximately 20-24 meatballs.
3. Cook the Meatballs: In a large skillet, melt the butter over medium heat. Once hot, add the meatballs in batches, being careful not to overcrowd the pan. Cook for about 5-7 minutes, turning occasionally, until they’re browned on all sides and cooked through.
Remove the meatballs from the skillet and set them aside on a plate.
4. Make the Cream Sauce: In the same skillet, add the flour to the leftover drippings and stir for about 1 minute to create a roux. Gradually whisk in the beef broth, scraping up any browned bits from the bottom of the skillet. Bring to a simmer and cook for 2-3 minutes until slightly thickened.
5. Add Cream and Finish the Sauce: Stir in the heavy cream and let the sauce simmer for an additional 3-5 minutes until it reaches your desired consistency. Taste and adjust seasoning if necessary.
6. Combine and Serve: Return the meatballs to the skillet and spoon the sauce over them, gently heating them through for 1-2 minutes. Serve the Swedish meatballs warm, garnished with fresh parsley if desired, alongside lingonberry sauce for a sweet contrast.
Extra Tips
When preparing Swedish meatballs, make sure that your meat mixture isn’t overworked; this helps maintain tenderness. You can also customize the spices to your preference, adding more or less depending on your taste.
If you want to save time, consider making the meatballs ahead of time and freezing them uncooked. Just remember to adjust the cooking time when you’re ready to serve, as frozen meatballs will take a little longer to cook through.
Enjoy your Swedish meatballs with a side of lingonberry sauce for an authentic touch!
Portuguese Piri-Piri Chicken Skewers

Portuguese Piri-Piri Chicken Skewers are a vibrant and flavorful dish that will transport your taste buds to the sunny shores of Portugal. Combining succulent chicken with a zesty marinade, these skewers not only make for an excellent appetizer but also shine as a main dish at any gathering or barbecue. The Piri-Piri sauce, which gets its heat from African bird’s eye chili, is a key ingredient that brings a delightful kick and a smoky flavor to the chicken.
The preparation is straightforward, making it perfect for both novice cooks and seasoned chefs. Marinating the chicken in the Piri-Piri sauce allows the flavors to penetrate deeply, resulting in juicy, tender meat that’s grilled to perfection. Whether served with a cooling dip or alongside a fresh salad, these skewers are sure to be a hit at your next dinner party or family meal.
Ingredients (Serves 4-6)
- 1.5 pounds (680g) boneless, skinless chicken thighs
- 1/4 cup olive oil
- 2 tablespoons Piri-Piri sauce
- 4 garlic cloves, minced
- 1 tablespoon smoked paprika
- 1 teaspoon dried oregano
- 1 teaspoon salt
- 1/2 teaspoon black pepper
- 1 tablespoon lemon juice
- 1 red bell pepper, cut into squares
- 1 green bell pepper, cut into squares
- Fresh parsley, chopped (for garnish)
- Skewers (wooden or metal)
Cooking Instructions
- Prepare the Marinade: In a large bowl, combine the olive oil, Piri-Piri sauce, minced garlic, smoked paprika, oregano, salt, black pepper, and lemon juice. Whisk the ingredients together until well blended to create a flavorful marinade.
- Marinate the Chicken: Cut the chicken thighs into bite-sized pieces and add them to the marinade. Toss the chicken until it’s evenly coated, then cover the bowl with plastic wrap and refrigerate for at least 1 hour, or up to overnight for deeper flavor.
- Prepare the Skewers: If using wooden skewers, soak them in water for about 30 minutes to prevent burning on the grill. If using metal skewers, you can skip this step.
- Assemble the Skewers: Thread the marinated chicken pieces onto the skewers, alternating with pieces of red and green bell pepper for color and added flavor. Aim to fill each skewer, but leave some space between the pieces for even cooking.
- Preheat the Grill: Preheat your grill to medium-high heat. Confirm the grill grates are clean and lightly oiled to prevent sticking.
- Grill the Skewers: Place the skewers on the grill and cook for about 10-15 minutes, turning occasionally, until the chicken is cooked through and reaches an internal temperature of 165°F (75°C) and has nice grill marks.
- Serve: Once cooked, remove the skewers from the grill and let them rest for a few minutes. Garnish with freshly chopped parsley before serving.
Extra Tips
For an extra layer of flavor, you can add a splash of white wine or apple cider vinegar to the marinade.
Feel free to customize the vegetables on the skewers based on your preference—zucchini, cherry tomatoes, or even onions work wonderfully.
If you prefer a milder flavor, you can reduce the amount of Piri-Piri sauce used in the marinade or serve the skewers with a cooling yogurt dip on the side.
Enjoy your delicious Portuguese Piri-Piri Chicken Skewers!
Belgian Endive With Blue Cheese
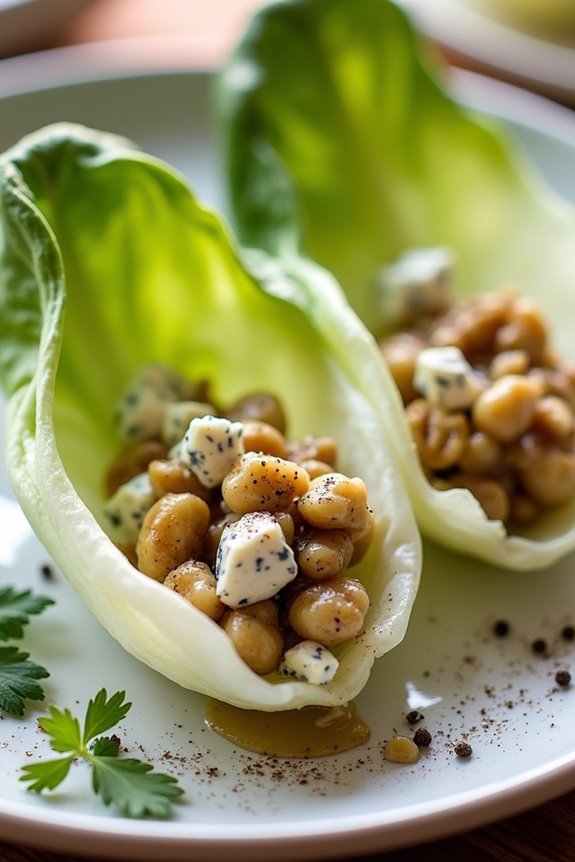
Belgian Endive with Blue Cheese is a delightful appetizer that combines the crisp, slightly bitter leaves of Belgian endive with the rich, creamy flavor of blue cheese. This dish isn’t only visually stunning but also incredibly easy to prepare, making it perfect for gatherings or as a light starter before a meal.
The contrast between the crunchy endive and the decadent cheese creates a balanced flavor profile that’s sure to impress your guests. This elegant appetizer can be tailored to suit various tastes, whether you prefer a more robust blue cheese or a milder variety.
Additionally, incorporating nuts or fruits can elevate the dish even further, providing additional textures and flavors. Follow this recipe to create a memorable starter that will be a hit at your next dinner party or festive occasion.
Ingredients (Serves 4-6):
- 4-6 Belgian endive heads
- 100g (about 3.5 oz) of blue cheese, crumbled
- 50g (about 1.75 oz) of walnuts, roughly chopped
- 2 tablespoons of honey
- 1 tablespoon of balsamic vinegar
- Salt and pepper, to taste
- Fresh parsley, for garnish (optional)
Cooking Instructions:
- Prepare the Endive: Start by rinsing the Belgian endive heads under cold running water. Shake off any excess water and trim the base of each endive to remove any tough or discolored leaves. Carefully separate the leaves from the head, aiming for whole leaves that can be filled later. Set aside.
- Make the Filling: In a medium-sized bowl, combine the crumbled blue cheese with the chopped walnuts. If you want a sweeter flavor, add a drizzle of honey to the mixture. Stir gently to combine, ensuring the ingredients are well mixed but the cheese remains chunky for texture.
- Assemble the Appetizers: Take each endive leaf and use a small spoon to fill it with the blue cheese and walnut mixture. Aim to fill each leaf generously, but avoid overfilling to prevent spillage. Arrange the filled leaves on a serving platter in an aesthetically pleasing manner.
- Drizzle with Dressing: In a small bowl, mix the honey and balsamic vinegar together until smooth. Drizzle this mixture over the assembled endive leaves for added flavor and a beautiful glaze. Sprinkle salt and freshly cracked pepper over the top to taste.
- Garnish and Serve: Optionally, chop some fresh parsley and sprinkle it over the endive appetizers for an extra pop of color and freshness. Serve immediately while the leaves are crisp and fresh, or chill briefly before serving if preferred.
Extra Tips:
When preparing Belgian Endive with Blue Cheese, consider using different types of blue cheese to suit varying palates—Stilton, Gorgonzola, or Roquefort can each provide a unique flavor.
Additionally, adding thin slices of pears or apples can introduce a delightful sweetness that complements the cheese. Make sure to serve the appetizers fresh, as the endive leaves can wilt if left too long. Enjoy experimenting with different toppings and dressings to personalize this elegant dish!
Czech Smažený Sýr

Czech Smažený Sýr, or fried cheese, is a beloved appetizer that brings the delightful crunch of golden-brown cheese encased in a crispy breadcrumb coating. Traditionally made with the popular Hermelín cheese, this dish is often served with a side of tartar sauce or a fresh salad, making it a perfect starter for any gathering. The combination of gooey cheese and a crunchy exterior creates a satisfying contrast that will please any palate, guaranteeing that your guests will be coming back for seconds.
This dish isn’t only easy to prepare but also allows for some creativity with the choice of cheese. While Hermelín is a classic option, you can experiment with other cheeses like mozzarella or cheddar to tailor the flavor to your liking. Serve it at your next dinner party or casual get-together, and watch as it quickly becomes a favorite among your family and friends.
Ingredients (Serves 4-6 people):
- 400g Hermelín cheese (or cheese of your choice)
- 1 cup all-purpose flour
- 2 large eggs
- 2 cups breadcrumbs (preferably seasoned)
- Salt and pepper, to taste
- Vegetable oil, for frying
- Tartar sauce, for serving (optional)
- Fresh parsley, for garnish (optional)
Cooking Instructions:
- Prepare the Cheese: Start by slicing the Hermelín cheese into thick slices, about 1 to 1.5 cm each. This guarantees that each piece will hold its shape during frying and gives you a perfect gooey center.
- Set Up Breading Station: In three separate shallow bowls, place the flour in the first bowl, whisk the eggs in the second bowl, and put the breadcrumbs in the third. Season the flour with salt and pepper to enhance the flavor of the cheese.
- Bread the Cheese: Take each slice of cheese and first coat it in the flour, shaking off any excess. Next, dip it into the whisked eggs, allowing any surplus to drip off, and finally roll it in the breadcrumbs until fully coated. Repeat this process for all cheese slices, making sure they’re well-coated to create a thick crust.
- Heat the Oil: In a large frying pan, pour enough vegetable oil to cover the bottom of the pan by about 1 cm. Heat the oil over medium heat until it shimmers, indicating that it’s hot enough for frying.
- Fry the Cheese: Carefully add the breaded cheese slices to the hot oil. Fry them in batches to avoid overcrowding, cooking for about 2-3 minutes on each side or until they turn a beautiful golden brown. Use a slotted spoon to flip them gently.
- Drain Excess Oil: Once the cheese is fried to perfection, use a slotted spoon to transfer the slices to a plate lined with paper towels. This will help absorb any excess oil, keeping your Smažený Sýr crispy.
- Serve: Serve the fried cheese hot, garnished with fresh parsley if desired. Offer tartar sauce on the side for dipping, and enjoy this delightful appetizer with your guests!
Extra Tips:
For an extra layer of flavor, consider adding spices or herbs to your breadcrumbs, such as garlic powder, paprika, or dried oregano.
Additionally, if you want a thicker crust, you can double-bread the cheese by repeating the egg and breadcrumb coating process before frying.
Make sure to keep an eye on the oil temperature while frying, as overheating can burn the breadcrumbs before the cheese is melted inside. Enjoy experimenting with different cheeses and serving styles!
British Mini Yorkshire Puddings

British Mini Yorkshire Puddings are a delightful twist on the traditional Yorkshire pudding, which is often served alongside roast beef in the UK. These bite-sized versions are perfect as appetizers, offering a crispy exterior and a soft, airy interior that can be filled with a variety of toppings.
Whether you’re hosting a dinner party or simply looking for a fun way to enjoy a classic dish, these mini puddings are sure to impress your guests and satisfy your taste buds.
Making Mini Yorkshire Puddings is straightforward and requires just a few simple ingredients. The key to achieving their signature puffiness is to guarantee that your batter is mixed well and that your oil is hot before pouring in the batter.
You can get creative with your fillings, from flavorful meats and vegetables to rich gravies or creamy sauces. These little treats are versatile and can be customized to suit any occasion.
Ingredients (serves 4-6 people):
- 1 cup all-purpose flour
- 1 cup whole milk
- 3 large eggs
- 1 teaspoon salt
- 1 teaspoon black pepper
- 1/4 cup vegetable oil (or beef dripping for traditional flavor)
Cooking Instructions:
- Preheat the Oven: Preheat your oven to 425°F (220°C). This high temperature is essential for making the Yorkshire puddings rise well.
- Prepare the Batter: In a mixing bowl, whisk together the flour, eggs, milk, salt, and pepper until the mixture is smooth and free of lumps. Let the batter rest for about 30 minutes at room temperature. This resting period allows the gluten to relax, which can help improve the texture of the puddings.
- Heat the Oil: While the batter is resting, pour a small amount of vegetable oil into each compartment of a muffin tin (about 1 teaspoon per compartment). Place the muffin tin in the preheated oven for about 10 minutes, or until the oil is shimmering and very hot.
- Pour in the Batter: Carefully remove the hot muffin tin from the oven. Quickly pour the rested batter into each compartment, filling them about halfway full. The hot oil will help the batter to rise and create that signature puff.
- Bake: Return the muffin tin to the oven and bake for 20-25 minutes, or until the Yorkshire puddings are golden brown and have puffed up. Avoid opening the oven door during baking, as this can cause them to deflate.
- Cool and Serve: Once baked, remove the tin from the oven and let the mini Yorkshire puddings cool for a minute or two before serving. They can be served plain or filled with your choice of savory toppings.
Extra Tips: For best results, guarantee all your ingredients are at room temperature before mixing. This helps the batter to rise better.
If you’re using beef dripping, it adds a traditional flavor to the puddings. Additionally, try experimenting with different fillings, such as roasted vegetables, caramelized onions, or even a dollop of gravy to enhance the overall taste. Enjoy your cooking!