

Dessert is my happy place, especially when it involves European flavors. There’s something magical about Chocolate Fondant and Tiramisu that just feels right. I still remember the joy of tasting Baklava for the first time. If you’re on the hunt for deliciously indulgent European desserts, you’re in for a treat. Let’s explore some recipes that are sure to make any occasion special.
Chocolate Fondant From France
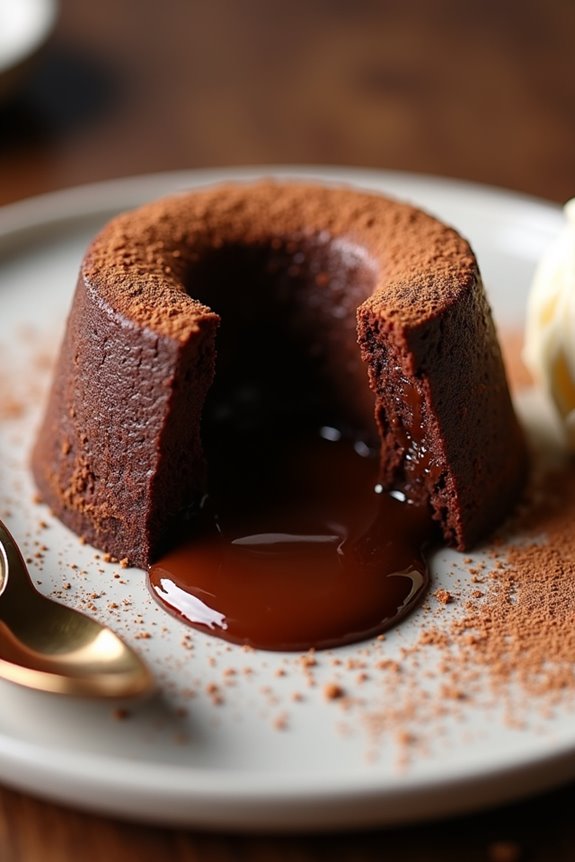
Chocolate Fondant, often referred to as Molten Chocolate Cake, is a rich and decadent dessert that delights chocolate lovers with its gooey, molten center. Originating from France, this dessert has become a classic in restaurants worldwide, known for its impressive presentation and indulgent flavor.
The exterior is baked to perfection, while the interior remains soft and flowing, creating a delightful contrast in texture that’s guaranteed to impress your guests.
This elegant dessert is surprisingly simple to make, requiring only a few ingredients and minimal preparation time. Whether you’re celebrating a special occasion or simply treating yourself, Chocolate Fondant is an excellent choice for a sweet ending to any meal. Serve it warm, ideally with a scoop of vanilla ice cream or a dollop of whipped cream, to enhance the sweet experience.
Ingredients (Serves 4-6):
- 200g dark chocolate (at least 70% cocoa)
- 100g unsalted butter
- 3 large eggs
- 100g granulated sugar
- 50g all-purpose flour
- 1 teaspoon vanilla extract
- A pinch of salt
- Cocoa powder (for dusting the ramekins)
Cooking Instructions:
1. Preheat the Oven: Begin by preheating your oven to 200°C (392°F). This guarantees that the fondant bakes evenly and achieves the perfect molten center.
2. Prepare the Ramekins: Grease four to six ramekins with butter and dust them with cocoa powder to prevent the fondant from sticking. This step is essential for an easy release after baking.
3. Melt the Chocolate and Butter: In a heatproof bowl, combine the dark chocolate and unsalted butter. Place the bowl over a pot of simmering water (double boiler method) and stir until both ingredients are melted and smooth.
Remove from heat and allow to cool slightly.
4. Whisk the Eggs and Sugar: In a separate bowl, whisk together the eggs and granulated sugar until the mixture is pale and frothy. This adds air to the batter, creating a light texture for the fondant.
5. Combine the Mixtures: Gradually pour the melted chocolate mixture into the egg and sugar mixture, stirring gently to combine. Add the vanilla extract and a pinch of salt, then fold in the flour until just combined, being careful not to overmix.
6. Fill the Ramekins: Pour the batter evenly into the prepared ramekins, filling them about three-quarters full. This allows room for the fondant to rise without overflowing.
7. Bake the Fondants: Place the ramekins on a baking tray and bake in the preheated oven for approximately 10-12 minutes. The edges should be set while the center remains soft and wobbly.
8. Cool and Serve: Once baked, let the fondants cool for a minute before gently running a knife around the edges to loosen them. Invert each ramekin onto a plate and serve immediately, ideally with ice cream or whipped cream.
Extra Tips:
For the best results, be sure to use high-quality chocolate, as the flavor will greatly impact the final dessert.
Additionally, you can prepare the batter in advance and refrigerate it in the ramekins. Just remember to add a couple of extra minutes to the baking time if you’re using cold batter.
Experiment with different flavor additions such as orange zest or espresso for a unique twist on this classic dish. Enjoy your indulgent Chocolate Fondant!
Tiramisu From Italy
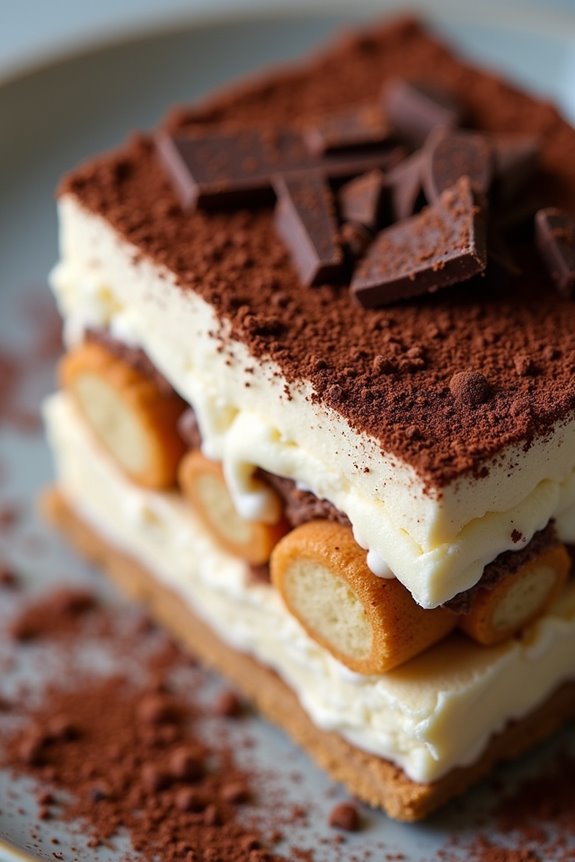
Tiramisu is a classic Italian dessert that has captured the hearts of many around the world with its rich flavors and luxurious texture. Originating from the Veneto region, this no-bake dessert combines layers of coffee-soaked ladyfingers with a creamy mixture of mascarpone cheese, eggs, and sugar, dusted with cocoa powder. Its name translates to “pick me up,” which is fitting given the energizing combination of espresso and cocoa.
Tiramisu is perfect for any occasion, whether it’s a festive gathering or a simple dinner at home, and it’s relatively easy to prepare, making it a favorite among both novice and seasoned bakers alike.
The beauty of tiramisu lies in its versatility; you can adjust the coffee or cocoa levels to suit your taste, and it can be made ahead of time, allowing the flavors to meld beautifully. The dessert is best served chilled, and each bite is a delightful experience, with the softness of the ladyfingers perfectly complementing the creamy filling.
With its indulgent flavors and elegant presentation, tiramisu is sure to impress your guests and satisfy your sweet tooth.
Ingredients (Serves 4-6):
- 6 large egg yolks
- 3/4 cup granulated sugar
- 2/3 cup milk
- 1 cup heavy cream
- 1 cup mascarpone cheese
- 1 cup strong brewed coffee (cooled)
- 2 tablespoons coffee liqueur (optional)
- 24 ladyfinger cookies
- Unsweetened cocoa powder (for dusting)
- Dark chocolate shavings (for garnish, optional)
Instructions:
- Prepare the Egg Mixture: In a medium saucepan, whisk together the egg yolks and granulated sugar until the mixture becomes light in texture and color. Gradually add the milk while continuously whisking. Cook over medium heat until the mixture thickens slightly and coats the back of a spoon, about 5-7 minutes. Remove from heat and let it cool.
- Make the Cream Mixture: In a separate mixing bowl, use an electric mixer to beat the heavy cream until soft peaks form. Gently fold in the mascarpone cheese until the mixture is smooth and well combined. Once the egg mixture has cooled, gently fold it into the mascarpone mixture until fully incorporated.
- Prepare the Coffee Mixture: In a shallow dish, combine the brewed coffee and coffee liqueur (if using). Dip each ladyfinger into the coffee mixture briefly, ensuring they soak up some flavor but don’t become overly soggy.
- Layer the Tiramisu: In a rectangular or square serving dish, arrange a layer of soaked ladyfingers at the bottom. Spread half of the mascarpone mixture over the ladyfingers, smoothing it out evenly. Repeat the process with another layer of soaked ladyfingers followed by the remaining mascarpone mixture.
- Chill the Dessert: Cover the dish with plastic wrap and refrigerate the tiramisu for at least 4 hours, or preferably overnight, to allow the flavors to meld and the dessert to set.
- Serve and Garnish: Before serving, dust the top of the tiramisu generously with cocoa powder and add dark chocolate shavings if desired. Slice and serve chilled.
Extra Tips: When making tiramisu, it’s important not to soak the ladyfingers for too long in the coffee mixture, as they can become overly soggy. A quick dip on each side is sufficient to infuse them with flavor while maintaining their structure.
Additionally, using high-quality espresso or coffee will greatly enhance the taste of your tiramisu. For an even more decadent dessert, consider adding a layer of chocolate ganache or a sprinkle of cinnamon for additional depth of flavor.
Baklava From Greece
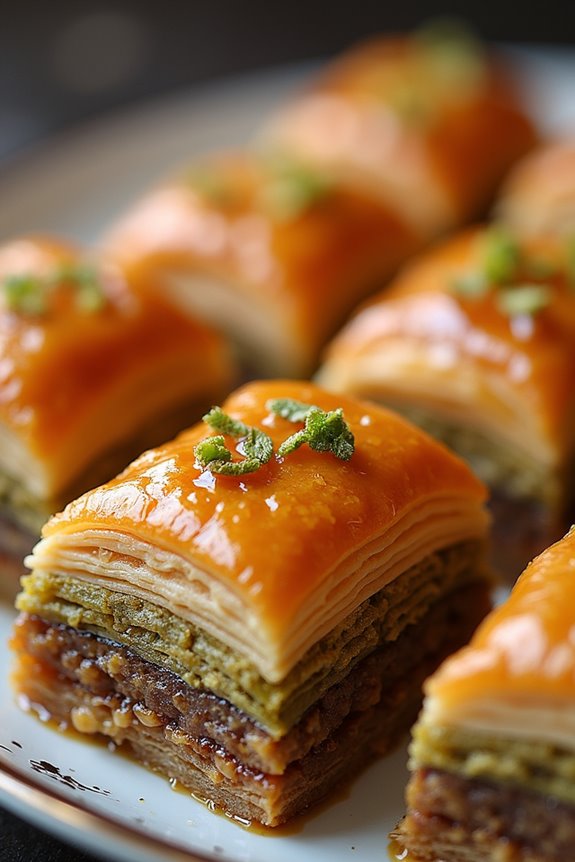
Baklava is a rich, sweet pastry made of layers of filo dough filled with chopped nuts and sweetened with honey or syrup. This delightful dessert is a staple in Greek cuisine, known for its flaky texture and aromatic flavors. Traditionally served during festive occasions, baklava is a symbol of hospitality and indulgence, making it a favorite among many. The combination of nuts, spices, and sweet syrup creates a mouthwatering experience that’s hard to resist.
Making baklava at home might seem challenging, but with the right ingredients and instructions, you can impress your family and friends with this delicious treat. The layers of filo dough are carefully brushed with melted butter, alternating with the nut mixture, before being baked to a golden perfection. Once baked, it’s drenched in a sweet syrup that seeps into every layer, guaranteeing every bite is packed with flavor.
Ingredients (serving size: 4-6 people):
- 1 package (16 oz) of filo dough, thawed
- 1 cup unsalted butter, melted
- 2 cups walnuts, finely chopped
- 1 cup pistachios, finely chopped
- 1 teaspoon ground cinnamon
- 1 cup granulated sugar
- 1 cup water
- 1 cup honey
- 1 teaspoon vanilla extract
- 1 tablespoon lemon juice
Cooking Instructions:
- Prepare the Nut Mixture: In a large bowl, combine the finely chopped walnuts, pistachios, and ground cinnamon. Mix well to guarantee the nuts are evenly coated with cinnamon. Set aside to allow the flavors to meld.
- Prepare the Filo Dough: Carefully unfold the thawed filo dough and cover it with a damp towel to prevent it from drying out. Preheat your oven to 350°F (175°C).
- Assemble the Layers: Brush a 9×13 inch baking dish with melted butter. Place one sheet of filo dough in the dish and brush it lightly with more melted butter. Repeat this process, layering and buttering 8 sheets of filo dough.
- Add the Nut Filling: Spread a portion of the nut mixture evenly over the layered filo. Continue layering 4 sheets of filo dough, brushing each sheet with melted butter. Repeat the layering and nut filling process until all the nuts are used, ending with 8 layers of filo on top.
- Cut the Baklava: Using a sharp knife, carefully cut the baklava into diamond or square shapes, ensuring you cut through to the bottom layer. This will help the syrup soak in later.
- Bake the Baklava: Place the dish in the preheated oven and bake for about 45-50 minutes or until the baklava is golden brown and crispy.
- Prepare the Syrup: While the baklava is baking, combine the sugar, water, honey, vanilla extract, and lemon juice in a saucepan. Bring to a boil, then reduce the heat and let it simmer for about 10 minutes. Remove from the heat and allow it to cool slightly.
- Add the Syrup to Baklava: Once the baklava is done baking, remove it from the oven and immediately pour the syrup evenly over the hot baklava. Allow it to soak for at least 4 hours, or overnight for the best flavor.
- Serve and Enjoy: Once the baklava has cooled and soaked up the syrup, it’s ready to be served. Serve it at room temperature, and enjoy the layers of flavor and texture!
Extra Tips: When working with filo dough, it’s essential to keep it covered while you assemble the baklava to prevent it from drying out. If you find that your baklava is too dry after baking, you can drizzle a little extra syrup over the top just before serving. Additionally, feel free to experiment with different nuts or spices in the filling to create your own unique version of baklava!
Sacher Torte From Austria
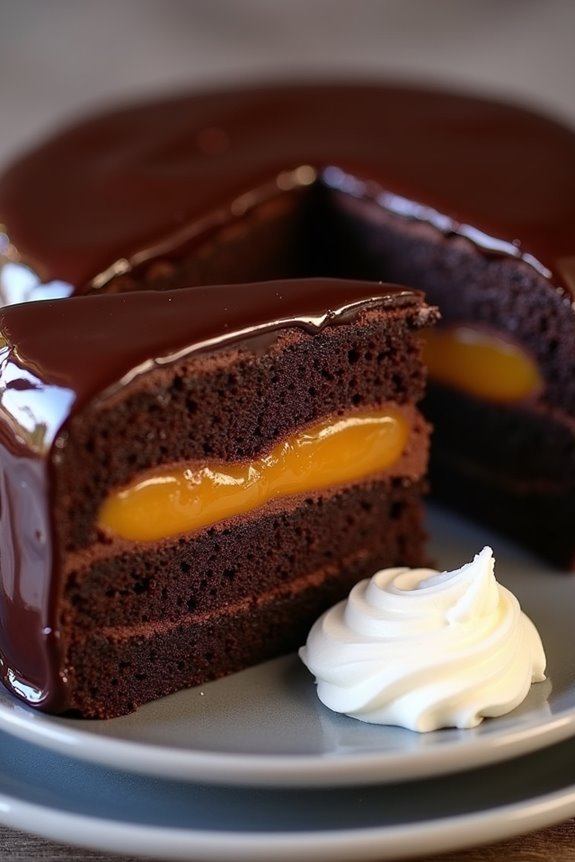
Sacher Torte is a classic Austrian dessert that embodies the perfect union of rich chocolate cake and smooth apricot jam. Originally created in 1832 by Franz Sacher for Prince Wenzel von Metternich, this indulgent treat has become a symbol of Viennese coffee house culture.
The cake features a dense, moist chocolate layer, a sweet apricot filling, and is typically topped with a glossy chocolate glaze, making it a favorite among chocolate lovers. This elegant dessert is often served with a dollop of whipped cream to balance the rich flavors.
While it may seem intimidating to prepare, with the right ingredients and a bit of patience, you can create a delightful Sacher Torte that will impress your guests. Perfect for special occasions, this cake not only tastes divine but also offers a glimpse into Austria’s rich culinary heritage.
Ingredients (Serves 4-6)
- 100g dark chocolate (70% cocoa)
- 100g unsalted butter, softened
- 100g granulated sugar
- 5 large eggs, separated
- 100g all-purpose flour
- 1 teaspoon vanilla extract
- 1/4 teaspoon salt
- 200g apricot jam
- 200g dark chocolate (for glaze)
- 100ml heavy cream (for glaze)
- Whipped cream (for serving, optional)
Cooking Instructions
1. Preheat the Oven: Begin by preheating your oven to 175°C (350°F). This guarantees that your cake bakes evenly and rises properly.
2. Melt the Chocolate: In a heatproof bowl, gently melt the 100g of dark chocolate over a pot of simmering water (double boiler method). Stir occasionally until fully melted. Remove from heat and let cool slightly.
3. Prepare the Batter: In a large mixing bowl, cream the softened butter and granulated sugar together until light and fluffy. This process should take about 3-5 minutes.
Then, add the cooled melted chocolate and mix until combined.
4. Add Egg Yolks: Incorporate the egg yolks, one at a time, into the chocolate mixture, mixing well after each addition. Add the vanilla extract and salt, and stir until everything is well blended.
5. Fold in Flour: Sift the all-purpose flour over the batter and gently fold it in using a spatula. Be careful not to overmix, as this can make the cake dense.
6. Whip Egg Whites: In a separate bowl, whip the egg whites until stiff peaks form. This step is essential for achieving a light and airy texture in your cake.
7. Combine Mixtures: Gently fold the whipped egg whites into the chocolate batter in three additions. This will help to keep the mixture light and fluffy.
8. Bake the Cake: Pour the batter into a greased and lined 9-inch round cake pan. Bake in the preheated oven for 30-35 minutes, or until a toothpick inserted into the center comes out clean.
Allow the cake to cool in the pan for about 10 minutes before transferring it to a wire rack.
9. Prepare the Glaze: While the cake cools, prepare the chocolate glaze. In a saucepan, heat the heavy cream until just boiling, then pour it over the 200g of dark chocolate in a bowl. Let it sit for a minute, then stir until smooth and glossy.
10. Assemble the Torte: Once the cake has cooled completely, carefully slice it in half horizontally. Spread a generous layer of apricot jam over the bottom half of the cake, then place the top half back on.
Pour the chocolate glaze over the entire cake, guaranteeing an even coating.
11. Serve: Allow the glaze to set for a few minutes before slicing the Sacher Torte. Serve each slice with a dollop of whipped cream, if desired.
Extra Tips
For the best results, use high-quality dark chocolate, as it greatly enhances the flavor of the Sacher Torte.
When glazing, make sure the cake is completely cooled to prevent the glaze from melting. If you want, you can also add a hint of coffee to the chocolate glaze for an extra depth of flavor.
Store leftover Sacher Torte in an airtight container at room temperature for up to 3 days, or in the fridge for up to a week. Enjoy this delightful taste of Austria with your friends and family!
Pasteis De Nata From Portugal

Pasteis de Nata, also known as Portuguese custard tarts, are a delightful and iconic dessert that hails from Portugal. These small pastries have a flaky, buttery crust filled with a creamy custard that’s lightly caramelized on top.
Originally created in the 18th century by monks at the Jerónimos Monastery in Lisbon, these tarts have become a beloved treat not just in Portugal but around the world. The combination of textures and flavors makes them irresistible, and they’re often enjoyed with a sprinkle of cinnamon or powdered sugar.
Making Pasteis de Nata at home may seem intimidating, but with the right ingredients and techniques, you can recreate this classic dessert in your kitchen. The key to achieving the perfect custard filling lies in the balance of creaminess and sweetness, while the pastry should be crisp and flaky.
This recipe will guide you through each step, guaranteeing that you can serve up a batch of these delicious tarts for 4-6 people.
Ingredients
- 1 package of puff pastry (thawed)
- 1 cup heavy cream
- 1 cup whole milk
- 3/4 cup granulated sugar
- 1/4 cup all-purpose flour
- 4 large egg yolks
- 1 tablespoon vanilla extract
- 1 cinnamon stick
- Ground cinnamon (for serving)
- Powdered sugar (for serving)
Cooking Instructions
1. Prepare the Pastry: Preheat your oven to 400°F (200°C). Roll out the thawed puff pastry on a lightly floured surface to smooth out any creases. Cut the pastry into circles, approximately 4 inches in diameter, and gently press them into the wells of a muffin tin.
Confirm the pastry comes up the sides of each well to form a cup shape. This will create the shell for your custard.
2. Make the Custard Filling: In a medium saucepan over medium heat, combine the heavy cream, whole milk, and cinnamon stick. Heat until just simmering, then remove from heat and let the cinnamon infuse the liquid for about 10 minutes.
In another bowl, whisk together the sugar and flour. Gradually add the warm cream mixture to the sugar and flour mixture, whisking continuously to prevent lumps.
3. Combine with Egg Yolks****: Once the mixture is smooth, whisk in the egg yolks and vanilla extract until well combined. Make sure to mix thoroughly to achieve a creamy custard texture.
4. Fill the Pastry Shells: Remove the cinnamon stick from the custard mixture. Carefully pour the custard into each pastry shell, filling them about 3/4 full.
It’s important not to overfill, as the custard will puff slightly during baking.
5. Bake the Tarts: Place the muffin tin into the preheated oven and bake for 15-20 minutes, or until the tops are set and golden brown. Keep an eye on them to confirm they don’t burn; the tops should have a nice caramelized look.
6. Cool and Serve: Once baked, remove the tarts from the oven and let them cool in the tin for a few minutes before transferring them to a wire rack.
They’re best served warm, dusted with a little ground cinnamon and powdered sugar.
Extra Tips
When making Pasteis de Nata, using high-quality puff pastry will greatly enhance the flavor and texture of your tarts. If you can, opt for a brand that uses real butter for a richer taste.
Additionally, letting the custard mixture cool slightly before pouring it into the pastry shells will help prevent the pastry from becoming soggy. Finally, serve your tarts fresh out of the oven for the best experience, as they’re most delicious when warm and crispy!
Black Forest Cake From Germany
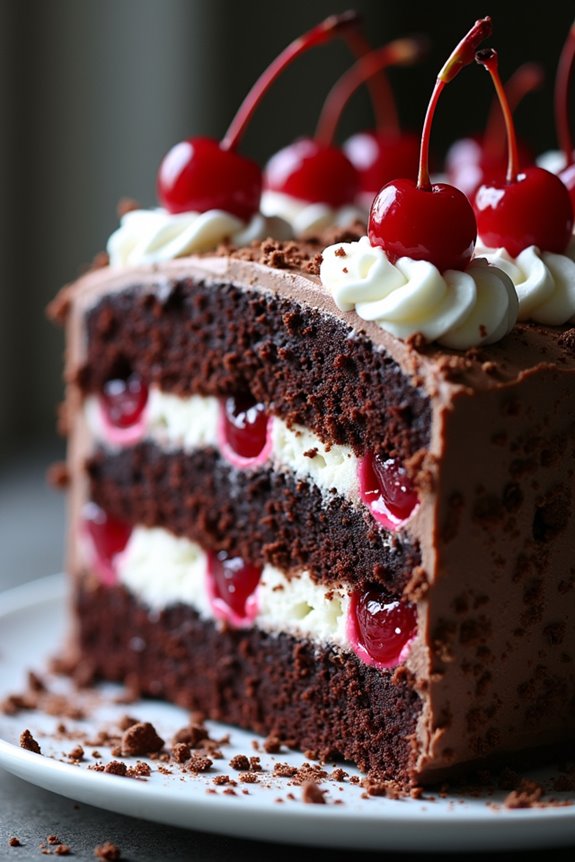
Black Forest Cake, or Schwarzwälder Kirschtorte, is a decadent dessert that hails from the Black Forest region of Germany. This iconic cake features layers of rich chocolate sponge cake, luscious whipped cream, and tart cherries. Traditionally, it’s flavored with Kirsch, a cherry schnapps that adds depth and authenticity to the cake.
The combination of sweet and slightly sour flavors, along with the beautiful contrasting layers, makes this cake an unforgettable treat for any occasion. Making a Black Forest Cake may seem intimidating, but with a few simple steps, you can create this show-stopping dessert at home.
Whether you’re celebrating a birthday, anniversary, or just indulging in a sweet craving, this cake is sure to impress your friends and family. So, roll up your sleeves and get ready to bake a slice of Germany!
Ingredients (serving size: 4-6 people)
- 1 ½ cups all-purpose flour
- 1 cup granulated sugar
- ½ cup unsweetened cocoa powder
- 1 ½ teaspoons baking powder
- 1 teaspoon baking soda
- ½ teaspoon salt
- 2 large eggs
- 1 cup buttermilk
- ½ cup vegetable oil
- 2 teaspoons vanilla extract
- 1 cup boiling water
- 1 cup heavy whipping cream
- 2 tablespoons powdered sugar
- 1 jar (about 24 oz) Morello cherries, drained and juice reserved
- ¼ cup Kirsch (cherry schnapps)
- Chocolate shavings for decoration
Instructions
1. Preheat the Oven: Start by preheating your oven to 350°F (175°C). This guarantees that your cake bakes evenly and rises properly.
2. Prepare the Cake Batter: In a large mixing bowl, combine the flour, granulated sugar, cocoa powder, baking powder, baking soda, and salt. Whisk these dry ingredients together until well mixed.
In another bowl, whisk the eggs, buttermilk, vegetable oil, and vanilla extract together. Gradually add the wet ingredients to the dry ingredients and mix until combined. Finally, stir in the boiling water until the batter is smooth.
3. Bake the Cake: Divide the batter evenly between two greased 9-inch round cake pans. Bake in the preheated oven for 30-35 minutes, or until a toothpick inserted in the center comes out clean.
Once baked, allow the cakes to cool in the pans for 10 minutes before transferring them to a wire rack to cool completely.
4. Prepare the Whipped Cream: In a mixing bowl, beat the heavy whipping cream and powdered sugar with an electric mixer on medium-high speed until soft peaks form. Be careful not to overbeat, as you want a light and fluffy texture.
5. Assemble the Cake: Once the cakes are completely cooled, slice each cake in half horizontally to create four layers. Place one layer on a serving plate and brush it generously with the reserved cherry juice mixed with Kirsch.
Spread a layer of whipped cream over the cake, then add some of the drained cherries on top. Repeat this process with the next two layers, finishing with the final layer of cake on top.
6. Decorate: Frost the top and sides of the cake with the remaining whipped cream. Use a spatula to create swirls or peaks for a decorative finish.
Finally, sprinkle chocolate shavings on top of the cake for an elegant touch.
Extra Tips
When making Black Forest Cake, it’s important to use high-quality ingredients, especially for the chocolate and cherries, as they greatly influence the flavor of the cake.
If you prefer a less boozy cake, you can reduce the amount of Kirsch or omit it entirely. Additionally, chilling the whipped cream for a bit before whipping can help it achieve a better consistency, making it easier to spread and decorate. Enjoy your delicious homemade Black Forest Cake!
Panna Cotta From Italy
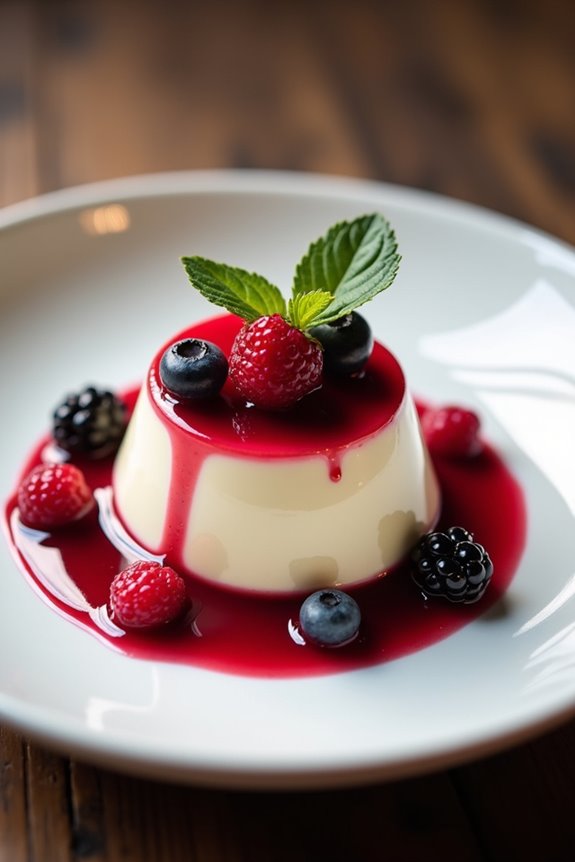
Panna Cotta, an exquisite Italian dessert, translates to “cooked cream.” This velvety, smooth treat is a perfect balance of cream, sugar, and gelatin, making it a favorite among dessert lovers. Often served with a berry coulis or caramel sauce, Panna Cotta is both elegant and simple, ideal for impressing guests at a dinner party or enjoying a special night at home.
Its versatility allows for various flavor infusions, from vanilla to coffee or even citrus, making it easy to customize according to your palate.
The origins of Panna Cotta trace back to the northern regions of Italy, particularly Piedmont. This classic dessert has gained popularity worldwide due to its light texture and delightful sweetness. Traditionally, Panna Cotta is set in molds and unmolded before serving, but it can also be served directly in ramekins. Regardless of the presentation, this dessert promises to be a crowd-pleaser that’s both satisfying and indulgent.
Ingredients for Panna Cotta (Serves 4-6):
- 2 cups heavy cream
- 1 cup whole milk
- 3/4 cup granulated sugar
- 2 teaspoons pure vanilla extract
- 2 1/4 teaspoons unflavored gelatin (about 1 packet)
- 3 tablespoons cold water
- Fresh berries or fruit sauce for serving (optional)
Cooking Instructions:
- Prepare the Gelatin: In a small bowl, sprinkle the unflavored gelatin over the cold water. Allow it to sit for about 5-10 minutes until it becomes spongy. This process is called blooming, and it guarantees that the gelatin dissolves properly in the cream mixture.
- Heat the Cream Mixture: In a medium saucepan, combine the heavy cream, whole milk, and granulated sugar. Place the saucepan over medium heat and stir gently until the sugar is fully dissolved. Don’t let the mixture come to a boil; you want it to be hot but not bubbling.
- Incorporate the Gelatin: Once the cream mixture is hot and the sugar has dissolved, remove the saucepan from the heat. Add the bloomed gelatin to the warm cream, stirring continuously until the gelatin is completely dissolved. This step is vital for achieving a smooth texture.
- Add Vanilla: Stir in the pure vanilla extract into the cream mixture, confirming it’s well incorporated. If you desire additional flavors, this is the time to add ingredients like espresso, citrus zest, or other flavorings.
- Pour into Molds: Carefully pour the mixture into individual serving molds or ramekins. If you prefer to unmold the Panna Cotta later, lightly grease the molds with cooking spray or oil for easy release. If you’re serving them in ramekins, this step isn’t necessary.
- Chill: Cover the molds with plastic wrap and refrigerate for at least 4 hours, or until the Panna Cotta is set. It’s best to leave it overnight for ideal texture.
- Serve: To serve, if you used molds, gently run a knife around the edges and invert onto a plate. If using ramekins, serve directly. Top with fresh berries or fruit sauce for an extra touch of flavor and presentation.
Extra Tips: When making Panna Cotta, confirm your cream mixture doesn’t boil, as this can affect the final texture. For a richer flavor, consider infusing the cream with herbs like lavender or basil while heating.
Strain the mixture before pouring it into molds to eliminate any lumps from undissolved gelatin. Finally, be mindful of the chilling time; the longer it sits in the refrigerator, the firmer and more delightful the texture will become. Enjoy experimenting with different toppings and flavors to make this classic dessert your own!
Éclairs From France
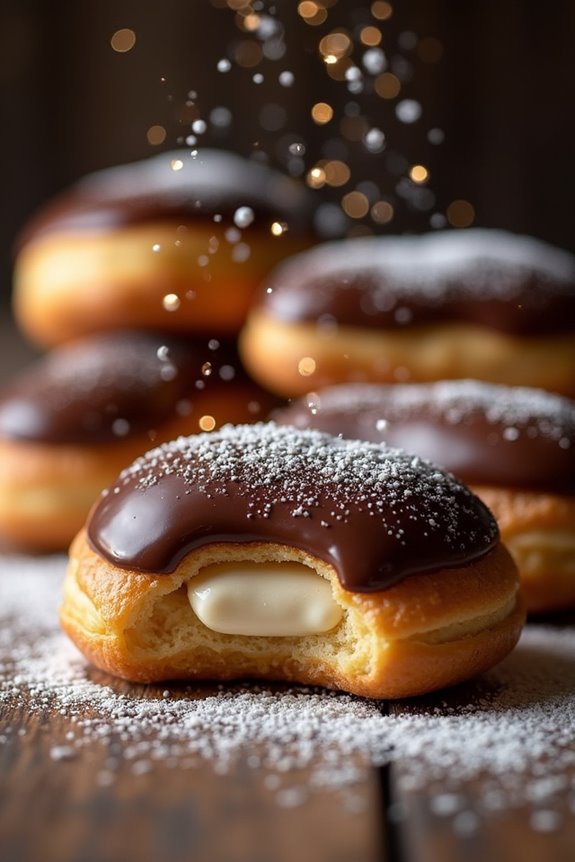
Éclairs are a classic French pastry that features a light and airy choux pastry filled with cream and topped with chocolate. Originating from France, these delectable treats have become a beloved dessert around the world. The name “éclair” translates to “flash” in French, possibly referencing the speed at which one can enjoy these delicious pastries.
With their elegant appearance and delightful flavors, éclairs are perfect for special occasions or simply to indulge in a sweet treat.
Making éclairs may seem intimidating, but with the right approach, they can be made at home with ease. The choux pastry is surprisingly simple to prepare, and once you master it, you can fill it with a variety of creams, such as vanilla pastry cream or whipped cream. Topping them off with a rich chocolate glaze adds the perfect finishing touch.
This recipe will guide you through the process to create 4-6 scrumptious éclairs that will impress your family and friends.
Ingredients:
- 1 cup water
- 1/2 cup unsalted butter
- 1 cup all-purpose flour
- 1/4 teaspoon salt
- 4 large eggs
- 1 cup pastry cream (store-bought or homemade)
- 1 cup semi-sweet chocolate chips
- 1 tablespoon vegetable oil
- Powdered sugar (optional, for dusting)
Instructions:
1. Prepare the Choux Pastry:
In a medium saucepan, combine the water and unsalted butter. Heat over medium-high heat until the butter is melted and the mixture comes to a boil.
Once boiling, remove from heat and quickly stir in the flour and salt until a dough forms. Return the pan to low heat and cook the dough for about 2 minutes, stirring constantly, until it pulls away from the sides of the pan.
2. Incorporate the Eggs:
Transfer the dough to a mixing bowl. Let it cool for a few minutes before adding the eggs one at a time.
Mix well after each addition until the dough is smooth and glossy. The consistency should be thick but still pipeable.
3. Pipe the Eclairs:
Preheat your oven to 400°F (200°C). Line a baking sheet with parchment paper.
Using a piping bag fitted with a large round tip, pipe strips of dough about 4 inches long, leaving space between each éclair. Smooth any pointed tops with a wet finger to guarantee even baking.
4. Bake the Éclairs:
Bake in the preheated oven for 20-25 minutes, or until the éclairs are golden brown and puffed up.
Don’t open the oven door while baking, as this can cause them to collapse. Once baked, remove from the oven and let cool completely on a wire rack.
5. Fill the Éclairs:
Once cooled, use a small sharp knife to make a slit on the side of each éclair.
Fill a piping bag with pastry cream and pipe it into each éclair until filled. Set aside the filled éclairs.
6. Prepare the Chocolate Glaze:
In a small microwave-safe bowl, combine the semi-sweet chocolate chips and vegetable oil.
Microwave in 30-second intervals, stirring in between, until melted and smooth.
7. Glaze the Éclairs:
Dip the top of each filled éclair into the chocolate glaze, allowing excess to drip off.
Place the glazed éclairs on a wire rack to set. If desired, dust with powdered sugar before serving.
Extra Tips:
For the best results, make sure that all your ingredients are at room temperature, especially the eggs, as they incorporate better into the dough.
Additionally, feel free to experiment with different fillings such as coffee or chocolate pastry cream to add a custom twist to your éclairs.
Properly storing the éclairs in an airtight container in the refrigerator will help maintain their freshness for a day or two, but they’re best enjoyed the same day they’re made.
Pavlova From Australia/New Zealand
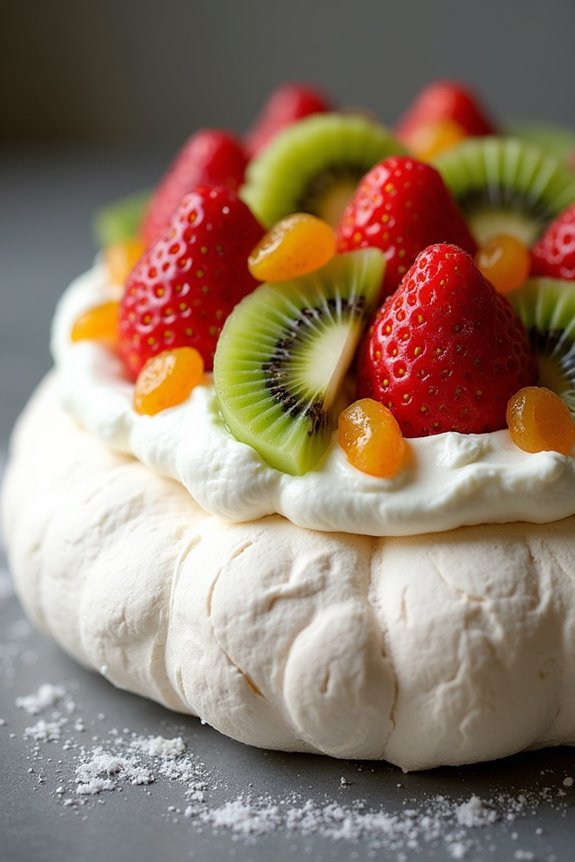
Pavlova is a stunning meringue-based dessert that’s both light and crisp on the outside while being soft and marshmallow-like on the inside. Named in honor of the Russian ballerina Anna Pavlova, this dessert is a delightful combination of sweetness and elegance, making it a favorite for celebrations and gatherings. Traditionally topped with whipped cream and fresh fruits, the Pavlova is a showstopper that can be customized with various toppings to suit any occasion.
Creating a Pavlova might seem overwhelming at first, but with a few simple ingredients and steps, you can produce a beautiful masterpiece that will impress your guests. The key to a perfect Pavlova is to verify that your egg whites are whipped to stiff peaks and that you bake it at a low temperature to achieve that signature texture. With its origins in Australia and New Zealand, this dessert has become a beloved classic that deserves a spot on your dessert table.
Ingredients (Serves 4-6)
- 4 large egg whites
- 1 cup granulated sugar
- 1 teaspoon white vinegar
- 1 teaspoon cornstarch
- 1 teaspoon vanilla extract
- 1 cup heavy whipping cream
- 2 tablespoons powdered sugar
- Fresh seasonal fruits (such as kiwi, strawberries, and passion fruit) for topping
Cooking Instructions
- Preheat the Oven: Preheat your oven to 250°F (130°C). Line a baking sheet with parchment paper and use a pencil to trace a circle (about 8-10 inches in diameter) on the parchment to guide the shape of your Pavlova.
- Whip the Egg Whites: In a clean, dry mixing bowl, beat the egg whites with an electric mixer on medium speed until soft peaks form. This means that the egg whites should start to hold their shape but will still be glossy and not stiff.
- Add Sugar Gradually: Increase the mixer speed to high and gradually add the granulated sugar, one tablespoon at a time, while continuing to beat. The mixture should become thick and glossy, and the sugar should be fully dissolved, which may take about 5-7 minutes. You can test if the sugar is dissolved by rubbing a small amount between your fingers.
- Incorporate Vinegar, Cornstarch, and Vanilla: Once the meringue is ready, gently fold in the vinegar, cornstarch, and vanilla extract using a spatula. Be careful not to deflate the meringue during this process; you want to keep as much air in as possible.
- Shape the Meringue: Spoon the meringue onto the traced circle on the parchment paper. Use a spatula to shape the meringue into a disc, creating a slight dip in the center to hold the toppings later. Smooth the edges to create a clean look.
- Bake the Pavlova: Place the baking sheet in the preheated oven and bake for about 1 hour and 15 minutes. The Pavlova should be dry to the touch and have a pale, ivory color. Once baked, turn off the oven and leave the door slightly ajar to cool completely. This helps prevent cracking.
- Prepare the Topping: While the Pavlova is cooling, whip the heavy cream and powdered sugar together in a bowl until soft peaks form.
- Assemble the Pavlova: Once the meringue is completely cool, carefully remove it from the parchment paper and place it on a serving platter. Spread the whipped cream over the top of the Pavlova and arrange the fresh fruits decoratively on top.
Extra Tips
When making Pavlova, it’s essential to verify that your mixing bowl and utensils are completely clean and free from any grease, as even a small amount can prevent the egg whites from whipping properly.
For an added flavor twist, you can infuse your whipped cream with a splash of vanilla extract or a hint of lemon zest. Finally, feel free to experiment with different fruits or even a drizzle of chocolate or fruit coulis for an extra touch of elegance!
Trifle From the United Kingdom
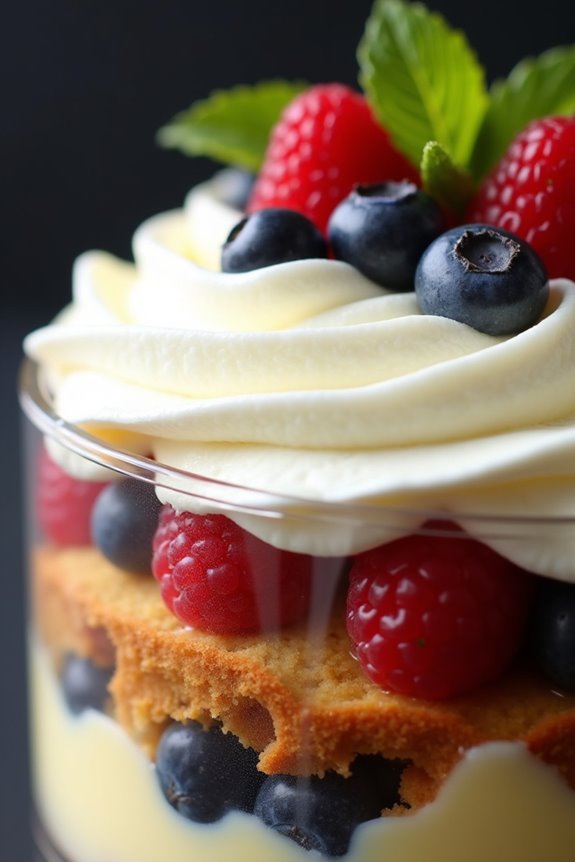
Trifle is a quintessential British dessert that beautifully layers flavors and textures, making it a favorite for special occasions and family gatherings. Traditionally, it consists of sponge cake soaked in sherry or fruit juice, a rich custard, fresh fruit, and a fluffy topping of whipped cream.
The beauty of trifle lies in its versatility; you can use different types of cake, fruit, and even flavored jellies to create your own unique version. This dessert not only pleases the palate but also creates a stunning visual appeal with its vibrant layers in a clear serving dish.
Making a trifle isn’t only about combining ingredients; it’s about allowing each layer to shine. The sponge cake can be homemade or store-bought, while the custard can be made from scratch or from a packet for convenience. The key to a great trifle is to let the individual components meld together, creating a harmonious blend of flavors.
Here’s how to make a classic British trifle that serves 4-6 people.
Ingredients
- 1 pound (450g) sponge cake or ladyfingers
- 1 cup (240ml) sherry or fruit juice
- 2 cups (480ml) custard (homemade or store-bought)
- 1 cup (150g) mixed berries (strawberries, blueberries, raspberries)
- 1 cup (240ml) heavy whipping cream
- 2 tablespoons powdered sugar
- 1 teaspoon vanilla extract
- Fresh mint leaves (for garnish, optional)
Cooking Instructions
- Prepare the Cake: If you’re using a sponge cake, slice it into even layers. If using ladyfingers, you can leave them whole. The cake should be light and airy to soak up the sherry or juice without becoming too soggy.
- Soak the Cake: Place the cake layers or ladyfingers in the bottom of a large trifle dish. Drizzle the sherry or fruit juice evenly over the cake, ensuring that it’s well-soaked but not falling apart. Let it sit for a few minutes to absorb the moisture.
- Add the Custard Layer: Pour the custard over the soaked cake, spreading it out evenly. This layer should be thick enough to hold the fruits and cream on top without mixing into the cake.
- Layer the Berries: Gently add the mixed berries on top of the custard. You can either layer them evenly or create a decorative pattern with the fruit for visual appeal.
- Whip the Cream: In a mixing bowl, combine the heavy whipping cream, powdered sugar, and vanilla extract. Using an electric mixer, whip the cream until it forms soft peaks. Be careful not to over-whip, as this can turn the cream grainy.
- Top with Whipped Cream: Spoon the whipped cream over the fruit layer, making sure to cover it completely. You can create peaks and swirls for a more decorative finish.
- Chill and Serve: Cover the trifle with plastic wrap and refrigerate for at least 2 hours or overnight to allow the flavors to meld. Serve chilled, garnished with fresh mint leaves if desired.
Extra Tips
When making trifle, feel free to experiment with different flavors and textures. You can use various fruits based on the season, such as peaches in summer or apples in autumn.
Additionally, if you want to make a non-alcoholic version, simply substitute the sherry with fruit juice or a flavored syrup. For a chocolate twist, consider adding chocolate custard or layers of chocolate cake.
Remember to assemble the trifle close to serving time if you want to maintain the freshness of the whipped cream. Enjoy your delightful British trifle!
Strudel From Austria
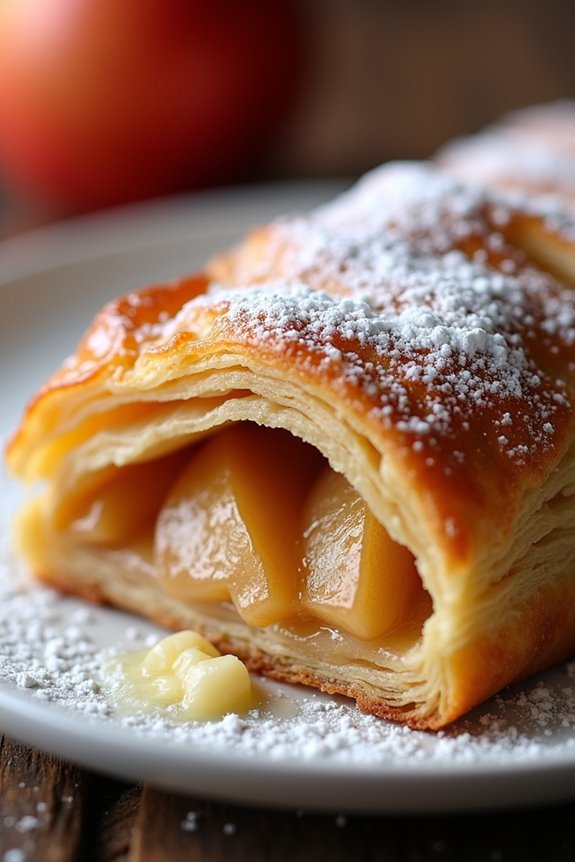
Strudel is a traditional Austrian pastry that has won the hearts of dessert lovers around the world. This delicate and flaky pastry is filled with various ingredients, but the most popular version is the apple strudel. The key to a perfect strudel lies in the dough, which must be rolled out thinly to create those signature layers. The filling is typically a delightful mixture of tart apples, sugar, cinnamon, and sometimes raisins or nuts, all enveloped in the golden, crisp pastry.
This dessert isn’t only delicious but also a beautiful centerpiece for any gathering or celebration. Making strudel may seem intimidating, but with a little patience and practice, you’ll be able to create a stunning dessert that will impress your family and friends. The aroma of baked apples and cinnamon wafting through your kitchen will surely evoke memories of cozy family gatherings and holidays.
This recipe will guide you step-by-step through the process of making a classic apple strudel, perfect for serving 4-6 people.
Ingredients
- 2 cups all-purpose flour
- 1/2 teaspoon salt
- 1 large egg
- 3 tablespoons vegetable oil
- 1/2 cup lukewarm water
- 4 medium apples, peeled, cored, and thinly sliced
- 1/2 cup granulated sugar
- 1 teaspoon ground cinnamon
- 1/2 cup raisins
- 1/2 cup chopped walnuts (optional)
- 3 tablespoons breadcrumbs
- 4 tablespoons unsalted butter, melted
- Powdered sugar for dusting
Cooking Instructions
- Prepare the Dough: In a large mixing bowl, combine the flour and salt. Create a well in the center and add the egg, vegetable oil, and lukewarm water. Mix with your hands or a wooden spoon until the dough comes together. Knead the dough on a floured surface for about 5-7 minutes until it’s smooth and elastic. Wrap it in plastic wrap and let it rest for at least 30 minutes at room temperature.
- Prepare the Filling: While the dough is resting, prepare the filling. In a large bowl, combine the sliced apples, granulated sugar, cinnamon, raisins, and walnuts (if using). Toss everything together until the apples are evenly coated. Set aside.
- Roll Out the Dough: After the dough has rested, place it on a floured surface. Using a rolling pin, roll it out as thinly as possible into a large rectangle (about 16×24 inches). The dough should be so thin that you can almost see through it. If necessary, you can stretch it gently with your hands.
- Add the Breadcrumbs: Sprinkle the breadcrumbs evenly over the rolled-out dough, leaving a border of about 1 inch. This will help absorb excess moisture from the apples and keep the pastry crisp.
- Add the Apple Filling: Spoon the apple filling over the breadcrumbs, spreading it out evenly. Make sure to keep the filling within the border.
- Roll the Strudel: Starting from one of the long sides, carefully lift the edge of the dough and begin to roll it over the filling. Continue rolling until the entire strudel is wrapped up. Use a spatula to help you if needed. Tuck in the ends to seal the filling inside.
- Bake: Preheat your oven to 375°F (190°C). Transfer the strudel to a parchment-lined baking sheet. Brush the top with melted butter. Bake for about 30-35 minutes, or until the strudel is golden brown and crisp.
- Cool and Serve: Once baked, remove the strudel from the oven and let it cool for a few minutes. Dust with powdered sugar before slicing. Serve warm or at room temperature, ideally with a scoop of vanilla ice cream or a dollop of whipped cream.
Extra Tips
For the best results, make sure that your dough is rolled out as thin as possible; this will create a light and flaky texture. If you find the dough is too elastic and resistant to rolling, let it rest for a few more minutes.
Additionally, feel free to experiment with the filling by adding spices like nutmeg or ginger, or swapping in different fruits such as pears or cherries for a unique twist. Enjoy your homemade strudel!