

When I think of comfort food, European pies are at the top of my list. Each recipe brings a unique blend of flavors that whisk me away to different parts of Europe. From the buttery crust of a French Tarte Tatin to the hearty filling of a British Steak and Ale Pie, there’s a pie for everyone. It’s not just about enjoying these dishes; it’s also about the stories they tell and the memories they create. Curious to see which pies made it into my favorites list?
Classic French Tarte Tatin

Tarte Tatin is a delightful upside-down caramelized apple tart that hails from the heart of France. Traditionally made with a flaky pastry base, this dish showcases the natural sweetness of apples, enhanced by caramel and baked to perfection.
The origin of this beloved dessert is steeped in history, claiming to have been created by the Tatin sisters in the late 19th century. It’s an indulgent dessert that’s both simple and elegant, making it a perfect centerpiece for any gathering.
In this recipe, we’ll guide you through the steps to create a classic Tarte Tatin that serves 4-6 people. With its rich flavors and stunning presentation, this dessert is sure to impress your guests. The combination of buttery pastry and luscious caramelized apples creates a heavenly experience that will leave everyone craving more.
Let’s explore the ingredients and cooking instructions for this classic French treat.
Ingredients:
- 6 medium apples (such as Granny Smith or Honeycrisp)
- 1 cup granulated sugar
- 1/2 cup unsalted butter (1 stick)
- 1 teaspoon vanilla extract
- 1 teaspoon ground cinnamon
- 1/4 teaspoon salt
- 1 sheet of puff pastry (thawed if frozen)
- Flour (for dusting)
- Optional: whipped cream or vanilla ice cream for serving
Cooking Instructions:
1. Prepare the Apples: Start by peeling, coring, and slicing the apples into quarters. This will guarantee even cooking and caramelization. Set the prepared apples aside as you move to the next step.
2. Make the Caramel: In a large, oven-safe skillet (preferably cast iron), add the granulated sugar over medium heat. Allow the sugar to melt slowly, swirling the pan occasionally to guarantee even melting.
Once the sugar is a deep golden color (about 8-10 minutes), remove it from the heat.
3. Add Butter and Flavorings: Immediately add the butter to the melted sugar and stir until fully combined. Be careful, as the mixture will bubble up.
Add the vanilla extract, ground cinnamon, and salt, mixing well to incorporate all the flavors.
4. Arrange the Apples: Carefully place the apple quarters into the skillet, arranging them in a circular pattern. It’s okay if they overlap; they’ll shrink as they cook.
Cook the apples in the caramel for about 10-15 minutes over medium heat, turning them occasionally to coat them with the caramel.
5. Preheat the Oven: While the apples are cooking, preheat your oven to 375°F (190°C) to prepare for baking the tart.
6. Top with Puff Pastry: Once the apples are slightly softened, remove the skillet from the heat. Roll out the puff pastry on a floured surface to guarantee it fits over the skillet.
Place the puff pastry over the apples, tucking the edges down into the skillet to cover the apples completely.
7. Bake the Tarte Tatin: Transfer the skillet to the preheated oven and bake for about 25-30 minutes, or until the pastry is golden brown and puffed up.
8. Invert and Serve: Once baked, carefully take the skillet out of the oven and let it cool for about 5 minutes.
To invert the tart, place a large plate over the skillet and quickly flip it over. Gently lift the skillet away to reveal the caramelized apples on top. Serve warm with whipped cream or vanilla ice cream if desired.
Extra Tips:
When making Tarte Tatin, it’s essential to use a good-quality, oven-safe skillet to guarantee even cooking and caramelization.
If you find that your caramel is too dark or starting to burn, remove it from the heat immediately to prevent bitterness.
Be careful during the inversion process, as the hot caramel can splatter. For an extra touch, consider adding a splash of Calvados or apple brandy to the caramel for a more intense apple flavor.
Enjoy your delicious Tarte Tatin!
British Steak and Ale Pie
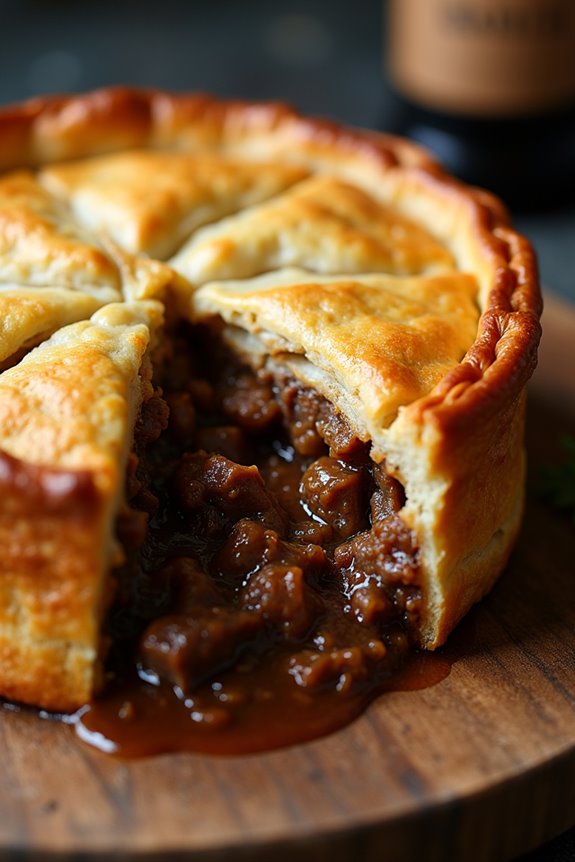
The British Steak and Ale Pie is a classic dish that embodies the heart and soul of British cuisine. It combines tender chunks of beef, slowly cooked in a rich and flavorful ale-based gravy, all encased in a golden, flaky pastry. This comforting pie is perfect for a family dinner or a cozy gathering with friends, offering a satisfying, hearty meal that warms the soul and delights the palate.
To make a truly authentic Steak and Ale Pie, it’s vital to choose the right cut of beef. Chuck or braising steak works beautifully, as it becomes wonderfully tender when cooked low and slow. Pairing the beef with a robust ale adds depth of flavor, making each bite a savory experience. The pie can be served with an array of sides, such as mashed potatoes, peas, or a simple green salad, making it a versatile dish that can suit any occasion.
Ingredients (serving size: 4-6 people)
- 1 kg (2.2 lbs) beef chuck or braising steak, cut into 2.5 cm (1 inch) cubes
- 2 tablespoons vegetable oil
- 1 large onion, diced
- 2 cloves garlic, minced
- 2 medium carrots, diced
- 250 ml (1 cup) beef stock
- 300 ml (1.25 cups) stout or brown ale
- 2 tablespoons Worcestershire sauce
- 1 tablespoon fresh thyme leaves (or 1 teaspoon dried thyme)
- Salt and pepper, to taste
- 1 tablespoon cornstarch (optional, for thickening)
- 2 sheets of ready-made shortcrust pastry
- 1 egg, beaten (for egg wash)
Cooking Instructions
- Prepare the beef: Start by seasoning the beef cubes generously with salt and pepper. This will help enhance the flavor of the meat as it cooks and tenderizes.
- Brown the beef: In a large, heavy-based pot or Dutch oven, heat the vegetable oil over medium-high heat. Working in batches, add the beef cubes and brown them on all sides. This step is significant as it builds a rich flavor base for the pie filling. Once browned, remove the beef from the pot and set aside.
- Sauté the vegetables: In the same pot, add the diced onion, carrots, and minced garlic. Cook for about 5-7 minutes, or until the onions become translucent and the carrots start to soften. Stir frequently to prevent sticking.
- Deglaze and add liquids: Pour in the stout or brown ale, scraping up any browned bits stuck to the bottom of the pot. This deglazing adds even more flavor to the filling. Add the beef stock and Worcestershire sauce, stirring to combine.
- Combine and simmer: Return the browned beef to the pot, and add the fresh thyme. Bring the mixture to a boil, then reduce the heat to low, cover the pot, and let it simmer for about 2 hours. This slow cooking will tenderize the beef and allow the flavors to develop.
- Thicken the filling: After 2 hours, check the filling for thickness. If you prefer a thicker gravy, mix the cornstarch with a little cold water to create a slurry, then stir it into the filling and simmer for an additional 10 minutes.
- Preheat the oven: While the filling cools slightly, preheat your oven to 200°C (400°F).
- Assemble the pie: Roll out one sheet of shortcrust pastry and line a pie dish with it. Fill the dish with the beef and ale mixture, ensuring an even layer. Roll out the second pastry sheet and place it over the filling, sealing the edges by crimping them together. Cut a few slits in the top to allow steam to escape.
- Apply egg wash: Brush the top of the pastry with the beaten egg to give it a beautiful golden glaze while baking.
- Bake the pie: Place the pie in the preheated oven and bake for 25-30 minutes, or until the pastry is golden brown and crispy.
Extra Tips
When making British Steak and Ale Pie, consider allowing the filling to cool before assembling the pie, as this helps prevent a soggy bottom crust. Additionally, if you have time, prepare the filling a day in advance; the flavors will deepen and improve overnight in the refrigerator.
Serve the pie with a side of creamy mashed potatoes or buttery peas for a complete comforting meal. Enjoy your homemade pie experience!
Italian Ricotta and Spinach Pie
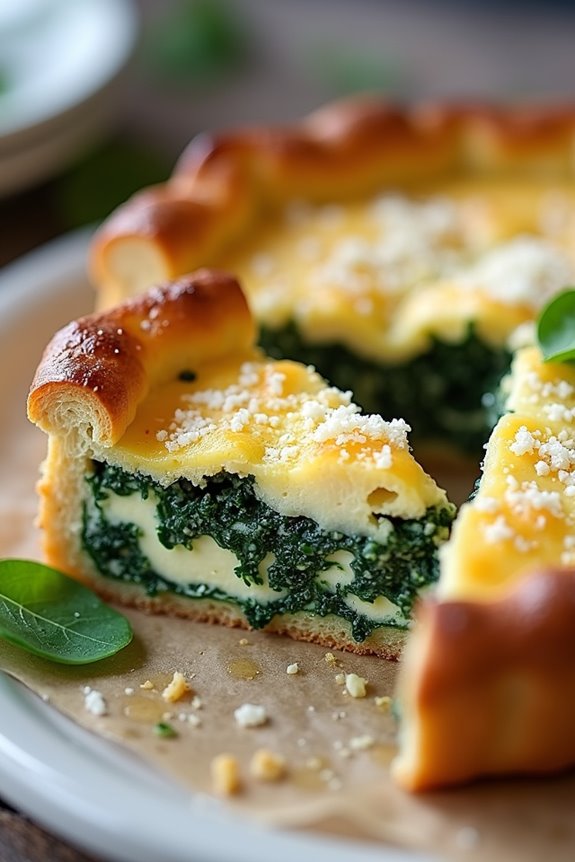
Italian Ricotta and Spinach Pie, known as “Torta di Ricotta e Spinaci,” is a delightful savory dish that showcases the rich flavors of ricotta cheese combined with fresh spinach, all encased in a crisp pastry.
This traditional Italian pie is perfect for family gatherings, a cozy dinner, or even a picnic treat. Its creamy filling is balanced with the earthiness of spinach, making it a satisfying meal or side dish that appeals to both vegetarians and meat lovers alike.
The preparation of this pie may seem intricate, but it can be easily mastered with a little practice. You’ll start by preparing the crust, which can be made from scratch or store-bought for convenience.
Once the crust is ready and the filling is mixed, the pie is baked until golden brown, resulting in a dish that’s as beautiful as it’s delicious. Serve it warm or at room temperature, and watch as it disappears from the table!
Ingredients (Serves 4-6):
- 1 pre-made pie crust (or homemade if preferred)
- 1 cup ricotta cheese
- 2 cups fresh spinach, chopped
- 1 cup grated Parmesan cheese
- 2 large eggs
- 1/2 teaspoon salt
- 1/4 teaspoon black pepper
- 1/4 teaspoon nutmeg
- 1 tablespoon olive oil (for sautéing)
- 1 small onion, finely chopped
- 2 cloves garlic, minced
Cooking Instructions:
1. Preheat the Oven: Start by preheating your oven to 375°F (190°C). This guarantees that the pie cooks evenly and the crust becomes perfectly golden brown.
2. Prepare the Spinach: In a skillet, heat the olive oil over medium heat. Add the chopped onion and sauté until translucent, about 5 minutes. Then, add the minced garlic and cook for an additional minute.
Add the chopped spinach and cook until wilted, about 3-4 minutes. Remove from heat and let it cool slightly.
3. Make the Filling: In a large bowl, combine the ricotta cheese, grated Parmesan cheese, eggs, salt, black pepper, and nutmeg. Mix well until you have a smooth consistency.
Once the spinach mixture has cooled, fold it into the ricotta mixture until evenly combined.
4. Assemble the Pie: Roll out your pie crust and fit it into a 9-inch pie dish. Pour the spinach and ricotta filling into the crust, spreading it evenly.
If desired, you can also add a sprinkle of extra Parmesan cheese on top for added flavor.
5. Bake the Pie: Place the pie in the preheated oven and bake for 30-35 minutes, or until the top is set and lightly golden.
You can check if it’s done by inserting a knife into the center; it should come out clean.
6. Cool and Serve: Once baked, remove the pie from the oven and let it cool for about 10-15 minutes before slicing.
This cooling time helps the filling to firm up a bit, making it easier to cut clean slices.
Extra Tips:
When making the Italian Ricotta and Spinach Pie, consider using fresh spinach for the best flavor, but frozen spinach can be a convenient substitute—just be sure to thaw and thoroughly drain it before adding to the filling to avoid excess moisture.
You can also experiment by adding other ingredients like sun-dried tomatoes or herbs such as basil or oregano to enhance the flavor profile. This pie can be made ahead of time and reheated, making it a fantastic option for meal prep or entertaining!
Spanish Empanadas
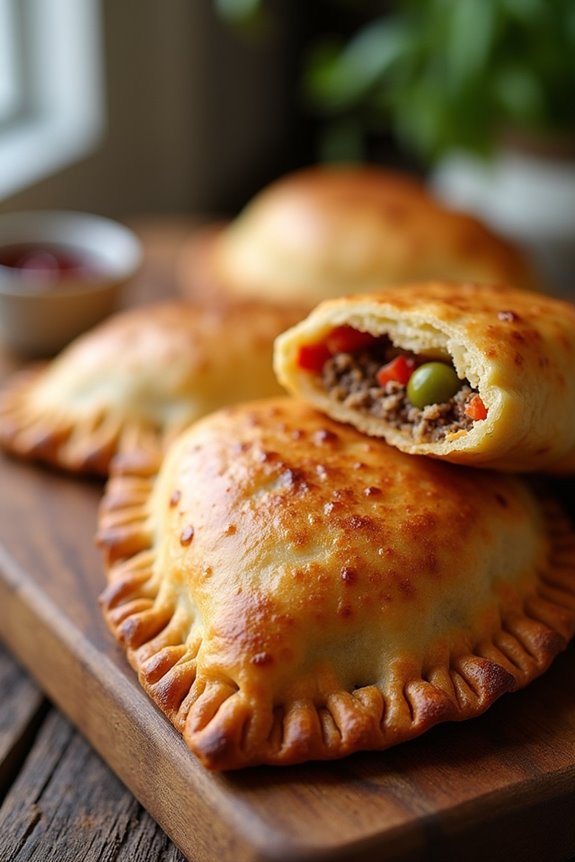
Spanish Empanadas are a delicious and versatile pastry that can be filled with a variety of ingredients, making them perfect for any occasion. Traditionally, these savory pies are filled with seasoned meats, vegetables, or cheeses, and then baked or fried until golden brown. The flaky, buttery crust contrasts beautifully with the flavorful filling, creating an irresistible combination that’s certain to delight your taste buds.
Whether served as a main dish, appetizer, or snack, Spanish Empanadas are a crowd-pleaser that will have everyone coming back for seconds.
Making Spanish Empanadas at home is easier than you might think. With a few simple ingredients and a bit of time, you can create a batch that rivals your favorite restaurant’s version. This recipe will guide you through the process of making your own dough from scratch, preparing a delicious filling, and assembling your empanadas for baking or frying.
Perfect for family gatherings, parties, or a cozy night in, these empanadas are certain to impress.
Ingredients (Serves 4-6)
- 2 cups all-purpose flour
- 1/2 cup unsalted butter, cold and cubed
- 1/2 teaspoon salt
- 6-8 tablespoons ice water
- 1 tablespoon olive oil
- 1 small onion, finely chopped
- 1 bell pepper, diced
- 2 cloves garlic, minced
- 1 pound ground beef or chicken
- 1 teaspoon paprika
- 1/2 teaspoon cumin
- Salt and pepper to taste
- 1/4 cup green olives, chopped (optional)
- 1 egg, beaten (for egg wash)
Cooking Instructions
1. Prepare the Dough: In a large mixing bowl, combine the all-purpose flour and salt. Add the cold cubed butter, and using a pastry cutter or your fingers, mix until the mixture resembles coarse crumbs. Gradually add ice water, one tablespoon at a time, mixing until the dough comes together. Be careful not to overwork the dough.
Once combined, shape it into a disc, wrap it in plastic wrap, and refrigerate for at least 30 minutes.
2. Make the Filling: In a large skillet, heat olive oil over medium heat. Add the chopped onion and bell pepper, and sauté until softened, about 5 minutes. Stir in the minced garlic and cook for another minute. Add the ground beef or chicken, cooking until browned.
Season with paprika, cumin, salt, and pepper. If using, stir in the chopped olives. Once cooked, remove from heat and let the filling cool slightly.
3. Roll Out the Dough: Once the dough is chilled, remove it from the refrigerator and place it on a lightly floured surface. Roll it out to about 1/8 inch thick. Use a round cutter (about 4-5 inches in diameter) to cut out circles of dough.
4. Assemble the Empanadas: Preheat your oven to 375°F (190°C) if baking. Place a tablespoon of the filling in the center of each dough circle. Fold the dough over to create a half-moon shape, pressing the edges together to seal.
You can crimp the edges with a fork or your fingers for a decorative touch. If frying, heat oil in a deep skillet or pot to 350°F (175°C) at this stage.
5. Bake or Fry: If baking, place the empanadas on a baking sheet lined with parchment paper. Brush the tops with the beaten egg for a golden finish. Bake for 20-25 minutes or until golden brown.
If frying, carefully add the empanadas to the hot oil in batches, frying until golden brown on both sides. Remove and drain on paper towels.
6. Serve: Allow the empanadas to cool slightly before serving. They can be enjoyed warm or at room temperature, making them great for entertaining or meal prep.
Extra Tips
When making Spanish Empanadas, feel free to get creative with the fillings! You can use leftover meats, vegetables, or even cheese. For a vegetarian option, consider using a mixture of mushrooms, spinach, and cheese.
Additionally, verify that your dough is chilled before rolling it out, as this will help achieve a flaky texture. Finally, if you prefer a lighter version, consider baking instead of frying – just be sure to brush the tops with egg wash for that beautiful golden color. Enjoy your homemade empanadas!
German Black Forest Cherry Pie

The German Black Forest Cherry Pie, known as Schwarzwälder Kirschtorte, is a decadent dessert that beautifully combines the rich flavors of dark chocolate, luscious cherries, and whipped cream. This pie pays homage to the enchanting Black Forest region of Germany, where cherries and chocolate are abundant and celebrated.
The dessert isn’t just a feast for the eyes but also a delightful treat for the taste buds, making it a perfect choice for special occasions or gatherings.
Creating a Black Forest Cherry Pie may seem intimidating, but with the right ingredients and a few easy steps, you can master this classic recipe. The layers of chocolate crust, cherry filling, and whipped cream come together to create a harmonious balance of flavors and textures.
Once you taste this indulgent pie, you’ll understand why it’s a beloved dessert across Europe and beyond.
Ingredients (serving size: 4-6 people)
- 1 ½ cups all-purpose flour
- ½ cup unsweetened cocoa powder
- ½ cup granulated sugar
- ½ teaspoon salt
- ½ cup unsalted butter, softened
- 1 large egg
- 1 cup pitted cherries (fresh or canned)
- ½ cup cherry juice (or Kirsch for added flavor)
- 1 tablespoon cornstarch
- 1 cup heavy whipping cream
- 2 tablespoons powdered sugar
- Chocolate shavings (for garnish)
Cooking Instructions
1. Prepare the Chocolate Crust: In a mixing bowl, combine the flour, cocoa powder, granulated sugar, and salt. Add the softened butter and mix until the mixture resembles coarse crumbs.
Then, beat in the egg until the dough comes together. Press the dough into a 9-inch pie pan evenly across the bottom and up the sides. Prick the crust with a fork and chill it in the refrigerator for 30 minutes.
2. Bake the Crust: Preheat your oven to 350°F (175°C). Once the crust has chilled, bake it in the preheated oven for 15-20 minutes or until set. Remove it from the oven and allow it to cool completely.
3. Prepare the Cherry Filling: In a small saucepan, combine the pitted cherries, cherry juice (or Kirsch), and cornstarch. Cook over medium heat, stirring gently, until the mixture thickens and bubbles.
This should take about 5 minutes. Once thickened, remove it from heat and let it cool slightly.
4. Assemble the Pie: Once the chocolate crust is completely cooled, pour the cherry filling into the crust, spreading it evenly. Allow it to set in the refrigerator for at least 1 hour.
5. Whip the Cream: In a mixing bowl, whip the heavy cream with the powdered sugar until soft peaks form. Be careful not to over-whip; you want the cream to be fluffy and smooth.
6. Top the Pie: After the cherry filling has set, spread the whipped cream over the top of the cherries evenly. Use a spatula to create swirls for a decorative finish.
7. Garnish and Serve: Finally, garnish the pie with chocolate shavings for an elegant touch. Slice the pie into wedges and serve chilled.
Extra Tips
For the best flavor, use high-quality dark chocolate cocoa powder and fresh cherries when in season. If using canned cherries, make sure to drain them well to avoid excess liquid in the filling.
Feel free to experiment with the amount of sugar in the whipped cream depending on your taste preference. For an added twist, consider drizzling some chocolate sauce over the whipped cream before serving, enhancing the visual appeal and taste of this delicious pie.
Portuguese Pastéis De Nata

Pastéis de Nata, or Portuguese custard tarts, are a beloved treat that hails from Portugal. These delicious pastries boast a flaky, buttery crust filled with a creamy vanilla custard that’s baked to perfection. Often enjoyed with a sprinkle of cinnamon or powdered sugar, they’re a staple in Portuguese cuisine and have gained popularity around the world. The contrast of the crisp pastry against the velvety filling makes each bite a delightful experience.
Making Pastéis de Nata at home may seem intimidating, but with the right ingredients and techniques, you can create these iconic tarts in your very own kitchen. This recipe will guide you through the process, ensuring that you achieve a beautiful, golden-brown crust and a silky custard filling that captures the essence of this traditional dessert. Perfect for sharing with family and friends, these tarts are sure to impress and transport you to the charming streets of Lisbon.
Ingredients (Serves 4-6 people):
- 1 sheet of puff pastry (store-bought)
- 1 cup heavy cream
- 1 cup whole milk
- 1 cup granulated sugar
- 1/4 cup all-purpose flour
- 6 large egg yolks
- 1 teaspoon vanilla extract
- Zest of 1 lemon
- Ground cinnamon (for sprinkling, optional)
- Powdered sugar (for sprinkling, optional)
Instructions:
- Preheat the Oven: Start by preheating your oven to 475°F (245°C). A hot oven is essential for achieving that desired crispy crust and properly cooking the custard filling.
- Prepare the Puff Pastry: Roll out the puff pastry sheet on a lightly floured surface until it’s thin. Cut it into circles that are about 4 inches in diameter. You’ll need enough circles to fit into the wells of a muffin tin. Gently press each circle into the muffin tin, ensuring that the pastry covers the sides and bottoms well.
- Make the Custard: In a medium saucepan, combine the heavy cream, whole milk, and sugar over medium heat. Stir until the sugar dissolves. In a separate bowl, whisk together the flour and egg yolks until smooth. Gradually add some of the warm milk mixture to the egg yolk mixture, whisking constantly to temper the eggs and prevent curdling.
- Combine the Mixtures: Once the egg mixture is warmed up, pour it back into the saucepan with the remaining milk mixture. Add the vanilla extract and lemon zest, and continue to cook over low heat, stirring constantly until the mixture thickens slightly, about 5-7 minutes. Remove from heat and let it cool for a few minutes.
- Fill the Pastry Shells: Carefully pour the custard filling into each puff pastry shell, filling them about ¾ full to allow for expansion during baking.
- Bake the Tarts: Place the muffin tin in the preheated oven and bake for 15-20 minutes, or until the tops of the tarts are golden brown and slightly charred. Keep an eye on them to avoid burning.
- Cool and Serve: Once baked, remove the tarts from the oven and let them cool in the tin for about 10 minutes. Then, transfer them to a wire rack to cool completely. Serve warm or at room temperature, and if desired, sprinkle with ground cinnamon and powdered sugar before serving.
Extra Tips:
For the best results, use high-quality ingredients, especially for the butter in the puff pastry and the eggs in the custard. If you’re looking for an authentic flavor, consider using a touch of almond extract in addition to vanilla.
When baking, monitor the tarts closely, as oven temperatures can vary. The tarts are best enjoyed fresh, but you can store any leftovers in an airtight container in the refrigerator for a couple of days and reheat them before serving for a delightful treat.
Hungarian Chicken Paprikash Pie
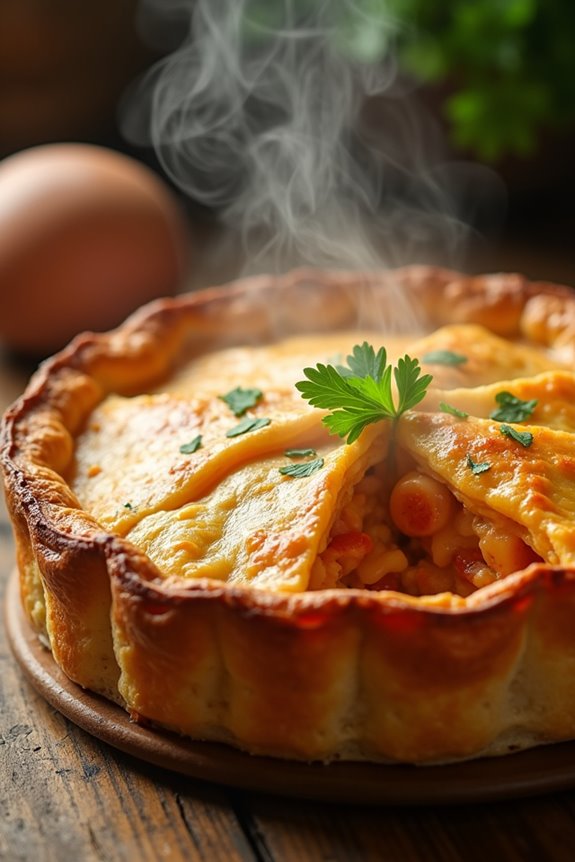
Hungarian Chicken Paprikash Pie is a delightful fusion of traditional Hungarian flavors wrapped in a flaky, golden crust. This dish combines the rich, creamy, and aromatic essence of chicken paprikash with a delicious pie crust, making it a comforting meal perfect for family dinners or special occasions. The vibrant red color of the paprika, paired with tender chicken and a hint of sour cream, creates a dish that isn’t only satisfying but also visually appealing.
To make this pie, you’ll first prepare the classic chicken paprikash filling, which involves sautéing chicken with onions, garlic, and sweet paprika. The combination of spices and sour cream gives the dish its characteristic flavor profile. Once the filling is ready, it’s encased in a pie crust and baked until golden, resulting in a scrumptious meal that’s sure to impress.
Ingredients (Serves 4-6):
- 1 lb (450g) boneless, skinless chicken thighs
- 2 tablespoons olive oil
- 1 large onion, finely chopped
- 3 cloves garlic, minced
- 2 tablespoons sweet paprika
- 1 teaspoon salt
- 1/2 teaspoon black pepper
- 1 cup chicken broth
- 1 cup sour cream
- 1 tablespoon all-purpose flour
- 1 pre-made pie crust (or homemade if preferred)
- 1 egg (for egg wash)
- Fresh parsley (for garnish, optional)
Cooking Instructions:
- Sauté the Chicken: In a large skillet, heat the olive oil over medium heat. Add the boneless chicken thighs and cook until browned on both sides, about 5-7 minutes. Remove the chicken from the pan and set aside.
- Cook the Aromatics: In the same skillet, add the chopped onion and sauté until translucent, about 3-4 minutes. Then add the minced garlic and cook for an additional 1 minute until fragrant.
- Add Spices and Chicken: Sprinkle the sweet paprika, salt, and black pepper over the onion and garlic mixture, stirring to combine. Return the chicken to the skillet and stir well to coat with the spices.
- Create the Sauce: Pour in the chicken broth and bring the mixture to a simmer. Reduce the heat to low, cover, and let it cook for about 20 minutes, until the chicken is cooked through and tender.
- Prepare the Paprikash Filling: Once the chicken is cooked, remove it from the skillet and shred it into bite-sized pieces. In a small bowl, mix the sour cream with the flour until smooth. Gradually stir this mixture into the skillet to create a creamy sauce. Return the shredded chicken back to the skillet, mix well, and let it cook for another 5 minutes.
- Assemble the Pie: Preheat your oven to 375°F (190°C). Roll out your pie crust and place it into a pie dish. Pour the chicken paprikash filling into the crust. Cover with a second layer of pie crust, sealing the edges by crimping them together. Cut a few slits in the top crust to allow steam to escape.
- Egg Wash and Bake: Beat the egg in a small bowl and brush it over the top crust for a golden finish. Bake in the preheated oven for 25-30 minutes, or until the crust is golden brown.
- Serve: Once baked, allow the pie to cool slightly before slicing. Garnish with fresh parsley if desired and serve warm.
Extra Tips:
For an even richer flavor, consider marinating the chicken thighs in a mixture of paprika, garlic, and a bit of sour cream a few hours before cooking.
Additionally, you can customize the pie by adding vegetables such as bell peppers or mushrooms to the filling. If you prefer a lighter version, you can use a whole wheat pie crust or even try a mashed potato topping instead of a pastry crust.
Enjoy your Hungarian Chicken Paprikash Pie with a side salad or steamed veggies for a complete meal!
Greek Spanakopita
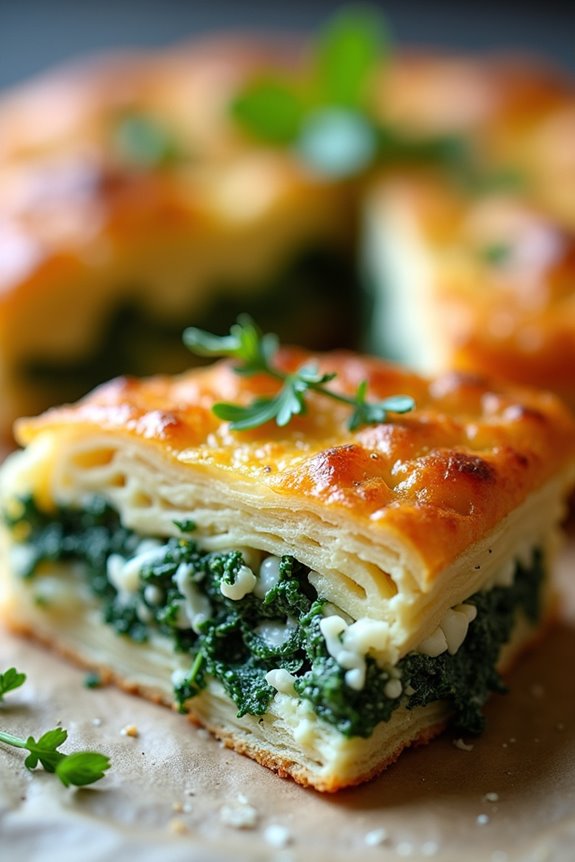
Spanakopita is a traditional Greek pie that features a delightful combination of spinach, feta cheese, and aromatic herbs wrapped in crispy phyllo pastry. This savory dish isn’t only a staple of Greek cuisine but also a favorite among many due to its rich flavor and flaky texture.
Commonly served as an appetizer or a light meal, spanakopita can be enjoyed warm or at room temperature, making it perfect for gatherings, picnics, or a cozy night in.
Preparing spanakopita may seem intimidating at first, but with a little practice and patience, you can create a delicious homemade version that rivals those found in Greek tavernas. The key is to guarantee that the phyllo dough remains covered while you work to prevent it from drying out.
The filling‘s balance of ingredients is essential, providing a harmonious blend of flavors that will keep everyone coming back for more.
Ingredients for Greek Spanakopita (Serves 4-6)
- 1 pound fresh spinach, washed and chopped
- 1 cup crumbled feta cheese
- 1/2 cup ricotta cheese
- 1/4 cup grated Parmesan cheese
- 1 medium onion, finely chopped
- 2 cloves garlic, minced
- 1/4 cup fresh dill, chopped (or 2 tablespoons dried dill)
- 1/4 cup fresh parsley, chopped
- 2 large eggs, beaten
- Salt and pepper, to taste
- 1 package (16 oz) phyllo dough, thawed
- 1/2 cup unsalted butter, melted (for brushing)
- Olive oil, for drizzling
Cooking Instructions
1. Prepare the Filling: In a large skillet, heat a tablespoon of olive oil over medium heat. Add the chopped onion and garlic, sautéing until they’re soft and fragrant, about 3-4 minutes.
Add the chopped spinach and cook until wilted and excess moisture has evaporated, roughly 5-7 minutes. Remove from heat and let the mixture cool slightly.
2. Mix the Ingredients: In a large mixing bowl, combine the cooled spinach mixture with the crumbled feta, ricotta, Parmesan, dill, parsley, and beaten eggs.
Season with salt and pepper to taste. Mix everything thoroughly until well combined, ensuring the cheeses and greens are evenly distributed.
3. Prepare the Phyllo Dough: Preheat your oven to 375°F (190°C). Unroll the phyllo dough and cover it with a damp cloth to prevent it from drying out.
Take one sheet of phyllo and lay it on a clean surface. Brush it lightly with melted butter, then place another sheet on top and brush it again. Repeat this process with 4-5 sheets.
4. Assemble the Spanakopita: Once you have layered the phyllo sheets, spoon a portion of the spinach filling along one edge of the dough, forming a log shape.
Fold the sides of the phyllo over the filling, then carefully roll it up from the edge to enclose the filling completely. Place the rolled spanakopita seam-side down on a baking sheet. Brush the top with more melted butter.
Repeat the process with the remaining phyllo and filling.
5. Bake the Spanakopita: Once all the spanakopita are assembled, place them in the preheated oven. Bake for 30-35 minutes or until the phyllo is golden brown and crispy.
Keep an eye on them to guarantee they don’t burn.
6. Serve and Enjoy: Remove the spanakopita from the oven and let them cool for a few minutes before slicing. Serve warm, garnished with additional herbs if desired.
Extra Tips
When making spanakopita, feel free to customize the filling according to your taste. You can add ingredients like leeks, artichokes, or even a touch of nutmeg for extra flavor.
If you have leftover filling, it can be used in omelets or as a topping for salad. Remember to work quickly with the phyllo dough and keep it covered to maintain its moisture.
For an added crunch, sprinkle sesame seeds on top before baking. Enjoy your homemade Greek spanakopita!
Swedish Köttbullar Pie
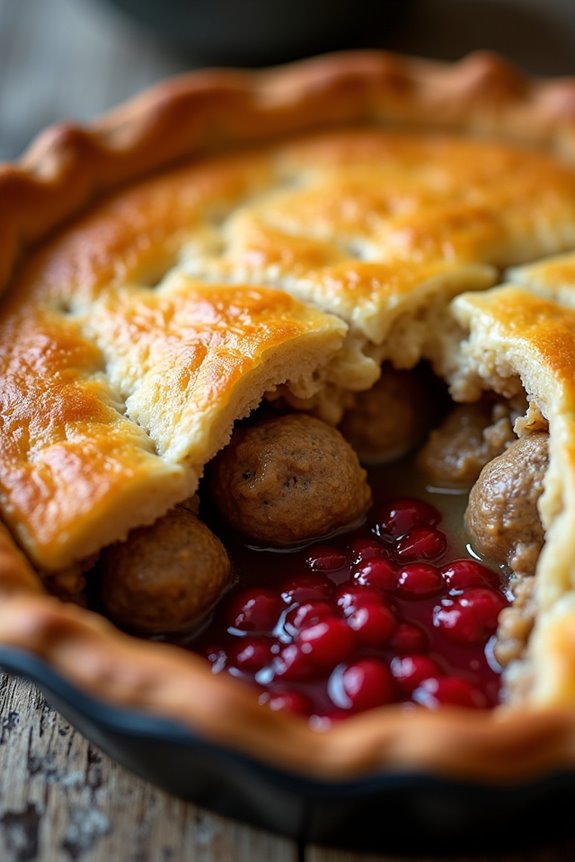
Swedish Köttbullar Pie is a delightful twist on traditional Swedish meatballs, combining all the familiar flavors into a delicious pie form. This unique dish features a buttery crust that encases tender meatballs, creamy gravy, and a hint of lingonberry sauce, making it a comforting and hearty meal.
Perfect for family dinners or gatherings, this pie is certain to impress with its rich flavors and satisfying texture. The pie isn’t only a celebration of Swedish cuisine but also a convenient way to enjoy the beloved Köttbullar in a new and exciting way. Each slice offers a taste of Sweden, bringing warmth and joy to your dining table.
Whether you’re familiar with Swedish food or trying it for the first time, this Köttbullar Pie is an excellent choice for a cozy night in or a festive occasion.
Ingredients (Serves 4-6)
- 1 pre-made pie crust (or homemade if preferred)
- 1 pound ground beef
- 1/2 pound ground pork
- 1/2 cup breadcrumbs
- 1/4 cup grated onion
- 1/4 cup milk
- 1 egg
- 1 teaspoon salt
- 1/2 teaspoon black pepper
- 1/4 teaspoon ground allspice
- 1/4 teaspoon ground nutmeg
- 1 cup beef broth
- 1 cup heavy cream
- 2 tablespoons soy sauce
- 1 tablespoon Worcestershire sauce
- 1/4 cup lingonberry sauce (for serving)
Cooking Instructions
- Preheat the Oven: Start by preheating your oven to 375°F (190°C). This guarantees that the pie cooks evenly and achieves a golden brown crust.
- Prepare the Meatballs: In a large mixing bowl, combine the ground beef, ground pork, breadcrumbs, grated onion, milk, egg, salt, black pepper, allspice, and nutmeg. Mix well until all ingredients are fully incorporated. Be careful not to overmix, as this can make the meatballs tough.
- Form the Meatballs: With your hands, shape the mixture into small meatballs, about 1 inch in diameter. You should get around 20-24 meatballs. Set them aside on a baking sheet.
- Brown the Meatballs: In a large skillet over medium heat, add a tablespoon of oil and brown the meatballs in batches until they’re golden brown on all sides, about 5-7 minutes. Once browned, remove them from the skillet and set aside.
- Make the Gravy: In the same skillet, add the beef broth, heavy cream, soy sauce, and Worcestershire sauce. Bring to a simmer, scraping up any browned bits from the bottom of the skillet. Let it simmer for about 5 minutes until the gravy thickens slightly.
- Assemble the Pie: Roll out the pie crust and place it into a pie dish. Arrange the browned meatballs evenly over the crust, then pour the gravy mixture over the meatballs, making sure they’re well-covered.
- Bake the Pie: Place the pie in the preheated oven and bake for 30-35 minutes, or until the crust is golden and flaky. Keep an eye on it to avoid over-browning.
- Serve: Once baked, remove the pie from the oven and let it cool for a few minutes. Slice into wedges and serve warm with a dollop of lingonberry sauce on the side.
Extra Tips
For an even more authentic flavor, consider adding fresh herbs like parsley or dill to the meatball mixture. You can also switch up the pie crust by using puff pastry for a flakier texture.
If lingonberry sauce is unavailable, cranberry sauce can be a good substitute, adding a similar sweet-tart contrast to the savory pie. Enjoy your Swedish Köttbullar Pie with a side of mashed potatoes or a crisp salad for a complete meal!
Belgian Speculoos Pie
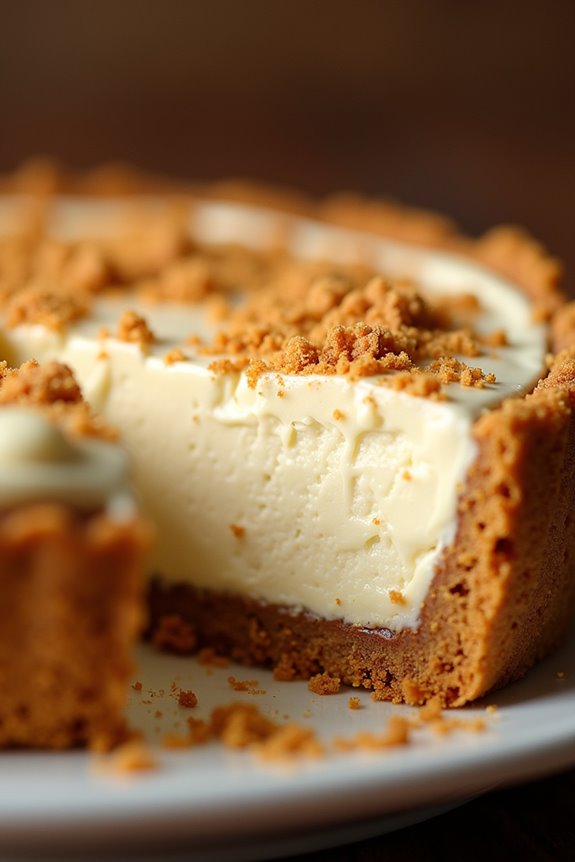
Belgian Speculoos Pie is a delightful dessert that captures the essence of traditional Belgian flavors, particularly the spiced cookies known as speculoos. This pie combines the rich, caramelized flavors of speculoos with a creamy filling, creating a dessert that’s both decadent and comforting. The distinct taste of these spiced cookies, often enjoyed with coffee, transforms into an indulgent pie that will impress your family and friends.
Making this pie is simpler than it may seem, and it offers a wonderful way to showcase the unique flavors of Belgium. The crust is made from crushed speculoos cookies, while the filling typically consists of cream cheese, whipped cream, and a touch of vanilla. This combination results in a pie that isn’t only visually appealing but also bursts with flavor in every bite. Perfect for gatherings or special occasions, this Belgian Speculoos Pie is a must-try for all dessert lovers.
Ingredients (Serves 4-6):
- 200g speculoos cookies
- 100g unsalted butter, melted
- 250g cream cheese, softened
- 100g powdered sugar
- 200ml heavy cream
- 1 teaspoon vanilla extract
- A pinch of salt
- Extra speculoos cookies for garnish (optional)
Cooking Instructions:
1. Prepare the Pie Crust****: Begin by preheating your oven to 180°C (350°F). In a food processor, crush the speculoos cookies until they resemble fine crumbs. In a mixing bowl, combine the cookie crumbs with the melted butter, mixing well until the mixture holds together like wet sand.
Press this mixture firmly into the bottom and up the sides of a 9-inch pie dish to form a crust. Bake the crust for 10 minutes, then remove it from the oven and let it cool completely.
2. Make the Filling: In a large mixing bowl, beat the softened cream cheese with an electric mixer until smooth and creamy. Gradually add the powdered sugar while continuing to mix. Once well combined, add the vanilla extract and a pinch of salt, mixing until fully incorporated.
3. Whip the Cream: In a separate bowl, whip the heavy cream until it forms stiff peaks. Carefully fold the whipped cream into the cream cheese mixture, being gentle to maintain the light and airy texture. Make sure there are no lumps, and the mixture is smooth.
4. Assemble the Pie: Pour the cream cheese filling into the cooled speculoos cookie crust, spreading it evenly with a spatula. Smooth the top to create an even surface, and then refrigerate the pie for at least 4 hours, or until fully set.
5. Serve: After the pie has set, remove it from the refrigerator. Optionally, you can garnish the top with extra crushed speculoos cookies for additional flavor and texture. Slice the pie into wedges and serve chilled.
Extra Tips:
When making Belgian Speculoos Pie, verify that the cream cheese is at room temperature for easier blending.
Also, for a more intense speculoos flavor, consider adding crushed speculoos cookies directly into the filling mixture. If you prefer a sweeter pie, feel free to adjust the amount of powdered sugar to your taste.
Finally, this pie can be prepared a day in advance, making it a convenient dessert option for busy schedules!
Czech Kolaczki
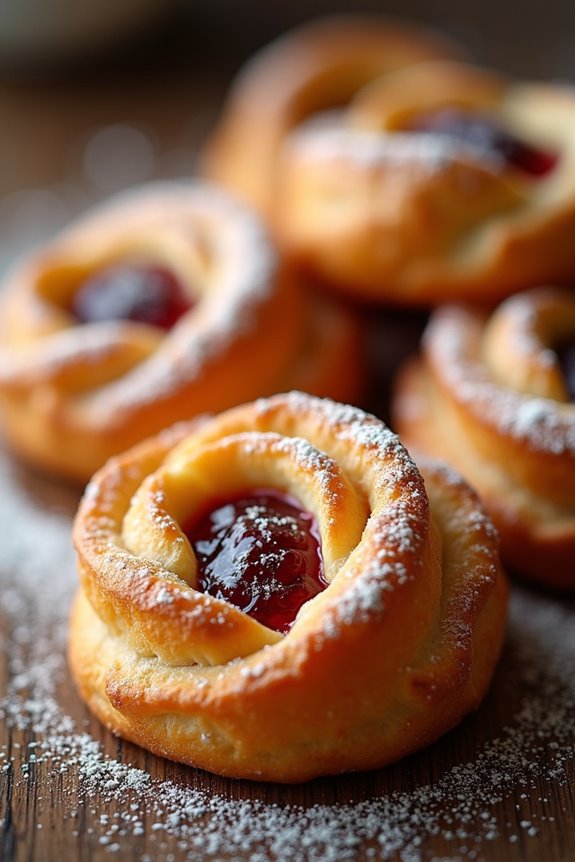
Czech Kolaczki are delightful pastry treats traditionally filled with fruit preserves or sweet cheese. These small, delicate pastries have a rich cultural heritage and are often served during holidays and family gatherings. The dough is buttery and flaky, creating a perfect contrast to the sweet filling.
Making Kolaczki can be a fun and rewarding experience, allowing you to explore the flavors of Central European cuisine right in your kitchen. The beauty of Kolaczki lies in their versatility; you can experiment with various fillings, including apricot, poppy seed, or cream cheese.
This recipe will guide you through the steps to create classic Czech Kolaczki filled with fruit preserves, perfect for a serving size of 4-6 people. Get ready to impress your family and friends with these delectable treats!
Ingredients:
- 2 cups all-purpose flour
- 1 cup unsalted butter, softened
- 8 oz cream cheese, softened
- 1/4 cup granulated sugar
- 1 tsp vanilla extract
- 1/4 tsp salt
- 1/2 cup fruit preserves (apricot, raspberry, or your choice)
- Powdered sugar, for dusting
Cooking Instructions:
1. Prepare the Dough: In a large mixing bowl, combine the softened butter and cream cheese. Beat with an electric mixer on medium speed until the mixture is smooth and creamy. Gradually add the granulated sugar, vanilla extract, and salt, mixing until well incorporated.
Slowly add the all-purpose flour, mixing until a soft dough forms.
2. Chill the Dough: Divide the dough into two equal portions and shape each portion into a disk. Wrap each disk in plastic wrap and refrigerate for at least 2 hours or overnight.
Chilling the dough will make it easier to roll out later.
3. Roll Out the Dough: Once the dough has chilled, preheat your oven to 350°F (175°C). Lightly flour your work surface and roll out one disk of dough to about 1/8 inch thick.
Use a sharp knife or a pizza cutter to cut the dough into squares, approximately 3 inches by 3 inches.
4. Add the Filling: Place about 1 teaspoon of your chosen fruit preserves in the center of each square. Fold the corners of the square toward the center, overlapping them slightly to create a pinwheel shape, and pinch to seal.
5. Bake the Kolaczki: Place the filled pastries on a baking sheet lined with parchment paper, spacing them about 1 inch apart. Bake in the preheated oven for 20-25 minutes or until the edges are lightly golden.
6. Cool and Dust: Once baked, remove the Kolaczki from the oven and allow them to cool on the baking sheet for a few minutes before transferring them to a wire rack.
Once completely cooled, dust the pastries with powdered sugar before serving.
Extra Tips:
For the best results, make sure your butter and cream cheese are at room temperature to facilitate a smooth dough. You can experiment with different kinds of fruit preserves to suit your taste preferences, and consider adding a little lemon zest to the filling for an extra burst of flavor.
If you find the dough too sticky, sprinkle a little extra flour while rolling it out, but be cautious not to overwork it, or the Kolaczki may become tough. Enjoy these delightful pastries with a cup of tea or coffee for a perfect afternoon treat!
Irish Shepherd’s Pie
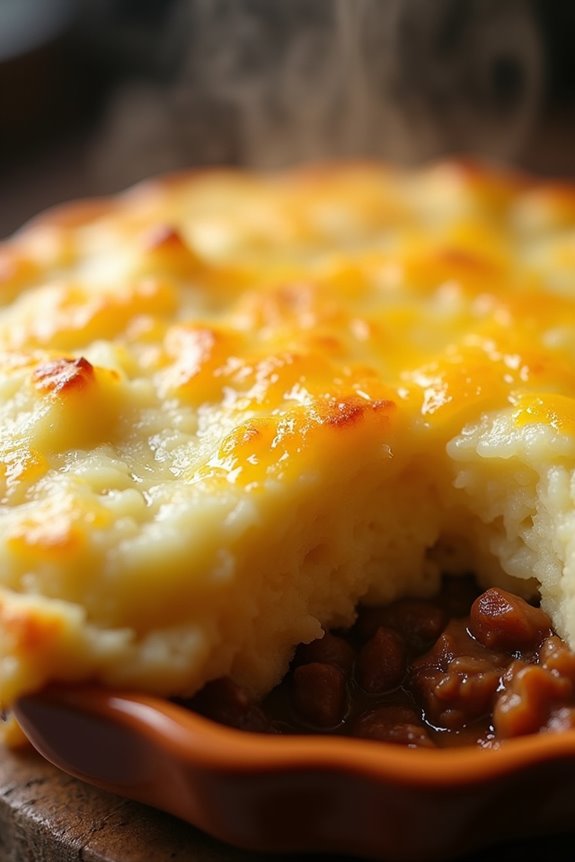
Irish Shepherd’s Pie is a hearty and comforting dish that originates from Ireland, traditionally made with minced lamb and topped with creamy mashed potatoes. This savory pie is perfect for family dinners or gatherings, as it combines rich flavors and a satisfying texture. The combination of savory meat, vegetables, and a fluffy potato topping makes it a beloved classic that warms the soul.
This dish isn’t only delicious but also versatile; you can customize it with various vegetables or even substitute the lamb with beef for a Cottage Pie. The key to a great Shepherd’s Pie lies in the quality of the ingredients and the balance of flavors. With a rich meat filling and a fluffy potato topping, it’s a meal that everyone will love.
Ingredients (Serves 4-6):
- 1 pound ground lamb
- 1 large onion, diced
- 2 carrots, diced
- 2 cloves garlic, minced
- 1 cup frozen peas
- 2 tablespoons tomato paste
- 1 tablespoon Worcestershire sauce
- 1 teaspoon dried thyme
- 1 teaspoon dried rosemary
- Salt and pepper to taste
- 4 cups mashed potatoes (prepared)
- 1 cup beef or chicken broth
- 2 tablespoons olive oil
- 1 tablespoon butter
- ½ cup shredded cheddar cheese (optional)
Cooking Instructions:
- Prepare the Meat Filling: In a large skillet, heat the olive oil over medium heat. Add the diced onion and carrots, cooking until they’re softened (about 5-7 minutes). Once softened, add the minced garlic and cook for an additional 1-2 minutes until fragrant.
- Brown the Lamb: Increase the heat to medium-high, and add the ground lamb to the skillet. Cook until the lamb is browned, breaking it apart with a spoon as it cooks. This should take about 5-8 minutes.
- Add Seasonings and Vegetables: Stir in the tomato paste, Worcestershire sauce, thyme, rosemary, salt, and pepper. Mix well to combine all the flavors. Then, pour in the broth and add the frozen peas. Bring the mixture to a simmer and let it cook for about 10 minutes until slightly thickened.
- Layer the Filling in a Baking Dish: Preheat your oven to 400°F (200°C). Transfer the meat mixture into a 9×13 inch baking dish, spreading it evenly across the bottom.
- Top with Mashed Potatoes: Spoon the mashed potatoes over the meat filling, spreading them evenly to cover the entire surface. You can use a fork to create a textured pattern on the top for a crispy finish.
- Optional Cheese Topping: If desired, sprinkle shredded cheddar cheese over the mashed potatoes for added flavor and richness.
- Bake: Place the dish in the preheated oven and bake for 25-30 minutes, or until the top is golden brown and the filling is bubbling around the edges.
- Serve: Allow the Shepherd’s Pie to cool for a few minutes before serving. This will help the layers set and make it easier to slice.
Extra Tips:
When making Shepherd’s Pie, use leftover mashed potatoes for a quicker preparation or make them from scratch for a creamier texture. For added depth of flavor, consider incorporating additional vegetables like corn or bell peppers into the meat filling.
Don’t be afraid to experiment with herbs and spices to suit your taste, and remember to let the pie sit for a few minutes after baking to allow the flavors to meld beautifully before serving.