

Scandinavian rosettes are the epitome of delicate beauty, resembling crispy snowflakes dusted with sugar. These treats not only look stunning but also bring a delightful crunch with every bite. From classic versions to flavors like chocolate-dipped and pumpkin spice, there’s a rosette for every taste. Perfect for sharing at your next gathering, these charming recipes will surely impress. Which one will become your favorite? Let’s find out.
Classic Scandinavian Rosettes

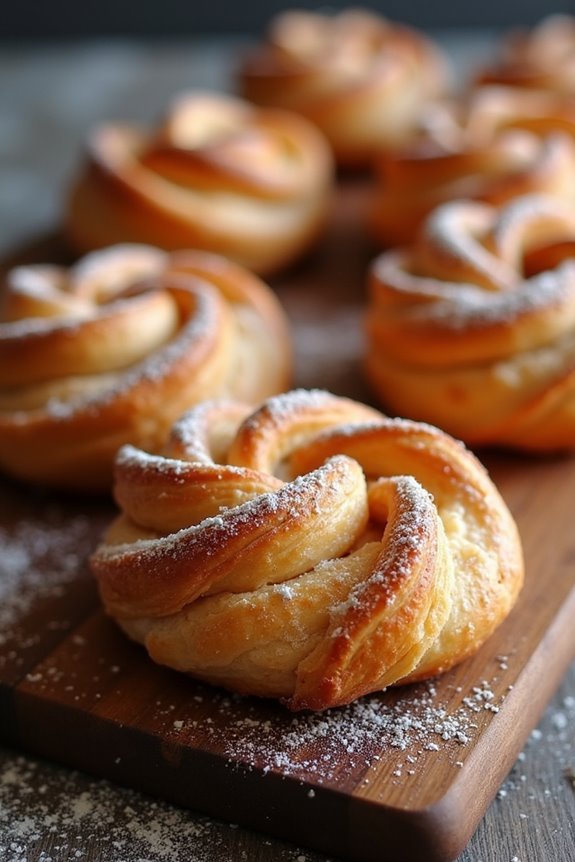
Classic Scandinavian Rosettes are a delightful treat traditionally enjoyed during festive seasons in Nordic countries. These delicate, crisp cookies are made by frying thinly rolled batter on intricately shaped molds, resulting in beautiful, lacy patterns. The light and airy texture, combined with a hint of sweetness, makes them an irresistible accompaniment to coffee or tea, perfect for gatherings or simply enjoying at home.
Making rosettes is a fun activity that requires some skill but is rewarding once you see the beautiful end results. The process involves preparing a batter made from common pantry ingredients, heating the molds, and carefully frying the rosettes until they’re golden brown. Once cooled, they can be dusted with powdered sugar for an extra touch of elegance.
Ingredients (serving size: 4-6 people):
- 1 cup all-purpose flour
- 1 tablespoon granulated sugar
- 1/4 teaspoon salt
- 1 cup milk
- 2 large eggs
- 1 teaspoon vanilla extract
- 1/4 teaspoon ground cinnamon
- Oil for frying
- Powdered sugar for dusting
Cooking Instructions:
- Prepare the batter: In a mixing bowl, combine the all-purpose flour, granulated sugar, and salt. Whisk together to guarantee they’re well mixed. In a separate bowl, beat the eggs and then add the milk, vanilla extract, and ground cinnamon. Gradually pour the wet ingredients into the dry ingredients, stirring gently until you have a smooth batter without lumps.
- Heat the rosette molds: Fill a deep frying pan or pot with oil, approximately 2 inches deep, and heat it over medium-high heat. To confirm the oil is hot enough, you can dip the rosette mold into the oil; if bubbles form around it, the oil is ready for frying.
- Dip the mold: Once the oil is heated, dip the rosette mold into the batter, covering it about two-thirds of the way up. Make sure not to let any batter drip off the mold.
- Fry the rosettes: Carefully place the batter-coated mold into the hot oil, holding it there for about 10-15 seconds. The batter will start to cook and should begin to release from the mold. Gently wiggle the mold to release the rosette into the oil.
- Cook until golden: Fry the rosette for about 1-2 minutes on each side or until it turns golden brown. Use a slotted spoon to carefully turn the rosette if necessary. Once cooked, remove the rosette and place it on a paper towel-lined plate to absorb excess oil.
- Dust with sugar: Once the rosettes have cooled slightly, dust them with powdered sugar for a lovely finish. This adds both sweetness and an elegant touch to your presentation.
Extra Tips: When making rosettes, ascertain the oil temperature is consistent; too hot will burn the cookies, while too cool will make them greasy. It’s also helpful to have a helper to manage the frying process, as the molds can cool down quickly. Experiment with different flavors by adding a hint of almond extract or lemon zest to the batter for a unique twist. Enjoy your Scandinavian rosettes with a warm drink or as part of a festive dessert platter!
Chocolate-Dipped Rosettes

Chocolate-Dipped Rosettes are a delightful Scandinavian treat that combines the delicate texture of traditional rosettes with the rich indulgence of chocolate. These beautifully intricate pastries are made using a special rosette iron, which gives them their signature shape.
Once fried to a crisp golden brown, they’re then dipped in luscious melted chocolate, creating a perfect balance of flavors and textures. Ideal for festive occasions or as a sweet snack, these rosettes are bound to impress family and friends alike.
The process of making Chocolate-Dipped Rosettes isn’t only fun but also allows for creativity in flavor and presentation. While the rosettes themselves are light and crispy, the chocolate coating adds a touch of decadence to each bite.
With just a few simple ingredients and some careful frying, you can create a stunning dessert that embodies the spirit of Scandinavian baking. Gather your ingredients, and let’s get started on this delightful treat!
Ingredients (Serves 4-6):
- 1 cup all-purpose flour
- 1 cup milk
- 2 large eggs
- 2 tablespoons sugar
- 1 teaspoon vanilla extract
- 1/2 teaspoon salt
- Oil for frying
- 1 cup semisweet chocolate chips
- Optional toppings: crushed nuts, sprinkles, or coconut flakes
Cooking Instructions:
- Prepare the Batter: In a mixing bowl, whisk together the flour, milk, eggs, sugar, vanilla extract, and salt until you achieve a smooth batter. Confirm there are no lumps, as a smooth consistency will help the rosettes fry evenly.
- Heat the Oil: In a deep saucepan or frying pot, pour enough oil to submerge the rosette iron halfway. Heat the oil over medium heat until it reaches approximately 375°F (190°C). You can test the temperature by dipping the rosette iron into the oil; if bubbles form around it, the oil is hot enough.
- Dip the Rosette Iron: Once the oil is hot, carefully dip the rosette iron into the batter, covering it without overflowing. Allow the excess batter to drip off.
- Fry the Rosettes: Submerge the batter-coated rosette iron into the hot oil. Fry for about 1-2 minutes or until the rosette turns golden brown. Carefully shake the iron to release the rosette into the oil, then fry for an additional 30 seconds to crisp it up.
- Drain and Cool: Remove the rosette from the oil and place it on a plate lined with paper towels to absorb excess oil. Repeat the process with the remaining batter until you have a batch of fried rosettes.
- Melt the Chocolate: In a microwave-safe bowl, melt the chocolate chips in 30-second intervals, stirring after each interval until smooth. Alternatively, you can use a double boiler to melt the chocolate gently.
- Dip the Rosettes: Once the rosettes are cool, dip the edges or the entire rosette into the melted chocolate. Allow any excess chocolate to drip off, then place the dipped rosettes on a baking sheet lined with parchment paper.
- Add Toppings: If desired, sprinkle crushed nuts, sprinkles, or coconut flakes on top of the chocolate before it sets. This adds an extra layer of flavor and visual appeal.
- Setting the Chocolate: Allow the chocolate-dipped rosettes to set at room temperature, or place them in the refrigerator for quicker setting. Once the chocolate is firm, they’re ready to serve.
Extra Tips:
For a unique twist on Chocolate-Dipped Rosettes, consider experimenting with different types of chocolate, such as dark or white chocolate, to suit your taste preferences.
Additionally, you can flavor the batter by adding a pinch of cinnamon or nutmeg for a warm spice note. Be mindful of the oil temperature while frying, as too hot can burn the rosettes, while too cool can result in greasy pastries.
Enjoy your delectable creation with a cup of coffee or tea for a delightful treat!
Almond Flavored Rosettes

Almond Flavored Rosettes are a delightful treat that brings a touch of Scandinavian tradition to any occasion. These delicate, crisp cookies are made using a specialty rosette iron, allowing you to create beautifully shaped pastries that are perfect for serving at parties or enjoying with your afternoon tea.
The subtle flavor of almonds adds a warm, nutty essence that elevates these treats to the next level, making them irresistible to both children and adults alike. This recipe is simple to follow and yields about 4-6 servings, depending on how many rosettes you make.
The ingredients are straightforward, and with a little care in handling the hot oil and rosette iron, you’ll be on your way to impressing your family and friends with these sweet, crunchy delights. Whether you’re familiar with Scandinavian cuisine or trying it for the first time, Almond Flavored Rosettes are sure to become a favorite in your baking repertoire.
Ingredients:
- 1 cup all-purpose flour
- 1/2 cup granulated sugar
- 1/2 cup milk
- 2 large eggs
- 1 teaspoon almond extract
- 1/2 teaspoon baking powder
- Pinch of salt
- Vegetable oil (for frying)
- Powdered sugar (for dusting)
Cooking Instructions:
- Prepare the Batter: In a mixing bowl, combine the all-purpose flour, granulated sugar, baking powder, and salt. Whisk together until well mixed. In a separate bowl, beat the eggs and then add the milk and almond extract. Gradually pour the wet ingredients into the dry mixture, stirring until a smooth batter forms. The batter should be thick yet pourable.
- Heat the Oil: In a deep, heavy-bottomed pot, pour in enough vegetable oil to submerge the rosette iron (about 2-3 inches deep). Heat the oil over medium heat until it reaches about 350°F (175°C). To test if the oil is ready, you can dip the edge of the iron into the oil; if bubbles form around it, the oil is hot enough.
- Prepare the Rosette Iron: Carefully dip the rosette iron into the hot oil for about 30 seconds to heat it up. Then, remove it and let any excess oil drip off. Immediately dip the hot iron into the batter, covering about two-thirds of the iron. Be cautious not to overcoat it.
- Fry the Rosettes: Return the batter-coated iron back into the hot oil. Fry for about 30 seconds or until the batter turns a light golden brown. Gently shake the iron to release the rosette into the oil if it doesn’t come off on its own. Fry for an additional 10-15 seconds to confirm it’s fully cooked.
- Drain and Dust: Using a slotted spoon, carefully remove the rosette from the oil and place it on a paper towel-lined plate to drain excess oil. Once cooled slightly, dust the rosettes with powdered sugar before serving.
Extra Tips:
To guarantee your Almond Flavored Rosettes turn out perfectly, make sure to maintain the oil temperature while frying. If the oil is too hot, the rosettes will burn; if it’s too cool, they’ll absorb too much oil and become greasy.
It’s also a good idea to experiment with different flavor extracts or spices to create variations — a hint of vanilla or a sprinkle of cinnamon can add a unique twist to this classic treat. Finally, always exercise caution when working with hot oil to avoid any accidents.
Spiced Cinnamon Rosettes
Spiced Cinnamon Rosettes are a delightful treat that embodies the cozy warmth of Scandinavian baking. These delicate, crispy pastries are intricately shaped into flower-like forms, capturing the essence of both tradition and flavor. The aromatic spices of cinnamon and nutmeg, combined with a hint of vanilla, make these rosettes perfect for festive gatherings or as an everyday indulgence with a cup of coffee or tea.
Their intricate design and delicious taste will impress your guests and leave them coming back for more. Making Spiced Cinnamon Rosettes is a rewarding experience that requires a bit of patience but is well worth the effort. The process of frying these pastries gives them a perfect crunch, while the sprinkling of powdered sugar adds a sweet finishing touch.
With this recipe, you can create a batch that serves 4-6 people, ideal for sharing or enjoying throughout the week. Gather your ingredients, and let’s get started on this delightful Scandinavian treat!
Ingredients:
- 1 cup all-purpose flour
- 1 teaspoon baking powder
- 1 teaspoon ground cinnamon
- 1/2 teaspoon ground nutmeg
- 1/4 teaspoon salt
- 1 large egg
- 1/2 cup milk
- 2 tablespoons granulated sugar
- 1 teaspoon vanilla extract
- 1/4 cup powdered sugar (for dusting)
- Vegetable oil (for frying)
Cooking Instructions:
- Prepare the batter: In a mixing bowl, whisk together the flour, baking powder, cinnamon, nutmeg, and salt until well combined. This dry mixture will form the base of your rosettes, giving them their signature flavor and texture.
- Mix the wet ingredients: In a separate bowl, beat the egg, then add the milk, granulated sugar, and vanilla extract. Whisk these ingredients together until they’re smooth and fully combined.
- Combine wet and dry mixtures: Gradually add the wet ingredients to the dry ingredients, stirring gently until just combined. Be careful not to overmix, as this can make the rosettes tough. The batter should be smooth and slightly thick.
- Heat the oil: In a deep frying pan or pot, pour enough vegetable oil to reach about 2 inches deep. Heat the oil over medium heat until it reaches 350°F (175°C). You can test the temperature by dropping in a small amount of batter; it should sizzle and rise to the surface.
- Fry the rosettes: Dip a rosette iron into the hot oil for a few seconds to heat it up. Then, dip the hot iron into the batter, coating it about halfway up the sides. Carefully place the iron back into the oil, allowing the batter to release from the iron and fry until golden brown, about 1-2 minutes per side. Use a slotted spoon to flip the rosette for even cooking.
- Drain and season: Once golden, remove the rosettes from the oil and place them on a paper towel-lined plate to drain excess oil. While still warm, dust with powdered sugar for a sweet finish.
- Serve and enjoy: Allow the Spiced Cinnamon Rosettes to cool slightly before serving. They’re best enjoyed warm but can also be stored in an airtight container for a few days.
Extra Tips:
For an extra burst of flavor, consider adding a tablespoon of finely grated lemon or orange zest to the batter. This will brighten up the spices and add a revitalizing note.
Additionally, make sure your oil is at the right temperature; too hot can burn the rosettes while too cool will make them greasy. If you don’t have a rosette iron, you can use a cookie cutter or simply shape them by hand into flower shapes. Enjoy your baking adventure!
Cardamom Infused Rosettes

Cardamom Infused Rosettes are a delightful twist on the traditional Scandinavian treat, perfect for adding an aromatic and exotic flavor to your dessert table. These delicate cookies aren’t only visually stunning with their intricate shapes but also offer a unique taste that will leave your guests enchanted.
The warm, spicy notes of cardamom combined with the crispy texture of the rosettes create an irresistible treat that pairs beautifully with coffee or tea.
Making Cardamom Infused Rosettes is a fun and rewarding experience. The process involves creating a simple batter, heating the rosette iron, and frying the cookies until golden brown. Once they’re cooled, a dusting of powdered sugar adds a sweet finish. Whether you’re celebrating a special occasion or simply indulging in a sweet treat, these rosettes will surely impress and satisfy.
Ingredients (Serves 4-6):
- 1 cup all-purpose flour
- 1 teaspoon baking powder
- 1/4 teaspoon ground cardamom
- 1/4 teaspoon salt
- 1 large egg
- 1 cup milk
- 1 tablespoon granulated sugar
- 1 teaspoon vanilla extract
- Vegetable oil (for frying)
- Powdered sugar (for dusting)
Cooking Instructions:
- Prepare the Batter: In a mixing bowl, sift together the all-purpose flour, baking powder, ground cardamom, and salt. In another bowl, whisk the egg, milk, granulated sugar, and vanilla extract until well combined. Gradually add the wet ingredients to the dry ingredients, stirring until you achieve a smooth batter. Make certain there are no lumps in the mixture.
- Heat the Rosette Iron: Fill a deep frying pan or pot with about 2 inches of vegetable oil and heat it over medium-high heat. While the oil is heating, place the rosette iron in the oil to warm it up. This step is essential for achieving the perfect crispy texture.
- Fry the Rosettes: Once the oil is hot (around 375°F or 190°C), carefully remove the rosette iron from the oil and dip it into the batter, covering only the decorative part of the iron. Be careful not to overcoat; a thin layer is ideal. Immediately immerse the iron back into the hot oil. Fry the rosette for about 1-2 minutes or until it turns golden brown. Carefully remove the rosette from the iron and let it drain on paper towels. Repeat this process with the remaining batter.
- Dust and Serve: Once the rosettes are completely cooled, dust them generously with powdered sugar. This finishing touch not only adds sweetness but also enhances the visual appeal of the cookies.
Extra Tips:
When making Cardamom Infused Rosettes, confirm that your oil is at the correct temperature, as this will greatly affect the texture of the cookies. If the oil is too cool, the rosettes may absorb excessive oil and become greasy; if too hot, they may burn quickly.
It’s also a good idea to experiment with the amount of cardamom to suit your taste, as some may prefer a stronger flavor while others may enjoy a subtler hint. Enjoy these rosettes fresh, as they’re best consumed on the same day they’re made!
Coconut Rosettes
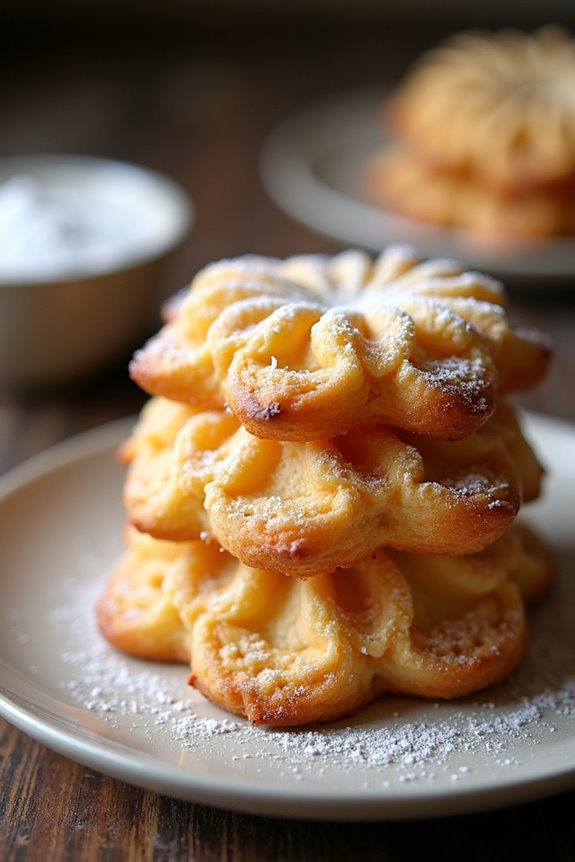
Coconut Rosettes are a delightful treat that combines the rich flavors of coconut with a crispy, delicate texture. Originating from Scandinavian traditions, these sweet snacks are often enjoyed during festive seasons and special occasions. Their intricate shape, resembling delicate lace, is achieved using a special rosette iron that gives them a unique appeal.
The light, airy nature of these cookies makes them perfect for serving alongside coffee or tea, adding a lovely touch to any gathering. Making Coconut Rosettes isn’t only simple but also a fun culinary project. The batter comes together quickly, and the frying process allows the cookies to puff up beautifully, creating an irresistible crunch.
The addition of coconut adds a tropical essence, making these cookies a delightful twist from traditional rosettes. Whether you’re familiar with Scandinavian cuisine or trying something new, Coconut Rosettes are sure to impress with their flavor and presentation.
Ingredients (Serves 4-6):
- 1 cup all-purpose flour
- 1/2 cup granulated sugar
- 1/2 cup shredded coconut (sweetened or unsweetened)
- 1/2 cup milk
- 2 large eggs
- 1/4 teaspoon salt
- 1 teaspoon vanilla extract
- Oil for frying (such as vegetable or canola oil)
- Powdered sugar (for dusting, optional)
Cooking Instructions:
- Prepare the Batter: In a mixing bowl, combine the flour, granulated sugar, shredded coconut, and salt. Whisk these dry ingredients together until evenly mixed. In a separate bowl, beat the eggs, then add the milk and vanilla extract. Gradually pour the wet ingredients into the dry mixture, whisking until you achieve a smooth batter free of lumps.
- Heat the Oil: In a deep skillet or heavy-bottomed pot, pour enough oil to cover the bottom by about 1-2 inches. Heat the oil over medium heat until it reaches approximately 350°F (175°C). To test if the oil is ready, drop a small amount of batter into the oil; it should sizzle and rise to the surface.
- Prepare the Rosette Iron: While the oil is heating, immerse the rosette iron in the hot oil for a few minutes to preheat it. This step is essential for ensuring that the batter adheres properly to the iron.
- Fry the Rosettes: Carefully remove the hot iron from the oil, allowing excess oil to drip off. Dip the iron into the batter until it’s about two-thirds covered, then return it to the hot oil. Fry for about 30-40 seconds or until the edges begin to turn golden brown. Gently shake the iron to release the rosette into the oil, and allow it to fry for an additional few seconds until crisp.
- Drain and Cool: Use a slotted spoon to remove the rosette from the oil and place it on a paper towel-lined plate to drain excess oil. Repeat the process with the remaining batter, ensuring to reheat the iron as needed.
- Dust and Serve: Once the Coconut Rosettes have cooled, you can dust them with powdered sugar if desired for an extra touch of sweetness. Serve them on a platter and enjoy!
Extra Tips:
When making Coconut Rosettes, be sure to keep an eye on the oil temperature, as overheating can burn the cookies quickly. If you don’t have a rosette iron, you can create similar shapes using a fork or small cookie cutter, but the traditional iron gives the best results.
Additionally, experimenting with different flavors, such as almond or lemon zest, can add a unique twist to your rosettes. Enjoy your delightful creations with family and friends!
Lemon Zest Rosettes

Lemon Zest Rosettes are a delightful Scandinavian treat that brings a burst of citrus flavor to the table. These charming pastries aren’t only visually appealing with their spiral shape but also offer a light, invigorating taste that can brighten any occasion. Perfect for gatherings, brunches, or a sweet afternoon snack, the zesty aroma of lemon combined with buttery dough creates an irresistible combination that’s sure to impress your family and friends.
Making Lemon Zest Rosettes is a fun and rewarding process that allows you to explore the art of Scandinavian baking. The recipe involves a simple dough infused with bright lemon zest, rolled out, and shaped into beautiful rosettes. Once baked, these pastries can be dusted with powdered sugar or drizzled with a lemon glaze for an extra touch of sweetness. With just a few ingredients and a bit of patience, you can create these delicious treats that will transport you to the charming cafes of Scandinavia.
Ingredients (Serves 4-6)
- 2 cups all-purpose flour
- 1/2 cup granulated sugar
- 1/2 cup unsalted butter, softened
- 1/2 cup milk
- 1 large egg
- Zest of 2 medium lemons
- 2 teaspoons baking powder
- 1/2 teaspoon salt
- 1 teaspoon vanilla extract
- Powdered sugar for dusting (optional)
- Lemon glaze (optional)
Cooking Instructions
1. Prepare the Dough: In a large mixing bowl, combine the all-purpose flour, granulated sugar, baking powder, and salt. Whisk these dry ingredients together until they’re well blended.
In a separate bowl, cream the softened butter until light and fluffy. Add in the egg, milk, lemon zest, and vanilla extract, mixing until well combined.
2. Combine Wet and Dry Ingredients: Gradually add the wet mixture to the dry ingredients, stirring gently until a soft dough forms. Be careful not to overmix, as this can make the rosettes tough.
If the dough is too sticky, add a little more flour until it reaches a workable consistency.
3. Roll Out the Dough: Lightly flour a clean surface and turn the dough onto it. Using a rolling pin, roll the dough out to about 1/4 inch thick.
Try to maintain a rectangular shape for easier cutting later.
4. Cut and Shape the Rosettes: Using a sharp knife or a pizza cutter, slice the dough into long strips about 1 inch wide.
Take each strip and twist it into a spiral shape, forming a rosette. You can tuck the end of the strip underneath to secure the shape. Place the formed rosettes on a baking sheet lined with parchment paper.
5. Bake: Preheat your oven to 350°F (175°C). Once heated, bake the rosettes for about 12-15 minutes or until they’re golden brown.
Keep an eye on them to avoid overbaking.
6. Cool and Serve: Remove the baked rosettes from the oven and let them cool slightly on a wire rack.
Once cool, dust with powdered sugar or drizzle with lemon glaze for added sweetness, if desired. Serve warm or at room temperature.
Extra Tips
For the best flavor, use fresh lemons and make sure to zest them thoroughly, avoiding the bitter white pith.
If you want to enhance the lemon flavor, consider adding a little lemon juice to your glaze. These rosettes can also be made in advance and stored in an airtight container for a few days.
Reheat them briefly in the oven before serving to restore their delightful texture. Enjoy your baking adventure with these delightful Lemon Zest Rosettes!
Vanilla Bean Rosettes
Vanilla Bean Rosettes are a delightful Scandinavian treat that brings a touch of elegance to any dessert table. These delicate, crispy pastries are shaped like beautiful rosettes and are infused with the rich aroma of vanilla beans, making them a perfect companion to coffee or tea. The process of creating rosettes may seem intricate, but with a little patience and practice, you can master this charming recipe that’s sure to impress family and friends alike.
Traditionally, rosettes are deep-fried, creating a light and airy texture that’s both satisfying and indulgent. The combination of the subtle vanilla flavor with a dusting of powdered sugar elevates these treats to a new level of deliciousness. Whether you’re celebrating a special occasion or simply looking to enjoy a sweet treat, Vanilla Bean Rosettes are an excellent choice that captures the essence of Scandinavian baking.
Ingredients (Serves 4-6)
- 1 cup all-purpose flour
- 1/4 cup granulated sugar
- 1/2 teaspoon baking powder
- 1/4 teaspoon salt
- 1 cup milk
- 2 large eggs
- 1 tablespoon vanilla bean paste (or 1 vanilla bean, split and seeds scraped)
- 1/4 cup vegetable oil (for frying)
- Powdered sugar (for dusting)
Cooking Instructions
- Prepare the Batter: In a mixing bowl, combine the all-purpose flour, granulated sugar, baking powder, and salt. Whisk the dry ingredients together until they’re well mixed. In another bowl, whisk together the milk, eggs, and vanilla bean paste. Gradually add the wet mixture to the dry ingredients, stirring until a smooth batter forms. Make certain there are no lumps.
- Heat the Oil: In a deep skillet or frying pan, pour in the vegetable oil until it’s about 2 inches deep. Heat the oil over medium-high heat until it reaches approximately 375°F (190°C). You can test the temperature by dropping a small amount of batter into the oil; it should sizzle and rise to the surface.
- Prepare the Rosette Iron: While the oil is heating, take your rosette iron and carefully dip it into the hot oil for about 30 seconds to preheat it. This step is essential for achieving that perfect golden-brown color and crispiness.
- Fry the Rosettes: Carefully remove the hot rosette iron from the oil and dip it into the batter, covering it about three-quarters of the way up the sides. Immediately place the batter-covered iron back into the hot oil. Fry for about 1-2 minutes or until the rosette is golden brown. Gently shake the iron to release the rosette into the oil and allow it to fry for an additional 30 seconds until fully cooked. Use a slotted spoon to remove the rosette and place it on a paper towel-lined plate to drain excess oil.
- Dust with Powdered Sugar: Once the rosettes have cooled slightly, dust them generously with powdered sugar. This adds a sweet touch and enhances the visual appeal of your Vanilla Bean Rosettes.
Extra Tips
When making Vanilla Bean Rosettes, verify that your oil is at the correct temperature for frying; if it’s too hot, the rosettes will burn, and if it’s too cold, they’ll absorb too much oil and become greasy.
Additionally, you can experiment with different flavorings by adding a hint of cinnamon or almond extract to the batter. Finally, for a festive touch, consider serving your rosettes with a side of fresh berries or a light drizzle of chocolate sauce for an extra layer of indulgence. Enjoy your delightful Scandinavian treat!
Pumpkin Spice Rosettes
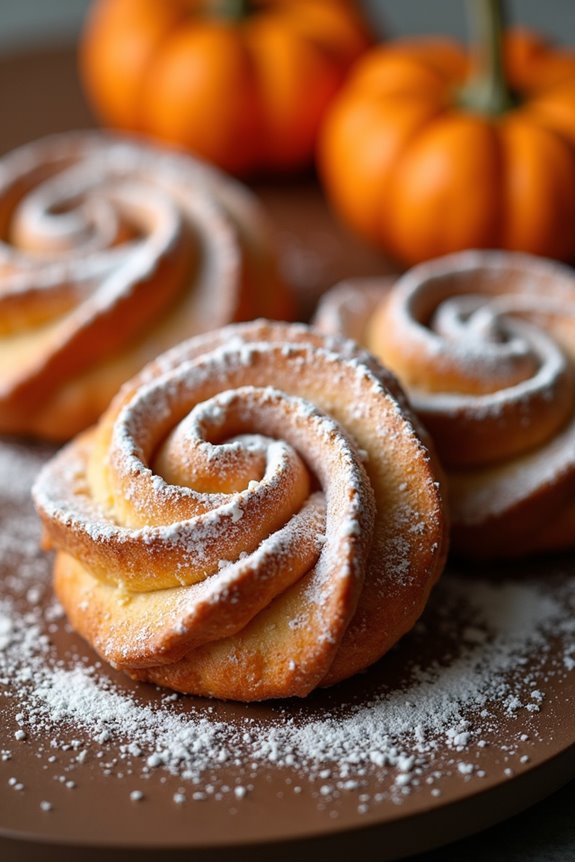
Pumpkin Spice Rosettes are a delightful Scandinavian treat that combines the warmth of seasonal spices with the whimsical shape of traditional rosettes. These delicate pastries are crisp on the outside and tender on the inside, making them a perfect accompaniment to coffee or tea during the fall season. The addition of pumpkin puree and spices like cinnamon, nutmeg, and ginger provides a comforting flavor profile that evokes the essence of autumn.
Making Pumpkin Spice Rosettes requires a special rosette iron, which is a mold that gives these pastries their unique shape. The batter is simple to prepare and can be customized with your favorite spices or toppings. Once fried to a golden brown, these rosettes can be dusted with powdered sugar for an added touch of sweetness. Ideal for gatherings, they can be served warm or at room temperature, making them a versatile treat for any occasion.
Ingredients (serving size: 4-6 people):
- 1 cup all-purpose flour
- 1/2 cup pumpkin puree
- 1/4 cup granulated sugar
- 1/2 teaspoon baking powder
- 1/2 teaspoon ground cinnamon
- 1/4 teaspoon ground nutmeg
- 1/4 teaspoon ground ginger
- 1/4 teaspoon salt
- 1 large egg
- 1/2 cup milk
- 1 teaspoon vanilla extract
- Powdered sugar (for dusting)
- Oil (for frying)
Cooking Instructions:
1. Prepare the Batter: In a large mixing bowl, combine the all-purpose flour, baking powder, cinnamon, nutmeg, ginger, and salt. Whisk together to verify the dry ingredients are well mixed.
In another bowl, whisk together the pumpkin puree, granulated sugar, egg, milk, and vanilla extract until smooth. Gradually add the wet ingredients to the dry ingredients, mixing until just combined. Be careful not to overmix.
2. Heat the Oil: In a deep skillet or pot, pour enough oil to submerge the rosette iron, about 2-3 inches deep, and heat it over medium-high heat. To test if the oil is hot enough, you can drop a small amount of batter into the oil; if it sizzles and rises to the surface, the oil is ready.
3. Prepare the Rosette Iron: Once the oil is hot, carefully dip the rosette iron into the oil for a few seconds to preheat it. Then, remove the iron and dip it into the batter, covering about two-thirds of the mold. Make sure not to overfill, as the batter will expand during frying.
4. Fry the Rosettes: Carefully place the batter-covered rosette iron back into the hot oil. Fry for about 30 seconds or until the edges are golden brown. Gently shake the iron to release the rosette into the oil and continue frying for an additional 30 seconds until fully cooked.
5. Drain and Dust: Remove the rosettes from the oil using a slotted spoon and place them on a paper towel-lined plate to drain excess oil. Once they’re cool, dust generously with powdered sugar before serving.
6. Serve: Arrange the Pumpkin Spice Rosettes on a serving plate and enjoy them warm or at room temperature with your favorite beverage.
Extra Tips:
For an extra touch of flavor, consider adding a pinch of cloves or allspice to the batter for a more complex spice profile. If you don’t have a rosette iron, you can use other molds or simply fry small dollops of batter to create free-form shapes.
Confirm the oil temperature remains consistent throughout frying, as too hot oil can burn the rosettes while too cool oil can make them greasy. Enjoy these treats fresh for the best texture, and store any leftovers in an airtight container for up to two days.
Raspberry Jam Filled Rosettes
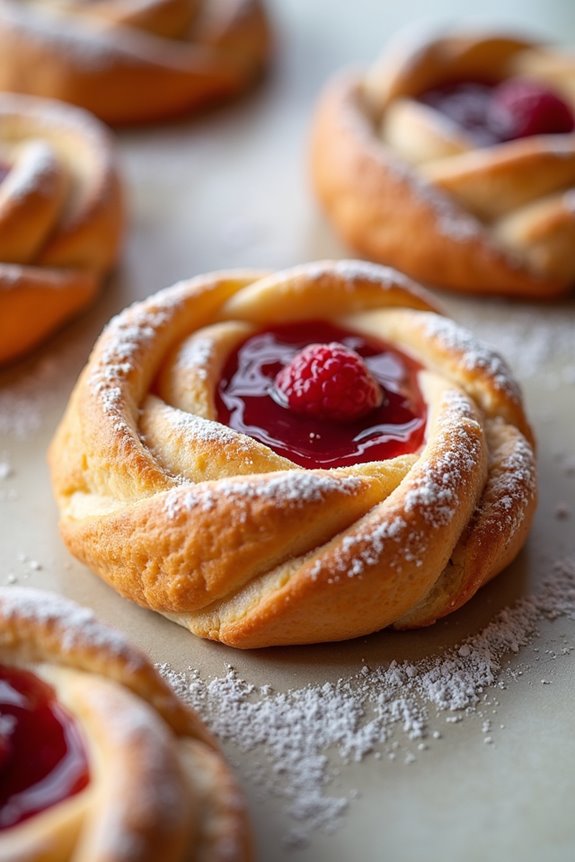
Raspberry Jam Filled Rosettes are a delightful treat that combines the rich, flaky texture of pastry with the sweet and tangy flavor of raspberry jam. These beautiful pastries are perfect for a special occasion or simply as a sweet indulgence to brighten any day. The charming rosette shape makes them visually appealing and fun to serve, while the raspberry filling adds a burst of flavor that’s certain to please anyone who takes a bite.
Making Raspberry Jam Filled Rosettes is a straightforward process, but it does require a bit of patience and attention to detail. The dough is rolled out, cut into shapes, filled with jam, and then shaped into lovely rosettes. Once baked, they’re often dusted with powdered sugar for an elegant finish. Whether you’re a seasoned baker or a novice in the kitchen, this recipe will guide you step-by-step to create these scrumptious pastries.
Ingredients (Serves 4-6)
- 2 cups all-purpose flour
- 2 tablespoons granulated sugar
- 1 teaspoon baking powder
- 1/2 teaspoon salt
- 1/2 cup unsalted butter, cold and cubed
- 1/4 cup sour cream
- 1 egg yolk
- 1 teaspoon vanilla extract
- 3/4 cup raspberry jam
- Powdered sugar for dusting
Cooking Instructions
- Prepare the Dough: In a large mixing bowl, combine the all-purpose flour, granulated sugar, baking powder, and salt. Mix well. Then, add the cold, cubed butter to the bowl. Using a pastry cutter or your fingers, work the butter into the dry ingredients until the mixture resembles coarse crumbs.
- Mix Wet Ingredients: In a separate small bowl, whisk together the sour cream, egg yolk, and vanilla extract until well combined. Pour this mixture into the flour mixture and stir gently until the dough begins to come together. Be careful not to overmix.
- Chill the Dough: Once the dough is formed, wrap it tightly in plastic wrap and refrigerate for at least 30 minutes. This chilling step will help the butter firm up and make the dough easier to handle.
- Roll Out the Dough: After chilling, preheat your oven to 375°F (190°C) and line a baking sheet with parchment paper. On a lightly floured surface, roll out the dough to about 1/8-inch thickness. Use a cookie cutter or a sharp knife to cut the dough into circles (approximately 3 inches in diameter).
- Fill and Shape the Rosettes: Place a small teaspoon of raspberry jam in the center of each dough circle. Fold the edges of the dough over the jam to create a rosette shape, pinching the edges to seal them. You can also create a decorative pattern by folding the dough in a specific way, if desired.
- Bake the Rosettes: Arrange the filled rosettes on the prepared baking sheet, leaving space between them. Bake in the preheated oven for 15-20 minutes or until golden brown. Keep an eye on them to prevent burning.
- Cool and Dust: After baking, remove the rosettes from the oven and let them cool on a wire rack. Once cooled, dust them lightly with powdered sugar for an elegant touch before serving.
Extra Tips
When making Raspberry Jam Filled Rosettes, feel free to experiment with different types of jam or fruit preserves for a variation in flavor. You can also enhance the taste by adding a touch of lemon zest to the dough for a citrusy twist.
Confirm that the butter is very cold when making the dough, as this will help achieve a flaky texture. Don’t hesitate to double the recipe if you’re expecting guests, as these delightful treats are sure to disappear quickly!