

There’s something so heartwarming about classic British cakes that instantly brings back fond memories.
From the delicate layers of a Victoria Sponge to the comforting richness of Sticky Toffee Pudding, each cake tells its own story.
These delightful treats not only satisfy the taste buds but also remind us of cherished family gatherings and tea time rituals.
Let’s explore these nostalgic recipes that celebrate our heritage.
Victoria Sponge Cake
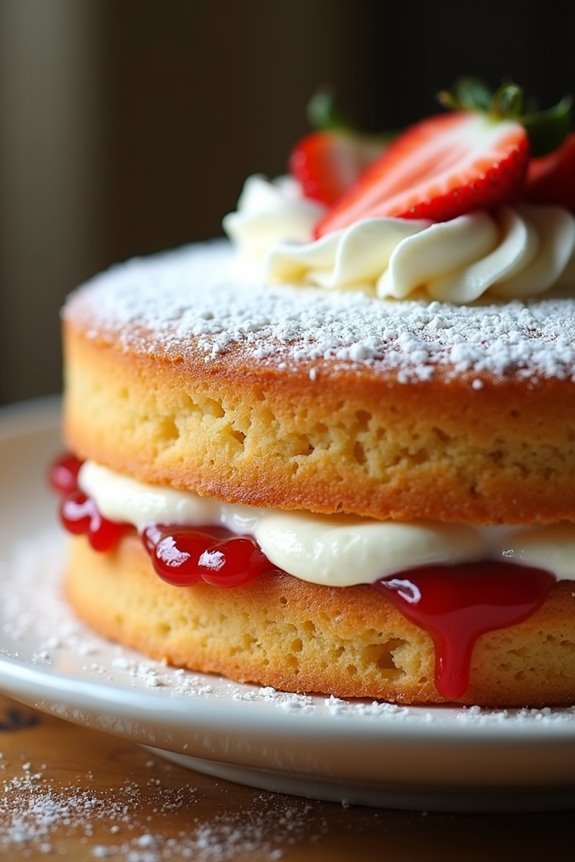
The Victoria Sponge Cake is a quintessential British dessert that has been adored for generations. Named after Queen Victoria, who was known to enjoy a slice of this delightful cake with her afternoon tea, the Victoria Sponge is characterized by its light and airy texture, with a sweet filling of jam and whipped cream or buttercream.
This classic treat is perfect for any occasion, whether it’s a tea party, birthday celebration, or simply a sweet indulgence at home.
Making a Victoria Sponge Cake is a straightforward process that yields impressive results. The key to achieving the perfect sponge lies in the creaming method, where butter and sugar are beaten together until light and fluffy, guaranteeing that the cake rises beautifully.
Once baked and cooled, it’s often filled with strawberry jam and whipped cream, though variations may include different fruits or flavored creams. This recipe serves 4-6 people, making it an ideal choice for a small gathering or an afternoon treat.
Ingredients:
- 200g unsalted butter, softened
- 200g caster sugar
- 4 large eggs
- 200g self-raising flour
- 1 tsp baking powder
- 1 tsp vanilla extract
- A pinch of salt
- 100g strawberry jam (or preferred jam)
- 150ml double cream (for whipping)
- Icing sugar (for dusting)
Cooking Instructions:
1. Preheat the Oven: Begin by preheating your oven to 180°C (350°F). This guarantees that the cake will bake evenly and rise properly once it’s in the oven.
2. Prepare the Cake Pans**: Grease two 20cm (8 inch) round cake pans with butter and line the bottoms with parchment paper. This will help prevent the cakes from sticking** and make them easier to remove after baking.
3. Cream the Butter and Sugar: In a large mixing bowl, combine the softened butter and caster sugar. Using an electric mixer or a wooden spoon, cream them together until the mixture is pale and fluffy.
This process usually takes about 3-5 minutes and is vital for a light sponge.
4. Add the Eggs: Crack the eggs into a separate bowl and beat them lightly. Gradually add the beaten eggs to the butter and sugar mixture, mixing well after each addition to guarantee everything is well combined.
If the mixture begins to curdle, add a spoonful of flour to help stabilize it.
5. Incorporate the Dry Ingredients: Sift the self-raising flour, baking powder, and salt into the bowl. Gently fold the dry ingredients into the wet mixture using a spatula or wooden spoon, taking care not to overmix, which can affect the cake’s texture.
6. Add Vanilla Extract: Stir in the vanilla extract to enhance the flavor of your sponge cake. Mix gently until just combined.
7. Divide and Bake: Pour the batter evenly into the prepared cake pans. Smooth the tops with a spatula and place them in the preheated oven.
Bake for 25-30 minutes, or until the cakes are golden brown and a skewer inserted into the center comes out clean.
8. Cool the Cakes: Once baked, remove the pans from the oven and let them cool in the pans for 5 minutes. Then, transfer the cakes to a wire rack to cool completely.
9. Prepare the Filling: While the cakes are cooling, whip the double cream in a mixing bowl until it forms soft peaks. Be careful not to over-whip, as it can turn into butter.
10. Assemble the Cake: Once the cakes are completely cooled, place one layer on a serving plate. Spread the strawberry jam evenly over the top, followed by a generous layer of whipped cream.
Place the second cake layer on top and gently press down.
11. Final Touch: Dust the top of the cake with icing sugar for a beautiful finish. Your Victoria Sponge Cake is now ready to be sliced and enjoyed!
Extra Tips:
When making a Victoria Sponge Cake, it’s essential to guarantee that all your ingredients are at room temperature before you start.
This helps in achieving a smooth batter and guarantees the cake rises evenly. Additionally, feel free to experiment with different jams or even fresh fruits for the filling.
For a touch of elegance, you can also add a layer of fresh berries on top of the whipped cream before placing the second layer on. Enjoy this delightful cake with a cup of tea for the ultimate British experience!
Ginger Cake
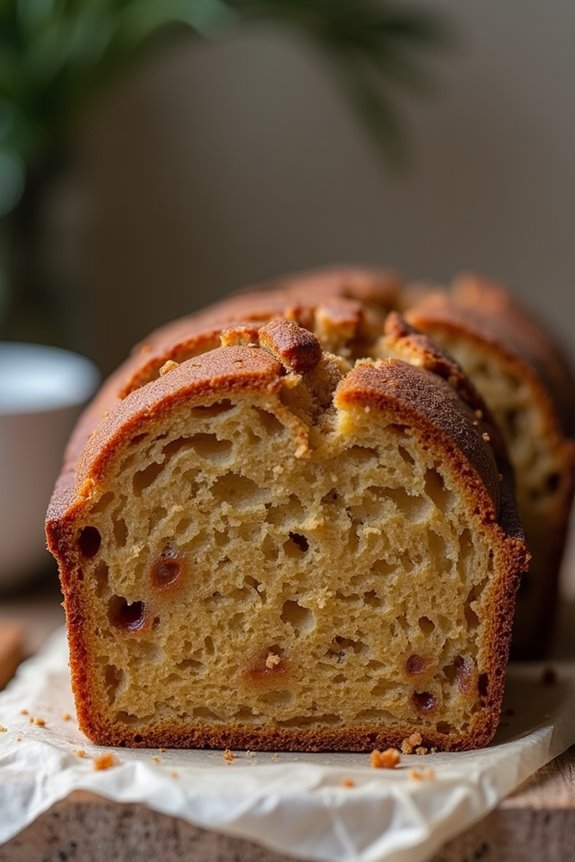
Ginger cake is a timeless classic that embodies the warm, comforting flavors of the British baking tradition. With its rich, moist texture and the delightful spice of ginger, this cake is perfect for afternoon tea or as a cozy dessert on a chilly day.
The combination of golden syrup, ground ginger, and fresh ginger creates a deep, aromatic flavor that will have your guests coming back for seconds. Whether enjoyed plain or adorned with a drizzle of icing, ginger cake is bound to please.
This easy-to-follow recipe will guide you through creating a delicious ginger cake that serves 4-6 people. The preparation is straightforward, making it an accessible choice for bakers of all skill levels. Once you’ve mastered the basics, feel free to experiment with additional spices or toppings to make it your own.
Ingredients:
- 225g (8 oz) self-raising flour
- 2 tsp ground ginger
- 1 tsp ground cinnamon
- 1 tsp baking soda
- 125g (4.5 oz) unsalted butter, softened
- 175g (6 oz) brown sugar
- 2 large eggs
- 200ml (7 fl oz) milk
- 100g (3.5 oz) golden syrup
- 50g (1.75 oz) fresh ginger, grated
Instructions:
- Preheat the Oven: Begin by preheating your oven to 160°C (320°F). This guarantees that the cake will bake evenly and achieve the perfect texture.
- Prepare the Cake Tin: Grease a loaf tin (approx. 8×4 inches) with butter and line it with baking parchment. This will prevent the cake from sticking and make it easier to remove after baking.
- Mix Dry Ingredients: In a large bowl, sift together the self-raising flour, ground ginger, cinnamon, and baking soda. This step aerates the flour and guarantees that all the dry ingredients are well combined.
- Cream Butter and Sugar: In another bowl, beat the softened butter and brown sugar together until light and fluffy. This process incorporates air into the mixture, which is essential for a light cake.
- Add Eggs: Beat in the eggs, one at a time, mixing well after each addition. This helps to emulsify the mixture and gives the cake a rich flavor.
- Combine with Dry Ingredients: Gradually fold the dry mixture into the butter mixture using a spatula. Be careful not to overmix, as this can lead to a dense cake.
- Incorporate Milk and Syrup: Gently stir in the milk, golden syrup, and grated fresh ginger until just combined. The syrup adds moisture and a lovely sweetness to the cake.
- Pour into Tin: Pour the batter into the prepared loaf tin, smoothing the top with a spatula. This guarantees an even bake and a nice rise.
- Bake: Place the tin in the preheated oven and bake for about 50-60 minutes, or until a skewer inserted into the center comes out clean. Keep an eye on it; if the top is browning too quickly, cover it loosely with foil.
- Cool: Once baked, remove the cake from the oven and allow it to cool in the tin for 10 minutes before transferring it to a wire rack to cool completely.
Tips:
For an extra burst of flavor, consider adding chopped crystallized ginger to the batter before baking.
If you prefer a sweeter cake, you can also top it with a simple icing made from icing sugar and a little water or lemon juice.
Remember to store any leftovers in an airtight container to keep the cake moist and flavorful for days to come!
Battenberg Cake
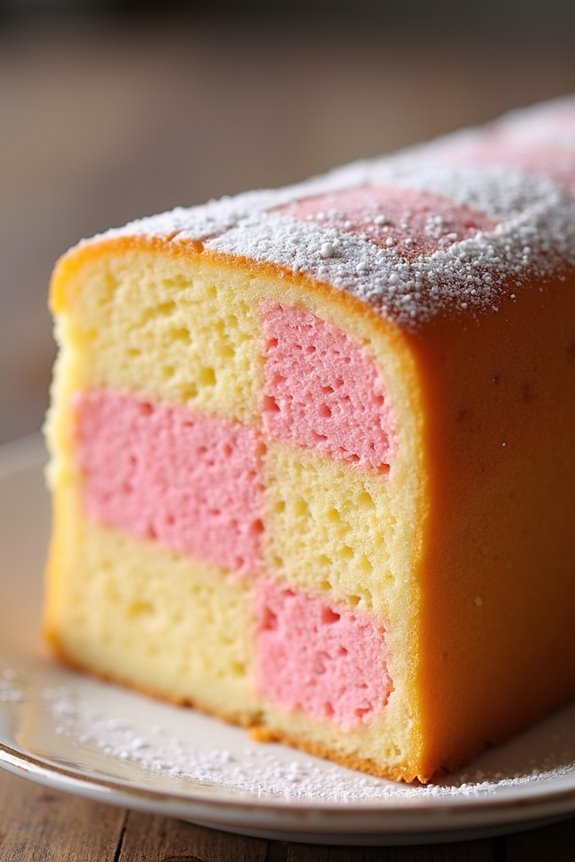
Battenberg Cake is a delightful British confection that has charmed dessert lovers since the early 19th century. Known for its distinctive checkered pattern, this cake features alternating squares of light and dark sponge, traditionally flavored with almond, and often coated with a layer of marzipan. Its origins are said to be linked to the marriage of Princess Victoria of Battenberg to Prince Louis of Battenberg, making it a perfect treat for celebrations.
The cake isn’t only visually stunning but also offers a wonderful mix of textures and flavors. The combination of the light, airy sponge paired with the sweet, smooth marzipan creates a delightful balance that’s sure to impress your guests. Whether served at tea time or as a centerpiece at a special occasion, Battenberg Cake is a classic that never goes out of style.
Ingredients (Serves 4-6)
- 200g unsalted butter, softened
- 200g caster sugar
- 4 large eggs
- 200g self-raising flour
- 1 tsp baking powder
- 1 tsp vanilla extract
- 2 tbsp milk
- A few drops of pink food coloring
- 200g marzipan
- Icing sugar for dusting
Cooking Instructions
- Preheat the Oven: Begin by preheating your oven to 180°C (350°F). This guarantees that the cake bakes evenly and thoroughly once you place it in the oven.
- Prepare the Cake Tin: Line an 8-inch square cake tin with baking paper. To make it easier to remove the cake later, you can also lightly grease the tin with butter.
- Make the Batter: In a large mixing bowl, cream together the softened butter and caster sugar until the mixture is light and fluffy. This process incorporates air into the batter, resulting in a lighter cake.
- Add Eggs and Dry Ingredients: Gradually add the eggs to the mixture, one at a time, guaranteeing each is fully incorporated before adding the next. Then, sift in the self-raising flour and baking powder, followed by the vanilla extract and milk. Mix until just combined.
- Divide the Batter: Split the batter into two equal portions. In one bowl, add a few drops of pink food coloring and gently fold it in until the desired shade is achieved.
- Bake the Cakes: Pour the plain batter into one half of the prepared tin and the pink batter into the other half. Use a spatula to smooth the surfaces. Bake in the preheated oven for 25-30 minutes, or until a skewer inserted into the center comes out clean.
- Cool the Cakes: Once baked, remove the cakes from the oven and allow them to cool in the tin for about 10 minutes. Then, turn them out onto a wire rack to cool completely.
- Assemble the Cake: Once the cakes are cool, trim the edges to create neat squares. Cut each cake in half lengthwise to create four equal rectangles. Lay them alternately – one plain, one pink – to form a checkered pattern.
- Cover with Marzipan: Roll out the marzipan on a surface dusted with icing sugar until it’s large enough to cover the cake. Place the assembled cake in the center and fold the marzipan over, smoothing it with your hands to make sure it fits snugly.
- Finish and Serve: Trim any excess marzipan from the edges and dust with icing sugar. Cut the cake into squares and serve.
Extra Tips
When making Battenberg Cake, verify your ingredients are at room temperature for ideal mixing. You can also experiment with flavors by adding almond extract to the sponge for a more pronounced taste.
If you’re not a fan of marzipan, a layer of fondant can be used instead, but keep in mind that it will alter the traditional flavor profile. Finally, for a fun twist, consider using different colors of food dye to create a more vibrant checkered pattern!
Bakewell Tart
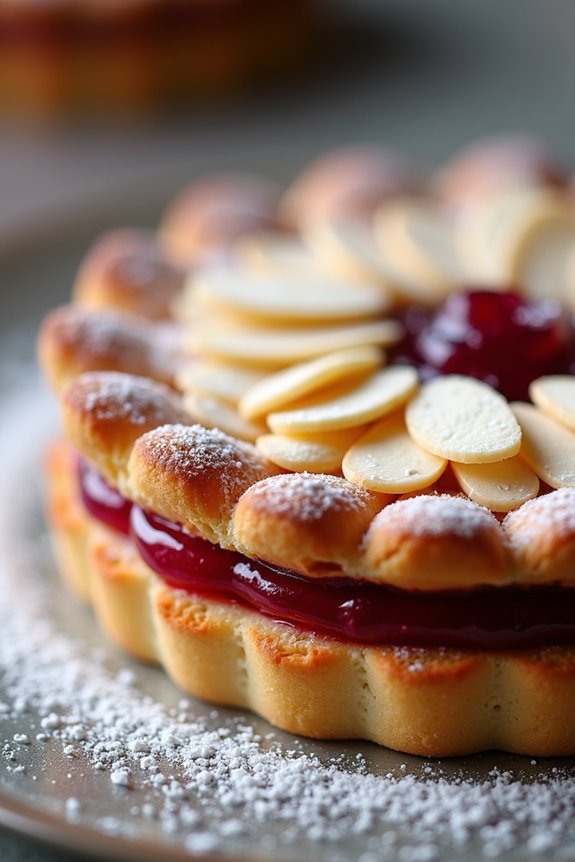
The Bakewell Tart is a quintessential British dessert that combines a buttery pastry base with a layer of fruity jam and a rich almond filling. Originating from the town of Bakewell in Derbyshire, this tart is beloved for its delightful combination of textures and flavors.
With a crisp crust, a sweet and tangy jam layer, and a soft, nutty frangipane filling, it’s perfect for afternoon tea or as a sweet treat after dinner.
Making a Bakewell Tart is a rewarding experience, and while it may seem intimidating at first, it’s relatively straightforward with a few simple steps. The key to a successful Bakewell Tart lies in the balance of flavors and the quality of the ingredients, particularly the almond extract and jam.
With practice, you’ll find that this classic dessert isn’t only delicious but also a wonderful addition to your baking repertoire.
Ingredients (Serves 4-6)
- 225g (8oz) shortcrust pastry
- 150g (5oz) raspberry jam (or your preferred jam)
- 125g (4.5oz) ground almonds
- 125g (4.5oz) unsalted butter, softened
- 125g (4.5oz) caster sugar
- 2 large eggs
- 1 teaspoon almond extract
- 25g (1oz) flaked almonds (for topping)
- A pinch of salt
- Icing sugar (for dusting, optional)
Cooking Instructions
1. Prepare the Pastry: Preheat your oven to 180°C (350°F). Roll out the shortcrust pastry on a lightly floured surface to about 3mm thick. Carefully line a 23cm (9-inch) tart tin with the pastry, making certain that it fits snugly into the edges. Trim any excess pastry hanging over the edges.
Prick the base with a fork to prevent bubbling during baking. Chill the lined tin in the refrigerator for about 20 minutes.
2. Bake the Pastry Case: Once chilled, line the pastry with baking parchment and fill it with baking beans or rice. This will help keep the shape of the pastry while it bakes. Place the tart tin in the preheated oven and bake for 15 minutes.
After 15 minutes, remove the parchment and beans, and return the tart to the oven for an additional 5-7 minutes, or until lightly golden. Remove from the oven and let it cool.
3. Spread the Jam: Once the pastry case has cooled, spread the raspberry jam evenly over the base. Be generous but make sure it’s an even layer, as this will provide a lovely contrast to the frangipane filling.
4. Make the Frangipane Filling: In a mixing bowl, cream together the softened butter and caster sugar until light and fluffy. This may take a few minutes. Gradually beat in the eggs one at a time, making sure each is fully incorporated before adding the next.
Stir in the almond extract and ground almonds, mixing until smooth and combined.
5. Fill the Tart: Spoon the frangipane mixture over the jam layer in the tart shell, spreading it out evenly. Sprinkle the flaked almonds on top for added texture and flavor.
6. Bake the Tart: Return the tart to the oven and bake for 25-30 minutes, or until the frangipane is set and lightly golden on top. You can test for doneness by inserting a skewer into the center; it should come out clean when the tart is ready.
7. Cool and Serve: Once baked, allow the tart to cool in the tin for about 10 minutes before transferring it to a wire rack to cool completely. Before serving, dust with icing sugar if desired.
Extra Tips
For the best results, use high-quality ingredients, especially the butter and jam, as they greatly impact the flavor of the tart.
If you’re a fan of different flavors, feel free to experiment with other jams, such as apricot or cherry, or even add a hint of lemon zest to the frangipane for a revitalizing twist.
Additionally, make sure that the almond extract is pure and not artificial for the best taste. Enjoy your Bakewell Tart with a cup of tea or coffee!
Sticky Toffee Pudding

Sticky Toffee Pudding is a quintessential British dessert that has won the hearts of many with its rich flavor and delightful texture. This indulgent treat features a moist sponge cake made with finely chopped dates, generously drenched in a luscious toffee sauce.
Traditionally served warm with a scoop of vanilla ice cream or a dollop of clotted cream, Sticky Toffee Pudding isn’t just a dessert; it’s an experience that brings comfort and joy to any dining occasion.
The origins of this delectable pudding can be traced back to the Lake District in England, where it’s said to have been created in the 20th century. However, its popularity has spread far and wide, making it a staple in pubs and restaurants across the UK.
Whether you’re hosting a dinner party or simply craving something sweet, this classic recipe is sure to impress your guests and satisfy your sweet tooth.
Ingredients (Serves 4-6):
- 200g (7 oz) pitted dates, chopped
- 250ml (1 cup) boiling water
- 1 tsp baking soda
- 85g (3 oz) unsalted butter, softened
- 150g (5 oz) light brown sugar
- 2 large eggs
- 1 tsp vanilla extract
- 175g (6 oz) self-raising flour
- Pinch of salt
For the Toffee Sauce:
- 100g (3.5 oz) light brown sugar
- 100g (3.5 oz) unsalted butter
- 200ml (7 fl oz) double cream
- 1 tsp vanilla extract
Cooking Instructions:
- Prepare the Dates: In a bowl, combine the chopped dates with boiling water and baking soda. Let this mixture sit for about 15 minutes, allowing the dates to soften and the flavors to meld. This step is essential as it helps to create a moist sponge.
- Make the Batter: In a separate mixing bowl, beat together the softened butter and light brown sugar until the mixture becomes light and fluffy. This process incorporates air, giving the pudding a lovely texture.
- Add Eggs and Vanilla: Once the butter and sugar mixture is fluffy, add the eggs one at a time, mixing well after each addition. Stir in the vanilla extract. This will add flavor and moisture to your pudding.
- Combine Dry Ingredients: Sift the self-raising flour and pinch of salt into the batter, mixing gently until just combined. Avoid overmixing to keep the pudding light and airy.
- Incorporate the Date Mixture: Fold the softened date mixture into the batter until fully integrated. The dates will add a rich sweetness and moistness to the pudding.
- Bake: Preheat your oven to 180°C (350°F) and pour the batter into a greased baking dish (approximately 8-inch square). Bake for 25-30 minutes, or until a toothpick inserted into the center comes out clean. This will guarantee your pudding is cooked through but still moist.
- Prepare the Toffee Sauce: While the pudding is baking, prepare the toffee sauce by melting the butter in a saucepan. Stir in the light brown sugar and double cream, bringing the mixture to a gentle boil. Reduce the heat and simmer for about 5 minutes, stirring constantly until the sauce thickens slightly.
- Serve: Once the pudding is baked, let it rest for a few minutes before slicing. Serve warm, drizzled generously with the toffee sauce and a scoop of vanilla ice cream or clotted cream on the side for an extra treat.
Extra Tips:
For the best results, make sure to use fresh dates as they provide the most flavor and moisture. You can also make the pudding ahead of time and reheat it gently in the oven before serving.
If you’re looking to elevate the dish further, consider adding a pinch of sea salt to the toffee sauce for a delightful contrast to the sweetness. Enjoy your Sticky Toffee Pudding warm for the most comforting experience!
Lemon Drizzle Cake
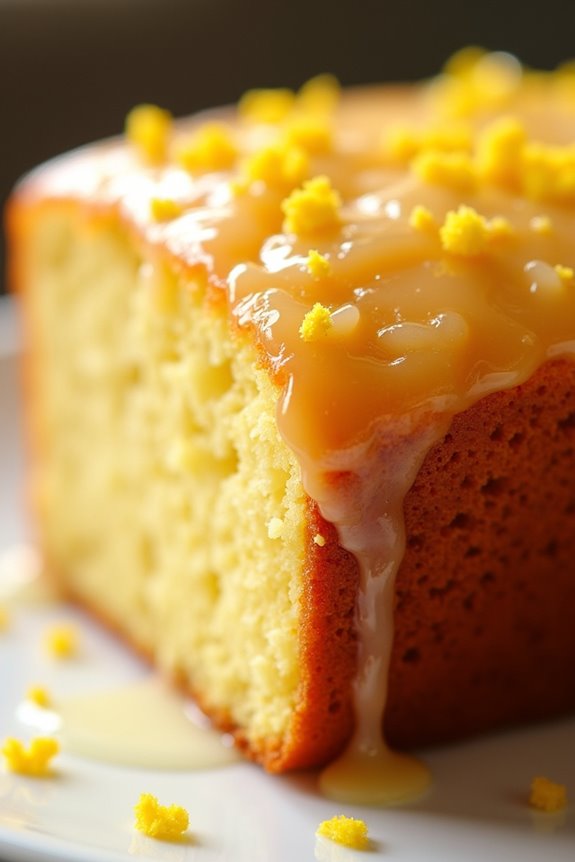
Lemon Drizzle Cake is a quintessential British treat that perfectly balances the tartness of fresh lemons with the sweetness of a light sponge cake. The cake is simple to make and is ideal for afternoon tea or as a delightful dessert after any meal. Its zesty flavor is rejuvenating and invigorating, making it a popular choice for gatherings and celebrations.
This cake is particularly famous for its sticky, tangy glaze, which seeps into the cake, enhancing its flavor and creating a moist texture. The beauty of this Lemon Drizzle Cake lies in its versatility; it can be enjoyed on its own, paired with a dollop of cream, or served alongside fresh berries.
The recipe is straightforward, making it accessible for bakers of all skill levels. Whether you’re an experienced baker or just starting out, this cake will impress your family and friends with its vibrant taste and charming presentation.
Ingredients (serving size: 4-6 people)
- 225g unsalted butter, softened
- 225g granulated sugar
- 4 large eggs
- 225g self-raising flour
- Zest of 2 lemons
- 4 tablespoons milk
- 100g icing sugar
- Juice of 2 lemons
Cooking Instructions
- Preheat the Oven: Start by preheating your oven to 180°C (350°F). This guarantees that your cake bakes evenly and rises properly. Grease and line a 2lb loaf tin with baking parchment to prevent the cake from sticking.
- Cream the Butter and Sugar: In a large mixing bowl, combine the softened butter and granulated sugar. Using an electric mixer, cream them together on medium speed until the mixture is light and fluffy. This incorporates air into the batter, which is essential for a light sponge.
- Add the Eggs: Gradually add the eggs, one at a time, to the creamed butter and sugar mixture. Make sure to beat well after each addition to confirm the eggs are fully incorporated. This will create a rich, cohesive batter.
- Incorporate the Dry Ingredients: Sift in the self-raising flour and lemon zest. Gently fold the flour into the mixture using a spatula. Be careful not to overmix, as this can result in a dense cake. Add the milk to loosen the batter, mixing until just combined.
- Bake the Cake: Pour the batter into the prepared loaf tin and smooth the top with a spatula. Bake in the preheated oven for 45-50 minutes, or until a skewer inserted into the center comes out clean. Keep an eye on it towards the end to avoid over-baking.
- Prepare the Drizzle: While the cake is baking, prepare the lemon drizzle. In a small bowl, mix the icing sugar with the lemon juice until smooth. This will form a syrup that gives the cake its signature tangy glaze.
- Glaze the Cake: Once the cake is baked, remove it from the oven and let it cool in the tin for about 10 minutes. Carefully poke holes all over the top of the cake using a skewer or fork, then pour the lemon drizzle over the warm cake, allowing it to soak in.
- Cool and Serve: Let the cake cool completely in the tin before transferring it to a wire rack. Once cooled, slice and serve with your favorite accompaniment, such as clotted cream or fresh fruits.
Extra Tips
To enhance the flavor of your Lemon Drizzle Cake, consider using organic lemons for their zest and juice, as they typically have a more robust flavor.
Additionally, let the cake cool completely before glazing to prevent the drizzle from running off. For a decorative touch, you can sprinkle some extra lemon zest on top of the glaze or serve the cake with a dusting of icing sugar.
If you like a stronger lemon flavor, you can increase the amount of lemon juice in the glaze. Enjoy your baking experience!
Chocolate Fudge Cake
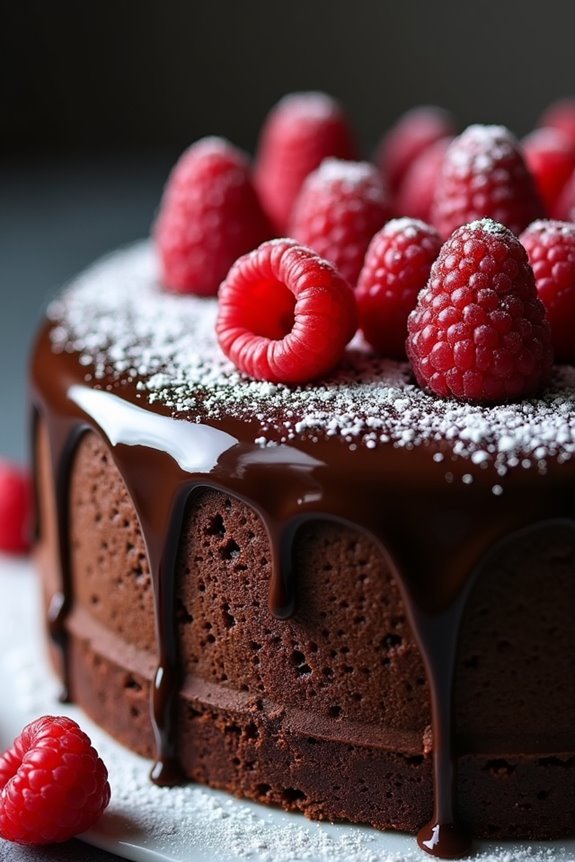
Chocolate Fudge Cake is a rich and indulgent dessert that’s perfect for any occasion, whether it’s a birthday celebration or a cozy family gathering. This classic British cake is known for its moist texture and decadent chocolate flavor, making it a favorite among chocolate lovers. The combination of dark chocolate, sugar, butter, and eggs creates a fudgy consistency that melts in your mouth, while the simple preparation makes it accessible to bakers of all skill levels.
Making Chocolate Fudge Cake isn’t only a treat for your taste buds, but it’s also a wonderful way to spend time in the kitchen. As the aroma of chocolate fills your home, you’ll be certain to create an inviting atmosphere that will have everyone asking for a slice. Once baked, this cake can be served plain or adorned with a rich chocolate ganache, fresh berries, or a dusting of icing sugar for an elegant touch.
Ingredients (Serves 4-6 people)
- 200g dark chocolate (minimum 70% cocoa)
- 150g unsalted butter
- 250g granulated sugar
- 4 large eggs
- 100g all-purpose flour
- 50g cocoa powder
- 1 tsp baking powder
- A pinch of salt
Cooking Instructions
- Preheat the Oven: Begin by preheating your oven to 180°C (350°F). This guarantees that the cake bakes evenly and rises properly.
- Prepare the Baking Pan: Grease a round 9-inch cake pan with butter and line the bottom with parchment paper to prevent sticking. This step is vital for easy removal of the cake once it’s baked.
- Melt Chocolate and Butter: In a heatproof bowl, combine the dark chocolate and unsalted butter. Place the bowl over a pot of simmering water (double boiler method) or microwave in short bursts, stirring until completely melted and smooth. Allow this mixture to cool slightly.
- Mix Sugar and Eggs: In a large mixing bowl, whisk together the granulated sugar and eggs until the mixture is pale and fluffy. This process incorporates air into the batter, leading to a lighter cake texture.
- Combine Mixtures: Gradually pour the cooled chocolate and butter mixture into the egg and sugar mixture, stirring gently to combine. Be careful not to deflate the mixture.
- Sift Dry Ingredients: In a separate bowl, sift together the all-purpose flour, cocoa powder, baking powder, and salt. Sifting helps to break up any lumps and guarantees a smooth batter.
- Fold in Dry Ingredients: Gently fold the dry ingredients into the wet mixture until just combined. Avoid overmixing, as this can lead to a dense cake.
- Transfer to Pan: Pour the batter into the prepared cake pan, smoothing the top with a spatula. Tap the pan on the counter to release any air bubbles.
- Bake the Cake: Place the cake in the preheated oven and bake for 25-30 minutes, or until a toothpick inserted into the center comes out with a few moist crumbs. Be cautious not to overbake, as this will dry out the cake.
- Cool and Serve: Once baked, remove the cake from the oven and allow it to cool in the pan for 10 minutes. Then, turn it out onto a wire rack to cool completely before serving.
Extra Tips
For an extra layer of indulgence, consider making a chocolate ganache to pour over the cooled cake. Simply heat equal parts of cream and chocolate, mix until smooth, and pour over the top.
Additionally, you can enhance the flavor by adding a teaspoon of vanilla extract to the batter or pairing the cake with whipped cream or ice cream for a delightful contrast. Enjoy your Chocolate Fudge Cake!
Queen of Puddings
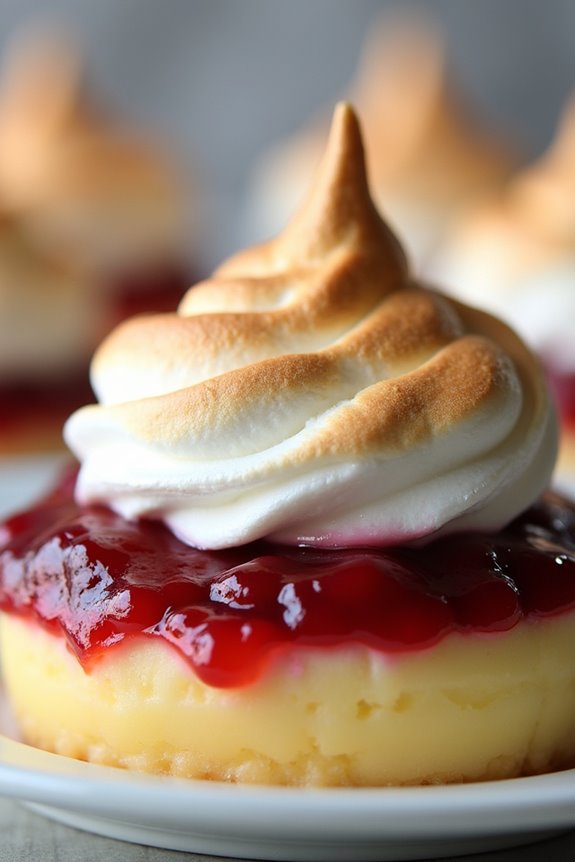
Queen of Puddings is a classic British dessert that beautifully combines layers of rich custard, fruity jam, and fluffy meringue. This dish is a delightful nod to the simplicity of British cooking while offering a touch of elegance that makes it perfect for special occasions. The name itself evokes a sense of royalty, as it was once a favorite among the British aristocracy.
With its beautiful presentation and delicious flavors, Queen of Puddings is bound to impress your family and friends.
The base of this dessert is a creamy custard made from milk, sugar, and breadcrumbs, which is then topped with a layer of fruit jam, typically raspberry or strawberry. The final touch is a generous layer of meringue that’s baked until golden and crispy. The combination of textures—from the smooth custard to the chewy meringue—creates a delightful experience in every bite.
This recipe serves 4-6 people, making it the perfect choice for a family gathering or a dinner party.
Ingredients
- 2 cups milk
- 4 tablespoons sugar
- 1/2 cup fine white breadcrumbs
- 2 large eggs (separated)
- 1 teaspoon vanilla extract
- 1/2 cup fruit jam (raspberry or strawberry)
- 1/4 teaspoon cream of tartar
- 1/4 cup sugar (for meringue)
Cooking Instructions
- Prepare the Oven and Baking Dish: Preheat your oven to 350°F (175°C). Grease a baking dish (about 8 inches) with butter. This guarantees that the pudding doesn’t stick to the sides and is easy to serve.
- Make the Custard Base: In a saucepan, combine the milk and sugar over medium heat. Stir occasionally until the sugar dissolves and the milk is warmed but not boiling. Remove from heat and add the breadcrumbs and vanilla extract. Allow the mixture to sit for about 10 minutes to thicken slightly.
- Add Egg Yolks: In a separate bowl, beat the egg yolks until they’re pale and thick. Gradually mix in the breadcrumb mixture to temper the yolks, making sure they don’t cook. Stir until well combined.
- Bake the Custard: Pour the custard mixture into the prepared baking dish. Bake in the preheated oven for 25-30 minutes, or until the custard is set and slightly golden on top. Remove from the oven and let it cool slightly.
- Layer with Jam: Once the custard has cooled, spread a generous layer of fruit jam over the surface. This adds a burst of flavor and color to the dish.
- Prepare the Meringue: In a clean bowl, beat the egg whites with a mixer on medium speed until soft peaks form. Gradually add the cream of tartar and the 1/4 cup of sugar, continuing to beat until stiff peaks form and the mixture is glossy.
- Top with Meringue: Spoon the meringue over the jam layer, spreading it out carefully to cover the surface completely. Use the back of a spoon to create peaks for a decorative effect.
- Bake Again: Return the dish to the oven and bake for an additional 10-15 minutes, or until the meringue is lightly browned. Keep an eye on it to avoid burning.
- Cool and Serve: Allow the Queen of Puddings to cool at room temperature for a short while before serving. This dessert can be enjoyed warm or at room temperature.
Extra Tips
When making Queen of Puddings, it’s crucial to use fresh eggs for the meringue to achieve the best possible texture.
If you want to add a twist to the flavor, consider incorporating a splash of lemon juice or zest into the custard for a revitalizing citrus note.
Additionally, make sure to let the dessert cool slightly before serving to allow the layers to set, which makes for easier slicing and a more appealing presentation.
Enjoy your delicious homemade Queen of Puddings!
Eton Mess Cake
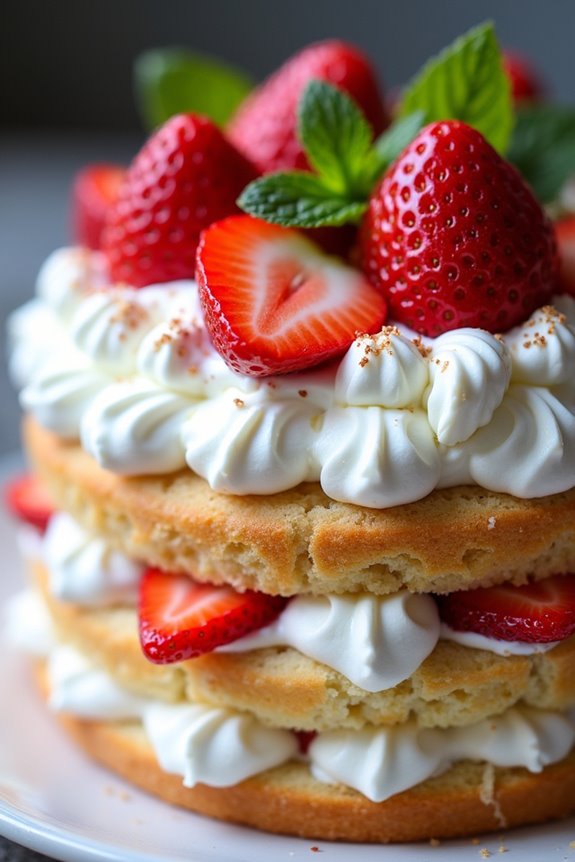
Eton Mess Cake is a delightful twist on the classic British dessert that combines meringues, fresh strawberries, and whipped cream. This cake captures the essence of the traditional Eton Mess while presenting it in a stunning layered cake form. The interplay of textures—crunchy meringue, soft cake, and creamy frosting—creates a dessert that’s both visually appealing and deliciously satisfying.
Perfect for summer gatherings or celebrations, this cake is sure to impress your friends and family.
To create this show-stopping dessert, you’ll start by baking a light and fluffy vanilla sponge cake, which serves as the foundation of the Eton Mess Cake. Layer this cake with homemade whipped cream, fresh strawberries, and broken meringue pieces to replicate the classic flavors of the Eton Mess. The result is a cake that’s invigorating, indulgent, and perfect for any occasion.
Ingredients (Serves 4-6)
- 200g unsalted butter, softened
- 200g caster sugar
- 4 large eggs
- 200g self-raising flour
- 1 tsp vanilla extract
- 300ml double cream
- 2 tbsp icing sugar
- 250g fresh strawberries, hulled and sliced
- 100g meringue nests, crushed
- Fresh mint leaves, for garnish (optional)
Cooking Instructions
- Preheat the Oven: Preheat your oven to 180°C (350°F). Greasing and lining two 8-inch round cake tins with baking parchment will guarantee that your cakes come out easily after baking.
- Cream Butter and Sugar: In a large mixing bowl, beat together the softened butter and caster sugar until the mixture is light and fluffy. This will take about 3-5 minutes. The air incorporated into the mixture will help create a light sponge.
- Add Eggs and Vanilla: Crack the eggs into the butter and sugar mixture one at a time, beating well after each addition. Add the vanilla extract and mix until fully combined. The mixture should be smooth and creamy at this stage.
- Fold in Flour: Sift the self-raising flour into the mixture and gently fold it in using a spatula or wooden spoon. Be careful not to overmix, as this can result in a dense cake. The batter should be well combined but still light.
- Bake the Cakes: Divide the batter evenly between the prepared cake tins. Bake in the preheated oven for 25-30 minutes or until a skewer inserted into the center comes out clean. Once baked, let the cakes cool in the tins for about 10 minutes before transferring them to a wire rack to cool completely.
- Prepare the Cream: While the cakes are cooling, whip the double cream with the icing sugar until it forms soft peaks. This will create a light and fluffy frosting that complements the other elements of the cake.
- Assemble the Cake: Once the cakes are completely cool, place one layer on a serving plate. Spread a generous layer of whipped cream over the top, followed by half of the sliced strawberries and half of the crushed meringue. Carefully place the second cake layer on top.
- Decorate: Top the second layer with the remaining whipped cream, strawberries, and crushed meringue. Garnish with fresh mint leaves if desired for an added touch of color and flavor.
Extra Tips
For the best results, use fresh, ripe strawberries as they enhance the flavor of the cake. If you want to prepare the cake in advance, you can bake the sponge layers a day ahead and store them wrapped in cling film.
Assemble the cake just before serving to guarantee the meringue stays crunchy. Additionally, feel free to experiment with other berries, such as raspberries or blueberries, to give your Eton Mess Cake a different twist!
Coffee and Walnut Cake

Coffee and Walnut Cake is a classic British dessert that has delighted tea lovers for generations. This rich, moist cake combines the robust flavor of coffee with the earthy crunch of walnuts, creating a delightful balance that’s both comforting and indulgent. Traditionally enjoyed with a cup of tea, this cake makes for a perfect centerpiece for afternoon gatherings or special occasions.
Baking a Coffee and Walnut Cake isn’t only a rewarding experience but also an opportunity to impress your friends and family with your culinary skills. The combination of fluffy sponge cake, coffee-infused buttercream, and crunchy walnuts makes for a delicious treat that’s hard to resist. So, roll up your sleeves and let’s plunge into this classic recipe that’s sure to please everyone around the table.
Ingredients (Serves 4-6):
- 175g unsalted butter, softened
- 175g caster sugar
- 3 large eggs
- 225g self-raising flour
- 2 tablespoons instant coffee granules, dissolved in 2 tablespoons hot water
- 100g walnuts, chopped (plus extra for decoration)
- 1 teaspoon baking powder
- 150g icing sugar
- 100g unsalted butter (for frosting)
- 2 tablespoons milk (for frosting)
Cooking Instructions:
- Preheat the Oven: Begin by preheating your oven to 180°C (350°F). This guarantees that your cake bakes evenly and rises properly.
- Prepare the Cake Tins: Grease and line two 20cm round cake tins with baking paper. This will prevent the cake from sticking and make it easier to remove once baked.
- Cream Butter and Sugar: In a large mixing bowl, cream together the softened unsalted butter and caster sugar until the mixture is light and fluffy. This process incorporates air into the batter, which is essential for a light and airy cake.
- Add the Eggs: Gradually add the eggs one at a time, mixing well after each addition. This helps to emulsify the mixture and guarantees a smooth batter.
- Incorporate Coffee: Stir in the dissolved coffee mixture. Make sure it’s well combined, as this will give the cake its signature coffee flavor.
- Combine Dry Ingredients: In a separate bowl, sift together the self-raising flour and baking powder. Gradually fold this into the wet mixture using a spatula, being careful not to overmix.
- Add Walnuts: Gently fold in the chopped walnuts, distributing them evenly throughout the batter.
- Bake the Cakes: Divide the batter evenly between the prepared cake tins and smooth the tops. Bake in the preheated oven for 25-30 minutes or until a skewer inserted into the center comes out clean.
- Cool the Cakes: Once baked, remove the cakes from the oven and let them cool in the tins for about 10 minutes. Then, transfer them to a wire rack to cool completely.
- Make the Frosting: While the cakes are cooling, prepare the coffee buttercream. In a bowl, beat the softened butter until creamy. Gradually add the icing sugar and milk, mixing until smooth. Add a bit of dissolved coffee if you desire a stronger flavor.
- Assemble the Cake: Once the cakes are completely cool, place one layer on a serving plate. Spread a generous layer of coffee buttercream on top, then place the second layer on top. Use the remaining buttercream to frost the top and sides of the cake.
- Decorate: Finish off by decorating the top with additional chopped walnuts for a beautiful presentation.
Extra Tips:
For an extra depth of flavor, consider adding a splash of vanilla extract to the cake batter. When it comes to frosting, you can adjust the coffee strength according to your taste; a bit more coffee will enhance the flavor.
If you’re looking to make the cake ahead of time, it keeps well in an airtight container for a few days, and the flavors often improve as it sits.
Treacle Tart
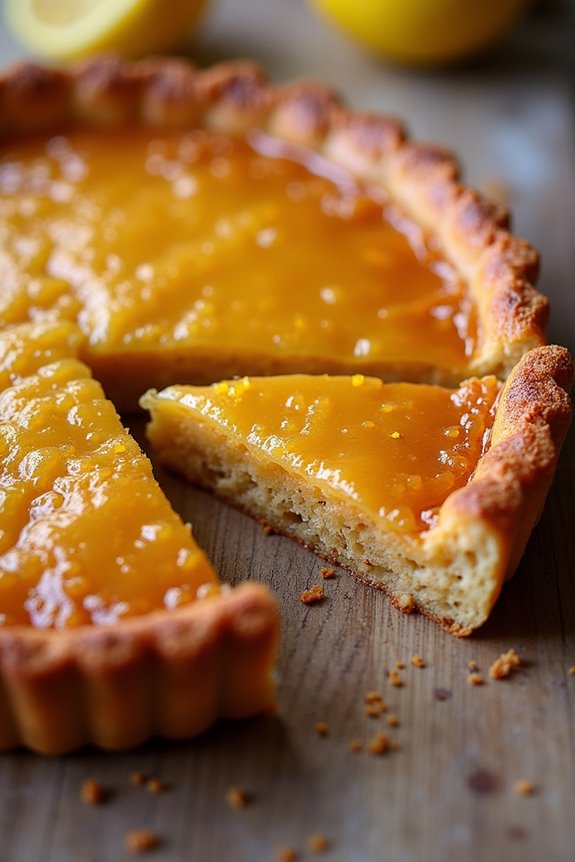
Treacle Tart is a quintessential British dessert that has charmed its way into the hearts of many. With its delightful combination of sweet golden syrup, breadcrumbs, and zesty lemon juice, this tart offers a comforting balance of flavors and textures. Traditionally served warm with a dollop of clotted cream or a scoop of vanilla ice cream, Treacle Tart is a perfect treat for afternoon tea or a special occasion.
This easy-to-follow recipe yields a deliciously sticky and sweet tart that serves 4 to 6 people. The buttery pastry crust encases the rich filling, creating a crust that has just the right amount of crunch to complement the luscious, gooey center. Whether you’re a seasoned baker or a novice in the kitchen, this classic British cake recipe is bound to impress your family and friends.
Ingredients:
- 200g all-purpose flour
- 100g unsalted butter, chilled and cubed
- 50g icing sugar
- 1 large egg, beaten (for egg wash)
- 200g golden syrup
- 150g fresh white breadcrumbs
- 1 lemon, zested and juiced
- 1 pinch of salt
- A little water (if needed)
Cooking Instructions:
- Prepare the Pastry: In a large mixing bowl, combine the all-purpose flour and icing sugar. Add the chilled, cubed butter and rub it into the flour using your fingertips until the mixture resembles fine breadcrumbs. If the mixture is too dry, add a little cold water, a teaspoon at a time, until it comes together to form a dough.
- Chill the Dough: Shape the dough into a disc, wrap it in plastic wrap, and refrigerate for at least 30 minutes. This chilling step helps to relax the gluten in the dough and makes it easier to roll out later.
- Preheat the Oven: While the dough is chilling, preheat your oven to 180°C (350°F).
- Roll Out the Pastry: Once the dough is chilled, lightly flour a clean surface and roll it out to about 3mm thick. Carefully transfer the rolled pastry into a 23cm (9-inch) tart tin, pressing it gently into the edges. Trim any excess pastry hanging over the edges.
- Blind Bake the Pastry: Line the pastry with parchment paper and fill it with baking beans or rice. Bake in the preheated oven for 15 minutes. Remove the parchment paper and beans, then return to the oven for an additional 5-10 minutes until lightly golden. Allow it to cool slightly.
- Prepare the Filling: In a medium saucepan over low heat, combine the golden syrup, fresh breadcrumbs, lemon juice, and lemon zest. Stir until well combined, then cook for about 5 minutes until heated through and the mixture thickens slightly. Remove from the heat and let it cool for a few minutes.
- Fill the Tart: Pour the filling mixture into the cooled pastry shell, spreading it evenly.
- Egg Wash: Brush the edges of the pastry with the beaten egg to give it a golden finish.
- Bake the Tart: Place the filled tart back in the oven and bake for 25-30 minutes or until the filling is set and the top is golden brown.
- Cool and Serve: Allow the tart to cool for a few minutes before slicing. Serve warm or at room temperature with clotted cream or ice cream.
Extra Tips: When making your Treacle Tart, verify that your butter is cold for the pastry to achieve a flaky texture. For added depth of flavor, consider adding a pinch of ground ginger or nutmeg to the filling.
If you’re looking for a more robust flavor, you can replace some of the white breadcrumbs with crushed digestive biscuits. Enjoy your baking experience and don’t hesitate to experiment with the flavors to make the tart your own!