

When I think of a cozy afternoon, I picture myself with a steaming cup of tea and a plate of crunchy biscuits by my side. There’s something special about the way a biscuit can transform that simple moment into a delightful ritual. From buttery shortbread to rich chocolate digestives, each bite brings its own charm. Let me share some of my favorite recipes that are not only delicious but also perfect for a satisfying dunk. You won’t want to miss these!
Classic Shortbread Biscuits
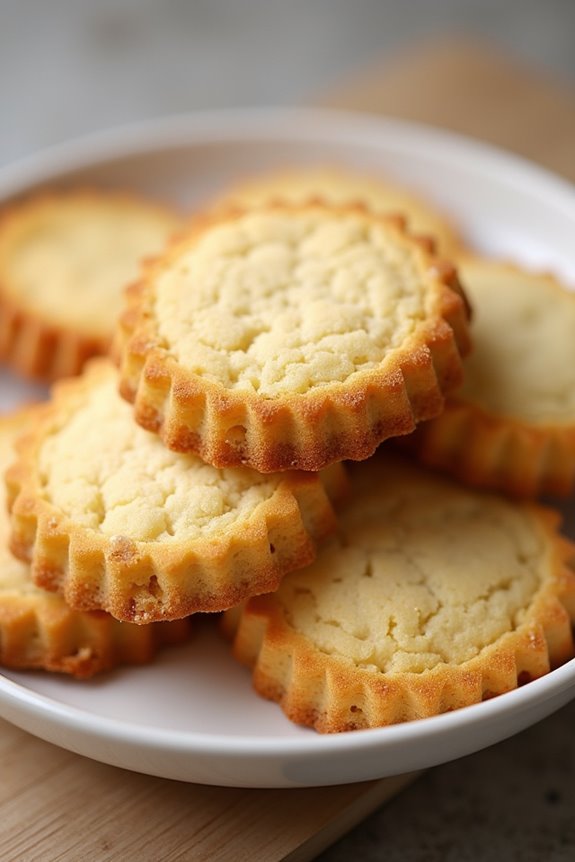
Classic shortbread biscuits are the epitome of simplicity and indulgence, making them the perfect companion for a steaming cup of tea. Originating from Scotland, these buttery delights have a rich history and are cherished for their crumbly texture and melt-in-your-mouth flavor. The beauty of shortbread lies in its minimal ingredients, which come together to create a delightful treat that’s both easy to prepare and immensely satisfying.
The key to achieving the perfect shortbread lies in the balance of butter, sugar, and flour. The high butter content gives the biscuits their characteristic richness, while the sugar adds just the right amount of sweetness. Traditionally, shortbread is cut into fingers, rounds, or other shapes, allowing you to enjoy them however you please. Whether you choose to dunk them in your favorite tea or savor them on their own, classic shortbread biscuits are sure to elevate your tea time experience.
Ingredients (Serves 4-6)
- 1 cup (225g) unsalted butter, softened
- 1/2 cup (100g) granulated sugar
- 2 cups (250g) all-purpose flour
- 1/4 teaspoon salt
- 1 teaspoon vanilla extract (optional)
Cooking Instructions
- Preheat the Oven: Begin by preheating your oven to 325°F (160°C). This guarantees that the biscuits bake evenly and develop a lovely golden color.
- Cream the Butter and Sugar: In a large mixing bowl, combine the softened unsalted butter and granulated sugar. Using an electric mixer or a wooden spoon, cream them together until the mixture is light and fluffy. This process incorporates air, giving the biscuits a tender texture.
- Add the Dry Ingredients: Gradually sift in the all-purpose flour and salt into the butter-sugar mixture. If you’re using vanilla extract, add it at this stage. Mix gently with a spatula or wooden spoon until the dough starts to come together. Be careful not to overmix, as this can lead to tougher biscuits.
- Form the Dough: Turn the dough out onto a lightly floured surface. Knead it gently just until smooth. If the dough is too soft, you can refrigerate it for about 15 minutes to make it easier to work with.
- Shape the Biscuits: Roll out the dough to about 1/4 inch thick. Use a knife or biscuit cutter to cut the dough into your desired shapes (fingers, rounds, or rectangles). Place the shaped biscuits onto a baking tray lined with parchment paper, spacing them about an inch apart.
- Bake: Place the baking tray in the preheated oven and bake for 15-20 minutes, or until the edges are lightly golden. Keep an eye on them, as baking time can vary based on the thickness of your biscuits.
- Cool and Serve: Once baked, remove the tray from the oven and allow the biscuits to cool on the tray for a few minutes before transferring them to a wire rack to cool completely. This will help them firm up as they cool.
Extra Tips
For an added twist, you can incorporate various flavors into your classic shortbread biscuits. Consider adding a tablespoon of lemon zest for a citrusy touch or incorporating finely chopped nuts for extra texture.
Additionally, if you prefer a sweeter biscuit, feel free to adjust the sugar to taste. Remember to store the cooled biscuits in an airtight container to keep them fresh for longer, and enjoy them with your favorite tea for the ultimate dunking experience!
Rich Chocolate Digestives

Rich Chocolate Digestives are the perfect treat for tea lovers who enjoy a delightful dunking experience. These biscuits boast a rich chocolate coating and a crumbly, buttery texture that complements the warmth of your favorite brew. With a hint of wholemeal flour, they offer a slightly nutty flavor that balances beautifully with the sweetness of the chocolate.
Making these biscuits at home not only fills your kitchen with a wonderful aroma but also gives you the satisfaction of indulging in a homemade treat. This recipe is easy to follow and requires minimal ingredients, making it a great choice for both novice and experienced bakers.
Whether you’re hosting a tea party or simply craving a sweet snack, these Rich Chocolate Digestives are sure to impress. Grab your ingredients, and let’s get started on creating these delicious biscuits that are just waiting to be dunked!
Ingredients (Serves 4-6):
- 200g digestive biscuits
- 100g unsalted butter
- 100g dark chocolate (70% cocoa)
- 50g golden syrup
- 100g wholemeal flour
- 50g caster sugar
- 1 tsp vanilla extract
- A pinch of sea salt
Cooking Instructions:
1. Prepare the Biscuit Mixture**: Start by placing the digestive biscuits in a food processor and blitz them until they turn into fine crumbs. In a separate bowl, melt the unsalted butter and golden syrup** together, either in a microwave or over a double boiler.
Once melted, combine the biscuit crumbs, wholemeal flour, caster sugar, vanilla extract, and a pinch of sea salt into the butter mixture. Stir until the ingredients are fully combined and form a dough.
2. Shape the Biscuits: Preheat your oven to 180°C (350°F). Line a baking tray with parchment paper. Take small amounts of the biscuit dough and roll them into balls, then flatten them slightly to form discs.
Place the discs onto the prepared baking tray, ensuring they’ve enough space between them as they’ll spread slightly while baking.
3. Bake the Biscuits: Bake the biscuits in the preheated oven for 10-12 minutes or until they’re golden brown. Keep an eye on them, as they can burn quickly.
Once baked, remove them from the oven and let them cool on the tray for a few minutes before transferring them to a wire rack to cool completely.
4. Coat in Chocolate: While the biscuits are cooling, melt the dark chocolate in a heatproof bowl over a pan of simmering water, stirring until smooth.
Once the biscuits have cooled, dip each one into the melted chocolate, ensuring they’re fully coated. Allow the excess chocolate to drip off before placing them back on the wire rack.
5. Set the Chocolate: Once all the biscuits are coated, place them in the refrigerator for about 30 minutes to allow the chocolate to set completely.
After the chocolate has hardened, your Rich Chocolate Digestives are ready to be served!
Extra Tips:
For an added twist, consider incorporating some crushed nuts or a sprinkle of sea salt on top of the chocolate before it sets for extra flavor and texture.
You can also experiment with different types of chocolate, such as milk or white chocolate, to suit your taste preferences. Remember to always store your biscuits in an airtight container to keep them fresh for as long as possible, and enjoy them with a hot cup of tea for the ultimate dunking experience!
Zesty Ginger Snaps
There’s something undeniably comforting about a warm cup of tea paired with a crunchy biscuit, and Zesty Ginger Snaps are the perfect companion for your afternoon tea ritual. These delightful treats bring together the warm, spicy notes of ginger with a rejuvenating zing from citrus zest, creating a flavor profile that’s both invigorating and satisfying. Crisp on the outside and slightly chewy on the inside, these ginger snaps are designed to hold up beautifully to your favorite tea while adding a burst of flavor to every dunk.
Making Zesty Ginger Snaps is a straightforward process that requires just a few simple ingredients, and the results are sure to impress. Ideal for sharing with friends or enjoying solo, this recipe yields a delightful batch that’s perfect for a tea party or a cozy evening at home.
Whether you prefer your tea black, green, or herbal, these biscuits are versatile enough to complement a variety of flavors, making them a must-try for any tea lover.
Ingredients (serving size: 4-6 people):
- 2 cups all-purpose flour
- 1 teaspoon baking soda
- 1 tablespoon ground ginger
- 1 tablespoon ground cinnamon
- ½ teaspoon ground cloves
- ½ teaspoon salt
- ¾ cup unsalted butter, softened
- 1 cup brown sugar, packed
- 1 large egg
- ¼ cup molasses
- Zest of 1 lemon
- Zest of 1 orange
- ½ cup granulated sugar (for rolling)
Cooking Instructions:
- Preheat the Oven: Begin by preheating your oven to 350°F (175°C). This guarantees that your biscuits will bake evenly and rise perfectly as soon as they hit the hot oven.
- Mix Dry Ingredients: In a medium bowl, whisk together the all-purpose flour, baking soda, ground ginger, ground cinnamon, ground cloves, and salt. Mixing these dry ingredients separately helps to evenly distribute the spices throughout the dough.
- Cream Butter and Sugar: In a large mixing bowl, use an electric mixer to cream the softened butter and brown sugar together until the mixture is light and fluffy. This should take about 3-5 minutes. Creaming incorporates air into the mixture, which will help your biscuits become light and tender.
- Add Egg and Molasses: Add the egg and molasses to the creamed mixture and mix until well combined. The egg acts as a binding agent, while the molasses contributes moisture and a rich depth of flavor.
- Incorporate Zest: Stir in the lemon and orange zests. This step adds a rejuvenating citrus flavor that complements the spiciness of the ginger while enhancing the overall taste of the biscuits.
- Combine Wet and Dry Ingredients: Gradually add the dry ingredient mixture to the wet ingredients, mixing until just combined. Be careful not to overmix, as this can lead to tougher biscuits.
- Shape the Dough: Using a tablespoon, scoop out portions of dough and roll them into balls. Roll each ball in granulated sugar to coat them lightly. This not only adds sweetness but also creates a lovely crunchy exterior.
- Bake: Place the sugar-coated dough balls on a baking sheet lined with parchment paper, spacing them about 2 inches apart. Bake in the preheated oven for 10-12 minutes, or until the edges are firm and the centers are slightly soft.
- Cool: Once baked, remove the baking sheet from the oven and allow the cookies to cool on the sheet for 5 minutes before transferring them to a wire rack to cool completely. This helps them set properly and ensures they remain chewy in the center.
Extra Tips: For an extra kick of flavor, try adding a pinch of freshly grated ginger or a dash of cayenne pepper to the dough for a spicy twist. You can also experiment with different citrus zests, such as lime or grapefruit, to create unique variations of these ginger snaps.
Remember that the key to a perfect snap isn’t to overbake them; they should be slightly soft in the middle when you take them out of the oven, as they’ll continue to firm up as they cool. Enjoy your freshly baked Zesty Ginger Snaps with a steaming cup of tea!
Oatmeal Raisin Cookies
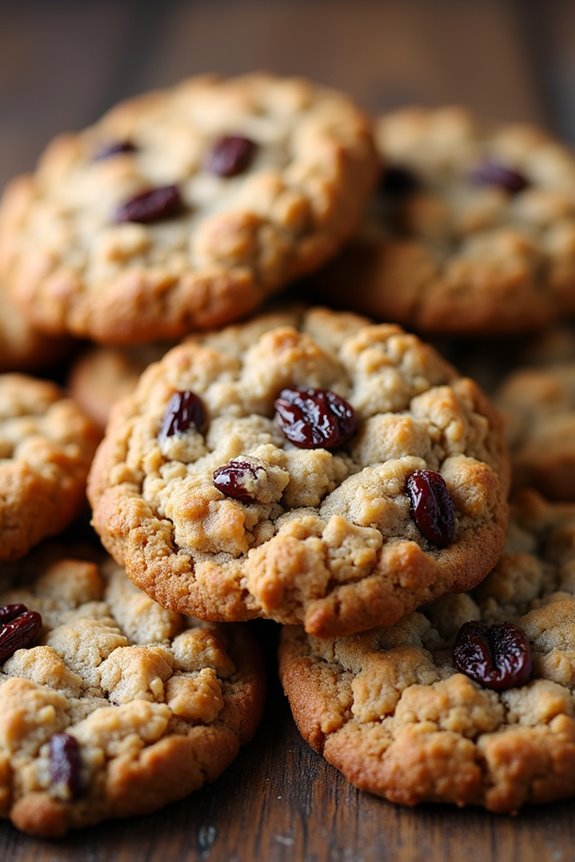
Oatmeal Raisin Cookies are a delightful treat that perfectly complement a warm cup of tea. With their chewy texture and sweet, plump raisins, these cookies provide a satisfying dunking experience that enhances the flavors of both the cookie and the tea. The combination of oats and raisins not only adds to the cookie’s deliciousness but also gives it a wholesome touch, making it a favored choice among cookie lovers.
Whether you’re enjoying a quiet afternoon or entertaining guests, these cookies are sure to satisfy.
Making Oatmeal Raisin Cookies is a straightforward process that requires minimal ingredients and effort. The key to achieving the perfect texture lies in the balance of oats and flour, while the addition of cinnamon and vanilla enhances the overall flavor profile. Once baked, these cookies will bring warmth and comfort, making them an ideal companion for your tea time rituals.
Ingredients (Serves 4-6 people)
- 1 cup rolled oats
- 1 cup all-purpose flour
- 1/2 cup brown sugar, packed
- 1/2 cup granulated sugar
- 1/2 cup unsalted butter, softened
- 1 large egg
- 1 teaspoon vanilla extract
- 1 teaspoon baking soda
- 1 teaspoon ground cinnamon
- 1/2 teaspoon salt
- 1 cup raisins
Cooking Instructions
- Preheat the Oven: Preheat your oven to 350°F (175°C). This step is crucial as it guarantees that your cookies bake evenly and achieve the perfect texture.
- Prepare the Baking Sheet: Line a baking sheet with parchment paper. This prevents the cookies from sticking and makes for easy cleanup.
- Mix Dry Ingredients: In a medium bowl, combine the rolled oats, flour, baking soda, cinnamon, and salt. Stir well to confirm the dry ingredients are evenly mixed, which helps distribute the flavors throughout the cookies.
- Cream Butter and Sugars: In a large mixing bowl, cream together the softened butter, brown sugar, and granulated sugar until light and fluffy. This process incorporates air into the mixture, resulting in a tender cookie.
- Add Egg and Vanilla: Beat in the egg and vanilla extract to the butter-sugar mixture, mixing until well combined. The egg acts as a binding agent, while the vanilla adds a rich flavor.
- Combine Wet and Dry Ingredients: Gradually add the dry ingredient mixture to the wet ingredients, stirring until just combined. Be careful not to over-mix, as this can lead to tough cookies.
- Fold in Raisins: Gently fold in the raisins until evenly distributed throughout the cookie dough. This step adds sweetness and texture to each bite.
- Scoop the Dough: Using a tablespoon or cookie scoop, drop rounded balls of dough onto the prepared baking sheet, spacing them about 2 inches apart to allow for spreading during baking.
- Bake the Cookies: Place the baking sheet in the preheated oven and bake for 10-12 minutes, or until the edges are lightly golden. Keep an eye on the cookies, as baking times may vary depending on your oven.
- Cool and Serve: Once baked, remove the cookies from the oven and let them cool on the baking sheet for 5 minutes before transferring them to a wire rack to cool completely. Enjoy them warm or at room temperature with your favorite tea!
Extra Tips
For an added layer of flavor, consider toasting the oats in a dry skillet for a few minutes before mixing them into the dough. This enhances their nuttiness and gives the cookies a deeper flavor profile.
Additionally, if you prefer a chewier cookie, you can slightly under-bake them and allow them to set on the baking sheet after removing them from the oven. Don’t hesitate to experiment with other mix-ins like chocolate chips or nuts for a customized treat!
Crunchy Biscotti
Biscotti are traditional Italian cookies that are perfect for dunking in tea. Their twice-baked nature gives them a delightful crunch that complements the warm, soothing qualities of tea. The word “biscotti” actually means “twice-baked” in Italian, and that process is what makes these cookies so uniquely delicious and sturdy, allowing them to withstand a dip without falling apart.
With their nutty flavors and hints of vanilla, these crunchy delights are an excellent choice for elevating your tea-time experience.
Making biscotti is a straightforward process that requires just a handful of ingredients and a bit of patience as they bake. The dough is fairly simple to whip up, and the result is a batch of crispy, golden-brown biscotti that can be customized with your favorite flavors, such as almonds, chocolate, or dried fruits.
With this recipe, you’ll be able to impress your friends and family with homemade treats that not only taste great but also pair beautifully with your favorite tea.
Ingredients (Serves 4-6):
- 2 cups all-purpose flour
- 1 cup granulated sugar
- 1 teaspoon baking powder
- ½ teaspoon salt
- 3 large eggs
- 1 teaspoon vanilla extract
- 1 teaspoon almond extract
- 1 cup chopped nuts (almonds, hazelnuts, or walnuts)
- ½ cup chocolate chips (optional)
Cooking Instructions:
- Preheat the Oven: Start by preheating your oven to 350°F (175°C). This guarantees that your biscotti will bake evenly and achieve that perfect crunch.
- Mix Dry Ingredients: In a large bowl, whisk together the flour, sugar, baking powder, and salt. This step is essential for combining the dry ingredients and guaranteeing an even distribution when mixed with the wet ingredients.
- Combine Wet Ingredients: In a separate bowl, beat the eggs, vanilla extract, and almond extract together until well combined. This mixture will add moisture and flavor to your biscotti.
- Form the Dough: Gradually add the wet mixture to the dry ingredients, stirring until a sticky dough forms. At this point, fold in the chopped nuts and chocolate chips if you’re using them. The dough will be quite thick.
- Shape and Bake the Dough: Divide the dough into two equal portions and shape each into a log about 12 inches long and 3 inches wide. Place the logs on a parchment-lined baking sheet, spacing them apart. Bake in the preheated oven for about 25-30 minutes or until they’re golden brown.
- Cool and Slice: Remove the logs from the oven and let them cool on the baking sheet for about 10 minutes. Once slightly cool, use a serrated knife to slice each log diagonally into ½ inch thick pieces.
- Second Bake: Arrange the sliced biscotti cut-side down on the baking sheet and return them to the oven. Bake for an additional 15-20 minutes, turning them halfway through until they’re dry and toasted.
- Cool Completely: Once baked, transfer the biscotti to a wire rack to cool completely before serving. This will help them achieve the final crunch.
Extra Tips:
For added flavor, consider experimenting with different extracts or adding spices such as cinnamon or nutmeg to the dough. If you prefer sweeter biscotti, feel free to increase the sugar slightly.
To store your biscotti, keep them in an airtight container at room temperature – they can last for weeks, making them a perfect treat to have on hand for unexpected tea time guests. Enjoy dunking these delightful cookies in your favorite brew!
Almond Biscuit Bites
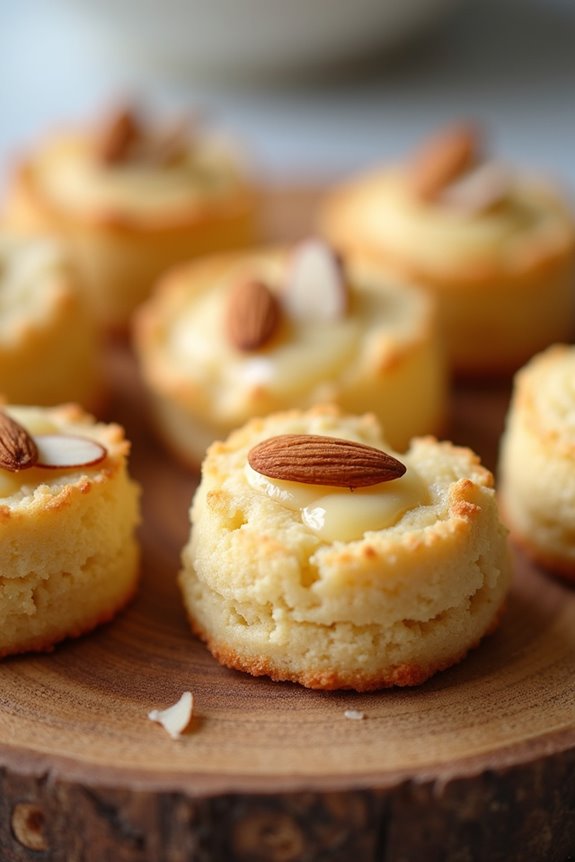
Almond Biscuit Bites are the perfect accompaniment to a warm cup of tea, offering a delightful crunch and a hint of nutty flavor that enhances the overall tea-drinking experience. These biscuits aren’t only simple to make but also allow for a burst of creativity by incorporating different flavors or toppings. The combination of almond flour and sliced almonds provides a unique texture that contrasts beautifully with a smooth tea.
Whether enjoyed during a quiet afternoon or served at a gathering with friends, these little bites are sure to impress.
Baking these Almond Biscuit Bites is a straightforward process that requires minimal ingredients and time. The biscuits are lightly sweetened and can be easily customized with additional spices or extracts, such as vanilla or almond extract, for an extra layer of flavor. Pairing these biscuits with your favorite tea not only enhances the taste but also creates a comforting ritual that many cherish.
Let’s explore the recipe and make these delightful treats!
Ingredients (Serves 4-6)
- 1 cup almond flour
- 1/2 cup all-purpose flour
- 1/4 cup granulated sugar
- 1/4 cup unsalted butter, softened
- 1/2 teaspoon baking powder
- 1/2 teaspoon vanilla extract
- 1/4 teaspoon almond extract
- 1/4 teaspoon salt
- 1/2 cup sliced almonds (for topping)
- 1 egg (for egg wash)
Cooking Instructions
- Preheat the Oven: Begin by preheating your oven to 350°F (175°C). This guarantees that the biscuits bake evenly and achieve a golden brown color.
- Prepare the Baking Sheet: Line a baking sheet with parchment paper. This will prevent the biscuits from sticking and make for an easy cleanup.
- Mix Dry Ingredients: In a large mixing bowl, combine the almond flour, all-purpose flour, granulated sugar, baking powder, and salt. Stir together until well blended to guarantee the baking powder is evenly distributed.
- Cream the Butter: In another bowl, beat the softened butter until creamy. Add the vanilla and almond extracts, mixing until fully incorporated. This will add flavor and richness to the biscuits.
- Combine Wet and Dry Ingredients: Gradually add the dry mixture to the butter mixture, stirring until just combined. Be careful not to overmix, as this can result in tough biscuits.
- Shape the Biscuits: Using your hands, form small bite-sized balls from the dough and place them on the prepared baking sheet, leaving space between each for spreading.
- Add Egg Wash: Beat the egg in a small bowl and brush it over the top of each biscuit. This will give the biscuits a nice golden hue when baked.
- Top with Almonds: Gently press a few sliced almonds into the top of each biscuit for added texture and a nutty flavor.
- Bake: Place the baking sheet in the oven and bake for 12-15 minutes, or until the edges are lightly golden. Keep an eye on them to prevent burning.
- Cool: Once baked, remove the biscuits from the oven and let them cool on the baking sheet for a few minutes before transferring them to a wire rack to cool completely.
Extra Tips
For the best results, make sure the butter is at room temperature to facilitate easy mixing. If you want to experiment with flavors, consider adding a pinch of cinnamon or even a dash of orange zest into the dough.
These variations can elevate the taste and make your Almond Biscuit Bites even more special. Additionally, storing the biscuits in an airtight container will keep them fresh for several days, making them a delightful snack to enjoy any time.
Digestive Biscuits With a Twist
Digestive biscuits are a classic tea accompaniment, known for their crumbly texture and slightly sweet flavor. In this recipe, we elevate the traditional digestive biscuit by incorporating healthy ingredients and unique flavors that provide a delightful twist. This version includes oats, a hint of chocolate, and the zest of orange, making them not only delicious but also a wholesome treat for your tea time.
Making these biscuits is straightforward and requires just a few ingredients, which you may already have in your pantry. The combination of oats and whole wheat flour gives them a hearty texture, while the chocolate and orange zest add an invigorating touch. Perfect for dunking, these biscuits will surely impress your friends and family during your next tea gathering.
Ingredients (Serves 4-6):
- 150g whole wheat flour
- 100g rolled oats
- 75g unsalted butter, softened
- 50g brown sugar
- 1 tsp baking powder
- 1/2 tsp salt
- 1/4 cup honey
- Zest of 1 orange
- 50g dark chocolate, chopped (optional)
- 1 tsp vanilla extract
- 3-4 tbsp milk (as needed)
Cooking Instructions:
- Preheat the Oven: Preheat your oven to 180°C (350°F). This step is essential as it guarantees that the biscuits bake evenly and achieve a lovely golden color.
- Mix Dry Ingredients: In a large mixing bowl, combine the whole wheat flour, rolled oats, baking powder, and salt. Stir the dry ingredients together until fully incorporated. This guarantees that the baking powder is evenly distributed throughout the mixture, leading to uniform rising.
- Cream Butter and Sugar: In a separate bowl, beat together the softened butter and brown sugar until the mixture is light and fluffy. This process incorporates air into the butter, which helps to create a light texture in the final biscuits.
- Add Wet Ingredients: To the butter and sugar mixture, add the honey, orange zest, and vanilla extract. Mix until well combined. The honey adds sweetness and moisture, while the orange zest provides an invigorating citrus flavor.
- Combine Wet and Dry Mixes: Gradually add the dry ingredients to the wet mixture, stirring gently until just combined. If the dough appears too dry, add milk one tablespoon at a time until it reaches a workable consistency. Be careful not to overmix, as this can result in tough biscuits.
- Fold in Chocolate: If using, fold in the chopped dark chocolate into the dough. This step adds a rich chocolatey flavor that complements the orange zest wonderfully.
- Shape the Biscuits: Take small portions of the dough and roll them into balls. Place them on a lined baking tray, flattening them slightly with your hand to form discs. Leave enough space between each biscuit, as they’ll spread during baking.
- Bake: Place the baking tray in the preheated oven and bake for 12-15 minutes or until the edges turn golden brown. Keep an eye on them towards the end of the baking time to prevent over-baking.
- Cool and Serve: Once baked, remove the biscuits from the oven and let them cool on the tray for a few minutes before transferring them to a wire rack to cool completely. Enjoy them with your favorite tea!
Extra Tips:
For an added crunch, consider mixing in some chopped nuts like walnuts or almonds to the biscuit dough. If you prefer a less sweet version, you can reduce the amount of honey or use a sugar substitute.
Store the cooled biscuits in an airtight container to maintain their freshness. They can also be enjoyed as a snack on their own, making them a versatile treat for any time of day!
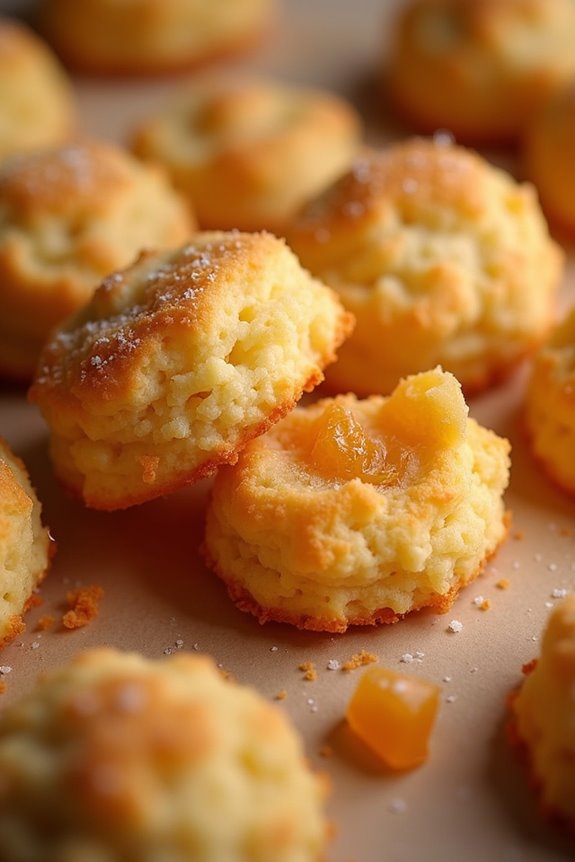
Coconut Macaroons
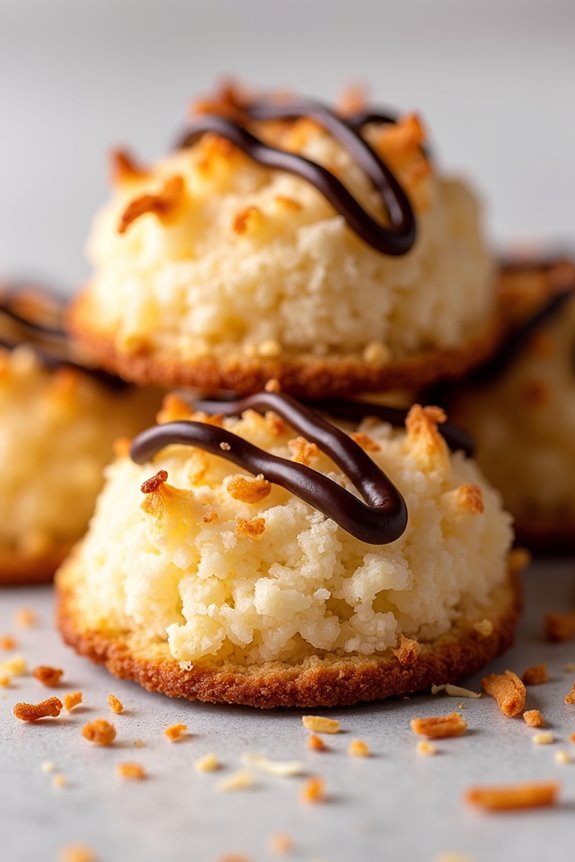
Coconut macaroons are delightful treats that perfectly complement a warm cup of tea. These chewy, sweet confections have a rich coconut flavor and a golden-brown crust that makes them irresistible. They aren’t only simple to prepare but also require minimal ingredients, making them an ideal choice for an afternoon tea snack or a quick dessert. The combination of shredded coconut, egg whites, and sugar creates a textured cookie that’s both satisfying and delicious.
Whether you’re looking to impress guests or just indulge in a sweet treat yourself, coconut macaroons are a fantastic option. They’re naturally gluten-free, which makes them suitable for a wider range of diets. Plus, they can be easily customized with chocolate drizzles or flavored extracts to fit your personal taste. So, grab your ingredients, and let’s get started on these delightful coconut macaroons!
Ingredients (serving size: 4-6 people):
- 2 3/4 cups shredded coconut (sweetened or unsweetened)
- 2/3 cup granulated sugar
- 1/4 cup all-purpose flour
- 1/4 teaspoon salt
- 2 large egg whites
- 1 teaspoon vanilla extract
- 1/2 teaspoon almond extract (optional)
- 1/2 cup chocolate chips (for drizzling, optional)
Cooking Instructions:
- Preheat the Oven: Begin by preheating your oven to 325°F (160°C). This guarantees that your coconut macaroons bake evenly and achieve that perfect golden color.
- Prepare the Baking Sheet: Line a baking sheet with parchment paper. This will prevent the macaroons from sticking and make for easier cleanup later.
- Mix Dry Ingredients: In a large mixing bowl, combine the shredded coconut, granulated sugar, all-purpose flour, and salt. Stir the mixture together until it’s well combined, making sure that the sugar and flour are evenly distributed throughout the coconut.
- Add Egg Whites and Extracts: In a separate bowl, whisk the egg whites until they become frothy but not stiff. Then, add the vanilla extract and almond extract (if using) to the egg whites. Pour this mixture into the bowl with the dry ingredients and mix until everything is well incorporated.
- Shape the Macaroons: Using a tablespoon or a small cookie scoop, portion out the coconut mixture and form it into compact mounds on the prepared baking sheet. Leave a little space between each mound, as they’ll expand slightly while baking.
- Bake: Place the baking sheet in the preheated oven and bake for 20-25 minutes, or until the tops of the macaroons are golden brown. Keep an eye on them to prevent burning.
- Cool: Once baked, remove the coconut macaroons from the oven and let them cool on the baking sheet for about 10 minutes. Then, transfer them to a wire rack to cool completely.
- Optional Chocolate Drizzle: If you’d like to add a chocolate drizzle, melt the chocolate chips in a microwave-safe bowl, stirring in 30-second intervals until smooth. Drizzle the melted chocolate over the cooled macaroons using a fork or a piping bag, and allow them to set before serving.
Extra Tips:
When making coconut macaroons, feel free to experiment with different flavors by adding a dash of lemon or orange zest for a citrus twist.
If you prefer a chewier texture, consider using sweetened shredded coconut, while unsweetened will give you a more natural coconut flavor.
Make sure your egg whites are at room temperature for peak volume when whipped.
Finally, these macaroons can be stored in an airtight container for up to a week, making them perfect for tea time whenever you need a sweet pick-me-up!
Spicy Cinnamon Cookies

Spicy Cinnamon Cookies are the perfect companion for your afternoon tea, bringing warmth and comfort with every bite. Infused with a delightful mix of spices and a hint of sweetness, these cookies not only provide a satisfying crunch but also enhance the experience of dunking them into your favorite brew. The bold flavors of cinnamon and a touch of spice will tantalize your taste buds, making them an irresistible treat for both tea enthusiasts and cookie lovers alike.
Preparing these cookies is a straightforward process, allowing you to whip up a batch in no time. With a mix of common pantry ingredients and a few warming spices, you’ll have a delicious batch of Spicy Cinnamon Cookies ready to share with friends and family—or to indulge in all by yourself while enjoying a cozy cup of tea.
Ingredients (Serves 4-6 people):
- 2 cups all-purpose flour
- 1 teaspoon baking soda
- 1 teaspoon ground cinnamon
- 1/2 teaspoon ground ginger
- 1/4 teaspoon ground cloves
- 1/4 teaspoon salt
- 1/2 cup unsalted butter, softened
- 1 cup brown sugar, packed
- 1 large egg
- 1 teaspoon vanilla extract
- 1/4 cup granulated sugar (for rolling)
Cooking Instructions:
- Preheat the Oven: Begin by preheating your oven to 350°F (175°C). This guarantees that your cookies will bake evenly and come out perfectly golden brown.
- Mix Dry Ingredients: In a medium bowl, whisk together the all-purpose flour, baking soda, ground cinnamon, ground ginger, ground cloves, and salt. Make sure all the spices are well combined, as this will help distribute the flavors throughout the cookies.
- Cream Butter and Sugar: In a large mixing bowl, use a handheld mixer or stand mixer to cream the softened butter and brown sugar together until the mixture is light and fluffy. This process incorporates air into the batter, giving your cookies a nice texture.
- Add Egg and Vanilla: Beat in the egg and vanilla extract to the butter-sugar mixture until fully combined. This will add moisture and richness to your cookies.
- Combine Dry and Wet Ingredients: Gradually add the dry ingredient mixture to the wet ingredients, stirring until just combined. Be careful not to overmix, as this can lead to tougher cookies.
- Chill the Dough: Cover the dough with plastic wrap and refrigerate for about 30 minutes. Chilling helps the flavors meld and prevents the cookies from spreading too much while baking.
- Shape the Cookies: Once chilled, use a tablespoon or cookie scoop to portion out the dough. Roll each piece into a ball and then roll it in granulated sugar to coat.
- Bake the Cookies: Place the sugar-coated dough balls onto a baking sheet lined with parchment paper, spacing them about 2 inches apart. Bake in the preheated oven for 10-12 minutes or until the edges are set and the tops are slightly cracked.
- Cool and Serve: Remove the cookies from the oven and allow them to cool on the baking sheet for 5 minutes before transferring them to a wire rack to cool completely. Enjoy them with a nice cup of tea!
Extra Tips:
For an added twist, feel free to incorporate chopped nuts or raisins into the cookie dough for extra texture and flavor. If you prefer a stronger spice profile, you can adjust the amount of ground spices according to your taste.
Additionally, these cookies can be stored in an airtight container for up to a week, making them a great make-ahead treat for gatherings or cozy tea times at home.
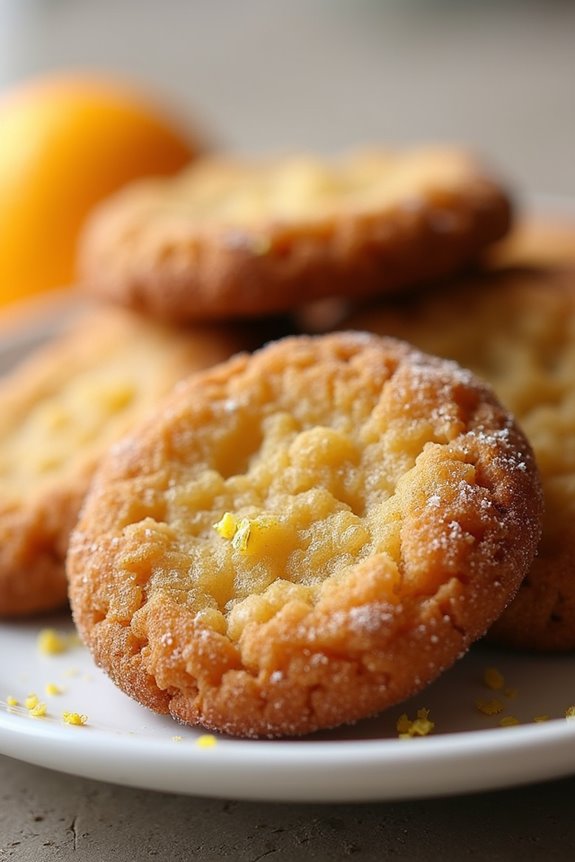
Lemon Drizzle Biscuits
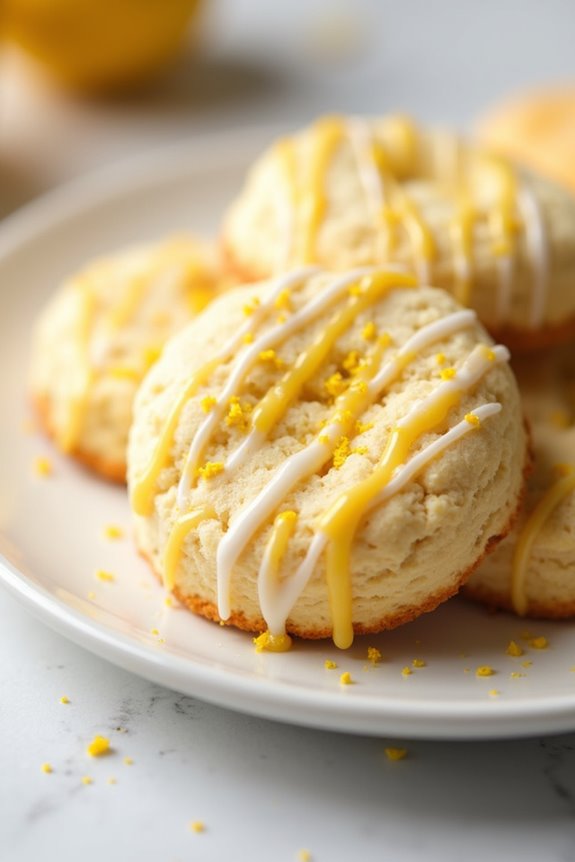
Lemon Drizzle Biscuits are a delightful treat that brings a zesty twist to traditional biscuit recipes. The combination of buttery richness and bright lemon flavor makes these biscuits a perfect accompaniment for a warm cup of tea. With a sweet and tangy glaze drizzled on top, they not only taste good but also look appealing when served as a snack or dessert.
These biscuits are light and crumbly, making them ideal for dunking. Making Lemon Drizzle Biscuits is a straightforward process that requires minimal ingredients and time. Whether you’re hosting afternoon tea or simply indulging in a quiet moment at home, these biscuits will surely elevate your experience. The invigorating lemon flavor paired with the comforting texture of the biscuit is irresistible, and they’re sure to become a favorite in your baking repertoire.
Ingredients (serving size: 4-6 people):
- 225g (2 cups) all-purpose flour
- 100g (1/2 cup) unsalted butter, softened
- 100g (1/2 cup) granulated sugar
- 1 large egg
- Zest of 1 lemon
- 2 tablespoons freshly squeezed lemon juice
- 1 teaspoon baking powder
- 1/2 teaspoon salt
- For the drizzle: 100g (1 cup) powdered sugar
- 2 tablespoons freshly squeezed lemon juice
Cooking Instructions:
- Preheat the Oven: Begin by preheating your oven to 180°C (350°F). This guarantees that the biscuits will bake evenly and achieve a nice golden color.
- Prepare the Baking Tray: Line a baking tray with parchment paper or a silicone baking mat. This will prevent the biscuits from sticking to the tray and make for easy cleanup.
- Cream Butter and Sugar: In a large mixing bowl, combine the softened butter and granulated sugar. Using an electric mixer or a whisk, beat them together until the mixture becomes light and fluffy. This usually takes about 3-5 minutes and is essential for creating a light texture in your biscuits.
- Add Egg and Lemon: Beat in the egg, lemon zest, and lemon juice until fully incorporated. The lemon zest adds a revitalizing aroma, while the egg helps bind the mixture together.
- Mix Dry Ingredients: In a separate bowl, whisk together the flour, baking powder, and salt. Gradually add this dry mixture to the wet ingredients, stirring gently until just combined. Be careful not to overmix, as this can result in tough biscuits.
- Shape the Biscuits: Using a spoon or cookie scoop, drop spoonfuls of the biscuit dough onto the prepared baking tray, leaving some space between each dollop as they’ll spread while baking. You can also roll them into balls if you prefer a more uniform shape.
- Bake: Place the tray in the preheated oven and bake for 12-15 minutes, or until the biscuits are lightly golden on the edges. Keep an eye on them, as baking times can vary depending on your oven.
- Prepare the Drizzle: While the biscuits are baking, prepare the lemon drizzle by mixing the powdered sugar and lemon juice in a small bowl until smooth. Adjust the consistency as needed by adding more sugar or lemon juice.
- Cool and Drizzle: Once the biscuits are done, remove them from the oven and let them cool on the baking tray for a few minutes before transferring them to a wire rack. Once they’re cool, drizzle the lemon glaze over the top of each biscuit.
Extra Tips: For an added touch, you can sprinkle some additional lemon zest on top of the glaze for a pop of color and flavor. If you want to enhance the lemon flavor even further, consider adding a pinch of lemon extract to the dough.
Make sure to store any leftover biscuits in an airtight container to keep them fresh, and they’ll be perfect for dunking in your tea the next day!
Peanut Butter Crunchies
Peanut Butter Crunchies are the perfect biscuit for dunking in tea, offering a delightful combination of nutty flavor and a satisfying crunch. These biscuits aren’t only easy to make but also require minimal ingredients that you likely already have in your pantry.
With their rich peanut butter taste and a hint of sweetness, they complement a warm cup of tea beautifully, making them a favorite for tea-time gatherings or a quiet afternoon snack.
To make these scrumptious cookies, you’ll be mixing together classic baking ingredients that result in a chewy yet crunchy texture. Whether you enjoy them plain or with a sprinkle of sea salt on top, these Peanut Butter Crunchies will undoubtedly become a staple in your biscuit repertoire, perfect for dunking into your favorite brew.
So, gather your ingredients and let’s get started on creating these delightful treats!
Ingredients (serving size: 4-6 people):
- 1 cup peanut butter
- 1 cup granulated sugar
- 1 egg
- 1 teaspoon vanilla extract
- 1 teaspoon baking soda
- ½ teaspoon salt
- 1 cup rolled oats
- Optional: chocolate chips or chopped nuts for added crunch
Cooking Instructions:
- Preheat the Oven: Begin by preheating your oven to 350°F (175°C). This step guarantees that your biscuits bake evenly and achieve a delightful golden color.
- Mix Wet Ingredients: In a large mixing bowl, combine 1 cup of peanut butter, 1 cup of granulated sugar, 1 egg, and 1 teaspoon of vanilla extract. Use a hand mixer or a whisk to blend the ingredients until they’re smooth and well combined. This mixture will create the creamy base of your biscuits.
- Add Dry Ingredients: Next, add 1 teaspoon of baking soda and ½ teaspoon of salt to the wet mixture. Stir until these dry ingredients are fully incorporated. The baking soda will help the biscuits rise slightly during baking, while the salt enhances the peanut butter flavor.
- Incorporate Oats: Now, fold in 1 cup of rolled oats into the mixture. The oats will add texture and a slight chewiness to your biscuits, making them even more enjoyable for dunking.
- Shape the Mixture: Using your hands or a spoon, scoop out small portions of the dough and roll them into balls, about 1 inch in diameter. Place them on a baking sheet lined with parchment paper, leaving enough space between each ball for them to spread as they bake.
- Bake the Biscuits: Place the baking sheet in the preheated oven and bake for 10-12 minutes, or until the edges are lightly golden. Keep an eye on them to guarantee they don’t overbake, as they’ll continue to firm up as they cool.
- Cool and Serve: Once baked, remove the biscuits from the oven and let them cool on the baking sheet for a few minutes before transferring them to a wire rack to cool completely. This cooling process helps them achieve the perfect crunchy texture.
Extra Tips: For an added twist, consider mixing in chocolate chips or chopped nuts into the dough for extra flavor and crunch. If you prefer a slightly softer biscuit, reduce the baking time by a minute or two.
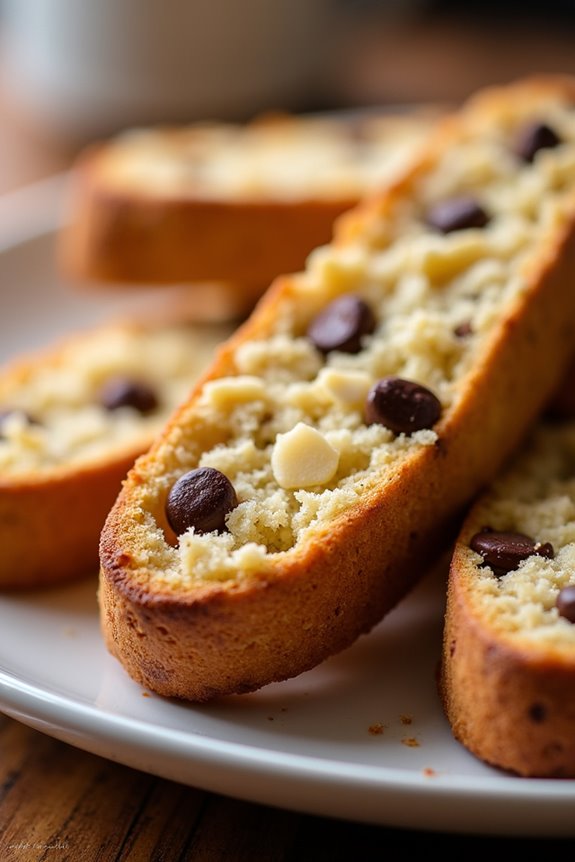
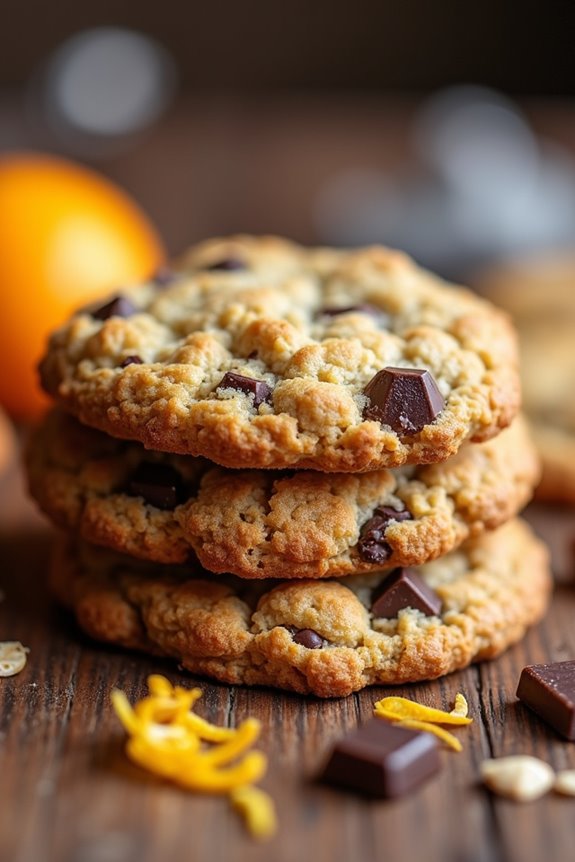
Chocolate Orange Biscotti
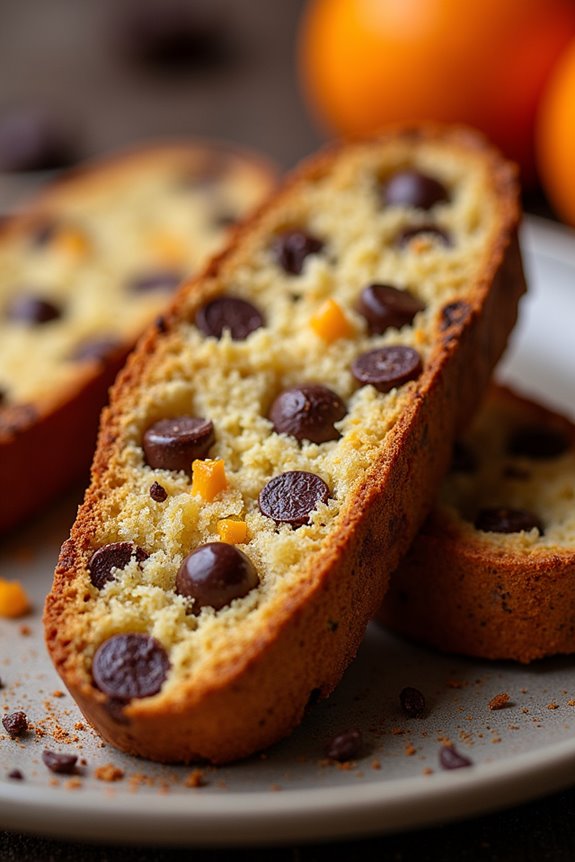
Chocolate Orange Biscotti is a delightful Italian cookie that perfectly complements a hot cup of tea. With its crunchy texture and rich flavors of chocolate and orange, this biscuit not only offers a satisfying crunch but also a zesty aroma that enhances your tea experience. Crafted with simple ingredients, this recipe is easy to follow and makes for an impressive treat when hosting friends or family.
The combination of chocolate and orange brings a unique twist to the traditional biscotti, making it a favorite for dunking. As you take a bite, the sweetness of the chocolate merges beautifully with the citrusy notes, creating a deliciously balanced flavor. Whether enjoyed during afternoon tea or as a snack any time of day, Chocolate Orange Biscotti is sure to delight your taste buds and elevate your dunking experience.
Ingredients (serving size: 4-6 people):
- 1 cup all-purpose flour
- 1/2 cup unsweetened cocoa powder
- 1 teaspoon baking powder
- 1/4 teaspoon salt
- 1/2 cup granulated sugar
- 2 large eggs
- 1 teaspoon vanilla extract
- Zest of 1 orange
- 1/2 cup chocolate chips (semi-sweet or dark)
- 1/4 cup chopped nuts (optional, such as almonds or hazelnuts)
Cooking Instructions:
- Preheat the Oven: Start by preheating your oven to 350°F (175°C). This guarantees that your biscotti will bake evenly and achieve the perfect crunchy texture.
- Mix Dry Ingredients: In a medium bowl, whisk together the all-purpose flour, cocoa powder, baking powder, and salt. This step is essential as it allows the leavening agent to be evenly distributed throughout the flour mixture.
- Combine Wet Ingredients: In a separate large bowl, beat the granulated sugar and eggs together until the mixture is pale and thick. This should take about 2-3 minutes. Then, stir in the vanilla extract and orange zest to infuse the mixture with flavor.
- Combine Dry and Wet Mixtures: Gradually add the dry mixture to the wet mixture, stirring until just combined. Be careful not to overmix, as this can lead to tough biscotti.
- Add Chocolate and Nuts: Gently fold in the chocolate chips and chopped nuts (if using). This step adds texture and enhances the overall flavor of the biscotti.
- Shape the Dough: On a lightly floured surface, shape the dough into a log, about 12 inches long and 2 inches wide. Place the log onto a baking sheet lined with parchment paper, making sure there’s space around it for spreading.
- Bake the Log: Bake the log in the preheated oven for 25-30 minutes, or until firm to the touch. Remove it from the oven and let it cool on the baking sheet for about 10 minutes.
- Slice the Biscotti: After the log has cooled slightly, use a sharp knife to slice it diagonally into 1-inch wide pieces. This is important for creating the classic biscotti shape that’s perfect for dunking.
- Second Bake: Place the sliced biscotti back onto the baking sheet, cut side up, and bake for an additional 15-20 minutes. This second baking is what gives the biscotti its signature crunch.
- Cool and Serve: Once baked, remove the biscotti from the oven and let them cool completely on a wire rack. They’re now ready to be enjoyed with your favorite cup of tea!
Extra Tips: For an extra burst of flavor, consider dipping the cooled biscotti in melted chocolate and sprinkling them with a pinch of sea salt or some additional orange zest.
Store any leftover biscotti in an airtight container at room temperature, where they’ll stay fresh for up to two weeks. Enjoy your delightful Chocolate Orange Biscotti with a warm cup of tea for the ultimate dunking experience!
Anzac Biscuits
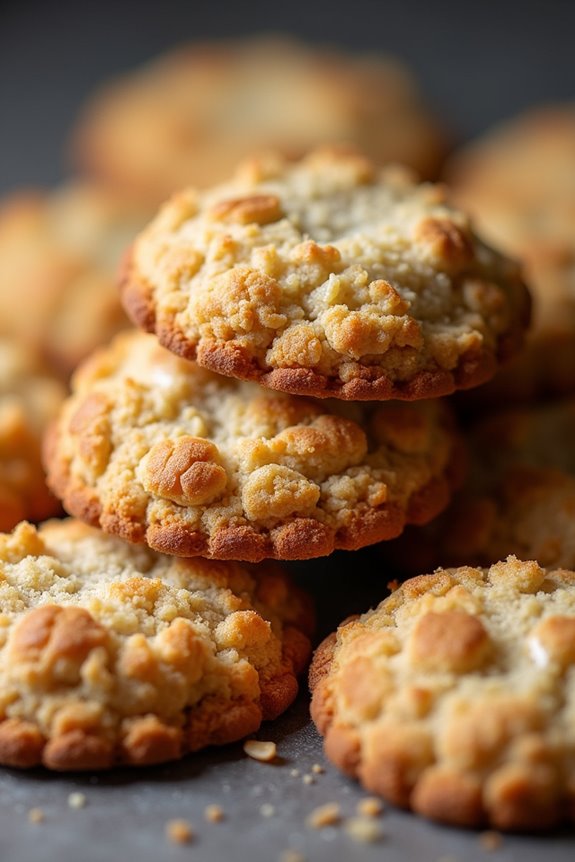
Anzac Biscuits are a delightful treat originating from Australia and New Zealand, traditionally made to honor the ANZAC soldiers during World War I. These biscuits aren’t only delicious but also have a rich history, making them perfect for dunking in tea. Their combination of oats, coconut, and golden syrup creates a chewy texture that complements a warm cup of tea beautifully.
Whether you’re reminiscing about the past or simply indulging in a sweet snack, Anzac Biscuits are bound to please.
Making Anzac Biscuits is a straightforward process, and you’ll find that they require minimal ingredients that you might already have in your pantry. The beauty of these biscuits lies in their simplicity and the wholesome flavors they offer. With a few easy steps, you can bake a batch that’s ideal for sharing with friends or enjoying during a quiet afternoon tea moment.
Let’s get started on this delightful recipe!
Ingredients (Serves 4-6)
- 1 cup rolled oats
- 1 cup all-purpose flour
- 1 cup desiccated coconut
- 1 cup brown sugar
- 1/2 cup unsalted butter
- 1/4 cup golden syrup (or light corn syrup)
- 1/2 teaspoon baking soda
- 2 tablespoons boiling water
- A pinch of salt
Cooking Instructions
- Preheat the Oven: Begin by preheating your oven to 160°C (320°F). This guarantees that the biscuits will bake evenly and achieve the perfect texture.
- Prepare Baking Tray: Line a baking tray with parchment paper. This will help prevent the biscuits from sticking and make cleanup easier.
- Mix Dry Ingredients: In a large mixing bowl, combine the rolled oats, all-purpose flour, desiccated coconut, brown sugar, and a pinch of salt. Stir the ingredients together until they’re well mixed.
- Melt Butter and Golden Syrup: In a small saucepan over low heat, melt the unsalted butter and golden syrup together. Stir continuously until fully melted and combined, then remove from heat.
- Activate Baking Soda: In a separate small bowl, dissolve the baking soda in the boiling water. This will activate the baking soda, helping the biscuits rise during baking.
- Combine Mixtures: Pour the melted butter and golden syrup mixture into the dry ingredients. Then, add the dissolved baking soda and water. Mix everything together until combined to form a sticky dough.
- Shape the Biscuits: Using your hands or a spoon, take small portions of the dough and roll them into balls, placing them on the prepared baking tray. Flatten each ball slightly to form a biscuit shape, leaving enough space between each for spreading.
- Bake: Place the tray in the preheated oven and bake for about 15-20 minutes, or until the biscuits are golden brown. Keep an eye on them to avoid over-baking.
- Cool Down: Once baked, remove the tray from the oven and allow the biscuits to cool on the tray for a few minutes before transferring them to a wire rack to cool completely.
Extra Tips
For an extra flavor kick, consider adding a handful of chopped nuts or chocolate chips to the dough before baking.
Make sure to store your Anzac Biscuits in an airtight container to keep them fresh and chewy. They can also be frozen for later enjoyment, making them a convenient treat to have on hand. Enjoy your biscuits dunked in a steaming cup of tea for a truly delightful experience!
Jammy Dodger-Inspired Cookies

Jammy Dodgers are a beloved classic in the world of biscuits, known for their delightful combination of buttery cookie and sweet fruit jam. These cookies aren’t only perfect for dunking in a hot cup of tea, but they also bring a touch of nostalgia to any afternoon snack. The fun of making Jammy Dodger-inspired cookies lies in the playful assembly of the biscuits, with their signature heart or circle cut-out that reveals a luscious jam center. Whether you choose raspberry, strawberry, or your favorite flavor, these cookies are sure to delight both young and old alike.
Making these cookies is a straightforward process that requires just a handful of ingredients and a bit of love. The buttery dough comes together easily and, once baked, creates a perfect canvas for the jam filling. These cookies are best enjoyed fresh out of the oven or stored in an airtight container for a few days. Pair them with your favorite tea, and you’ll have a delightful treat that isn’t just delicious but also fun to eat!
Ingredients (Serves 4-6 people)
- 250g unsalted butter, softened
- 150g granulated sugar
- 1 large egg
- 1 teaspoon vanilla extract
- 350g plain flour
- 1/4 teaspoon salt
- 100g fruit jam (raspberry, strawberry, or your choice)
- Icing sugar for dusting (optional)
Cooking Instructions
- Preheat the Oven: Start by preheating your oven to 180°C (350°F). This step is essential as it guarantees that your cookies bake evenly and achieve a lovely golden color.
- Cream Butter and Sugar: In a mixing bowl, combine the softened butter and granulated sugar. Using an electric mixer, cream these ingredients together until the mixture is light and fluffy, which usually takes about 3-5 minutes. This process incorporates air into the batter, giving your cookies a nice texture.
- Add Egg and Vanilla: Once the butter and sugar are well combined, add the egg and vanilla extract. Beat the mixture until fully integrated, making certain that the egg is completely mixed in to help bind the dough.
- Combine Flour and Salt: In a separate bowl, sift together the plain flour and salt. Gradually add this dry mixture to the wet mixture, mixing on low speed until a soft dough forms. Be careful not to overmix, as this can result in tough cookies.
- Chill the Dough: Wrap the dough in plastic wrap and refrigerate for about 30 minutes. Chilling the dough will make it easier to roll out and shape, while also preventing the cookies from spreading too much during baking.
- Roll Out and Cut Cookies: On a lightly floured surface, roll out the dough to about 5mm thick. Use a cookie cutter to cut out shapes for the base of the cookies. Make sure to cut a matching number of cookies with a smaller cutter for the tops to create the signature cut-out.
- Bake: Place the cookies on a lined baking tray and bake in the preheated oven for 10-12 minutes, or until the edges are lightly golden. Keep an eye on them to guarantee they don’t over-bake.
- Cool and Assemble: Once baked, remove the cookies from the oven and allow them to cool on the tray for a few minutes before transferring them to a wire rack. Once cooled, spread a teaspoon of jam on the base cookies and gently place the cut-out tops on top, creating a sandwich.
- Dust with Icing Sugar: For an elegant finish, you can dust the tops of the cookies with icing sugar before serving. This step is optional but adds a lovely touch.
Extra Tips
When making Jammy Dodger-inspired cookies, feel free to get creative with the flavors of jam you use; apricot or blackcurrant can also be delicious alternatives. If you want an extra twist, consider adding a pinch of lemon zest to the dough for a revitalizing citrus flavor.
Always make sure that your butter is at room temperature for easier mixing, and remember to check the cookies a minute or two before the end of the baking time to prevent burning. Enjoy these delightful treats with a warm cup of tea for a perfect dunking experience!
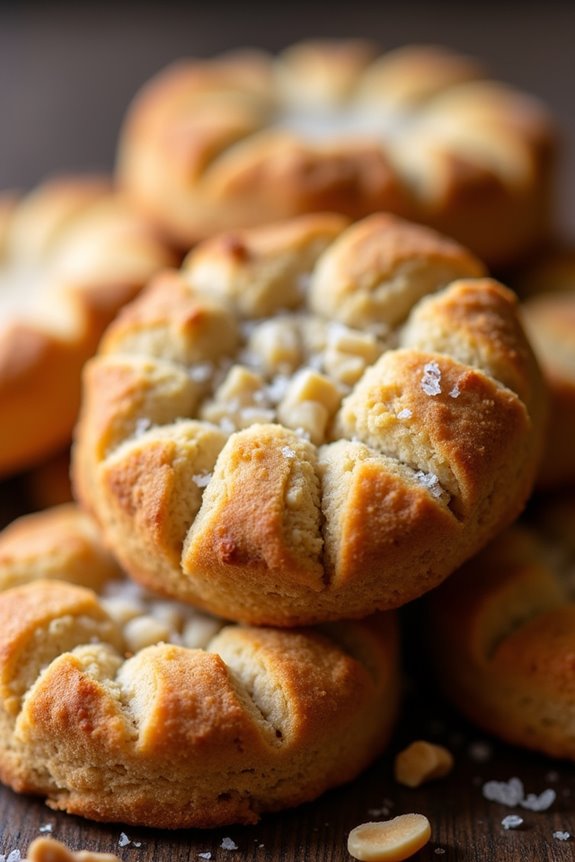
Honeycomb Crunch Biscuits
Honeycomb Crunch Biscuits are a delightful treat that perfectly complement a warm cup of tea. These biscuits are infused with the sweet, rich flavor of honey and have a satisfying crunch that makes them ideal for dunking. The addition of a honeycomb candy element adds an extra layer of texture and flavor, creating a unique biscuit that will leave your taste buds tingling.
Whether you’re enjoying an afternoon tea or a cozy evening snack, these biscuits are bound to impress.
Making Honeycomb Crunch Biscuits is a straightforward process that requires a few simple ingredients and some basic baking techniques. The combination of butter, sugar, and flour creates a soft dough that holds the delightful honeycomb pieces. The result is a biscuit that’s both crispy on the outside and tender on the inside, with a sweet, honeyed flavor that pairs beautifully with your favorite tea.
Gather your ingredients and let’s get ready to bake!
Ingredients (Serves 4-6)
- 150g unsalted butter, softened
- 100g granulated sugar
- 1 large egg
- 1 teaspoon vanilla extract
- 200g all-purpose flour
- 1 teaspoon baking powder
- 100g honeycomb candy, crushed into small pieces
- A pinch of salt
Cooking Instructions
- Preheat the Oven: Start by preheating your oven to 180°C (350°F). This guarantees that your biscuits bake evenly and achieve a nice golden color.
- Cream the Butter and Sugar: In a mixing bowl, combine the softened unsalted butter and granulated sugar. Using an electric mixer or a wooden spoon, cream them together until the mixture is light and fluffy. This step incorporates air into the mixture, which will help your biscuits rise and become light.
- Add Egg and Vanilla: Crack the egg into the creamed butter and sugar mixture, and add the vanilla extract. Mix until fully incorporated. The egg acts as a binding agent, helping to hold the biscuits together, while the vanilla adds a wonderful aroma and flavor.
- Combine Dry Ingredients: In a separate bowl, sift together the all-purpose flour, baking powder, and salt. Sifting helps to aerate the flour and removes any lumps, guaranteeing a smoother dough.
- Mix Dry and Wet Ingredients: Gradually add the dry ingredient mixture to the wet mixture, stirring gently until just combined. Be careful not to overmix, as this can lead to tough biscuits.
- Fold in Honeycomb: Gently fold the crushed honeycomb candy into the dough. This adds a delightful crunchy texture and a sweet, honey flavor that will elevate your biscuits.
- Shape the Biscuits: Using a tablespoon or a cookie scoop, scoop out portions of the dough and place them on a lined baking sheet, leaving space between each for spreading. Flatten them slightly with the back of the spoon for a more even shape.
- Bake: Place the baking sheet in the preheated oven and bake for 12-15 minutes, or until the edges are lightly golden. Keep an eye on them to prevent overbaking, as they can turn hard.
- Cool: Once baked, remove the biscuits from the oven and let them cool on the baking sheet for a few minutes before transferring them to a wire rack to cool completely. This cooling step allows them to firm up and makes them easier to handle.
Extra Tips
For the best results, make sure all your ingredients are at room temperature before you begin, as this helps them blend together more easily.
If you prefer a stronger honey flavor, consider adding a tablespoon of honey into the dough alongside the egg. Additionally, store any leftover biscuits in an airtight container to maintain their crunch, and enjoy them within a week for the best taste.
Happy baking!