

When British cuisine comes to mind, I envision dishes that offer both comfort and elegance. Shepherd’s pie and sticky toffee pudding are perfect examples of this balance. Each recipe is a piece of history, allowing us to savor flavors that have endured over time. Join me as we uncover 15 easy British recipes that can add a touch of tradition to your kitchen. Let’s celebrate these timeless dishes together!
Classic Fish and Chips

Classic Fish and Chips is a beloved British dish that has become a symbol of traditional British cuisine. This hearty meal consists of battered and deep-fried fish, usually cod or haddock, served alongside golden, crispy chips (fries).
Originating from the 19th century, it was popularized in working-class communities and has since evolved into a staple of British takeaway culture. The perfect fish and chips should have a light, crispy batter that encases the tender fish, accompanied by thick-cut chips that are fluffy on the inside.
The dish is often served with a side of tartar sauce and a wedge of lemon to enhance the flavors. You can adjust the thickness of the batter and the size of the chips to your preference, but the essence of this classic meal remains the same.
Whether enjoyed at a seaside restaurant or from a local chippy, fish and chips are a comforting, delicious representation of British culinary tradition.
Ingredients (Serves 4-6)
- 4-6 pieces of white fish fillets (cod or haddock)
- 1 cup all-purpose flour (plus extra for dusting)
- 1 cup cold sparkling water
- 1 teaspoon baking powder
- ½ teaspoon salt
- ½ teaspoon black pepper
- 4 large potatoes (Russet or Maris Piper), peeled and cut into thick chips
- Vegetable oil (for frying)
- Tartar sauce (for serving)
- Lemon wedges (for serving)
Cooking Instructions
1. Prepare the Chips: Start by soaking the cut potatoes in cold water for about 30 minutes. This helps to remove excess starch and guarantees that the chips will be crispy when fried.
After soaking, drain the potatoes and pat them dry with a kitchen towel.
2. Make the Batter: In a mixing bowl, combine 1 cup of flour, baking powder, salt, and pepper. Gradually whisk in the cold sparkling water until you achieve a smooth batter.
The batter should be thick enough to coat the back of a spoon. If it’s too runny, add a bit more flour.
3. Preheat the Oil: In a deep frying pan or fryer, heat vegetable oil to 350°F (175°C). Confirm there’s enough oil for deep frying, about 2-3 inches deep in the pan.
Use a thermometer to check the temperature, as proper heat is essential for crispy results.
4. Fry the Chips: Carefully add the dried potato chips to the hot oil in batches. Fry them for about 5-7 minutes until they’re soft but not yet golden.
Remove them from the oil and drain on a paper towel. This initial fry is known as blanching, which prepares them for their final fry.
5. Cook the Fish: Dust the fish fillets lightly with flour to help the batter adhere better. Dip each fillet into the batter, allowing any excess to drip off.
Carefully place the battered fish into the hot oil and fry for about 4-6 minutes, turning occasionally until the batter is golden brown and crispy. Remove and drain on a paper towel.
6. Final Fry for Chips: Increase the oil temperature to 375°F (190°C). Fry the blanched chips again for about 3-5 minutes until they’re golden and crispy.
Remove from the oil and drain on paper towels again. Season with salt.
7. Serve: Plate the crispy fish and chips together and Serve with tartar sauce and lemon wedges on the side.
Extra Tips
For the best results, verify your oil is at the correct temperature for frying. If the oil is too cool, the batter will absorb excess oil and become greasy.
A light, airy batter can be achieved by using very cold sparkling water, and you may also experiment with adding herbs or spices to the batter for additional flavor.
For a true British experience, consider serving your fish and chips with mushy peas or pickled onions on the side!
Shepherd’s Pie
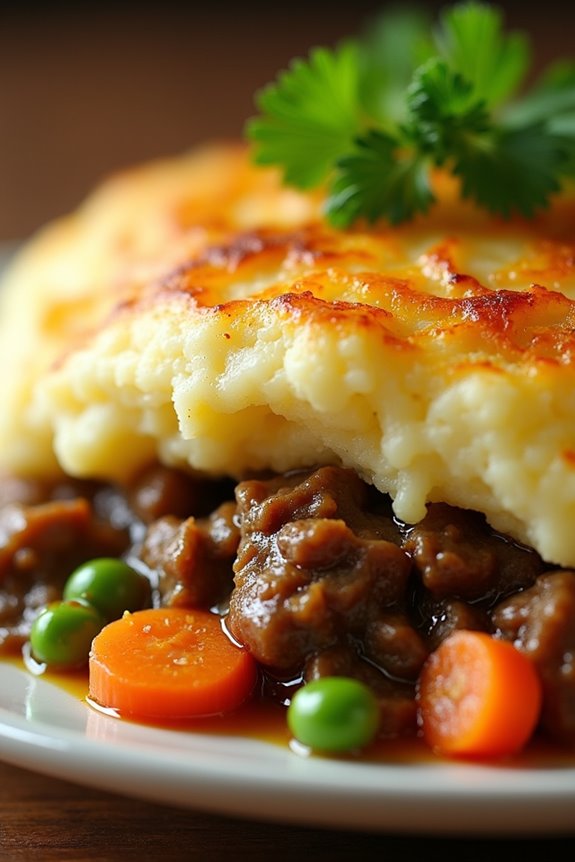
Shepherd’s Pie is a classic British comfort food that has won the hearts of many with its hearty flavors and satisfying textures. Traditionally made with minced lamb, this dish is topped with creamy mashed potatoes and baked until golden brown. The dish isn’t only delicious but also versatile, allowing for variations that include different meats or even vegetarian options.
Shepherd’s Pie is perfect for a family dinner or a cozy gathering, providing a warm and filling meal that everyone will enjoy.
Making Shepherd’s Pie can seem intimidating at first, but with a little preparation and the right ingredients, you can create this dish in no time. The secret to a great Shepherd’s Pie lies in the balance of flavors in the meat filling and the fluffiness of the mashed potatoes. This recipe serves 4-6 people, making it ideal for feeding a small group or for leftovers that can be enjoyed later.
Ingredients (serves 4-6):
- 1 lb (450g) ground lamb
- 1 medium onion, finely chopped
- 2 carrots, diced
- 2 cloves garlic, minced
- 1 cup (240ml) beef or lamb broth
- 1 tablespoon tomato paste
- 1 tablespoon Worcestershire sauce
- 1 teaspoon dried thyme
- Salt and black pepper to taste
- 4 cups (about 900g) mashed potatoes (prepared)
- 1 cup (100g) frozen peas
- 2 tablespoons olive oil
- Fresh parsley, chopped (for garnish)
Cooking Instructions:
- Preheat the oven: Begin by preheating your oven to 400°F (200°C). This will guarantee that your Shepherd’s Pie bakes evenly and develops a beautiful golden crust on top.
- Sauté the vegetables: In a large skillet, heat 2 tablespoons of olive oil over medium heat. Add the chopped onion and diced carrots, cooking them for about 5-7 minutes until they’re softened. Stir in the minced garlic and continue cooking for an additional minute until fragrant.
- Brown the meat: Add the ground lamb to the skillet, breaking it up with a spoon. Cook for approximately 8-10 minutes, stirring frequently, until the meat is browned and fully cooked. Make sure to drain any excess fat if necessary.
- Add flavor: Once the meat is browned, stir in the tomato paste, Worcestershire sauce, dried thyme, and broth. Bring the mixture to a simmer and allow it to cook for about 5 minutes, letting the flavors meld together. Season with salt and black pepper to taste.
- Incorporate peas: Stir in the frozen peas and mix well. Remove the skillet from heat and set aside while you prepare the mashed potatoes.
- Assemble the pie: In a large baking dish, spread the meat mixture evenly across the bottom. Carefully spoon the prepared mashed potatoes over the top, using a fork to create a textured surface that will brown nicely in the oven.
- Bake: Place the baking dish in the preheated oven and bake for about 25-30 minutes, or until the mashed potatoes are golden and crispy on top.
- Garnish and serve: Once baked, remove the Shepherd’s Pie from the oven and let it cool for a few minutes. Sprinkle chopped fresh parsley over the top for garnish before serving.
Extra Tips:
When making Shepherd’s Pie, consider using leftover roast lamb or beef for a quicker filling option. Additionally, you can customize the toppings by adding cheese to the mashed potatoes for an extra layer of flavor.
Confirm your mashed potatoes are smooth and well-seasoned to complement the savory filling. If you prefer a slightly spicy kick, add some chili flakes or a dash of hot sauce to the meat mixture. Enjoy your homemade Shepherd’s Pie with a side of steamed vegetables or a fresh salad!
Bangers and Mash

Bangers and Mash is a quintessential British dish that combines savory sausages with creamy mashed potatoes and a rich onion gravy. It’s a comforting meal that’s both hearty and satisfying, making it a favorite among families and pub-goers alike.
The dish’s name originates from the slang term “bangers” for sausages, which are often made with water that causes them to burst or “bang” during cooking. Mash refers to the mashed potatoes that serve as a perfect companion to the sausages, bringing together simple ingredients for a truly delightful experience.
To create an authentic Bangers and Mash, it’s essential to choose high-quality sausages, preferably pork, as they provide the best flavor and texture. The accompanying gravy, usually made from sautéed onions and beef stock, adds depth and moisture to the dish, enhancing the overall taste.
This meal isn’t only easy to prepare but also allows for variations, such as adding different herbs or spices to the mash or experimenting with different types of sausages.
Ingredients (Serves 4-6):
- 8 pork sausages
- 2 pounds (900g) of potatoes (e.g., Russet or Yukon Gold)
- 1/2 cup (120ml) of milk
- 1/4 cup (60g) of unsalted butter
- Salt and pepper to taste
- 2 large onions, thinly sliced
- 2 cups (480ml) of beef stock
- 2 tablespoons of olive oil
- 1 tablespoon of flour
- Fresh parsley for garnish (optional)
Cooking Instructions:
1. Prepare the Potatoes: Peel and chop the potatoes into even-sized chunks. Place them in a large pot of cold salted water and bring to a boil. Cook for about 15-20 minutes, or until they’re tender when pierced with a fork.
2. Cook the Sausages: While the potatoes are cooking, heat the olive oil in a large skillet over medium heat. Add the sausages and cook until browned on all sides, about 10-15 minutes. Once cooked, remove them from the skillet and keep them warm.
3. Make the Onion Gravy: In the same skillet, add the sliced onions and cook over low heat. Stir frequently until they’re soft and caramelized, about 10-15 minutes.
Sprinkle the flour over the onions and stir to combine. Gradually add the beef stock while continuing to stir, allowing the mixture to thicken. Season with salt and pepper.
4. Mash the Potatoes: Once the potatoes are tender, drain them and return them to the pot. Add the butter and milk, then mash until smooth and creamy. Season with salt and pepper to taste.
5. Serve the Dish: To serve, plate a generous scoop of mashed potatoes, place the sausages on top, and ladle the onion gravy over the entire dish. Garnish with fresh parsley if desired.
Extra Tips:
For a twist on the classic recipe, consider adding garlic or cream to the mashed potatoes for enhanced flavor and richness.
You can also try using different types of sausages, such as chicken or lamb, for a unique taste. Make sure to adjust the seasoning in the gravy to suit your palate, and feel free to incorporate additional herbs like thyme or rosemary for added depth.
This dish is best enjoyed hot, so serve it immediately after preparation for the best experience!
Sticky Toffee Pudding
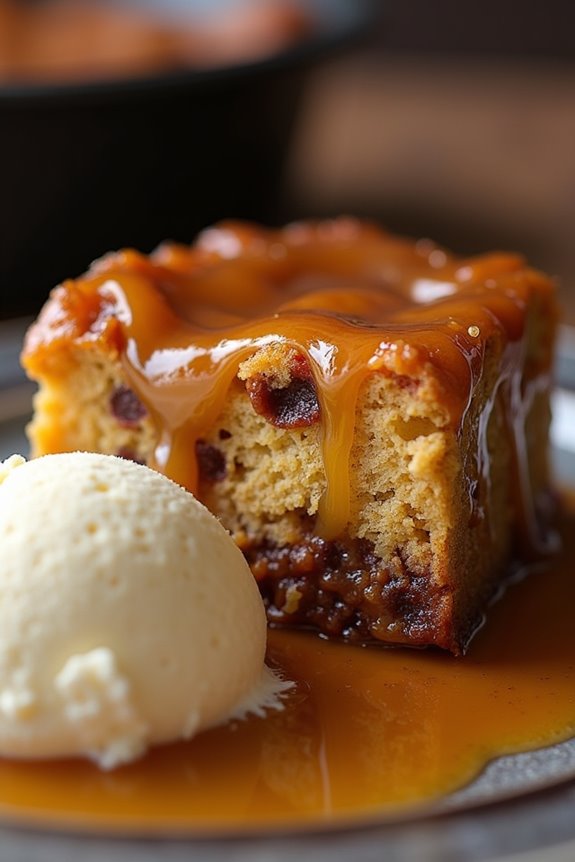
Sticky Toffee Pudding is a quintessential British dessert that can easily win over any sweet tooth. This indulgent treat features a rich, moist sponge cake made with finely chopped dates, which is then drenched in a luscious toffee sauce. Traditionally served warm, it’s often accompanied by a scoop of vanilla ice cream or a dollop of clotted cream, making it a perfect way to end a meal.
The combination of flavors and textures is truly delightful, and it’s no wonder that this classic pudding remains a favorite in pubs and homes alike.
Making Sticky Toffee Pudding isn’t only a rewarding experience but also a chance to impress your family and friends. While it may seem like an elaborate dessert, with a little preparation and care, you can create this beautiful dish from scratch.
The comforting aroma of the toffee sauce and the soft, moist cake will fill your kitchen, promising a delicious treat that’s worth every effort.
Ingredients (Serves 4-6)
- 200g (7 oz) pitted dates, chopped
- 250ml (1 cup) boiling water
- 1 tsp baking soda
- 100g (1/2 cup) unsalted butter, softened
- 150g (3/4 cup) light brown sugar
- 2 large eggs
- 1 tsp vanilla extract
- 200g (1 1/2 cups) all-purpose flour
- 1 tsp baking powder
- 1/2 tsp salt
- 100g (1/2 cup) dark brown sugar (for the sauce)
- 100ml (1/2 cup) heavy cream (for the sauce)
- 50g (1/4 cup) unsalted butter (for the sauce)
- 1 tbsp treacle (or golden syrup, for the sauce)
Cooking Instructions
- Prepare the Dates: Begin by placing the chopped dates in a bowl. Pour the boiling water over the dates and add the baking soda. Stir gently and allow it to sit for about 15-20 minutes. This will soften the dates and help to create a moist sponge.
- Make the Batter: In a large mixing bowl, cream together the softened butter and light brown sugar until light and fluffy, which should take about 3-4 minutes. This aeration is vital for a light sponge.
- Incorporate Eggs and Vanilla: Add the eggs, one at a time, to the butter and sugar mixture, mixing well after each addition. Then, stir in the vanilla extract. Confirm everything is well combined.
- Combine Dry Ingredients: In a separate bowl, whisk together the flour, baking powder, and salt. Gradually fold this mixture into the wet ingredients until just combined. Be careful not to overmix, as this can lead to a dense pudding.
- Add the Date Mixture: Once the date mixture has cooled slightly, mash the dates with a fork until they’re well broken down. Fold this into the batter gently, guaranteeing an even distribution without overworking the mixture.
- Bake the Pudding: Preheat your oven to 180°C (350°F). Grease a baking dish or individual ramekins and pour the batter into the prepared dish. Bake in the preheated oven for 30-35 minutes, or until a skewer inserted into the center comes out clean.
- Prepare the Toffee Sauce: While the pudding is baking, prepare the toffee sauce. In a saucepan, combine the dark brown sugar, heavy cream, butter, and treacle. Heat over medium heat, stirring until the sugar has dissolved. Bring it to a simmer and cook for a few minutes until slightly thickened.
- Serve: Once the pudding is baked, allow it to cool for a few minutes before flipping it onto a serving plate. Pour the warm toffee sauce generously over the pudding and serve immediately, ideally with vanilla ice cream or clotted cream.
Extra Tips
To achieve the best flavor and texture, use fresh, high-quality dates, as they contribute considerably to the pudding’s sweetness and moisture.
If you want to prepare the pudding in advance, you can make it a day ahead and reheat it gently in the oven before serving.
Additionally, feel free to adjust the amount of toffee sauce to your liking; some prefer a generously drenched pudding, while others might like just a drizzle. Enjoy your homemade Sticky Toffee Pudding!
Ploughman’s Lunch

The Ploughman’s Lunch is a traditional British meal that embodies the simplicity and heartiness of rural fare. Typically enjoyed in pubs across the UK, this dish isn’t just a single recipe but a delightful assortment of flavors and textures that can be tailored to individual tastes.
Traditionally served cold, it features a variety of ingredients that complement one another, making it a satisfying option for lunch or a light dinner. It often includes a selection of cheeses, crusty bread, pickles, and sometimes cold meats, ensuring a fulfilling and wholesome meal.
This dish isn’t only easy to prepare but also allows for creativity. You can mix and match your favorite cheeses, add seasonal fruits, or include local specialties to make it your own. Whether you’re enjoying a picnic in the park or a leisurely lunch at home, the Ploughman’s Lunch is sure to please everyone at the table.
Let’s explore the ingredients and the simple steps to create this classic British dish for 4-6 people.
Ingredients
- 200g of mature cheddar cheese
- 200g of Stilton cheese
- 200g of soft goat cheese
- 1 loaf of crusty bread (such as a baguette or sourdough)
- 100g of butter
- 4-6 pickled onions
- 200g of Branston pickle or any sweet chutney
- Fresh salad greens (such as lettuce or arugula)
- 2 tomatoes, sliced
- 1 cucumber, sliced
- 4-6 apples or pears, sliced
- Optional: Cold meats (such as ham or salami)
Cooking Instructions
- Select and Prepare Cheeses: Begin by selecting a variety of cheeses. For a classic Ploughman’s Lunch, include a strong cheddar, a blue cheese like Stilton, and a soft goat cheese. Cut each cheese into generous wedges or slices and arrange them on a serving platter.
- Prepare the Bread: Slice the crusty bread into thick pieces. If desired, you can lightly toast the slices to add a bit of crunch. Arrange the bread alongside the cheeses on the platter.
- Add Pickles and Chutney: Place the pickled onions and a bowl of Branston pickle or your chosen chutney on the platter. These condiments add a tangy contrast to the richness of the cheeses.
- Incorporate Fresh Vegetables: Add the sliced tomatoes and cucumber to the platter. These fresh ingredients will brighten the dish and provide a revitalizing crunch.
- Include Salad Greens: Serve a handful of fresh salad greens drizzled lightly with olive oil and a pinch of salt. This adds color and a crisp texture to your Ploughman’s Lunch.
- Add Fruit: Slice the apples or pears and arrange them on the platter. The sweetness of the fruit complements the savory flavors of the cheeses and meats.
- Optional Cold Meats: If you’re including cold meats, slice them thinly and arrange them on the platter next to the cheeses and pickles.
- Serve: Once everything is beautifully arranged, serve the Ploughman’s Lunch family-style, allowing everyone to help themselves to the components they prefer.
Extra Tips
For an authentic experience, consider pairing your Ploughman’s Lunch with a nice pint of British ale or cider.
Variations can be made by incorporating local specialties, such as regional cheeses or homemade chutneys. Feel free to experiment with different bread types, such as wholegrain or seeded loaves, to add more flavor and texture.
Cornish Pasties

Cornish pasties are a traditional British dish that hails from Cornwall, where they were originally made for miners as a hearty, portable meal. These savory pastries are filled with a delightful mixture of meat and vegetables, all encased in a golden, flaky pastry. The beauty of Cornish pasties lies not only in their delicious filling but also in the way they’re crafted. Traditionally, they’re shaped into a distinctive D-shape and crimped along one edge, allowing for easy handling and a satisfying crunch.
Making Cornish pasties at home can be a rewarding culinary experience. With a few simple ingredients and some patience, you can create a dish that’s perfect for lunch, dinner, or even as a snack. This recipe will guide you through the process of making authentic Cornish pasties from scratch, guaranteeing that you capture the essence of this beloved British classic.
Ingredients (Serves 4-6):
- 500g all-purpose flour
- 250g unsalted butter, cold and diced
- 1 teaspoon salt
- 5-6 tablespoons cold water
- 250g beef skirt or chuck, finely diced
- 1 medium onion, finely chopped
- 2 medium potatoes, peeled and diced
- 1 medium carrot, peeled and diced
- Salt and pepper to taste
- 1 egg, beaten (for egg wash)
Cooking Instructions:
- Prepare the Pastry: In a large mixing bowl, combine the flour and salt. Add in the cold, diced butter and rub it into the flour using your fingertips until the mixture resembles breadcrumbs. Make a well in the center and gradually add cold water, mixing until a dough forms. Knead lightly until smooth, then wrap in plastic wrap and chill in the refrigerator for at least 30 minutes.
- Make the Filling: While the pastry is chilling, prepare the filling. In a large bowl, combine the diced beef, onion, potatoes, and carrot. Season with salt and pepper to taste. Mix the ingredients well so that all the flavors are evenly distributed.
- Roll Out the Pastry: Once the dough has chilled, remove it from the refrigerator and divide it into 4-6 equal portions. On a floured surface, roll out each portion into a circle about 5mm thick. Aim for a diameter of approximately 20cm.
- Fill the Pastry: Place a generous spoonful of the filling onto one half of each pastry circle, leaving a border around the edge. Be careful not to overfill, as this can make sealing difficult.
- Seal the Pasties: Fold the other half of the pastry over the filling to create a semi-circle. Press the edges together to seal, then crimp the edges by folding them over and pressing with your fingers. Make a small hole in the top of each pasty to allow steam to escape during baking.
- Bake the Pasties: Preheat your oven to 200°C (400°F). Place the pasties on a baking tray lined with parchment paper. Brush the tops with the beaten egg for a golden finish. Bake in the preheated oven for 30-35 minutes or until the pasties are golden brown and cooked through.
Extra Tips:
When making Cornish pasties, confirm that all ingredients are chopped evenly to promote even cooking. You can also experiment with different fillings, such as adding swede (rutabaga) or using different types of meat.
If you prefer a vegetarian version, simply substitute the meat with a mix of hearty vegetables or mushrooms. Don’t rush the chilling process for the pastry, as it’s essential for achieving the perfect flaky texture.
Finally, these pasties can be made in advance and frozen before baking, making them a convenient option for busy days!
Full English Breakfast

A Full English Breakfast is a hearty and traditional British meal that has been enjoyed for generations. Typically served in the morning, this breakfast is known for its wide variety of components, all cooked to perfection and often enjoyed with a steaming cup of tea or coffee. The dish can vary by region, but it usually includes eggs, sausages, bacon, beans, and toast, guaranteeing a fulfilling start to the day.
This iconic breakfast not only showcases the best of British cuisine but also exemplifies the concept of a meal that brings people together.
Preparing a Full English Breakfast may seem intimidating due to its numerous components, but with a little organization and planning, it can be a delightful experience. Each ingredient contributes to the overall flavor and texture of the dish, making it a true feast. Whether you’re cooking for family or friends, this breakfast is sure to impress and satisfy.
Ingredients (Serves 4-6)
- 8 large eggs
- 8 slices of back bacon
- 8 sausages (pork or your choice)
- 1 can of baked beans (410g)
- 4 large tomatoes, halved
- 4 slices of black pudding (optional)
- 4-6 slices of thick white or wholemeal bread
- 4 tablespoons of cooking oil (for frying)
- Salt and pepper to taste
- Fresh parsley (for garnish, optional)
Cooking Instructions
- Prepare the Ingredients: Gather all ingredients and verify that they’re at room temperature. This will help with even cooking. Slice the tomatoes in half, and if using black pudding, slice those into rounds as well. Set aside the baked beans for warming later.
- Cook the Bacon and Sausages: In a large frying pan, heat 2 tablespoons of cooking oil over medium heat. Add the sausages and cook for about 10-12 minutes, turning occasionally until they’re browned and cooked through. Once the sausages are nearly done, add the bacon slices to the same pan and cook for another 5-6 minutes until crispy. Remove both from the pan and keep warm.
- Fry the Eggs: In the same pan, add a little more oil if necessary. Crack the eggs into the pan and fry them to your desired doneness, sunny-side up or over-easy. Season with salt and pepper. Once done, remove and keep warm.
- Cook the Tomatoes and Black Pudding: Using the same pan, add the halved tomatoes cut side down and the black pudding slices (if using). Cook for about 3-4 minutes or until the tomatoes are softened and the black pudding is heated through and slightly crispy. Remove and keep warm.
- Heat the Baked Beans: In a small saucepan, heat the baked beans over low heat until warmed through. Stir occasionally to prevent sticking.
- Toast the Bread: While the beans are heating, you can toast the slices of bread. You can use a toaster or place them in the pan with a little butter until golden brown on both sides.
- Assemble the Breakfast: On each plate, arrange the cooked sausages, bacon, eggs, tomatoes, black pudding, and a generous scoop of baked beans. Serve with toasted bread on the side.
- Garnish and Serve: Optionally, sprinkle fresh parsley over the assembled breakfast for a touch of color. Serve hot and enjoy!
Extra Tips
When preparing a Full English Breakfast, timing is key to guarantee everything is served hot and fresh. Start with the sausages, as they take the longest to cook, and work your way down to the eggs, which can be cooked last to stay warm.
To make cleanup easier, use the same pan for multiple ingredients, as the flavors blend beautifully. Don’t hesitate to adjust the components based on personal preference—vegetarian options can also be created by substituting plant-based sausages and omitting the bacon and black pudding. Enjoy your cooking adventure!
Beef Wellington
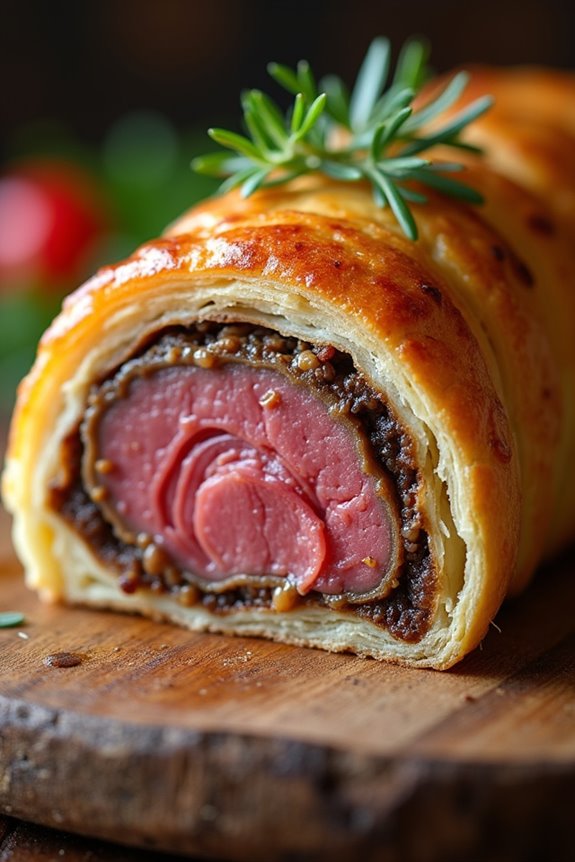
Beef Wellington is a classic British dish that showcases the rich flavors of tender beef fillet wrapped in flaky pastry, combined with a delightful mushroom duxelles and prosciutto. This dish is perfect for special occasions and celebrations, as it not only delivers a delicious taste but also presents beautifully on the plate. The combination of textures—from the buttery pastry to the succulent meat—makes it a favorite among many.
The origins of Beef Wellington are somewhat unclear, but it’s widely believed to have been named after the Duke of Wellington, who defeated Napoleon at the Battle of Waterloo. This elegant entrée has stood the test of time, remaining a staple in British cuisine. Preparing a Beef Wellington may seem intimidating, but with careful preparation and attention to detail, anyone can create this impressive dish at home.
Ingredients (Serves 4-6)
- 1.5 to 2 pounds beef fillet (center-cut)
- Salt and black pepper, to taste
- 2 tablespoons olive oil
- 8 ounces mushrooms (finely chopped)
- 2 cloves garlic (minced)
- 2 tablespoons fresh thyme (chopped)
- 4 ounces prosciutto (slices)
- 1 tablespoon Dijon mustard
- 1 sheet of puff pastry (thawed)
- 1 egg (beaten, for egg wash)
- Flour (for dusting)
Cooking Instructions
- Prepare the Beef Fillet: Season the beef fillet generously with salt and black pepper. Heat the olive oil in a large skillet over high heat, then sear the beef on all sides until browned (about 2-3 minutes per side). Remove from heat and let it cool. Once cooled, brush the fillet with Dijon mustard.
- Make the Mushroom Duxelles: In the same skillet, add the finely chopped mushrooms, minced garlic, and chopped thyme. Cook over medium heat, stirring occasionally, until the mixture is dry and all excess moisture has evaporated (about 10-12 minutes). Season with salt and pepper, then let it cool.
- Assemble the Wellington: Lay out the prosciutto slices on a sheet of plastic wrap, slightly overlapping them. Spread the cooled mushroom mixture evenly over the prosciutto. Place the beef fillet on top and use the plastic wrap to roll it tightly, forming a log. Wrap it tightly and refrigerate for at least 30 minutes.
- Wrap in Puff Pastry: Preheat the oven to 400°F (200°C). On a lightly floured surface, roll out the puff pastry to a size large enough to encase the beef. Unwrap the beef from the plastic wrap and place it in the center of the pastry. Fold the pastry over the beef, sealing the edges well and trimming any excess. Brush the entire pastry with the beaten egg to give it a golden color when baked.
- Bake the Wellington: Place the wrapped Beef Wellington on a baking sheet lined with parchment paper. Make a few slits on top of the pastry to allow steam to escape. Bake in the preheated oven for 25-30 minutes, or until the pastry is golden brown and the internal temperature of the beef reaches 125°F (52°C) for medium-rare. Allow it to rest for 10 minutes before slicing.
Extra Tips
For the best results, confirm that the beef fillet is of high quality and well-trimmed to enhance flavor and tenderness.
When making the mushroom duxelles, be patient while cooking to confirm all moisture evaporates; this prevents the pastry from becoming soggy.
Additionally, using a meat thermometer can help you achieve the desired doneness without overcooking the beef.
Finally, serve your Beef Wellington with a rich red wine sauce or a side of seasonal vegetables to complement the dish perfectly.
Eton Mess
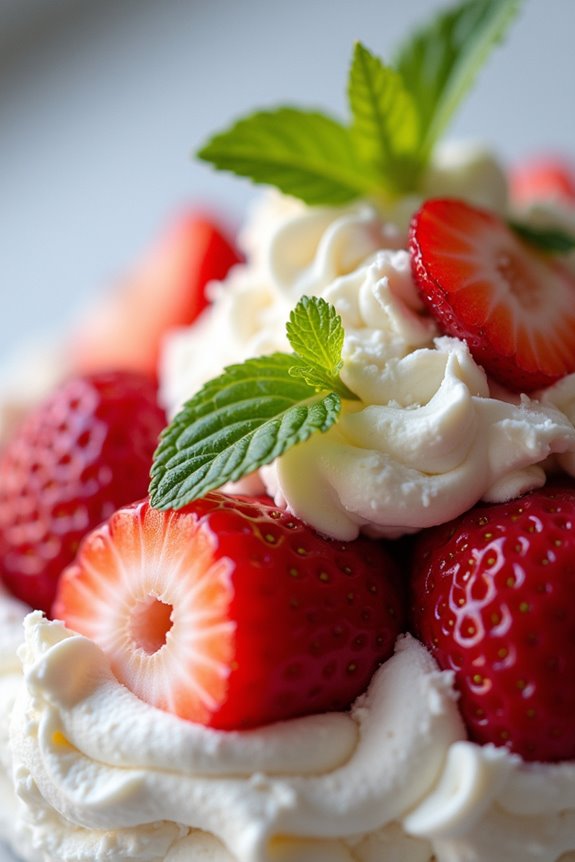
Eton Mess is a classic British dessert that embodies the sweet, summery flavors of fresh strawberries and the delightful crunch of meringue. Traditionally served at Eton College’s annual cricket match against Harrow School, this dish isn’t only a treat for the taste buds but also a feast for the eyes.
Its combination of whipped cream, crushed meringue, and fresh fruit creates a light and airy dessert that’s perfect for warm weather gatherings or special occasions. The beauty of Eton Mess lies in its simplicity; it requires minimal ingredients and can be prepared in a matter of minutes.
The vibrant colors of the strawberries and the fluffy, white cream make it an appealing dessert for both kids and adults alike. With a few easy steps, you can whip up this delightful dish that’s sure to impress your guests and satisfy your sweet tooth.
Ingredients (serving size: 4-6 people)
- 2 cups of fresh strawberries, hulled and quartered
- 1 cup of heavy whipping cream
- 2 tablespoons of powdered sugar
- 1 teaspoon of vanilla extract
- 4-6 store-bought meringue nests, crushed
- Fresh mint leaves for garnish (optional)
Cooking Instructions
1. Prepare the Strawberries: Begin by hulling the strawberries and cutting them into quarters. Place them in a bowl and, if you prefer, sprinkle a bit of sugar over them to enhance their sweetness. Set aside for about 10-15 minutes to allow the juices to develop.
2. Whip the Cream: In a separate mixing bowl, pour in the heavy whipping cream. Using an electric mixer or a whisk, begin to whip the cream on medium speed until it starts to thicken. Gradually add the powdered sugar and vanilla extract, then continue to whip until stiff peaks form.
Be careful not to over-whip, as this can result in a grainy texture.
3. Combine Ingredients: Once the cream is whipped, gently fold in the quartered strawberries. Use a spatula to incorporate the fruit without deflating the cream. It’s important to maintain the fluffy texture of the whipped cream.
4. Add Meringue: Fold in the crushed meringue nests into the strawberry and cream mixture. Again, be gentle to preserve the lightness of the dessert. The meringue will add a delightful crunch and sweetness to the Eton Mess.
5. Serve: Spoon the Eton Mess mixture into serving bowls or glasses. For an elegant presentation, layer the ingredients if desired. Garnish with fresh mint leaves for a pop of color and an aromatic touch.
Extra Tips
When making Eton Mess, feel free to experiment with different fruits such as raspberries or blueberries, depending on your preference and seasonal availability.
For a more indulgent twist, you can also add a splash of liqueur such as elderflower or a drizzle of chocolate sauce. This dessert is best enjoyed shortly after preparation, as the meringue can become soggy over time.
If making ahead, consider keeping the meringue separate until serving to maintain its crisp texture.
Bread and Butter Pudding

Bread and Butter Pudding is a classic British dessert that embodies comfort and nostalgia. It’s a simple yet delicious way to transform stale bread into a warm and creamy treat. Traditionally made with buttered bread layered with raisins or currants and baked in a custard mixture, this pudding is a staple in many households. The dish is often served warm with a drizzle of cream or a scoop of ice cream, making it the perfect ending to any meal.
The beauty of Bread and Butter Pudding lies in its versatility. You can use different types of bread, such as brioche or fruit bread, and customize it with your favorite spices, fruits, or even chocolate. This recipe serves 4-6 people, making it an excellent choice for family gatherings or dinner parties. The result is a delightful combination of textures—the crisp top, soft middle, and rich custard that will leave everyone wanting more.
Ingredients
- 6 slices of day-old bread (white, brioche, or fruit bread)
- 75g unsalted butter, softened
- 100g raisins or currants
- 4 large eggs
- 500ml whole milk
- 150ml double cream
- 100g granulated sugar
- 1 teaspoon vanilla extract
- 1 teaspoon ground cinnamon (optional)
- Zest of 1 lemon (optional)
- A pinch of salt
Cooking Instructions
- Preheat the Oven: Begin by preheating your oven to 180°C (350°F). This guarantees that the pudding cooks evenly and develops a golden-brown top.
- Prepare the Bread: Take the slices of bread and spread a generous layer of softened butter on one side of each slice. If you’re using fruit bread, you can skip this step for a richer flavor. Once buttered, cut the slices into triangles or quarters.
- Layer the Bread and Fruit: In a buttered baking dish, arrange a layer of the buttered bread, placing the buttered side up. Sprinkle a handful of raisins or currants over the first layer, and then repeat the process until all the bread and fruit are used, finishing with a layer of bread on top.
- Make the Custard Mixture: In a large mixing bowl, whisk together the eggs, milk, double cream, sugar, vanilla extract, ground cinnamon, lemon zest, and a pinch of salt until well combined. This mixture will create the creamy custard that binds the pudding.
- Pour the Custard Over the Bread: Carefully pour the custard mixture over the layered bread, ensuring that all the slices are soaked. Allow the bread to sit for about 10-15 minutes to absorb the custard.
- Bake the Pudding: Place the baking dish in the preheated oven and bake for 30-40 minutes, or until the top is golden brown and the custard is set. You can check for doneness by inserting a knife into the center; it should come out clean.
- Cool and Serve: Once baked, remove the pudding from the oven and let it cool for a few minutes before serving. You can serve it warm, drizzled with cream or accompanied by a scoop of ice cream.
Extra Tips
For the best results, use stale bread as it will absorb the custard better without becoming too mushy. Feel free to experiment with different flavorings; adding a splash of rum or brandy can enhance the taste. Additionally, you can cover the pudding with aluminum foil during the first half of baking to prevent it from browning too quickly. Enjoy your delicious Bread and Butter Pudding!
Welsh Rarebit

Welsh Rarebit is a classic British dish that showcases the rich flavors of cheese combined with a variety of delicious ingredients. Often enjoyed as a hearty snack or light meal, this dish is traditionally served on toast and can be customized with various toppings or sides.
The name “rarebit” is believed to have originated as a playful alternative to “rabbit,” as the dish doesn’t actually contain any meat. Instead, it features a luscious cheese sauce that’s both creamy and savory, making it a comforting choice for any occasion.
This delectable dish has a history that dates back to the 18th century, and it has remained a favorite in pubs and homes throughout Wales and beyond. The blend of melted cheese, mustard, and spices creates a flavorful topping that pairs perfectly with crispy toast.
Whether enjoyed on a rainy day or as a late-night snack, Welsh Rarebit is sure to satisfy your cravings and impress your guests.
Ingredients (Serves 4-6 people)
- 8 slices of thick-cut bread (such as sourdough or whole wheat)
- 2 cups of sharp cheddar cheese, grated
- 1 tablespoon of unsalted butter
- 1 tablespoon of all-purpose flour
- 1 cup of milk
- 2 teaspoons of Worcestershire sauce
- 1 teaspoon of mustard powder (or 1 tablespoon of Dijon mustard)
- 1/2 teaspoon of paprika
- Salt and pepper, to taste
- Optional: chopped chives or parsley for garnish
Cooking Instructions
- Prepare the Toast: Begin by preheating your oven to 400°F (200°C). While the oven is heating, toast the slices of bread in a toaster or on a griddle until golden brown. This will create a sturdy base for the cheesy topping.
- Make the Cheese Sauce: In a medium saucepan, melt the butter over medium heat. Once melted, add the flour and whisk continuously for about 1-2 minutes to create a roux. This will help thicken the cheese sauce.
- Add Milk: Gradually pour in the milk while continuing to whisk. Keep stirring until the mixture thickens and bubbles, which should take about 5 minutes. Be sure to prevent any lumps from forming.
- Incorporate Cheese and Seasonings: Remove the saucepan from the heat and stir in the grated cheddar cheese until it’s fully melted and the sauce is smooth. Add Worcestershire sauce, mustard powder (or Dijon mustard), paprika, and season with salt and pepper to taste. Mix well to combine all the flavors.
- Assemble the Dish: Place the toasted bread on a baking sheet. Spoon the cheese sauce generously over each slice of toast, ensuring that they’re well-covered.
- Bake: Place the baking sheet in the preheated oven and bake for about 10-12 minutes, or until the cheese sauce is bubbling and slightly browned on top. Keep an eye on it to prevent burning.
- Garnish and Serve: Once done, remove the Welsh Rarebit from the oven, and if desired, sprinkle with chopped chives or parsley. Serve hot and enjoy!
Extra Tips
For an extra kick, consider adding a splash of your favorite beer or a dash of hot sauce to the cheese mixture for additional flavor.
You can also experiment with different types of cheese, such as Gruyère or a blend of cheeses, to create a unique twist on this traditional recipe. Serve with a side salad or pickles for a delightful contrast in flavors!
Scampi and Chips

Scampi and chips is a classic British dish that perfectly combines the flavors of succulent prawns with crispy, golden chips. This comforting meal is often associated with seaside dining, where fresh seafood is a staple. Traditionally, the dish features large, juicy scampi that’s either breaded and deep-fried or simply sautéed in garlic butter, served alongside thick-cut chips that are fluffy on the inside and crispy on the outside.
The simplicity of the ingredients allows the natural flavors of the seafood to shine, making it a favorite among many. To elevate your scampi and chips experience, consider serving it with a side of tartar sauce and a wedge of lemon. This adds a zesty kick that complements the sweetness of the prawns beautifully.
Whether you’re preparing it for a casual family dinner or a special gathering, this dish is sure to impress your guests with its delicious flavors and satisfying textures. Below is a recipe for Scampi and Chips, perfect for serving 4-6 people.
Ingredients
- 600g large raw scampi (prawns), peeled and deveined
- 150g breadcrumbs (preferably panko)
- 2 large eggs
- 100g plain flour
- 1 tsp garlic powder
- 1 tsp paprika
- Salt and pepper, to taste
- 1 kg potatoes (for chips)
- Vegetable oil (for frying)
- Fresh lemon wedges, for serving
- Tartar sauce, for serving (optional)
Cooking Instructions
- Prepare the Chips: Begin by washing and peeling the potatoes. Cut them into thick chips, about 1-2 cm wide. Soak the cut chips in cold water for at least 30 minutes to remove excess starch, which helps make them crispier. Drain and pat them dry with a clean towel.
- Parboil the Chips: In a large pot, bring water to a boil and add a pinch of salt. Add the soaked chips and parboil them for about 5 minutes until they’re just tender but not fully cooked. Drain the chips and let them cool slightly.
- Heat the Oil: In a deep fryer or a large, deep saucepan, heat vegetable oil to 180°C (350°F). You’ll need enough oil to submerge the chips. Use a thermometer for accuracy to verify the oil is hot enough for frying.
- Fry the Chips: Carefully add the parboiled chips to the hot oil in batches, ensuring not to overcrowd the pan. Fry them for about 5-7 minutes until they’re golden brown and crispy. Remove the chips with a slotted spoon and drain on paper towels. Season with salt immediately.
- Prepare the Scampi: Set up a breading station with three shallow bowls: one for flour mixed with garlic powder, one for beaten eggs, and one for breadcrumbs. Season the flour with salt and pepper.
- Bread the Scampi: Dip each scampi first into the flour, coating it well. Then, dip it in the beaten eggs, allowing excess to drip off. Finally, coat the scampi in breadcrumbs, ensuring they’re fully covered. Set the breaded scampi aside on a plate.
- Fry the Scampi: In the same hot oil used for the chips, carefully add the breaded scampi in batches. Fry them for about 3-4 minutes until they’re golden brown and cooked through. Remove them with a slotted spoon and drain on paper towels.
- Serve: Arrange the chips on a serving platter alongside the scampi. Garnish with fresh lemon wedges and serve with tartar sauce on the side, if desired.
Extra Tips
When making scampi and chips, verify that your oil is at the right temperature before frying to achieve a crispy exterior while keeping the insides succulent.
If you want to add a twist to the dish, consider seasoning the breadcrumbs with herbs like parsley or dill for added flavor. Additionally, serving the dish with a fresh salad can provide a rejuvenating contrast to the richness of the fried items.
Enjoy your homemade British classic!
Yorkshire Pudding

Yorkshire pudding is a classic British dish that has been enjoyed for centuries, originally serving as a way to make the most of the drippings from roasting meat. Traditionally served alongside roast beef, this delightful dish has a light, airy texture with a crispy exterior and a soft, chewy interior.
Yorkshire pudding isn’t only a great accompaniment to a Sunday roast but can also be served as a standalone dish with gravy or filled with various ingredients for a modern twist.
The key to a perfect Yorkshire pudding lies in the batter, which is made from a simple mixture of flour, eggs, and milk. The batter is then baked in hot oil or drippings, which creates that signature puffed-up look and satisfying crunch.
With a few tips and tricks, you can easily master this beloved British staple and impress your family and friends at your next gathering.
Ingredients (Serves 4-6)
- 1 cup all-purpose flour
- 1 cup milk
- 3 large eggs
- 1/2 teaspoon salt
- 1/4 cup beef drippings or vegetable oil
Cooking Instructions
- Prepare the Batter: In a bowl, whisk together the flour and salt. In another bowl, beat the eggs until frothy, then add in the milk. Gradually combine the milk and egg mixture with the flour, whisking until you have a smooth batter. Let the batter rest for at least 30 minutes at room temperature to allow the gluten to relax, which will help the pudding rise better.
- Preheat the Oven: Preheat your oven to 425°F (220°C). It’s important that the oven is hot enough to create steam when the batter is added, which will help the Yorkshire pudding to rise.
- Heat the Fat: In a muffin tin or a large baking dish, add about 1 teaspoon of beef drippings or vegetable oil to each cup. Place the tin in the preheated oven for about 10 minutes, or until the oil is shimmering and almost smoking.
- Pour in the Batter: Carefully remove the hot tin from the oven (be cautious, as the oil is very hot). Quickly pour the rested batter into each cup, filling them about halfway full. The batter should sizzle when it hits the hot oil.
- Bake: Return the tin to the oven and bake for 20-25 minutes, or until the Yorkshire puddings are puffed up and golden brown. Avoid opening the oven door during baking, as this can cause them to deflate.
- Serve: Once baked, remove the Yorkshire puddings from the oven. Serve immediately alongside your roast beef, drizzled with gravy or filled with your favorite ingredients.
Extra Tips
For the best results, make sure all your ingredients are at room temperature before mixing. This helps the batter to rise more effectively.
Additionally, using a combination of beef drippings and oil can enhance the flavor, but be sure to use a high smoke point oil to prevent burning.
Finally, resist the temptation to open the oven door while cooking, as this can cause the puddings to collapse. Enjoy your Yorkshire pudding fresh out of the oven for the best texture!
Toad in the Hole

Toad in the Hole is a classic British dish that consists of sausages baked in Yorkshire pudding batter. Originating in the 18th century, this hearty meal is both comforting and satisfying, making it a popular choice for family dinners. Traditionally served with onion gravy and vegetables, Toad in the Hole showcases the versatility of Yorkshire pudding batter and the savory goodness of quality sausages.
Cooking Toad in the Hole is straightforward, but achieving the perfect rise and texture in the batter is key to making this dish a success. The sausages can vary based on personal preference, but pork sausages are the most commonly used. Whether you choose spicy, herby, or classic sausages, the dish will surely be a hit. Let’s get started on this delightful recipe!
Ingredients (Serves 4-6):
- 6-8 pork sausages (or preferred sausages)
- 1 cup all-purpose flour
- 1 cup milk
- 3 large eggs
- 1 teaspoon salt
- 1 teaspoon black pepper
- 2 tablespoons vegetable oil
- Optional: fresh herbs (such as thyme or rosemary) for seasoning
Cooking Instructions:
- Preheat the Oven: Start by preheating your oven to 220°C (425°F). A high temperature is vital for achieving a well-risen Yorkshire pudding batter.
- Prepare the Sausages: In a large oven-proof skillet or baking dish, add the vegetable oil and place it in the preheated oven. While the oil heats up, place the sausages in the skillet and let them cook for about 10-15 minutes or until they’re browned on the outside. This step not only cooks the sausages but also helps to create a crispy edge.
- Make the Batter: In a mixing bowl, combine the flour, salt, and pepper. Make a well in the center and add the eggs one at a time, whisking until smooth. Gradually pour in the milk while continuing to whisk until you have a smooth batter. The consistency should be similar to that of heavy cream.
- Combine and Pour: Once the sausages are browned, carefully remove the skillet from the oven. Pour the batter over the sausages evenly, making sure they’re well covered. The sizzling oil will help create a beautiful rise as the batter bakes.
- Bake the Toad in the Hole: Return the skillet to the oven and bake for about 25-30 minutes. Don’t open the oven door during this time, as this can cause the batter to collapse. The dish is done when the batter is puffed up and golden brown.
- Serve: Once baked, remove from the oven and let it cool for a few minutes. Cut into portions and serve hot, ideally with onion gravy and your choice of vegetables.
Extra Tips:
For the best results, make sure that your sausages are of good quality for maximum flavor. You can experiment with different types of sausages to suit your taste, such as chicken or vegetarian options.
For a more flavorful batter, consider adding finely chopped herbs or a pinch of mustard powder. Additionally, letting the batter rest for about 30 minutes before pouring it into the pan can help improve its texture.
Enjoy your Toad in the Hole with a generous helping of gravy and seasonal vegetables for a delightful British feast!
Cream Tea With Scones

Cream tea is a quintessential British tradition that combines freshly baked scones with clotted cream and jam, served alongside a steaming pot of tea. This delightful treat is often enjoyed during afternoon tea, a practice that dates back to the early 19th century.
Scones are light, fluffy, and slightly sweet, making them the perfect accompaniment to rich clotted cream and fruity jam. Whether you’re hosting a gathering or simply indulging in a personal treat, this recipe will guide you through making the perfect cream tea experience.
To truly embrace the essence of British culture, consider pairing your cream tea with a selection of fine teas, such as Earl Grey or English Breakfast. The combination of the warm, buttery scones with the smooth cream and sweet jam, complemented by a fragrant cup of tea, creates a truly memorable experience.
Follow this simple recipe to impress your guests or to enjoy a cozy afternoon for yourself.
Ingredients (Serves 4-6):
- 250g plain flour
- 75g unsalted butter, cold and cubed
- 30g caster sugar
- 1 tbsp baking powder
- 1/4 tsp salt
- 150ml whole milk
- 1 tsp vanilla extract
- Clotted cream (for serving)
- Strawberry jam (for serving)
Cooking Instructions:
- Preheat the Oven: Begin by preheating your oven to 220°C (425°F). This high temperature is vital for achieving a nice rise on your scones, giving them a golden brown color and fluffy texture.
- Mix Dry Ingredients: In a large mixing bowl, combine the plain flour, caster sugar, baking powder, and salt. Whisk these ingredients together until they’re well mixed, ensuring an even distribution of the baking powder, which will help the scones rise.
- Add Butter: Add the cold, cubed butter to the flour mixture. Use your fingertips to rub the butter into the flour until the mixture resembles coarse breadcrumbs. This step is essential as it creates the scone’s tender texture by incorporating air into the mix.
- Combine Wet Ingredients: In a separate bowl, mix the whole milk and vanilla extract together. Gradually pour this mixture into the dry ingredients, stirring gently with a fork until the dough begins to come together. Be careful not to overwork the dough; you want it to be slightly sticky but manageable.
- Shape the Dough: Turn the dough out onto a lightly floured surface. Gently knead the dough for a few seconds, just until it holds together. Pat it out to about 2.5 cm (1 inch) thick. Use a round cutter (about 5 cm or 2 inches in diameter) to cut out your scones, re-rolling any scraps to cut out additional scones.
- Bake the Scones: Place the scones on a baking tray lined with parchment paper, ensuring they’re spaced apart. Bake in the preheated oven for 10-12 minutes, or until they’re risen and golden brown. Keep an eye on them to avoid overbaking.
- Cool and Serve: Once baked, remove the scones from the oven and allow them to cool on a wire rack. Serve warm with generous dollops of clotted cream and a spoonful of strawberry jam, alongside your favorite tea.
Extra Tips: For the best scones, make sure your butter is very cold when adding it to the flour mixture, as this will help create a flaky texture. Additionally, avoid over-kneading the dough to keep the scones light and airy.
You can also experiment with different flavorings, such as adding dried fruit like raisins or currants to the dough for a classic twist. Enjoy your cream tea experience!