

Eggs are one of those ingredients that can do it all.
Whether you’re in the mood for cloud-like scrambled eggs or soft-boiled delights with crispy toast soldiers, there’s something special about each recipe.
These playful British egg dishes can take your meals from ordinary to extraordinary with ease.
Let’s explore some fun ways to enjoy this versatile ingredient together.
What’s your favorite egg recipe?
Cloud-Like Scrambled Eggs
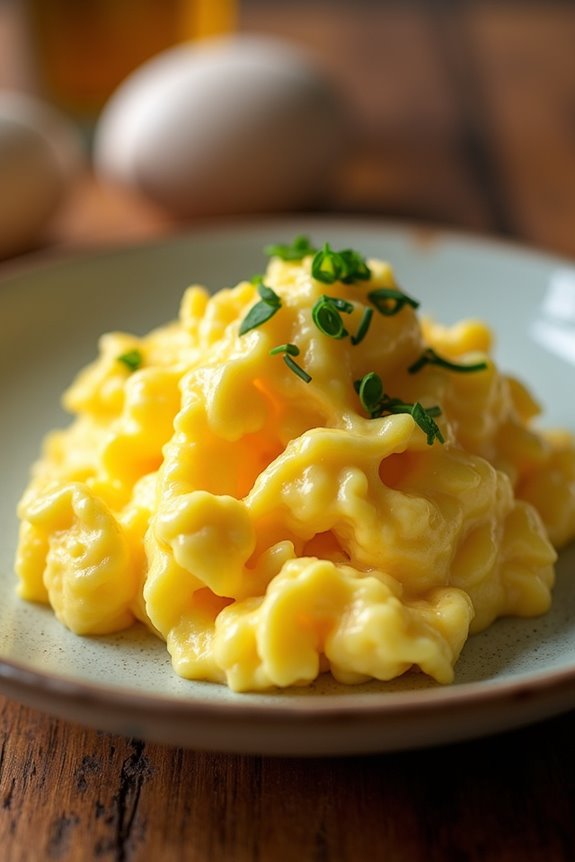
Cloud-Like Scrambled Eggs are a delectable twist on the traditional scrambled eggs, offering a light and airy texture that’s almost ethereal. This recipe elevates the humble egg to a fluffy delight, perfect for breakfast or brunch. The secret lies in whipping the egg whites to stiff peaks before gently folding them into the yolks, creating a dish that’s both visually stunning and deliciously satisfying.
Not only are these scrambled eggs a feast for the eyes, but they also provide a delightful mouthfeel that melts in your mouth. Serve them alongside toast, sautéed vegetables, or a fresh salad for a complete meal. This dish isn’t just about flavor; it also brings an element of fun and creativity to your dining table, making it a great choice for gatherings or special occasions.
Ingredients (serving size: 4-6 people)
- 6 large eggs
- 2 tablespoons of milk or cream
- Salt, to taste
- Freshly ground black pepper, to taste
- 1 tablespoon of unsalted butter
- Fresh herbs (like chives or parsley), for garnish (optional)
Cooking Instructions
- Separate the Eggs: Carefully separate the egg whites from the yolks, placing the whites in a large mixing bowl and the yolks in a separate bowl. It’s important to guarantee no yolk gets into the whites, as this will prevent them from whipping properly.
- Whip the Egg Whites: Using an electric mixer, beat the egg whites on high speed until they form stiff peaks. This may take about 3-5 minutes. The egg whites should be glossy and hold their shape when the beaters are lifted.
- Combine Yolks and Milk: In the bowl with the egg yolks, add the milk or cream, salt, and pepper. Whisk the mixture until well combined and slightly frothy.
- Fold the Mixtures Together: Gently fold the whipped egg whites into the yolk mixture using a spatula. Start by adding a small amount of the egg whites to lighten the yolks, then gradually fold in the remaining whites. Be careful not to deflate the egg whites; the goal is to maintain that airy texture.
- Cook the Eggs: In a nonstick skillet, melt the butter over medium-low heat. Once bubbling, pour in the egg mixture. Let it sit for a few seconds, then gently stir with a spatula, allowing the uncooked eggs to flow to the bottom. Continue to cook for about 3-5 minutes until the eggs are softly set but still creamy.
- Serve: Once cooked, remove the skillet from heat. Serve the Cloud-Like Scrambled Eggs immediately, garnished with fresh herbs if desired.
Extra Tips
For the best results, make certain all your utensils and bowls are clean and dry, particularly when whipping the egg whites. Any trace of fat or moisture can hinder their ability to whip up properly.
Additionally, feel free to experiment with seasoning or add-ins such as cheese, sautéed mushrooms, or diced tomatoes for extra flavor. These scrambled eggs are best enjoyed fresh, so try to serve them immediately after cooking for the ultimate texture and taste.
Classic Eggs Benedict

Classic Eggs Benedict is a timeless breakfast dish that brings together the rich flavors of poached eggs, crispy bacon, and velvety hollandaise sauce, all served atop a toasted English muffin.
Originating from the United States, this dish has become a staple in brunch menus around the world. The combination of soft eggs, savory ham or bacon, and creamy sauce creates a delightful balance of textures and flavors that’s hard to resist.
To prepare Classic Eggs Benedict, you’ll need some essential ingredients and a little bit of technique. While it might seem intricate at first, with a bit of practice, you can master this dish and impress your family or guests.
Whether enjoyed on a leisurely Sunday morning or at a special occasion, Classic Eggs Benedict is sure to elevate any meal.
Ingredients (Serves 4-6)
- 4-6 large eggs
- 2 English muffins, split in half
- 4-6 slices of Canadian bacon or ham
- 1 tablespoon white vinegar
- 1 cup unsalted butter
- 3 large egg yolks
- 1 tablespoon fresh lemon juice
- Salt and pepper, to taste
- Fresh chives or parsley, for garnish (optional)
Cooking Instructions
1. Prepare the Hollandaise Sauce: Start by melting the unsalted butter in a small saucepan over low heat. Once melted, remove from heat and set aside.
In a separate bowl, whisk together the egg yolks and lemon juice until pale and slightly thickened. Gradually drizzle the melted butter into the yolk mixture while continuously whisking to create a smooth, creamy sauce. Season with salt and pepper to taste. Keep the hollandaise sauce warm, but not hot, by placing it in a bowl over a pot of warm water.
2. Toast the English Muffins: While the hollandaise is being prepared, split the English muffins in half and toast them until golden brown. This adds a nice crunch and prevents them from becoming soggy once the toppings are added.
3. Cook the Bacon or Ham: In a skillet over medium heat, cook the Canadian bacon or ham until it’s heated through and lightly browned, about 2-3 minutes per side. Remove from the skillet and set aside.
4. Poach the Eggs: Fill a large saucepan with water and add the white vinegar. Bring the water to a gentle simmer. Crack each egg into a small bowl and gently slide them into the simmering water, one at a time.
Poach the eggs for 3-4 minutes, or until the whites are set but the yolks remain runny. Use a slotted spoon to remove the eggs and drain them on a paper towel.
5. Assemble the Dish: To assemble, place a toasted half of the English muffin on each plate. Top each muffin half with a slice of the cooked bacon or ham, followed by a poached egg. Drizzle the warm hollandaise sauce generously over the top and garnish with chopped chives or parsley, if desired.
Extra Tips
When making Classic Eggs Benedict, timing is essential. Prepare the hollandaise sauce and bacon first, then toast the English muffins while the water for poaching the eggs is heating up.
This way, everything will be ready to serve hot and fresh. If you’re serving a larger group, consider poaching the eggs in batches and keeping them warm in a bowl of hot water until you’re ready to assemble.
Don’t be afraid to adjust the seasoning in the hollandaise sauce to suit your taste, and remember that fresh ingredients make a significant difference in flavor!
Full English Breakfast Frittata

A Full English Breakfast Frittata is a delightful twist on the traditional full English breakfast, combining all the essential elements into one hearty dish. This versatile meal is perfect for brunch, lunch, or even a cozy dinner.
With ingredients like sausages, bacon, tomatoes, mushrooms, and, of course, eggs, this frittata captures the essence of a classic English breakfast while providing an easy-to-make option that can be served warm or at room temperature.
This dish isn’t only satisfying but also allows for customization based on your preferences or what you have on hand. Using fresh ingredients guarantees a burst of flavor in every bite, and the frittata can be enjoyed with toast or baked beans for a complete meal.
Whether you’re hosting a family gathering or simply looking for a comforting dish to enjoy at home, the Full English Breakfast Frittata is sure to please.
Ingredients (serves 4-6):
- 6 large eggs
- 100ml whole milk
- 200g sausages, sliced
- 150g bacon, chopped
- 100g cherry tomatoes, halved
- 100g mushrooms, sliced
- 1 small onion, finely chopped
- 1 tablespoon olive oil
- Salt and pepper, to taste
- Fresh parsley, for garnish (optional)
Cooking Instructions:
1. Preheat the oven: Begin by preheating your oven to 180°C (350°F). This guarantees that your frittata cooks evenly and sets properly once it’s in the oven.
2. Cook the meat: In a large, oven-safe skillet, heat the olive oil over medium heat. Add the sliced sausages and chopped bacon. Cook for about 5-7 minutes, stirring occasionally until the meat is browned and cooked through. Remove the meat from the skillet and set aside.
3. Sauté the vegetables: In the same skillet, add the finely chopped onion and sliced mushrooms. Sauté for about 3-4 minutes until the onions are translucent and the mushrooms are tender.
Then, add the halved cherry tomatoes and cook for an additional 2 minutes.
4. Whisk the eggs and milk: In a large bowl, whisk together the eggs and whole milk. Season the mixture with salt and pepper to taste. This will create a light and fluffy base for your frittata.
5. Combine ingredients: Once the vegetables are cooked, return the meat to the skillet and stir to combine. Pour the egg mixture evenly over the meat and vegetables, ensuring all ingredients are well distributed.
6. Cook on the stovetop: Allow the frittata to Cook on the stovetop for about 3-4 minutes without stirring. This will help set the bottom of the frittata.
7. Transfer to the oven: After the bottom has set, transfer the skillet to the preheated oven. Bake for 15-20 minutes, or until the frittata is puffed up and golden brown on top.
8. Serve: Once cooked, remove the frittata from the oven and let it cool for a few minutes. Carefully slice into wedges and serve warm, garnished with fresh parsley if desired.
Extra Tips:
For a more personalized frittata, feel free to swap out ingredients based on your taste or dietary preferences—try adding spinach, bell peppers, or different types of cheese.
Additionally, make sure not to overcook the frittata in the oven; it should be just set in the middle for a creamy texture. Leftovers can be stored in the fridge and enjoyed cold or reheated the next day, making it a convenient option for meal prep!
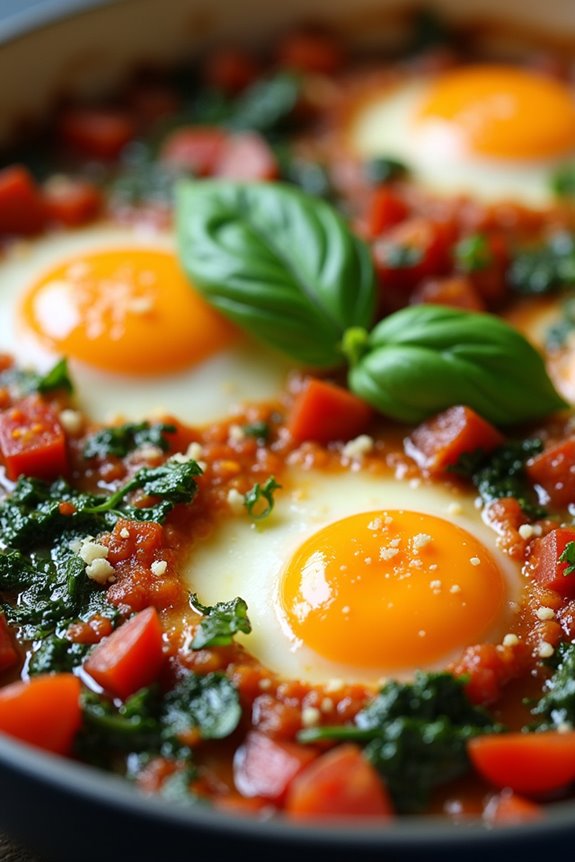
Shakshuka With a British Twist

Shakshuka is a vibrant and flavorful dish that originates from North Africa and the Middle East, where eggs are poached in a spicy tomato sauce. The British twist on this classic recipe incorporates traditional British breakfast ingredients like sausage and baked beans, adding a hearty and comforting element to the dish. This fusion not only enhances the texture and flavor but also makes it a perfect dish for brunch or a cozy dinner.
In this recipe, we’ll combine the rich flavors of tomatoes, spices, and British breakfast essentials to create a Shakshuka that’s both familiar and unique. The dish isn’t only visually appealing with its bright colors, but it also offers a delightful mix of flavors that will please a crowd. Serve it with crusty bread or buttery toast to soak up the delicious sauce, making it an excellent meal for sharing with family and friends.
Ingredients (Serves 4-6):
- 2 tablespoons olive oil
- 1 onion, finely chopped
- 2 cloves garlic, minced
- 1 red bell pepper, diced
- 1 green bell pepper, diced
- 1 teaspoon smoked paprika
- 1 teaspoon ground cumin
- 1 can (400g) chopped tomatoes
- 1 can (400g) baked beans
- 4-6 large eggs
- 4 British sausages, cooked and sliced
- Salt and pepper to taste
- Fresh parsley, chopped (for garnish)
- Crusty bread or toast (for serving)
Cooking Instructions:
- Sauté the Vegetables: In a large skillet, heat the olive oil over medium heat. Add the chopped onion and cook until it becomes translucent, about 5 minutes. Stir in the minced garlic, diced red and green bell peppers, and cook for an additional 3-4 minutes until the peppers are soft. This step builds the flavor base for the shakshuka.
- Add Spices: Sprinkle in the smoked paprika and ground cumin, stirring well to combine. Allow the spices to cook for about 1 minute, which will release their natural oils and enhance their flavors.
- Incorporate Tomatoes and Beans: Pour in the chopped tomatoes and add the baked beans to the skillet. Stir everything together and bring the mixture to a gentle simmer. Season with salt and pepper to taste. Let it cook for about 10 minutes, allowing the sauce to thicken slightly and the flavors to meld.
- Add Sausages: Once the sauce has thickened, gently fold in the sliced cooked sausages. Make sure they’re evenly distributed in the sauce. This adds a savory depth to the dish, making it heartier.
- Poach the Eggs: Using a spoon, create small wells in the sauce, and crack an egg into each well. Cover the skillet with a lid and let the eggs cook for about 5-8 minutes, or until the whites are set but the yolks are still runny. If you prefer firmer yolks, cook for an additional minute or two.
- Garnish and Serve: Once the eggs are cooked to your liking, remove the skillet from the heat. Garnish with freshly chopped parsley. Serve the shakshuka hot with slices of crusty bread or buttered toast on the side for dipping.
Extra Tips:
For an extra kick of flavor, consider adding a pinch of chili flakes or a dash of hot sauce to the tomato and bean mixture. If you’d like to make this dish vegetarian, simply omit the sausages and add more vegetables like spinach or mushrooms.
You can also experiment with different types of cheese, such as feta or cheddar, for a creamy element. Shakshuka is versatile, so feel free to customize it to your taste!
Deviled Eggs With Worcestershire Sauce

Deviled eggs are a classic appetizer that never goes out of style. They aren’t only easy to make but also versatile, allowing for various flavor combinations. In this recipe, we add Worcestershire sauce to give the filling a unique depth of flavor that enhances the traditional deviled egg. Perfect for gatherings, picnics, or just as a snack at home, these deviled eggs with Worcestershire sauce will surely impress your guests.
Preparing deviled eggs is a straightforward process, but achieving the perfect texture and flavor balance takes a little finesse. The creamy yolk mixture, combined with the tangy kick from Worcestershire sauce, creates a delightful treat. Whether you choose to garnish with paprika, chives, or even crispy bacon bits, these deviled eggs are sure to be a hit.
Ingredients (Serves 4-6):
- 6 large eggs
- 3 tablespoons mayonnaise
- 1 teaspoon Dijon mustard
- 1 teaspoon Worcestershire sauce
- 1 teaspoon white vinegar
- Salt and pepper to taste
- Paprika for garnish
- Chopped chives or parsley for garnish (optional)
Cooking Instructions:
- Boil the Eggs: Place the eggs in a single layer in a saucepan and cover them with cold water. Bring the water to a boil over medium-high heat. Once boiling, cover the pan, remove it from heat, and let the eggs sit for 10-12 minutes. This method helps guarantee that the yolks are fully cooked without being overdone.
- Cool the Eggs: After the eggs have finished cooking, transfer them to a bowl of ice water. Let them sit for about 5-10 minutes until completely cooled. This process stops the cooking and makes peeling easier.
- Peel the Eggs: Gently tap the eggs on a hard surface to crack the shell, then peel under running water to help remove any stubborn bits of shell. Once peeled, rinse the eggs to remove any shell fragments.
- Prepare the Filling: Slice each egg in half lengthwise and carefully remove the yolks. Place the yolks in a mixing bowl and mash them with a fork until smooth. Add the mayonnaise, Dijon mustard, Worcestershire sauce, white vinegar, salt, and pepper. Mix until well combined and creamy.
- Fill the Egg Whites: Using a spoon or a piping bag, fill each egg white half with the yolk mixture. You can create a smooth top or use a piping bag for a decorative swirl.
- Garnish and Serve: Sprinkle paprika over the filled eggs for a pop of color and flavor. If desired, add chopped chives or parsley for an extra touch of freshness. Arrange the deviled eggs on a serving platter and enjoy!
Extra Tips:
For the best results, choose eggs that are at least a week old; they tend to peel more easily than very fresh eggs. You can customize the recipe by adding other ingredients to the yolk mixture, such as hot sauce for heat, or dill for a fresh flavor.
If you’re preparing these deviled eggs in advance, consider adding the garnish just before serving to keep them looking fresh and vibrant.
Scotch Eggs With a Spicy Kick

Scotch eggs are a classic British dish that combines the heartiness of a boiled egg with the richness of sausage meat, all encased in a crispy breadcrumb coating. This version adds a spicy twist to the traditional recipe, giving it an exciting kick that elevates the flavors and makes it a perfect snack or appetizer.
Whether you’re serving them at a picnic, a party, or as a delightful addition to a brunch spread, these spicy Scotch eggs are sure to impress your guests.
To achieve the perfect balance of flavors, the sausage meat is seasoned with a blend of spices that includes chili powder and cayenne pepper, guaranteeing that each bite has a satisfying heat. The eggs are boiled to a firm, yet tender consistency, and then carefully wrapped in the spicy sausage mix before being coated in breadcrumbs and fried to a golden crisp.
This recipe serves 4-6 people, making it an ideal choice for gatherings or family meals.
Ingredients:
- 6 large eggs
- 1 pound (450g) pork sausage meat
- 1 teaspoon chili powder
- 1/2 teaspoon cayenne pepper (adjust to taste)
- 1/2 teaspoon black pepper
- 1/2 teaspoon salt
- 1 cup all-purpose flour
- 2 large eggs (for egg wash)
- 2 cups breadcrumbs
- Vegetable oil (for frying)
Cooking Instructions:
- Boil the Eggs: Place 6 large eggs in a saucepan and cover them with cold water. Bring the water to a boil, then reduce the heat and simmer for 9-10 minutes. Once cooked, transfer the eggs to an ice bath to cool. This will make peeling easier.
- Prepare the Sausage Mixture: In a mixing bowl, combine 1 pound of pork sausage meat with 1 teaspoon of chili powder, 1/2 teaspoon of cayenne pepper, 1/2 teaspoon of black pepper, and 1/2 teaspoon of salt. Mix thoroughly until the spices are evenly distributed throughout the meat.
- Peel the Eggs: Once the boiled eggs are cool, carefully peel them under running water to help remove the shells without damaging the eggs.
- Wrap the Eggs: Take a portion of the sausage mixture (about the size of a golf ball) and flatten it in your palm. Place a peeled egg in the center and mold the sausage around the egg, guaranteeing it’s completely covered. Repeat this process for the remaining eggs.
- Prepare for Frying: Set up a dredging station by placing 1 cup of all-purpose flour in one bowl, 2 large beaten eggs in another, and 2 cups of breadcrumbs in a third bowl. Roll each sausage-wrapped egg in flour, then dip it in the beaten eggs, and finally coat it with breadcrumbs, pressing gently to guarantee the coating sticks.
- Fry the Scotch Eggs: Heat vegetable oil in a deep frying pan or pot over medium heat. Once hot (about 350°F or 175°C), carefully add the Scotch eggs in batches, frying for about 5-6 minutes or until they’re golden brown and cooked through. Use a slotted spoon to remove them from the oil and drain on paper towels.
- Serve: Allow the Scotch eggs to cool slightly before serving. They can be enjoyed warm or at room temperature, perfect for any occasion.
Extra Tips:
When making Scotch eggs, you can experiment with different sausage flavors, such as chorizo or spicy Italian sausage, to customize the heat level to your liking.
Additionally, if you prefer a lighter version, you can bake the Scotch eggs instead of frying them. Just brush them with a little olive oil and bake at 400°F (200°C) for about 25-30 minutes, or until golden brown.
Remember to guarantee the sausage is fully cooked for food safety, and enjoy your spicy Scotch eggs with a tangy dipping sauce or a dollop of mustard!
Baked Eggs in Tomato and Spinach
Baked Eggs in Tomato and Spinach is a delightful and nutritious dish that perfectly combines the hearty flavors of tomatoes and the vibrant freshness of spinach. This recipe isn’t only simple to prepare but also makes for a wholesome breakfast or brunch option that can be enjoyed by the whole family.
With the added goodness of eggs, this dish is packed with protein and essential nutrients, guaranteeing that you start your day off on the right foot.
The beauty of this dish lies in its versatility; you can easily customize it by adding your favorite herbs or spices, or even incorporating other vegetables such as bell peppers or mushrooms. This hearty meal is perfect for gatherings, as it can be prepared in one large baking dish, allowing everyone to partake and enjoy the delicious flavors together.
Let’s plunge into the recipe to create this delightful dish!
Ingredients (Serves 4-6):
- 6 large eggs
- 2 cups fresh spinach, chopped
- 1 can (14 oz) diced tomatoes, drained
- 1 small onion, diced
- 2 cloves garlic, minced
- 1 teaspoon olive oil
- 1 teaspoon dried oregano
- 1 teaspoon salt
- ½ teaspoon black pepper
- ¼ cup grated Parmesan cheese (optional)
- Fresh basil leaves for garnish (optional)
Cooking Instructions:
1. Preheat the Oven: Begin by preheating your oven to 375°F (190°C). This will guarantee that the eggs bake evenly and you achieve that perfect set texture.
2. Sauté the Vegetables: In a large oven-safe skillet, heat the olive oil over medium heat. Add the diced onion and sauté for about 3-4 minutes until it becomes translucent.
Then, add the minced garlic and cook for an additional minute until fragrant.
3. Add the Spinach and Tomatoes: Stir in the chopped spinach and cook until it wilts down, which should take about 2-3 minutes.
Next, add the drained diced tomatoes, oregano, salt, and black pepper. Mix everything well and allow it to cook for another 2 minutes, letting the flavors meld together.
4. Create Wells for the Eggs: Once the vegetable mixture is evenly distributed, use a spoon to create small wells in the mixture for the eggs.
Make sure there’s enough space for each egg to sit comfortably without breaking.
5. Add the Eggs: Carefully crack an egg into each well you’ve created. Be gentle to avoid breaking the yolks.
If desired, sprinkle the grated Parmesan cheese over the top for added flavor.
6. Bake: Transfer the skillet to the preheated oven and bake for about 12-15 minutes, or until the egg whites are set but the yolks are still slightly runny.
Keep an eye on them to achieve your desired doneness.
7. Garnish and Serve: Once baked, remove the skillet from the oven and let it cool for a couple of minutes.
Garnish with fresh basil leaves, if using, and serve warm right from the skillet.
Extra Tips:
For an added layer of flavor, consider incorporating some chili flakes for a bit of heat or adding crumbled feta cheese instead of Parmesan for a Mediterranean twist.
Additionally, using fresh herbs like thyme or parsley can elevate the taste even further. If you’re short on time, you can prepare the vegetable mixture in advance and simply bake the eggs when you’re ready to serve.
Enjoy your delicious Baked Eggs in Tomato and Spinach!
Egg and Soldiers
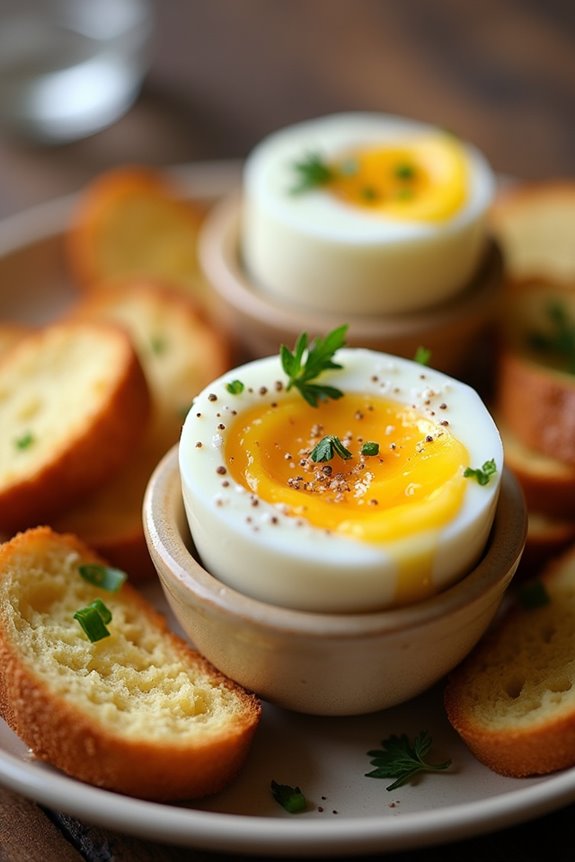
Egg and soldiers is a classic British breakfast dish that has delighted generations with its simplicity and charm. The dish features soft-boiled eggs served alongside strips of toast, affectionately known as “soldiers,” perfect for dipping into the creamy yolk. This nostalgic meal isn’t only quick to prepare but also offers a fun and interactive dining experience, making it a favorite among both children and adults.
To achieve the perfect egg and soldiers, it’s essential to master the timing of the soft-boiled eggs. Ideally, the eggs should have a firm white and a gooey, runny yolk that can be easily scooped up with the crispy toast. Pairing the eggs with buttered toast enhances the flavors and adds a satisfying crunch. This dish is often enjoyed with a sprinkle of salt and pepper for added taste, making it a delightful start to the day.
Ingredients (serving size: 4-6 people)
- 4-6 large eggs
- 4-6 slices of bread (white, wholemeal, or sourdough)
- Butter (for spreading)
- Salt and pepper (for seasoning)
- Fresh herbs (optional, for garnish)
Cooking Instructions
- Boil the Eggs: Fill a saucepan with enough water to cover the eggs and bring it to a gentle boil. Carefully lower the eggs into the boiling water using a spoon. For soft-boiled eggs, cook them for 4 to 6 minutes, depending on how runny you prefer the yolk. After the time is up, quickly transfer the eggs to a bowl of cold water to stop the cooking process.
- Prepare the Toast: While the eggs are boiling, toast the bread slices to your desired level of crispiness. You can use a toaster or grill them in a pan. Once toasted, remove the bread and let it cool slightly before spreading a layer of butter on each slice.
- Cut the Toast into Soldiers: Using a sharp knife, cut each piece of toast into long strips, approximately 1 inch wide. These strips are your “soldiers” that will be used for dipping into the eggs.
- Serve the Dish: Once the eggs are cool enough to handle, gently tap the top of each egg with a spoon to crack it open, then remove the top shell. Place the eggs in egg cups for serving. Arrange the toast soldiers on the side, and season the eggs with a sprinkle of salt and pepper. Optionally, you can garnish with fresh herbs for an added touch.
Extra Tips
For the best results, use eggs that are at room temperature, as they cook more evenly and are less likely to crack during boiling.
Experiment with different types of bread for your soldiers; wholemeal or sourdough can add a unique flavor profile to the dish.
Additionally, if you’re cooking for a larger group, consider using a large pot to boil multiple eggs at once, ensuring everyone gets their meal at the same time.
Enjoy your egg and soldiers with a side of fresh fruit or a cup of tea for a truly British breakfast experience!
Creamy Egg and Smoked Salmon Bagel
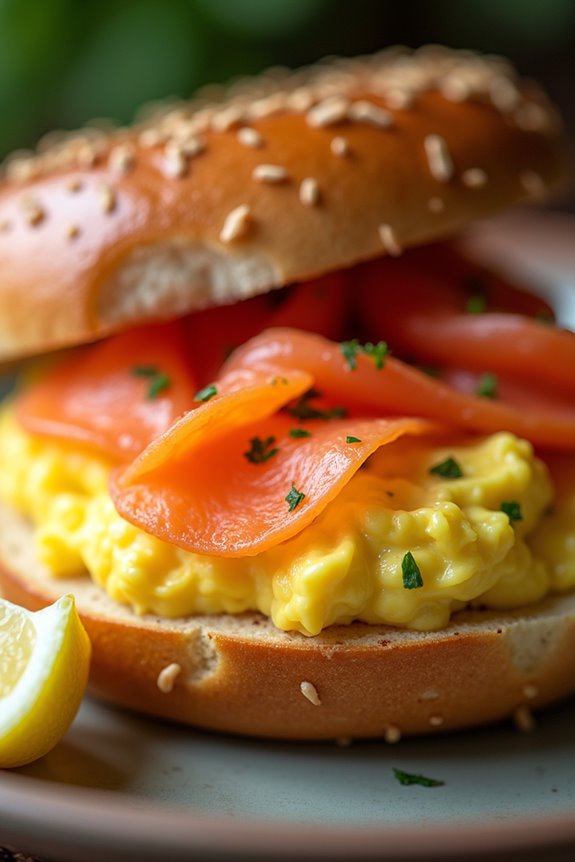
For a delightful breakfast or brunch option, the Creamy Egg and Smoked Salmon Bagel is a perfect choice. This dish combines the rich flavors of creamy scrambled eggs with the luxurious taste of smoked salmon, all nestled in a toasted bagel. It’s not only simple to prepare but also packed with protein, making it a nutritious start to your day.
The contrast of textures between the soft eggs and the chewy bagel, along with the savory notes of the salmon, creates a satisfying meal that’s sure to impress.
What makes this recipe even more appealing is its versatility. You can customize it with additional toppings like capers, dill, or even a squeeze of lemon to enhance the flavors further. Perfect for a leisurely weekend brunch or a quick weekday breakfast, the Creamy Egg and Smoked Salmon Bagel is a dish that brings a taste of luxury to your table without requiring hours in the kitchen.
Ingredients (serves 4-6):
- 4 large eggs
- 2 tablespoons cream cheese
- 2 tablespoons milk
- Salt and pepper, to taste
- 4-6 bagels (your choice of type)
- 200g smoked salmon
- Fresh chives or dill, for garnish (optional)
- Lemon wedges, for serving (optional)
Cooking Instructions:
- Prepare the Eggs: Crack the eggs into a mixing bowl. Add the cream cheese and milk. Use a whisk to blend the ingredients together until smooth. Season with salt and pepper to taste. The cream cheese will create a rich and creamy texture in the scrambled eggs.
- Cook the Eggs: Heat a non-stick skillet over medium-low heat. Once the skillet is warm, pour in the egg mixture. Gently stir the eggs with a spatula, pushing them from the edges towards the center. Continue to cook the eggs slowly, stirring frequently, until they’re just set but still creamy. Remove from heat to prevent overcooking.
- Toast the Bagels: While the eggs are cooking, slice the bagels in half and toast them until golden brown. This adds a nice crunch and helps hold up the creamy filling.
- Assemble the Bagels: Once the bagels are toasted, place the creamy scrambled eggs generously on each bagel half. Top with slices of smoked salmon, allowing the flavors to meld together beautifully.
- Garnish and Serve: If desired, sprinkle with fresh chives or dill for added flavor and color. Serve with lemon wedges on the side for a zesty finish.
Extra Tips:
When making the Creamy Egg and Smoked Salmon Bagel, consider adjusting the seasoning to your preference. Using a variety of bagels, such as everything bagels or sesame, can also add an interesting twist to the dish.
Additionally, if you prefer a bit more texture, consider folding in some sautéed spinach or chopped tomatoes into the egg mixture. This not only enhances the flavor but also adds color and nutrition to your meal. Enjoy your delicious creation with a side of fresh fruit or a light salad for a complete brunch experience!
Pea and Mint Frittata

The Pea and Mint Frittata is a delightful and invigorating dish that brings together the sweet flavors of peas and the aromatic essence of fresh mint. This simple yet elegant recipe is perfect for brunch or a light lunch and can be served warm or at room temperature.
Ideal for gatherings or family meals, the frittata is a versatile dish that can be enjoyed by everyone, making it a popular choice in British cuisine. This frittata isn’t only delicious but also packed with protein from the eggs, making it a nutritious option.
It’s easy to prepare, requiring minimal ingredients and time. Serve it alongside a fresh salad or some crusty bread for a complete meal that’s sure to impress your guests. Whether you’re an experienced cook or a beginner, this frittata is a great dish to add to your repertoire.
Ingredients (Serves 4-6):
- 8 large eggs
- 200g frozen peas
- 1 small onion, finely chopped
- 2 tablespoons fresh mint, chopped
- 50g grated cheese (optional)
- 2 tablespoons olive oil
- Salt and pepper, to taste
Cooking Instructions:
- Preheat the Oven: Begin by preheating your oven to 180°C (350°F). This guarantees that the frittata cooks evenly and sets properly once it’s placed in the oven.
- Sauté the Onion: In a large, oven-proof frying pan, heat the olive oil over medium heat. Add the finely chopped onion and sauté for about 5 minutes until it becomes soft and translucent. This step adds depth of flavor to your frittata.
- Add the Peas: Once the onion is ready, add the frozen peas to the pan. Stir them in and cook for an additional 2-3 minutes until they’re heated through. This will help to maintain the vibrant color and sweetness of the peas.
- Whisk the Eggs: In a separate bowl, crack the eggs and whisk them together until they’re well combined. Season with salt and pepper to taste. This step is vital as it will provide the base texture for the frittata.
- Combine Ingredients: Pour the whisked eggs over the sautéed onion and peas in the frying pan. Gently stir in the chopped mint and cheese (if using) to guarantee an even distribution of ingredients. This will give flavor throughout the frittata.
- Cook on the Stove: Allow the frittata to cook on the stove for about 5 minutes, or until the edges begin to set. This step is important as it creates a nice base for the frittata before transferring it to the oven.
- Bake in the Oven: Transfer the frying pan to the preheated oven and bake for 15-20 minutes, or until the frittata is puffed up and golden brown on top. Keep an eye on it to avoid overcooking.
- Cool and Serve: Once cooked, remove the frittata from the oven and let it cool for a few minutes. Slice it into wedges and serve warm or at room temperature.
Extra Tips:
For an even more flavorful frittata, consider adding other vegetables such as bell peppers or spinach. You can also experiment with different types of cheese for added taste.
If you prefer a firmer texture, you can cook the frittata a little longer in the oven. Leftovers can be stored in the refrigerator and enjoyed the next day, making this dish a convenient option for meal prep.
Yorkshire Pudding Filled With Eggs

Yorkshire pudding is a classic British dish that originated in Yorkshire and is traditionally served with roast beef. Its unique texture and flavor make it a versatile vehicle for various fillings, and when filled with eggs, it transforms into a delightful breakfast or brunch option.
This dish combines the airy, crispy goodness of Yorkshire pudding with the richness of eggs, resulting in a satisfying and hearty meal that’s sure to impress your family and friends.
Making Yorkshire pudding filled with eggs is easier than you might think. The key to achieving the perfect rise is guaranteeing that your batter is poured into hot oil, which creates that signature puffiness. You can customize your filling by adding cheese, herbs, or vegetables to the eggs for an extra burst of flavor.
Whether you serve it with a side of bacon or enjoy it plain, this dish is a wonderful way to showcase the versatility of eggs and Yorkshire pudding.
Ingredients (Serves 4-6):
- 140g plain flour
- 4 large eggs
- 200ml milk
- 1/2 teaspoon salt
- 2 tablespoons vegetable oil (or beef drippings)
- 6 large eggs (for filling)
- Salt and pepper to taste
- Optional: grated cheese, chopped herbs, or sautéed vegetables
Cooking Instructions:
1. Preheat the Oven: Start by preheating your oven to 220°C (425°F). This high temperature is essential for creating the perfect rise in your Yorkshire pudding.
2. Prepare the Batter: In a mixing bowl, whisk together the plain flour and salt. In another bowl, beat the four large eggs and then add the milk, mixing until fully combined. Gradually pour the egg mixture into the flour while whisking continuously until you have a smooth batter.
Allow the batter to rest for at least 30 minutes at room temperature.
3. Heat the Oil: In a large muffin tin or Yorkshire pudding tray, add the vegetable oil (or beef drippings) to each compartment. Place the tray in the preheated oven for about 10 minutes, or until the oil is hot and shimmering.
4. Bake the Puddings: Carefully remove the hot tray from the oven. Pour the rested batter into each compartment, filling them about halfway. Quickly return the tray to the oven and bake for 20-25 minutes, or until the Yorkshire puddings have risen and are golden brown.
5. Prepare the Egg Filling****: While the Yorkshire puddings are baking, crack the six large eggs into a bowl, season with salt and pepper, and whisk gently. If desired, fold in any optional ingredients like grated cheese or chopped herbs.
6. Fill the Yorkshire Puddings: Once the Yorkshire puddings are fully cooked and risen, remove the tray from the oven. Carefully make a small well in the center of each pudding and pour in the egg mixture.
Return the tray to the oven and bake for an additional 10-12 minutes, or until the eggs are set to your preference.
7. Serve: Once the eggs are cooked, remove the tray from the oven, let the Yorkshire puddings cool slightly, and serve warm. Enjoy your Yorkshire pudding filled with eggs alongside your favorite breakfast items!
Extra Tips:
To guarantee your Yorkshire puddings rise beautifully, the batter should be at room temperature when added to the hot oil. Avoid opening the oven door while they’re baking, as this can cause them to collapse.
For added flavor, consider using flavored oils or adding herbs to the batter. If you’re serving a larger crowd, you can easily double the recipe and use multiple trays for baking. Enjoy experimenting with different fillings to find your favorite combination!
Kedgeree With Flaked Fish and Eggs

Kedgeree is a classic British dish that boasts a rich history, originally inspired by Indian cuisine. It’s a delightful combination of flaked fish, rice, and hard-boiled eggs, infused with aromatic spices. Traditionally made with smoked haddock, kedgeree has become a beloved breakfast or brunch option in many British households.
The smoky fish pairs beautifully with the creamy texture of the eggs and the fluffy rice, creating a dish that’s both satisfying and full of flavor.
This recipe for Kedgeree With Flaked Fish and Eggs is designed to serve 4-6 people, making it perfect for family gatherings or brunch with friends. The combination of ingredients and spices will transport your taste buds, while the ease of preparation allows you to enjoy the cooking process without feeling overwhelmed. Whether you’re a seasoned chef or a novice in the kitchen, this dish is sure to impress.
Ingredients:
- 300g smoked haddock fillets
- 1 cup basmati rice
- 4 large eggs
- 1 onion, finely chopped
- 2 cloves garlic, minced
- 1 teaspoon curry powder
- 1 teaspoon ground cumin
- 1 tablespoon butter
- 2 tablespoons vegetable oil
- 2 tablespoons fresh parsley, chopped
- Salt and pepper, to taste
- Lemon wedges, for serving
Cooking Instructions:
1. Prepare the Fish: Place the smoked haddock fillets in a saucepan and cover them with water. Bring the water to a gentle simmer over medium heat and poach the fish for about 10-12 minutes, or until the fish is cooked through and flakes easily with a fork.
Remove the fish from the water and set aside to cool. Reserve the poaching liquid for later use.
2. Cook the Rice: In a separate pot, rinse the basmati rice under cold water until the water runs clear. Add the rinsed rice to a saucepan with 2 cups of the reserved poaching liquid from the fish.
Bring it to a boil, then reduce the heat to low, cover, and simmer for about 15 minutes until the rice is tender and has absorbed the liquid. Once cooked, fluff the rice with a fork and set aside.
3. Boil the Eggs: While the rice is cooking, place the eggs in a pot and cover them with cold water. Bring the water to a boil, then reduce the heat to a simmer and cook the eggs for 8-10 minutes for hard-boiled eggs.
Once done, transfer the eggs to an ice bath to cool, then peel and chop them coarsely.
4. Sauté the Aromatics: In a large frying pan, heat the vegetable oil and butter over medium heat. Add the chopped onion and sauté for 5-7 minutes until it becomes translucent.
Stir in the minced garlic, curry powder, and ground cumin, cooking for an additional minute until fragrant.
5. Combine Ingredients: Flake the cooled smoked haddock into bite-sized pieces and add it to the frying pan with the sautéed onions and spices.
Gently fold in the cooked rice and chopped eggs, making sure everything is well combined. Season with salt and pepper to taste, and heat through for another 2-3 minutes.
6. Garnish and Serve: Remove the kedgeree from the heat and stir in the fresh parsley. Serve the dish warm with lemon wedges on the side for an extra burst of flavor.
Extra Tips: When preparing Kedgeree, feel free to experiment with different types of fish, such as salmon or trout, if you prefer.
Additionally, for a touch of sweetness, you can add peas or finely chopped bell peppers to the dish. Make sure to taste and adjust the seasoning as you go, since the saltiness of the fish can vary.
Finally, serving the kedgeree with a sprinkle of fresh herbs and a squeeze of lemon elevates the dish and adds a revitalizing finish. Enjoy your culinary adventure!
Curried Egg Salad Sandwiches
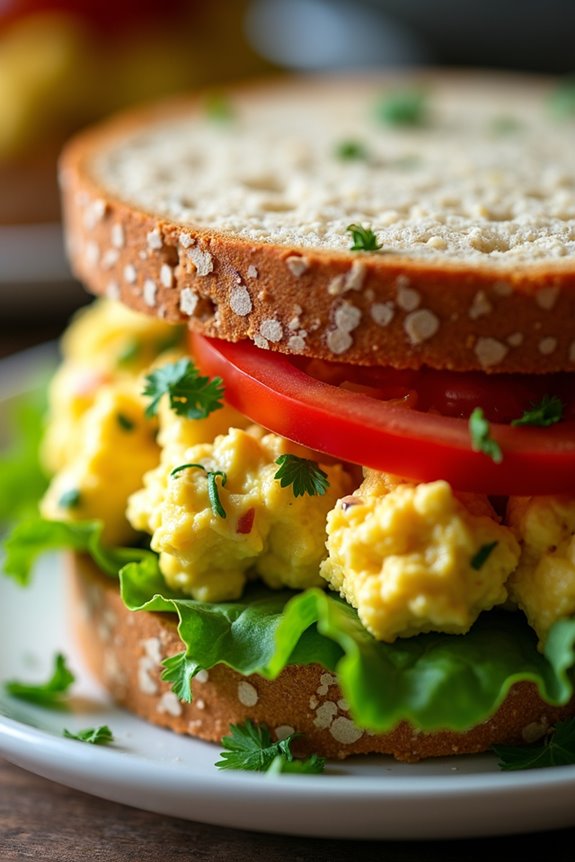
Curried Egg Salad Sandwiches are a delightful twist on the classic egg salad, infusing it with aromatic spices that elevate the flavors to a whole new level. This dish is perfect for picnics, lunchboxes, or light dinners, offering a creamy and satisfying filling nestled between slices of bread. The combination of boiled eggs, curry powder, and various fresh ingredients creates a rich texture and a vibrant taste that will please even the most discerning palate.
This recipe isn’t only easy to make but also allows for customization based on your preferences. You can adjust the level of spiciness by varying the amount of curry powder and even add other ingredients like raisins or chopped apples for a touch of sweetness. Perfectly paired with crisp lettuce and fresh tomatoes, these sandwiches are sure to become a family favorite.
Ingredients (serves 4-6 people):
- 6 large eggs
- 3 tablespoons mayonnaise
- 1 tablespoon plain yogurt
- 1 teaspoon curry powder (adjust to taste)
- 1 teaspoon Dijon mustard
- Salt and pepper, to taste
- 1/4 cup finely chopped red onion
- 1/4 cup chopped celery
- 2 tablespoons chopped fresh cilantro or parsley
- 6 slices of whole grain or white bread
- Lettuce leaves (for serving)
- Tomato slices (for serving)
Cooking Instructions:
- Boil the Eggs: Place the eggs in a saucepan and cover them with cold water. Bring the water to a boil over medium heat. Once boiling, cover the pan, remove it from the heat, and let the eggs sit for 12 minutes. This will guarantee they’re hard-boiled but not overcooked.
- Cool and Peel the Eggs: After 12 minutes, transfer the eggs to a bowl of ice water to stop the cooking process. Let them cool for about 5-10 minutes. Once cooled, gently tap the eggs on a hard surface and peel them under running water for easier removal of the shell.
- Prepare the Egg Salad Mixture: In a mixing bowl, chop the peeled eggs into small pieces. Add the mayonnaise, yogurt, curry powder, Dijon mustard, salt, and pepper. Mix well to combine all the ingredients, ensuring the eggs are coated with the dressing.
- Add Vegetables and Herbs: Fold in the chopped red onion, celery, and fresh herbs (cilantro or parsley) into the egg mixture. Mix gently to incorporate the vegetables without mashing the eggs too much.
- Assemble the Sandwiches: Lay out the slices of bread on a clean surface. Place a generous amount of the curried egg salad on one slice of bread. Top with lettuce leaves and tomato slices, then cover with another slice of bread. Repeat with the remaining bread and filling.
- Slice and Serve: Cut the sandwiches in half or quarters for easy serving. Arrange them on a platter and enjoy immediately, or cover with plastic wrap and refrigerate until ready to serve.
Extra Tips:
For an added crunch, consider including chopped nuts like walnuts or almonds in the egg salad mixture. If you’re looking to make the sandwiches ahead of time, prepare the egg salad and store it in the refrigerator, but assemble the sandwiches just before serving to keep the bread from getting soggy.
You can also experiment with different types of bread, such as ciabatta or pita, for a unique twist on this classic dish.
Spanish Tortilla With British Flavors

The Spanish Tortilla, a classic Spanish dish traditionally made with eggs, potatoes, and onions, can be enhanced with British flavors to create a delightful twist on this beloved recipe. By incorporating ingredients such as mature Cheddar cheese and fresh herbs like chives or parsley, you can bring a new dimension to the dish while still honoring its roots.
This hearty and savory tortilla is perfect for breakfast, brunch, or even as a light lunch complemented with a side salad. In this version, the addition of British flavors not only elevates the taste but also makes it a comforting meal that resonates with both Spanish and British culinary traditions.
The creamy texture of the eggs, combined with the richness of the cheese and the earthiness of the potatoes, creates a satisfying dish that everyone will enjoy. Serve it warm or at room temperature, and watch as it becomes a favorite at your dining table.
Ingredients (serves 4-6):
- 6 large British eggs
- 3 medium potatoes, peeled and thinly sliced
- 1 medium onion, finely chopped
- 150g mature Cheddar cheese, grated
- 3 tablespoons olive oil
- Salt and pepper to taste
- Fresh chives or parsley, chopped (for garnish)
Cooking Instructions:
1. Prepare the ingredients: Start by peeling the potatoes and slicing them thinly (about 1/8 inch thick). Finely chop the onion and set both aside. Grate the mature Cheddar cheese and chop the chives or parsley for garnish.
2. Cook the potatoes and onions: In a large non-stick frying pan, heat 2 tablespoons of olive oil over medium heat. Add the sliced potatoes and onions, seasoning with salt and pepper. Cook gently for about 15-20 minutes, stirring occasionally until the potatoes are tender and slightly golden.
You want to ascertain they’re cooked through but not browning too much, as they should remain soft.
3. Beat the eggs: While the potatoes and onions are cooking, crack the eggs into a mixing bowl. Whisk them thoroughly until they’re well combined. Season with salt and pepper to taste.
4. Combine ingredients: Once the potatoes and onions are cooked, remove the pan from the heat and allow it to cool slightly. Gently fold the potato and onion mixture into the beaten eggs, followed by the grated Cheddar cheese, ensuring everything is evenly distributed.
5. Cook the tortilla: Wipe out the frying pan and add the remaining tablespoon of olive oil. Heat over medium-low heat. Pour the egg, potato, and cheese mixture into the pan, spreading it evenly. Cook for about 6-8 minutes until the bottom is set and lightly golden.
6. Flip the tortilla: To Flip the tortilla, place a large plate over the pan and carefully invert the pan to transfer the tortilla onto the plate. Add a little more oil to the pan if needed, then slide the tortilla back into the pan to cook the other side for another 5-6 minutes until it’s fully set.
7. Serve: Once cooked through, slide the tortilla onto a serving plate. Let it cool for a few minutes, then garnish with chopped chives or parsley before slicing into wedges to serve.
Extra Tips:
When cooking the Spanish Tortilla, make sure to keep the heat at medium-low to prevent the eggs from cooking too quickly and becoming rubbery. If you prefer a creamier interior, you can slightly undercook the tortilla and allow it to finish cooking off the heat.
This dish can be made ahead of time and served cold or at room temperature, making it an excellent choice for gatherings or picnics. Enjoy your Spanish Tortilla with a side of fresh salad or crusty bread for a complete meal!