

There’s something so comforting about the aroma of a freshly baked cake, isn’t there? British baking classics like Victoria sponge and sticky toffee pudding have a magical way of making any day feel special. Each recipe carries a touch of tradition and warmth. Let’s explore these delightful bakes together. I’ll share some secrets that make them truly unforgettable.
Victoria Sponge Cake
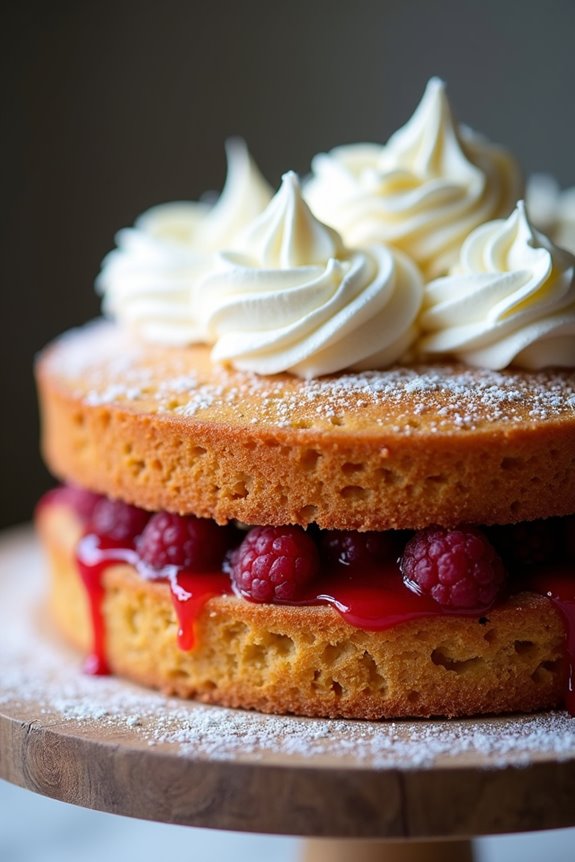
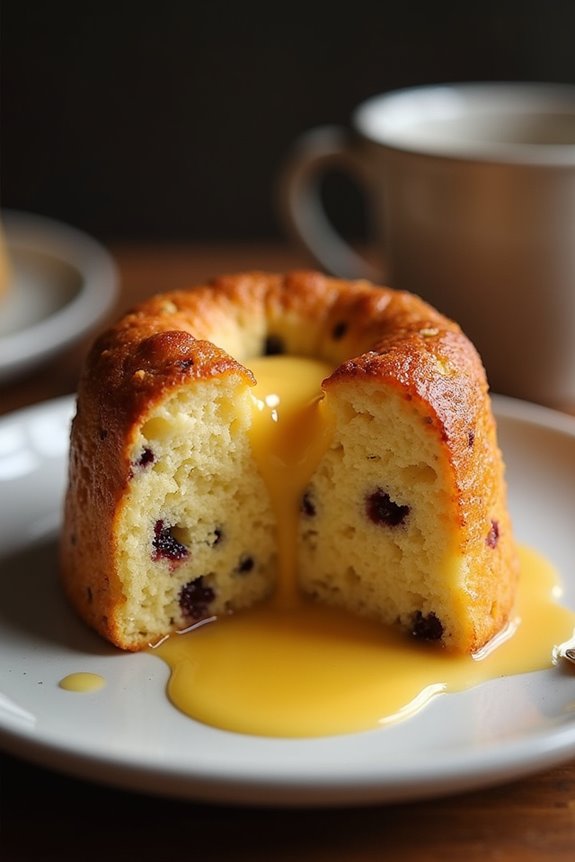
The Victoria Sponge Cake is a classic British dessert named after Queen Victoria, who’s said to have enjoyed a slice with her afternoon tea. This delightful cake consists of two layers of light and fluffy sponge, filled with a sweet jam and whipped cream, making it the perfect accompaniment for any special occasion or simply an afternoon treat.
The simplicity of this cake allows the quality of the ingredients to shine through, resulting in a moist and flavorful dessert that’s loved by many.
Making a Victoria Sponge Cake is a straightforward process that yields impressive results. The key to a successful sponge cake lies in the creaming method, where butter and sugar are beaten together until light and fluffy, incorporating air into the batter. This recipe is designed to serve 4-6 people, making it an ideal choice for small gatherings or family celebrations.
Follow the steps below for a delightful treat that’s certain to impress.
Ingredients
- 200g unsalted butter, softened
- 200g granulated sugar
- 4 large eggs
- 200g all-purpose flour
- 1 tsp baking powder
- 1 tsp vanilla extract
- A pinch of salt
- 150g raspberry or strawberry jam
- 200ml heavy whipping cream
- Icing sugar for dusting
Cooking Instructions
- Preheat the Oven: Begin by preheating your oven to 180°C (350°F). This guarantees that your cake will bake evenly and rise properly.
- Prepare the Cake Pans: Grease two 20cm (8-inch) round cake pans with butter and line the bottoms with parchment paper. This prevents the cakes from sticking and makes for easy removal.
- Cream Butter and Sugar: In a large mixing bowl, add the softened butter and granulated sugar. Using an electric mixer, beat them together on medium speed until the mixture becomes light and fluffy, which should take about 4-5 minutes.
- Add Eggs: Add the eggs one at a time, mixing well after each addition. Make sure to scrape down the sides of the bowl as needed. This step helps to incorporate the eggs thoroughly into the batter.
- Combine Dry Ingredients: In a separate bowl, sift together the all-purpose flour, baking powder, and salt. This will aerate the flour and help to evenly distribute the baking powder.
- Mix Dry Ingredients with Wet Ingredients: Gradually add the dry ingredients to the butter mixture, folding them in gently with a spatula or wooden spoon. Be careful not to overmix, as this can lead to a dense cake.
- Add Vanilla Extract: Stir in the vanilla extract until just combined. This adds a lovely flavor to the cake.
- Divide the Batter: Evenly divide the batter between the prepared cake pans and smooth the tops with a spatula.
- Bake: Place the pans in the preheated oven and bake for about 25-30 minutes, or until the cakes are golden brown and a toothpick inserted into the center comes out clean.
- Cool the Cakes: Once baked, remove the cakes from the oven and let them cool in the pans for 10 minutes. Then, carefully turn the cakes out onto a wire rack to cool completely.
- Assemble the Cake: Once the cakes are completely cool, spread a generous layer of jam on the top of one cake layer. In a separate bowl, whip the heavy cream until soft peaks form, and then spread it over the jam. Place the second cake layer on top.
- Dust with Icing Sugar: Finally, dust the top of the cake with icing sugar for an elegant finish.
Extra Tips
For the best results, make sure all your ingredients are at room temperature before you start baking, as this helps to create a smoother batter.
If you want to add a twist to your Victoria Sponge Cake, consider incorporating fresh berries or lemon zest into the cream for added flavor.
Always store your cake in an airtight container to keep it fresh, and enjoy it within a few days for the best taste.
Sticky Toffee Pudding
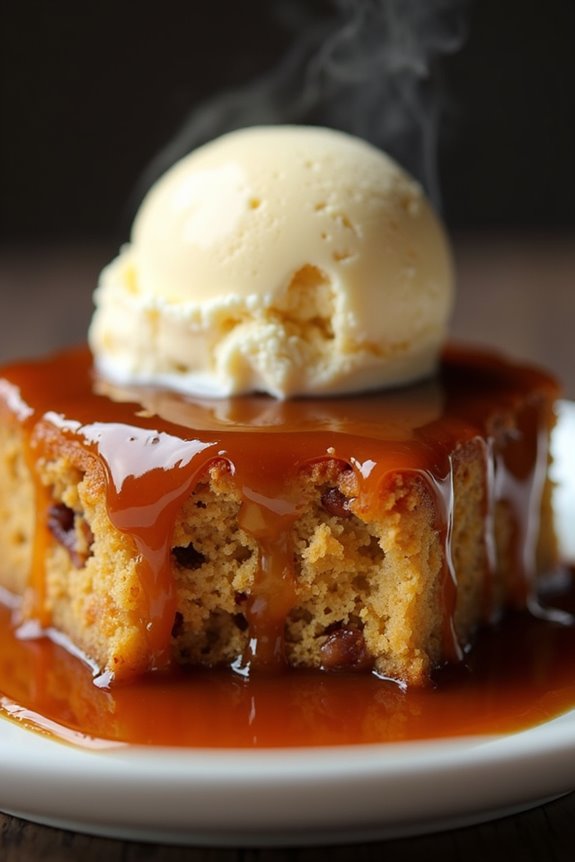
Sticky Toffee Pudding is a quintessential British dessert that has won the hearts of many with its rich, moist sponge cake and indulgent toffee sauce. Originating from the Lake District, this delightful treat is traditionally served warm with a generous drizzle of warm toffee sauce and often accompanied by a scoop of vanilla ice cream or a dollop of clotted cream.
The combination of flavors and textures creates a comforting dessert that’s perfect for any occasion, whether it’s a festive gathering or a cozy family dinner.
To create the perfect Sticky Toffee Pudding, the key lies in the balance of sweetness and the moisture of the sponge. The dates used in the pudding not only add natural sweetness but also contribute to the pudding’s luscious texture.
With a bit of patience and attention to detail, you can craft this beloved dessert that will impress your family and friends. So, roll up your sleeves and get ready to indulge in this heavenly British classic!
Ingredients (Serves 4-6):
- 200g pitted dates, chopped
- 250ml boiling water
- 1 tsp baking soda
- 75g unsalted butter, softened
- 150g brown sugar
- 2 large eggs
- 175g all-purpose flour
- 1 tsp baking powder
- 1/2 tsp vanilla extract
- Pinch of salt
For the Toffee Sauce:
- 200g brown sugar
- 100g unsalted butter
- 200ml double cream
- 1 tsp vanilla extract
Cooking Instructions:
- Prepare the Dates: In a mixing bowl, combine the chopped pitted dates with the boiling water and baking soda. Stir the mixture gently and let it sit for about 10-15 minutes. This allows the dates to soften and meld with the water, creating a rich base for the pudding.
- Cream the Butter and Sugar: In a separate large mixing bowl, cream together the softened unsalted butter and brown sugar until the mixture is light and fluffy. This process incorporates air into the butter, which will help give the pudding a light texture.
- Add the Eggs: Beat the eggs in a small bowl and gradually add them to the creamed butter and sugar mixture. Mix well to guarantee that everything is well combined. The eggs help to bind the mixture and add moisture.
- Combine Dry Ingredients: In another bowl, sift together the all-purpose flour, baking powder, and a pinch of salt. Gradually fold the dry ingredients into the wet mixture, mixing until just combined. Be careful not to overmix, as this can result in a dense pudding.
- Incorporate the Date Mixture: Fold the softened date mixture, including the water, into the batter until fully combined. The mixture should be thick and slightly sticky.
- Bake the Pudding: Preheat your oven to 180°C (350°F). Grease a baking dish or individual ramekins and pour the batter into the prepared dish. Bake in the preheated oven for about 30-35 minutes, or until a skewer inserted into the center comes out clean.
- Prepare the Toffee Sauce: While the pudding is baking, prepare the toffee sauce. In a saucepan, combine the brown sugar, unsalted butter, and double cream. Heat over medium heat, stirring constantly until the sugar has dissolved and the sauce is smooth. Stir in the vanilla extract for added flavor.
- Serve: Once the pudding is baked, remove it from the oven and let it cool for a few minutes. Serve warm, drizzled generously with the toffee sauce. You can also add a scoop of vanilla ice cream or a dollop of clotted cream for an extra treat.
Extra Tips:
For an even richer flavor, consider adding a splash of dark rum or whiskey to the toffee sauce. This will elevate the taste and add depth to the sweetness.
Also, if you want to make your Sticky Toffee Pudding ahead of time, you can prepare the batter and store it in the fridge for up to 24 hours before baking. Just remember to let the batter come to room temperature before placing it in the oven. Enjoy your delightful creation!
Bakewell Tart
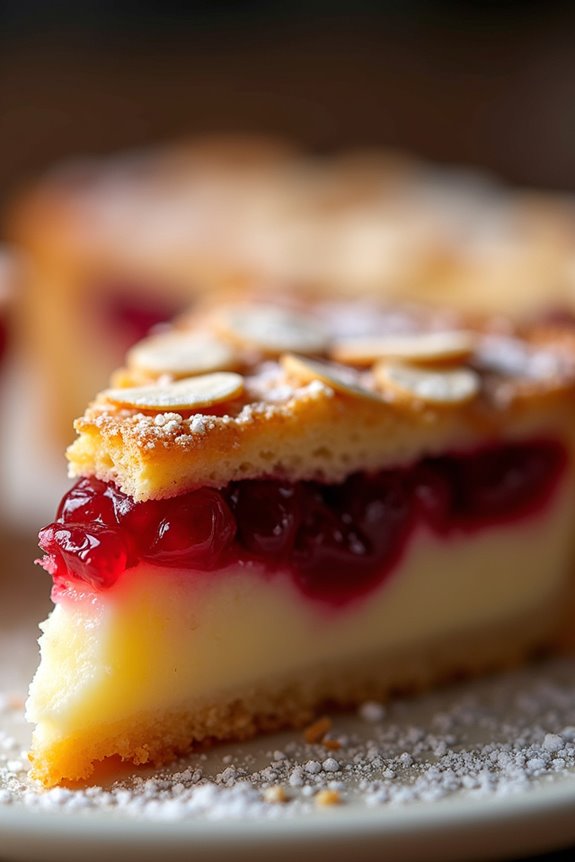
Bakewell Tart is a classic British dessert that originates from the town of Bakewell in Derbyshire. This delightful tart consists of a buttery pastry base filled with a layer of raspberry jam and topped with a rich almond sponge, often enhanced with flaked almonds and a drizzle of icing. The combination of sweet and tart flavors, along with the nutty aroma of almonds, makes this tart a favorite for tea time or any special occasion.
To create the perfect Bakewell Tart, it’s vital to use high-quality ingredients, particularly for the pastry and almond filling. The balance of textures—from the crisp pastry to the soft sponge—along with the fruity jam, creates a truly indulgent treat. Whether served warm or at room temperature, this tart is sure to impress friends and family alike.
Ingredients (Serves 4-6):
- 250g shortcrust pastry
- 200g raspberry jam
- 125g unsalted butter, softened
- 125g caster sugar
- 2 large eggs
- 125g ground almonds
- 50g self-raising flour
- 1 tsp almond extract
- Flaked almonds, for topping
- Icing sugar, for drizzling (optional)
Cooking Instructions:
- Prepare the Pastry: Roll out the shortcrust pastry on a lightly floured surface to about 3mm thick. Gently line a 23cm tart tin with the pastry, making sure the edges are trimmed and the base is fully covered. Prick the base with a fork to prevent bubbling. Chill in the refrigerator for 30 minutes while you preheat the oven to 180°C (350°F).
- Blind Bake the Pastry: Once chilled, remove the pastry from the fridge. Line the pastry case with baking parchment and fill with baking beans or rice. Bake in the preheated oven for 15 minutes. Remove the beans and parchment, then bake for an additional 5-10 minutes until the pastry is golden and crisp. Allow to cool slightly.
- Spread the Jam: Once the pastry has cooled, spread the raspberry jam evenly over the base of the tart. This layer adds sweetness and moisture to the filling, making it a significant step.
- Make the Almond Sponge: In a mixing bowl, beat together the softened butter and caster sugar until light and fluffy. This can take about 3-5 minutes. Gradually add the eggs, mixing well after each addition. Stir in the ground almonds, self-raising flour, and almond extract until the mixture is smooth.
- Fill the Tart: Spoon the almond sponge mixture over the jam layer, smoothing it out evenly with a spatula. Be careful not to disturb the jam underneath. Sprinkle flaked almonds on top for added texture and flavor.
- Bake the Tart: Place the tart back in the oven and bake for 25-30 minutes, or until the sponge is golden and a skewer inserted into the center comes out clean. Keep an eye on the tart towards the end of the baking time to avoid over-browning.
- Cool and Decorate: Once baked, remove the tart from the oven and allow it to cool in the tin for about 10 minutes before transferring it to a wire rack. Once completely cool, drizzle with icing sugar mixed with a little water if desired.
Extra Tips: When making Bakewell Tart, feel free to experiment with different jams, such as apricot or cherry, for a unique twist on the traditional flavor. To guarantee a flaky pastry, avoid overworking the dough and keep your ingredients chilled. If you prefer a more intense almond flavor, consider adding a few drops of almond essence directly into the sponge mixture. Enjoy your Bakewell Tart with a cup of tea for an authentic British experience!
Eton Mess
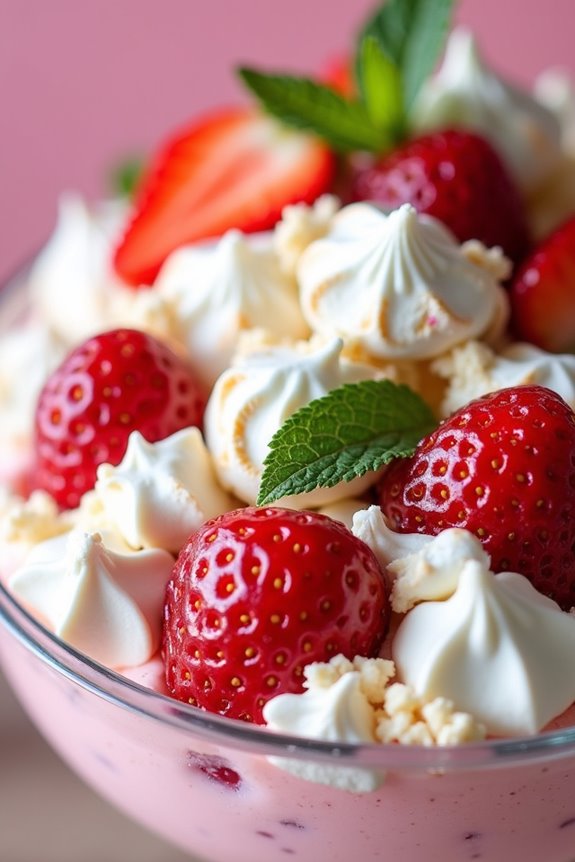
Eton Mess is a classic British dessert that beautifully combines the textures and flavors of crisp meringue, fresh strawberries, and whipped cream. Traditionally served at Eton College’s annual cricket match against Harrow School, this delightful treat offers a harmonious balance of sweetness and creaminess, making it a perfect summer dessert.
Its name reflects its messy appearance, but that doesn’t detract from its deliciousness; in fact, it enhances the charm of this indulgent dish.
The beauty of Eton Mess lies in its simplicity and quick preparation. With minimal cooking involved, this dessert isn’t only easy to make but also allows you to showcase the freshness of seasonal strawberries.
Whether you’re hosting a summer gathering or just want to treat yourself and your family, Eton Mess is sure to please and impress.
Ingredients (serving size: 4-6 people):
- 400g strawberries, hulled and halved
- 300ml double cream
- 2 tablespoons icing sugar
- 1 teaspoon vanilla extract
- 4-6 meringue nests, crushed
- Fresh mint leaves for garnish (optional)
Instructions:
- Prepare the Strawberries: Begin by washing the strawberries thoroughly. Remove the green tops (hulls) and slice them in half. Place the halved strawberries in a mixing bowl and sprinkle a small amount of icing sugar over them. This will help to draw out the natural juices of the strawberries, making them sweeter and more flavorful. Let them sit for about 10-15 minutes.
- Whip the Cream: In a separate mixing bowl, pour in the double cream. Using an electric mixer or a whisk, start beating the cream until it begins to thicken. Gradually add the remaining icing sugar and the vanilla extract, continuing to whip until soft peaks form. Be careful not to over-whip, as you want a smooth and creamy texture.
- Combine Ingredients: Once the strawberries have released their juices and the cream is whipped to the right consistency, gently fold the strawberries into the whipped cream. Use a spatula and be careful not to deflate the cream too much, as you want to maintain that light and airy texture.
- Add the Meringue: Next, take the crushed meringue nests and fold them into the strawberry and cream mixture. Again, be gentle as you want to keep some of the meringue pieces intact for added crunch. The mixture should be a beautiful blend of pink and white, with textures of creamy, soft, and crunchy.
- Serve: Spoon the Eton Mess into individual serving dishes or glasses. You can layer the mixture for a beautiful presentation or simply pile it in. To finish, garnish with a few fresh mint leaves on top for a pop of color and a hint of freshness.
Extra Tips: For the best flavor, use ripe, in-season strawberries, as they’ll be sweeter and juicier. If you’d like to experiment, feel free to substitute other berries like raspberries or blueberries.
You can also make your own meringues for a more personalized touch, but store-bought meringue nests work perfectly for a quick and easy dessert. Eton Mess can be assembled shortly before serving but is best enjoyed fresh to retain the crunchy texture of the meringue.
Scones With Clotted Cream
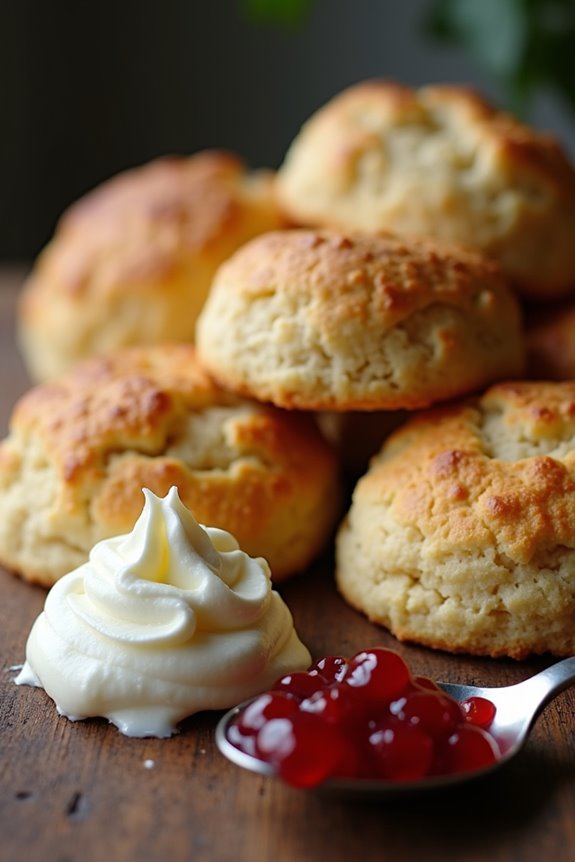
Scones with clotted cream are a quintessential British treat, often enjoyed during afternoon tea, alongside a pot of freshly brewed tea. These delightful baked goods are slightly crumbly, light, and airy, making them the perfect base for a generous dollop of clotted cream and a spoonful of jam. The contrast of textures and flavors creates an indulgent experience that’s hard to resist.
Making scones is a straightforward process, allowing even novice bakers to achieve delicious results that can impress family and friends alike. To create the perfect scone, it’s important to use the right ingredients and techniques. The key to achieving a light and fluffy scone lies in the mixing and handling of the dough; overworking it can result in a dense texture.
This recipe balances the richness of the cream with a hint of sweetness, making it a delightful addition to any tea spread. Whether served plain or with your favorite jam, these scones are sure to be a hit.
Ingredients (serving size: 4-6 people):
- 225g (8 oz) all-purpose flour
- 1 tablespoon baking powder
- 50g (1.75 oz) unsalted butter, chilled and cubed
- 25g (0.88 oz) granulated sugar
- 1 pinch of salt
- 150ml (5 fl oz) whole milk
- 1 large egg (for glazing)
- Clotted cream (for serving)
- Jam (for serving)
Cooking Instructions:
- Preheat the Oven: Begin by preheating your oven to 220°C (428°F). This high temperature is essential for achieving that lovely rise in the scones, helping them to become light and fluffy.
- Prepare the Dry Ingredients: In a large mixing bowl, sift the all-purpose flour and baking powder together. This guarantees that the baking powder is evenly distributed and helps to aerate the flour for a lighter scone.
- Incorporate the Butter: Add the chilled, cubed butter to the dry ingredients. Using your fingertips, rub the butter into the flour until the mixture resembles coarse breadcrumbs. This step is vital as it distributes the fat evenly, creating a tender scone.
- Add Sugar and Salt: Stir in the granulated sugar and a pinch of salt to the flour mixture. The sugar adds a subtle sweetness, while the salt enhances the overall flavor of the scones.
- Mix in the Milk: Make a well in the center of the dry ingredients and pour in the whole milk. Using a fork, gently mix the ingredients until a soft dough forms. Be careful not to overmix; the dough should be slightly sticky but manageable.
- Shape the Dough: Turn the dough out onto a lightly floured surface. With floured hands, gently knead the dough a few times until it comes together. Pat the dough into a round shape about 2.5 cm (1 inch) thick.
- Cut the Scones: Using a round cutter (about 5 cm or 2 inches in diameter), cut out the scones and place them on a baking tray lined with parchment paper. Gather any scraps and repeat until all the dough is used.
- Glaze the Scones: Beat the egg in a small bowl and brush the tops of the scones with the egg wash. This will give them a beautiful golden color when baked.
- Bake the Scones: Place the baking tray in the preheated oven and bake for 12-15 minutes, or until the scones have risen and are lightly golden on top. Keep an eye on them to avoid overbaking.
- Cool and Serve: Once baked, remove the scones from the oven and transfer them to a wire rack to cool slightly. Serve warm with clotted cream and jam.
Extra Tips: For the best results, confirm that your ingredients, especially the butter, are cold. This helps to create that flaky texture you desire in scones.
Additionally, for an extra flavor twist, consider adding dried fruits like raisins or cranberries to the dough before baking. Finally, serve your scones fresh out of the oven for the most enjoyable experience; they’re best eaten the same day they’re made!
Lemon Drizzle Cake
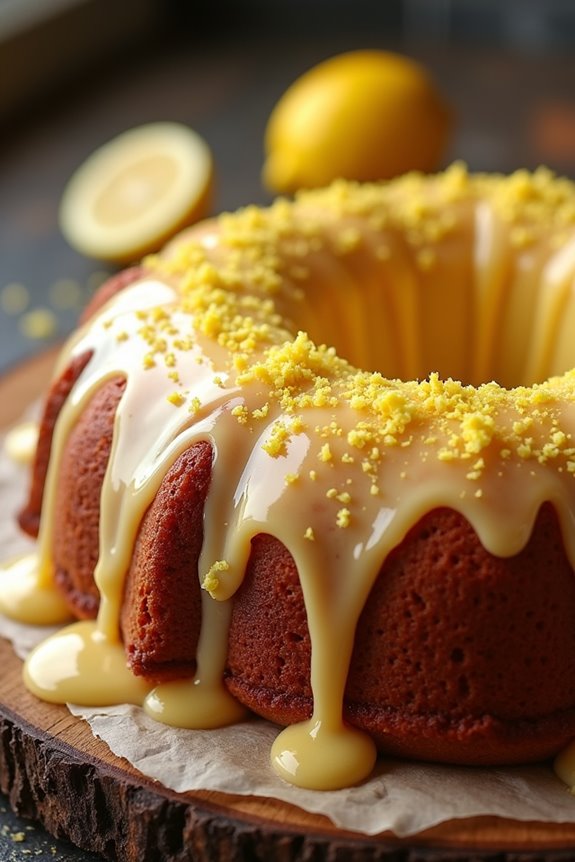
Lemon Drizzle Cake is a classic British dessert known for its zesty flavor and moist texture. This delightful cake is perfect for afternoon tea, gatherings, or just a sweet treat any time of the day. The bright, tangy lemon flavor combined with a sweet drizzle takes this cake to a whole new level, making it a favorite among citrus lovers.
With its simple ingredients and straightforward preparation, anyone can master this delicious recipe. The beauty of Lemon Drizzle Cake lies not only in its taste but also in its appearance. The glaze adds a glossy finish that appeals to the eye, while the soft, fluffy interior keeps each bite light and enjoyable.
This recipe serves 4-6 people, making it a perfect centerpiece for a small gathering or a cozy family dessert. Get ready to whip up a delightful cake that’s sure to impress your guests!
Ingredients:
- 225g unsalted butter, softened
- 225g granulated sugar
- 4 large eggs
- 225g self-raising flour
- Zest of 2 large lemons
- 50ml fresh lemon juice
- 100g icing sugar (for the drizzle)
- 25ml fresh lemon juice (for the drizzle)
Cooking Instructions:
1. Preheat the Oven: Begin by preheating your oven to 180°C (350°F). This guarantees that the cake bakes evenly and rises properly. Prepare a loaf tin (approximately 2lb capacity) by greasing it or lining it with parchment paper for easy removal.
2. Cream the Butter and Sugar: In a large mixing bowl, add the softened butter and granulated sugar. Using an electric mixer or a wooden spoon, cream them together until the mixture is light and fluffy. This process incorporates air, which is essential for lightening the cake.
3. Add the Eggs: Crack the eggs into a separate bowl and beat them lightly. Gradually add the beaten eggs to the creamed butter and sugar mixture, mixing well after each addition. This helps to prevent the mixture from curdling and guarantees that the eggs are evenly distributed.
4. Incorporate Flour and Lemon Zest: Sift the self-raising flour into the bowl and gently fold it into the mixture using a spatula. Be careful not to overmix, as this can lead to a dense cake.
Once the flour is almost fully incorporated, add the lemon zest and the fresh lemon juice, folding until just combined.
5. Transfer to Tin and Bake: Pour the batter into the prepared loaf tin, smoothing the top with a spatula. Place it in the preheated oven and bake for 40-45 minutes, or until a skewer inserted into the center comes out clean. Keep an eye on it towards the end of baking to prevent over-browning.
6. Prepare the Drizzle: While the cake is baking, prepare the lemon drizzle. In a small bowl, mix the icing sugar with 25ml of fresh lemon juice until smooth. Adjust the consistency if necessary by adding more lemon juice or icing sugar.
7. Drizzle on the Cake: Once the cake is baked, remove it from the oven and allow it to cool in the tin for about 10 minutes. Then, transfer it to a wire rack. While the cake is still warm, poke small holes in the top with a skewer or fork and pour the lemon drizzle over the top, allowing it to soak in.
8. Cool and Serve: Let the cake cool completely before slicing. This allows the flavors to meld and the texture to set. Serve the cake as is, or with a dollop of whipped cream or a scoop of ice cream for an extra indulgent treat.
Extra Tips:
For an added burst of flavor, consider adding a handful of poppy seeds to the batter before baking. This not only enhances the texture but also gives the cake a beautiful look.
Make sure to use fresh lemons for the best flavor, and you can even zest the lemons ahead of time to save on prep time. Finally, if you have any leftovers, store them in an airtight container at room temperature for up to three days or in the fridge for up to a week. Enjoy your baking!
Treacle Tart
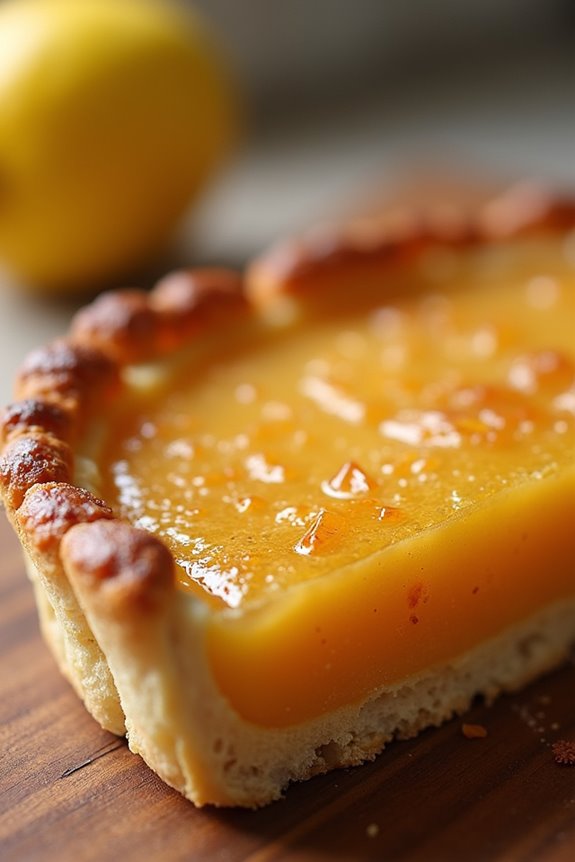
Treacle Tart is a classic British dessert that combines a sweet, sticky filling with a crisp pastry crust, making it a beloved treat across the country. The tart is typically made with golden syrup, breadcrumbs, and lemon juice, resulting in a delightful balance of flavors that’s both rich and invigorating.
Often enjoyed warm, it’s perfect for any occasion, from afternoon tea to dessert after a hearty meal. This dessert has its roots in traditional English cuisine, and it has gained a special place in popular culture, famously mentioned in the Harry Potter series as Harry’s favorite dessert.
Making a Treacle Tart at home is quite straightforward, and with a few simple ingredients, you can create a delightful dish that will impress your family and friends.
Ingredients (Serves 4-6)
- 200g shortcrust pastry (store-bought or homemade)
- 300g golden syrup
- 150g fresh white breadcrumbs
- 1 lemon (zested and juiced)
- 1 egg (beaten)
- 25g unsalted butter (melted)
- A pinch of salt
Cooking Instructions
1. Prepare the Pastry: Preheat your oven to 190°C (375°F). Roll out the shortcrust pastry on a lightly floured surface to fit a 23cm (9-inch) tart tin. Carefully transfer the pastry to the tin, pressing it into the edges and trimming any excess.
Prick the base with a fork and chill in the fridge for about 15 minutes to prevent shrinking during baking.
2. Blind Bake the Pastry: Line the pastry with baking parchment and fill it with baking beans or rice. Bake in the preheated oven for 15 minutes. Remove the parchment and beans, then return to the oven for an additional 5-7 minutes until the pastry is lightly golden and cooked through.
Remove from the oven and set aside to cool slightly.
3. Make the Filling: In a mixing bowl, combine the golden syrup, breadcrumbs, lemon zest, lemon juice, melted butter, and a pinch of salt. Mix well until all ingredients are fully incorporated.
Add the beaten egg and stir until the filling is smooth and evenly mixed.
4. Assemble the Tart: Pour the treacle filling into the pre-baked pastry shell, spreading it evenly with a spatula. Make sure not to overfill, as the filling may bubble up during baking.
5. Bake the Tart: Place the tart back in the oven and bake for 25-30 minutes, or until the filling is set and slightly golden. The tart should have a slight wobble in the center but not be liquid.
6. Cool and Serve: Once baked, remove the tart from the oven and allow it to cool for at least 15 minutes before serving. This allows the filling to firm up slightly.
Serve warm or at room temperature, ideally with a dollop of clotted cream or a scoop of vanilla ice cream.
Extra Tips
For an added twist, consider infusing the filling with a touch of ground ginger or nutmeg for a warm spice flavor.
Additionally, ensuring that your pastry is chilled before baking helps maintain its texture, so avoid skipping the chilling step. If you have leftover filling, you can bake it in small ramekins for individual servings, which are just as delightful!
Queen of Puddings
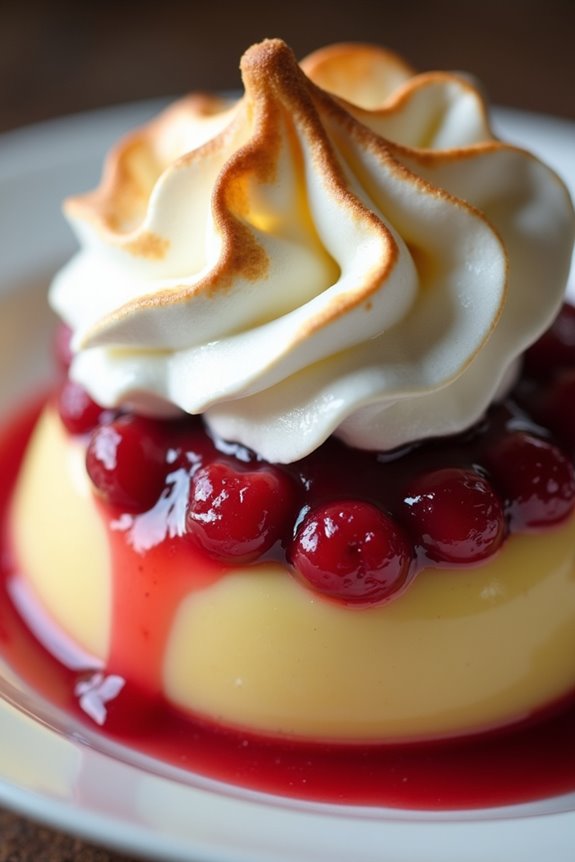
Queen of Puddings is a classic British dessert that has delighted taste buds for centuries. This delightful dish features a creamy custard base, layered with a tart fruit preserve, and topped with a light and airy meringue. Traditionally served warm, it has a beautiful presentation that makes it perfect for both casual family dinners and elegant gatherings.
The combination of textures and flavors in this dish is simply irresistible, making it a beloved staple in many households. To create the perfect Queen of Puddings, you’ll want to guarantee that you have all the necessary ingredients on hand and follow the preparation steps carefully. The balance of sweetness from the meringue and the tanginess of the fruit preserve creates a harmonious blend that’s sure to impress.
Whether you’re a seasoned baker or trying your hand at this recipe for the first time, the result will be a show-stopping dessert that will have everyone asking for seconds.
Ingredients (Serves 4-6)
- 4 slices of white bread
- 2 cups milk
- 1/4 cup granulated sugar
- 2 large eggs, separated
- 1 teaspoon vanilla extract
- 1/4 cup lemon curd or fruit jam (such as raspberry or strawberry)
- 1/4 teaspoon salt
- 1/2 teaspoon cream of tartar
- Additional sugar for meringue (about 1/4 cup)
Cooking Instructions
1. Prepare the Bread: Begin by preheating your oven to 350°F (175°C). Remove the crusts from the bread slices and cut them into quarters. Arrange the bread in a buttered baking dish, overlapping the pieces if necessary to fill the dish evenly.
2. Make the Custard: In a saucepan, heat the milk and 1/4 cup of sugar over medium heat until it’s just about to boil. In a separate bowl, whisk together the egg yolks and vanilla extract. Gradually pour the hot milk mixture into the egg yolks, whisking constantly to temper the eggs and prevent them from scrambling.
Once combined, pour the mixture over the bread in the baking dish.
3. Bake the Custard: Place the baking dish in the preheated oven and bake for about 25-30 minutes, or until the custard is set and slightly golden on top. Remove from the oven and allow to cool for a few minutes before spreading the lemon curd or fruit jam evenly over the top.
4. Prepare the Meringue: In a clean bowl, beat the egg whites with the cream of tartar until soft peaks form. Gradually add in the remaining sugar, continuing to beat until the meringue is glossy and holds stiff peaks.
5. Top with Meringue: Spread the meringue over the fruit layer, guaranteeing that it seals the edges to prevent it from shrinking during baking. Use a spatula to create peaks and swirls for an attractive finish.
6. Final Bake: Return the dish to the oven and bake for an additional 10-15 minutes, or until the meringue is golden brown and firm to the touch. Once done, remove from the oven and let it cool for a few minutes before serving.
Extra Tips
When making Queen of Puddings, guarantee that your egg whites are at room temperature for the best volume when whipping. Additionally, feel free to experiment with different fruit preserves to find your favorite flavor combination.
If you want to add a twist, consider incorporating a splash of almond extract or a sprinkle of nutmeg into the custard for added depth. Finally, serve the pudding warm for the best texture and taste, and enjoy the compliments that will surely follow!
Chocolate Biscuit Cake
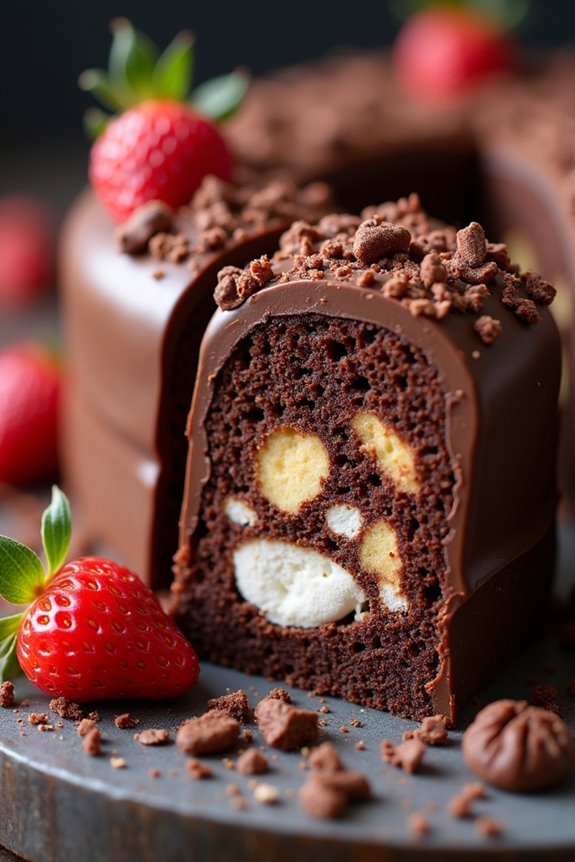
Chocolate Biscuit Cake is a delightful no-bake dessert that has been a favorite in British households for generations. This rich and decadent cake is made from crushed biscuits, cocoa, and a mix of sweet ingredients that come together to form a delicious treat. Perfect for celebrations or simply as a sweet indulgence, it’s an easy recipe that requires minimal cooking skills and can be prepared in advance, allowing the flavors to meld beautifully as it sets.
The beauty of Chocolate Biscuit Cake lies in its versatility; you can customize it by adding various ingredients like nuts, dried fruits, or even a splash of liqueur for an adult twist. This cake isn’t only a feast for the taste buds but also a visual treat, especially when decorated with chocolate shavings, sprinkles, or fresh fruit. Whether served at a birthday party or enjoyed on a cozy afternoon, this cake is sure to please chocolate lovers of all ages.
Ingredients (Serves 4-6)
- 200g digestive biscuits
- 100g unsalted butter
- 150g milk chocolate
- 50g dark chocolate
- 75g golden syrup
- 50g cocoa powder
- 50g chopped nuts (optional)
- 50g mini marshmallows (optional)
Cooking Instructions
- Prepare the Biscuit Base: Begin by crushing the digestive biscuits into small pieces. You can do this by placing them in a zip-lock bag and using a rolling pin, or by pulsing them in a food processor until they resemble coarse crumbs. Transfer the crushed biscuits into a large mixing bowl.
- Melt the Chocolate and Butter: In a heatproof bowl, combine the unsalted butter, milk chocolate, dark chocolate, and golden syrup. Place the bowl over a pot of simmering water to create a double boiler. Stir occasionally until the mixture is completely melted and smooth, then remove from heat.
- Combine Ingredients: Pour the melted chocolate mixture over the crushed biscuits in the mixing bowl. Add the cocoa powder and, if using, the chopped nuts and mini marshmallows. Stir everything together until the biscuits are fully coated in the chocolate mixture.
- Mold the Cake: Line a loaf tin or a round cake tin with parchment paper for easy removal. Pour the biscuit mixture into the prepared tin and press it down firmly to create an even layer. Use the back of a spatula or your hands to compact the mixture well.
- Chill the Cake: Cover the tin with plastic wrap or foil and place it in the refrigerator for at least 4 hours, or overnight if possible. This allows the cake to set properly and makes it easier to slice.
- Serve the Cake: Once set, remove the Chocolate Biscuit Cake from the tin by lifting it out using the parchment paper. Slice it into thick pieces and serve. You can garnish with chocolate shavings, sprinkles, or fresh fruit if desired.
Extra Tips
When making Chocolate Biscuit Cake, feel free to experiment with different types of biscuits or add-ins to suit your taste. You can use bourbon biscuits, rich tea biscuits, or even ginger snaps for a unique flavor twist.
Additionally, if you prefer a firmer cake, guarantee you pack the biscuit mixture tightly into the tin. For a more indulgent treat, consider drizzling melted chocolate on top before serving.
Remember to store any leftovers in an airtight container in the refrigerator, where it will stay fresh for several days. Enjoy your delicious creation!
Carrot Cake
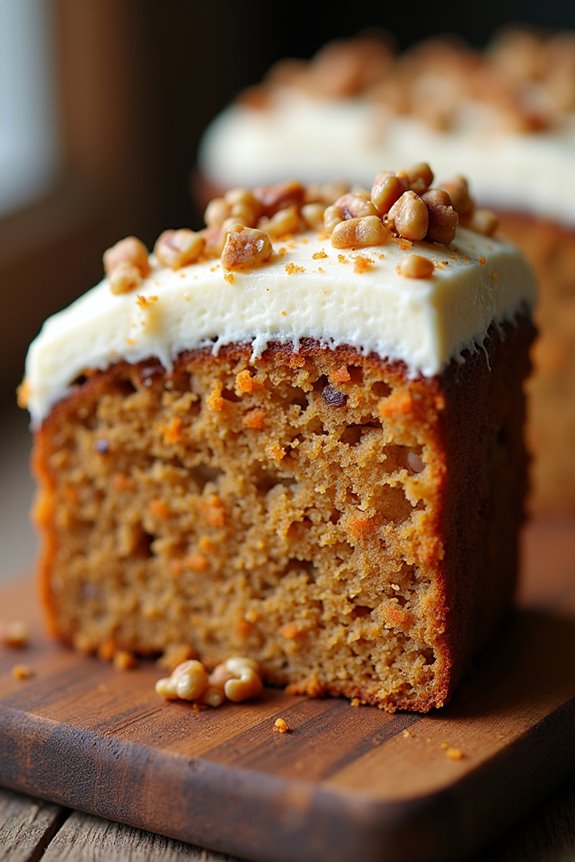
Carrot Cake is a classic dessert that combines moist, flavorful cake with the natural sweetness of carrots, often enhanced with spices like cinnamon and nutmeg. This delightful treat is perfect for birthdays, celebrations, or simply as a comforting dessert at the end of a meal. The addition of cream cheese frosting brings a rich, tangy flavor that beautifully complements the sweetness of the cake.
Whether you’re a seasoned baker or a beginner, this recipe will guide you through creating a memorable Carrot Cake that everyone will love.
To achieve the best flavor and texture, it’s important to use freshly grated carrots. Not only does this add moisture, but it also infuses the cake with a subtle earthiness that pairs wonderfully with the warm spices. Additionally, you can customize your Carrot Cake by adding nuts, raisins, or even crushed pineapple for extra flavor and texture. This recipe serves 4-6 people, making it the perfect size for an intimate gathering or a family dessert night.
Ingredients
- 1 ½ cups all-purpose flour
- 1 tsp baking powder
- 1 tsp baking soda
- 1 tsp ground cinnamon
- ½ tsp ground nutmeg
- ½ tsp salt
- ½ cup vegetable oil
- 1 cup granulated sugar
- 2 large eggs
- 1 ½ cups grated carrots (about 3-4 medium carrots)
- ½ cup chopped walnuts or pecans (optional)
- ½ cup raisins (optional)
Cooking Instructions
- Preheat the oven: Start by preheating your oven to 350°F (175°C). This guarantees that the cake bakes evenly and rises properly.
- Prepare the baking pan: Grease and flour an 8-inch round cake pan. This helps prevent the cake from sticking and allows for easy removal once it’s baked.
- Mix dry ingredients: In a large mixing bowl, sift together the flour, baking powder, baking soda, cinnamon, nutmeg, and salt. This step is vital as it evenly distributes the leavening agents and spices throughout the flour.
- Combine wet ingredients: In another bowl, whisk together the vegetable oil and granulated sugar until well combined. Add the eggs one at a time, mixing well after each addition until the mixture is smooth.
- Incorporate the carrots: Stir in the grated carrots, and if using, fold in the chopped nuts and raisins. This adds texture and flavor to the cake.
- Combine wet and dry mixtures: Gradually add the dry ingredients to the wet mixture, stirring gently until just combined. Be careful not to overmix, as this can result in a dense cake.
- Pour into the pan: Transfer the batter into the prepared cake pan, spreading it evenly. This guarantees an even bake and a nice flat top.
- Bake the cake: Place the pan in the preheated oven and bake for 30-35 minutes, or until a toothpick inserted into the center comes out clean. Keep an eye on the cake, and if it starts to brown too quickly, cover it loosely with foil.
- Cool the cake: Once baked, remove the cake from the oven and let it cool in the pan for 10 minutes. Then, turn it out onto a wire rack to cool completely before frosting.
- Frost the cake: Once cool, frost the Carrot Cake with your favorite cream cheese frosting. A simple mix of cream cheese, butter, powdered sugar, and a splash of vanilla extract works wonderfully.
Extra Tips
When making Carrot Cake, consider using fresh spices rather than pre-ground ones for a more vibrant flavor.
Also, if you want to add a fruity twist, crushed pineapple can be substituted for some of the oil in the recipe for added moisture and sweetness.
Finally, if you’re making this cake ahead of time, it freezes well. Just wrap it tightly in plastic wrap before placing it in an airtight container. Enjoy your baking!
Battenberg Cake
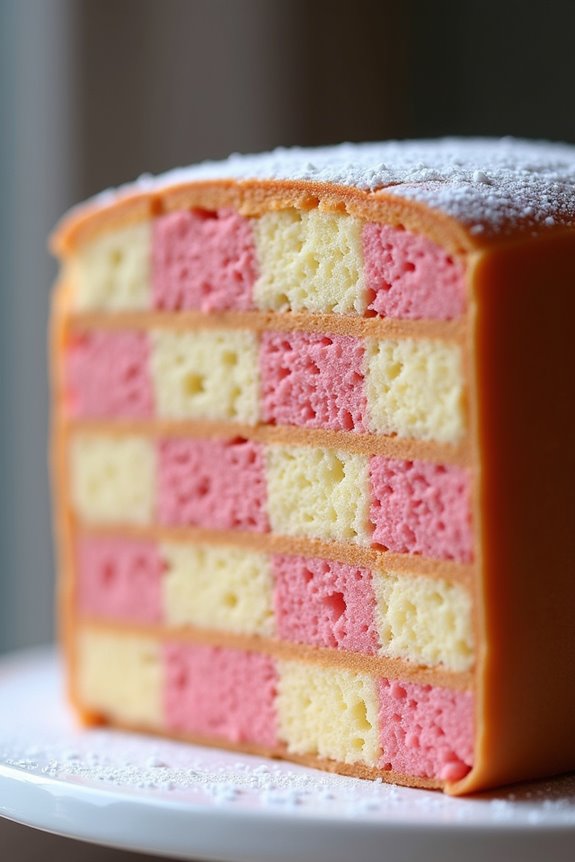
Battenberg Cake is a classic British dessert that has delighted taste buds for generations. Its distinctive checkered pattern and elegant appearance make it a perfect centerpiece for any tea party or special occasion. Traditionally wrapped in marzipan, this cake combines the flavors of almond and vanilla, offering a delightful contrast to the soft, moist sponge.
The cake isn’t only a treat for the palate but also a visual feast, making it a fun project for bakers of all skill levels. Making a Battenberg Cake can be a rewarding experience, providing an opportunity to hone your baking skills while creating something truly impressive. The process involves baking two separate sponge cakes, which are then carefully assembled and covered in a layer of marzipan.
Whether you’re a seasoned baker or a novice, this recipe will guide you through each step to guarantee your Battenberg Cake turns out beautifully.
Ingredients (Serves 4-6)
- 200g unsalted butter, softened
- 200g caster sugar
- 4 large eggs
- 200g self-raising flour
- 1 tsp baking powder
- 1 tsp vanilla extract
- 50g ground almonds
- A few drops of pink food coloring
- 200g marzipan
- Icing sugar, for dusting
Cooking Instructions
1. Preheat the Oven: Preheat your oven to 180°C (350°F) and grease a 20cm square cake tin. Line the base with baking parchment for easy removal later.
2. Prepare the Cake Batter: In a large mixing bowl, cream together the softened butter and caster sugar until the mixture is light and fluffy. This usually takes about 3-5 minutes using an electric mixer.
Next, add the eggs one at a time, mixing well after each addition.
3. Combine Dry Ingredients: In a separate bowl, sift together the self-raising flour and baking powder. Gradually fold the dry ingredients into the butter and egg mixture using a spatula until just combined.
Be careful not to overmix; you want the batter to remain light and airy.
4. Divide the Batter: Split the batter evenly into two bowls. To one bowl, add the vanilla extract and ground almonds, mixing well.
To the other bowl, incorporate the pink food coloring until you achieve your desired shade.
5. Bake the Cakes: Pour the vanilla batter into one half of the prepared cake tin and the pink batter into the other half. Use a spatula to smooth the tops.
Bake in the preheated oven for 25-30 minutes, or until a skewer inserted into the center comes out clean. Allow the cakes to cool in the tin for about 10 minutes, then transfer to a wire rack to cool completely.
6. Assemble the Cake: Once cooled, carefully trim the edges of both cakes to guarantee they’re neat. Cut each cake into equal strips (about 2.5cm wide).
Arrange the strips alternately, with one pink and one vanilla, to create a checkerboard pattern.
7. Wrap in Marzipan: Roll out the marzipan on a surface dusted with icing sugar to a rectangle large enough to cover the assembled cake.
Lay the checkerboard cake in the center of the marzipan and fold the marzipan over to encase the cake completely. Trim any excess marzipan and use your hands to smooth out the surface.
8. Final Touches: Dust the top of the marzipan-covered cake with a little icing sugar and, if desired, decorate with additional marzipan shapes or ribbon for presentation.
Extra Tips
When making Battenberg Cake, confirm that your ingredients are at room temperature for the best results. This helps the batter mix more evenly and rise properly.
If you’re not a fan of marzipan, feel free to coat the cake in fondant or a simple glaze instead. Additionally, you can experiment with flavors by adding lemon zest or orange zest to the batter for a citrus twist.
Remember to take your time when assembling the cake to achieve a perfect checkered pattern; patience is key!
Bread and Butter Pudding
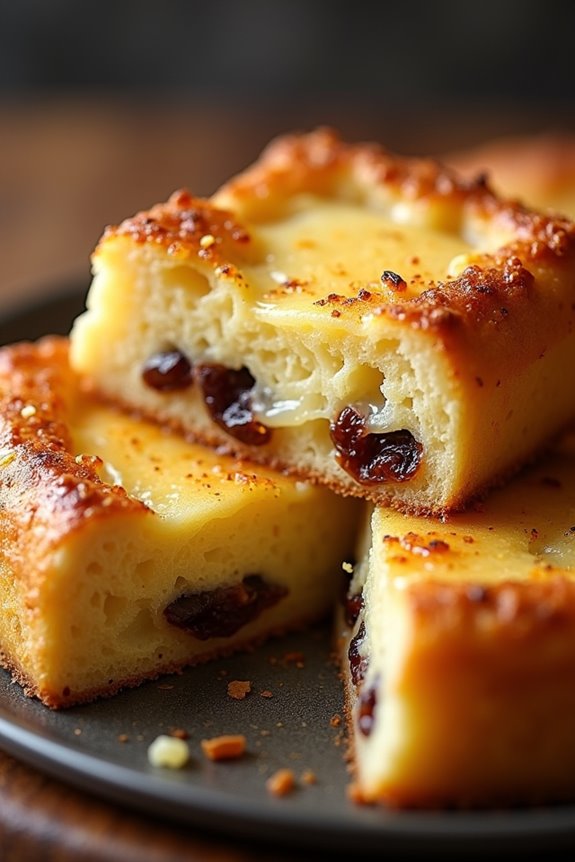
Bread and Butter Pudding is a classic British dessert that has stood the test of time, offering warm, comforting flavors that evoke feelings of nostalgia. This delightful dish is perfect for utilizing leftover bread, transforming it into a sweet, creamy pudding that not only satisfies your sweet tooth but also reduces food waste.
Traditionally made with simple ingredients, it embodies the essence of home cooking, making it a beloved staple in many households across the UK. The beauty of Bread and Butter Pudding lies in its versatility. You can customize it with various additions, such as dried fruits, nuts, or even a hint of citrus zest, to suit your taste preferences.
Served warm with a drizzle of custard, cream, or ice cream, this pudding is the ultimate indulgence that can easily impress your family and friends. Whether you’re looking for a comforting dessert on a cold evening or a way to use up stale bread, this recipe is sure to become a favorite.
Ingredients (serving size: 4-6 people)
- 6-8 slices of stale bread (white, brioche, or challah)
- 100g unsalted butter, softened
- 4 large eggs
- 500ml whole milk
- 200ml double cream
- 150g sugar (castor or granulated)
- 1 tsp vanilla extract
- 1 tsp ground cinnamon
- 50g raisins or sultanas (optional)
- Zest of 1 lemon (optional)
- A pinch of salt
Cooking Instructions
- Preheat the Oven: Begin by preheating your oven to 180°C (350°F). This guarantees that your pudding cooks evenly and achieves a beautiful golden-brown crust.
- Prepare the Bread: While the oven is heating, take your slices of stale bread and spread a generous amount of softened butter on one side of each slice. If using, you can also sprinkle a bit of sugar on the buttered side for added sweetness. Cut the slices into triangles or strips for easier layering.
- Layer the Bread: In a greased baking dish, start layering the bread slices, buttered-side up. You can sprinkle the raisins or sultanas and some lemon zest between the layers for extra flavor. Continue until all the bread is used, making sure to create a nice, even layer.
- Make the Custard Mixture: In a mixing bowl, whisk together the eggs, sugar, milk, double cream, vanilla extract, ground cinnamon, and a pinch of salt until well combined. This mixture will provide the creamy custard base for your pudding.
- Combine and Soak: Pour the custard mixture evenly over the layered bread in the baking dish. Press the bread down gently to ascertain it soaks up the custard mixture. Allow it to sit for about 10-15 minutes to let the bread absorb the custard.
- Bake the Pudding: Place the baking dish in the preheated oven and bake for about 30-40 minutes, or until the pudding is set in the middle and the top is golden brown. You may cover it with foil for the first half of baking if it browns too quickly.
- Cool and Serve: Once baked, remove the pudding from the oven and let it cool for a few minutes before serving. It’s best enjoyed warm, accompanied by custard, cream, or ice cream.
Extra Tips
For a twist on the traditional recipe, consider adding spices like nutmeg or incorporating different types of bread, such as whole grain or fruit bread, for a unique flavor profile.
If you prefer a richer taste, substitute some of the milk with additional double cream. Additionally, feel free to experiment with different dried fruits or nuts to add texture and variety to your pudding.
Spotted Dick
Spotted Dick is a traditional British steamed pudding that has delighted generations with its rich flavor and delightful texture. Typically made with suet, flour, sugar, and dried fruit, this classic dessert boasts a somewhat quirky name, derived from the ‘spots’ of currants or raisins that are mixed into the batter. It’s often served warm with a generous helping of custard, making it a comforting and nostalgic treat for many.
This pudding isn’t only a historical staple of British cuisine but also a fun and delicious dish to prepare. Its simple ingredients and straightforward preparation process make it an excellent choice for both novice and experienced bakers looking to explore traditional British recipes. Whether you’re serving it for a family gathering or a cozy night in, Spotted Dick is sure to impress with its unique flavor and satisfying warmth.
Ingredients (serves 4-6):
- 225g (8 oz) self-raising flour
- 125g (4.5 oz) shredded suet (or grated butter)
- 100g (3.5 oz) caster sugar
- 150g (5.3 oz) currants or raisins
- 150ml (5 fl oz) milk
- 1 medium egg
- 1 tsp ground cinnamon
- Pinch of salt
Cooking Instructions:
- Prepare the Batter: In a large mixing bowl, combine the self-raising flour, shredded suet, caster sugar, ground cinnamon, and a pinch of salt. Mix these dry ingredients well to guarantee they’re evenly distributed. This step is vital as it lays the foundation for the pudding’s texture and flavor.
- Add Wet Ingredients: In a separate bowl, beat the egg and then add the milk, mixing until combined. Slowly pour this mixture into the dry ingredients, stirring gently until you have a thick batter. Be careful not to overmix, as this can affect the pudding’s fluffiness.
- Incorporate the Dried Fruit: Fold in the currants or raisins into the batter. Confirm that they’re evenly distributed throughout the mixture, as these little ‘spots’ will provide bursts of sweetness in each bite of the pudding.
- Prepare the Steaming Vessel: Grease a 1.5-liter (2.5-pint) pudding basin or a heatproof bowl with butter. This will prevent the pudding from sticking and make it easier to remove once cooked. Place a circle of parchment paper at the bottom of the basin for extra assurance.
- Fill the Basin: Spoon the batter into the prepared pudding basin, filling it about two-thirds full to allow room for rising during cooking. Cover the basin with a piece of parchment paper and then a layer of foil, securing it tightly with string around the rim.
- Steam the Pudding: Place the pudding basin into a large pot filled with boiling water, guaranteeing the water comes halfway up the sides of the basin. Steam for about 1.5 to 2 hours, checking occasionally to top up the water as necessary. This gentle cooking method allows the pudding to rise and cook evenly.
- Check for Doneness: After the steaming time, carefully remove the pudding from the pot and test it with a skewer; it should come out clean. If it needs more time, re-cover and return it to the pot for an additional 10-15 minutes.
- Serve: Once cooked, allow the pudding to rest for a few minutes, then carefully invert it onto a serving plate. Slice and serve warm with your choice of custard poured generously over the top.
Extra Tips:
When making Spotted Dick, feel free to experiment with different dried fruits, such as sultanas or mixed dried fruit, to add variation to the flavor. For an extra touch, consider adding grated lemon or orange zest for a hint of citrus brightness.
Always confirm that the water in your steaming pot doesn’t run dry during cooking; this is essential for the pudding to steam properly. Finally, if you’re short on time, you can opt to cook the pudding in a microwave using a microwave-safe bowl, but the traditional steaming method imparts the classic rich texture and flavor.
Gingerbread Cake
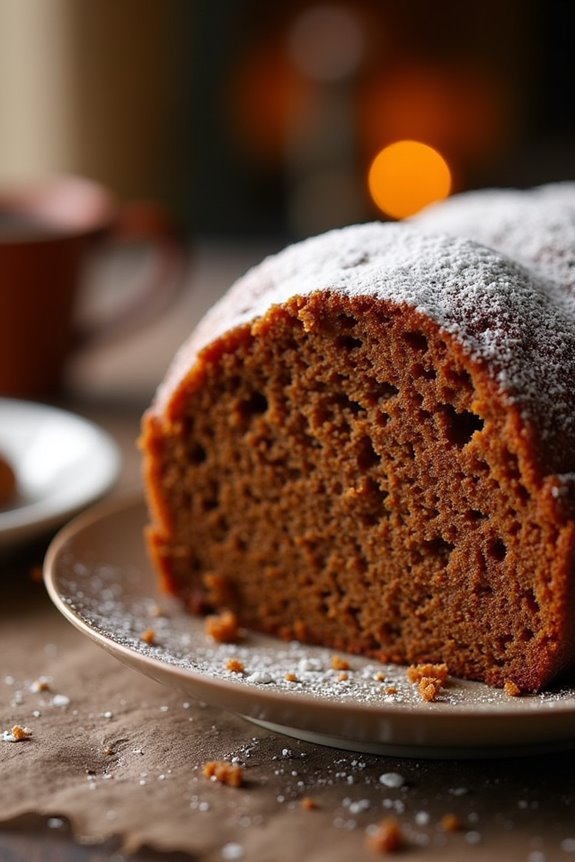
Gingerbread Cake is a delightful dessert that captures the essence of warm spices and molasses, making it a perfect treat for cozy gatherings or festive celebrations. This moist and flavorful cake isn’t only a classic favorite but also a wonderfully versatile delight that can be enjoyed on its own or adorned with icing, whipped cream, or a scoop of vanilla ice cream.
Whether served during the holidays or on a chilly afternoon, this cake is bound to bring smiles to the faces of your family and friends.
This recipe for Gingerbread Cake serves 4-6 people and is simple enough for bakers of all skill levels. With its rich flavors of ginger, cinnamon, and nutmeg, paired with the sweetness of brown sugar and molasses, this cake serves as a fantastic centerpiece for any dessert table.
Follow the steps below to create this delectable treat that will fill your kitchen with an irresistible aroma.
Ingredients:
- 1 ½ cups all-purpose flour
- 1 teaspoon baking soda
- 1 teaspoon ground ginger
- 1 teaspoon ground cinnamon
- ½ teaspoon ground nutmeg
- ¼ teaspoon ground cloves
- ½ teaspoon salt
- ½ cup unsalted butter, softened
- 1 cup brown sugar, packed
- 1 large egg
- 1 cup molasses
- 1 cup hot water
Cooking Instructions:
- Preheat the Oven: Start by preheating your oven to 350°F (175°C). This is an essential step to guarantee that your Gingerbread Cake bakes evenly and rises properly.
- Prepare the Baking Pan: Grease and flour an 8-inch square baking pan or line it with parchment paper. This will prevent the cake from sticking and make it easier to remove once it’s baked.
- Mix Dry Ingredients: In a medium-sized bowl, whisk together the all-purpose flour, baking soda, ground ginger, ground cinnamon, ground nutmeg, ground cloves, and salt. This combines the dry ingredients and guarantees that the spices are evenly distributed throughout the cake.
- Cream Butter and Sugar: In a large mixing bowl, cream together the softened butter and brown sugar using an electric mixer on medium speed until light and fluffy. This should take about 3-4 minutes. The creaming process helps incorporate air into the mixture, leading to a lighter cake.
- Add Egg and Molasses: Beat in the egg until fully incorporated, then add the molasses. Mix until smooth. The molasses not only adds sweetness but also contributes to the rich color and flavor of the cake.
- Combine Wet and Dry Ingredients: Gradually add the dry ingredient mixture to the butter and sugar mixture, alternating with the hot water. Start and end with the dry ingredients. Mix until just combined; be careful not to overmix, as this can lead to a denser texture.
- Pour and Bake: Pour the batter into the prepared baking pan and smooth the top with a spatula. Bake in the preheated oven for about 30-35 minutes, or until a toothpick inserted into the center comes out clean.
- Cool and Serve: Once baked, remove the cake from the oven and let it cool in the pan for about 10 minutes before transferring it to a wire rack to cool completely. Serve warm or at room temperature, optionally topped with whipped cream or icing.
Extra Tips:
For an extra burst of flavor, consider adding chopped nuts, such as walnuts or pecans, or even some chocolate chips to the batter before baking.
You can also enhance the cake’s presentation by dusting it with powdered sugar or drizzling a simple glaze on top. If you want a stronger spice flavor, feel free to adjust the quantities of the spices according to your taste.
Storing the cake in an airtight container at room temperature will keep it fresh for several days, allowing you to enjoy this delicious treat even longer!
Tiramisu Trifle
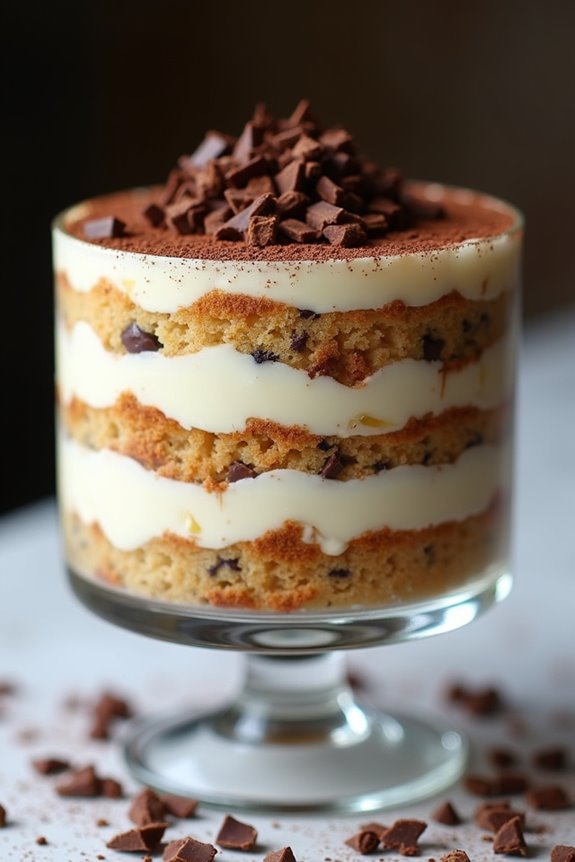
Tiramisu Trifle is a delightful dessert that marries the classic Italian flavors of tiramisu with the fun, layered presentation of a trifle. This indulgent treat features layers of coffee-soaked sponge cake, rich mascarpone cream, and a dusting of cocoa powder, all beautifully assembled in a glass dish.
It’s perfect for gatherings, dinner parties, or simply to satisfy your sweet tooth. The beauty of this dessert lies in its versatility; you can prepare it in advance, allowing the flavors to meld together beautifully.
The trifle format allows for visual appeal, showcasing the luscious layers as you serve. Each spoonful offers a delicious combination of textures and flavors, from the creamy mascarpone to the tender sponge cake.
Whether you’re a seasoned baker or a novice in the kitchen, this Tiramisu Trifle is an accessible yet elegant dessert that will impress your guests and make any occasion special.
Ingredients (Serves 4-6):
- 1 cup strong brewed coffee, cooled
- 2 tablespoons coffee liqueur (optional)
- 1 package ladyfinger cookies (about 24)
- 1 cup heavy cream
- 1 cup mascarpone cheese
- 1/2 cup powdered sugar
- 1 teaspoon vanilla extract
- Unsweetened cocoa powder, for dusting
- Dark chocolate shavings (optional, for garnish)
Cooking Instructions:
- Prepare the Coffee Mixture: In a shallow dish, combine the cooled brewed coffee and coffee liqueur (if using). Stir well and set aside. This mixture will be used to soak the ladyfingers, giving them that delicious coffee flavor.
- Whip the Cream: In a large mixing bowl, pour the heavy cream and whip it using an electric mixer on medium-high speed until soft peaks form. This should take about 3-5 minutes. Be careful not to overwhip, as the cream can turn grainy.
- Combine Mascarpone and Sugar: In another bowl, combine the mascarpone cheese, powdered sugar, and vanilla extract. Using a spatula or a mixer on low speed, gently mix until smooth and creamy. Be cautious not to over-mix to maintain a light texture.
- Fold in the Whipped Cream: Gently fold the whipped cream into the mascarpone mixture using a spatula. Start by adding a dollop of whipped cream to lighten the mascarpone, then gradually fold in the rest until fully combined, ensuring you maintain the airy texture.
- Assemble the Trifle: Begin the layering process in a trifle dish or individual serving glasses. Dip each ladyfinger briefly into the coffee mixture (do not soak) and place them at the bottom of your serving dish. Spread a layer of the mascarpone cream over the ladyfingers, then repeat the process, layering until you run out of ingredients, finishing with the mascarpone layer on top.
- Chill and Serve: Cover the trifle with plastic wrap and refrigerate for at least 4 hours, or overnight if possible. This chilling time allows the flavors to meld and the dessert to set properly. Just before serving, dust the top generously with cocoa powder and add dark chocolate shavings if desired.
Extra Tips:
When preparing Tiramisu Trifle, using fresh, high-quality ingredients will make a noticeable difference in flavor. For an added twist, consider incorporating a layer of caramel or fruit puree between the mascarpone layers.
If you prefer a non-alcoholic version, simply omit the coffee liqueur, and you can experiment with flavored coffee or even chocolate milk for the soaking mixture.
Finally, remember to serve chilled, as the trifle is best enjoyed when the layers are set and the flavors have developed. Enjoy your delicious creation!