

When it comes to Portuguese cuisine, it’s all about embracing vibrant flavors and comforting dishes. These recipes don’t require hours of preparation, making them perfect for any home cook. From the heartwarming Caldo Verde to the irresistible Pastéis De Nata, each dish offers a taste of tradition and simplicity. This collection of 14 easy Portuguese recipes will help you explore the charm of this delightful cuisine. Get ready to bring a touch of Portugal to your table with these culinary treasures.
Caldo Verde (Green Soup)
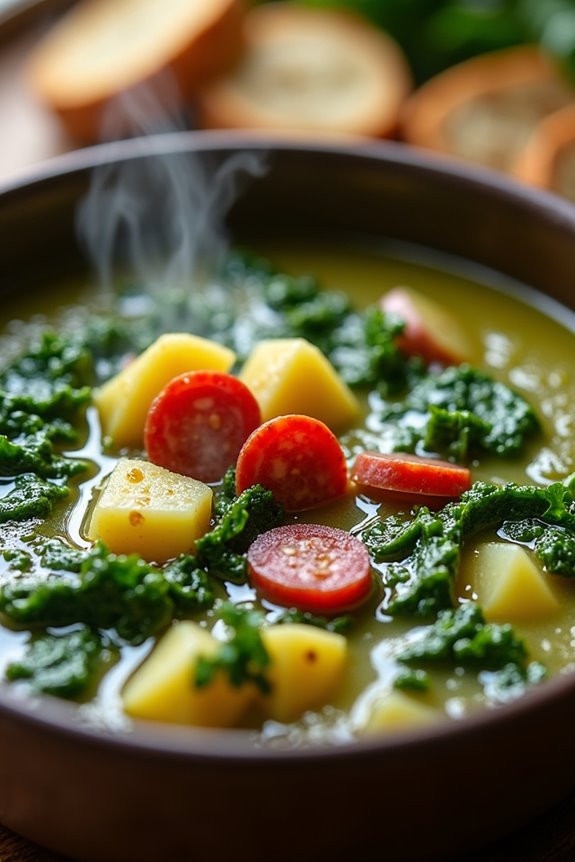
Caldo Verde is a traditional Portuguese soup that embodies the essence of comfort food with its simple yet flavorful ingredients. Originating from the northern region of Portugal, this delightful dish primarily features kale, potatoes, and chorizo, creating a nourishing and satisfying meal. Perfect for chilly evenings, Caldo Verde isn’t only easy to prepare but also a great way to enjoy the earthy flavors of fresh vegetables.
The richness of this soup comes from the combination of tender potatoes and the distinct taste of collard greens or kale. It’s often served with a drizzle of olive oil and accompanied by crusty bread, making it an ideal dish for gatherings or family dinners. Whether you’re looking to explore Portuguese cuisine or simply want a hearty soup, Caldo Verde is a must-try recipe that will warm your heart and soul.
Ingredients (Serves 4-6):
- 1 lb (450 g) potatoes, peeled and diced
- 1 onion, chopped
- 2 cloves garlic, minced
- 6 cups (1.5 L) vegetable or chicken broth
- 1 lb (450 g) kale or collard greens, stemmed and chopped
- 4 oz (115 g) chorizo sausage, sliced
- 3 tablespoons olive oil
- Salt and pepper, to taste
- Crusty bread, for serving
Cooking Instructions:
- Sauté the Aromatics: In a large pot, heat the olive oil over medium heat. Add the chopped onion and minced garlic, sautéing until the onion becomes translucent and fragrant, about 5 minutes. This step builds a flavorful base for the soup.
- Cook the Potatoes: Add the diced potatoes to the pot and stir well to combine with the onion and garlic mixture. Pour in the vegetable or chicken broth, bringing the mixture to a gentle boil. Reduce the heat and let it simmer for about 15-20 minutes, or until the potatoes are fork-tender.
- Blend the Soup: Once the potatoes are cooked, use an immersion blender to purée the soup until smooth. If you prefer a chunkier texture, you can blend only half the soup and leave the rest as is. This step gives the soup its signature creamy consistency without adding any cream.
- Add the Greens and Chorizo: Stir in the chopped kale or collard greens and sliced chorizo. Allow the soup to simmer for an additional 10-15 minutes, or until the greens are tender and the chorizo has infused its flavor into the soup. Be sure to stir occasionally to prevent sticking.
- Season and Serve: Taste the soup and season with salt and pepper as needed. Once everything is heated through, ladle the soup into bowls and drizzle a little extra olive oil on top, if desired. Serve hot with crusty bread on the side for dipping.
Extra Tips:
For an added depth of flavor, consider using homemade broth or adding a bay leaf during the simmering stage. Additionally, if you want to make the dish vegetarian, you can simply omit the chorizo or replace it with a plant-based sausage.
Don’t forget to adjust the seasoning based on the type of broth you use, as some are saltier than others. Enjoy your Caldo Verde with a sprinkle of freshly cracked pepper or a dash of red pepper flakes for an extra kick!
Bacalhau À Brás (Cod With Potatoes and Eggs)
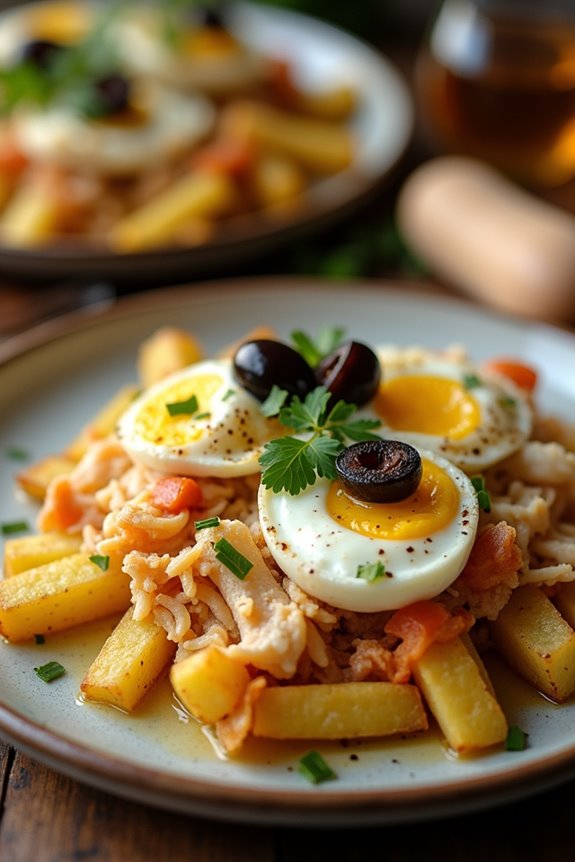
Bacalhau À Brás is a traditional Portuguese dish that beautifully combines the flavors of salted cod with eggs and crispy potatoes. This dish is a demonstration of the culinary prowess of Portugal, showcasing how simple ingredients can come together to create something truly special.
The texture of the shredded cod mingling with the creamy eggs, along with the crunch of the fried potatoes, makes this a comforting and satisfying meal that’s perfect for family gatherings or special occasions.
Preparing Bacalhau À Brás requires some planning, especially when it comes to the cod. The salted cod must be soaked in water for at least 24 hours prior to cooking to remove excess salt and rehydrate the fish. Once you have prepared the cod, the rest of the recipe comes together quickly, making it an excellent option for both novice cooks and seasoned chefs alike.
With its rich flavors and comforting textures, Bacalhau À Brás is sure to become a favorite in any household.
Ingredients (Serving Size: 4-6 People)
- 500g salted cod (bacalhau)
- 500g potatoes (preferably starchy potatoes)
- 6 large eggs
- 1 medium onion, finely chopped
- 2 cloves of garlic, minced
- 100ml olive oil
- 100g black olives, pitted and sliced
- Fresh parsley, chopped (for garnish)
- Salt and pepper to taste
Cooking Instructions
1. Prepare the Cod: Begin by soaking the salted cod in cold water for 24-48 hours, changing the water several times. This will help to rehydrate the fish and remove excess salt.
After soaking, drain and rinse the cod, then place it in a pot of fresh water. Bring it to a boil, then reduce the heat and let it simmer for about 10-15 minutes, or until the fish is cooked through. Remove from the water and let it cool. Once cool, shred the cod into small pieces, removing any skin and bones.
2. Fry the Potatoes: Peel the potatoes and cut them into thin matchstick-sized pieces. Heat about 80ml of olive oil in a large frying pan over medium heat. Add the potatoes and fry them until golden brown and crispy, about 5-7 minutes.
Remove the potatoes from the pan and place them on a plate lined with paper towels to absorb excess oil. Season lightly with salt.
3. Sauté the Onion and Garlic: In the same pan, add the remaining olive oil and heat over medium heat. Add the chopped onion and cook until it becomes translucent, about 5 minutes.
Add the minced garlic and cook for an additional minute, stirring frequently to avoid burning the garlic.
4. Combine Ingredients: Once the onion and garlic are softened, add the shredded cod to the pan. Stir well to combine and allow the flavors to meld for about 2-3 minutes.
Then, gently fold in the fried potatoes, ensuring they’re evenly distributed throughout the mixture.
5. Add the Eggs: In a separate bowl, beat the eggs and season with a pinch of salt and pepper. Pour the beaten eggs over the cod and potato mixture in the pan.
Stir gently and continuously over low heat until the eggs are just set, but still creamy. This should take about 3-5 minutes.
6. Serve: Once the eggs are cooked to your liking, remove the pan from the heat. Garnish with sliced black olives and fresh parsley before serving.
Bacalhau À Brás is best enjoyed warm, either on its own or accompanied by a fresh salad.
Extra Tips
When making Bacalhau À Brás, feel free to adjust the amount of olives and parsley according to your taste preferences.
Some people also like to add a touch of lemon juice for a hint of acidity that brightens the dish. If you’re short on time, you can use pre-cooked frozen potatoes for frying, but homemade fried potatoes will give you the best texture.
Finally, make sure that you don’t overcook the eggs; they should be creamy rather than dry for the best results. Enjoy your cooking!
Piri-Piri Chicken

Piri-Piri Chicken is a vibrant and spicy dish that originates from Portugal, heavily influenced by the flavors of Africa. The name “Piri-Piri” refers to the small, fiery chili pepper that gives this dish its signature heat. Traditionally, the chicken is marinated in a zesty sauce made from a blend of spices, herbs, and the iconic chili, then grilled to perfection, resulting in tender, juicy meat with a smoky flavor.
This dish isn’t only delicious but also versatile, making it perfect for summer barbecues or cozy family dinners. The beauty of Piri-Piri Chicken lies in its bold flavors and the ease of preparation. With just a handful of ingredients, you can create a meal that’s sure to impress.
Serve it with sides like rice, roasted vegetables, or a fresh salad to complete your dining experience. Whether you’re a fan of spicy food or looking to try something new, Piri-Piri Chicken is a fantastic way to explore Portuguese cuisine.
Ingredients (Serves 4-6 people)
- 1 whole chicken (approximately 3-4 lbs)
- 1/4 cup olive oil
- 2 tablespoons lemon juice
- 4 cloves garlic, minced
- 2-3 Piri-Piri peppers (or 1-2 teaspoons red pepper flakes)
- 1 teaspoon smoked paprika
- 1 teaspoon dried oregano
- 1 teaspoon salt
- 1/2 teaspoon black pepper
- Fresh parsley, for garnish
- Lemon wedges, for serving
Cooking Instructions
- Prepare the Marinade: In a bowl, combine the olive oil, lemon juice, minced garlic, Piri-Piri peppers (or red pepper flakes), smoked paprika, dried oregano, salt, and black pepper. Mix well until all ingredients are fully integrated into a smooth marinade.
- Marinate the Chicken: Place the whole chicken in a large resealable plastic bag or a shallow dish. Pour the marinade over the chicken, ensuring that it’s well-coated both inside and out. Seal the bag or cover the dish and refrigerate for at least 2 hours, or preferably overnight, to allow the flavors to penetrate the meat.
- Preheat the Grill: If using a charcoal grill, light the coals and allow them to become white hot. If using a gas grill, preheat it to medium-high heat. This step is essential for achieving that perfect char on the chicken.
- Grill the Chicken: Remove the chicken from the marinade and let any excess marinade drip off. Place the chicken on the grill, breast side down, and cook for about 15-20 minutes. Flip the chicken carefully and continue grilling for an additional 20-25 minutes, or until the internal temperature reaches 165°F (75°C) and the skin is crispy and golden brown.
- Rest and Serve: Once cooked, remove the chicken from the grill and let it rest for about 10 minutes. This resting period allows the juices to redistribute, ensuring a moist chicken. Carve the chicken and serve it garnished with fresh parsley and lemon wedges for an extra burst of flavor.
Extra Tips
For an even richer flavor, consider adding some additional herbs such as thyme or rosemary to the marinade. If you prefer a milder version of Piri-Piri Chicken, reduce the number of peppers or use sweet paprika instead of smoked paprika.
Additionally, pairing the chicken with a cooling yogurt or cucumber sauce can help balance the heat for those who are sensitive to spice. Enjoy your cooking adventure with this delightful Portuguese dish!
Portuguese Chicken Stew

Portuguese Chicken Stew, known as “Frango Estufado,” is a heartwarming dish that embodies the rustic flavors and vibrant ingredients of Portugal. This comforting stew combines tender chicken with a medley of vegetables, spices, and a rich tomato base, making it a perfect meal for family gatherings or a cozy dinner.
The dish isn’t only flavorful but also showcases the simplicity and warmth of Portuguese cuisine, allowing you to enjoy a delightful experience with every bite.
The beauty of this stew lies in its versatility; you can easily customize it with your favorite vegetables or spices. Traditionally made with chicken, this dish can also be adapted for other proteins or made vegetarian by substituting the chicken with hearty vegetables or legumes.
Serve it with crusty bread or over rice to soak up the delicious sauce, and you have a satisfying meal that brings everyone to the table.
Ingredients (serving size: 4-6 people)
- 1.5 kg (3.3 lbs) chicken (cut into pieces)
- 4 tablespoons olive oil
- 1 large onion (chopped)
- 4 cloves garlic (minced)
- 2 medium carrots (sliced)
- 1 red bell pepper (diced)
- 2 medium potatoes (peeled and cubed)
- 400 g (14 oz) canned diced tomatoes
- 2 cups chicken broth
- 1 tablespoon paprika
- 1 teaspoon dried oregano
- Salt and pepper to taste
- Fresh parsley (for garnish)
Cooking Instructions
- Heat the Olive Oil: In a large pot or Dutch oven, heat the olive oil over medium heat. Once hot, add the chopped onion and sauté until it becomes translucent, about 5 minutes. This step builds the base flavor of the stew.
- Add Garlic and Chicken: Stir in the minced garlic and cook for an additional minute until fragrant. Next, add the chicken pieces to the pot, browning them on all sides for about 8-10 minutes. This browning process enhances the flavor and color of the chicken.
- Incorporate Vegetables: Add the sliced carrots, diced red bell pepper, and cubed potatoes to the pot. Stir well to combine all ingredients. The vegetables will add a variety of textures and flavors to the stew.
- Add Tomatoes and Broth: Pour in the canned diced tomatoes and chicken broth. Stir in the paprika, dried oregano, salt, and pepper. Bring the mixture to a boil, then reduce the heat to low, allowing it to simmer gently. This will help meld the flavors together.
- Simmer the Stew: Cover the pot and let the stew simmer for about 30-40 minutes, or until the chicken is cooked through and tender, and the vegetables are soft. Stir occasionally to prevent sticking and guarantee even cooking.
- Finish and Serve: Once cooked, taste and adjust seasoning if necessary. Serve hot, garnished with fresh parsley. This stew pairs wonderfully with crusty bread or over a bed of rice to soak up the savory juices.
Extra Tips
For an even richer flavor, consider marinating the chicken in olive oil, garlic, and herbs for a few hours before cooking.
Additionally, feel free to experiment with different vegetables or add a splash of white wine during the simmering stage for a depth of flavor.
This stew also tastes great the next day, as the flavors continue to develop, making it an excellent option for meal prep or leftovers.
Arroz De Marisco (Seafood Rice)
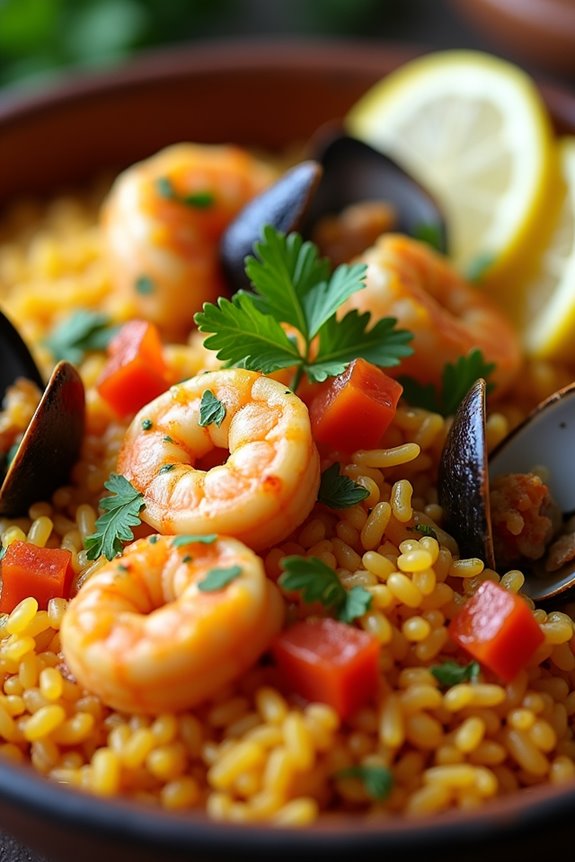
Arroz De Marisco, or Seafood Rice, is a beloved dish in Portuguese cuisine, celebrated for its rich flavors and hearty ingredients. This delightful one-pot meal combines a variety of seafood with rice, creating a comforting and satisfying dish that’s perfect for any occasion, from family dinners to gatherings with friends.
The dish is typically infused with aromatic spices, fresh herbs, and a hint of tomato, making every bite a burst of flavor. It showcases the bounty of the sea, with shrimp, clams, and mussels often taking center stage.
To prepare Arroz De Marisco, you’ll need to embrace the essence of Portuguese cooking, which emphasizes the use of fresh, high-quality ingredients. The key to achieving a perfect seafood rice lies in the balance of flavors and the cooking techniques employed.
Whether you’re a seasoned cook or a beginner, this recipe will guide you through the process, ensuring a delicious result that will impress your guests and satisfy your cravings.
Ingredients (serving size: 4-6 people)
- 2 cups short-grain rice
- 1 lb shrimp, peeled and deveined
- 1 lb mussels, cleaned
- 1 lb clams, cleaned
- 1 onion, finely chopped
- 4 cloves garlic, minced
- 1 red bell pepper, diced
- 1 can (14 oz) diced tomatoes
- 4 cups fish or seafood broth
- 1/2 cup white wine
- 1 teaspoon paprika
- 1/2 teaspoon saffron threads
- 1/4 cup fresh parsley, chopped
- Olive oil
- Salt and pepper to taste
- Lemon wedges for serving
Cooking Instructions
- Prepare the Seafood: Start by cleaning the mussels and clams thoroughly under cold water to remove any sand or debris. Set them aside. Make sure the shrimp are peeled and deveined, and pat them dry with a paper towel.
- Sauté Aromatics: In a large pot or deep skillet, heat a generous drizzle of olive oil over medium heat. Add the chopped onion and sauté until translucent, about 5 minutes. Then, add the minced garlic and diced red bell pepper, cooking for another 2-3 minutes until fragrant.
- Add the Tomatoes and Spices: Stir in the canned diced tomatoes, paprika, and saffron threads. Allow the mixture to simmer for 5 minutes, stirring occasionally. This will help to develop the flavors before adding the rice.
- Incorporate the Rice: Add the short-grain rice to the pot, stirring well to combine it with the tomato mixture. Toast the rice for about 2 minutes, allowing it to absorb some of the flavors.
- Pour in the Broth and Wine: Slowly add the fish or seafood broth and white wine to the pot. Bring the mixture to a gentle boil, then reduce the heat to low. Season with salt and pepper to taste. Cover the pot and let it simmer for 15 minutes, or until the rice is nearly cooked.
- Add the Seafood: Gently fold in the shrimp, mussels, and clams into the rice. Cover the pot again and continue to cook for an additional 5-7 minutes, or until the seafood is cooked through and the mussels and clams have opened.
- Garnish and Serve: Once cooked, remove the pot from the heat and sprinkle with fresh parsley. Let it rest for a few minutes before serving. Serve the Arroz De Marisco hot, with lemon wedges on the side for an extra burst of flavor.
Extra Tips
When cooking Arroz De Marisco, it’s important to use fresh seafood for the best flavor and texture. You can also customize the recipe by adding your favorite seafood or adjusting the spices to suit your taste.
If the rice seems too dry, feel free to add a bit more broth or water during the cooking process. Finally, for a touch of heat, consider adding a pinch of red pepper flakes to spice things up. Enjoy your culinary adventure with this traditional Portuguese dish!
Feijoada (Bean Stew)
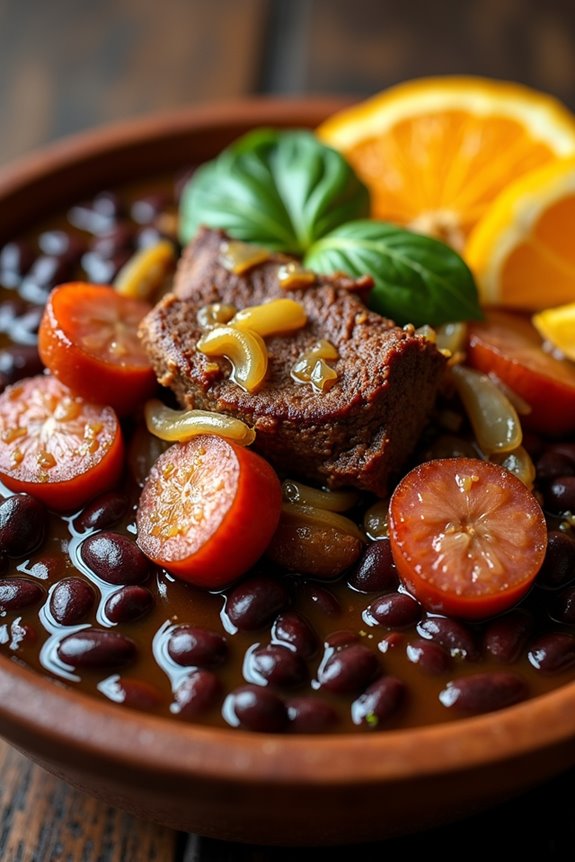
Feijoada is a traditional Brazilian dish that showcases a rich blend of flavors and ingredients, making it one of the most beloved meals in Portuguese-speaking cultures. This hearty bean stew is typically made with black beans, a variety of meats, and spices that create a comforting and satisfying meal perfect for family gatherings or special occasions.
Originating from the Portuguese influence in Brazil, feijoada has evolved into a symbol of Brazilian cuisine, often served with rice, collard greens, and orange slices to balance its richness.
The beauty of feijoada lies in its versatility; you can customize the meats used according to your preferences. Common ingredients include pork, beef, and sausage, all contributing to the stew’s depth of flavor. Slow-cooked to perfection, the stew allows the beans and meats to meld together, creating a dish that’s both nourishing and delicious.
Whether you’re enjoying it in a cozy home setting or at a festive gathering, feijoada is sure to impress and delight your guests.
Ingredients (Serves 4-6)
- 1 lb black beans (soaked overnight)
- 1/2 lb pork shoulder, cut into cubes
- 1/2 lb beef brisket, cut into cubes
- 1/2 lb chorizo sausage, sliced
- 1/2 lb smoked sausage, sliced
- 1 onion, chopped
- 4 cloves garlic, minced
- 2 bay leaves
- 1 teaspoon paprika
- 1 teaspoon cumin
- Salt and pepper to taste
- 4 cups chicken or beef broth
- 2 tablespoons olive oil
- Fresh orange slices (for serving)
- Cooked white rice (for serving)
- Collard greens (for serving)
Cooking Instructions
- Prepare the Beans: Drain the soaked black beans and set them aside. This step is essential to guarantee the beans cook evenly and absorb the flavors of the stew.
- Sauté the Meats: In a large pot or Dutch oven, heat the olive oil over medium heat. Add the pork shoulder and beef brisket, browning them on all sides for about 5-7 minutes. This step adds depth of flavor through caramelization.
- Add Sausages: Add the sliced chorizo and smoked sausage to the pot. Cook for another 3-4 minutes until the sausages begin to brown. The fat released from the sausages will enhance the overall flavor of the stew.
- Sauté Aromatics: Stir in the chopped onion and minced garlic. Sauté for about 5 minutes until the onions are translucent and fragrant. This will create a flavorful base for the stew.
- Combine Ingredients: Add the drained black beans, bay leaves, paprika, cumin, salt, and pepper to the pot. Pour in the chicken or beef broth, making sure that all ingredients are submerged. Stir to combine.
- Simmer: Bring the mixture to a boil, then reduce the heat to low. Cover the pot and let it simmer for about 2-3 hours, stirring occasionally. This slow cooking allows the flavors to meld and the beans to become tender.
- Final Adjustments: After simmering, check the seasoning and adjust with more salt and pepper if needed. Remove the bay leaves before serving.
- Serve: Serve the feijoada hot over cooked white rice, accompanied by fresh collard greens and orange slices. The orange adds a revitalizing contrast to the rich flavors of the stew.
Extra Tips
When cooking feijoada, consider using a mix of different meats for a more complex flavor profile. Feel free to experiment with the types of sausages you include; just make sure they’re flavorful.
If time permits, allow the stew to sit for a few hours or overnight in the refrigerator before reheating and serving; this often enhances the flavors even more. Finally, don’t skip the orange slices; they provide a delightful brightness that complements the dish beautifully. Enjoy your feijoada!
Pastéis De Nata (Custard Tarts)

Pastéis de Nata, or Portuguese custard tarts, are a beloved pastry that hails from Portugal, particularly from the city of Lisbon. These delightful treats consist of a crisp, flaky pastry shell filled with a rich, creamy custard, often topped with a sprinkle of cinnamon or powdered sugar. The combination of textures and flavors makes them a favorite dessert for both locals and visitors alike.
With a history dating back to the 18th century, these tarts have become synonymous with Portuguese culture and cuisine.
Making Pastéis de Nata at home can be a rewarding experience, allowing you to enjoy these delicious pastries fresh from the oven. While the process may seem intimidating at first, following the right steps will guarantee that your tarts turn out perfectly golden and creamy. Whether you’re serving them at a gathering or simply indulging in a sweet treat, these custard tarts are sure to impress.
Ingredients (Serves 4-6)
- 1 package of puff pastry (thawed if frozen)
- 1 cup heavy cream
- 1 cup whole milk
- 3/4 cup granulated sugar
- 1/4 cup all-purpose flour
- 6 large egg yolks
- 1 teaspoon vanilla extract
- 1 cinnamon stick
- Zest of 1 lemon
- Ground cinnamon (for dusting, optional)
- Powdered sugar (for dusting, optional)
Cooking Instructions
- Prepare the Pastry Shell: Preheat your oven to 400°F (200°C). Roll out the puff pastry on a floured surface until it’s thin. Cut circles that are about 4 inches in diameter and press them into the wells of a muffin tin, guaranteeing the pastry rises up the sides. Chill in the refrigerator while you prepare the custard.
- Make the Custard Mixture: In a medium saucepan over medium heat, combine the heavy cream, whole milk, and cinnamon stick. Heat until just simmering, then remove from heat and let it steep for about 10 minutes to infuse the flavors.
- Whisk the Sugar and Flour: In a separate bowl, whisk together the granulated sugar and all-purpose flour until well combined. This will help prevent lumps in your custard.
- Combine Ingredients: In a large mixing bowl, whisk the egg yolks until they’re well beaten. Gradually add the sugar and flour mixture to the egg yolks, whisking continuously to avoid cooking the eggs. Slowly incorporate the warm milk mixture (remove the cinnamon stick first) into the egg mixture, mixing until smooth. Stir in the vanilla extract and lemon zest.
- Fill the Pastry Shells: Pour the custard mixture into each pastry shell, filling them about three-quarters full. Be careful not to overfill, as the custard will rise while baking.
- Bake the Tarts: Place the muffin tin in the preheated oven and bake for 15-20 minutes, or until the tops are golden brown and the custard is puffed and slightly set. Keep an eye on them to avoid burning.
- Cool and Serve: Once baked, remove the tarts from the oven and let them cool in the tin for about 5 minutes. Carefully transfer the tarts to a wire rack to cool completely. Serve warm or at room temperature, dusted with ground cinnamon and powdered sugar if desired.
Extra Tips
For the best results, guarantee that your puff pastry is well-chilled before working with it, as this will help achieve that flaky texture when baked. If you want to enhance the flavor of your custard, consider adding a touch of nutmeg or a splash of orange zest along with the lemon.
Additionally, for a more authentic taste, you can experiment with using a Portuguese cheese called “Queijo da Serra” in the custard mixture, which adds a unique richness. Enjoy your Pastéis de Nata fresh, as they’re best eaten the same day they’re made!
Bifana (Pork Sandwich)

Bifana is a beloved Portuguese dish that consists of marinated pork served in a crusty roll. Originating from the Alentejo region, this flavorful sandwich is a staple in Portuguese cuisine and is often enjoyed as a quick meal or snack. The distinct combination of spices and marinated pork creates a deliciously savory experience, making it a must-try for anyone looking to explore Portuguese flavors.
Traditionally, the pork is thinly sliced and marinated in a mixture of garlic, white wine, and spices, which allows the meat to absorb all the flavors and become tender. Served hot and typically accompanied by mustard or piri-piri sauce, the Bifana isn’t just a meal; it’s a cultural experience that embodies the essence of Portuguese street food. Whether enjoyed at a local tavern or made at home, this sandwich is sure to impress.
Ingredients (Serves 4-6 people)
- 1.5 pounds pork loin, thinly sliced
- 4 cloves garlic, minced
- 1/2 cup white wine
- 1/4 cup olive oil
- 1 tablespoon paprika
- 1 teaspoon ground cumin
- 1 teaspoon ground coriander
- Salt and pepper, to taste
- 4-6 crusty rolls (Portuguese bread or similar)
- Mustard or piri-piri sauce (optional, for serving)
- Fresh cilantro or parsley, chopped (for garnish)
Cooking Instructions
- Prepare the Marinade: In a large bowl, combine the minced garlic, white wine, olive oil, paprika, ground cumin, ground coriander, salt, and pepper. Mix thoroughly to create a marinade.
- Marinate the Pork: Add the thinly sliced pork loin to the marinade, ensuring each piece is well-coated. Cover the bowl with plastic wrap and refrigerate for at least 2 hours, or preferably overnight. This allows the flavors to penetrate the meat, making it more flavorful and tender.
- Cook the Pork: Heat a large skillet or frying pan over medium-high heat. Once hot, add the marinated pork slices (discard the excess marinade) in batches, ensuring not to overcrowd the pan. Cook for about 3-4 minutes per side, or until the pork is golden brown and cooked through. Remove from the pan and set aside.
- Assemble the Sandwiches: Slice the crusty rolls in half. If desired, toast them lightly on the skillet for added crunch. Layer the cooked pork inside each roll and add mustard or piri-piri sauce according to your taste.
- Garnish and Serve: Sprinkle chopped cilantro or parsley over the pork before closing the sandwich. Serve the Bifanas hot, with extra sauce on the side if desired.
Extra Tips
For an authentic experience, serve your Bifanas with a side of Portuguese fries or a simple salad. If you have time, letting the pork marinate overnight will greatly enhance the flavors. Additionally, feel free to experiment with the spices in the marinade to adjust the heat and flavor profile to your liking. Enjoy your homemade Bifanas and share the taste of Portugal with friends and family!
Polvo À Lagareiro (Octopus With Olive Oil)
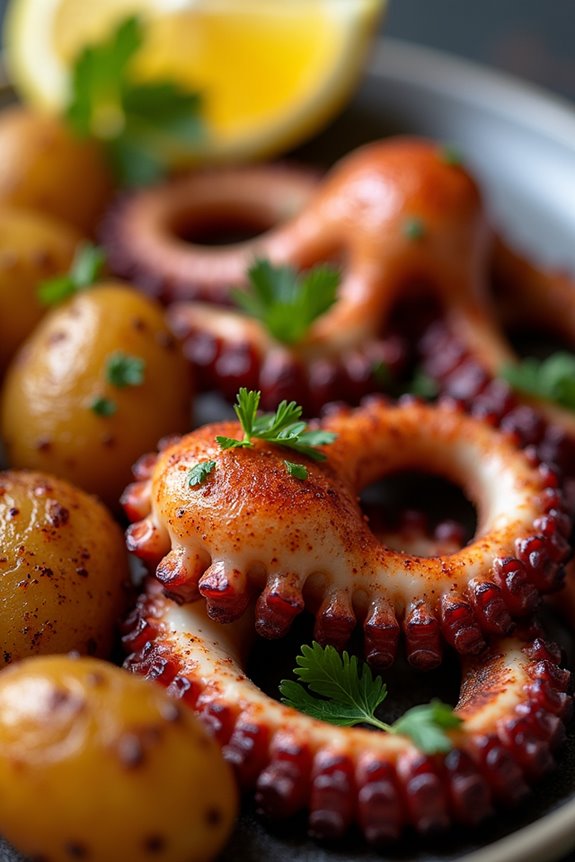
Polvo À Lagareiro is a classic Portuguese dish that showcases the delicate flavors of octopus, enhanced by the richness of olive oil and the freshness of garlic and herbs. This dish isn’t only a feast for the eyes but also a delightful treat for the palate, making it a staple in coastal regions of Portugal.
Traditionally served with roasted potatoes and a sprinkle of fresh parsley, this recipe captures the essence of Portuguese cuisine, where simple ingredients come together to create something truly special.
Cooking octopus may seem challenging, but with the right technique, it can be incredibly tender and flavorful. The key is to confirm that the octopus is cooked just right, allowing it to absorb the aromatic olive oil and seasoning. This recipe is perfect for gatherings and will impress your guests with its vibrant flavors and beautiful presentation.
So gather your ingredients, and let’s plunge into this exquisite dish that embodies the spirit of Portugal!
Ingredients (Serves 4-6)
- 2-3 pounds of octopus
- 1 cup of extra virgin olive oil
- 6 cloves of garlic, minced
- 1 tablespoon of smoked paprika
- 1 teaspoon of salt
- 1 teaspoon of black pepper
- 1 tablespoon of fresh parsley, chopped
- 1 tablespoon of lemon juice
- 1 pound of small potatoes, halved
- Lemon wedges, for serving
Cooking Instructions
- Prepare the Octopus: Begin by cleaning the octopus. Rinse it under cold water and remove the beak and any innards. In a large pot, bring water to a boil and add the octopus. Boil for about 30-40 minutes until the octopus is tender but not mushy. You can test its tenderness by piercing it with a fork. Once cooked, remove from water and let it cool slightly.
- Cook the Potatoes: While the octopus is cooling, place the halved potatoes in a pot of salted water. Bring to a boil and cook for about 15-20 minutes, or until fork-tender. Drain and set aside.
- Marinate the Octopus: Once the octopus is cool enough to handle, cut it into bite-sized pieces. In a large bowl, combine the octopus pieces, minced garlic, smoked paprika, salt, pepper, lemon juice, and half of the olive oil. Toss to confirm all pieces are well coated. Let it marinate for at least 30 minutes to allow the flavors to meld.
- Sear the Octopus: In a large skillet or grill pan, heat the remaining olive oil over medium-high heat. Once hot, add the marinated octopus pieces and sear for 3-4 minutes on each side, until golden brown and slightly crispy.
- Roast the Potatoes: In the same skillet, add the boiled potatoes and sauté them in the leftover olive oil for about 5-7 minutes until they’re golden and crispy on the outside.
- Serve: Arrange the seared octopus on a serving platter alongside the roasted potatoes. Drizzle with any remaining olive oil from the skillet and sprinkle with fresh parsley. Serve with lemon wedges on the side for an extra burst of flavor.
Extra Tips
When cooking octopus, choosing the right size is essential; larger octopuses tend to be tougher, while smaller ones can be more tender.
If you want an even more tender texture, consider freezing the octopus before cooking, as this helps break down the fibers.
Also, for an added depth of flavor, feel free to experiment with herbs such as bay leaves or thyme during the boiling process.
Finally, serving this dish with a good quality crusty bread is a great way to soak up the delicious olive oil and juices!
Chouriço (Spicy Sausage)
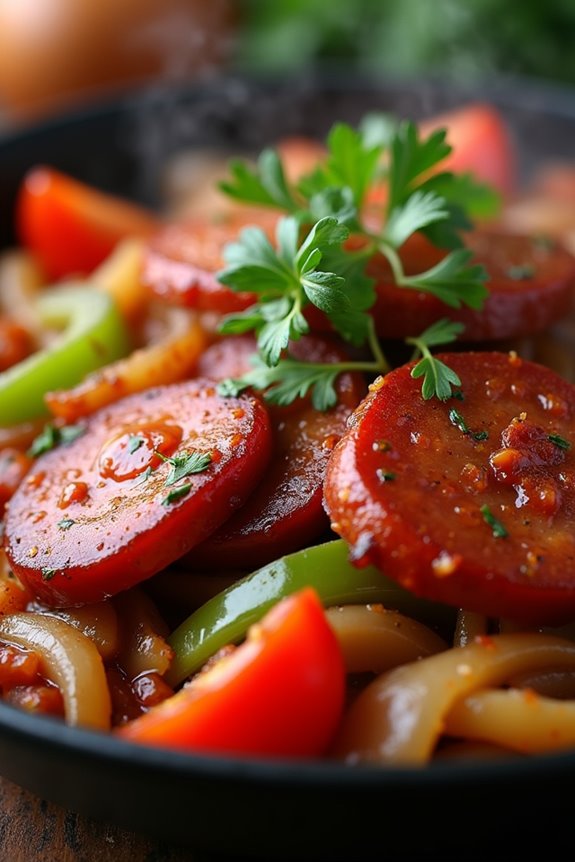
Chouriço is a traditional Portuguese sausage that’s beloved for its rich, smoky flavor and spicy kick. Made primarily from pork, this sausage is seasoned with a mix of spices including paprika, garlic, and sometimes even a splash of wine, which gives it a distinctive taste that can enhance a variety of dishes.
Chouriço can be enjoyed on its own, grilled, or incorporated into stews, soups, and rice dishes. Cooking chouriço is a great way to explore Portuguese cuisine and bring a taste of Portugal into your kitchen.
This recipe is designed to serve 4-6 people and is perfect for gatherings, barbecues, or a cozy family dinner. Whether you’re cooking it on the stove, grilling it, or preparing it in the oven, the key is to allow the flavors to meld and the sausage to cook thoroughly.
Get ready to indulge in the delightful taste of chouriço!
Ingredients
- 1 lb chouriço sausage
- 1 cup onion, diced
- 2 cloves garlic, minced
- 1 bell pepper, sliced (red or green)
- 1 cup tomatoes, diced (fresh or canned)
- 1 cup dry red wine
- 1 tablespoon olive oil
- 1 teaspoon paprika
- Salt and pepper, to taste
- Fresh parsley, chopped (for garnish)
Cooking Instructions
- Prepare the Ingredients: Start by slicing the chouriço into thick rounds. Dice the onion, mince the garlic, and slice the bell pepper. If using fresh tomatoes, chop them into small pieces. Having all your ingredients prepped will streamline the cooking process.
- Sauté the Base: In a large skillet or saucepan, heat the olive oil over medium heat. Add the diced onion and cook for about 3-4 minutes until they become translucent. Then, add the minced garlic and sliced bell pepper, cooking for an additional 2-3 minutes until the vegetables are softened and fragrant.
- Add the Chouriço: Once the base of onions and peppers is ready, add the sliced chouriço to the pan. Sauté for about 5-7 minutes, allowing the sausage to brown and release its flavors into the pan.
- Incorporate the Tomatoes and Wine: Add the diced tomatoes and dry red wine to the pan. Stir well to combine all ingredients and scrape any browned bits off the bottom of the pan. This will enhance the dish’s flavor.
- Season and Simmer: Sprinkle in the paprika, and season with salt and pepper to taste. Bring the mixture to a gentle simmer and cover the pan. Let it cook for about 15-20 minutes, allowing the flavors to meld and the sauce to thicken slightly.
- Garnish and Serve: Once cooked, remove the pan from heat and garnish with freshly chopped parsley. Serve the chouriço hot, either on its own, with crusty bread, or alongside rice or potatoes.
Extra Tips
When cooking chouriço, you can adjust the level of spiciness by choosing different varieties of chouriço; some are milder while others pack a serious punch.
If you want to add a smoky flavor, consider grilling the sausage before adding it to the pan, or even incorporating smoked paprika for an extra depth of flavor. Additionally, pairing this dish with a glass of red wine that complements the sauce can elevate the dining experience.
Enjoy your culinary journey into Portuguese flavors!
Sopa De Pedra (Stone Soup)
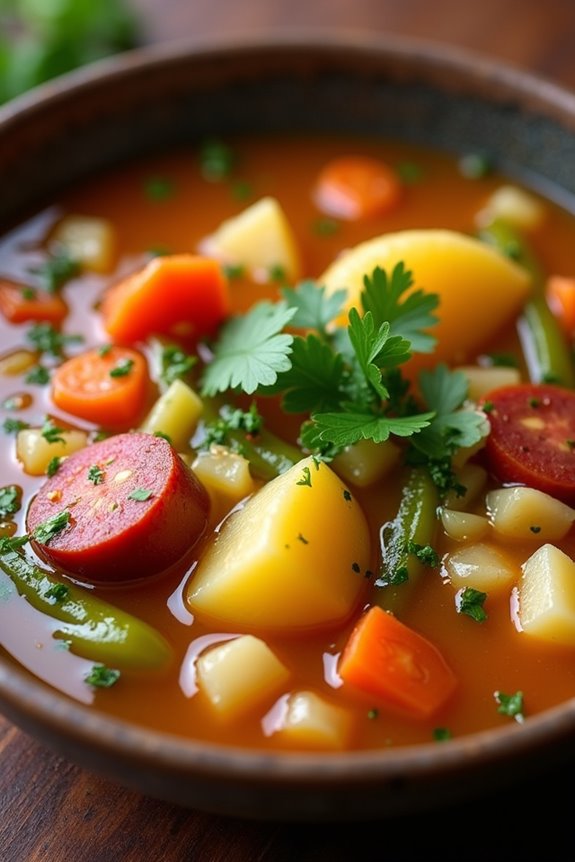
Sopa De Pedra, or Stone Soup, is a traditional Portuguese dish that carries with it a rich history and a heartwarming story. The tale tells of a traveler who, upon arriving in a village, found the locals unwilling to share their food. To demonstrate the power of community and sharing, he began to boil a stone in a pot of water, claiming he’d make a delicious soup. Curious villagers gathered around, and one by one, they offered various ingredients to enhance the soup, transforming it into a hearty meal that everyone could enjoy.
This recipe not only creates a delicious soup but also emphasizes the importance of cooperation and generosity.
This dish can be made with a variety of ingredients, making it quite versatile and adaptable to personal tastes and available produce. Typically, Sopa De Pedra includes a mix of vegetables and meats, along with the symbolic stone, which represents the idea that great things can come from humble beginnings. It’s perfect for family gatherings, as it serves 4-6 people, allowing everyone to savor its comforting flavors together.
Ingredients (Serves 4-6)
- 1 large onion, chopped
- 2 cloves of garlic, minced
- 2 medium carrots, sliced
- 2 medium potatoes, diced
- 1 leek, sliced
- 1 bell pepper, chopped
- 1 large tomato, diced
- 1 cup of green beans, trimmed and cut into pieces
- 4 cups of vegetable or chicken broth
- 1 cup of diced chorizo or any sausage (optional)
- 1 bay leaf
- Salt and pepper to taste
- Fresh parsley, chopped, for garnish
- A clean stone (optional, for authenticity)
Cooking Instructions
- Sauté the Aromatics: In a large pot, add a bit of olive oil over medium heat. Once hot, add the chopped onion and minced garlic. Sauté for about 5 minutes until the onions become translucent and fragrant, stirring occasionally to prevent burning.
- Add the Vegetables: Incorporate the sliced carrots, diced potatoes, and sliced leek into the pot. Stir well to combine and cook for another 5-7 minutes, allowing the vegetables to soften slightly.
- Introduce the Broth: Pour in the vegetable or chicken broth and bring the mixture to a gentle boil. Add the bay leaf, salt, and pepper to taste. If you’re using the stone for authenticity, add it now; otherwise, skip this step.
- Simmer the Soup: Once boiling, reduce the heat to low and let the soup simmer for about 20 minutes. During this time, the flavors will meld beautifully together, and the vegetables will cook through.
- Add Additional Ingredients: After 20 minutes, stir in the chopped bell pepper, diced tomato, and green beans. If you chose to include chorizo or sausage, add it at this stage as well. Allow the soup to simmer for an additional 10-15 minutes until all vegetables are tender and the flavors are well combined.
- Finish and Serve: Remove the stone if used and discard the bay leaf. Taste the soup and adjust seasoning if needed. Ladle the soup into bowls and garnish with freshly chopped parsley before serving.
Extra Tips
When making Sopa De Pedra, feel free to get creative with the ingredients. The beauty of this dish lies in its adaptability—add any seasonal vegetables or meats you have on hand.
If you want a heartier version, consider adding beans or lentils. For a vegetarian option, simply omit the sausage and use vegetable broth. Additionally, serving the soup with crusty bread makes it a complete meal and enhances the overall experience. Enjoy the process of sharing and creating, just like the original story of Stone Soup!
Salada De Grão De Bico (Chickpea Salad)
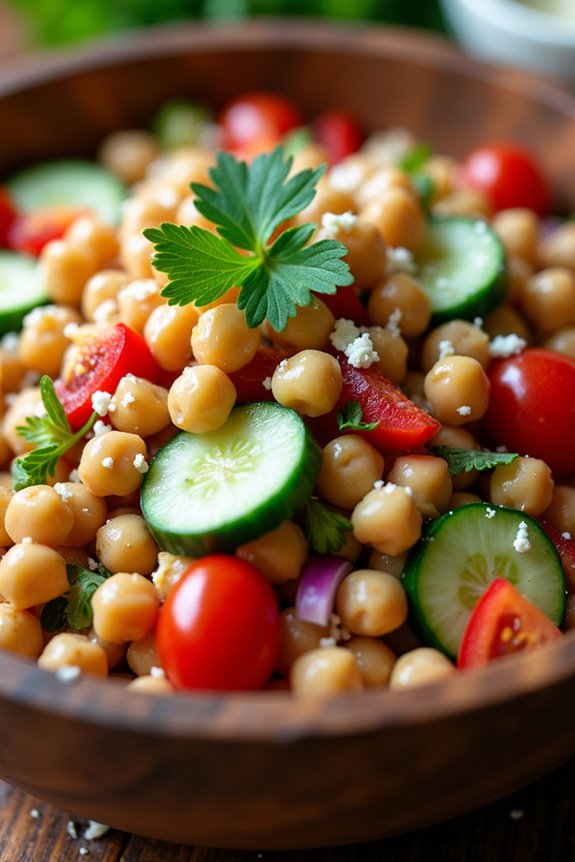
Salada De Grão De Bico, or Chickpea Salad, is a delightful and nutritious dish that showcases the versatility of chickpeas. This colorful salad not only packs a punch regarding flavor but is also rich in protein and fiber. Perfect as a side dish or a light meal, it’s ideal for warm days or as a revitalizing appetizer at gatherings.
The combination of fresh vegetables, herbs, and a zesty dressing brings this salad to life, making it a favorite among both vegetarians and meat-lovers alike. This dish is simple to prepare and can be customized with your favorite ingredients. Whether you choose to add avocado, feta cheese, or an extra sprinkle of spices, the chickpeas provide a hearty base that holds the flavors beautifully.
With a preparation time of just 15 minutes, Salada De Grão De Bico is an excellent choice for busy weeknights or potluck parties.
Ingredients (Serves 4-6):
- 1 can (15 oz) chickpeas, drained and rinsed
- 1 medium cucumber, diced
- 1 red bell pepper, diced
- 1 small red onion, finely chopped
- 1 cup cherry tomatoes, halved
- 1/4 cup fresh parsley, chopped
- 1/4 cup olive oil
- 2 tablespoons red wine vinegar
- 1 teaspoon Dijon mustard
- Salt and pepper to taste
- Optional: crumbled feta cheese for garnish
Cooking Instructions:
- Prepare the Chickpeas: Start by draining and rinsing the canned chickpeas under cold water. This removes excess sodium and any canning residue. Once rinsed, place them in a large mixing bowl. The chickpeas serve as the protein-packed base of your salad.
- Chop Vegetables: Dice the cucumber and red bell pepper, and finely chop the red onion. Halve the cherry tomatoes. Add all of these freshly chopped vegetables to the bowl with the chickpeas. The vibrant colors and textures will enhance the visual appeal and flavor of the salad.
- Add Fresh Herbs: Chop the fresh parsley and add it to the mixing bowl. Fresh herbs are essential for adding a burst of flavor and a touch of freshness to the salad.
- Make the Dressing: In a small bowl, whisk together the olive oil, red wine vinegar, Dijon mustard, salt, and pepper. This dressing will tie all the ingredients together, adding a tangy and savory note. Taste and adjust the seasoning according to your preference.
- Combine Ingredients: Pour the dressing over the chickpea and vegetable mixture. Gently toss everything together until all the ingredients are evenly coated with the dressing. Be careful not to mash the chickpeas while mixing.
- Chill and Serve: For the best flavor, let the salad chill in the refrigerator for at least 30 minutes before serving. This allows the flavors to meld together beautifully. When ready to serve, you can optionally sprinkle crumbled feta cheese on top for an added layer of taste.
Extra Tips:
For added crunch and flavor, consider including diced avocado or shredded carrots to your salad. You can also experiment with different herbs, such as mint or cilantro, for a unique twist.
If you prefer a spicier kick, add a pinch of red pepper flakes or a dash of hot sauce. This salad stores well in the refrigerator for up to three days, making it a great option for meal prep. Enjoy your Salada De Grão De Bico as a nutritious and delicious addition to any meal!
Bolinhos De Bacalhau (Codfish Cakes)

Bolinhos De Bacalhau, or codfish cakes, are a beloved traditional Portuguese dish that perfectly captures the essence of Portuguese cuisine. With their crispy exterior and tender, flavorful interior, these cakes are often served as appetizers or snacks, making them a favorite at gatherings and celebrations.
The key ingredient, salted cod, is a staple in Portuguese cooking and brings a distinct flavor that’s both savory and satisfying.
To prepare Bolinhos De Bacalhau, you’ll need to soak and desalt the cod before mixing it with potatoes, onions, and a blend of spices. The resulting mixture is then shaped into small cakes and fried until golden brown. These delightful treats are typically served with a wedge of lemon and can be enjoyed hot or at room temperature. They aren’t only delicious but also a wonderful way to experience the flavors of Portugal in your own kitchen.
Ingredients (Serves 4-6):
- 1 pound salted cod (bacalhau)
- 2 medium potatoes
- 1 small onion, finely chopped
- 2 cloves garlic, minced
- 2 large eggs
- ¼ cup fresh parsley, chopped
- ½ teaspoon black pepper
- ½ teaspoon paprika
- Salt, to taste
- Oil, for frying (such as vegetable or olive oil)
- Lemon wedges, for serving
Cooking Instructions:
1. Desalt the Cod: Start by rinsing the salted cod under cold water to remove excess salt. Place it in a bowl, cover it with cold water, and let it soak for 24 hours, changing the water several times.
After soaking, drain and boil the cod in fresh water for about 15-20 minutes until cooked through. Once cooked, remove any skin and bones, and flake the fish into small pieces.
2. Cook the Potatoes: While the cod is boiling, peel and chop the potatoes into chunks. In a pot of boiling salted water, cook the potatoes until they’re fork-tender, about 15-20 minutes.
Drain the potatoes and let them cool slightly before mashing them in a bowl.
3. Combine Ingredients: In a large mixing bowl, combine the flaked cod, mashed potatoes, chopped onion, minced garlic, parsley, eggs, black pepper, and paprika.
Mix well until all ingredients are thoroughly combined. Taste the mixture and add salt if needed, keeping in mind that the cod may already be salty.
4. Shape the Cakes: With your hands, take a small amount of the mixture and shape it into small patties or cakes, about 2-3 inches in diameter.
Place the shaped cakes on a plate or tray and continue until all the mixture is used.
5. Fry the Cakes: In a large skillet, heat oil over medium heat until hot. Fry the cod cakes in batches, being careful not to overcrowd the pan.
Cook each side for about 3-4 minutes, or until they’re golden brown and crispy. Remove the cakes and place them on a paper towel-lined plate to drain excess oil.
6. Serve: Once all the cakes are cooked, Serve them warm with lemon wedges on the side for squeezing over the top.
Extra Tips:
When making Bolinhos De Bacalhau, be certain to adjust the salt according to your taste and the saltiness of the cod, as some brands may vary.
For a twist, you can add other ingredients such as diced bell peppers or a touch of chili flakes for some heat. Additionally, if you’re looking for a healthier option, consider baking the cakes in the oven at 375°F (190°C) for about 20-25 minutes, flipping them halfway through to guarantee they brown evenly.
Enjoy experimenting with this classic recipe!
Tarte De Amêndoa (Almond Tart)

Tarte De Amêndoa is a delightful Portuguese dessert that showcases the rich flavor of almonds in a beautifully baked tart. This traditional recipe combines a buttery crust with a creamy almond filling, creating a dessert that’s both elegant and satisfying.
Perfect for special occasions or as a sweet treat after dinner, this tart is bound to impress your family and friends with its nutty aroma and delicious taste.
Making Tarte De Amêndoa involves a few simple steps, but the result is a show-stopping dessert that highlights the essence of Portuguese cuisine. The tart can be served warm or at room temperature, making it a versatile choice for any gathering.
Whether you’re an experienced baker or a novice in the kitchen, this recipe is easy to follow and yields a scrumptious result.
Ingredients (Serves 4-6 People)
- 1 ½ cups (180g) all-purpose flour
- ½ cup (113g) unsalted butter, softened
- ¼ cup (50g) granulated sugar
- 1 large egg
- 1 teaspoon vanilla extract
- 1 cup (120g) almond flour
- ¾ cup (90g) granulated sugar (for the filling)
- 3 large eggs (for the filling)
- 1 teaspoon almond extract
- ½ cup (120ml) heavy cream
- Sliced almonds (for garnish)
- Powdered sugar (for dusting)
Cooking Instructions
- Prepare the Tart Crust: In a mixing bowl, combine the all-purpose flour and granulated sugar. Add the softened butter and mix until the mixture resembles coarse crumbs. Incorporate the egg and vanilla extract, mixing until a dough forms. Wrap the dough in plastic wrap and refrigerate for 30 minutes.
- Preheat the Oven: While the dough is chilling, preheat your oven to 350°F (175°C). This guarantees that the tart will bake evenly once assembled.
- Roll Out the Dough: After chilling, remove the dough from the refrigerator. On a lightly floured surface, roll out the dough into a circle about ¼ inch thick. Carefully transfer it to a tart pan, pressing gently into the bottom and sides. Trim any excess dough.
- Pre-bake the Crust: Place the tart crust in the preheated oven and bake for about 10-12 minutes, or until lightly golden. Remove from the oven and let it cool while you prepare the filling.
- Make the Almond Filling: In a mixing bowl, combine the almond flour, granulated sugar, and three eggs. Add the almond extract and heavy cream, whisking until smooth and well combined.
- Assemble the Tart: Pour the almond filling into the pre-baked tart crust, smoothing it out evenly. Sprinkle sliced almonds on top for added texture and garnish.
- Bake the Tart: Return the tart to the oven and bake for an additional 25-30 minutes, or until the filling is set and lightly golden. A toothpick inserted in the center should come out clean.
- Cool and Serve: Once baked, remove the tart from the oven and let it cool in the pan for about 10 minutes. Carefully remove it from the pan and allow it to cool completely on a wire rack. Dust with powdered sugar before serving.
Extra Tips
When making Tarte De Amêndoa, using high-quality almond flour will greatly enhance the flavor of the tart.
Additionally, you can customize the tart by adding a hint of orange or lemon zest to the filling for a revitalizing twist. If you prefer a sweeter dessert, feel free to adjust the sugar levels according to your taste.
Be sure to serve the tart with a dollop of whipped cream or a scoop of vanilla ice cream for an indulgent experience!