

Midsummer is such a delightful time to embrace the simple joys of the season. From the sweetness of fresh strawberries to the crispness of a refreshing herring salad, the flavors are simply enchanting. Elderflower cordial adds a fragrant touch that feels just right for this time of year. With these charming recipes and the tradition of flower crowns, every celebration feels extra special. Let’s explore these culinary delights that truly capture the magic of Midsummer.
Fresh Strawberry Cake

Fresh Strawberry Cake is a delightful treat that embodies the essence of Scandinavian Midsummer celebrations. With its light, fluffy texture and the natural sweetness of ripe strawberries, this cake is perfect for summer gatherings, picnics, or simply enjoying on a sunny afternoon.
The combination of soft vanilla cake layers and luscious strawberry frosting creates a beautiful centerpiece that’s as pleasing to the eye as it’s to the palate.
In this recipe, we’ll guide you through creating a Fresh Strawberry Cake that serves 4-6 people. You’ll be surprised at how simple it’s to whip up this delicious dessert, making it a fantastic option for both novice and experienced bakers.
The fresh strawberries shine in this cake, so be certain to choose the ripest, juiciest berries you can find for the best flavor.
Ingredients:
- 2 cups all-purpose flour
- 1 ½ cups granulated sugar
- ½ cup unsalted butter, softened
- 1 cup buttermilk
- 3 large eggs
- 1 tablespoon vanilla extract
- 2 teaspoons baking powder
- 1 teaspoon baking soda
- ½ teaspoon salt
- 2 cups fresh strawberries, hulled and sliced
- 1 cup heavy cream
- 2 tablespoons powdered sugar
- 1 teaspoon vanilla extract (for the frosting)
Cooking Instructions:
1. Preheat the Oven: Begin by preheating your oven to 350°F (175°C). This guarantees that the cake bakes evenly and rises properly once you put it in the oven.
2. Prepare the Cake Batter: In a large mixing bowl, combine the softened butter and granulated sugar. Use an electric mixer to beat them together until the mixture is light and fluffy. This process usually takes about 3-4 minutes.
Next, add the eggs one at a time, mixing well after each addition. Then, stir in the vanilla extract.
3. Mix Dry Ingredients: In another bowl, whisk together the all-purpose flour, baking powder, baking soda, and salt. This guarantees that the leavening agents are evenly distributed throughout the flour.
4. Combine Mixtures: Gradually add the dry ingredient mixture to the wet mixture, alternating with the buttermilk. Start and end with the dry ingredients, mixing just until combined. Be careful not to overmix, as this can lead to a dense cake.
5. Bake the Cake: Divide the batter evenly between two greased 9-inch round cake pans. Smooth the tops with a spatula and bake in the preheated oven for 25-30 minutes or until a toothpick inserted into the center of the cakes comes out clean.
Remove from the oven and allow the cakes to cool in the pans for 10 minutes before transferring them to a wire rack to cool completely.
6. Prepare the Frosting: In a clean mixing bowl, pour in the heavy cream, powdered sugar, and vanilla extract. Use an electric mixer to whip the cream until stiff peaks form. This will create a light and fluffy frosting.
7. Assemble the Cake: Once the cakes are completely cooled, place one layer on a serving plate. Spread a generous layer of strawberry slices on top, followed by a portion of the whipped cream frosting.
Place the second cake layer on top and repeat the process with more strawberries and frosting. Finish by decorating the top with additional strawberries.
8. Serve: Slice the Fresh Strawberry Cake and serve immediately, or refrigerate for up to an hour to chill before serving. Enjoy the invigorating flavors of this summer delight!
Extra Tips:
When making Fresh Strawberry Cake, it’s important to use fresh, ripe strawberries for the best flavor and texture. If strawberries are out of season, consider using frozen berries, but be sure to thaw and drain them before using.
Also, for added flavor, you can incorporate a splash of lemon juice into the whipped cream or layer in a bit of strawberry jam between the cake and frosting.
Finally, this cake can be made a day in advance; just keep it in the refrigerator to maintain freshness.
Herring Salad With New Potatoes
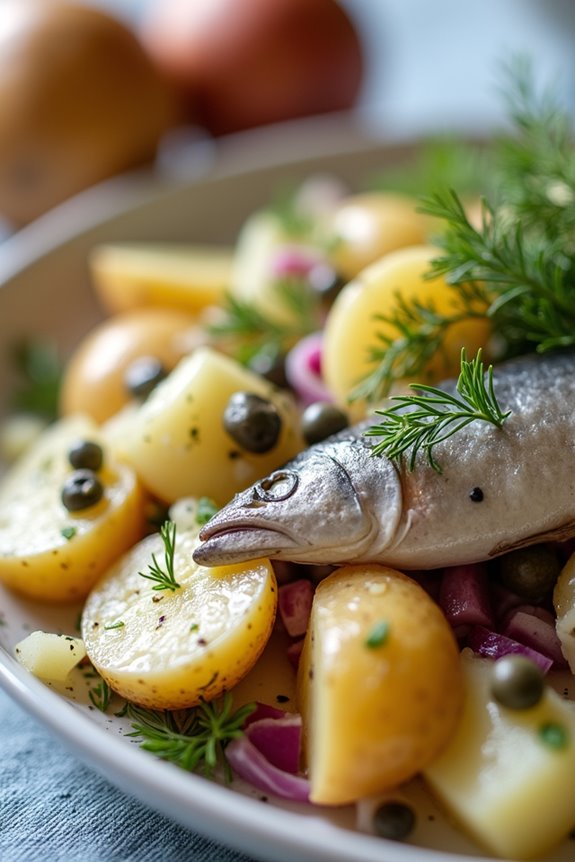
Herring Salad with New Potatoes is a quintessential Scandinavian dish that beautifully captures the essence of summer gatherings and festive occasions, particularly during Midsummer celebrations. This dish combines the tangy, rich flavor of pickled herring with the vitality of new potatoes, crisp vegetables, and a creamy dressing, making it a delightful centerpiece for any outdoor feast.
The combination of textures and flavors creates a rejuvenating salad that isn’t only satisfying but also visually appealing. This dish is often served as part of a larger spread during Midsummer festivals, where it can be enjoyed alongside other traditional dishes like salmon, meatballs, and seasonal salads.
With its vibrant colors and delightful taste, Herring Salad with New Potatoes is sure to impress your guests and evoke the spirit of Scandinavian summer festivities.
Ingredients (Serves 4-6):
- 500g new potatoes
- 300g pickled herring (in fillets or chunks)
- 1 small red onion, finely chopped
- 1 large apple, diced (preferably a tart variety)
- 150g sour cream
- 2 tablespoons mayonnaise
- 1 tablespoon apple cider vinegar
- 2 tablespoons fresh dill, chopped
- Salt and pepper to taste
- 2 tablespoons capers (optional)
- Fresh dill sprigs for garnish
Cooking Instructions:
1. Prepare the New Potatoes: Begin by washing the new potatoes thoroughly under cold water to remove any dirt. Place them in a pot of salted water and bring to a boil. Cook for about 15-20 minutes or until tender when pierced with a fork.
Once cooked, drain the potatoes and let them cool slightly before slicing them into halves or quarters, depending on their size.
2. Prepare the Herring: While the potatoes are cooking, drain any excess liquid from the pickled herring. If the herring is in fillets, cut them into bite-sized pieces. This will guarantee that the herring is evenly distributed throughout the salad.
3. Combine Ingredients: In a large mixing bowl, combine the sliced new potatoes, chopped pickled herring, finely chopped red onion, and diced apple. Gently toss the ingredients together to mix them well without breaking up the potatoes too much.
4. Make the Dressing: In a separate small bowl, whisk together the sour cream, mayonnaise, apple cider vinegar, chopped dill, and season with salt and pepper to taste. This dressing will add creaminess and flavor to the salad.
5. Combine Dressing with Salad: Pour the dressing over the potato and herring mixture, then gently fold everything together until the potatoes and herring are well coated with the dressing.
6. Serve: Transfer the salad to a serving platter or bowl. If desired, sprinkle with capers and garnish with fresh dill sprigs for an added touch of color.
7. Chill and Enjoy: For the best flavor, let the salad chill in the refrigerator for about 30 minutes before serving. This allows the flavors to meld and enhances the overall taste.
Extra Tips:
When preparing Herring Salad with New Potatoes, consider using freshly harvested new potatoes for the best flavor and texture. If you prefer a lighter dressing, you can adjust the mayonnaise and sour cream ratio to your taste.
Additionally, feel free to experiment with other vegetables like cucumbers or radishes for added crunch and vitality. Serve the salad with crisp bread or rye for a traditional accompaniment, and enjoy it as part of a larger Midsummer feast.
Grilled Salmon With Dill
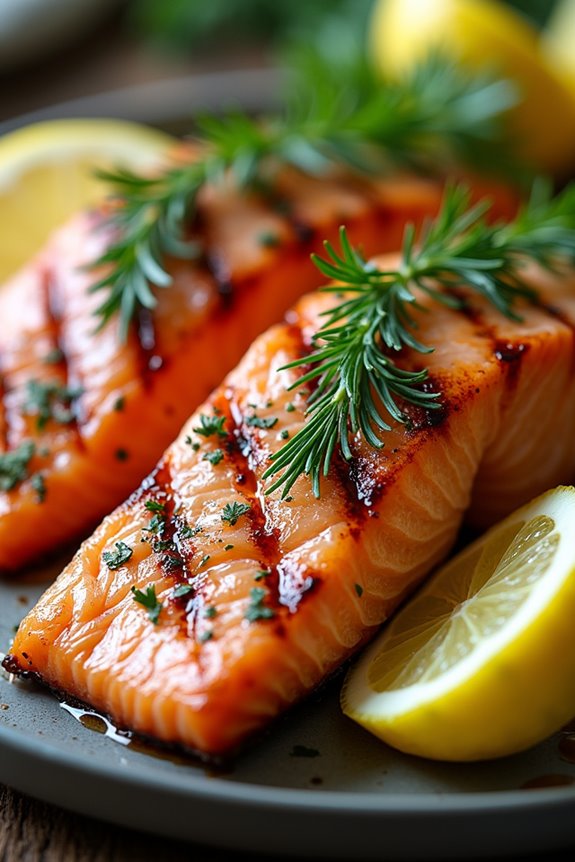
Grilled Salmon with Dill is a quintessential Scandinavian dish that perfectly captures the essence of Midsummer celebrations. This dish combines the rich, buttery flavor of salmon with the fresh and aromatic qualities of dill, creating a meal that’s both light and satisfying.
The grilling process enhances the natural flavors of the fish while adding a smoky char that complements the bright notes of dill. Served with a side of new potatoes or a crisp salad, this dish makes for a delightful summer feast that brings people together.
As you prepare to celebrate the long days of summer, this recipe will guide you through creating a deliciously grilled salmon that’s bound to impress your family and friends. The combination of simple ingredients guarantees that the freshness of the salmon shines through while the dill adds that classic Scandinavian touch.
Whether you’re grilling outdoors or using an indoor grill, this dish is a perfect way to enjoy the flavors of Scandinavia.
Ingredients (serving size: 4-6 people)
- 4-6 salmon fillets (approximately 6 ounces each)
- 3 tablespoons fresh dill, chopped
- 2 tablespoons olive oil
- 1 lemon, zested and juiced
- 3 cloves garlic, minced
- Salt and pepper to taste
- Lemon wedges, for serving
Cooking Instructions
- Prepare the Marinade: In a medium bowl, combine the chopped dill, olive oil, lemon zest, lemon juice, minced garlic, salt, and pepper. Mix well to create a marinade that will infuse the salmon with flavor.
- Marinate the Salmon: Place the salmon fillets in a shallow dish or a resealable plastic bag. Pour the marinade over the salmon, making certain that each fillet is evenly coated. Cover the dish or seal the bag, and let the salmon marinate in the refrigerator for at least 30 minutes, or up to 2 hours for more intense flavor.
- Preheat the Grill: While the salmon is marinating, preheat your grill to medium-high heat (about 375-400°F or 190-200°C). If you’re using a charcoal grill, make certain the coals are evenly distributed for consistent heat.
- Grill the Salmon: Once the grill is ready, lightly oil the grill grates to prevent sticking. Carefully place the marinated salmon fillets on the grill, skin-side down. Grill for about 4-6 minutes per side, depending on the thickness of the fillets. Salmon should be opaque and easily flake with a fork when done.
- Serve: Remove the salmon from the grill and let it rest for a minute. Serve hot, garnished with additional dill and lemon wedges on the side.
Extra Tips
When grilling salmon, it’s important to choose fillets that have the skin on, as this helps hold the fish together and adds flavor during cooking.
If you’re concerned about the salmon sticking to the grill, you can also use a grill basket or aluminum foil. Additionally, consider pairing the grilled salmon with a light sauce, such as a yogurt-dill sauce or a simple vinaigrette, for added flavor and moisture.
Enjoy your Scandinavian Midsummer meal!
Potato Salad With Mustard Dressing
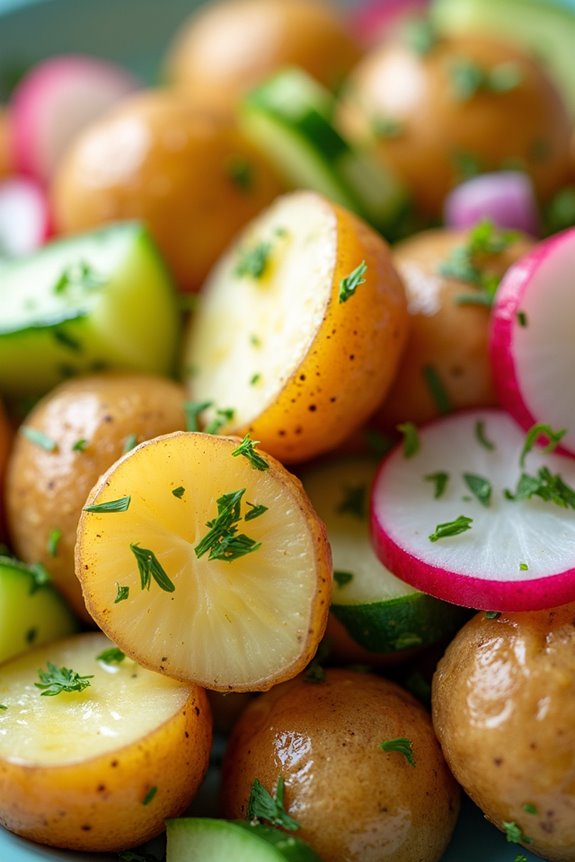
Potato salad is a quintessential dish that graces many Scandinavian tables, especially during Midsummer celebrations. This vibrant and flavorful salad isn’t only a crowd-pleaser but also a versatile side that pairs beautifully with grilled meats and fish.
The combination of tender potatoes, crisp vegetables, and a tangy mustard dressing brings a revitalizing twist that complements the light, summery atmosphere of the season.
In this recipe, we’ll create a delightful Potato Salad With Mustard Dressing that serves 4-6 people. The mustard dressing adds an energizing kick that elevates the traditional potato salad to new heights. With its simple ingredients and easy preparation, this dish is perfect for gatherings, picnics, or a casual family meal.
Ingredients
- 2 pounds (900g) new potatoes or baby potatoes
- 1 cup (150g) radishes, sliced
- 1 cup (150g) cucumber, diced
- 1/2 cup (75g) red onion, finely chopped
- 1/4 cup (60ml) fresh dill, chopped
- 1/4 cup (60ml) olive oil
- 3 tablespoons (45ml) apple cider vinegar
- 2 tablespoons (30g) Dijon mustard
- 1 tablespoon (15g) honey
- Salt and pepper to taste
Cooking Instructions
1. Prepare the Potatoes: Begin by washing the new potatoes thoroughly to remove any dirt. Place them in a large pot and cover with cold water. Add a pinch of salt and bring the water to a boil.
Once boiling, reduce the heat to a simmer and cook the potatoes for about 15-20 minutes, or until they’re fork-tender. Be careful not to overcook them, as they should hold their shape.
2. Cool and Cut the Potatoes: Once the potatoes are cooked, drain them and let them cool for a few minutes. When they’re cool enough to handle, cut the potatoes into halves or quarters, depending on their size. Place the cut potatoes in a large mixing bowl.
3. Prepare the Vegetables: While the potatoes are cooling, slice the radishes, dice the cucumber, and finely chop the red onion. Add these vegetables to the bowl with the warm potatoes.
The heat from the potatoes will help to release the flavors of the vegetables.
4. Make the Mustard Dressing: In a small bowl, whisk together the olive oil, apple cider vinegar, Dijon mustard, honey, and a pinch of salt and pepper.
Taste the dressing and adjust the seasoning to your preference. If you like a stronger mustard flavor, feel free to add more Dijon.
5. Combine Everything: Pour the mustard dressing over the warm potato and vegetable mixture. Gently toss everything together until the potatoes and vegetables are well coated with the dressing.
Finally, fold in the chopped fresh dill for a burst of freshness.
6. Chill and Serve: Allow the potato salad to sit at room temperature for about 20 minutes to let the flavors meld. For ideal taste, refrigerate the salad for at least an hour before serving.
This will enhance the flavors and create a revitalizing dish that’s perfect for Midsummer celebrations.
Extra Tips
When making Potato Salad With Mustard Dressing, consider using a variety of potatoes for added texture and flavor. New potatoes are ideal for their creaminess, but you can also mix in some waxy potatoes for contrast.
Additionally, feel free to customize the salad by adding other ingredients like hard-boiled eggs, capers, or even pickles to suit your taste. The mustard dressing can also be prepared a day in advance to save time, allowing the flavors to meld even more.
Elderflower Cordial
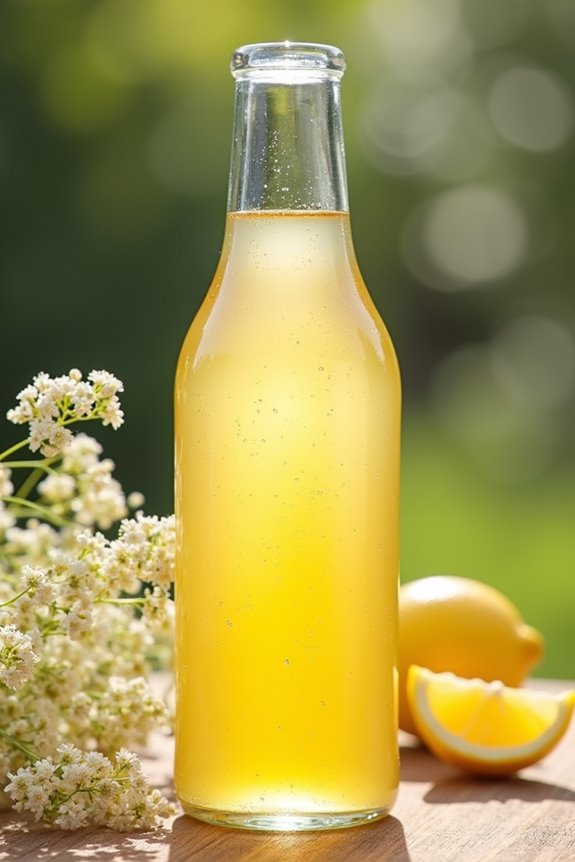
Elderflower cordial is a delightful, invigorating beverage that captures the essence of summer in every sip. This traditional Scandinavian drink is made from the delicate blossoms of the elderflower tree, which bloom in late spring to early summer. The sweet, floral notes of elderflowers, combined with the zesty brightness of lemons and a touch of sugar, create a thirst-quenching drink that can be enjoyed on its own or mixed into various cocktails.
Making elderflower cordial is simple and rewarding, allowing you to preserve the fleeting flavor of elderflowers to enjoy throughout the year. This cordial isn’t only a beloved beverage in Scandinavia but has also gained popularity worldwide for its unique taste and versatility.
Whether served with sparkling water, added to cocktails, or used as a flavoring in desserts, elderflower cordial is a delightful addition to any summer gathering. Gather your ingredients, and let’s plunge into making this revitalizing drink that encapsulates the spirit of Midsummer celebrations!
Ingredients (serving size: 4-6 people)
- 20-25 elderflower heads
- 1 liter water
- 400g granulated sugar
- 2 lemons (zested and juiced)
- 1 teaspoon citric acid (optional)
- 1 tablespoon white wine vinegar
Cooking Instructions
- Prepare the Elderflowers: Gently shake the elderflower heads to remove any insects or debris. Avoid rinsing them, as this may wash away the delicate pollen that adds to the flavor. Set aside.
- Make the Syrup: In a large saucepan, combine the water and granulated sugar. Heat gently over medium heat, stirring until the sugar has completely dissolved. This creates a sweet syrup base for your cordial.
- Infuse Flavors: Once the sugar has dissolved, remove the saucepan from the heat. Add the elderflower heads, lemon zest, and lemon juice to the syrup. If using citric acid, add it at this stage as well. The citric acid enhances the flavor and helps preserve the cordial. Stir gently to combine the ingredients.
- Let it Steep: Cover the saucepan with a clean cloth or lid and let the mixture steep at room temperature for 24 hours. This allows the flavors from the elderflowers and lemons to infuse into the syrup.
- Strain the Mixture: After 24 hours, use a fine mesh strainer or cheesecloth to strain the mixture into a clean bottle or jar, discarding the solid elderflower heads and lemon zest. Make sure to press gently on the solids to extract as much liquid as possible.
- Add Vinegar: Stir in the white wine vinegar. This adds a subtle complexity to the flavor and acts as a natural preservative.
- Bottle and Store: Transfer the strained elderflower cordial into sterilized bottles or jars. Seal tightly and store in the refrigerator. The cordial should keep well for about 2-3 weeks.
Extra Tips
When foraging for elderflower, verify that you’re picking from a safe and pollution-free environment. Ideally, choose elderflower heads that are fully open and fragrant, as these will provide the best flavor.
If you can’t find fresh elderflowers, consider using dried elderflowers as an alternative, adjusting the quantity accordingly. Additionally, elderflower cordial can be frozen in ice cube trays for easy use later, allowing you to enjoy the taste of summer even in the colder months.
Swedish Midsummer Cake

Swedish Midsummer Cake, or “Midsommartårta,” is a delightful dessert that perfectly captures the spirit of Swedish summer celebrations. Traditionally enjoyed during Midsummer festivities, this cake is a light and airy creation, often adorned with fresh strawberries, whipped cream, and a hint of vanilla.
Its vibrant colors and fresh flavors make it an ideal centerpiece for any summer gathering, evoking the beauty of blooming flowers and lush landscapes that define this enchanting season.
Making a Swedish Midsummer Cake may seem intimidating, but it’s quite straightforward. The key to a successful cake lies in the sponge, which should be light and fluffy, allowing it to soak up the luscious flavors of the cream and fruit.
This cake isn’t only a feast for the taste buds but also a visual delight, making it an excellent choice for entertaining guests. With simple ingredients and accessible steps, you can create this stunning dessert that will impress everyone at your Midsummer celebration.
Ingredients (Serves 4-6)
- 4 large eggs
- 1 cup granulated sugar
- 1 cup all-purpose flour
- 1 teaspoon baking powder
- ½ teaspoon salt
- 1 teaspoon vanilla extract
- 1 cup heavy whipping cream
- 2 tablespoons powdered sugar
- 2 cups fresh strawberries (hulled and sliced)
- Fresh mint leaves for garnish (optional)
Cooking Instructions
1. Preheat the Oven: Begin by preheating your oven to 350°F (175°C). This guarantees that the cake will bake evenly and rise appropriately.
2. Prepare the Cake Batter****: In a large mixing bowl, whisk together the eggs and granulated sugar until the mixture is thick and pale, about 5 minutes. The volume should increase considerably, incorporating air for a light sponge.
3. Combine Dry Ingredients: In a separate bowl, sift together the flour, baking powder, and salt. This helps to aerate the flour, which contributes to the cake’s light texture.
4. Incorporate the Dry Ingredients: Gently fold the dry mixture into the egg and sugar mixture using a spatula. Be careful not to overmix; you want to maintain the airiness of the batter.
5. Add Vanilla: Stir in the vanilla extract, making sure it’s evenly distributed throughout the batter.
6. Bake the Cake: Pour the batter into a greased 9-inch round cake pan and smooth the top. Bake in the preheated oven for 25-30 minutes or until a toothpick inserted into the center comes out clean.
Let the cake cool in the pan for about 10 minutes before transferring it to a wire rack to cool completely.
7. Prepare the Whipped Cream: In a chilled bowl, combine the heavy whipping cream and powdered sugar. Using an electric mixer, whip the cream until soft peaks form. Be cautious not to overwhip, as this can lead to a grainy texture.
8. Assemble the Cake: Once the cake has cooled, slice it horizontally into two layers. Place one layer on a serving platter. Spread a generous amount of whipped cream over the first layer and top with half of the sliced strawberries.
9. Finish the Cake: Place the second layer of cake on top and repeat the process, spreading whipped cream and topping with the remaining strawberries. Optionally, garnish with fresh mint leaves for a pop of color.
10. Chill and Serve: Allow the assembled cake to chill in the refrigerator for at least 30 minutes before serving. This helps the flavors meld together and makes it easier to slice.
Extra Tips
When preparing your Swedish Midsummer Cake, consider using seasonal berries like raspberries or blueberries for a twist on the classic strawberry topping.
Additionally, you can infuse the whipped cream with a splash of lemon juice or zest for an extra layer of flavor. For a more decadent touch, feel free to add a layer of lemon curd between the cake layers.
Remember to keep the cake chilled until serving to maintain its freshness and prevent the whipped cream from melting. Enjoy your festive creation!
Cucumber Salad With Sour Cream
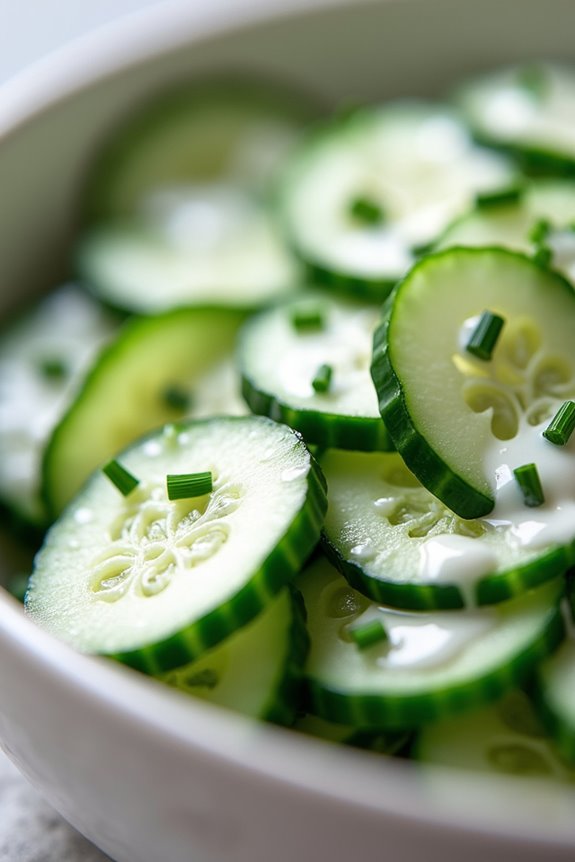
Cucumber Salad with Sour Cream is a revitalizing and tangy dish that embodies the spirit of Scandinavian Midsummer celebrations. This simple yet flavorful salad is a perfect accompaniment to grilled meats and can be enjoyed as a light side dish on warm summer days. The crisp cucumbers are combined with a creamy sour cream dressing, fresh herbs, and a hint of sweetness from the sugar, creating a delightful balance of flavors that complement any meal.
In Scandinavian cuisine, cucumbers are often enjoyed during the Midsummer festivities, symbolizing the freshness of the season. This salad isn’t only easy to prepare but also showcases the vibrant flavors of summer produce, making it a staple at Midsummer gatherings. Serve it chilled for the best taste and enjoy the burst of flavors that this delightful dish brings to your table.
Ingredients (Serves 4-6)
- 4 medium cucumbers
- 1 cup sour cream
- 2 tablespoons fresh dill, chopped
- 1 tablespoon fresh chives, chopped
- 1 tablespoon sugar
- 1 tablespoon white vinegar
- Salt and pepper to taste
Cooking Instructions
- Prepare the Cucumbers: Start by washing the cucumbers thoroughly under cold water. If desired, peel them for a smoother texture. Slice the cucumbers thinly using a sharp knife or a mandolin for even pieces. Place the sliced cucumbers in a large mixing bowl.
- Make the Dressing: In a separate bowl, combine the sour cream, chopped dill, chopped chives, sugar, white vinegar, salt, and pepper. Whisk the ingredients together until the mixture is smooth and well combined. The vinegar adds acidity, balancing the richness of the sour cream.
- Combine the Ingredients: Pour the dressing over the sliced cucumbers in the mixing bowl. Gently toss the cucumbers with the dressing using a spatula or wooden spoon, ensuring that all slices are evenly coated with the creamy mixture.
- Chill and Serve: Cover the bowl with plastic wrap and place it in the refrigerator for at least 30 minutes to allow the flavors to meld and the salad to chill. This step enhances the taste and makes the salad more invigorating.
- Final Touches: Before serving, give the salad a final stir. Taste and adjust seasoning if necessary by adding more salt, pepper, or vinegar to suit your preference. Serve the salad in individual bowls or on a large serving platter.
Extra Tips
When making Cucumber Salad with Sour Cream, it’s best to use fresh, firm cucumbers for the crunchiest texture. If you prefer a less watery salad, you can sprinkle the sliced cucumbers with a bit of salt and let them sit for about 10 minutes before mixing them with the dressing to draw out excess moisture. This will help keep the salad crisp.
Additionally, feel free to experiment with other herbs, such as parsley or mint, to customize the flavor to your liking. Enjoy this revitalizing salad at your next Midsummer celebration or any summer gathering!
Smoked Salmon Canapés
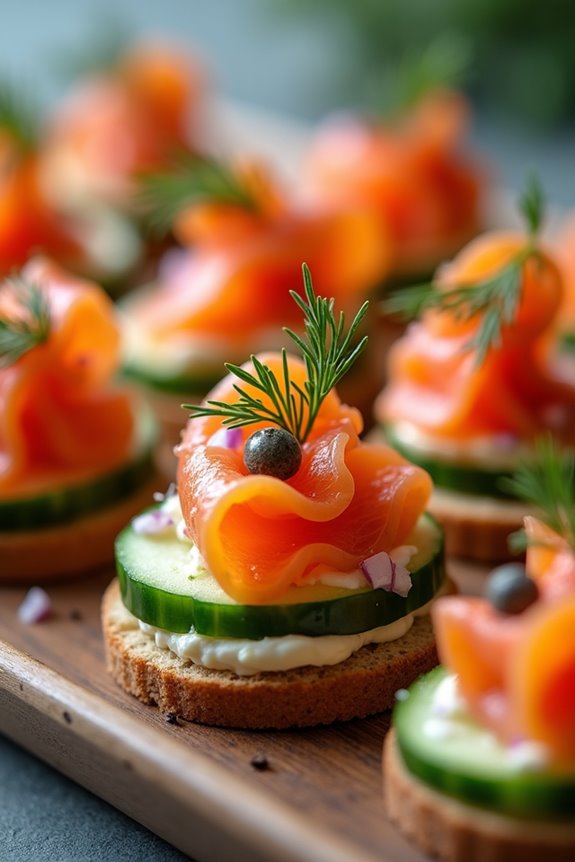
Smoked Salmon Canapés are a delightful and elegant appetizer that perfectly embodies the spirit of Scandinavian Midsummer celebrations. These bite-sized treats combine the rich, smoky flavor of salmon with the freshness of dill, cream cheese, and crisp vegetables, making them a crowd-pleaser at any gathering.
Easy to prepare and visually appealing, they can be customized to suit various tastes, allowing you to impress your guests with minimal effort.
The beauty of Smoked Salmon Canapés lies in their versatility. You can use various bases such as small rye bread, crackers, or cucumber slices, making them suitable for different dietary preferences. These canapés aren’t only delicious but also add a splash of color to your table, making them an ideal addition to your Midsummer feast.
Serve them chilled, and watch as they disappear from the platter!
Ingredients (Serves 4-6 people):
- 200g smoked salmon
- 150g cream cheese
- 1 tablespoon fresh dill, chopped
- Juice of 1 lemon
- 1 cucumber, thinly sliced
- 1 small red onion, finely chopped
- 1 tablespoon capers, rinsed and drained
- 12-15 small rye bread slices or crackers
- Fresh dill sprigs for garnish
- Salt and pepper to taste
Cooking Instructions:
- Prepare the Cream Cheese Mixture: In a bowl, combine the cream cheese, fresh dill, and lemon juice. Mix well until smooth and creamy. Season with salt and pepper to taste. This mixture will add a creamy base to your canapés, balancing the smoky flavor of the salmon.
- Slice the Base: If you’re using rye bread, cut it into small squares or rounds to create the base for your canapés. If you prefer crackers, select a sturdy variety that can hold the toppings without breaking. Alternatively, cut cucumber slices that are about 1/2 inch thick if you want a lighter option. These bases provide the foundation for the toppings.
- Assemble the Canapés: Spread a generous layer of the cream cheese mixture on each slice of bread or cracker. If using cucumber, place a dollop of the cream cheese mixture on each slice. This step is essential for creating a stable and flavorful base for your toppings.
- Add the Smoked Salmon: Place a slice of smoked salmon on top of the cream cheese layer. You can fold the salmon for a more decorative presentation. This ingredient gives the canapés their signature flavor and richness, making them irresistible.
- Garnish: Top each canapé with a sprinkle of finely chopped red onion and a few capers. Finish with a small sprig of fresh dill for an elegant touch. This adds a burst of color and flavor that enhances the overall dish.
- Chill and Serve: Place the assembled canapés on a serving platter and refrigerate for at least 30 minutes before serving. This allows the flavors to meld and guarantees they’re served chilled, which is especially invigorating.
Extra Tips:
When preparing Smoked Salmon Canapés, consider using different types of smoked fish or spreads to create variety. You can also experiment with different herbs, such as chives or parsley, to complement the dish.
To save time, you can prepare the cream cheese mixture and slice the vegetables ahead of time, allowing for a quick assembly right before serving. For an added crunch, consider topping the canapés with finely chopped radishes or a sprinkle of sesame seeds.
Enjoy your Midsummer celebration with these delicious bites!
Lingonberry Jam Tart
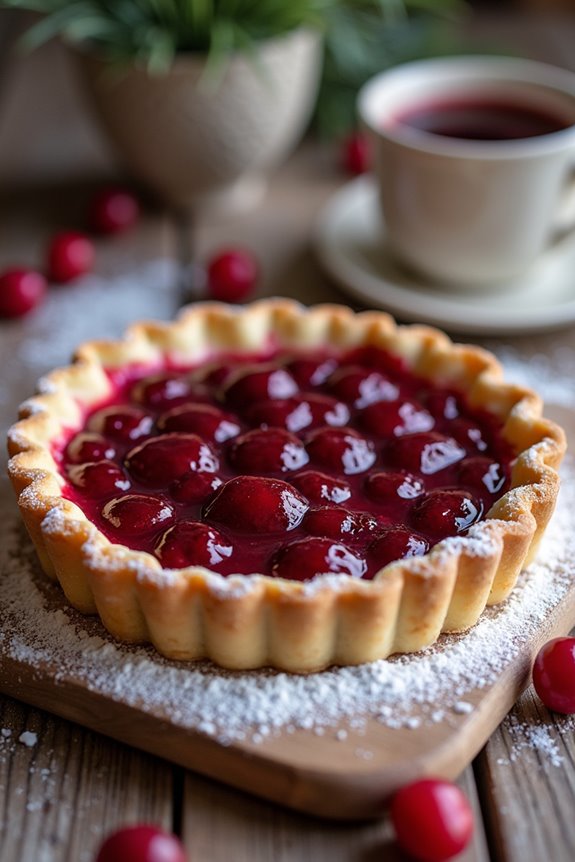
Lingonberry Jam Tart is a delightful Scandinavian dessert that beautifully captures the essence of Midsummer celebrations. This tart isn’t only visually appealing but also offers a harmonious blend of sweet and tangy flavors, making it a perfect treat for both casual gatherings and festive occasions. The rich, buttery crust complements the vibrant lingonberry jam, creating a dessert that’s certain to impress your guests.
In Scandinavian culture, lingonberries are celebrated for their unique taste and versatility. They’re often used in jams, sauces, and desserts, making them a staple during the Midsummer festivities. This tart is a wonderful way to showcase the fruit while embracing the spirit of the season. Whether served with whipped cream or enjoyed on its own, the Lingonberry Jam Tart is a delicious homage to Scandinavian culinary traditions.
Ingredients (Serves 4-6):
- 1 ½ cups all-purpose flour
- ½ cup unsalted butter, softened
- ¼ cup granulated sugar
- 1 large egg
- 1 tsp vanilla extract
- 1 cup lingonberry jam
- 1 tsp lemon zest
- ¼ tsp salt
- Powdered sugar (for dusting, optional)
Cooking Instructions:
- Prepare the Dough: In a large mixing bowl, combine the all-purpose flour, softened butter, granulated sugar, and salt. Using a pastry cutter or your hands, mix until the mixture resembles coarse crumbs. Add the egg and vanilla extract, then mix until a dough forms. Be careful not to overwork the dough.
- Chill the Dough: Shape the dough into a disc, wrap it in plastic wrap, and refrigerate for at least 30 minutes. This will help the butter firm up, resulting in a flaky crust.
- Preheat the Oven: While the dough is chilling, preheat your oven to 375°F (190°C). This guarantees that the tart will bake evenly and achieve a golden crust.
- Roll Out the Dough: Once chilled, remove the dough from the refrigerator and place it on a lightly floured surface. Roll it out to about ¼ inch thick. Carefully transfer the rolled dough into a 9-inch tart pan, pressing it into the bottom and sides. Trim any excess dough hanging over the edges.
- Add Lingonberry Jam: Spread the lingonberry jam evenly over the bottom of the crust. You can also sprinkle the lemon zest on top of the jam for added flavor.
- Bake the Tart: Place the tart in the preheated oven and bake for 25-30 minutes or until the crust is golden brown and the jam is bubbling. Keep an eye on it to prevent over-browning.
- Cool and Serve: Once baked, remove the tart from the oven and allow it to cool in the pan for about 10 minutes. Carefully transfer it to a wire rack to cool completely. Before serving, dust with powdered sugar if desired.
Extra Tips:
When making the Lingonberry Jam Tart, you can experiment with different flavors by adding spices like cinnamon or nutmeg to the dough for a warm twist.
If you can’t find lingonberry jam, cranberry or raspberry jam can be used as substitutes, though the flavor profile will change slightly.
Serve the tart with a dollop of whipped cream or a scoop of vanilla ice cream for an extra indulgent treat. Enjoy the festive spirit of Midsummer with this simple yet elegant dessert!
Open-Faced Sandwiches (Smörgås)
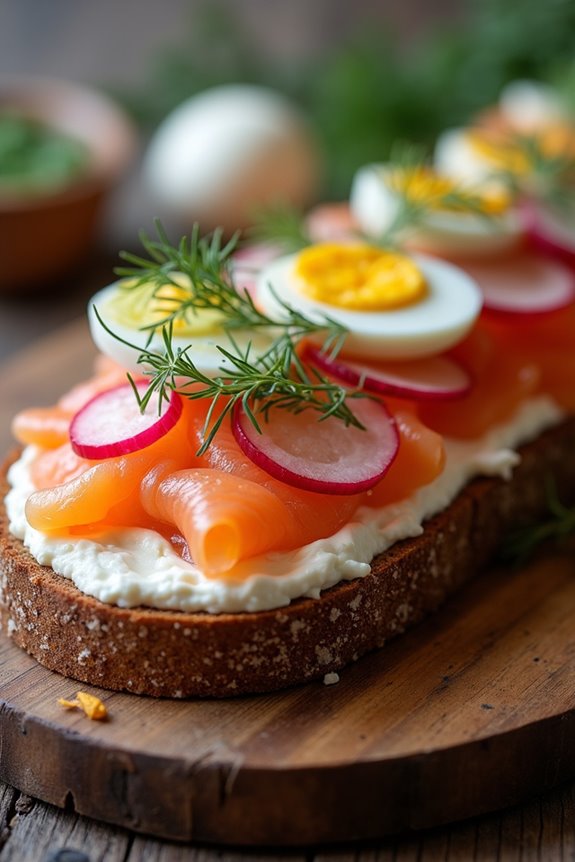
Open-faced sandwiches, or smörgås, are a quintessential part of Scandinavian cuisine, particularly during festive occasions like Midsummer. These delightful creations allow for a variety of toppings and combinations, making them versatile and suitable for any palate. Traditionally served on hearty rye or crispbread, smörgås are topped with an array of ingredients such as cured meats, pickled vegetables, and fresh herbs, which not only enhance the flavor but also create a vibrant presentation.
Preparing smörgås is an excellent opportunity to showcase seasonal ingredients, especially during Midsummer when fresh produce is abundant. You can get creative with the toppings, mixing and matching to suit your tastes. Whether you prefer a classic combination of herring and potatoes or a more modern twist with avocado and smoked salmon, these open-faced sandwiches are sure to impress your guests.
Ingredients (Serves 4-6)
- 8 slices of dark rye bread or crispbread
- 200g smoked salmon or herring fillets
- 1 small red onion, thinly sliced
- 1 cucumber, thinly sliced
- 200g cream cheese or butter
- 4 hard-boiled eggs, sliced
- Fresh dill or chives, for garnish
- 2-3 radishes, thinly sliced
- Salt and pepper, to taste
- Lemon wedges, for serving
Cooking Instructions
- Prepare the Base: Start by laying out your slices of dark rye bread or crispbread on a large serving platter. If using rye bread, you can lightly toast it for added crunch and flavor.
- Spread the Cream Cheese: Take your cream cheese or butter and spread a generous layer on each slice of bread. This step acts as a flavorful base and helps to keep the toppings in place.
- Layer the Protein: Begin adding your choice of protein on top of the cream cheese. Arrange the smoked salmon or herring fillets evenly across the slices, ensuring each piece gets a fair amount.
- Add Fresh Vegetables: Next, layer the thinly sliced cucumber, red onion, and radishes over the fish. The fresh vegetables will add a nice crunch and balance the flavors of the dish.
- Top with Egg Slices: Place slices of hard-boiled eggs on top of the vegetable layer. The eggs add richness and a beautiful color contrast to the open-faced sandwiches.
- Season and Garnish: Lightly season with salt and pepper to enhance the flavors. Finally, garnish with fresh dill or chives for an aromatic touch.
- Serve and Enjoy: Serve your smörgås with lemon wedges on the side, allowing guests to squeeze fresh lemon juice over their sandwiches for an extra burst of flavor.
Extra Tips
When making smörgås, feel free to experiment with different toppings and combinations based on seasonal ingredients or personal preferences. You can include ingredients like roasted beets, avocado, or even goat cheese for a twist on traditional flavors.
Additionally, consider serving a selection of different open-faced sandwiches to provide variety for your guests. Preparing the components in advance can save time, allowing you to assemble the sandwiches just before serving for maximum freshness.
Rhubarb Crumble
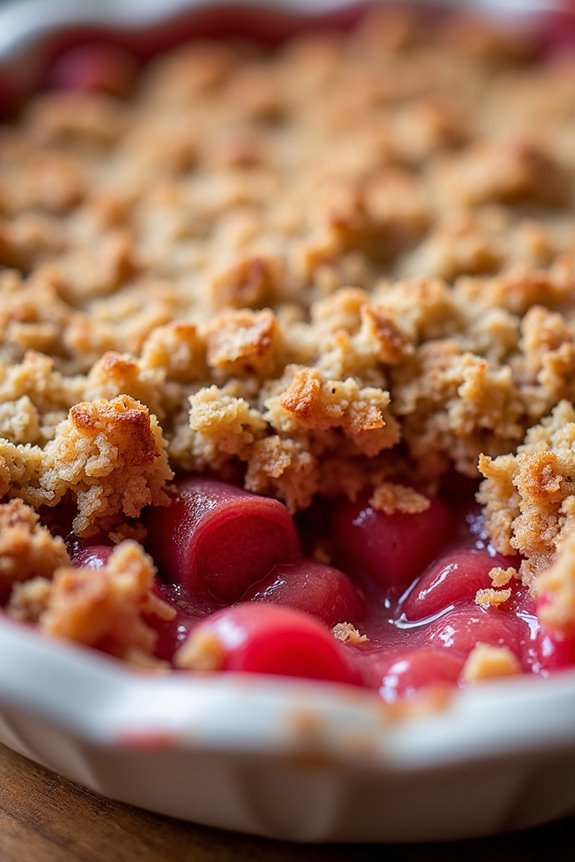
Rhubarb crumble is a delightful dessert that celebrates the tartness of rhubarb, perfectly balanced with a sweet, buttery crumble topping. Traditionally enjoyed during the Midsummer festivities in Scandinavia, this dish is a true crowd-pleaser, making it an ideal choice for summer gatherings.
The vibrant, tangy rhubarb pairs wonderfully with the crunchy oat and flour topping, creating a comforting treat that can be served warm or at room temperature, often accompanied by vanilla ice cream or custard.
Making rhubarb crumble is a straightforward process that requires minimal ingredients, making it an accessible recipe for both novice and experienced bakers. The beauty of this dish lies in its simplicity, allowing the natural flavors of the rhubarb to shine through while providing a satisfying texture contrast with the crumble.
Whether you’re celebrating Midsummer or simply looking for a delicious dessert, this rhubarb crumble is sure to delight your taste buds and impress your guests.
Ingredients (Serves 4-6):
- 500g fresh rhubarb, chopped into 1-inch pieces
- 150g granulated sugar
- 1 tablespoon cornstarch
- 1 teaspoon vanilla extract
- 150g all-purpose flour
- 100g rolled oats
- 100g unsalted butter, softened
- 50g brown sugar
- 1 teaspoon ground cinnamon
- A pinch of salt
Cooking Instructions:
- Preheat the Oven: Begin by preheating your oven to 190°C (375°F). This guarantees that the crumble will cook evenly and develop a golden-brown crust.
- Prepare the Rhubarb Filling: In a mixing bowl, combine the chopped rhubarb with granulated sugar, cornstarch, and vanilla extract. Toss until the rhubarb is well-coated. This mixture will create a sweet-tart filling that serves as the base for your crumble.
- Transfer to Baking Dish: Pour the rhubarb mixture into a greased baking dish (around 9×9 inches). Spread it evenly to confirm that every bite is filled with that delicious rhubarb flavor.
- Make the Crumble Topping: In another mixing bowl, combine the flour, rolled oats, softened butter, brown sugar, ground cinnamon, and a pinch of salt. Use your fingers or a pastry cutter to mix until the mixture resembles coarse crumbs. This crumble topping will create a delightful texture contrast with the juicy rhubarb beneath.
- Assemble the Dish: Evenly distribute the crumble topping over the rhubarb filling in the baking dish. Make sure to cover the filling thoroughly, as this will help to create a lovely crust as it bakes.
- Bake: Place the baking dish in the preheated oven and bake for 35-40 minutes, or until the topping is golden brown and the rhubarb is bubbling around the edges. Keep an eye on it to prevent over-browning.
- Cool and Serve: Once baked, remove the crumble from the oven and let it cool for about 10-15 minutes. This cooling time will help the filling set slightly, making it easier to serve. Enjoy warm with vanilla ice cream or custard.
Extra Tips:
When making rhubarb crumble, feel free to experiment with additional fruits such as strawberries or apples mixed in with the rhubarb for added sweetness and flavor.
Adjust the sugar content based on your taste and the tartness of the rhubarb. For an extra crunch, consider adding chopped nuts like walnuts or almonds to the crumble topping.
Finally, if you have leftovers, store them in the fridge covered for up to three days; simply reheat in the oven for a quick dessert!
Creamy Mushroom Soup
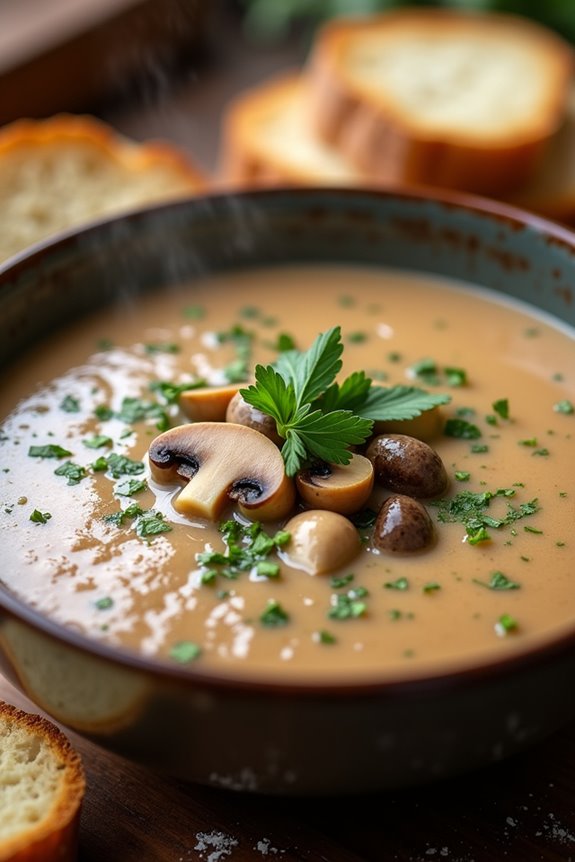
Creamy Mushroom Soup is a beloved dish that fits perfectly into the Scandinavian Midsummer tradition, where fresh ingredients and light, hearty meals take center stage.
With the abundance of mushrooms available during the summer months, this rich and velvety soup highlights their earthy flavors while providing a comforting element to any meal. It pairs wonderfully with crusty bread or can be served as a starter during a festive gathering.
This soup isn’t only delicious but also surprisingly easy to make. The combination of sautéed mushrooms, onions, and garlic creates a fragrant base, while the addition of cream gives it a luxurious texture. This recipe serves 4-6 people, making it an ideal choice for a family dinner or summer get-together with friends.
Ingredients:
- 1 lb (450g) mixed mushrooms (such as cremini, shiitake, and button), sliced
- 1 medium onion, chopped
- 2 cloves garlic, minced
- 3 tablespoons butter
- 4 cups vegetable or chicken broth
- 1 cup heavy cream
- 1 teaspoon dried thyme
- Salt and pepper to taste
- Fresh parsley for garnish (optional)
Cooking Instructions:
- Sauté the Aromatics: In a large pot, melt the butter over medium heat. Add the chopped onion and minced garlic, cooking for about 5-7 minutes until they’re soft and translucent. This step builds the flavor base of the soup.
- Cook the Mushrooms: Add the sliced mushrooms to the pot. Increase the heat to medium-high and sauté for about 8-10 minutes, stirring occasionally, until the mushrooms are browned and have released their moisture. This enhances the umami flavor of the mushrooms.
- Add Broth and Seasoning: Pour in the vegetable or chicken broth and add the dried thyme. Stir to combine. Bring the mixture to a gentle boil, then reduce the heat and let it simmer for about 15 minutes. This allows the flavors to meld together.
- Blend the Soup: Using an immersion blender, blend the soup until smooth. If you prefer a chunkier texture, you can blend only half of the soup and leave the rest as is. Alternatively, you can transfer the soup in batches to a countertop blender, but be cautious of the hot liquid.
- Incorporate Cream: Return the blended soup to the pot (if you used a countertop blender) and stir in the heavy cream. Heat the soup gently over low heat for an additional 5 minutes, ensuring it doesn’t boil. Taste and adjust seasoning with salt and pepper.
- Serve and Garnish: Ladle the soup into bowls and garnish with fresh parsley if desired. Serve hot alongside crusty bread or a fresh salad for a complete meal.
Extra Tips:
When selecting mushrooms for this dish, try to use a mix of varieties to achieve a depth of flavor.
For a fun twist, consider adding a splash of white wine after sautéing the mushrooms for an added layer of complexity.
If you prefer a lighter version, you can substitute half of the heavy cream with milk or a non-dairy alternative. This soup also freezes well, making it a great make-ahead option for those busy summer days.
Pickled Beet Salad
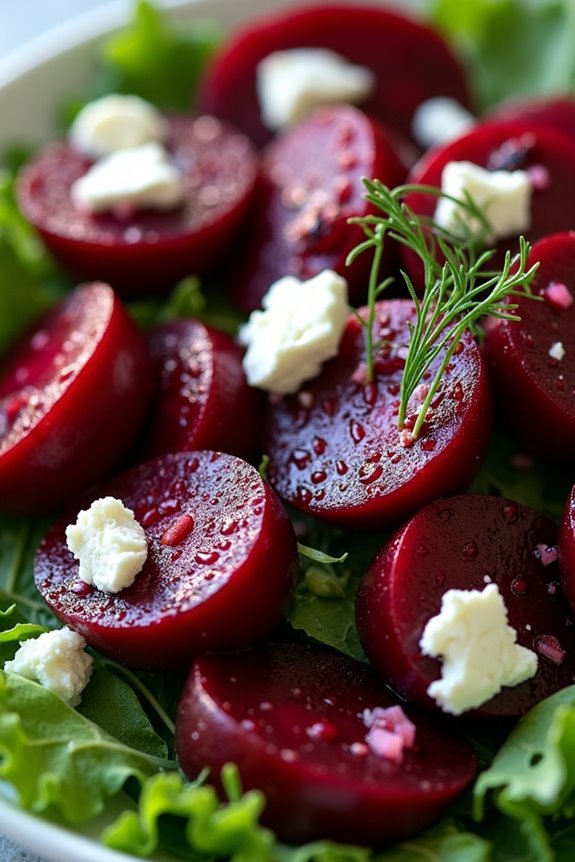
Pickled Beet Salad is a vibrant and tangy dish that perfectly embodies the spirit of Scandinavian Midsummer celebrations. This invigorating salad combines the earthy sweetness of beets with a bright, zesty pickling solution that enhances their flavor and adds a delightful crunch.
Not only does it serve as an eye-catching centerpiece on any summer table, but it also offers a nutritious boost packed with vitamins and minerals, making it a fantastic addition to your Midsummer feast.
The beauty of Pickled Beet Salad lies in its versatility; it can be enjoyed on its own, as a side dish, or even as a topping for grilled meats or fish. This recipe is designed to serve 4-6 people, making it perfect for gatherings with family and friends.
With its combination of sweet, sour, and savory flavors, this salad will have everyone coming back for seconds!
Ingredients
- 4 medium-sized beets
- 1/2 cup apple cider vinegar
- 1/4 cup sugar
- 1/2 cup water
- 1 teaspoon salt
- 1/2 teaspoon black peppercorns
- 1/2 teaspoon mustard seeds
- 1 bay leaf
- 1/4 cup chopped fresh dill
- 1/4 cup crumbled feta cheese (optional)
- Mixed salad greens for serving (optional)
Cooking Instructions
1. Prepare the Beets: Begin by cleaning the beets under running water to remove any dirt. Trim the tops and roots, then place them in a pot of boiling water. Boil the beets for about 30-40 minutes, or until they’re fork-tender.
Once cooked, drain the beets and let them cool slightly.
2. Peel and Slice the Beets: Once the beets are cool enough to handle, use your hands or a paper towel to gently rub off the skins. The skins should come off easily.
After peeling, slice the beets into wedges or rounds, depending on your preference.
3. Prepare the Pickling Solution: In a small saucepan, combine the apple cider vinegar, sugar, water, salt, black peppercorns, mustard seeds, and bay leaf. Bring the mixture to a gentle simmer over medium heat, stirring until the sugar dissolves.
Once the solution is simmering, remove it from the heat and let it cool for a few minutes.
4. Pickle the Beets: Place the sliced beets in a clean glass jar or container. Pour the cooled pickling solution over the beets, ensuring they’re fully submerged.
If desired, add chopped fresh dill to the jar for an extra burst of flavor. Seal the jar tightly and refrigerate for at least 1-2 hours, or overnight for best results.
5. Serve the Salad: When ready to serve, remove the pickled beets from the refrigerator. If you’re using mixed salad greens, arrange them on a serving plate.
Top the greens with the pickled beets, and if desired, sprinkle crumbled feta cheese on top for a creamy contrast.
Extra Tips
For a more complex flavor profile, consider adding sliced red onions or a splash of orange juice to the pickling solution.
You can also experiment with different herbs, such as thyme or tarragon, to customize the salad to your taste. Keep in mind that the longer the beets sit in the pickling liquid, the more flavorful they’ll become, so don’t hesitate to prepare them ahead of time for your Midsummer celebration!
Cloudberry Ice Cream
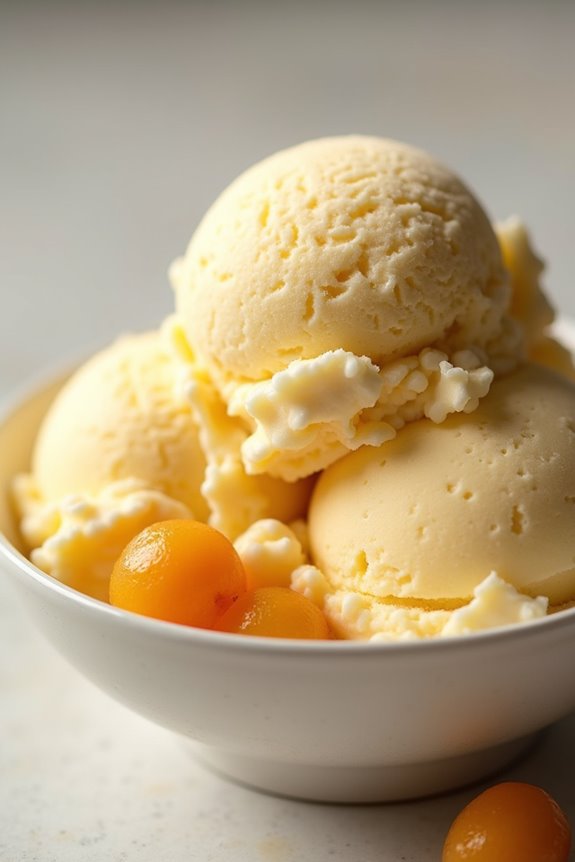
Cloudberries are a cherished delicacy in Scandinavian countries, known for their unique, sweet-tart flavor and vibrant golden color. This Cloudberry Ice Cream is a delightful way to celebrate the Midsummer festivities and showcase the essence of these rare berries. The creamy texture of the homemade ice cream pairs perfectly with the distinct taste of cloudberries, making it a revitalizing treat for warm summer days.
Making Cloudberry Ice Cream from scratch isn’t only a great way to enjoy this seasonal fruit, but it also allows you to control the ingredients for a more wholesome dessert. With just a few simple steps, you can create a luscious ice cream that embodies the spirit of Scandinavian summers. Whether enjoyed on its own or served alongside other festive dishes, this ice cream is sure to impress your guests.
Ingredients (Serves 4-6)
- 2 cups fresh cloudberries (or thawed frozen cloudberries)
- 1 cup heavy cream
- 1 cup whole milk
- 3/4 cup granulated sugar
- 1 teaspoon vanilla extract
- 1 tablespoon lemon juice
- A pinch of salt
Instructions
- Prepare the Cloudberries: If you’re using fresh cloudberries, gently rinse them under cold water and pat them dry with a paper towel. If using frozen cloudberries, verify they’re fully thawed and drained of excess liquid. Reserve a few whole cloudberries for garnish if desired.
- Make the Base: In a medium-sized mixing bowl, combine the heavy cream, whole milk, granulated sugar, vanilla extract, lemon juice, and a pinch of salt. Whisk the mixture until the sugar is dissolved and the ingredients are well incorporated.
- Blend the Cloudberries: In a blender or food processor, add the prepared cloudberries and blend until smooth. If you prefer a chunkier texture, you can blend them lightly to keep some pieces intact.
- Combine Mixtures: Gently fold the blended cloudberries into the cream mixture, making sure that the cloudberry puree is evenly distributed throughout the base.
- Chill the Mixture: Cover the bowl with plastic wrap and refrigerate the mixture for at least 2 hours or until it’s thoroughly chilled. This step is essential for achieving a smooth texture once churned.
- Churn the Ice Cream: Once chilled, pour the mixture into an ice cream maker and churn according to the manufacturer’s instructions, typically for about 20-25 minutes, until it reaches a soft-serve consistency.
- Freeze the Ice Cream: Transfer the churned ice cream to an airtight container, smoothing the top with a spatula. Seal the container and place it in the freezer for at least 4-6 hours, or until firm.
- Serve: Scoop the Cloudberry Ice Cream into bowls or cones and garnish with reserved whole cloudberries if desired. Enjoy this delightful treat on a warm summer evening!
Extra Tips
For a richer flavor, consider adding a splash of cloudberry liqueur to the mixture before churning, as it enhances the berry flavor without affecting the ice cream’s texture.
Additionally, if cloudberries are hard to find, you can substitute them with a mixture of raspberries and blackberries for a similar tart and sweet profile.
Don’t forget to let the ice cream sit at room temperature for a few minutes before serving to soften it slightly for easier scooping!