

As the leaves turn and the air becomes crisp, there’s nothing more comforting than the flavors of Scandinavian cuisine. A creamy Finnish salmon soup or Swedish meatballs with tangy lingonberry sauce can make any fall day feel special. These recipes not only satisfy your cravings but also bring a sense of togetherness. Let’s explore some cozy dishes perfect for this enchanting season. Get ready to warm up your kitchen with these delightful fall recipes.
Hearty Swedish Meatballs With Lingonberry Sauce
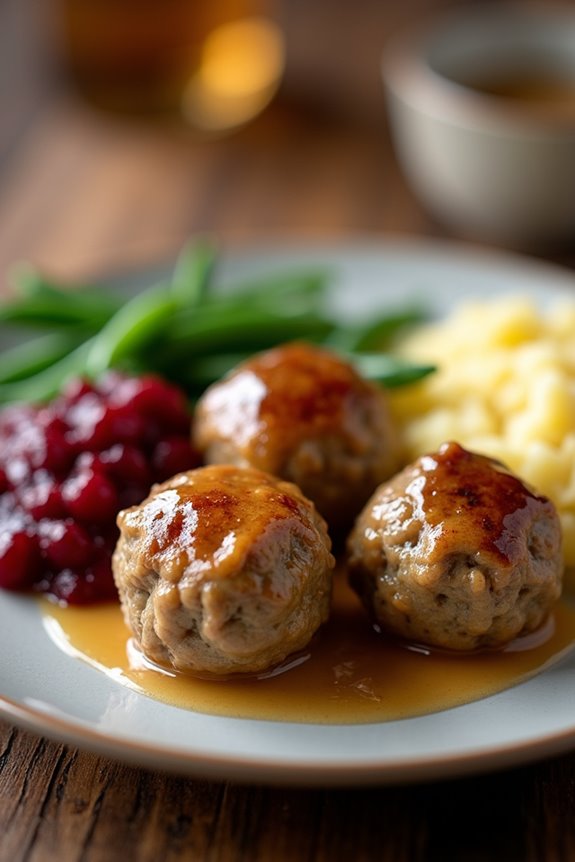
As the leaves turn and the air becomes brisk, there’s nothing quite like a warm, hearty meal to comfort the soul. Hearty Swedish Meatballs with Lingonberry Sauce is a quintessential dish that not only warms you up but also brings a taste of Scandinavian tradition to your kitchen.
These tender meatballs, often served with creamy gravy and a side of lingonberry sauce, create a delightful balance of savory and sweet flavors that are perfect for a cozy fall dinner. This dish is relatively simple to prepare, making it suitable for both weeknight dinners and special occasions.
The meatballs are made from a blend of ground beef and pork, seasoned with classic spices, and then simmered in a rich gravy. The lingonberry sauce adds a tangy sweetness that perfectly complements the savory meatballs, making each bite an explosion of flavor. So gather your ingredients and get ready to enjoy a taste of Sweden right at home!
Ingredients (serving size: 4-6 people)
- 1 pound ground beef
- 1 pound ground pork
- 1/2 cup breadcrumbs
- 1/4 cup milk
- 1/4 cup finely chopped onion
- 1 egg
- 1 teaspoon salt
- 1/2 teaspoon black pepper
- 1/2 teaspoon ground allspice
- 1/2 teaspoon ground nutmeg
- 1 tablespoon olive oil (for frying)
- 2 cups beef broth
- 1/2 cup heavy cream
- 2 tablespoons soy sauce
- Lingonberry sauce (for serving)
Cooking Instructions
- Prepare the Meatball Mixture: In a large mixing bowl, combine the ground beef, ground pork, breadcrumbs, milk, chopped onion, egg, salt, black pepper, allspice, and nutmeg. Use your hands or a spoon to mix everything together until well combined. Be careful not to overmix, as this can make the meatballs tough.
- Form the Meatballs: Using your hands, shape the mixture into small meatballs, about 1 inch in diameter. Place the formed meatballs on a baking sheet or plate as you go to guarantee they’re ready for cooking.
- Cook the Meatballs: In a large skillet, heat the olive oil over medium heat. Once hot, add the meatballs in batches, making sure not to overcrowd the pan. Cook them for about 5-7 minutes, turning occasionally, until they’re browned on all sides and cooked through. Remove the cooked meatballs from the skillet and set aside.
- Make the Gravy: In the same skillet, pour in the beef broth and stir to deglaze the pan, scraping up any browned bits from the bottom. Bring the broth to a simmer, then reduce the heat to low and whisk in the heavy cream and soy sauce. Allow the gravy to simmer for a few minutes until it thickens slightly.
- Combine Meatballs and Gravy: Return the meatballs to the skillet, gently stirring them into the gravy. Let them simmer together for another 5-10 minutes, allowing the meatballs to absorb some of the gravy flavor.
- Serve: Plate the meatballs and spoon the gravy over the top. Serve with a generous dollop of lingonberry sauce on the side for drizzling or dipping. Enjoy!
Extra Tips
For an authentic touch, serve the meatballs with boiled or mashed potatoes and steamed green beans or lingonberry jam for a true Swedish experience.
If you prefer a lighter option, you can substitute half of the heavy cream with low-fat milk or even Greek yogurt for a tangy twist. Additionally, these meatballs can be made ahead of time and frozen, making them perfect for busy weeknights. Just reheat them in the gravy when you’re ready to serve!
Classic Finnish Salmon Soup

Classic Finnish Salmon Soup, known as “lohikeitto,” is a comforting dish that embodies the essence of Finnish cuisine. This delightful soup is a warm hug on a chilly autumn day, featuring tender pieces of salmon swimming in a creamy broth infused with fresh dill and vegetables.
Traditionally made with root vegetables and potatoes, it’s both hearty and nourishing, making it an ideal meal for family gatherings or cozy dinners.
This dish showcases the simplicity and freshness of Scandinavian cooking, where quality ingredients shine through. The combination of salmon and creamy broth creates a rich flavor profile that’s both satisfying and wholesome. The addition of dill not only enhances the taste but also adds a beautiful touch of color and aroma to the dish.
Let’s explore the recipe and bring a taste of Finland to your kitchen!
Ingredients (Serves 4-6):
- 1 lb (450 g) fresh salmon fillet, skin removed and cut into chunks
- 4 medium potatoes, peeled and diced
- 2 medium carrots, peeled and sliced
- 1 medium onion, finely chopped
- 4 cups (1 liter) fish stock or water
- 1 cup (240 ml) heavy cream
- 1 tablespoon fresh dill, chopped (plus extra for garnish)
- 2 tablespoons butter
- Salt and pepper to taste
- Lemon wedges, for serving
Cooking Instructions:
- Prepare the Vegetables: Begin by peeling and dicing the potatoes and carrots. Finely chop the onion. This preparation is essential as it guarantees all the vegetables cook evenly and contribute to the overall flavor of the soup.
- Sauté the Onions: In a large pot, melt the butter over medium heat. Add the chopped onion and sauté until it becomes translucent and soft, about 3-5 minutes. This step builds the foundational flavor of the soup and adds sweetness to the broth.
- Add Vegetables and Stock: Once the onions are ready, add the diced potatoes and sliced carrots to the pot. Pour in the fish stock (or water) and bring the mixture to a gentle boil. This helps to cook the root vegetables until they’re tender, which takes about 15 minutes.
- Incorporate Salmon: After the vegetables have softened, gently add the salmon chunks to the pot. Allow the soup to simmer for an additional 5-7 minutes, or until the salmon is cooked through and flakes easily. Be careful not to overcook the salmon to maintain its tender texture.
- Finish with Cream and Dill: Lower the heat and stir in the heavy cream and chopped dill. Season with salt and pepper to taste. Let the soup warm through for another 3-5 minutes, making sure the flavors meld beautifully.
- Serve: Ladle the soup into bowls and garnish with additional fresh dill. Serve with lemon wedges on the side for a zesty finish. The acidity from the lemon complements the richness of the salmon and cream, elevating the dish.
Extra Tips:
When making Classic Finnish Salmon Soup, using fresh, high-quality ingredients will make a significant difference in the flavor. If you can find wild-caught salmon, it will enhance the taste even further.
Additionally, feel free to customize the vegetables according to your preference or what’s in season—adding leeks or parsnips can also provide a lovely depth of flavor.
Finally, for a little extra kick, consider adding a pinch of white pepper or a splash of white wine for a more complex taste. Enjoy your culinary journey through Finland!
Danish Apple Cake With Cinnamon
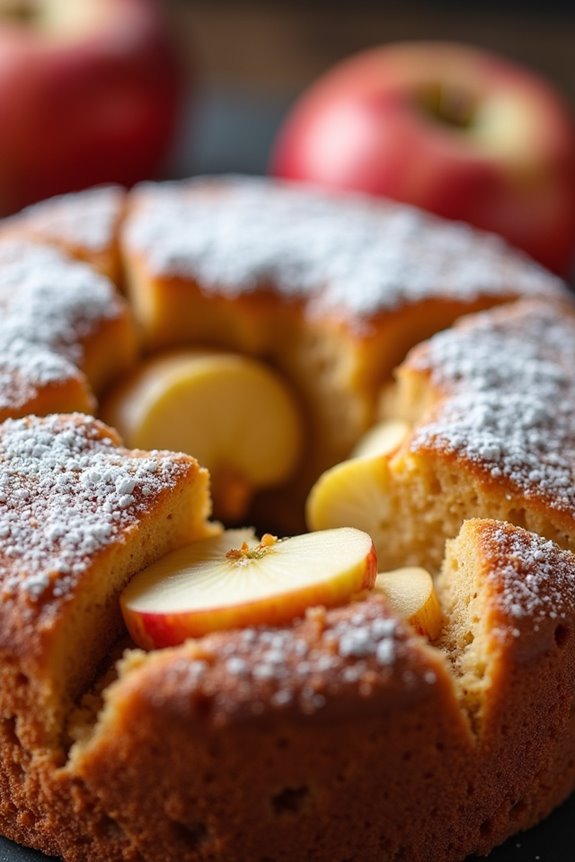
As autumn settles in, there’s nothing quite like the comforting aroma of a freshly baked Danish Apple Cake wafting through your home. This delightful treat celebrates the essence of fall with its warm spices and sweet apples, making it the perfect dessert for gatherings or a cozy family dinner.
The combination of tender apples, rich cinnamon, and a moist cake base is sure to become a favorite in your recipe repertoire. Danish Apple Cake isn’t only a delicious dessert but also a beautiful centerpiece for any autumn table.
Serve it warm, dusted with powdered sugar, and accompanied by a scoop of vanilla ice cream or a dollop of whipped cream for an indulgent experience. Whether you’re entertaining guests or enjoying a quiet evening at home, this cake is a delightful way to savor the flavors of the season.
Ingredients (Serves 4-6)
- 4 medium-sized apples, peeled, cored, and sliced
- 1 teaspoon lemon juice
- 2 teaspoons ground cinnamon
- 1 cup granulated sugar
- 1 cup all-purpose flour
- 1/2 cup unsalted butter, softened
- 2 large eggs
- 1 teaspoon vanilla extract
- 1 teaspoon baking powder
- 1/4 teaspoon salt
- Powdered sugar (for dusting)
Cooking Instructions
1. Preheat the Oven: Begin by preheating your oven to 350°F (175°C). This guarantees that the cake bakes evenly and rises properly.
2. Prepare the Apples: In a large bowl, toss the sliced apples with lemon juice and 1 teaspoon of ground cinnamon. This not only adds flavor but also helps to prevent the apples from browning. Set aside to let the flavors meld.
3. Mix the Batter: In another large mixing bowl, cream the softened butter and granulated sugar together until light and fluffy. This usually takes about 3-4 minutes.
Then, add the eggs one at a time, mixing well after each addition. Stir in the vanilla extract.
4. Combine Dry Ingredients: In a separate bowl, whisk together the flour, baking powder, salt, and the remaining teaspoon of cinnamon. Gradually add this dry mixture to the butter and sugar mixture, mixing until just combined.
Be careful not to overmix, as this can lead to a dense cake.
5. Fold in Apples: Gently fold the prepared apple slices into the batter, ensuring they’re evenly distributed. The batter will be thick, but this is normal.
6. Prepare the Baking Pan: Grease a 9-inch round cake pan or a similar-sized baking dish. Pour the apple batter into the pan and spread it out evenly.
7. Bake the Cake: Place the pan in the preheated oven and bake for approximately 45-50 minutes, or until a toothpick inserted into the center comes out clean.
Keep an eye on it towards the end of the baking time to prevent over-baking.
8. Cool and Serve: Once baked, remove the cake from the oven and let it cool in the pan for about 10 minutes before transferring it to a wire rack to cool completely. Dust with powdered sugar before serving.
Extra Tips
For an added layer of flavor, consider mixing in some chopped nuts, such as walnuts or pecans, into the batter along with the apples.
You can also experiment with different types of apples to find your favorite combination, as some varieties offer a sweeter or tarter taste. For an even more decadent treat, drizzle caramel sauce over each slice before serving.
Enjoy your Danish Apple Cake warm or at room temperature—it’s delicious either way!
Norwegian Lamb Stew With Root Vegetables
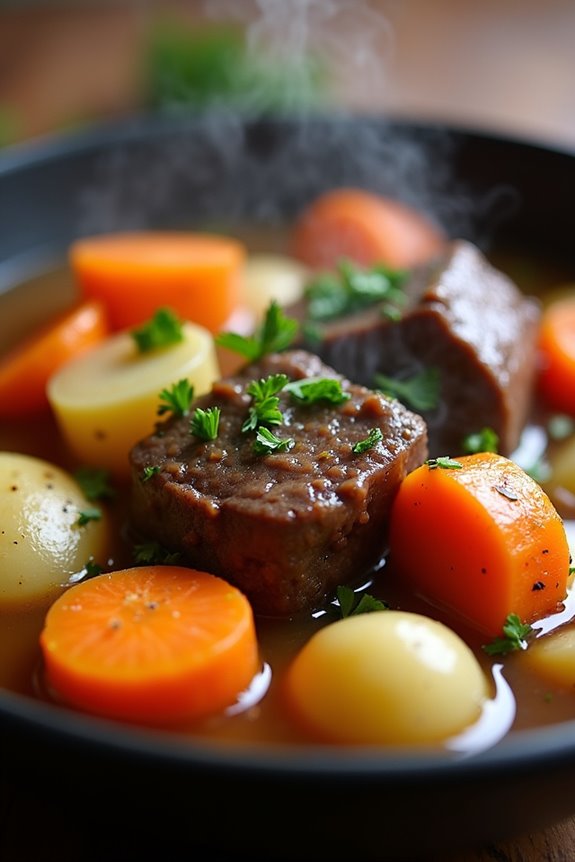
As the crisp air of autumn settles in, there’s nothing more comforting than a hearty bowl of Norwegian Lamb Stew with Root Vegetables. This traditional dish embraces the essence of Scandinavian cuisine, known for its rich flavors and wholesome ingredients. It combines tender lamb with a medley of root vegetables, creating a warming meal that’s perfect for chilly evenings.
The slow-cooked lamb becomes incredibly tender, while the vegetables add depth and sweetness to the stew, making it a family favorite. This dish isn’t just delicious; it’s also a celebration of seasonal produce. Carrots, parsnips, and potatoes shine in this stew, soaking up the flavorful broth.
Serve it with crusty bread or over a bed of creamy mashed potatoes for a complete meal. Whether you’re gathering around the dinner table with loved ones or simply seeking comfort during the fall season, Norwegian Lamb Stew with Root Vegetables is sure to satisfy.
Ingredients (Serves 4-6):
- 2 lbs lamb shoulder, cut into 1.5-inch cubes
- 2 tablespoons olive oil
- 1 large onion, diced
- 3 cloves garlic, minced
- 4 medium carrots, sliced
- 2 parsnips, sliced
- 4 medium potatoes, diced
- 1 cup turnips, diced
- 4 cups beef or lamb broth
- 1 cup red wine (optional)
- 2 tablespoons tomato paste
- 1 teaspoon dried thyme
- 1 teaspoon dried rosemary
- Salt and pepper, to taste
- Fresh parsley, for garnish
Cooking Instructions:
- Brown the Lamb: In a large pot or Dutch oven, heat the olive oil over medium-high heat. Add the lamb cubes in batches, ensuring not to overcrowd the pot. Brown the lamb on all sides for about 5-7 minutes. This step is essential as it locks in flavor.
- Sauté Aromatics: Once the lamb is browned, remove it from the pot and set it aside. In the same pot, add the diced onion and minced garlic. Sauté for 3-4 minutes until the onion is translucent and fragrant, scraping up any browned bits from the bottom of the pot.
- Add Vegetables: Incorporate the sliced carrots, parsnips, diced potatoes, and turnips into the pot. Stir everything together and cook for an additional 5 minutes to allow the vegetables to soften slightly.
- Deglaze the Pot: If using red wine, pour it into the pot and scrape the bottom to deglaze, cooking for about 2-3 minutes until the wine has reduced slightly. This adds rich flavor to the stew.
- Combine Ingredients: Return the browned lamb to the pot. Stir in the tomato paste, thyme, rosemary, and season with salt and pepper. Pour in the broth, making sure the ingredients are covered.
- Simmer the Stew: Bring the stew to a boil, then reduce the heat to low. Cover the pot and let it simmer for about 1.5 to 2 hours, stirring occasionally, until the lamb is tender and the flavors have melded beautifully.
- Serve: Once the stew is ready, taste and adjust the seasoning if necessary. Ladle the stew into bowls and garnish with fresh parsley before serving.
Extra Tips:
For an even richer flavor, consider adding a bay leaf during the simmering process and removing it before serving. You can also experiment with different root vegetables based on your preference or seasonal availability.
If you want a thicker stew, mix a tablespoon of cornstarch with a bit of cold water to create a slurry and stir it into the stew during the last 10 minutes of cooking. Enjoy your homemade Norwegian Lamb Stew with Root Vegetables!
Spiced Rye Bread With Butter and Cheese
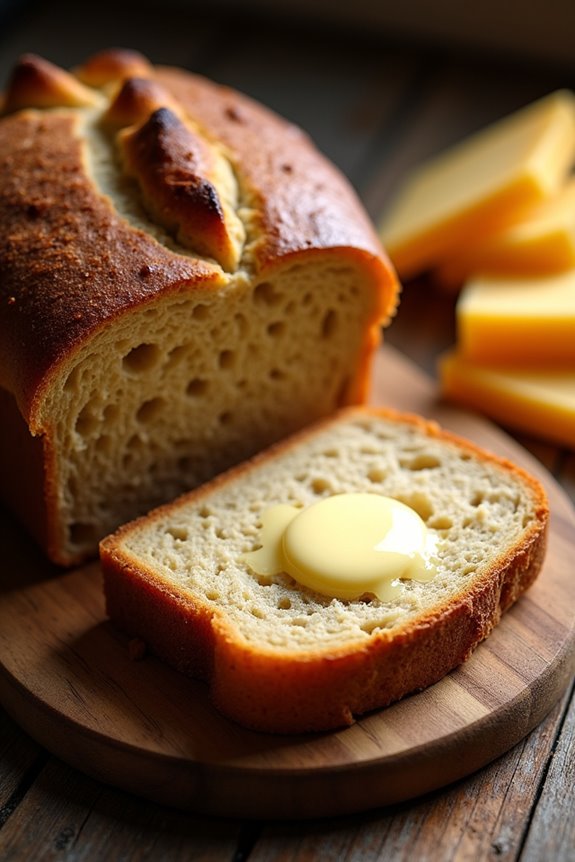
As the leaves turn and the air becomes crisp, there’s nothing quite like the warm aroma of freshly baked bread filling your home. Spiced Rye Bread is a traditional Scandinavian staple that not only brings comfort but also pairs beautifully with a generous spread of butter and slices of cheese.
This hearty bread, infused with spices, is perfect for enjoying during the chilly fall months, serving as a delightful canvas for toppings or simply savored on its own. This recipe yields a deliciously spiced rye bread that can be enjoyed warm or toasted, making it ideal for breakfast, lunch, or as an accompaniment to your favorite soup or stew.
With a mix of rye flour, warm spices, and a touch of sweetness, each bite will transport you to the cozy kitchens of Scandinavia. Gather your ingredients, and let’s plunge into the art of baking this delightful bread!
Ingredients (Serves 4-6 people):
- 2 cups rye flour
- 1 cup all-purpose flour
- 1 tablespoon brown sugar
- 1 teaspoon baking soda
- 1 teaspoon salt
- 1 teaspoon ground cinnamon
- 1/2 teaspoon ground ginger
- 1/2 teaspoon ground cardamom
- 1 1/2 cups buttermilk
- 1/4 cup unsalted butter, melted
- 1 tablespoon caraway seeds (optional)
- Softened butter for serving
- Slices of cheese (your choice, such as cheddar, gouda, or havarti)
Cooking Instructions:
- Preheat the Oven: Begin by preheating your oven to 375°F (190°C). This guarantees that the bread will bake evenly and gives it a nice crust.
- Mix Dry Ingredients: In a large mixing bowl, whisk together the rye flour, all-purpose flour, brown sugar, baking soda, salt, cinnamon, ginger, and cardamom. Make sure all the ingredients are well combined, as this will enhance the flavor of the bread.
- Combine Wet Ingredients: In a separate bowl, mix the buttermilk and melted butter until well blended. If you’re using caraway seeds, you can add them to this mixture for an extra burst of flavor.
- Combine Wet and Dry Mixtures: Slowly pour the wet mixture into the dry ingredients. Stir gently with a wooden spoon or spatula until just combined. Be careful not to overmix, as this can result in a denser bread.
- Shape the Dough: Once the dough is combined, turn it out onto a lightly floured surface. Knead the dough gently for about 2-3 minutes until it’s smooth. Shape it into a round loaf.
- Prepare for Baking: Place the loaf on a baking sheet lined with parchment paper. You can score the top with a sharp knife for a decorative touch and to allow for even rising.
- Bake the Bread: Transfer the baking sheet to the preheated oven and bake for 30-35 minutes, or until the bread sounds hollow when tapped on the bottom and has a golden brown crust.
- Cool and Serve: Once baked, remove the bread from the oven and let it cool on a wire rack for at least 10-15 minutes. Slice and serve warm with softened butter and cheese.
Extra Tips:
For the best flavor and texture, consider using a mix of different types of rye flour, such as medium and dark rye, for added depth.
If you want to enhance the spices further, allow the dough to rest for about 10 minutes before shaping, letting the flavors meld. This bread also freezes well, so you can make a larger batch and save some for later—just wrap it tightly in plastic wrap and store it in an airtight container. Enjoy your Scandinavian-inspired fall treat!
Creamy Potato and Leek Soup
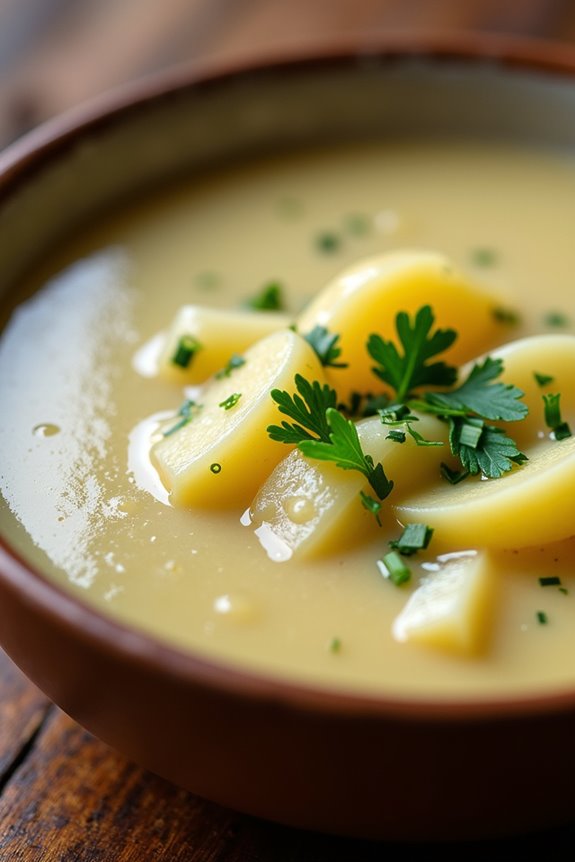
As the leaves begin to turn and the air becomes crisp, there’s nothing quite like a warm bowl of soup to embrace the cozy ambiance of fall. Creamy Potato and Leek Soup is a classic Scandinavian dish that not only warms the body but also delights the palate with its rich flavors and silky texture. The combination of tender potatoes and subtle leeks creates a comforting base, while the addition of cream elevates the dish to a decadent level.
This soup is perfect for chilly autumn evenings or when you want to impress guests with a simple yet elegant dish. It’s easy to prepare and can be enjoyed as a starter or a main course, paired beautifully with crusty bread. With just a few wholesome ingredients and straightforward steps, you can create a delightful meal that embodies the essence of Scandinavian fall cooking.
Ingredients (serving size: 4-6 people):
- 4 large potatoes, peeled and diced
- 3 leeks, cleaned and sliced
- 1 medium onion, chopped
- 4 cups vegetable or chicken broth
- 1 cup heavy cream
- 2 tablespoons butter
- Salt, to taste
- Black pepper, to taste
- Fresh chives or parsley, for garnish (optional)
Cooking Instructions:
- Prepare the Vegetables: Start by peeling and dicing the potatoes into small cubes for even cooking. Clean the leeks thoroughly, as they can hold dirt between their layers; slice them into thin rounds. Chop the onion finely to enhance the flavor of the soup.
- Sauté the Aromatics: In a large pot, melt the butter over medium heat. Add the chopped onion and sliced leeks, and sauté them for about 5-7 minutes until they become soft and translucent. This step is essential as it builds the flavor base for your soup.
- Add the Potatoes and Broth: Once the leeks and onion are soft, add the diced potatoes to the pot. Pour in the vegetable or chicken broth, making certain that the potatoes are fully submerged. Bring the mixture to a boil, then reduce the heat to a simmer. Cover the pot and let it cook for approximately 20 minutes, or until the potatoes are tender.
- Blend the Soup: After the potatoes are cooked, use an immersion blender to puree the soup until smooth. If you don’t have an immersion blender, carefully transfer the soup in batches to a countertop blender. Make sure to leave a small opening in the lid for steam to escape. Blend until you achieve a creamy consistency.
- Incorporate Cream and Season: Once blended, stir in the heavy cream and season the soup with salt and black pepper to taste. Allow the soup to gently heat through on low for about 5 minutes, making sure it doesn’t boil to preserve the creaminess.
- Serve and Garnish: Ladle the creamy potato and leek soup into bowls. If desired, garnish with freshly chopped chives or parsley for a splash of color and added freshness. Serve warm with crusty bread on the side.
Extra Tips: To enhance the flavor of your Creamy Potato and Leek Soup, consider adding a splash of white wine during the sautéing stage or incorporating herbs like thyme or dill for a fragrant twist.
For a vegan version, you can substitute the heavy cream with coconut cream or a plant-based alternative and use vegetable broth. Always taste and adjust the seasoning before serving to guarantee a perfectly balanced flavor.
Swedish Cardamom Buns

Swedish Cardamom Buns, or “Kardemummabullar,” are a delightful treat that captures the essence of Scandinavian baking. These soft, sweet buns are infused with aromatic cardamom and often enjoyed during fika, the cherished Swedish coffee break. The combination of warm spices and a slightly sweet dough creates a comforting pastry that pairs beautifully with your favorite cup of coffee or tea.
The process of making Swedish Cardamom Buns is a labor of love that rewards you with fragrant, golden-brown treats. The dough requires a bit of time to rise, allowing it to develop the perfect texture. Once baked, the buns are often brushed with melted butter and sprinkled with sugar, giving them an irresistible glossy finish. This recipe yields 4-6 servings, making it an ideal choice for sharing with family or friends during the cozy fall season.
Ingredients:
- 4 cups all-purpose flour
- 1 cup milk
- 1/4 cup sugar
- 1/2 cup unsalted butter, softened
- 2 1/4 teaspoons active dry yeast (1 packet)
- 1/2 teaspoon ground cardamom
- 1/2 teaspoon salt
- 1 large egg
- 1/4 cup sugar (for sprinkling)
- 1/4 cup melted butter (for brushing)
Cooking Instructions:
- Prepare the Dough: In a small saucepan, heat the milk over low heat until lukewarm. Remove from heat, sprinkle the yeast over the milk, and let it sit for about 5 minutes until it becomes frothy. In a large mixing bowl, combine the flour, sugar, ground cardamom, and salt. Create a well in the center, and pour in the yeast mixture along with the softened butter and the egg.
- Knead the Dough: Mix the ingredients together until a shaggy dough forms. Transfer the dough onto a floured surface and knead it for about 8-10 minutes until it becomes smooth and elastic. If the dough is too sticky, add a little more flour as needed.
- First Rise: Place the kneaded dough in a lightly greased bowl, cover it with a clean kitchen towel, and let it rise in a warm place for about 1 hour, or until it has doubled in size.
- Shape the Buns: After the dough has risen, punch it down to release the air. Roll the dough out on a floured surface into a rectangle about 1/4 inch thick. Brush the surface with melted butter and sprinkle with sugar. Fold the rectangle in half lengthwise, then cut it into strips about 1 inch wide. Twist each strip into a spiral shape and place them on a baking sheet lined with parchment paper.
- Second Rise: Cover the shaped buns with a kitchen towel and let them rise again for about 30-45 minutes, until they puff up slightly.
- Bake the Buns: Preheat your oven to 375°F (190°C). Once the buns have risen, bake them in the preheated oven for 15-20 minutes, or until they’re golden brown.
- Finish and Serve: Remove the buns from the oven and immediately brush them with melted butter and sprinkle with sugar. Allow them to cool slightly before serving.
Extra Tips:
When making Swedish Cardamom Buns, feel free to experiment with the filling by adding raisins or chopped nuts for extra texture and flavor. You can also adjust the sweetness by varying the amount of sugar sprinkled on top.
For an authentic touch, consider using whole cardamom pods; crush them to release their oils before adding to the dough. Enjoy these buns fresh, but they can also be stored in an airtight container for a couple of days, making them perfect for snacks or breakfast treats!
Finnish Mushroom Risotto

Finnish Mushroom Risotto is a delightful dish that perfectly captures the essence of the Finnish autumn. Rich, creamy, and full of earthy flavors, this risotto showcases the natural bounty of wild mushrooms that are often foraged during the fall season. The combination of Arborio rice, sautéed mushrooms, and a hint of Finnish cheese creates a comforting and satisfying meal that’s perfect for cozy evenings.
Whether served as a main course or a side dish, this risotto is sure to impress family and friends alike. To elevate its flavor profile, you can experiment with various types of mushrooms, such as chanterelles, porcini, or even classic button mushrooms. Pair this dish with a crisp salad and a glass of white wine, and you have a wonderfully balanced meal that embodies the spirit of Scandinavian cooking.
With the right techniques and a bit of patience, you can create this creamy risotto that’s both hearty and wholesome.
Ingredients (Serves 4-6)
- 1 ½ cups Arborio rice
- 4 cups vegetable or chicken broth
- 1 cup water
- 2 tablespoons olive oil
- 1 onion, finely chopped
- 3 garlic cloves, minced
- 8 ounces wild mushrooms, chopped (such as chanterelles or porcini)
- ½ cup dry white wine
- 1 cup grated Finnish cheese (like Leipäjuusto or another mild cheese)
- ½ cup heavy cream
- Salt and pepper to taste
- Fresh parsley, chopped (for garnish)
Cooking Instructions
- Prepare the Broth: In a saucepan, combine the vegetable or chicken broth and water. Heat over medium heat until it simmers. Keep it warm on a low flame; this will help the rice cook evenly as you add it to the risotto.
- Sauté the Aromatics: In a large, heavy-bottomed skillet, heat the olive oil over medium heat. Add the finely chopped onion and sauté for about 3-4 minutes until it becomes translucent. Then, add the minced garlic and cook for an additional minute, stirring frequently to avoid burning.
- Cook the Mushrooms: Add the chopped mushrooms to the skillet and cook for about 5-7 minutes until they’re tender and have released their moisture. Stir occasionally, allowing the mushrooms to caramelize slightly for added flavor.
- Toast the Rice: Increase the heat to medium-high and add the Arborio rice to the skillet. Stir the rice and allow it to toast for about 2-3 minutes, ensuring that each grain is coated in the oil and absorbs the flavors from the garlic and mushrooms.
- Deglaze with Wine: Pour in the dry white wine and stir continuously until the liquid is mostly absorbed by the rice. This step adds depth to the flavor and gives the risotto a beautiful aroma.
- Add the Broth Gradually: Begin adding the warm broth one ladle at a time, stirring frequently. Wait until the liquid is mostly absorbed before adding the next ladle. This process should take about 20-25 minutes, and the rice should be creamy and al dente when finished.
- Finish with Cheese and Cream: Once the rice reaches the desired consistency, remove the skillet from the heat. Stir in the grated Finnish cheese and heavy cream, mixing well to create a rich and creamy texture. Season with salt and pepper to taste.
- Serve and Garnish: Spoon the risotto onto plates or into bowls and garnish with chopped fresh parsley for a pop of color and freshness. Serve immediately while hot.
Extra Tips
When making Finnish Mushroom Risotto, patience is key. Stirring the rice frequently allows it to release its starch, resulting in that signature creamy texture. Additionally, using a mix of different mushrooms can enhance the dish’s complexity; just make sure they’re clean and properly prepared.
For an added touch, consider finishing the risotto with a drizzle of truffle oil or a sprinkle of freshly grated lemon zest for a bright contrast to the earthy flavors.
Rustic Danish Pumpkin Tart

As the leaves begin to change colors and the air turns crisp, there’s nothing quite like a warm, homemade Rustic Danish Pumpkin Tart to embrace the essence of autumn. This delightful dessert combines the earthy sweetness of pumpkin with a flaky, buttery crust, making it a perfect centerpiece for your fall gatherings.
Traditionally enjoyed during the harvest season, this tart brings together the comforting flavors of nutmeg, cinnamon, and vanilla, creating a nostalgic aroma that fills your kitchen and warms your heart.
Making this Rustic Danish Pumpkin Tart isn’t only a treat for the taste buds but also a wonderful way to showcase seasonal ingredients. Whether you’re hosting a dinner party or simply indulging in a cozy night in, this tart is bound to impress.
It’s easy to prepare, and once baked, you can serve it warm or at room temperature, topped with a dollop of whipped cream or a scoop of vanilla ice cream for an extra touch of sweetness.
Ingredients (Serves 4-6):
- 1 pre-made pie crust (store-bought or homemade)
- 2 cups pumpkin puree (freshly cooked or canned)
- 3/4 cup brown sugar
- 1/2 cup heavy cream
- 2 large eggs
- 1 teaspoon vanilla extract
- 1 teaspoon ground cinnamon
- 1/2 teaspoon ground nutmeg
- 1/4 teaspoon salt
- 1/4 teaspoon ground ginger
- Optional: whipped cream for serving
Cooking Instructions:
1. Preheat the Oven: Begin by preheating your oven to 375°F (190°C). This guarantees that the tart will bake evenly and achieve a golden-brown crust.
2. Prepare the Pie Crust: Roll out your pre-made pie crust and fit it into a 9-inch tart pan. Press the crust firmly into the edges and trim any excess dough hanging over the sides.
Prick the bottom of the crust with a fork to prevent it from puffing up during baking. Place the crust in the refrigerator to chill while you prepare the filling.
3. Mix the Filling: In a large mixing bowl, combine the pumpkin puree, brown sugar, heavy cream, eggs, vanilla extract, cinnamon, nutmeg, salt, and ginger.
Use a whisk to mix the ingredients until smooth and well incorporated. Make sure there are no lumps for a creamy filling.
4. Pour Filling into Crust: Remove the chilled crust from the refrigerator and carefully pour the pumpkin filling into the prepared pie crust.
Use a spatula to spread the filling evenly, ensuring that it fills the crust to the edges.
5. Bake the Tart: Place the tart in the preheated oven and bake for 40-45 minutes, or until the filling is set and a toothpick inserted into the center comes out clean.
The edges of the crust should be golden brown.
6. Cool and Serve: Once baked, remove the tart from the oven and allow it to cool on a wire rack for at least 15 minutes.
This cooling period helps the filling to firm up further. Serve warm or at room temperature, optionally topped with a dollop of whipped cream.
Extra Tips:
When making your Rustic Danish Pumpkin Tart, consider using fresh pumpkin for a more vibrant flavor.
If using canned pumpkin, make certain it’s 100% pumpkin and not pumpkin pie filling, as the latter contains added sugars and spices. To enhance the spices, feel free to adjust the quantities to suit your taste.
Additionally, if you want a more decorative touch, you can use a knife to create a few slits in the crust before baking to allow steam to escape, which can add a rustic charm to your tart.
Enjoy your fall baking!
Norwegian Fish Cakes With Dill

Norwegian Fish Cakes, or “Fiskekaker,” are a beloved dish in Norway, showcasing the country’s rich maritime culture. These cakes are made primarily from fresh fish, typically white fish like cod or haddock, combined with a delicate blend of seasonings and herbs. The addition of dill not only enhances the flavor but also adds a fresh, aromatic touch that complements the fish beautifully.
Often served with boiled potatoes, a light salad, or a tangy sauce, these fish cakes are a delightful way to enjoy the tastes of Scandinavia during the fall season. This recipe is perfect for serving 4-6 people and is relatively simple to prepare, making it an excellent choice for both special occasions and cozy family dinners.
The key to achieving the perfect texture is to blend the fish thoroughly, guaranteeing a smooth mixture that holds together well when cooked. Whether you’re familiar with Scandinavian cuisine or trying it for the first time, these fish cakes are sure to impress with their light, flaky, and flavorful profile.
Ingredients:
- 500g white fish fillets (such as cod or haddock)
- 200ml milk
- 1 small onion, finely chopped
- 100g potatoes, peeled and diced
- 1 large egg
- 2 tablespoons all-purpose flour
- 2 tablespoons fresh dill, finely chopped
- Salt, to taste
- Pepper, to taste
- Butter or oil, for frying
Cooking Instructions:
- Prepare the Potatoes: Start by boiling the diced potatoes in a pot of salted water until they’re tender, which should take about 10-15 minutes. Drain them and set aside to cool slightly. This step helps to create a light and fluffy texture in the fish cakes.
- Cook the Onion: In a small frying pan over medium heat, add a bit of butter or oil and sauté the finely chopped onion until it’s soft and translucent, about 5 minutes. This will enhance the flavor of the fish cakes and add a subtle sweetness.
- Blend the Fish Mixture: In a food processor, add the fish fillets and blend until you achieve a smooth paste. If you don’t have a food processor, you can finely chop the fish with a knife. This step is vital for the texture of the cakes.
- Combine Ingredients: In a large bowl, combine the blended fish, sautéed onions, boiled potatoes, milk, egg, flour, dill, salt, and pepper. Mix gently until all ingredients are well incorporated. Avoid over-mixing, as this can make the cakes dense.
- Shape the Fish Cakes: With wet hands, form the mixture into small patties or cakes, about 2 inches in diameter. Make sure they’re even in size to cook uniformly.
- Fry the Cakes: In a large frying pan, heat butter or oil over medium heat. Once hot, carefully add the fish cakes to the pan, cooking them in batches if necessary. Fry for about 4-5 minutes on each side, or until golden brown and cooked through. Be careful not to overcrowd the pan.
- Serve: Once cooked, transfer the fish cakes to a plate lined with paper towels to drain any excess oil. Serve them warm with boiled potatoes, a fresh salad, or your favorite dipping sauce.
Extra Tips:
When making Norwegian Fish Cakes, it’s essential to use the freshest fish possible for the best flavor. You can also experiment with different herbs if you don’t have dill on hand; parsley or chives could work well too.
For an extra kick, consider adding a splash of lemon juice or zest to the mixture. Additionally, if you have leftovers, these fish cakes can be frozen before frying; just be certain to separate them with parchment paper to prevent sticking. Enjoy your Scandinavian culinary adventure!
Swedish Cloudberry Jam and Cream Dessert

Swedish Cloudberry Jam and Cream Dessert is a delightful treat that captures the essence of Scandinavian flavors. This simple yet elegant dessert highlights the unique taste of cloudberries, which are small, golden-orange berries that thrive in the cold climates of Northern Europe. Known for their sweet and slightly tart flavor, cloudberries make for a perfect jam that pairs wonderfully with whipped cream, creating a light and invigorating dessert that’s perfect for any occasion.
Making this dessert is as easy as it’s delicious. The combination of the sweet cloudberry jam and the creamy, airy whipped cream creates a harmonious blend of textures and flavors that will leave your guests wanting more. Whether you’re hosting a dinner party or simply indulging in a sweet treat, this dessert is sure to impress.
Ingredients (Serves 4-6):
- 2 cups fresh or frozen cloudberries
- 1 cup granulated sugar
- 1 tablespoon lemon juice
- 1 cup heavy cream
- 2 tablespoons powdered sugar
- 1 teaspoon vanilla extract
- Fresh mint leaves (for garnish, optional)
Cooking Instructions:
- Prepare the Cloudberry Jam: In a medium saucepan, combine the cloudberries, granulated sugar, and lemon juice. Cook over medium heat, stirring occasionally, until the mixture comes to a gentle boil. Continue to boil for about 10-15 minutes, or until the jam thickens slightly. Remove from heat and allow it to cool to room temperature.
- Whip the Cream: In a separate bowl, pour in the heavy cream. Use an electric mixer to beat the cream on medium speed until soft peaks form. Gradually add the powdered sugar and vanilla extract, then continue to whip until stiff peaks form. Be careful not to overbeat, as this can turn the cream into butter.
- Assemble the Dessert: In serving bowls or glasses, start by adding a layer of the cooled cloudberry jam at the bottom. Next, carefully spoon a generous layer of whipped cream on top of the jam. Repeat the layers if your serving vessels allow, ending with a dollop of whipped cream on top.
- Garnish and Serve: If desired, garnish the dessert with fresh mint leaves for a pop of color and added freshness. Serve immediately or refrigerate for up to an hour before serving for a chilled dessert experience.
Extra Tips:
When making Swedish Cloudberry Jam and Cream Dessert, using fresh cloudberries is ideal for the best flavor, but frozen cloudberries work just as well if fresh ones are unavailable. Additionally, you can adjust the sweetness of the jam by altering the amount of sugar based on your taste preference.
For a fun twist, consider adding a splash of liqueur, such as Grand Marnier, to the whipped cream for an extra layer of flavor. Enjoy this delightful dessert chilled for an invigorating treat!