

Gather around the glow of candlelight as the aroma of spiced gingerbread cookies fills the air. This collection of Scandinavian Christmas recipes is all about creating festive traditions. From warming glögg to delightful saffransbullar, there’s a variety of flavors waiting to be explored. What enchanting tastes will you discover in these winter fairytale-inspired dishes? Let’s embark on this culinary journey together.
Spiced Gingerbread Cookies

As the holiday season approaches, the aroma of freshly baked gingerbread cookies fills the air, bringing warmth and joy to homes across Scandinavia. These spiced cookies, often decorated with icing and enjoyed with a warm cup of cocoa, are a beloved tradition that delights both young and old alike.
With a blend of spices including ginger, cinnamon, and cloves, these cookies aren’t only delicious but also evoke the spirit of Christmas with every bite.
Making spiced gingerbread cookies is a fun and engaging activity that can be enjoyed with family and friends. The process of mixing the ingredients, rolling out the dough, and cutting the cookies into festive shapes creates a wonderful holiday atmosphere.
Once baked and decorated, these cookies can be shared as gifts, hung on Christmas trees, or simply enjoyed as a delicious treat throughout the season.
Ingredients (Serves 4-6)
- 3 1/4 cups all-purpose flour
- 1 teaspoon baking soda
- 1 tablespoon ground ginger
- 1 tablespoon ground cinnamon
- 1 teaspoon ground cloves
- 1/2 teaspoon salt
- 1 cup unsalted butter, softened
- 1 cup brown sugar, packed
- 1/2 cup molasses
- 1 large egg
- 1 tablespoon vanilla extract
- Royal icing (for decoration)
- Sprinkles or edible decorations (optional)
Cooking Instructions
- Prepare the Dry Ingredients: In a large mixing bowl, whisk together the flour, baking soda, ground ginger, ground cinnamon, ground cloves, and salt. This guarantees that the spices and baking soda are evenly distributed throughout the flour.
- Cream the Butter and Sugar: In another bowl, use an electric mixer to beat the softened butter and brown sugar together until the mixture is light and fluffy. This process incorporates air into the butter, which helps create a light texture in the cookies.
- Add Molasses and Egg: Mix in the molasses, egg, and vanilla extract until fully combined. The molasses adds a rich sweetness and depth of flavor, while the egg helps bind the ingredients together.
- Combine Wet and Dry Ingredients: Gradually add the dry ingredient mixture to the wet mixture, stirring until a dough forms. If the dough is too sticky, you can add a little more flour until it reaches a workable consistency.
- Chill the Dough: Divide the dough into two equal portions, wrap them in plastic wrap, and refrigerate for at least 1 hour. Chilling helps the dough firm up, making it easier to roll out and cut into shapes.
- Roll and Cut the Cookies: Preheat your oven to 350°F (175°C). On a floured surface, roll out one portion of the chilled dough to about 1/4 inch thick. Use cookie cutters to cut out festive shapes and place them on baking sheets lined with parchment paper.
- Bake the Cookies: Bake the cookies in the preheated oven for 8-10 minutes, or until the edges are firm but the centers are still soft. Allow the cookies to cool on the baking sheet for a few minutes before transferring them to a wire rack to cool completely.
- Decorate: Once the cookies are completely cooled, use royal icing to decorate them as desired. Add sprinkles or edible decorations for a festive touch.
Extra Tips
For the best flavor, consider making your gingerbread dough a day in advance and allowing it to chill overnight. This extra time enhances the spices, resulting in a more flavorful cookie.
Additionally, be sure to roll the dough evenly to guarantee uniform baking. If you want to experiment with flavors, try adding a pinch of nutmeg or cardamom for a unique twist.
Finally, store the cookies in an airtight container to keep them fresh and enjoy them throughout the holiday season!
Glögg (Mulled Wine)
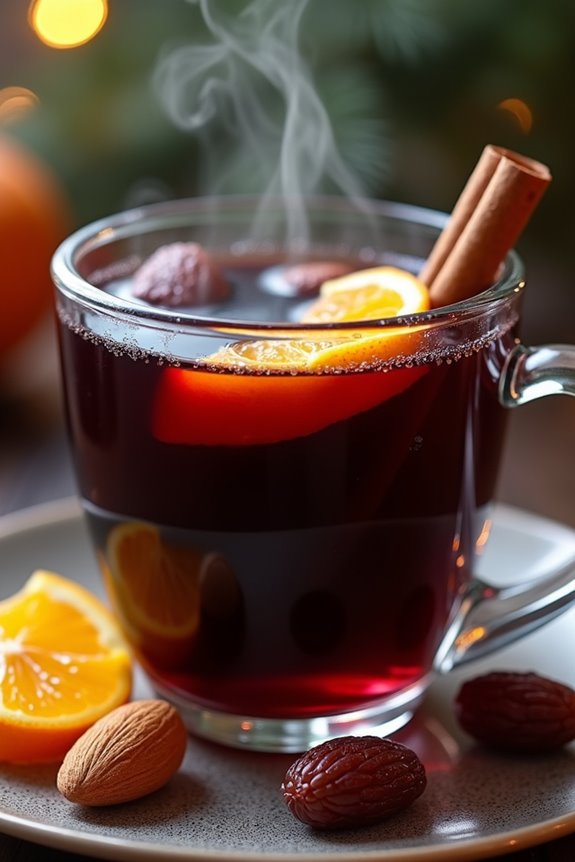
Glögg is a traditional Scandinavian mulled wine that brings warmth and festive cheer during the cold winter months, especially around Christmas. This aromatic drink is perfect for gatherings, holiday parties, or simply cozy nights spent by the fireplace. Infused with spices like cinnamon, cardamom, and cloves, along with a hint of citrus, Glögg is an inviting beverage that can be enjoyed hot, often enhanced with a splash of brandy or vodka for an extra kick.
The beauty of Glögg lies in its versatility, allowing you to customize the spice combinations and sweetness according to your taste. Some variations even include almonds and raisins, adding texture and a delightful surprise in each sip. Whether you prefer a non-alcoholic version or wish to indulge in a spirited one, Glögg is sure to evoke the holiday spirit and create memorable moments with friends and family.
Ingredients (Serves 4-6)
- 1 bottle of red wine (750ml)
- 1 cup of water
- 1/2 cup of sugar (adjust to taste)
- 2-3 cinnamon sticks
- 5-6 whole cloves
- 5-6 cardamom pods
- 1 orange (zested and juiced)
- 1/4 cup of raisins (optional)
- 1/4 cup of blanched almonds (optional)
- 1/4 to 1/2 cup of vodka or brandy (optional)
Cooking Instructions
- Prepare the spices: In a small saucepan, combine the water, cinnamon sticks, cloves, and cardamom pods. Bring this mixture to a gentle boil over medium heat and let it simmer for about 5-10 minutes. This step allows the spices to release their aromatic oils, creating a flavorful base for your Glögg.
- Mix the wine: In a large pot, pour in the bottle of red wine and add the sugar, orange juice, and orange zest. Stir well to combine. The wine should be warmed gently, not boiled, so keep the heat on low.
- Combine everything: Once the spices have simmered, strain the spice-infused water into the pot with the wine mixture. Make sure to discard the solid spices. If you’re using raisins and almonds, add them to the pot now for extra texture and flavor.
- Add spirits (optional): If you wish to include vodka or brandy for added warmth, pour it into the pot now and stir to mix. This is completely optional, but it can enhance the depth of flavor and give your Glögg a little more kick.
- Heat and serve: Gently heat the mixture on low until it’s steaming but not boiling. This should take about 10-15 minutes. Once it’s ready, ladle the Glögg into heatproof glasses or mugs, making sure to include a few raisins and almonds in each serving if you added them.
- Garnish (optional): For an extra festive touch, you can garnish each serving with a slice of orange or a cinnamon stick.
Extra Tips
For the best flavor, allow your Glögg to simmer for a longer time on low heat, which helps the spices to meld beautifully. If you prefer a sweeter drink, feel free to adjust the sugar to your liking, and consider experimenting with different types of red wine to find your perfect combination.
Additionally, let your Glögg cool and then refrigerate it if you want to serve it later; simply reheat before serving. Enjoy this delightful drink with some traditional Scandinavian Christmas pastries for the ultimate festive experience!
Julefrokost (Christmas Lunch)
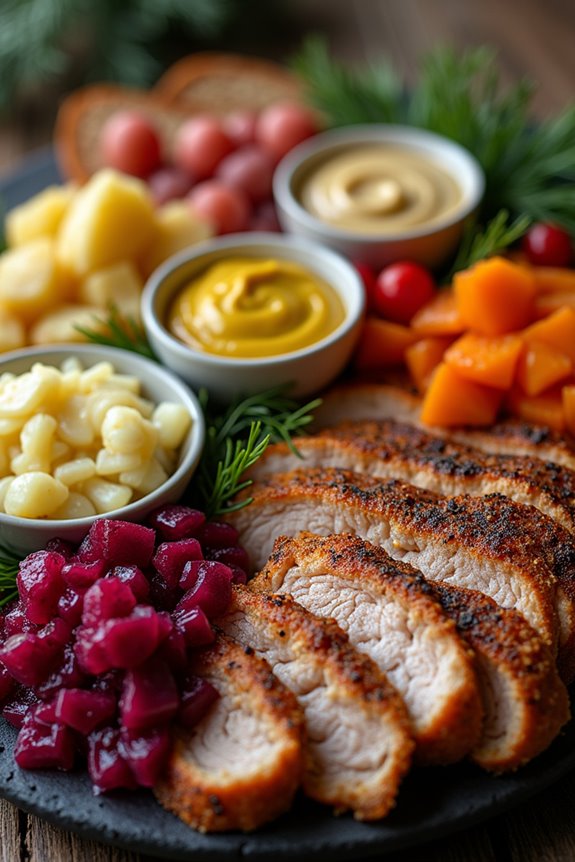
Julefrokost, or Christmas Lunch, is a beloved Scandinavian tradition that brings family and friends together to celebrate the festive season with an array of delicious dishes. This meal often features a variety of cold and warm items laid out buffet-style, allowing everyone to sample different flavors and textures.
Typical Julefrokost offerings include cured meats, pickled herring, cheese, and various salads, all complemented by freshly baked bread and festive beverages. The joy of Julefrokost lies in its communal aspect, where the sharing of food becomes a celebration of togetherness and the holiday spirit.
In this recipe, we’ll focus on a classic spread that embodies the essence of Julefrokost. The centerpiece will be a beautifully arranged platter featuring marinated herring, roast pork, and a selection of traditional accompaniments. Each component is easy to prepare but comes together to create a memorable dining experience that will transport you to the heart of Scandinavian holiday traditions.
Ingredients (Serves 4-6)
- 500g pickled herring (preferably in different marinades)
- 600g roast pork (cooked and sliced)
- 200g remoulade sauce
- 150g mustard sauce
- 250g rye bread (sliced)
- 200g beetroot salad
- 200g potato salad
- 100g cheese (e.g., Danish blue cheese or aged gouda)
- Fresh dill for garnish
- Lemon wedges for serving
Cooking Instructions
1. Prepare the Pickled Herring: If you’re using store-bought pickled herring, simply remove it from the jar and let it drain for a few minutes. For homemade herring, verify it has been marinated in your desired solution (such as vinegar, spices, and herbs) for at least 24 hours prior to serving.
Arrange the herring on a platter, showcasing different marinades for visual appeal.
2. Slice the Roast Pork: If you have a pre-cooked roast pork, slice it into thin pieces. If you’re preparing it from scratch, season a pork loin with salt, pepper, and your favorite herbs, roast it in the oven at 180°C (350°F) until it reaches an internal temperature of 70°C (160°F), then allow it to rest before slicing.
3. Prepare Accompaniments: In small bowls, serve the remoulade sauce and mustard sauce. These will be used as condiments for the herring and pork.
You can also prepare your potato salad and beetroot salad in advance and refrigerate them until serving.
4. Arrange the Platter: On a large serving platter or board, arrange the sliced roast pork, pickled herring, bowls of sauces, potato salad, and beetroot salad.
Place slices of rye bread around the edge of the platter. Confirm that the presentation is colorful and inviting.
5. Garnish and Serve: Finish by garnishing the platter with fresh dill and lemon wedges for a touch of freshness. Offer your guests plates and cutlery, and encourage them to serve themselves from the buffet-style spread.
Extra Tips
To elevate your Julefrokost experience, consider adding more traditional elements such as homemade liver pâté or a selection of cured sausages.
It’s also a great idea to serve some festive beverages, such as gløgg (a spiced mulled wine) or aquavit, to complement the flavors of the food.
Don’t forget to plan ahead; many components can be made a day in advance, allowing you to enjoy the day without the stress of last-minute preparations.
Lutefisk
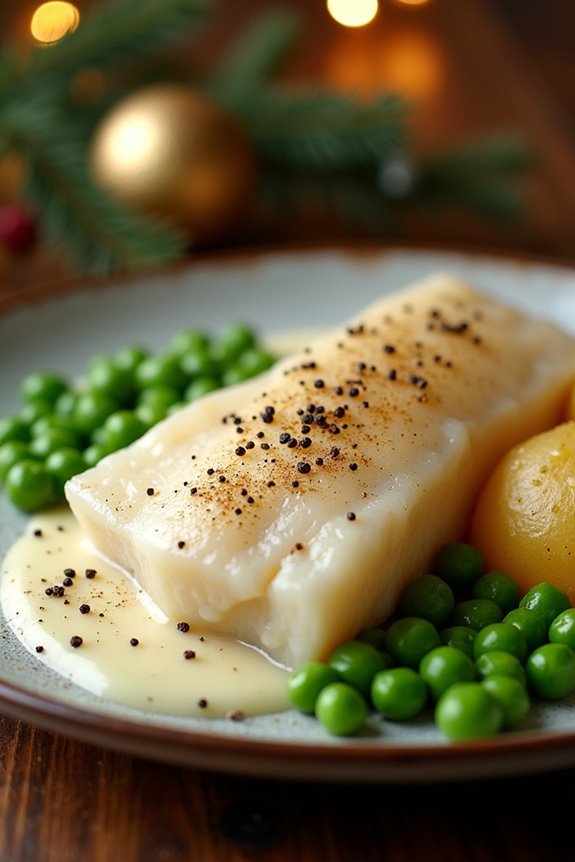
Lutefisk is a traditional Scandinavian dish that has become synonymous with holiday feasts, particularly during Christmas time. This unique dish is made from dried fish, typically cod, that has undergone a special preparation process involving soaking in a lye solution, followed by rinsing in water. The result is a gelatinous texture that can be polarizing; however, for many, it’s a beloved festive delicacy.
Served with an array of accompaniments, lutefisk is a dish that brings family and friends together around the table, celebrating the rich culinary heritage of Scandinavia.
The preparation of lutefisk requires a bit of patience, as it’s vital to follow the soaking and rinsing process for the fish to guarantee it’s safe and palatable. Although the methods may vary slightly across regions, the core essence of the dish remains the same.
It’s typically served with melted butter, white sauce, and a sprinkling of either salt or pepper, alongside traditional sides such as potatoes and peas, making it a hearty and memorable meal for the holiday season.
Ingredients (Serves 4-6)
- 1 lb lutefisk (preferably cod)
- 4 cups cold water (for soaking)
- 1 cup lye (for soaking; to be handled with care)
- 1/2 cup melted butter (for serving)
- 1 cup white sauce (for serving)
- Salt and pepper (to taste)
- Boiled potatoes (for serving)
- Peas (for serving)
Cooking Instructions
- Prepare the Lutefisk: Start by rinsing the lutefisk under cold running water to remove any excess salt and impurities. Place the fish in a large bowl or container.
- Soak in Lye: In a separate container, prepare the lye solution by carefully mixing the lye with water, following safety guidelines. Make sure you wear gloves and goggles, as lye is caustic. Soak the lutefisk in this solution for 2-3 days, changing the water daily. This process rehydrates the fish and gives it its distinctive texture.
- Rinse Thoroughly: After the soaking period, thoroughly rinse the lutefisk again under cold running water for about 30 minutes to remove all traces of lye. This step is essential for safety and flavor.
- Cook the Lutefisk: Preheat your oven to 350°F (175°C). Place the lutefisk in a baking dish, adding a little water to the bottom to keep it moist. Cover the dish with aluminum foil and bake for approximately 30-40 minutes, or until the fish flakes easily with a fork.
- Prepare Accompaniments: While the lutefisk is baking, boil the potatoes until tender and heat the peas. Prepare the white sauce by melting butter, adding flour to create a roux, and slowly whisking in milk until thickened.
- Serve: Once the lutefisk is cooked, remove it from the oven and serve hot. Drizzle the melted butter over the fish, add white sauce, and season with salt and pepper to taste. Serve alongside boiled potatoes and peas for a complete meal.
Extra Tips
When preparing lutefisk, make sure you follow the soaking and rinsing instructions meticulously, as the lye can be dangerous if not handled properly.
If you’re new to lutefisk, consider using a smaller portion for your first attempt. Additionally, serving lutefisk with traditional accompaniments such as bacon, mustard, or even lingonberry sauce can enhance the flavor and provide a delightful contrast to the dish’s unique texture.
Enjoy the experience and the rich cultural tradition behind this Scandinavian Christmas delicacy!
Smoked Salmon Canapés
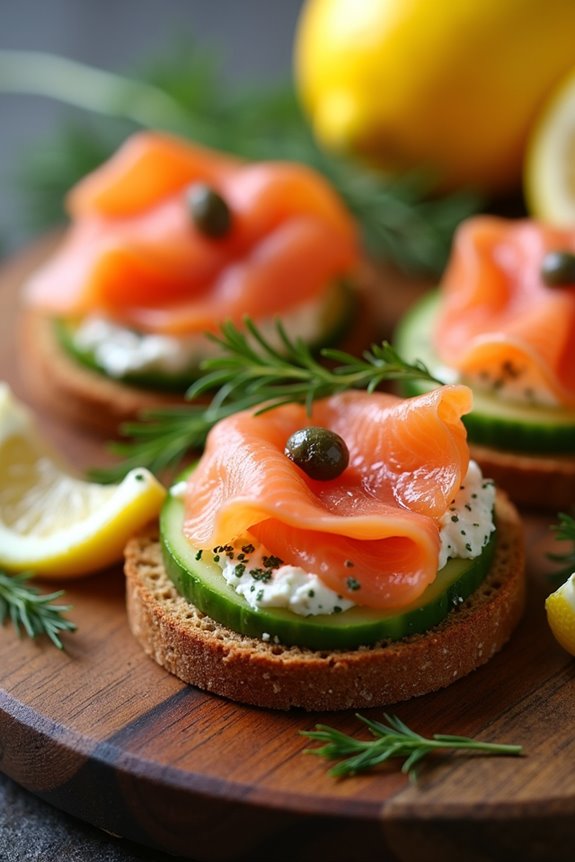
Smoked Salmon Canapés are a delightful addition to any festive table, especially during the Christmas season. These elegant bite-sized treats aren’t only visually appealing but also bursting with flavor, making them a favorite among guests. The combination of creamy spreads, fresh herbs, and the delicate taste of smoked salmon creates a harmonious blend that will impress both family and friends.
Creating these canapés is a simple process that allows you to showcase your culinary skills without spending hours in the kitchen. With just a few ingredients, you can assemble these delicious bites in no time. Perfect for holiday gatherings, these canapés are sure to be a hit at your Scandinavian Christmas celebrations.
Ingredients (serving size: 4-6 people)
- 200g smoked salmon, sliced
- 1 small cucumber, thinly sliced
- 150g cream cheese, softened
- 2 tablespoons fresh dill, chopped
- 1 tablespoon lemon juice
- 1 tablespoon capers, drained
- 1 teaspoon black pepper
- 12-15 small rounds of rye bread or blinis
- Lemon wedges for garnish
Cooking Instructions
- Prepare the Cream Cheese Spread: In a mixing bowl, combine the softened cream cheese, chopped dill, lemon juice, and black pepper. Using a spatula or fork, mix until all ingredients are well incorporated and the mixture is smooth. This cream cheese spread will serve as the base for your canapés.
- Slice the Cucumber: Using a sharp knife or mandoline, slice the cucumber into thin rounds. Aim for about 1/8 inch thick slices, as this will allow for easy layering on the canapés. Place the cucumber slices on a paper towel to absorb excess moisture, which will prevent the canapés from getting soggy.
- Assemble the Canapés: On each round of rye bread or blini, spread a generous layer of the cream cheese mixture. Next, place a slice of smoked salmon on top of the cream cheese, followed by a cucumber slice. Finally, add a few capers on top for an added burst of flavor. Repeat this process until all the ingredients are used.
- Garnish and Serve: Arrange the assembled canapés on a serving platter. To add a touch of freshness and color, garnish with additional dill and lemon wedges. Serve immediately or refrigerate until ready to serve, allowing the flavors to meld together.
Extra Tips
When preparing Smoked Salmon Canapés, consider using different types of bread or bases for variety, such as pumpernickel or whole grain for a heartier option.
Additionally, if you want to add a bit of crunch, you can include a layer of arugula or microgreens beneath the salmon. For an extra touch of elegance, drizzle a bit of olive oil or a sprinkle of paprika before serving.
Köttbullar (Swedish Meatballs)
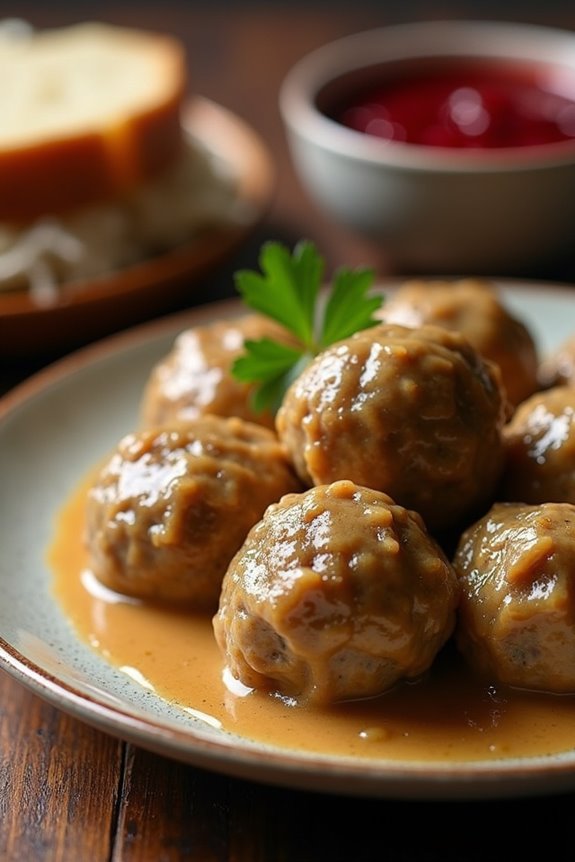
Köttbullar, or Swedish meatballs, are a beloved staple of Scandinavian cuisine, particularly during the festive season. These savory meatballs are often served with creamy gravy, lingonberry sauce, and a side of mashed potatoes or crisp, buttery flatbreads. The secret to their rich flavor lies in the combination of ground meat, aromatic spices, and a touch of cream, which makes them incredibly tender and juicy.
Perfect for holiday gatherings, Köttbullar can be prepared ahead of time and warmed up before serving, making them an excellent addition to your Christmas feast. The tradition of making Köttbullar extends beyond just the meal; it’s often a family affair where everyone pitches in to roll the meatballs and share stories.
As you gather around the kitchen, the aroma of sautéed onions and spices fills the air, evoking the warmth of Scandinavian holiday spirit. Whether you choose to serve them as an appetizer or as part of a main course, Köttbullar are sure to please and bring a taste of Sweden to your holiday table.
Ingredients (Serves 4-6 people):
- 1 pound ground beef
- 1/2 pound ground pork
- 1/2 cup breadcrumbs
- 1/4 cup whole milk
- 1/4 cup finely chopped onion
- 1/2 teaspoon salt
- 1/4 teaspoon black pepper
- 1/4 teaspoon allspice
- 1/4 teaspoon nutmeg
- 1 egg
- 2 tablespoons butter (for frying)
- 1 cup beef broth (for gravy)
- 1 cup heavy cream (for gravy)
- Lingonberry sauce (for serving)
Cooking Instructions:
- Prepare the Meatball Mixture: In a large bowl, combine the ground beef and ground pork. Add the breadcrumbs, milk, chopped onion, salt, black pepper, allspice, nutmeg, and egg. Using your hands, mix everything together until well combined, but be careful not to overmix.
- Shape the Meatballs: Once the meat mixture is ready, wet your hands with a little water to prevent sticking. Take a small amount of the mixture and roll it into a ball about 1 inch in diameter. Repeat this process until all the mixture is shaped into meatballs, placing them on a baking sheet as you go.
- Fry the Meatballs: In a large skillet, melt the butter over medium heat. Once the butter is hot, add the meatballs in batches, ensuring not to overcrowd the pan. Cook the meatballs for about 5-7 minutes, turning them occasionally until they’re browned on all sides and cooked through. Remove the meatballs from the skillet and set aside.
- Make the Gravy: In the same skillet, add the beef broth and bring to a simmer, scraping up any browned bits from the bottom of the pan. Slowly whisk in the heavy cream and allow the gravy to thicken slightly for about 5 minutes. You can adjust the seasoning with salt and pepper to taste.
- Combine and Serve: Once the gravy has thickened, return the meatballs to the skillet, gently coating them in the sauce. Allow them to warm through for another 2-3 minutes. Serve the Köttbullar hot, drizzled with gravy, alongside lingonberry sauce for a delightful contrast of flavors.
Extra Tips:
When making Köttbullar, consider using a mix of meats, such as beef and pork, for added flavor and tenderness. If you want a more pronounced onion flavor, sauté the chopped onion in a bit of butter before adding it to the meat mixture.
Additionally, for extra moist meatballs, you can soak the breadcrumbs in milk for a few minutes before mixing. Finally, serve your meatballs with traditional sides such as creamy mashed potatoes, pickled cucumbers, or steamed green beans to complete the experience. Enjoy the taste of Sweden during this festive season!
Risgrynsgröt (Rice Porridge)
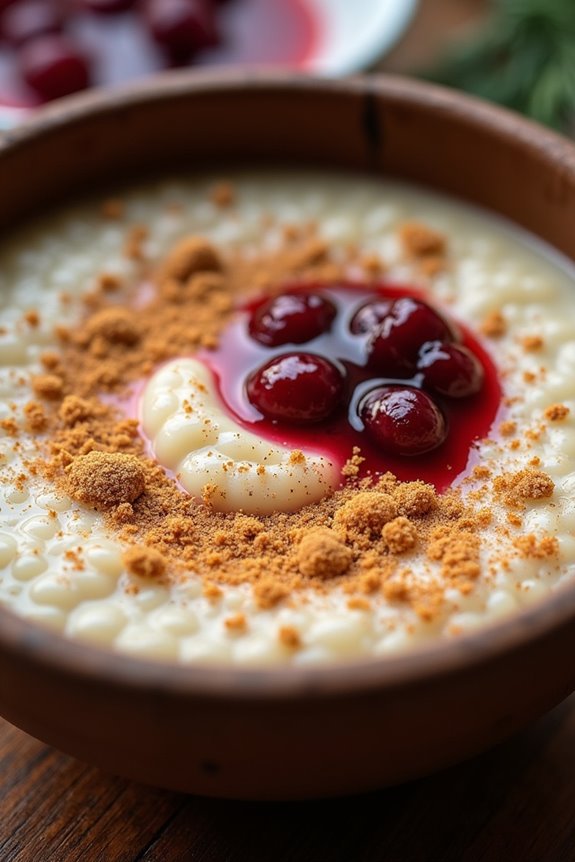
Risgrynsgröt, a traditional Scandinavian dish, is a comforting rice porridge often enjoyed during the Christmas season. This creamy porridge is made from short-grain rice cooked slowly in milk, creating a rich and satisfying texture that warms the heart and soul.
Often served with a sprinkle of cinnamon and sugar, and sometimes accompanied by a dollop of berry sauce, Risgrynsgröt is a beloved staple that brings families together during festive gatherings.
The origins of Risgrynsgröt can be traced back to the Nordic countries, where it was traditionally eaten on Christmas Eve. This delightful dish isn’t only easy to prepare but also incredibly versatile. Whether served as a breakfast treat or a festive dessert, its simplicity and heartiness make it a cherished addition to any holiday table.
With just a handful of ingredients, you can create a delicious and nostalgic dish that embodies the spirit of Scandinavian Christmas traditions.
Ingredients (Serves 4-6)
- 1 cup short-grain rice
- 4 cups whole milk
- 1/4 teaspoon salt
- 1/4 cup sugar (optional, adjust to taste)
- 1 cinnamon stick (optional)
- Ground cinnamon (for serving)
- Sugar (for serving)
- Butter (for serving, optional)
- Berry sauce (for serving, optional)
Cooking Instructions
- Rinse the Rice: Begin by rinsing the short-grain rice under cold water in a fine mesh strainer. This step removes excess starch and helps achieve a creamy texture in the final dish. Drain well.
- Combine Ingredients: In a large saucepan, combine the rinsed rice, whole milk, and salt. If you’re using a cinnamon stick, add it to the mixture as well. The milk will create a rich base for the porridge, while the salt enhances the flavor.
- Cook the Rice: Place the saucepan over medium heat and bring the mixture to a gentle boil. Once boiling, reduce the heat to low, cover the pot, and let it simmer. Stir occasionally to prevent the rice from sticking to the bottom of the pan. Cook for about 30-40 minutes, or until the rice is tender and the porridge has thickened to your desired consistency.
- Sweeten the Porridge: After cooking, if you prefer a sweeter porridge, stir in the sugar to taste. If you used a cinnamon stick, remove it at this point. Allow the porridge to sit for a few minutes before serving to thicken further.
- Serve: Ladle the Risgrynsgröt into bowls and serve warm. Offer ground cinnamon, sugar, butter, and berry sauce on the side for guests to customize their portions to their liking.
Extra Tips
When preparing Risgrynsgröt, it’s important to keep an eye on the porridge as it cooks to prevent it from scorching. If the porridge becomes too thick, you can stir in a little more milk to reach your preferred consistency.
Additionally, for an authentic touch, consider placing a whole almond in the pot before serving; the person who finds the almond in their bowl is said to have good luck in the coming year! Enjoy this festive dish with family and friends, and savor the warmth of Scandinavian holiday traditions.
Danish Æbleskiver
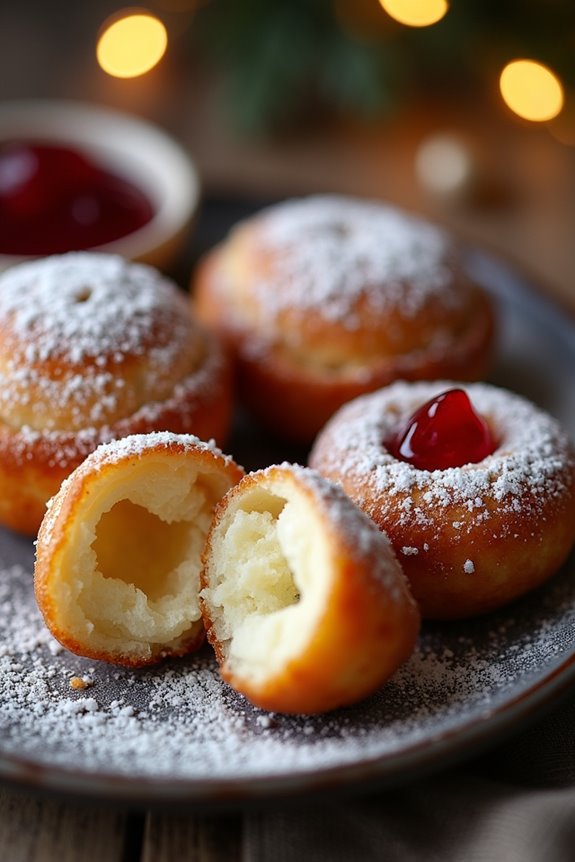
Danish Æbleskiver, often referred to simply as æbleskiver, are delightful round pancakes that are traditionally enjoyed during the holiday season in Denmark.
These fluffy, doughnut-shaped treats are typically served with powdered sugar and jam, making them a sweet addition to any festive gathering. Their unique spherical shape is achieved using a special pan, which allows them to be cooked evenly and develop a crispy outer layer while remaining soft and tender inside.
These delicious bites are perfect for breakfast, dessert, or as a snack during holiday celebrations. While they’re often filled with apple slices, the base recipe is quite versatile, allowing for a variety of fillings such as berries, chocolate, or even savory options. Serve them warm and enjoy the cozy flavors of the season!
Ingredients (serving size: 4-6 people)
- 2 cups all-purpose flour
- 1 tablespoon sugar
- 1 teaspoon baking powder
- 1/2 teaspoon baking soda
- 1/2 teaspoon salt
- 2 large eggs
- 2 cups buttermilk
- 1/4 cup melted butter
- 1 teaspoon vanilla extract
- Apple slices (optional filling)
- Powdered sugar (for serving)
- Jam (for serving)
Cooking Instructions
1. Prepare the Batter: In a large mixing bowl, whisk together the flour, sugar, baking powder, baking soda, and salt.
In another bowl, beat the eggs and then add the buttermilk, melted butter, and vanilla extract. Combine the wet ingredients with the dry ingredients and mix until just blended. Be careful not to overmix; a few lumps are okay.
2. Heat the Æbleskiver Pan: Place your æbleskiver pan over medium heat and let it heat up for a couple of minutes.
To guarantee the æbleskiver cook evenly, you want the pan to be hot but not smoking. Once heated, brush each well of the pan with a bit of melted butter to prevent sticking.
3. Fill the Wells: Using a ladle or a spoon, pour the batter into each well of the pan, filling them about 2/3 full.
If you choose to add apple slices for filling, place a slice in the center of the batter in each well.
4. Cook and Flip: Allow the æbleskiver to cook for about 2-3 minutes, or until the bottoms are golden brown.
You’ll notice the edges starting to set while the top remains slightly liquid. Using a skewer or a fork, carefully flip each æbleskiver over to cook the other side. Let them cook for another 2-3 minutes until golden brown and cooked through.
5. Serve: Once cooked, remove the æbleskiver from the pan and place them on a serving platter.
Dust generously with powdered sugar and serve with your choice of jam on the side.
Extra Tips
When making Danish æbleskiver, it’s key to maintain the right temperature of the pan.
If it’s too hot, the outside will cook too quickly, leaving the inside raw. For best results, practice flipping the æbleskiver with a skewer or fork to achieve that perfect round shape.
You can also experiment with different fillings to suit your taste—try using chocolate chips, berries, or even a savory cheese filling for a unique twist. Enjoy your cooking!
Pepperkaker (Pepper Cookies)

Pepperkaker, or pepper cookies, are a cherished Scandinavian holiday treat that brings warmth and spice to any festive gathering. These crisp, spiced cookies are typically made with a blend of ginger, cinnamon, and cloves, offering a delightful balance of sweetness and spiciness.
Traditionally, pepperkaker aren’t only enjoyed as a delicious snack but are often used to create elaborate decorations for Christmas trees and homes, making them an integral part of Scandinavian holiday traditions.
The preparation of pepperkaker is a wonderful way to engage the whole family during the holiday season. While the dough needs some time to chill, the process of rolling, cutting, and baking these cookies can be a fun activity for both kids and adults.
Once baked, these cookies can be enjoyed plain, decorated with icing, or even transformed into festive shapes that delight the eye as much as they do the palate.
Ingredients (Serves 4-6 people):
- 3 ½ cups all-purpose flour
- 1 teaspoon baking soda
- 1 tablespoon ground ginger
- 1 tablespoon ground cinnamon
- 1 teaspoon ground cloves
- 1 teaspoon ground nutmeg
- 1 cup unsalted butter, softened
- 1 cup granulated sugar
- 1 cup molasses
- 1 large egg
- 1 teaspoon vanilla extract
- Icing (for decoration, optional)
Cooking Instructions:
1. Prepare the Dough: In a large mixing bowl, combine the all-purpose flour, baking soda, ginger, cinnamon, cloves, and nutmeg. In another bowl, cream the softened butter and granulated sugar together until light and fluffy.
Add the molasses, egg, and vanilla extract to the butter-sugar mixture and mix until fully combined.
2. Combine Wet and Dry Ingredients: Gradually add the dry flour mixture to the wet ingredients, mixing until a soft dough forms. Verify there are no lumps and everything is well incorporated.
3. Chill the Dough: Once the dough is well mixed, wrap it in plastic wrap and refrigerate for at least 2 hours, or overnight if possible. Chilling the dough makes it easier to roll out and helps the cookies hold their shape during baking.
4. Roll Out the Dough: Preheat your oven to 350°F (175°C). On a floured surface, roll out the chilled dough to about ¼ inch thickness. Use cookie cutters to cut out various shapes, such as hearts, stars, or traditional Scandinavian designs.
5. Bake the Cookies: Place the cut-out cookies onto ungreased baking sheets, leaving some space between each. Bake in the preheated oven for about 8-10 minutes, or until the edges are slightly golden.
Remove from the oven and allow them to cool on the baking sheets for a few minutes before transferring to a wire rack to cool completely.
6. Decorate (Optional): Once the cookies are completely cooled, you can decorate them with icing if desired. A simple royal icing can be made by mixing powdered sugar with water to create a spreadable consistency.
Use piping bags or a small spatula for decoration.
Extra Tips:
To enhance the flavor of your pepperkaker, consider letting the dough sit in the refrigerator for a longer period; this allows the spices to meld beautifully, resulting in a deeper taste.
Additionally, when rolling out the dough, make sure to use enough flour to prevent sticking, but try to avoid adding too much flour, as this can result in tough cookies.
Finally, experiment with different shapes and decorations to personalize your pepperkaker—these cookies aren’t just tasty, but they can also add a festive touch to your holiday celebrations!
Christmas Ham
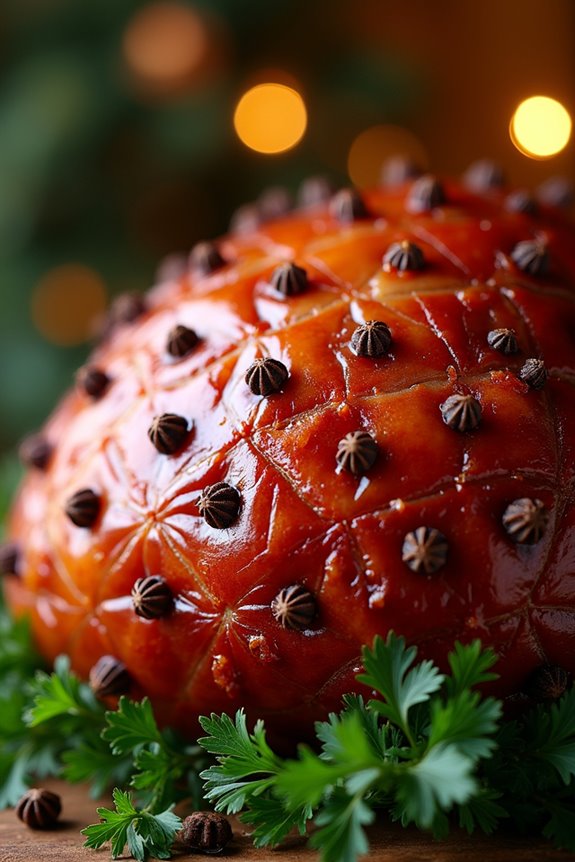
Christmas Ham is a traditional dish that graces many Scandinavian tables during the festive season. This succulent ham, often glazed with a sweet and tangy mixture, isn’t only a centerpiece for holiday feasts but also a source of joy and warmth for families gathering together.
The preparation of this dish is a cherished ritual, and its aroma wafting through the home brings back memories of Christmases past.
Preparing Christmas Ham might seem intimidating, but with a bit of planning, it becomes an enjoyable experience. The key to a successful ham lies in the careful selection of spices and the glazing technique that creates that perfect caramelized outer layer.
Whether served hot or cold, the flavors of the ham will be a delightful addition to your holiday celebrations.
Ingredients (Serves 4-6)
- 1 fully cooked bone-in ham (about 4-6 pounds)
- 1 cup brown sugar
- 1/2 cup honey
- 1/4 cup Dijon mustard
- 1/4 cup apple cider vinegar
- 1 teaspoon ground cloves
- 1 teaspoon ground cinnamon
- 1/2 teaspoon freshly ground black pepper
- Whole cloves (for studding the ham)
- Fresh parsley (for garnish, optional)
Cooking Instructions
- Preheat the Oven: Begin by preheating your oven to 325°F (160°C). This guarantees that the ham cooks evenly and thoroughly.
- Prepare the Ham: Remove the ham from its packaging and place it on a large cutting board. Use a sharp knife to score the surface of the ham in a diamond pattern, about 1/4 inch deep. This allows the glaze to penetrate the meat and enhances the presentation.
- Stud the Ham: Insert whole cloves into the intersections of the diamond cuts. This won’t only add flavor but also create a beautiful decorative effect.
- Make the Glaze: In a saucepan, combine the brown sugar, honey, Dijon mustard, apple cider vinegar, ground cloves, cinnamon, and black pepper. Heat over medium heat, stirring until the sugar has dissolved and the mixture is smooth.
- Glaze the Ham: Place the ham in a roasting pan and brush half of the glaze generously over the surface. Reserve the other half of the glaze for later use.
- Bake the Ham: Cover the ham loosely with aluminum foil and place it in the preheated oven. Bake for about 1 1/2 to 2 hours, or until heated through (approximately 15-18 minutes per pound).
- Baste and Caramelize: Remove the foil during the last 30 minutes of cooking. Baste the ham with the reserved glaze every 10 minutes until the surface is beautifully caramelized and golden brown.
- Rest and Serve: Once cooked, remove the ham from the oven and let it rest for at least 15 minutes before slicing. This allows the juices to redistribute, making for a moist and flavorful ham. Serve warm or at room temperature, garnished with fresh parsley if desired.
Extra Tips
When selecting your ham, opt for a high-quality, bone-in variety for the best flavor and texture.
If you want to infuse even more flavor, consider adding apple juice or orange juice to the glaze mixture. For a smoky element, try incorporating some smoked paprika.
Klippfisk (Dried Cod)
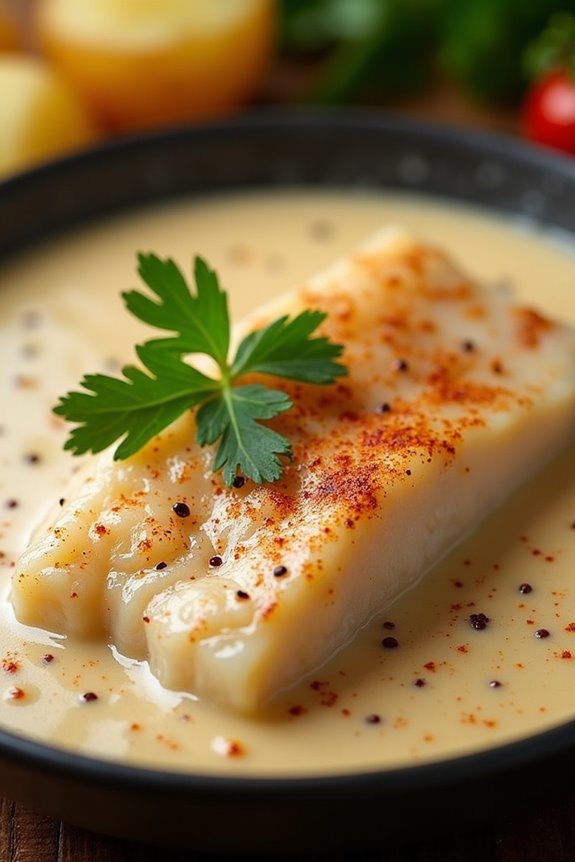
Klippfisk, or dried cod, is a traditional Scandinavian dish that has been enjoyed for centuries. This method of preserving fish dates back to the Viking era, when fishermen would dry their catch on cliffs to guarantee they’d enough food provisions for long sea voyages.
Today, klippfisk remains a beloved ingredient in various festive dishes, particularly during the Christmas season. Its unique flavor and texture, combined with hearty accompaniments, make it a staple for family gatherings and holiday feasts.
Preparing klippfisk requires some planning, as the cod must be soaked to rehydrate and remove excess salt before cooking. This dish is often served with a creamy sauce and a side of potatoes or vegetables, making it a comforting and satisfying meal.
With its rich history and delectable taste, klippfisk is sure to impress anyone who tries it, bringing a taste of Scandinavia to your holiday table.
Ingredients (Serves 4-6):
- 1.5 lbs (680 g) klippfisk (dried cod)
- 4 cups (950 ml) water (for soaking)
- 3 tablespoons olive oil
- 1 large onion, finely chopped
- 3 garlic cloves, minced
- 2 cups (480 ml) heavy cream
- 1 teaspoon black pepper
- 1 teaspoon paprika
- 2 tablespoons chopped fresh parsley (for garnish)
- Salt (to taste, if needed)
- Boiled potatoes or steamed vegetables (for serving)
Cooking Instructions:
- Soak the Klippfisk: Begin by rinsing the klippfisk under cold running water to remove any surface salt. Place the fish in a large bowl and cover it with water. Allow it to soak for at least 24 hours, changing the water every 8 hours. This process rehydrates the fish and reduces its saltiness.
- Prepare the Fish: After soaking, drain the klippfisk and rinse it again under cold water. Place it in a pot and cover it with fresh water. Bring to a gentle boil over medium heat, then reduce to a simmer. Cook for about 15-20 minutes, or until the fish is tender and flakes easily with a fork. Remove from heat and drain.
- Sauté the Aromatics: In a large skillet, heat the olive oil over medium heat. Add the chopped onion and sauté for about 5 minutes, or until the onion becomes translucent. Add the minced garlic and cook for an additional 1-2 minutes, making sure it doesn’t burn.
- Make the Cream Sauce: Pour the heavy cream into the skillet with the sautéed onions and garlic. Stir well to combine. Season with black pepper and paprika. Allow the sauce to simmer gently for about 5-7 minutes, stirring occasionally, until it thickens slightly.
- Combine the Fish and Sauce: Gently flake the cooked klippfisk into large pieces and add it to the cream sauce. Carefully fold the fish into the sauce, making sure it’s well coated but not breaking it up too much. Taste and adjust seasoning with salt if needed.
- Serve: Remove the skillet from heat and transfer the klippfisk with sauce to a serving dish. Garnish with chopped fresh parsley. Serve hot alongside boiled potatoes or steamed vegetables for a complete meal.
Extra Tips:
When preparing klippfisk, it’s important to allow sufficient time for soaking to achieve the right flavor and texture. If you’re short on time, you can soak the fish in warm water for a shorter duration, but be cautious as this may affect the final taste.
Additionally, try experimenting with different herbs and spices in the cream sauce to customize the dish to your liking. Klippfisk also pairs wonderfully with a crisp white wine, making it a delightful addition to your festive holiday dining experience.
Saffransbullar (Saffron Buns)
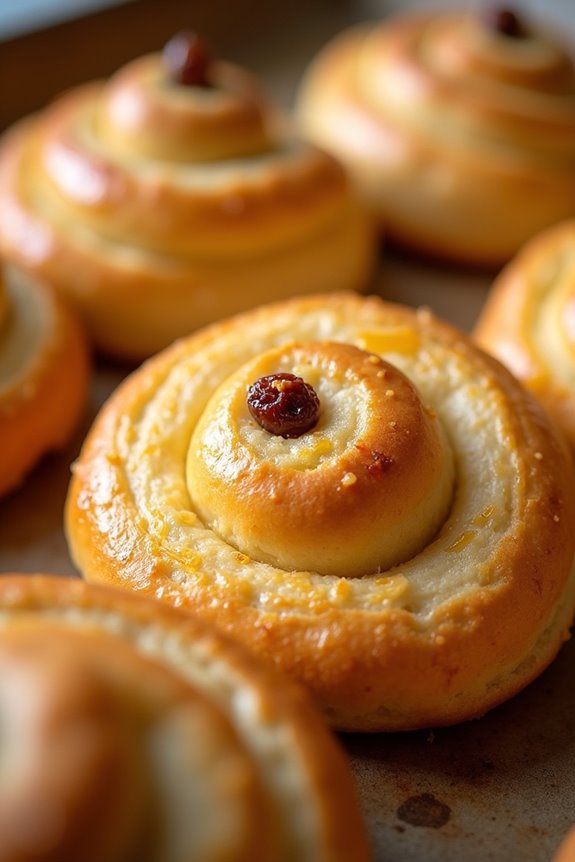
Saffransbullar, or saffron buns, are a beloved treat in Scandinavian countries, especially around the Christmas season. These golden-yellow, sweet buns are infused with the distinct flavor of saffron, giving them their unique taste and vibrant color. Traditionally shaped like an “S” or spirals, they’re often enjoyed warm with a cup of coffee or tea during the holiday festivities.
The preparation of these buns isn’t only a culinary experience but also a delightful way to celebrate the season with family and friends. Making saffransbullar is a wonderful way to bring a touch of Nordic tradition to your holiday baking. The process includes creating a rich, fragrant dough that’s allowed to rise before being shaped into beautiful forms and baked to perfection.
The delightful aroma of saffron wafting through your kitchen will surely evoke the spirit of Christmas, making these buns a wonderful addition to your festive table.
Ingredients (Serves 4-6)
- 1/2 teaspoon saffron threads
- 1/4 cup warm milk (110°F or 43°C)
- 1/4 cup sugar
- 1/2 cup unsalted butter, softened
- 1/2 teaspoon salt
- 2 1/4 teaspoons active dry yeast (1 packet)
- 2 large eggs
- 3 1/2 to 4 cups all-purpose flour
- 1/4 teaspoon ground cardamom (optional)
- 1 egg (for egg wash)
- Raisins (for decoration)
Cooking Instructions
- Prepare the Saffron: Begin by crushing the saffron threads using a mortar and pestle or the back of a spoon. Mix them with the warm milk and let it steep for about 10 minutes. This step helps to release the flavor and color of the saffron.
- Activate the Yeast: In a small bowl, combine the yeast and a tablespoon of sugar with the warm milk mixture. Let it sit for about 5-10 minutes until it becomes frothy. This indicates that the yeast is active and ready to use.
- Mix the Ingredients: In a large mixing bowl, cream together the softened butter and the remaining sugar until light and fluffy. Add the eggs one at a time, mixing well after each addition. Pour in the saffron milk and the activated yeast mixture, along with the salt and ground cardamom (if using). Stir to combine.
- Incorporate the Flour: Gradually add the flour, one cup at a time, mixing until a soft dough forms. You may need more or less flour depending on humidity and other factors. Knead the dough on a floured surface for about 5-10 minutes until it becomes smooth and elastic.
- First Rise: Place the dough in a greased bowl and cover it with a clean kitchen towel. Let it rise in a warm place for about 1-1.5 hours, or until it has doubled in size.
- Shape the Buns: After the dough has risen, punch it down to release the air. Divide the dough into equal portions (about 12-14 pieces). Roll each piece into a long rope, then shape it into an “S” or spiral. Place the shaped buns on a parchment-lined baking tray.
- Second Rise: Cover the shaped buns with a towel and let them rise again for about 30-45 minutes, until they puff up.
- Preheat the Oven: Preheat your oven to 375°F (190°C). While the oven is heating, prepare an egg wash by beating one egg and brushing it over the tops of the buns. Decorate with raisins for added sweetness.
- Bake: Bake the buns in the preheated oven for 15-20 minutes or until they’re golden brown. Remove from the oven and let them cool on a wire rack.
- Serve: Enjoy the saffransbullar warm or at room temperature, preferably with a cup of coffee or tea!
Extra Tips
When making saffransbullar, guarantee that your saffron is high quality for the best flavor and color. If you can find it, using fresh saffron strands will enhance the aroma of your buns.
Additionally, you can experiment with the shapes of the buns to create a fun variety for your holiday gatherings. If you want to prepare them ahead of time, you can freeze the shaped but unbaked buns and let them rise and bake fresh when you’re ready to serve!
Norwegian Kransekake
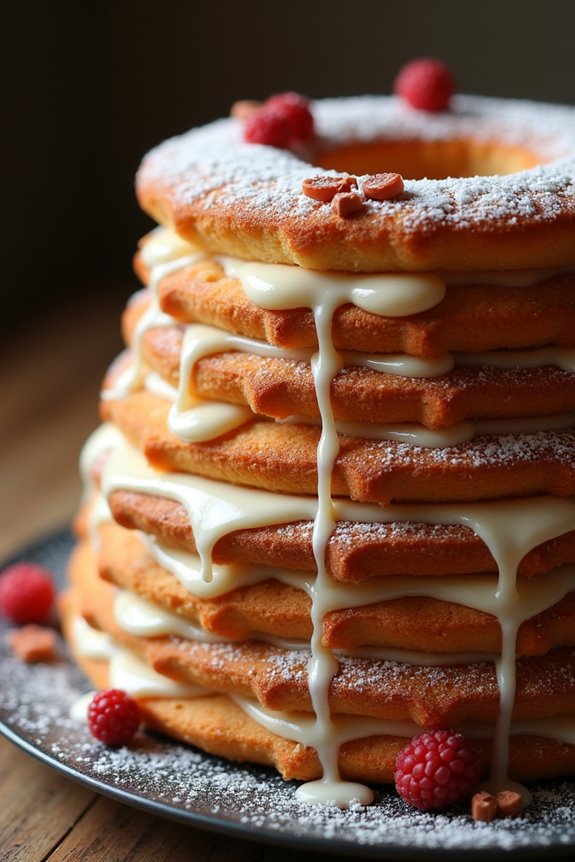
Kransekake, also known as “wreath cake,” is a traditional Norwegian dessert that’s often served during festive occasions, especially Christmas and weddings. This towering confection is made from a delightful combination of almond flour, sugar, and egg whites, giving it a unique chewy texture that’s both elegant and satisfying.
Its iconic ring-shaped structure, crafted by stacking circular almond cakes, makes it not only a treat for the taste buds but also a stunning centerpiece for your holiday table. The cake is typically adorned with a simple icing and sometimes decorated with marzipan figures, making it a visually appealing addition to any celebration.
The preparation of Kransekake involves a bit of precision, especially when piping the batter into rings, but the end result is a beautiful and delicious treat that’s bound to impress your guests. Serve it alongside a cup of coffee or tea, and watch as this beloved Norwegian dessert becomes a highlight of your holiday festivities.
Ingredients (Serves 4-6):
- 250g almond flour
- 250g powdered sugar
- 2 large egg whites
- 1 tsp almond extract
- 1 tsp vanilla extract
- Pinch of salt
- Royal icing (for decoration)
- Optional: marzipan decorations
Cooking Instructions:
- Prepare the Oven and Pans: Preheat your oven to 180°C (350°F). Prepare a few baking pans by greasing them lightly or lining them with parchment paper. You’ll need several ring-shaped molds to create the layers of the Kransekake.
- Mix the Dry Ingredients: In a large mixing bowl, combine the almond flour, powdered sugar, and a pinch of salt. This step guarantees that your dry ingredients are well mixed, leading to a smoother batter.
- Whip the Egg Whites: In a separate bowl, whisk the egg whites until they form soft peaks. This will help create a light and airy texture in your Kransekake. Be careful not to overwhip; you want them to be fluffy but still moist.
- Combine Ingredients: Gently fold the whipped egg whites into the almond flour mixture. Add the almond and vanilla extracts. The goal here is to combine everything without deflating the egg whites too much, which will help the cake rise properly.
- Pipe the Batter: Transfer the batter into a piping bag fitted with a large round tip. Pipe the batter into the prepared ring molds, starting with the largest ring at the bottom and working your way up to the smallest. Verify that the edges are smooth and even to maintain a nice shape while baking.
- Bake the Rings: Place the filled molds in the preheated oven and bake for 15-20 minutes, or until the rings are lightly golden and firm to the touch. Keep an eye on them, as baking times may vary based on your oven.
- Cool and Assemble: Once baked, remove the rings from the oven and let them cool in the pans for a few minutes before transferring them to a wire rack to cool completely. After they’ve cooled, stack the rings from largest to smallest to create the traditional Kransekake shape.
- Decorate: Prepare the royal icing by mixing powdered sugar and water until it reaches a thick but drizzling consistency. Use this icing to decorate the Kransekake, drizzling it over the stacked rings and adding any marzipan decorations as desired.
Extra Tips: When making Kransekake, it’s important to measure your ingredients accurately for the best results. If you find the batter too stiff, you can add a bit more egg white to achieve the desired consistency.
Additionally, verify that your baking trays are well-prepped to prevent sticking. For a festive touch, consider adding edible glitter or small ornaments to your Kransekake for a charming holiday appearance. Enjoy the process and the delightful results!
Jansson’s Temptation
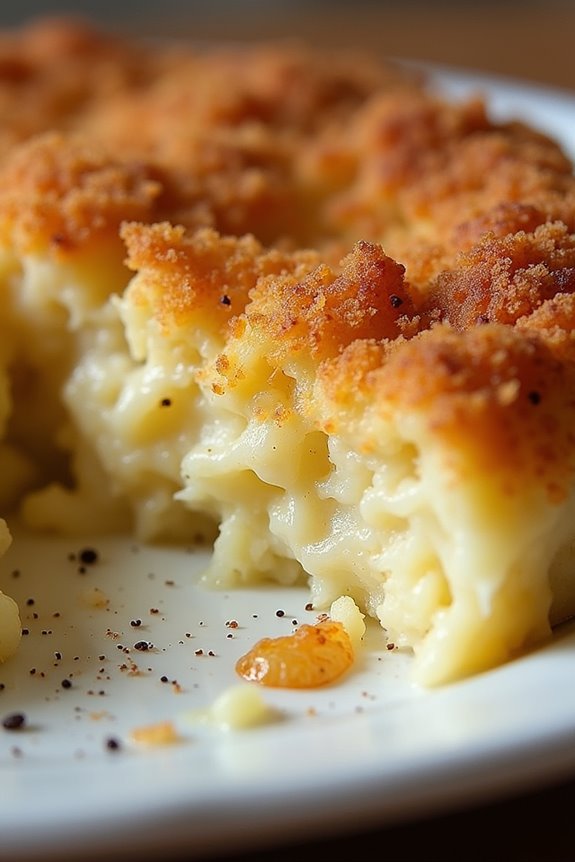
Jansson’s Temptation, or Jansson’s Frästelse, is a beloved Swedish dish that showcases the comforting flavors of creamy potatoes and savory anchovies. This traditional casserole is often enjoyed during the Christmas season, making it a staple on many holiday tables across Scandinavia. The combination of potatoes, onions, anchovies, and cream creates a rich and indulgent experience that complements a variety of festive dishes.
The dish is deceptively simple yet incredibly satisfying, making it an excellent choice for both novice cooks and seasoned chefs. Its layers of flavor and texture come together beautifully, guaranteeing that Jansson’s Temptation will be a highlight of your holiday feast. Whether you’re serving it as a side dish or a main attraction, this recipe will leave your guests asking for seconds.
Ingredients (Serves 4-6):
- 1 kg (2.2 lbs) starchy potatoes, peeled and thinly sliced
- 2 medium onions, finely chopped
- 2 cans (about 120g each) anchovy fillets, drained and chopped
- 300 ml (1 ¼ cups) heavy cream
- 200 ml (¾ cup) whole milk
- 50 g (3.5 tbsp) unsalted butter, melted
- 1 tsp ground black pepper
- 1 tsp salt (or to taste)
- 1 tsp sugar
- Breadcrumbs (for topping)
Cooking Instructions:
- Preheat the Oven: Begin by preheating your oven to 200°C (390°F). This guarantees that your casserole cooks evenly and develops a beautiful golden crust on top.
- Prepare the Baking Dish: Grease a large baking dish (approximately 2 liters in capacity) with a little butter to prevent sticking. This will help in easy serving once the dish is baked.
- Layer the Ingredients: Start by layering half of the sliced potatoes in the bottom of the baking dish. Follow this with half of the chopped onions and half of the anchovy fillets. Repeat the layering process with the remaining potatoes, onions, and anchovies.
- Mix the Cream and Milk: In a separate bowl, combine the heavy cream, whole milk, melted butter, black pepper, salt, and sugar. Whisk until well blended. This mixture will create a luscious sauce that binds the casserole together.
- Pour the Cream Mixture: Carefully pour the cream and milk mixture over the layered potatoes, making sure that it seeps through the layers. This will keep the potatoes moist and flavorful during baking.
- Add Breadcrumbs: Sprinkle breadcrumbs evenly over the top of the casserole. This will create a delightful crunchy topping that contrasts beautifully with the creamy interior.
- Bake: Place the baking dish in the preheated oven and bake for about 45-60 minutes, or until the potatoes are tender and the top is golden brown. You can check for doneness by inserting a knife into the center; it should slide in easily.
- Cool and Serve: Once baked, remove the dish from the oven and let it cool for a few minutes before serving. This resting time allows the flavors to settle and makes it easier to serve.
Extra Tips:
For an added depth of flavor, consider using a bit of the anchovy brine in the cream mixture; this will enhance the umami notes in the dish.
Additionally, make sure that the potatoes are sliced uniformly to promote even cooking. If you prefer a milder taste, you can reduce the amount of anchovies or substitute them with a different type of fish, such as smoked salmon.
This dish can also be prepared in advance and reheated; just be sure to cover it with foil to maintain moisture. Enjoy your Jansson’s Temptation as a centerpiece of your Scandinavian Christmas feast!
Lingonberry Sauce
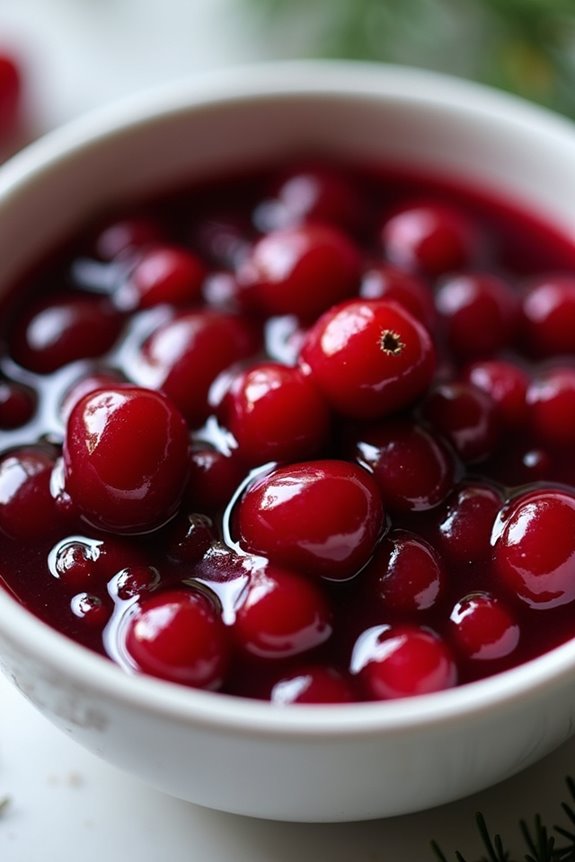
Lingonberry sauce is a traditional Scandinavian condiment that adds a burst of tart and sweet flavor to various holiday dishes, particularly roasted meats and game. This vibrant red sauce, made from lingonberries, sugar, and water, is a staple on many festive tables across Sweden and Norway. Its unique taste perfectly complements the rich flavors of roasted duck, meatballs, and even pancakes, making it a versatile addition to your Christmas feast.
Making lingonberry sauce is a simple process that captures the essence of Scandinavian cooking. The key to a successful sauce lies in using fresh or frozen lingonberries, which are readily available in many specialty stores or online. Once prepared, this sauce can be made ahead of time, allowing the flavors to deepen and develop, making it an excellent choice for holiday meal prep.
Ingredients (Serves 4-6):
- 2 cups fresh or frozen lingonberries
- 1 cup granulated sugar
- 1 cup water
- 1 tablespoon lemon juice
- 1 cinnamon stick (optional)
- A pinch of salt
Cooking Instructions:
- Prepare the Lingonberries: If you’re using fresh lingonberries, rinse them gently under cold water to remove any dirt or debris. If using frozen, there’s no need to thaw them; you can use them straight from the freezer. Inspect the berries and remove any stems or damaged fruit.
- Combine Ingredients: In a medium saucepan, combine the lingonberries, sugar, water, and lemon juice. If you’re adding a cinnamon stick for extra flavor, include it at this stage. Stir the mixture gently to combine all ingredients evenly.
- Cook the Sauce: Place the saucepan over medium heat and bring the mixture to a gentle boil. As it heats up, the lingonberries will start to release their juices. After reaching a boil, reduce the heat to low and let it simmer for about 15-20 minutes. Stir occasionally to prevent sticking and to help break down the berries.
- Check Consistency: After simmering, check the consistency of the sauce. It should be slightly thickened but still pourable. If you prefer a smoother sauce, you can mash the berries with a fork or use an immersion blender to blend it to your desired consistency.
- Season and Cool: Once the sauce has reached your preferred consistency, remove it from the heat. If you added a cinnamon stick, discard it at this point. Taste the sauce and add a pinch of salt if needed to enhance the flavors. Allow the sauce to cool to room temperature before transferring it to a serving dish or airtight container.
- Store or Serve: Lingonberry sauce can be served immediately or refrigerated for up to a week. If you’re preparing it ahead of time, store it in the fridge and allow it to come to room temperature before serving.
Extra Tips: When making lingonberry sauce, feel free to experiment by adding other spices such as cloves or allspice for a unique twist. If you prefer a sweeter sauce, adjust the amount of sugar to your taste. Additionally, this sauce can be frozen for longer-term storage, making it a convenient option for future meals. Always remember to label your containers with the date so you can keep track of freshness.