

When I picture a slow and cozy morning, Scandinavian breakfasts are my go-to. There’s something so comforting about creamy oat porridge topped with fresh berries or the elegance of smoked salmon on rye bread. These recipes bring a delightful mix of flavors and textures that can truly enhance your morning routine. Are you ready to discover how these meals can make your breakfast a little more special? Let’s explore these blissful recipes together.
Creamy Oat Porridge With Berries
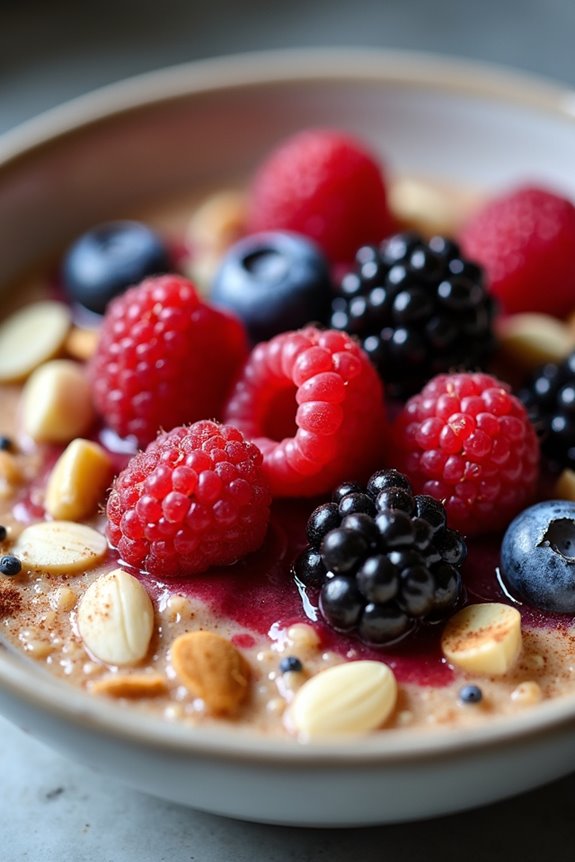
Creamy Oat Porridge with Berries is a delightful and wholesome breakfast that exemplifies the Scandinavian approach to simple, nourishing foods. This dish isn’t only comforting but also versatile, allowing for a variety of toppings to suit individual tastes. Made with rolled oats and simmered in milk or water, the porridge develops a rich, creamy texture that balances perfectly with the natural sweetness of fresh or frozen berries.
It’s an ideal way to start your day, providing sustained energy and a wealth of nutrients. To enhance the flavor profile, you can incorporate spices such as cinnamon or vanilla, and sweeteners like honey or maple syrup. Additionally, the berries can be customized; whether you prefer the tartness of raspberries, the sweetness of strawberries, or a medley of mixed berries, this dish can easily adapt to what you have on hand.
Serving this porridge warm, garnished with a sprinkle of nuts or seeds, turns it into a hearty breakfast that will keep you satisfied until lunchtime.
Ingredients (Serves 4-6):
- 2 cups rolled oats
- 4 cups milk (or a non-dairy alternative)
- 1/2 teaspoon salt
- 1 teaspoon vanilla extract (optional)
- 1 tablespoon honey or maple syrup (optional)
- 2 cups mixed berries (fresh or frozen)
- 1/4 cup nuts or seeds (e.g., almonds, walnuts, chia seeds) for topping
- Ground cinnamon (to taste, optional)
Cooking Instructions:
- Prepare the Ingredients: Gather all the necessary ingredients and measure them out. This will facilitate a smooth cooking process and prevent any last-minute scrambling for components.
- Combine Oats and Liquid: In a large saucepan, combine the rolled oats, milk (or non-dairy alternative), and salt. Stir the mixture gently to combine the ingredients evenly.
- Cook the Porridge: Place the saucepan over medium heat and bring the mixture to a gentle boil, stirring frequently to prevent the oats from sticking to the bottom of the pan. Once it reaches a boil, reduce the heat to low and let it simmer for about 10-15 minutes, stirring occasionally, until the oats are tender and the porridge has thickened to your desired consistency.
- Add Flavorings: When the porridge is nearly done cooking, stir in the vanilla extract and sweetener (if using). Mix well to incorporate these flavors into the porridge. If you prefer a sweeter porridge, adjust the amount of sweetener to taste.
- Prepare the Berries: If you’re using fresh berries, rinse them gently under cold water. If using frozen berries, you can either thaw them slightly or add them directly to the porridge in the last few minutes of cooking for a warm, jam-like consistency.
- Serve: Once the porridge has reached your desired thickness, remove it from heat. Ladle the porridge into bowls and top it generously with mixed berries. Finish with a sprinkle of nuts or seeds and a dash of ground cinnamon if desired.
Extra Tips:
For an even creamier texture, consider using a combination of milk and water, or add a splash of cream to the porridge before serving. You can also prepare the oats overnight by soaking them in milk or water in the refrigerator. This method not only cuts down on cooking time in the morning but also results in a creamier porridge.
Feel free to experiment with different spices and toppings, such as yogurt or shredded coconut, to make the dish your own!
Swedish Cinnamon Buns

Swedish Cinnamon Buns, or “Kanelbullar,” are a beloved treat enjoyed during breakfast or as a delightful snack throughout the day. Their sweet, buttery aroma fills the kitchen as they bake, making them an irresistible addition to any Scandinavian breakfast spread.
These soft, spiral-shaped buns are filled with a rich mixture of cinnamon and sugar, creating a warm and comforting flavor that’s perfect with a cup of coffee or tea.
Making Swedish Cinnamon Buns may seem challenging at first, but the process is quite simple and rewarding. With a few basic ingredients and some patience, you’ll have a batch of these delightful pastries ready to share with family and friends.
The dough requires time to rise, allowing for a light and fluffy texture, while the sweet filling provides a perfect contrast to the tender bread. Enjoy these buns fresh out of the oven for an authentic taste of Sweden!
Ingredients (Serves 4-6 people):
- 4 cups all-purpose flour
- 1 packet (2 ¼ teaspoons) active dry yeast
- 1 cup milk, warmed
- 1/2 cup unsalted butter, melted
- 1/4 cup granulated sugar
- 1/2 teaspoon salt
- 1 teaspoon ground cinnamon
- 1/2 cup brown sugar
- 1 egg (for egg wash)
- Extra flour for dusting
Cooking Instructions:
- Prepare the Dough: In a large mixing bowl, combine the warmed milk, melted butter, and granulated sugar. Sprinkle the active dry yeast over the mixture and let it sit for about 5-10 minutes until it becomes frothy. This indicates that the yeast is activated.
- Mix in Dry Ingredients: Gradually add the all-purpose flour and salt to the yeast mixture. Stir until a dough begins to form. If the dough is too sticky, add additional flour, one tablespoon at a time, until it becomes manageable.
- Knead the Dough: Transfer the dough onto a floured surface and knead it for about 5-7 minutes until it’s smooth and elastic. This step is essential for developing the gluten, which will give the buns their chewy texture.
- First Rise: Place the kneaded dough in a lightly greased bowl, cover it with a clean kitchen towel, and let it rise in a warm place for about 1-2 hours or until it has doubled in size.
- Prepare the Filling: While the dough is rising, mix the ground cinnamon and brown sugar in a small bowl. This will be the filling for the buns.
- Roll Out the Dough: Once the dough has risen, punch it down to release the air. Roll it out on a floured surface into a rectangle about 1/4 inch thick.
- Add the Filling: Spread the cinnamon and sugar mixture evenly over the rolled-out dough. Make sure to leave a small edge around the perimeter for sealing.
- Shape the Buns: Starting from one long side, roll the dough tightly into a log. Once rolled, cut the log into 12-15 equal pieces.
- Second Rise: Place the sliced buns on a baking sheet lined with parchment paper, leaving space between each bun. Cover them with a kitchen towel and let them rise for another 30-45 minutes.
- Preheat the Oven: While the buns are rising, preheat your oven to 375°F (190°C).
- Egg Wash and Bake: Beat the egg in a small bowl and brush it over the tops of the buns for a golden finish. Bake the buns in the preheated oven for 15-20 minutes, or until they’re golden brown.
- Cool and Serve: Once baked, remove the buns from the oven and let them cool slightly on a wire rack. Enjoy them warm or at room temperature.
Extra Tips:
When making Swedish Cinnamon Buns, make sure to measure your ingredients accurately for the best results.
If you want to add a unique twist, consider incorporating cardamom into the filling for an extra layer of flavor, which is traditional in some Swedish recipes.
Additionally, keep an eye on the baking time as ovens can vary; you want the buns to be a beautiful golden brown but be careful not to overbake them. Enjoy your homemade Kanelbullar with a cup of coffee or tea for an authentic Swedish experience!
Smoked Salmon on Rye Bread
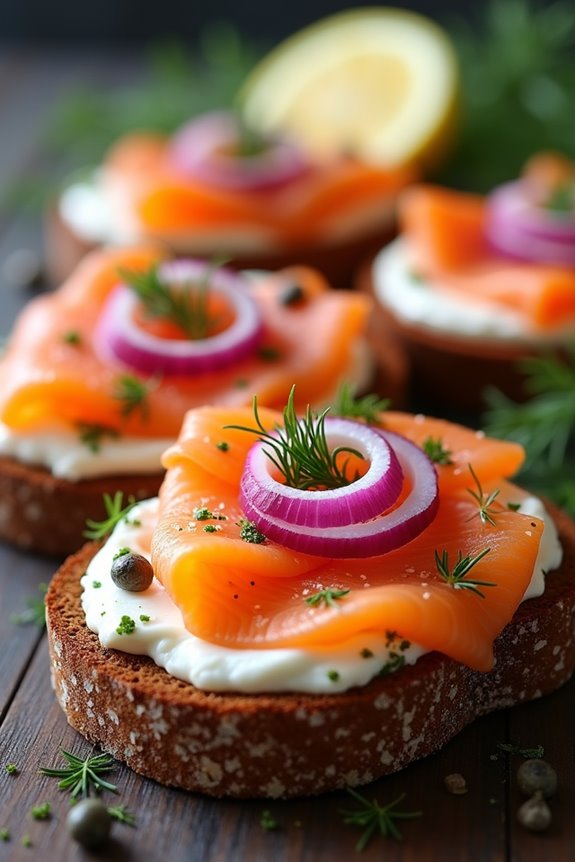
Smoked Salmon on Rye Bread is a classic Scandinavian breakfast that brings together the rich flavors of smoked salmon, the hearty texture of rye bread, and the vibrancy of toppings like cream cheese, capers, and dill.
This dish not only offers a delightful start to the day but also embodies the essence of Nordic cuisine, where simplicity and quality ingredients reign supreme. Whether enjoyed at a leisurely breakfast or as a charming brunch offering, this dish is sure to impress with its vibrant presentation and exquisite taste.
Rye bread serves as the perfect base for the luscious smoked salmon, providing a nutty flavor that pairs beautifully with the fish. The addition of cream cheese creates a creamy layer that enhances the overall experience, while fresh herbs and toppings add a burst of vitality.
This recipe is easy to prepare and can be made in under 30 minutes, making it a fantastic option for those busy mornings or when hosting guests for brunch.
Ingredients (Serves 4-6)
- 8 slices of dark rye bread
- 8 ounces of smoked salmon
- 4 ounces of cream cheese
- 1 tablespoon of fresh dill, chopped
- 1 small red onion, thinly sliced
- 1 lemon, cut into wedges
- 1/4 cup of capers
- Freshly ground black pepper, to taste
Cooking Instructions
- Prepare the Rye Bread: Lay the slices of rye bread on a clean countertop or cutting board. If you prefer toasted bread, you can toast the slices in a toaster or on a skillet until they’re lightly browned and crispy. This adds an extra layer of flavor and texture to the dish.
- Spread the Cream Cheese: Using a butter knife or a spatula, evenly spread a generous layer of cream cheese on each slice of rye bread. This will serve as the creamy base that holds the toppings together and balances the flavors of the smoked salmon.
- Add the Smoked Salmon: Place a slice or two of smoked salmon on top of the cream cheese layer on each piece of rye bread. You can either fold the salmon or lay it flat, depending on your presentation preference.
- Garnish with Toppings: Sprinkle the chopped fresh dill over the salmon for a burst of flavor. Next, add a few slices of red onion on top and some capers for an additional layer of flavor.
- Finish with Lemon and Pepper: Squeeze a few drops of fresh lemon juice over each slice, and finish with a light sprinkle of freshly ground black pepper to enhance the flavors of the dish.
- Serve: Arrange the finished smoked salmon on rye bread on a serving platter. Include lemon wedges on the side for guests to add more juice if desired.
Extra Tips
For an added twist, consider using flavored cream cheeses such as herb or garlic for an extra kick. You can also experiment with additional toppings like cucumber slices or avocado for a revitalizing variation.
If you’re making this dish ahead of time, assemble the components separately and combine them just before serving to guarantee the bread remains crisp and the salmon stays fresh. Enjoy your Scandinavian breakfast with a side of fresh fruit or a cup of robust coffee for a complete meal!
Danish Pastry With Almond Cream

Danish pastry is a delightful treat known for its flaky, buttery layers and sweet fillings. Originating from Denmark, this pastry has become a beloved breakfast item in many parts of the world. The combination of a rich, almond-flavored cream filling and the light, crispy pastry creates a perfect balance that will leave your taste buds wanting more.
Whether enjoyed with a cup of coffee or as a sweet indulgence on a lazy weekend morning, this Danish pastry with almond cream is sure to impress.
Making Danish pastry can seem challenging, but with a bit of patience and practice, you can create this bakery-style treat in your own kitchen. The process involves preparing the dough, chilling it, and then shaping it into the desired form before adding the creamy almond filling.
Once baked, the pastries will have a beautiful golden color and a delightful aroma that fills your home, making it impossible to resist.
Ingredients (Serves 4-6)
- 2 cups all-purpose flour
- 1/2 cup unsalted butter, chilled and cubed
- 1/4 cup granulated sugar
- 1/2 teaspoon salt
- 1/2 cup cold milk
- 1 packet (2 1/4 teaspoons) instant yeast
- 1/2 cup almond meal
- 1/4 cup powdered sugar
- 1 teaspoon almond extract
- 1 large egg, beaten (for egg wash)
- Sliced almonds (for topping)
Cooking Instructions
- Prepare the Dough: In a large mixing bowl, combine the all-purpose flour, granulated sugar, and salt. Add the chilled, cubed butter into the flour mixture and use a pastry cutter or your fingers to mix until it resembles coarse crumbs. This step is essential for achieving flaky layers in your pastry.
- Activate the Yeast: In a separate bowl, mix the cold milk with the instant yeast and let it sit for about 5 minutes. This will activate the yeast, ensuring your pastry rises properly.
- Combine Ingredients: Pour the milk and yeast mixture into the flour mixture. Stir until the dough comes together. It should be slightly sticky but manageable. Avoid overmixing to keep the texture light.
- Chill the Dough: Wrap the dough in plastic wrap and refrigerate for at least 1 hour. Chilling helps to firm up the butter, which is key to creating the flaky layers in the pastry.
- Make the Almond Cream Filling: In a medium bowl, combine the almond meal, powdered sugar, and almond extract. Mix until smooth. This will be the delicious filling for your Danish pastries.
- Roll Out the Dough: After chilling, turn the dough onto a lightly floured surface. Roll it out into a rectangle about 1/4 inch thick. Try to keep the edges straight for even shaping.
- Shape the Pastry: Cut the rolled dough into squares or rectangles. Place a spoonful of the almond cream in the center of each square. Fold the corners of the pastry toward the center, pinching them together to seal.
- Prepare for Baking: Place the shaped pastries on a baking sheet lined with parchment paper. Brush the tops with the beaten egg for a beautiful golden finish and sprinkle with sliced almonds.
- Bake: Preheat your oven to 375°F (190°C). Bake the pastries for 15-20 minutes or until they’re golden brown and puffed up. The aroma will be heavenly!
- Cool and Serve: Allow the pastries to cool on a wire rack for a few minutes before serving. Enjoy them warm or at room temperature.
Extra Tips
When making Danish pastry, it’s essential to keep all your ingredients, especially the butter, cold to maintain the flaky texture. If you’re short on time, consider making the dough in advance and chilling it overnight.
Additionally, feel free to experiment with different fillings such as fruit preserves or cream cheese for variety. Finally, serving the pastries with a light dusting of powdered sugar can elevate their presentation and sweetness, making them even more irresistible.
Overnight Chia Pudding
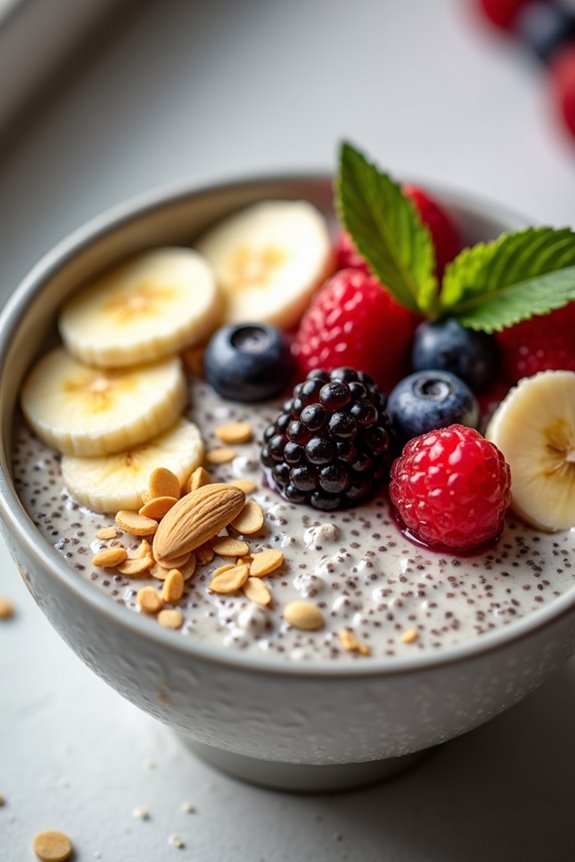
Overnight chia pudding is a delightful and nutritious breakfast option that embodies the simplicity and freshness of Scandinavian cuisine. This dish isn’t only easy to prepare, but it also allows for a variety of toppings that can be customized to your taste. The chia seeds, when soaked in liquid, create a creamy and indulgent texture that makes for a satisfying start to your day.
With the added benefits of omega-3 fatty acids and fiber, this pudding is a wholesome choice that nourishes both body and soul. This recipe can be prepared the night before, making it an ideal option for busy mornings. Simply mix together your ingredients, let them sit overnight in the fridge, and wake up to a delicious breakfast ready to go.
Feel free to experiment with your favorite fruits, nuts, or sweeteners to make this dish truly your own.
Ingredients (Serves 4-6):
- 1 cup chia seeds
- 4 cups almond milk (or any milk of choice)
- 4 tablespoons maple syrup (or honey)
- 1 teaspoon vanilla extract
- A pinch of salt
- Fresh fruits for topping (e.g., berries, banana slices)
- Nuts or seeds for garnish (e.g., almonds, walnuts, sunflower seeds)
- Optional: Coconut flakes or nut butter for added flavor
Cooking Instructions:
- Combine Ingredients: In a large mixing bowl, combine the chia seeds, almond milk, maple syrup, vanilla extract, and a pinch of salt. Stir well to guarantee that the chia seeds are evenly distributed in the liquid. This step is fundamental as it helps prevent clumping and guarantees a smooth texture.
- Let It Sit: Allow the mixture to sit at room temperature for about 10-15 minutes. During this time, the chia seeds will start to absorb the liquid and expand. Stir the mixture again to break up any clumps that may form.
- Refrigerate: Transfer the chia mixture into airtight containers or jars, and seal them tightly. Place them in the refrigerator and let them chill overnight or at least for 4 hours. This step is vital as it allows the chia seeds to fully hydrate and develop that pudding-like consistency.
- Serve and Garnish: Once the pudding has set, remove it from the fridge. Give it a good stir, then portion it into serving bowls. Top with your favorite fresh fruits, nuts, or seeds for added texture and flavor. If desired, drizzle a little extra maple syrup or a dollop of nut butter on top.
Extra Tips: To enhance the flavor of your overnight chia pudding, consider infusing the almond milk with spices like cinnamon or cardamom while warming it slightly before combining with chia seeds.
Additionally, you can adjust the sweetness to your preference, and don’t hesitate to try different types of milk or milk alternatives to find your ideal combination. The pudding can be stored in the refrigerator for up to five days, making it a convenient make-ahead breakfast option.
Finnish Rye Bread With Cheese and Honey

Finnish Rye Bread, known as “Ruisleipä,” is a staple in Finnish cuisine, celebrated for its dense texture and hearty flavor. This traditional bread is often enjoyed with various toppings, but one of the most delightful combinations is with creamy cheese and a drizzle of sweet honey.
This dish not only showcases the rich flavors of rye but also provides a satisfying balance between savory and sweet, making it an excellent choice for breakfast or a light snack.
Preparing Finnish Rye Bread With Cheese and Honey is simple and requires minimal ingredients. The bread itself can be purchased at a local bakery or made from scratch if you’re feeling adventurous. Paired with a mild cheese such as Finnish leipäjuusto (bread cheese) or any soft cheese, and finished with a touch of honey, this dish is sure to be a hit at the breakfast table.
Serve it alongside fresh fruits or a cup of coffee for a complete Scandinavian breakfast experience.
Ingredients (Serves 4-6 people):
- 1 loaf of Finnish rye bread (or any dense rye bread)
- 8 ounces of mild cheese (e.g., leipäjuusto, cream cheese, or goat cheese)
- 4 tablespoons of honey
- Fresh fruits (optional, for serving)
Cooking Instructions:
- Prepare the Rye Bread: If you’re using store-bought rye bread, slice it into thick pieces, about 1 inch wide. If you’re making your own, verify it has cooled completely before slicing to maintain its texture. Lay the slices on a serving platter, ready for topping.
- Choose Your Cheese: Select a mild cheese that pairs well with the earthy flavor of rye. If using leipäjuusto, cut it into thin slices, or if you prefer cream cheese, scoop out portions to spread later. Make sure the cheese is at room temperature to facilitate easy spreading.
- Assemble the Dish: Take a slice of rye bread and spread a generous amount of cheese on top. If you’re using a cheese that can be sliced, place the cheese slice directly on the bread.
- Drizzle with Honey: Using a spoon or a squeeze bottle, drizzle honey over the cheese-topped rye bread. The amount of honey can be adjusted according to your taste preference.
- Serve and Enjoy: Arrange your finished rye bread slices on a serving platter. If desired, add fresh fruits like berries or sliced apples alongside for a revitalizing contrast. Serve immediately for the best taste.
Extra Tips:
When preparing Finnish Rye Bread With Cheese and Honey, feel free to experiment with different types of cheese and honey to find your perfect combination. A sharp cheddar or a tangy blue cheese can add a unique twist, while flavored honey, such as lavender or thyme-infused, can enhance the overall profile of the dish.
Additionally, toasting the rye bread slightly before adding the toppings can provide a delightful crunch and warmth that complements the creamy cheese and sweet honey beautifully. Enjoy your Scandinavian breakfast adventure!
Swedish Pancakes With Lingonberry Jam
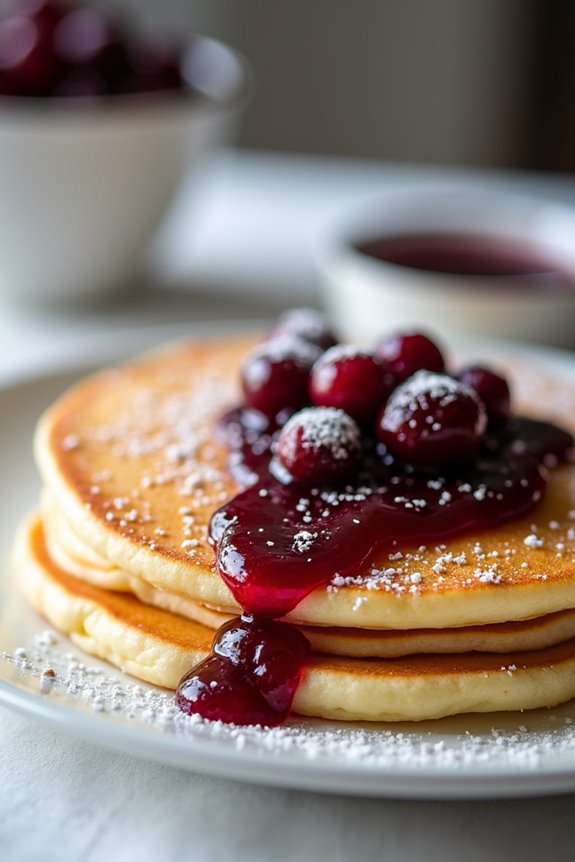
Swedish pancakes are a delightful twist on the traditional breakfast favorite, offering a light, fluffy texture that’s simply irresistible. These pancakes are thinner than their American counterparts and are often served rolled or folded, making them perfect for filling with sweet or savory ingredients.
When paired with lingonberry jam, a classic Swedish accompaniment, they transform into a deliciously tart and sweet treat that’s sure to please everyone at the breakfast table.
Making Swedish pancakes is a straightforward process that requires just a few simple ingredients. The batter is easy to whip up, and the pancakes cook quickly, allowing you to serve a warm and satisfying breakfast in no time.
Whether enjoyed on a lazy weekend morning or as part of a festive brunch, these pancakes with lingonberry jam are bound to become a family favorite.
Ingredients (Serves 4-6)
- 1 cup all-purpose flour
- 1 tablespoon sugar
- 1/2 teaspoon salt
- 1 1/2 cups milk
- 3 large eggs
- 2 tablespoons melted butter (plus extra for cooking)
- Lingonberry jam (for serving)
- Powdered sugar (for garnish, optional)
Cooking Instructions
- Prepare the Batter: In a large mixing bowl, combine the all-purpose flour, sugar, and salt. In a separate bowl, whisk together the milk and eggs until well combined. Gradually pour the wet ingredients into the dry ingredients while whisking continuously to avoid lumps. Once smooth, stir in the melted butter. Allow the batter to rest for about 10-15 minutes; this helps to create a tender pancake.
- Preheat the Pan: Place a non-stick skillet or frying pan over medium heat. Add a small amount of butter to the pan, swirling to coat the surface evenly. You want the pan to be hot enough that a few drops of water sizzle when dropped onto the surface.
- Cook the Pancakes: Pour about 1/4 cup of the batter into the center of the pan, tilting the pan gently to spread the batter into a thin, even layer. Cook for about 1-2 minutes or until the edges start to lift and the surface appears set.
- Flip the Pancake: Carefully slide a spatula under the pancake and flip it over. Cook for an additional 1-2 minutes on the other side until lightly golden. Transfer the pancake to a warm plate and repeat the process with the remaining batter, adding more butter to the pan as needed.
- Serve: Once all the pancakes are cooked, serve them warm with generous dollops of lingonberry jam. Optionally, you can dust them with powdered sugar for an extra touch of sweetness.
Extra Tips
When making Swedish pancakes, the key is to keep them thin, so don’t worry about getting them perfectly round. If you like a richer flavor, consider adding a splash of vanilla extract to the batter.
For a fun twist, you can also fill the pancakes with fresh berries or whipped cream before rolling them up. Serve them immediately for the best texture, as they tend to lose their fluffiness when left to sit.
Enjoy your delicious Swedish pancakes with lingonberry jam!
Norwegian Granola With Yogurt
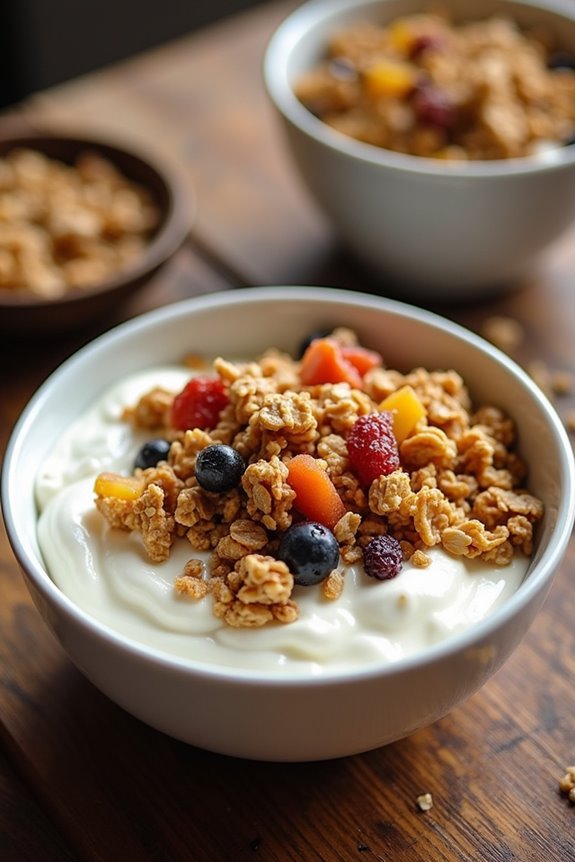
Norwegian granola is a wholesome and hearty breakfast option that embodies the essence of Scandinavian cuisine. This delightful dish features a mix of oats, nuts, seeds, and dried fruits, all baked to perfection, creating a crunchy texture that pairs wonderfully with creamy yogurt. It’s a nutritious start to your day, providing energy and satisfaction that will keep you going until lunchtime.
This recipe for Norwegian granola with yogurt isn’t only simple to prepare but also customizable to suit your taste preferences. You can switch up the nuts, seeds, or dried fruits based on what you have on hand or what you enjoy most. Serve it with your choice of yogurt—be it Greek, skyr, or a plant-based alternative—for a filling and delicious breakfast that the whole family will love.
Ingredients (Serves 4-6):
- 3 cups rolled oats
- 1 cup chopped nuts (e.g., almonds, hazelnuts, or walnuts)
- 1/2 cup pumpkin seeds
- 1/2 cup sunflower seeds
- 1 cup dried fruit (e.g., raisins, cranberries, or apricots)
- 1/4 cup honey or maple syrup
- 1/4 cup vegetable oil (or melted coconut oil)
- 1 teaspoon vanilla extract
- 1 teaspoon cinnamon
- Pinch of salt
- Yogurt for serving (e.g., Greek yogurt or skyr)
Cooking Instructions:
- Preheat the Oven: Begin by preheating your oven to 350°F (175°C). This guarantees that your granola bakes evenly and achieves the perfect level of crispiness.
- Combine Dry Ingredients: In a large mixing bowl, combine the rolled oats, chopped nuts, pumpkin seeds, sunflower seeds, cinnamon, and a pinch of salt. Stir the mixture until everything is evenly distributed.
- Mix Wet Ingredients: In a separate bowl, whisk together the honey or maple syrup, vegetable oil, and vanilla extract until well combined. This mixture will help bind the granola together and add sweetness.
- Combine Wet and Dry Mixtures: Pour the wet mixture over the dry ingredients, using a spatula to mix thoroughly until all the oats and nuts are coated. This step is fundamental for achieving that delicious granola flavor and texture.
- Spread on a Baking Sheet: Line a large baking sheet with parchment paper and spread the granola mixture evenly across the sheet. Use a spatula to press it down slightly, which will help it clump together as it bakes.
- Bake: Place the baking sheet in the preheated oven and bake for about 20-25 minutes, stirring halfway through to guarantee even browning. Keep an eye on it towards the end to avoid burning.
- Add Dried Fruit: Once the granola is golden brown, remove it from the oven and let it cool for about 10 minutes. Once cooled, stir in the dried fruit, mixing well.
- Cool Completely: Allow the granola to cool completely on the baking sheet before breaking it into clusters. This will give you that crunchy texture you’re after.
- Serve With Yogurt: To serve, scoop a generous portion of yogurt into bowls and top with the homemade granola. Enjoy this delightful breakfast dish!
Extra Tips:
When making Norwegian granola, feel free to experiment with different flavor profiles by adding spices such as nutmeg or cardamom for a unique twist. Additionally, you can store any leftover granola in an airtight container at room temperature for up to two weeks to maintain its freshness. This makes it a perfect make-ahead breakfast option that you can enjoy throughout the week!
Traditional Karelian Pies

Traditional Karelian Pies, or “Karjalanpiirakka,” are a beloved Finnish dish that showcases the simple yet hearty flavors of the Nordic region. Originating from the Karelia region, these hand-held pastries feature a thin rye crust filled with a creamy rice porridge or mashed potatoes. Traditionally served for breakfast, they can also be enjoyed as a snack or light meal, often accompanied by a dollop of egg butter—a mixture of butter and chopped hard-boiled eggs—that elevates the flavor to new heights.
Making Karelian Pies is a rewarding culinary experience that connects you with Finnish culture. The process involves creating a rustic dough, preparing the filling, and then carefully shaping the pies for baking. While they may seem a bit intricate at first glance, the result is a delightful treat that will impress your family and friends.
Let’s explore the ingredients and cooking instructions to bring this traditional dish to your table.
Ingredients (serving size: 4-6 people):
- 2 cups rye flour
- 1 cup all-purpose flour
- 1 teaspoon salt
- 1 ½ cups water (approximately)
- 1 cup short-grain rice
- 3 cups milk
- 1 tablespoon butter
- 2 hard-boiled eggs
- ½ cup butter (for spreading)
Cooking Instructions:
- Prepare the Dough: In a large mixing bowl, combine the rye flour, all-purpose flour, and salt. Gradually mix in water until the dough comes together. Knead the dough on a floured surface until smooth and elastic, about 5-7 minutes. Cover the dough with a damp cloth and let it rest for at least 30 minutes.
- Cook the Rice Porridge: Rinse the rice under cold water and drain. In a saucepan, combine the rice with milk and bring to a boil over medium heat, stirring occasionally. Once boiling, reduce the heat, cover, and let it simmer until the rice is tender and the mixture thickens, about 20-25 minutes. Stir in butter and let it cool slightly.
- Prepare the Egg Butter: While the rice is cooking, finely chop the hard-boiled eggs in a bowl. Add the softened butter and mix until well combined. Set aside.
- Shape the Pies: Preheat the oven to 450°F (230°C). Divide the rested dough into small balls (about the size of a golf ball). Roll each ball out on a floured surface into a thin oval shape, about 1/8 inch thick. Place a spoonful of the rice porridge in the center of each oval, then fold the edges over the filling, pinching to create a pleated effect while leaving the center exposed.
- Bake the Pies: Place the shaped pies on a baking sheet lined with parchment paper. Bake in the preheated oven for 15-20 minutes or until the edges are golden brown. Remove from the oven and let them cool slightly before serving.
- Serve: Serve the Karelian Pies warm with a generous spread of egg butter on top. They can also be enjoyed cold or reheated, making them a versatile dish for any meal.
Extra Tips: When making Karelian Pies, it’s important to roll the dough as thinly as possible for a crisp texture. You can experiment with different fillings, such as mashed potatoes or carrot filling, for variation. Additionally, for an authentic touch, brush the baked pies with melted butter while they’re still warm to add a lovely sheen and extra flavor.
Enjoy your homemade Karelian Pies as a delightful start to your day!
Soft Boiled Eggs With Crispbread

Soft boiled eggs with crispbread is a delightful Scandinavian breakfast that combines simplicity and flavor. The creamy yolks of the eggs are perfectly complemented by the crunchy texture of the crispbread, making this dish not only satisfying but also nourishing.
This breakfast is often enjoyed with toppings such as butter, cheese, and fresh herbs, enhancing the flavor profile and making it a versatile meal option for any time of day.
This dish is especially popular in Sweden and Norway, where crispbread is a staple. Soft boiled eggs are easy to prepare and provide a good source of protein, while the crispbread adds fiber and crunch. Whether you’re looking for a quick breakfast or a leisurely brunch, soft boiled eggs with crispbread can be tailored to your taste with various toppings or spreads.
Ingredients (Serves 4-6)
- 8 large eggs
- 4-6 pieces of crispbread
- 4 tablespoons of unsalted butter
- 1 cup of shredded cheese (e.g., cheddar or gouda)
- Fresh dill or chives for garnish
- Salt and pepper to taste
Cooking Instructions
- Prepare the Water for Boiling: Fill a medium-sized pot with enough water to cover the eggs by at least an inch. Add a pinch of salt to the water to help the eggs peel more easily later on. Bring the water to a rolling boil over medium-high heat.
- Boil the Eggs: Once the water is boiling, gently lower the eggs into the pot using a slotted spoon. Be careful not to crack the eggs. Set a timer for 6-7 minutes, depending on how runny you prefer your yolks. For a softer yolk, aim for 6 minutes, while 7 minutes will yield a slightly firmer yolk.
- Prepare an Ice Bath: While the eggs are boiling, prepare an ice bath by filling a large bowl with ice and cold water. This will help stop the cooking process once the eggs are done.
- Transfer Eggs to Ice Bath: After the timer goes off, immediately transfer the eggs from the boiling water to the ice bath using the slotted spoon. Let them sit in the ice bath for about 5 minutes to cool down.
- Prepare the Crispbread: While the eggs are cooling, toast the crispbread lightly if desired. You can also spread a thin layer of unsalted butter on each piece for added flavor.
- Peel and Serve the Eggs: Gently tap each egg on the counter to crack the shell and peel under running water for easier removal. Place the soft boiled eggs in egg cups or on a plate. Season with salt and pepper to taste.
- Serve with Crispbread: Arrange the toasted crispbread around the eggs. You can also sprinkle shredded cheese on the warm crispbread, allowing it to melt slightly. Finally, add fresh dill or chives as a garnish for a burst of flavor and color.
Extra Tips
When cooking soft boiled eggs, it’s essential to monitor the timing closely for the perfect consistency. If you’re unsure about your stovetop’s boiling intensity, it can be helpful to do a test run with one egg first.
Additionally, if you’re preparing a larger batch, consider using a steaming method instead, as it can yield more consistent results. Feel free to experiment with various toppings on the crispbread, such as smoked salmon, avocado, or even a slice of tomato, to create a delicious and varied breakfast experience.
Berry Smoothie Bowl
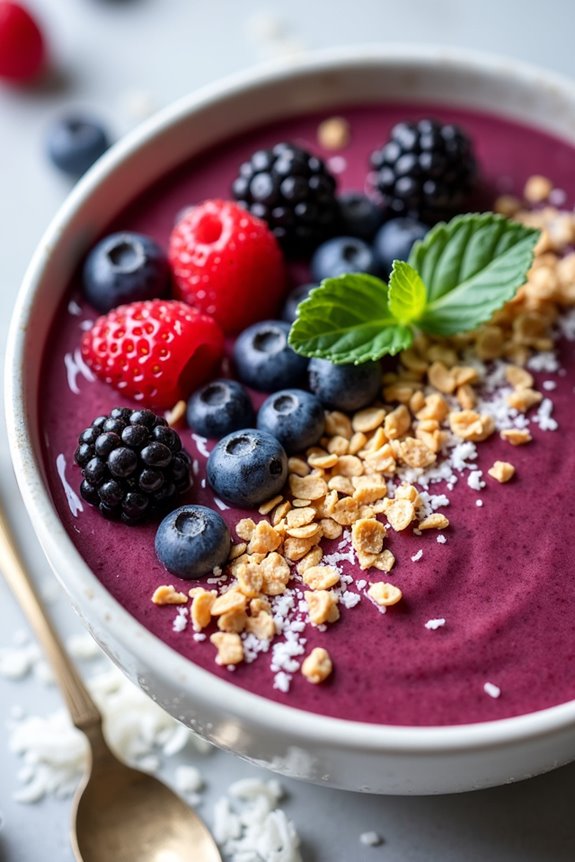
Start your day with a revitalizing and nourishing Berry Smoothie Bowl, a delightful Scandinavian breakfast that brings together a medley of vibrant fruits and creamy textures. This bowl not only looks beautiful but is also packed with vitamins, antioxidants, and fiber, making it a perfect way to kick off your morning.
The combination of berries, yogurt, and toppings creates a balanced meal that’s both satisfying and energizing. In Scandinavian cuisine, fresh ingredients and simplicity are key. The Berry Smoothie Bowl embodies this philosophy, allowing the natural flavors of the fruits to shine through.
You can customize your bowl with various toppings, such as granola, nuts, or seeds, for added crunch and nutrition. This recipe serves 4-6 people, making it ideal for family breakfasts or brunch gatherings.
Ingredients:
- 2 cups mixed berries (such as strawberries, blueberries, and raspberries)
- 1 banana, sliced
- 2 cups Greek yogurt (or any preferred yogurt)
- 1 cup milk (dairy or plant-based)
- 2 tablespoons honey or maple syrup (optional, for sweetness)
- 1 teaspoon vanilla extract
- 1 cup granola (for topping)
- 1/4 cup shredded coconut (for topping)
- Fresh mint leaves (for garnish, optional)
Instructions:
- Prepare the Ingredients: Begin by washing the mixed berries thoroughly under cold water. If using strawberries, hull and slice them. Peel and slice the banana. Gather all your ingredients on a clean countertop to make the blending process easier.
- Blend the Smoothie Base: In a blender, combine the mixed berries, banana slices, Greek yogurt, milk, honey or maple syrup, and vanilla extract. Blend on high speed until the mixture is smooth and creamy, ensuring there are no chunks of fruit left. If the mixture is too thick, add a little more milk to reach your desired consistency.
- Taste and Adjust: After blending, taste the smoothie base. If you prefer a sweeter flavor, you can add more honey or maple syrup and blend again briefly to combine. This is also a good time to adjust the thickness; add more yogurt for a thicker bowl or more milk for a thinner consistency.
- Assemble the Bowls: Once the smoothie base is ready, divide it evenly among your serving bowls. Use a spoon to create a smooth, even surface in each bowl, making it ready for toppings.
- Add Toppings: Generously sprinkle granola and shredded coconut over the top of each smoothie bowl. Feel free to get creative with your toppings; add more fresh berries, sliced bananas, nuts, or seeds as desired. Finish with a sprig of fresh mint for a pop of color and freshness.
- Serve Immediately: Berry Smoothie Bowls are best enjoyed fresh. Serve them immediately while the toppings are crisp and the smoothie is cold.
For best results, use ripe and fresh fruits to maximize flavor. You can prepare the smoothie base in advance and store it in the refrigerator for a couple of hours, but it’s best to add the toppings just before serving to maintain their texture.
Additionally, feel free to experiment with different fruits or yogurt types based on your preferences; this recipe is versatile, allowing you to create your own signature smoothie bowl. Enjoy this delicious, healthy breakfast that captures the essence of Scandinavian simplicity!
Apple and Cinnamon Breakfast Quinoa
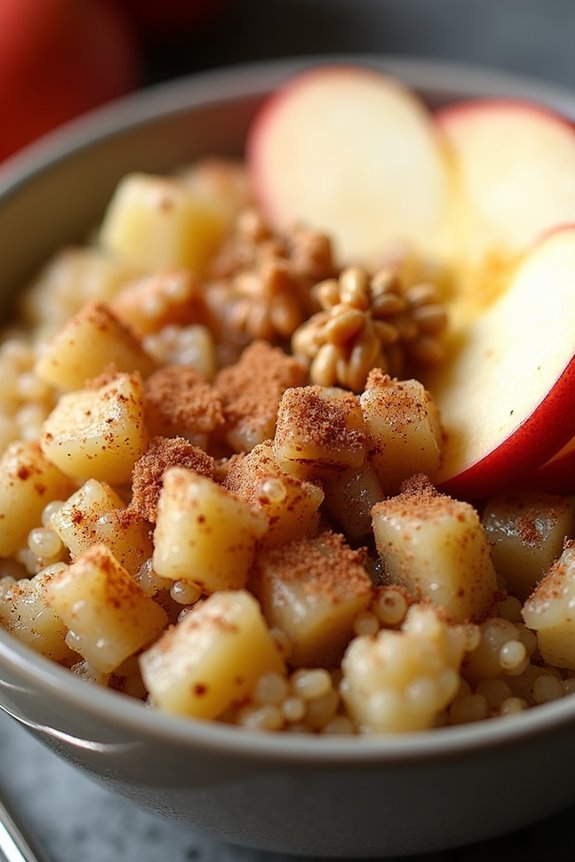
Start your day off right with a wholesome and nutritious breakfast that combines the delightful flavors of apple and cinnamon in a hearty quinoa base. This Apple and Cinnamon Breakfast Quinoa is a perfect choice for those looking for a warm, filling, and satisfying meal that’s also packed with protein and fiber. Quinoa, a superfood grain, provides a nutty flavor and chewy texture, making it an excellent alternative to traditional oatmeal or cereal.
With the addition of sweet apples and aromatic cinnamon, this dish will surely become a family favorite. This recipe isn’t only easy to prepare but also customizable to suit your taste preferences. You can adjust the sweetness, add nuts for extra crunch, or even incorporate dried fruits for a burst of flavor.
It’s a versatile breakfast option that can be enjoyed throughout the week, whether you’re serving a crowd or meal prepping for busy mornings. Give your breakfast routine a Scandinavian twist with this delightful dish that will nourish your body and please your taste buds.
Ingredients (Serves 4-6)
- 1 cup quinoa, rinsed
- 2 cups almond milk (or any milk of choice)
- 2 medium apples, peeled and diced
- 1 teaspoon ground cinnamon
- 1/4 teaspoon nutmeg (optional)
- 1/4 cup maple syrup or honey (adjust to taste)
- 1/4 cup chopped walnuts or pecans (optional)
- 1 teaspoon vanilla extract
- Pinch of salt
Cooking Instructions
- Rinse the Quinoa: Start by rinsing 1 cup of quinoa under cold water in a fine-mesh sieve. This step is essential as it removes the natural coating called saponin, which can give the quinoa a bitter taste.
- Cook the Quinoa: In a medium saucepan, combine the rinsed quinoa and 2 cups of almond milk (or your choice of milk). Add a pinch of salt to enhance the flavor. Bring the mixture to a boil over medium-high heat. Once boiling, reduce the heat to low, cover, and let it simmer for about 15 minutes or until the quinoa has absorbed the liquid and is fluffy.
- Prepare the Apples: While the quinoa is cooking, peel and dice the 2 medium apples. You can use any variety you prefer, such as Granny Smith for tartness or Fuji for sweetness.
- Combine Ingredients: Once the quinoa is cooked, remove it from heat. Stir in the diced apples, 1 teaspoon of ground cinnamon, and 1/4 teaspoon of nutmeg (if using). Add the 1/4 cup of maple syrup or honey and 1 teaspoon of vanilla extract, mixing well to combine all the flavors.
- Add Nuts (Optional): If you like a bit of crunch, fold in the 1/4 cup of chopped walnuts or pecans at this stage. Nuts not only add texture but also provide healthy fats and additional protein.
- Serve Warm: Spoon the Apple and Cinnamon Breakfast Quinoa into bowls and serve warm. You can garnish with a sprinkle of extra cinnamon, a drizzle of maple syrup, or some additional fresh apple slices for a beautiful presentation.
Extra Tips
To make this breakfast even more delightful, consider letting the quinoa sit for a few minutes after cooking to allow the flavors to meld together. Additionally, this dish can be stored in the refrigerator for up to 3 days, making it a great option for meal prep.
Just reheat it in the microwave or on the stovetop with a splash of milk to restore its creamy texture. Experiment with different fruits or spices to find your perfect combination!