

I’ve been exploring the best Mediterranean diet recipes that Pinterest is buzzing about lately, and I can’t wait to share my favorites with you. These dishes are vibrant, full of flavor, and incredibly nutritious. From a classic Greek salad to savory baked lemon herb chicken skewers, there’s something for everyone. Wondering what else made the list? Let’s explore these mouthwatering creations that are sure to inspire your next meal.
Classic Greek Salad With Feta and Olives

The Classic Greek Salad, known as Horiatiki, is a vibrant and invigorating dish that embodies the essence of Mediterranean cuisine. This salad is a delightful combination of crisp vegetables, tangy feta cheese, and briny olives, making it a perfect accompaniment to grilled meats or a light meal on its own.
With its colorful presentation and robust flavors, this dish isn’t only nutritious but also brings a taste of Greece right to your dining table.
Preparing a Classic Greek Salad is simple and quick, making it an ideal choice for busy weeknights or casual gatherings. The key to a great Greek salad lies in using fresh, high-quality ingredients, particularly ripe tomatoes, crunchy cucumbers, and authentic feta cheese. This salad is best served fresh, allowing the flavors to shine, and can be easily customized with your favorite Mediterranean ingredients.
Ingredients (Serves 4-6 people):
- 4 medium ripe tomatoes, chopped
- 1 large cucumber, diced
- 1 bell pepper (red or green), sliced
- 1 red onion, thinly sliced
- 1 cup Kalamata olives, pitted
- 200g feta cheese, crumbled or in large chunks
- 1/4 cup extra virgin olive oil
- 2 tablespoons red wine vinegar
- 1 teaspoon dried oregano
- Salt and pepper to taste
- Fresh parsley or basil for garnish (optional)
Cooking Instructions:
- Prepare the Vegetables: Start by washing and chopping the vegetables. Chop the tomatoes into bite-sized pieces, dice the cucumber, and slice the bell pepper and red onion thinly. The variety of colors and textures will enhance the visual appeal and flavor of the salad.
- Combine Ingredients: In a large salad bowl, combine the chopped tomatoes, diced cucumber, sliced bell pepper, and red onion. Add the Kalamata olives to the bowl, guaranteeing they’re evenly distributed among the vegetables.
- Add Feta Cheese: Crumble the feta cheese over the vegetable mixture, or if you prefer a more rustic look, add the feta in large chunks. This will add creaminess and a tangy flavor that’s characteristic of a Greek salad.
- Make the Dressing: In a small bowl or jar, whisk together the extra virgin olive oil, red wine vinegar, dried oregano, and a pinch of salt and pepper. This simple dressing will enhance the flavors of the salad without overpowering the fresh ingredients.
- Toss the Salad: Drizzle the dressing over the salad and gently toss everything together. Be careful not to mash the feta too much; you want to maintain some large pieces for texture and presentation.
- Serve and Garnish: Transfer the salad to a serving platter or bowl, and if desired, garnish with fresh parsley or basil. This will add a nice pop of color and enhance the Mediterranean flair of the dish.
Extra Tips:
For the best flavor, prepare the salad shortly before serving to guarantee the vegetables remain crisp. If you need to prepare it in advance, keep the dressing separate until just before serving.
Additionally, feel free to customize your Greek salad by adding ingredients like artichokes, capers, or even grilled chicken for a heartier meal. Enjoy your Classic Greek Salad as a side dish or a light main course, and don’t forget to savor the fresh, vibrant flavors of the Mediterranean!
Zucchini Noodles With Pesto and Cherry Tomatoes

Zucchini noodles, often referred to as “zoodles,” offer a light and invigorating alternative to traditional pasta, making them a perfect choice for those following a Mediterranean diet. This dish combines the vibrant flavors of fresh basil pesto with the juiciness of cherry tomatoes, creating a wholesome meal that’s both satisfying and nutritious.
Ideal for a summer evening or a quick weeknight dinner, zucchini noodles aren’t only low in calories but also packed with vitamins and minerals.
This recipe for Zucchini Noodles With Pesto and Cherry Tomatoes serves 4-6 people and can be prepared in just 30 minutes. By using seasonal produce and a homemade or store-bought pesto, you guarantee that every bite bursts with flavor. The cherry tomatoes add a delightful sweetness, while the pesto brings a rich, herbaceous note that ties the dish together beautifully.
Ingredients
- 4 medium zucchinis
- 2 cups cherry tomatoes, halved
- 1 cup basil pesto (homemade or store-bought)
- 3 tablespoons olive oil
- 2 cloves garlic, minced
- Salt and pepper to taste
- Fresh basil leaves for garnish (optional)
- Grated Parmesan cheese for serving (optional)
Cooking Instructions
- Prepare the Zucchini Noodles: Use a spiralizer, julienne peeler, or a knife to make zucchini noodles. If using a knife, slice the zucchini into thin strips, resembling spaghetti. Set aside in a colander and sprinkle with a little salt to help draw out excess moisture. Let it sit for about 10 minutes, then gently pat dry with paper towels.
- Sauté the Cherry Tomatoes: In a large skillet, heat the olive oil over medium heat. Add the minced garlic and sauté for 1-2 minutes until fragrant, being careful not to burn it. Then, add the halved cherry tomatoes and cook for about 5-7 minutes, stirring occasionally, until the tomatoes soften and start to burst.
- Combine Zoodles and Pesto: Add the prepared zucchini noodles to the skillet with the cherry tomatoes. Toss everything together to combine, and cook for an additional 2-3 minutes, just until the zoodles are slightly tender but still al dente.
- Add Pesto: Remove the skillet from the heat and stir in the basil pesto, mixing well to coat the zoodles and tomatoes evenly. Season with salt and pepper to taste.
- Serve: Divide the zucchini noodles with pesto and cherry tomatoes among serving plates. If desired, garnish with fresh basil leaves and sprinkle with grated Parmesan cheese before serving.
Extra Tips
For a more substantial meal, consider adding protein such as grilled chicken, shrimp, or chickpeas to the dish. Additionally, if you prefer a creamier texture, you can mix in a splash of heavy cream or a dollop of Greek yogurt with the pesto.
Feel free to customize the recipe by adding other vegetables like spinach or bell peppers, or even sprinkling some red pepper flakes for a hint of heat. Enjoy your delicious and healthy Mediterranean-inspired meal!
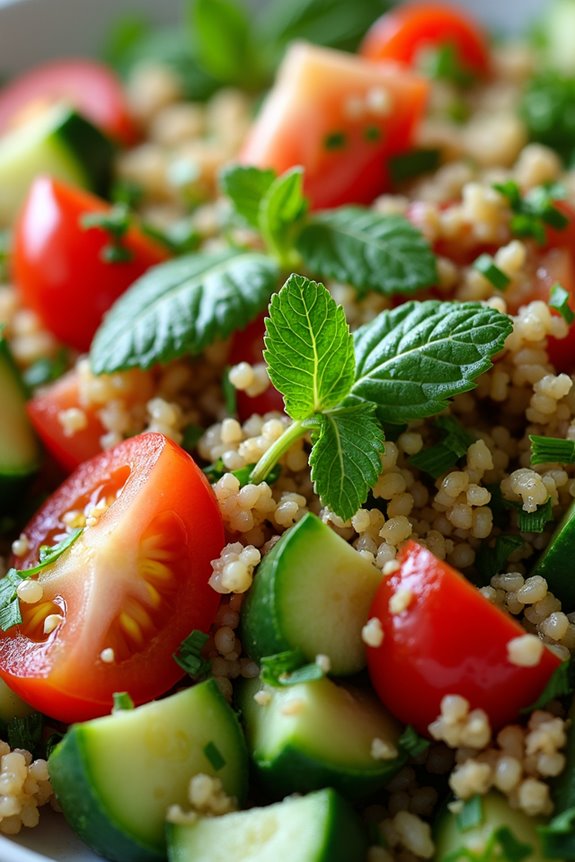
Mediterranean Quinoa Bowl With Chickpeas
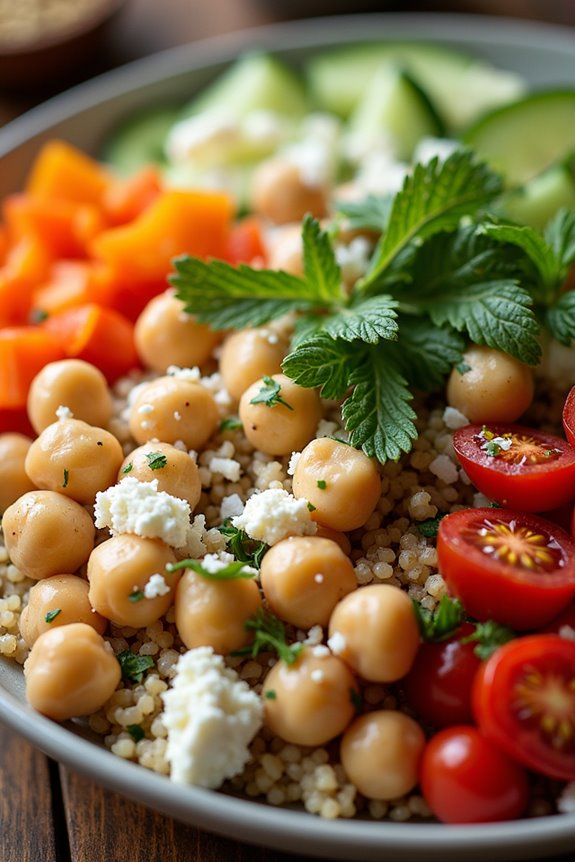
The Mediterranean Quinoa Bowl with Chickpeas is a vibrant and nutritious dish that brings together the wholesome flavors of the Mediterranean diet. This easy-to-make meal is packed with protein from quinoa and chickpeas, along with an array of colorful vegetables that add both texture and taste.
It’s not only filling but also a feast for the eyes, making it a perfect option for lunch or dinner. Plus, it can be easily customized to include your favorite seasonal vegetables or proteins, allowing for endless variations.
What sets this quinoa bowl apart is the delightful combination of spices and fresh herbs, enhancing the natural flavors of the ingredients. The dish isn’t only delicious but also offers a variety of health benefits, thanks to the abundance of fiber, vitamins, and minerals.
Whether you’re following a Mediterranean diet or just looking to incorporate more wholesome meals into your routine, this recipe is sure to become a staple in your kitchen.
Ingredients (Serves 4-6)
- 1 cup quinoa, rinsed
- 2 cups vegetable broth or water
- 1 can (15 oz) chickpeas, drained and rinsed
- 1 bell pepper, diced (any color)
- 1 cucumber, diced
- 1 cup cherry tomatoes, halved
- 1/2 red onion, finely chopped
- 1/4 cup fresh parsley, chopped
- 1/4 cup fresh mint, chopped
- 1/4 cup feta cheese, crumbled (optional)
- 1/4 cup olive oil
- 2 tablespoons lemon juice
- 1 teaspoon garlic powder
- 1 teaspoon ground cumin
- Salt and pepper to taste
Cooking Instructions
1. Cook the Quinoa: In a medium saucepan, combine the rinsed quinoa and vegetable broth (or water). Bring it to a boil over medium-high heat. Once boiling, reduce the heat to low, cover, and let it simmer for about 15 minutes, or until the quinoa is fluffy and the liquid has been absorbed.
Remove from heat and let it sit covered for an additional 5 minutes before fluffing it with a fork.
2. Prepare the Vegetables: While the quinoa is cooking, prepare the vegetables. Dice the bell pepper, cucumber, and red onion; halve the cherry tomatoes; and chop the fresh parsley and mint. Place all the chopped vegetables in a large mixing bowl.
3. Mix the Chickpeas: Add the drained and rinsed chickpeas to the bowl of chopped vegetables. These will add protein and a nice texture to the dish.
4. Make the Dressing: In a small bowl, whisk together the olive oil, lemon juice, garlic powder, ground cumin, salt, and pepper. Adjust the seasoning according to your taste.
5. Combine Everything: Once the quinoa is cooked and slightly cooled, add it to the bowl of chickpeas and vegetables. Pour the dressing over the mixture and toss everything together until well combined.
6. Serve: If desired, sprinkle crumbled feta cheese on top before serving. You can enjoy this dish warm, at room temperature, or cold.
Extra Tips
For added flavor, consider roasting the chickpeas with spices before adding them to the bowl. This can enhance their crunchiness and provide a delicious contrast to the fresh vegetables.
Additionally, feel free to swap out or add any seasonal vegetables you have on hand, such as spinach, kale, or roasted zucchini, to make the dish your own. This Mediterranean Quinoa Bowl can also be stored in the refrigerator for up to three days, making it a great option for meal prep!
Baked Lemon Herb Chicken Skewers
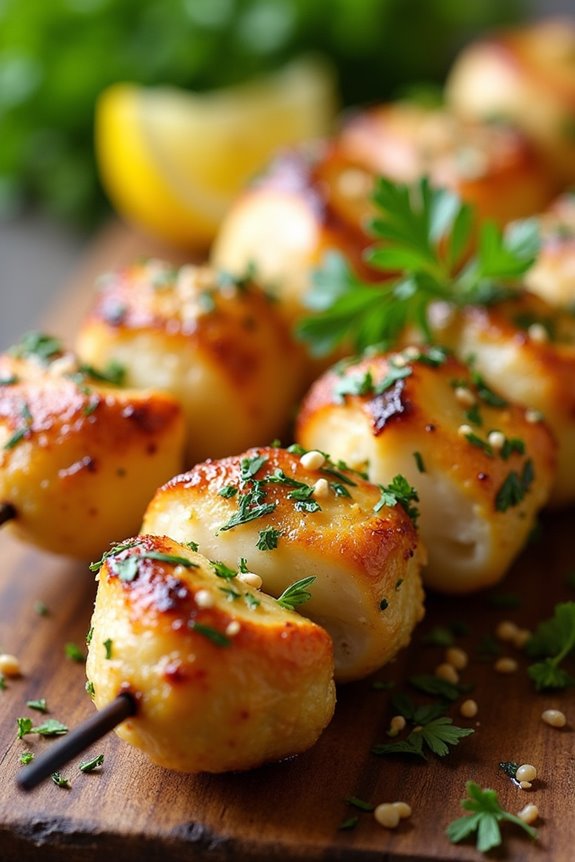
Baked Lemon Herb Chicken Skewers are a delightful addition to the Mediterranean diet, combining fresh flavors with healthy ingredients. This dish isn’t only easy to prepare but also makes for a vibrant meal that’s perfect for family gatherings or casual dinners. The zesty lemon and aromatic herbs infuse the chicken with a rejuvenating taste, while the vibrant colors of the skewers make them visually appetizing and appealing.
To prepare these skewers, you’ll marinate chicken pieces in a mixture of lemon juice, olive oil, and a blend of herbs, allowing the flavors to meld beautifully. After marinating, the chicken is threaded onto skewers and baked to perfection. Serve them with a side of fresh salad or whole grains for a complete Mediterranean experience.
Ingredients (Serves 4-6):
- 1.5 pounds boneless, skinless chicken breasts, cut into 1-inch pieces
- 1/4 cup extra-virgin olive oil
- 1/4 cup fresh lemon juice
- 2 cloves garlic, minced
- 1 tablespoon fresh oregano, chopped (or 1 teaspoon dried oregano)
- 1 tablespoon fresh thyme, chopped (or 1 teaspoon dried thyme)
- 1 tablespoon fresh parsley, chopped
- 1 teaspoon salt
- 1/2 teaspoon black pepper
- 1/2 teaspoon red pepper flakes (optional)
- Wooden or metal skewers (if using wooden skewers, soak them in water for 30 minutes prior to use)
Cooking Instructions:
- Prepare the Marinade: In a large mixing bowl, combine the olive oil, lemon juice, minced garlic, oregano, thyme, parsley, salt, pepper, and red pepper flakes (if using). Whisk the ingredients together until they’re well blended, creating a flavorful marinade.
- Marinate the Chicken: Add the chicken pieces to the marinade, making sure each piece is thoroughly coated. Cover the bowl with plastic wrap or a lid and refrigerate for at least 30 minutes, or up to 2 hours for more intense flavor.
- Preheat the Oven: While the chicken is marinating, preheat your oven to 400°F (200°C). This guarantees the chicken cooks evenly and develops a nice golden color as it bakes.
- Assemble the Skewers: After marinating, remove the chicken from the refrigerator. Thread the marinated chicken pieces onto the skewers, leaving a little space between each piece to guarantee even cooking. If using metal skewers, they can go directly into the oven; if using wooden skewers, place them on a baking sheet lined with parchment paper.
- Bake the Skewers: Place the skewers in the preheated oven and bake for 20-25 minutes, or until the chicken is cooked through and reaches an internal temperature of 165°F (75°C). You may want to turn them halfway through cooking for even browning.
- Serve and Enjoy: Once cooked, remove the skewers from the oven and let them rest for a few minutes. Serve the baked chicken skewers warm, garnished with fresh herbs or lemon wedges if desired.
Extra Tips:
For an added burst of flavor, consider adding vegetables such as bell peppers, zucchini, or cherry tomatoes to the skewers alongside the chicken. These not only enhance the taste but also add color and nutrition to the dish.
Additionally, if you prefer a grill flavor, you can cook the skewers on an outdoor grill instead of baking, just be sure to adjust the cooking time accordingly. Enjoy your meal with a side of tzatziki sauce or a rejuvenating Greek salad for a complete Mediterranean feast!
Spinach and Feta Stuffed Peppers
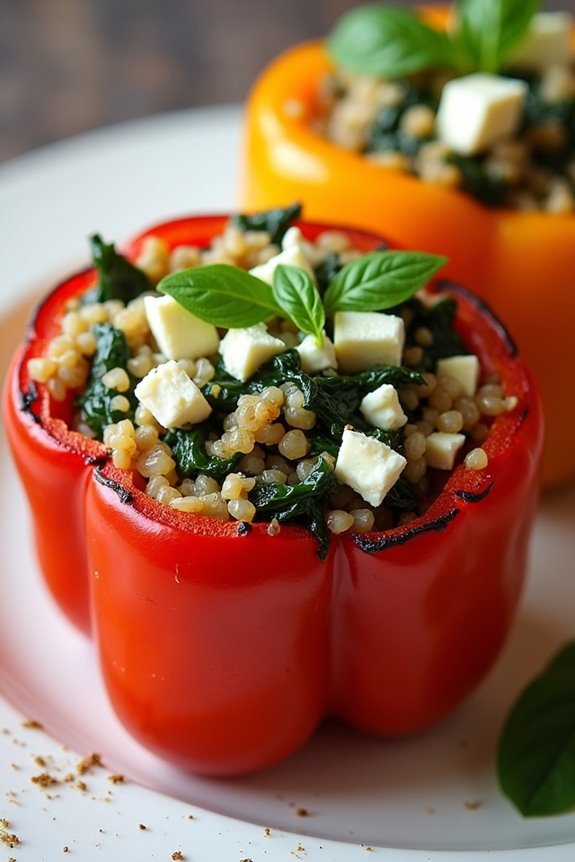
Spinach and Feta Stuffed Peppers are a delightful and nutritious way to enjoy the flavors of the Mediterranean diet. This dish combines fresh spinach, savory feta cheese, and fragrant herbs, all packed into sweet bell peppers. Not only does it offer a vibrant presentation, but it’s also a wonderful option for a healthy dinner or lunch.
The combination of colors and textures makes it appealing to both the eyes and the palate, making it a perfect dish for family gatherings or a cozy weeknight meal. The stuffed peppers aren’t only delicious but also versatile. You can easily customize the filling by adding other ingredients such as quinoa, rice, or even proteins like chicken or chickpeas to suit your taste.
This dish is also a great way to sneak in extra vegetables, making it a fantastic choice for those looking to increase their intake of healthy foods. Serve these stuffed peppers warm, garnished with a sprinkle of fresh herbs for an added touch of flavor.
Ingredients (Serves 4-6)
- 4 large bell peppers (any color)
- 2 cups fresh spinach, chopped
- 1 cup feta cheese, crumbled
- 1 cup cooked quinoa or rice
- 1/2 cup onion, finely chopped
- 2 cloves garlic, minced
- 1 teaspoon dried oregano
- 1 teaspoon dried basil
- 1/2 teaspoon red pepper flakes (optional)
- 2 tablespoons olive oil
- Salt and pepper, to taste
- Fresh parsley or basil for garnish (optional)
Cooking Instructions
- Preheat the Oven: Start by preheating your oven to 375°F (190°C). This will guarantee that the peppers cook evenly and become tender while the filling gets a nice warm texture.
- Prepare the Bell Peppers: While the oven is preheating, wash the bell peppers, slice off the tops, and remove the seeds and membranes. You can save the tops for later use or discard them. Place the hollowed peppers upright in a baking dish.
- Cook the Filling: In a large skillet, heat the olive oil over medium heat. Add the chopped onion and sauté for about 3-4 minutes until they become translucent. Then, add the minced garlic and cook for an additional minute until fragrant.
- Add Spinach and Other Ingredients: Stir in the chopped spinach and cook until it wilts down, which should take about 2-3 minutes. Remove the skillet from heat and mix in the cooked quinoa or rice, crumbled feta cheese, oregano, basil, red pepper flakes (if using), and season with salt and pepper to taste.
- Stuff the Peppers: Carefully spoon the spinach and feta filling into each bell pepper, packing it gently to make sure they’re well-filled.
- Bake the Stuffed Peppers: Pour a small amount of water into the bottom of the baking dish to help steam the peppers while they cook. Cover the dish with aluminum foil and bake in the preheated oven for 25 minutes. Then, remove the foil and bake for an additional 10-15 minutes until the peppers are tender and slightly charred.
- Garnish and Serve: Once done, remove the stuffed peppers from the oven and let them sit for a few minutes. Garnish with fresh parsley or basil before serving for an added touch of freshness.
Extra Tips
For a more robust flavor, consider roasting the bell peppers before stuffing them; this will enhance their sweetness. Additionally, feel free to experiment with the filling by adding other vegetables like zucchini or mushrooms, or even proteins like ground turkey or lentils for a heartier meal.
Leftover stuffed peppers can be stored in an airtight container in the fridge for up to 3 days, making them a perfect option for meal prep. Enjoy your healthy and delicious Spinach and Feta Stuffed Peppers!
Roasted Eggplant and Tomato Pasta
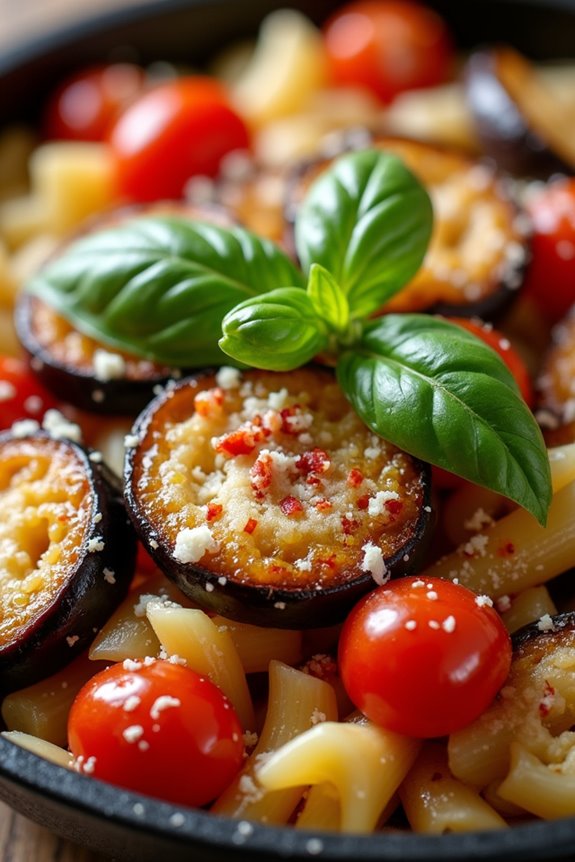
Roasted Eggplant and Tomato Pasta is a vibrant dish that beautifully embodies the essence of the Mediterranean diet. This dish isn’t only packed with flavor but also offers a healthy serving of vegetables, making it a perfect choice for a wholesome meal. The combination of tender roasted eggplant, juicy tomatoes, and al dente pasta creates a satisfying meal that’s sure to please everyone at the table.
With the addition of fresh herbs and a drizzle of olive oil, this pasta dish is a celebration of simple, fresh ingredients that harmonize perfectly together. Preparing this dish is a delightful experience that engages your senses. The aroma of roasted eggplant mingling with garlic and herbs fills your kitchen, while the bright colors of the ingredients make the dish visually appealing.
It’s a great option for a family dinner or when hosting friends, as it can be made in larger batches and is easy to prepare. Just follow the steps below to create this delicious Roasted Eggplant and Tomato Pasta.
Ingredients (serving size: 4-6 people)
- 1 large eggplant, cut into 1-inch cubes
- 1 pint cherry tomatoes, halved
- 3 tablespoons olive oil
- 4 cloves garlic, minced
- 1 teaspoon salt
- ½ teaspoon black pepper
- ½ teaspoon red pepper flakes (optional)
- 12 ounces pasta (such as penne or spaghetti)
- ¼ cup fresh basil leaves, chopped
- ¼ cup grated Parmesan cheese (optional)
Cooking Instructions
- Preheat the Oven: Begin by preheating your oven to 400°F (200°C). This high temperature is essential for roasting the eggplant and tomatoes, allowing them to caramelize and develop rich flavors.
- Prepare the Vegetables: In a large mixing bowl, combine the cubed eggplant and halved cherry tomatoes. Add the minced garlic, olive oil, salt, black pepper, and red pepper flakes (if using). Toss everything together until the vegetables are well coated with oil and seasonings.
- Roast the Vegetables: Spread the vegetable mixture evenly on a baking sheet lined with parchment paper. Make sure to leave some space between the pieces for even roasting. Place the baking sheet in the preheated oven and roast for about 25-30 minutes, or until the eggplant is golden brown and tender, stirring halfway through for even cooking.
- Cook the Pasta: While the vegetables are roasting, bring a large pot of salted water to a boil. Add the pasta and cook according to the package instructions until al dente. Once cooked, reserve about ½ cup of the pasta water, then drain the pasta.
- Combine Everything: In a large serving bowl, combine the cooked pasta with the roasted vegetables. Toss gently, adding reserved pasta water a little at a time until you reach your desired sauce consistency. Stir in the chopped fresh basil for an added burst of flavor.
- Serve: Plate the pasta and garnish with grated Parmesan cheese if desired. Enjoy your Roasted Eggplant and Tomato Pasta warm, drizzled with a bit more olive oil and a sprinkle of fresh basil.
Extra Tips
When preparing Roasted Eggplant and Tomato Pasta, consider using larger eggplants for a meatier texture, and try experimenting with different pasta shapes to enhance the dish’s presentation.
You can also add other vegetables such as zucchini or bell peppers for additional flavor and nutrition. For a protein boost, consider incorporating grilled chicken or chickpeas.
Finally, make sure to taste and adjust seasoning before serving, as the flavors develop during cooking and may require a little extra salt or pepper to suit your palate. Enjoy your cooking!
Tabbouleh Salad With Fresh Herbs
Tabbouleh is a vibrant and invigorating salad that hails from the Mediterranean region, particularly Lebanon and Syria. Bursting with fresh herbs, bulgur wheat, and a zesty dressing, this salad isn’t only healthy but also a delightful addition to any meal. The primary ingredients, such as parsley, mint, and tomatoes, come together to create a dish that’s both nourishing and satisfying.
Tabbouleh is often served as a mezze, making it perfect for sharing among friends and family. This salad isn’t just a side dish; it can stand alone as a light lunch or a main course during hot summer days. The combination of fresh ingredients and the tangy dressing makes it incredibly invigorating. Plus, it’s simple to prepare, allowing you to whip up a batch in no time.
Whether you’re a seasoned cook or a beginner, Tabbouleh is an accessible recipe that will impress your guests and leave them craving more.
Ingredients (serves 4-6):
- 1 cup bulgur wheat
- 2 cups water
- 1/2 teaspoon salt
- 2 cups fresh parsley, finely chopped
- 1/2 cup fresh mint, finely chopped
- 1 cup ripe tomatoes, diced
- 1/2 cucumber, diced
- 1/4 cup red onion, finely chopped
- 1/4 cup olive oil
- 1/4 cup lemon juice
- Salt and pepper to taste
Cooking Instructions:
- Prepare the bulgur: In a medium saucepan, bring 2 cups of water to a boil. Add 1/2 teaspoon of salt and the bulgur wheat. Stir, cover, and remove from heat. Let it sit for about 15-20 minutes or until the bulgur has absorbed all the water and is tender. Fluff with a fork and allow it to cool.
- Chop the herbs and vegetables: While the bulgur is cooling, finely chop the fresh parsley and mint. Dice the tomatoes and cucumber, and finely chop the red onion. Make sure to keep the pieces uniform for a pleasant texture and presentation.
- Combine the ingredients: In a large bowl, combine the cooled bulgur, chopped herbs, diced tomatoes, cucumber, and onion. Gently mix everything together, ensuring that the herbs and vegetables are evenly distributed.
- Make the dressing: In a small bowl or jar, whisk together the olive oil, lemon juice, salt, and pepper to taste. Adjust the seasoning as needed to suit your preference.
- Dress the salad: Pour the dressing over the bulgur mixture and toss thoroughly to ensure that all ingredients are well-coated with the dressing. Allow the salad to rest for at least 30 minutes before serving, as this will allow the flavors to meld together.
- Serve: Serve Tabbouleh chilled or at room temperature. It can be enjoyed on its own or as part of a mezze platter.
Extra Tips:
When making Tabbouleh, always use the freshest herbs you can find, as they’re the star of the dish. You can also customize the recipe by adding other ingredients like bell peppers or pomegranate seeds for extra flavor and color.
If you prefer a gluten-free version, you can substitute the bulgur with quinoa or cauliflower rice. Finally, Tabbouleh can be stored in the refrigerator for a couple of days, making it a great make-ahead dish for gatherings.
Grilled Shrimp With Garlic and Lemon
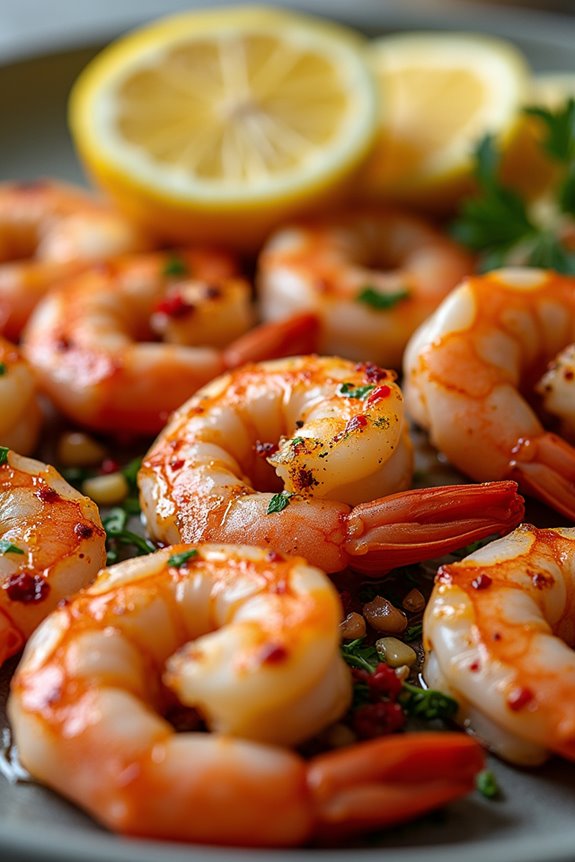
Grilled Shrimp with Garlic and Lemon is a quintessential Mediterranean dish that showcases the vibrant flavors of the region. This easy-to-make recipe highlights succulent shrimp marinated in a fragrant blend of garlic, fresh lemon juice, and aromatic herbs, making it a perfect dish for a summer barbecue or a quick weeknight dinner.
The simplicity of the ingredients allows the natural sweetness of the shrimp to shine, while the garlic and lemon add a zesty punch that elevates the overall flavor profile. Pairing beautifully with a variety of sides, such as a fresh Mediterranean salad or grilled vegetables, this dish can easily impress your family and friends.
Whether you’re a seasoned cook or a beginner, grilling shrimp is straightforward and quick, taking only a few minutes to achieve that perfect char. Get ready to enjoy a taste of the Mediterranean right in your own home!
Ingredients (Serves 4-6):
- 1 ½ pounds large shrimp, peeled and deveined
- 1/4 cup olive oil
- 4 cloves garlic, minced
- 1/4 cup fresh lemon juice
- Zest of 1 lemon
- 1 teaspoon red pepper flakes (optional)
- 2 tablespoons fresh parsley, chopped
- Salt and black pepper to taste
- Lemon wedges for serving
Cooking Instructions:
- Prepare the Shrimp: In a large bowl, combine the peeled and deveined shrimp with olive oil, minced garlic, lemon juice, lemon zest, red pepper flakes (if using), chopped parsley, salt, and black pepper. Mix well so that the shrimp are evenly coated in the marinade. Allow the mixture to marinate for at least 15-30 minutes, or up to 2 hours in the refrigerator for deeper flavor.
- Preheat the Grill: While the shrimp is marinating, preheat your grill to medium-high heat. If using a charcoal grill, make certain the coals are hot and ashy before grilling. For a gas grill, allow it to heat for about 10-15 minutes.
- Skewer the Shrimp: If you’re using wooden skewers, soak them in water for about 30 minutes to prevent burning. Thread the marinated shrimp onto the skewers, leaving a little space between each shrimp for even cooking. If you prefer, you can grill the shrimp directly on the grill grates.
- Grill the Shrimp: Place the skewers on the preheated grill and cook for about 2-3 minutes on each side, or until the shrimp turn pink and opaque, and have grill marks. Be careful not to overcook them, as shrimp can become tough when cooked too long.
- Serve: Once cooked, remove the shrimp skewers from the grill and transfer them to a serving platter. Serve immediately with lemon wedges on the side for an extra burst of flavor.
Extra Tips:
For a delightful twist, you can experiment with different herbs and spices in the marinade, such as oregano or thyme, to enhance the Mediterranean flavors.
Additionally, if you want to add some smokiness to the shrimp, consider using wood chips on the grill. Always make certain that the shrimp are fresh and of good quality, as this will greatly impact the final taste of the dish.
Finally, pairing this grilled shrimp with a chilled glass of white wine will elevate your meal experience even further!
Mediterranean Chickpea Stew
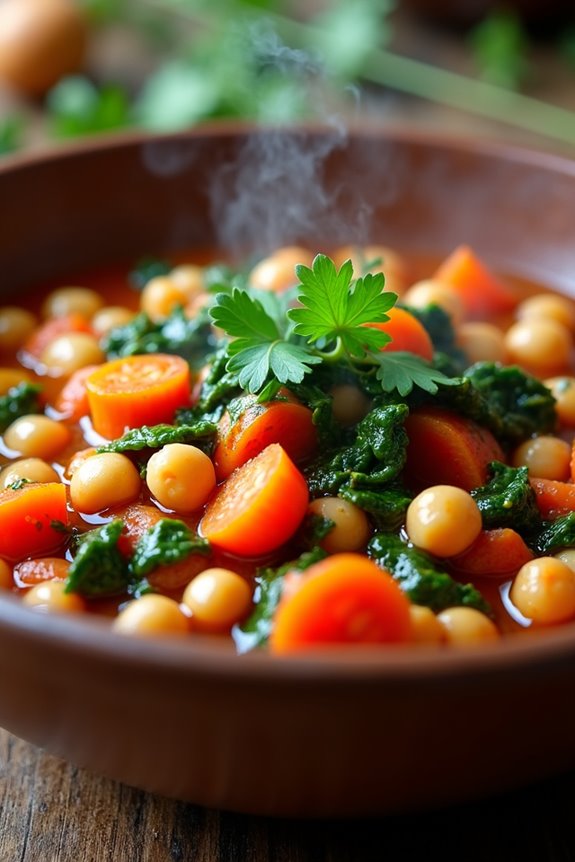
The Mediterranean Chickpea Stew is a hearty and nutritious dish that embodies the vibrant flavors of the Mediterranean region. Packed with protein-rich chickpeas, fresh vegetables, and aromatic spices, this stew isn’t only satisfying but also incredibly healthy.
The combination of tomatoes, garlic, and herbs creates a rich sauce that complements the tender chickpeas, making it a perfect option for a cozy dinner or a meal prep for the week ahead. This stew is versatile and can be served on its own or accompanied by crusty bread or over a bed of fluffy couscous.
The ingredients are simple, yet they come together to create a dish that’s both comforting and full of flavor. Whether you’re a seasoned cook or just starting out, this Mediterranean Chickpea Stew is easy to make and sure to impress your family and friends.
Ingredients (serving size: 4-6 people):
- 2 tablespoons olive oil
- 1 medium onion, chopped
- 3 cloves garlic, minced
- 1 bell pepper (red or yellow), chopped
- 2 medium carrots, diced
- 1 zucchini, diced
- 1 can (14 oz) diced tomatoes, with juice
- 1 can (15 oz) chickpeas, drained and rinsed
- 2 cups vegetable broth
- 1 teaspoon ground cumin
- 1 teaspoon smoked paprika
- 1/2 teaspoon cayenne pepper (optional, for heat)
- Salt and pepper, to taste
- 1 cup fresh spinach, roughly chopped
- Juice of 1 lemon
- Fresh parsley, chopped (for garnish)
Cooking Instructions:
1. Sauté the Aromatics: In a large pot, heat the olive oil over medium heat. Add the chopped onion and sauté for about 5 minutes, or until the onion becomes translucent.
Then, add the minced garlic and cook for an additional minute until fragrant.
2. Add the Vegetables: Stir in the chopped bell pepper, diced carrots, and zucchini to the pot. Cook for another 5-7 minutes, stirring occasionally, until the vegetables begin to soften.
3. Incorporate the Tomatoes and Chickpeas: Add the diced tomatoes (with their juice) and the drained chickpeas to the pot. Stir to combine all the ingredients evenly.
4. Pour in the Broth and Season: Add the vegetable broth, ground cumin, smoked paprika, cayenne pepper (if using), and season with salt and pepper. Bring the mixture to a gentle boil.
5. Simmer: Reduce the heat to low, cover the pot, and let the stew Simmer for about 20-25 minutes. This allows the flavors to meld and the vegetables to become tender.
6. Add Spinach and Lemon Juice: Once the stew is ready, stir in the chopped spinach and lemon juice. Cook for an additional 2-3 minutes until the spinach has wilted.
7. Serve: Taste the stew and adjust seasoning if necessary. Serve hot, garnished with fresh parsley.
Extra Tips: For added depth of flavor, consider letting the stew sit for a few hours or overnight in the fridge before reheating. This allows the flavors to develop even more.
Additionally, feel free to customize the stew by adding other vegetables or proteins of your choice, such as sweet potatoes or cooked chicken, to suit your tastes. Enjoy this comforting dish on its own or with a side of whole grain bread for a complete meal!
Greek Yogurt Parfait With Honey and Nuts
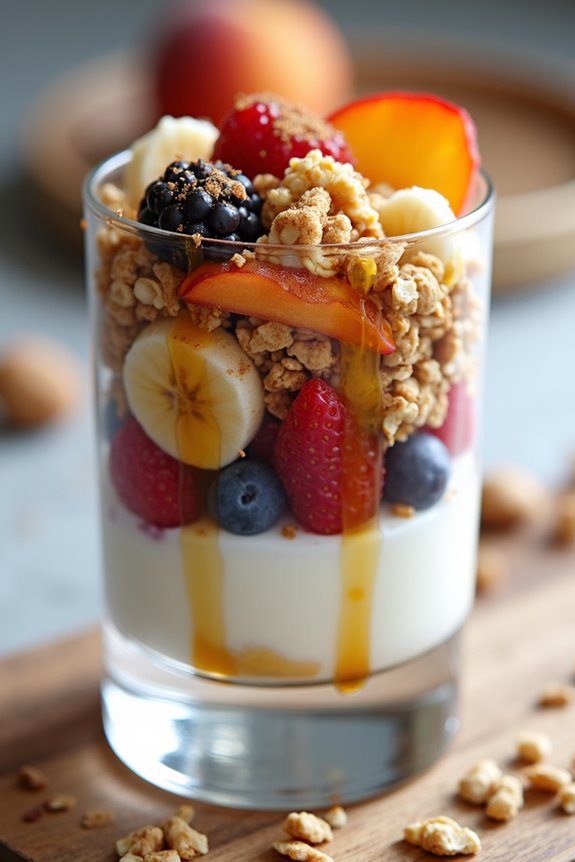
Greek Yogurt Parfait With Honey and Nuts is a delectable and nutritious dessert that embodies the essence of the Mediterranean diet. This dish showcases creamy Greek yogurt layered with sweet honey, crunchy nuts, and fresh fruits, providing a perfect balance of flavors and textures. Not only is it delicious, but it’s also packed with protein, healthy fats, and essential nutrients, making it an ideal choice for breakfast, a snack, or even a light dessert.
The beauty of this parfait lies in its versatility; you can customize it with your favorite fruits and nuts. Seasonal fruits such as berries, bananas, or peaches add a rejuvenating touch, while a mix of walnuts, almonds, or pistachios enhances the crunch factor. This recipe is simple to prepare and can easily be made in advance, making it a convenient option for busy mornings or entertaining guests.
Ingredients (Serves 4-6)
- 4 cups Greek yogurt (plain, unsweetened)
- 1/4 cup honey (plus extra for drizzling)
- 1 teaspoon vanilla extract
- 2 cups granola (preferably low-sugar)
- 2 cups mixed fresh fruit (such as berries, sliced bananas, or diced peaches)
- 1 cup assorted nuts (such as walnuts, almonds, and pistachios, roughly chopped)
- A pinch of cinnamon (optional)
Cooking Instructions
- Prepare the Yogurt Mixture: In a large mixing bowl, combine the Greek yogurt, honey, and vanilla extract. Stir well until the ingredients are thoroughly mixed. This will create a sweetened yogurt base that will be the star of your parfait.
- Layer the Parfait: Begin layering your parfait in individual serving glasses or bowls. Start by adding a generous spoonful of the yogurt mixture to the bottom of each glass. This will be the first layer.
- Add Granola: Next, sprinkle a layer of granola on top of the yogurt. The granola adds a delightful crunch that contrasts beautifully with the creaminess of the yogurt.
- Incorporate Fresh Fruit: Add a layer of mixed fresh fruit over the granola. Feel free to be creative with the arrangement; this is where you can showcase the vibrant colors of the fruits.
- Repeat the Layers: Repeat the layering process by adding another spoonful of the yogurt mixture, followed by granola, and more fresh fruit. Continue layering until the glasses are filled, leaving a little space at the top for the nuts.
- Finish with Nuts and Honey: Top the parfaits with a final layer of chopped nuts for added texture. Drizzle a little extra honey on top for sweetness, and sprinkle with a pinch of cinnamon if desired.
- Serve and Enjoy: Serve the parfaits immediately for a fresh and vibrant presentation, or refrigerate them for up to an hour before serving to allow the flavors to meld.
Extra Tips
When preparing Greek Yogurt Parfait With Honey and Nuts, feel free to experiment with different ingredients to suit your taste. For a lower-calorie version, you can use low-fat Greek yogurt and reduce the amount of honey.
Additionally, consider adding chia seeds or flax seeds for an extra boost of nutrients. If you have leftovers, store the components separately to maintain freshness, and assemble them just before serving for the best texture.
Olive Oil Cake With Citrus Zest

Olive Oil Cake With Citrus Zest is a delightful Mediterranean dessert that captures the essence of the region with its unique flavors and moist texture. This cake isn’t only easy to prepare but also offers a sophisticated taste that will impress your family and friends. The use of high-quality olive oil lends a rich depth to the cake, while the citrus zest brightens up each bite, making it a perfect ending to any meal.
This cake is a wonderful alternative to traditional butter-based cakes, and it’s also a great option for those who are looking for a lighter dessert. The citrus notes from the zest of lemons and oranges provide a revitalizing contrast to the olive oil’s richness. Whether served plain or with a light dusting of powdered sugar, Olive Oil Cake With Citrus Zest is sure to become a favorite in your dessert repertoire.
Ingredients (Serving Size: 4-6 people):
- 1 cup extra-virgin olive oil
- 1 cup granulated sugar
- 3 large eggs
- 1 cup all-purpose flour
- 1/2 cup almond flour
- 1 tablespoon baking powder
- 1/2 teaspoon salt
- Zest of 1 lemon
- Zest of 1 orange
- 1/2 cup milk
- Powdered sugar (for dusting, optional)
Cooking Instructions:
- Preheat the Oven: Begin by preheating your oven to 350°F (175°C). This guarantees that your cake bakes evenly and rises properly.
- Prepare the Baking Pan: Grease a 9-inch round cake pan with olive oil and line the bottom with parchment paper. This will prevent the cake from sticking and make it easier to remove after baking.
- Mix Wet Ingredients: In a large mixing bowl, combine the extra-virgin olive oil and granulated sugar. Whisk them together until the mixture is well combined and slightly frothy. Then, add the eggs one at a time, whisking well after each addition until the mixture is smooth.
- Combine Dry Ingredients: In a separate bowl, whisk together the all-purpose flour, almond flour, baking powder, and salt. This step helps to evenly distribute the leavening agent and guarantees a uniform texture in the cake.
- Add Zest and Milk: Add the lemon and orange zest to the wet ingredients mixture, followed by the dry ingredients. Pour in the milk and gently fold everything together until just combined. Be careful not to overmix, as this can lead to a dense cake.
- Transfer to Pan: Pour the batter into the prepared cake pan, smoothing the top with a spatula. Tap the pan lightly on the counter to release any air bubbles.
- Bake the Cake: Place the cake in the preheated oven and bake for 30-40 minutes, or until a toothpick inserted in the center comes out clean. The top should be golden brown.
- Cool and Serve: Once baked, remove the cake from the oven and let it cool in the pan for about 10 minutes. Then, carefully invert it onto a wire rack to cool completely. If desired, dust the top with powdered sugar before serving.
Extra Tips: When selecting your olive oil, opt for a high-quality extra-virgin variety, as it greatly enhances the flavor of the cake. Additionally, feel free to experiment with different citrus fruits or even add a splash of citrus juice to the batter for an extra zing.
This cake can also be made ahead of time and stored in an airtight container for a few days, making it an ideal choice for gatherings or special occasions. Enjoy your culinary creation!