

I’ve been exploring the delicious world of Portuguese cuisine and stumbled upon some amazing recipes that keep making waves on Pinterest. From the comforting Bacalhau À Brás to the irresistible Pastéis de Nata, each dish is a blend of tradition and flavor. If you’re curious about why these recipes have become favorites, you’re in the right place. Let’s explore the details behind these culinary gems.
Bacalhau À Brás
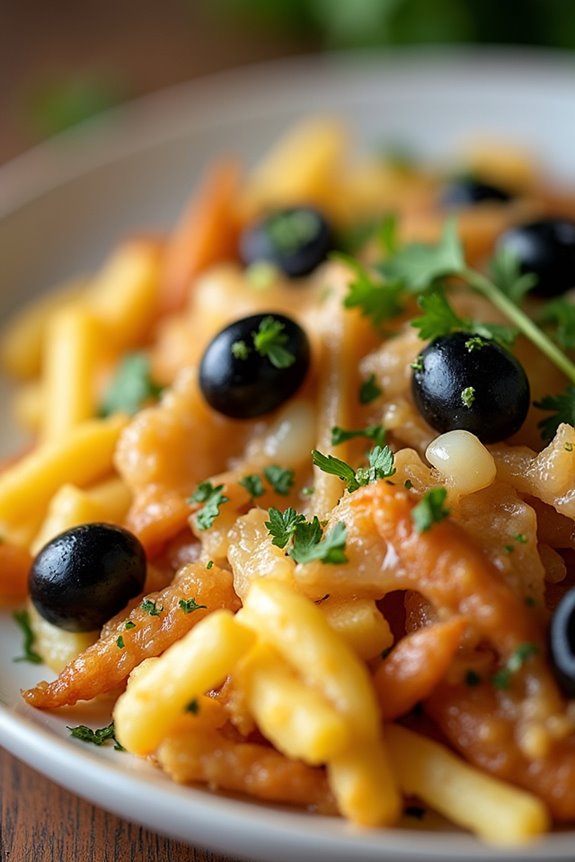
Bacalhau À Brás is a traditional Portuguese dish that showcases the beloved salted cod, or bacalhau, which is a staple in Portuguese cuisine. This dish combines shredded bacalhau with finely chopped onions and straw fries, all bound together with creamy scrambled eggs. The result is a comforting and savory meal that’s often garnished with black olives and fresh parsley.
Perfect for family gatherings or special occasions, Bacalhau À Brás is a true representation of Portugal’s rich culinary heritage.
To prepare Bacalhau À Brás, it’s important to start with high-quality salted cod. If you can’t find cod that’s already prepared, you’ll need to soak it to remove the excess salt. This dish isn’t only flavorful but also visually appealing, making it a feast for the senses. With just a handful of ingredients, you can create a delicious meal that captures the essence of Portuguese home cooking.
Ingredients (Serves 4-6):
- 500g salted cod (bacalhau)
- 4 medium potatoes
- 1 large onion
- 4 large eggs
- 2 cloves of garlic
- 100ml olive oil
- Salt and pepper, to taste
- Fresh parsley, chopped (for garnish)
- Black olives (for garnish)
Cooking Instructions:
- Soak the Cod: If your bacalhau is salted, soak it in cold water for 24-48 hours, changing the water several times. This will help remove excess salt. After soaking, drain and rinse the cod, then boil it in fresh water for about 10-15 minutes until cooked through. Once cooked, allow it to cool, then flake the fish into bite-sized pieces, removing any skin and bones.
- Prepare the Potatoes: While the cod is soaking, peel and cut the potatoes into thin strips to create straw fries. Alternatively, you can use a mandoline slicer for consistent thickness.
- Fry the Potatoes: Heat a generous amount of olive oil in a large frying pan over medium heat. Carefully add the potato strips and fry them until they’re golden brown and crispy. This should take about 5-7 minutes. Once done, remove them from the pan and let them drain on paper towels, seasoning lightly with salt.
- Sauté the Onions and Garlic: In the same pan, add more olive oil if needed. Sauté the chopped onion and minced garlic over medium heat until the onion becomes soft and translucent, about 5 minutes. Be careful not to let the garlic burn.
- Combine Ingredients: Add the flaked bacalhau to the onion and garlic mixture, stirring gently to combine. Cook for an additional 2-3 minutes to warm the fish through.
- Add the Potatoes and Eggs: Once the cod is heated, add the fried potato strips to the mixture. In a separate bowl, whisk the eggs together, then pour them over the bacalhau and potato mixture. Stir continuously over low heat until the eggs are just set but still creamy. Season with salt and pepper to taste.
- Serve and Garnish: Once the eggs are cooked to your desired consistency, remove the pan from heat. Transfer the Bacalhau À Brás to a serving dish and garnish with chopped parsley and black olives before serving.
Extra Tips:
For an extra layer of flavor, consider adding a splash of white wine or a pinch of paprika when sautéing the onions and garlic. You can also experiment with different types of olives or fresh herbs to personalize the dish.
Bacalhau À Brás can be served warm or at room temperature, making it a versatile option for gatherings. Enjoy this delicious dish with a side of crusty bread or a fresh salad for a complete meal!
Caldo Verde
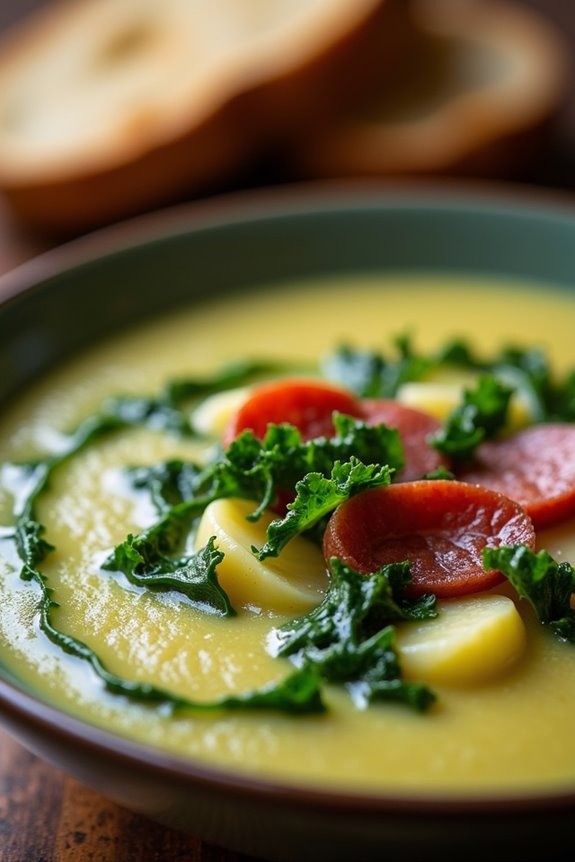
Caldo Verde, a traditional Portuguese soup, is a beloved dish that warms the heart and soul. Originating from the northern regions of Portugal, this rustic soup is known for its simple yet flavorful combination of ingredients. At its core, Caldo Verde is made with potatoes, kale, and chorizo, creating a comforting meal that’s perfect for cold evenings or as a hearty appetizer.
The vibrant green color of the kale, combined with the smooth texture of the potatoes, makes this dish not only delicious but also visually appealing.
What sets Caldo Verde apart is its adaptability. While the classic recipe features Portuguese chorizo, you can easily customize it by using other types of sausage or even making it vegetarian by omitting the meat altogether. This soup is often served with a drizzle of olive oil and a slice of crusty bread, making it a fulfilling and satisfying meal.
Whether you’re enjoying it at a family gathering or preparing it for a cozy night in, Caldo Verde is sure to bring a taste of Portugal to your table.
Ingredients (Serving Size: 4-6 people)
- 4 large potatoes, peeled and diced
- 1 large onion, chopped
- 3 cloves garlic, minced
- 1 liter of vegetable or chicken broth
- 200g kale, finely shredded
- 150g Portuguese chorizo, sliced (or any sausage of your choice)
- 4 tablespoons olive oil
- Salt and pepper to taste
Cooking Instructions
- Prepare the Base: In a large pot, heat 2 tablespoons of olive oil over medium heat. Add the chopped onion and minced garlic, sautéing until the onion becomes translucent, about 5 minutes. This step is essential as it builds the flavor base for the soup.
- Cook the Potatoes: Add the diced potatoes to the pot and stir well to coat them with the oil and onion mixture. Pour in the vegetable or chicken broth, making sure the potatoes are fully submerged. Bring the mixture to a boil, then reduce the heat to a simmer. Cook for about 15-20 minutes or until the potatoes are tender.
- Blend the Soup: Once the potatoes are cooked, use an immersion blender to puree the soup until smooth. If you don’t have an immersion blender, you can transfer the soup in batches to a regular blender. Be cautious with hot liquids and make sure the lid is vented to avoid splattering. This step gives the soup its signature creamy texture.
- Add the Kale and Chorizo: Return the pureed soup to the pot (if using a regular blender) and stir in the finely shredded kale and sliced chorizo. Allow the soup to simmer for an additional 5-10 minutes until the kale is tender and the chorizo is heated through. This adds a wonderful depth of flavor and texture to the dish.
- Season and Serve: Taste the soup and season with salt and pepper as desired. Ladle the Caldo Verde into bowls, drizzle with the remaining olive oil, and serve hot with crusty bread on the side. This step enhances the overall flavor, making sure your soup is perfectly seasoned.
Extra Tips
When making Caldo Verde, using fresh ingredients can make a significant difference in flavor. If you prefer a more robust flavor, consider adding a bay leaf during the simmering process, then remove it before blending.
Additionally, feel free to adjust the amount of kale and chorizo based on your personal preference. For a vegetarian version, simply replace the chorizo with smoked paprika for a similar smoky flavor.
Enjoy your Caldo Verde, and don’t hesitate to experiment with the ingredients to suit your taste!
Pastéis De Nata

Pastéis de Nata, also known as Portuguese custard tarts, are a delectable treat that has captured the hearts of many around the world. Originating from the pastéis de Belém in Lisbon, this pastry combines a flaky crust with a creamy custard filling, often topped with a sprinkle of cinnamon or powdered sugar.
These tarts are perfect for any occasion, whether enjoyed with a cup of coffee or as a sweet ending to a meal. Making Pastéis de Nata at home is a rewarding experience, allowing you to savor these pastries fresh out of the oven. With a few simple ingredients and some patience, you can recreate the authentic flavors of Portugal right in your kitchen.
Follow this recipe to impress your family and friends with these delightful pastries that are sure to be a hit.
Ingredients (Serves 4-6):
- 1 package of puff pastry (about 14 oz)
- 1 cup heavy cream
- 1 cup whole milk
- 3/4 cup granulated sugar
- 1/4 cup all-purpose flour
- 6 large egg yolks
- 1 tablespoon vanilla extract
- Zest of 1 lemon
- Ground cinnamon (for sprinkling)
- Powdered sugar (for serving, optional)
Cooking Instructions:
1. Prepare the Puff Pastry: Preheat your oven to 475°F (245°C). On a lightly floured surface, roll out the puff pastry into a rectangle, about 1/8 inch thick. Then, cut the pastry into circles that are slightly bigger than your muffin tin cups. Carefully press each circle into the cups of a greased muffin tin, ensuring the pastry covers the bottom and sides.
2. Make the Custard Filling: In a medium saucepan over medium heat, combine the heavy cream, whole milk, and sugar. Stir until the sugar has dissolved. In a separate bowl, whisk together the flour and egg yolks until smooth.
Once the milk mixture is warm (not boiling), slowly pour it into the egg yolk mixture while whisking continuously to prevent the eggs from curdling.
3. Thicken the Custard: Return the combined mixture back to the saucepan and cook over medium heat, stirring constantly until the mixture thickens and coats the back of a spoon (about 5-7 minutes). Remove from heat and stir in the vanilla extract and lemon zest. Allow the custard to cool slightly.
4. Fill the Pastry Shells: Carefully pour the custard filling into the prepared pastry shells, filling each one about 3/4 full.
5. Bake the Tarts: Place the muffin tin in the preheated oven and bake for about 15-20 minutes or until the tops of the custards are browned and slightly blistered. Keep an eye on them to avoid burning.
6. Cool and Serve: Once baked, remove the tarts from the oven and allow them to cool for a few minutes in the tin before transferring them to a wire rack to cool completely. Serve warm or at room temperature, sprinkled with ground cinnamon and powdered sugar if desired.
Extra Tips: When making Pastéis de Nata, it’s essential to keep an eye on the baking time, as each oven may vary. The ideal tart should have a slightly caramelized top without being burnt.
Additionally, letting the custard mixture cool slightly before pouring it into the pastry can help achieve that perfect, creamy texture. For an extra touch, feel free to experiment with different flavorings such as orange zest or a splash of almond extract in the custard. Enjoy your homemade Pastéis de Nata!
Francesinha

Francesinha, which translates to “Little Frenchie,” is a beloved sandwich hailing from the vibrant city of Porto, Portugal. This indulgent dish is a hearty combination of layers of cured meats, sausage, and steak, all nestled between slices of soft bread. What sets Francesinha apart is its luxurious sauce—a rich, spicy tomato and beer-based concoction that drapes over the sandwich like a warm blanket, often topped with a gooey layer of melted cheese. It’s a dish that celebrates the rich culinary traditions of Portugal, making it an essential recipe for anyone looking to explore Portuguese cuisine.
Making Francesinha isn’t just about the sandwich itself; it’s about the experience it brings. Often served with a side of French fries and sometimes topped with a fried egg, this dish embodies comfort food at its finest. Whether you’re enjoying it on a chilly evening or as a festive gathering centerpiece, Francesinha is sure to impress your family and friends with its bold flavors and satisfying textures. Below is a recipe that serves 4-6 people, ensuring everyone gets to enjoy this iconic Portuguese delight.
Ingredients (Serves 4-6):
- 4 slices of thick white bread
- 200g of fresh chorizo sausage
- 200g of smoked sausage (linguiça)
- 200g of roast beef or steak
- 4 slices of cheese (preferably a good melting cheese like Edam or Gouda)
- 500ml of beer (preferably a light lager)
- 400g of crushed tomatoes (canned)
- 2 tablespoons of tomato paste
- 1 tablespoon of Worcestershire sauce
- 1 teaspoon of hot sauce (adjust to taste)
- 1 bay leaf
- 2 cloves of garlic (minced)
- 1 onion (finely chopped)
- 2 tablespoons of olive oil
- Salt and pepper to taste
- French fries (for serving)
- Optional: fried eggs (for topping)
Cooking Instructions:
- Prepare the Sauce: In a large saucepan, heat the olive oil over medium heat. Add the chopped onions and minced garlic, and sauté until the onions are translucent, about 5 minutes. Then, add the crushed tomatoes, tomato paste, beer, Worcestershire sauce, hot sauce, and bay leaf. Stir well and let the mixture simmer for about 20-30 minutes, allowing the flavors to meld. Season with salt and pepper to taste before removing the bay leaf.
- Cook the Meats: While the sauce is simmering, cook the chorizo and smoked sausage in a skillet over medium heat until browned and cooked through. Remove from the skillet and set aside. If using steak, cook it in the same skillet to absorb the flavors, then slice thinly.
- Assemble the Sandwich: Take a slice of bread and layer it with a slice of cheese, followed by a layer of roast beef or steak, a layer of chorizo, and a layer of smoked sausage. Top with another slice of bread. Repeat this process for the remaining sandwiches, creating multiple layers for a hearty Francesinha.
- Grill the Sandwich: Preheat a grill or a panini press. Grill each assembled sandwich until the bread is golden brown and crispy, and the cheese is melted. This should take about 3-5 minutes per sandwich.
- Serve: Place each grilled sandwich on a plate and generously ladle the prepared sauce over the top. Add extra cheese on top of the sauce if desired, and place under the broiler for a minute to melt the cheese further. Serve with a side of French fries and a fried egg on top if preferred.
Extra Tips:
When preparing Francesinha, don’t hesitate to customize the meats based on your preferences; you can even include leftover meats or different sausages. The sauce can also be made ahead of time and refrigerated, allowing the flavors to deepen. For a vegetarian version, consider substituting the meats with hearty vegetables and a plant-based protein.
Finally, serve it hot and fresh for the best experience, as the combination of melted cheese and rich sauce is what truly makes Francesinha a standout dish in Portuguese cuisine.
Piri-Piri Chicken

Piri-Piri Chicken is a vibrant and spicy dish that originates from Portugal, deeply influenced by African flavors. This iconic recipe showcases the bold taste of piri-piri sauce, a fiery chili-based condiment made with a mix of spices, garlic, and lemon, which gives the chicken a deliciously zesty kick.
Perfect for gatherings or a family meal, this dish combines succulent chicken with the tantalizing heat of piri-piri sauce, making it a favorite among spice lovers.
Marinating the chicken in piri-piri sauce not only infuses it with flavor but also helps to tenderize the meat. This recipe is simple yet packed with mouthwatering flavors that will transport you straight to the sunny shores of Portugal.
Serve it alongside rice, grilled vegetables, or crusty bread to soak up the delicious juices, and you’ll have a meal everyone will love.
Ingredients (serving size: 4-6 people)
- 4-6 chicken thighs (bone-in, skin-on)
- 1/4 cup piri-piri sauce (store-bought or homemade)
- 3 tablespoons olive oil
- 4 cloves garlic, minced
- Juice of 1 lemon
- 1 teaspoon smoked paprika
- Salt and pepper to taste
- Fresh parsley, chopped (for garnish)
- Lemon wedges (for serving)
Cooking Instructions
- Prepare the Marinade: In a large mixing bowl, combine the piri-piri sauce, olive oil, minced garlic, lemon juice, smoked paprika, salt, and pepper. Whisk the ingredients together until well blended to create a smooth marinade.
- Marinate the Chicken: Add the chicken thighs to the bowl and coat them thoroughly with the marinade. Make sure each piece is evenly covered. For the best flavor, cover the bowl with plastic wrap and let the chicken marinate in the refrigerator for at least 1 hour, or preferably overnight. This allows the flavors to penetrate the meat.
- Preheat the Oven: Preheat your oven to 425°F (220°C). This high temperature will help achieve crispy skin while keeping the chicken juicy.
- Bake the Chicken: Place the marinated chicken thighs in a single layer on a baking sheet lined with parchment paper or foil. Roast in the preheated oven for about 35-40 minutes, or until the chicken is cooked through and the skin is crispy and golden. You can use a meat thermometer to check; the internal temperature should reach 165°F (75°C).
- Rest and Serve: Once cooked, remove the chicken from the oven and let it rest for about 5 minutes. This allows the juices to redistribute within the meat. Garnish with fresh parsley and serve with lemon wedges on the side for an extra zing.
Extra Tips
For an even more intense flavor, consider making your own piri-piri sauce by blending fresh chili peppers, garlic, olive oil, vinegar, and spices. You can also adjust the heat level to your preference by selecting milder or hotter peppers.
When grilling or roasting, keep an eye on the chicken to avoid overcooking, as this can lead to dryness. Pair your Piri-Piri Chicken with a revitalizing salad or some grilled vegetables for a complete meal. Enjoy!
Arroz De Marisco
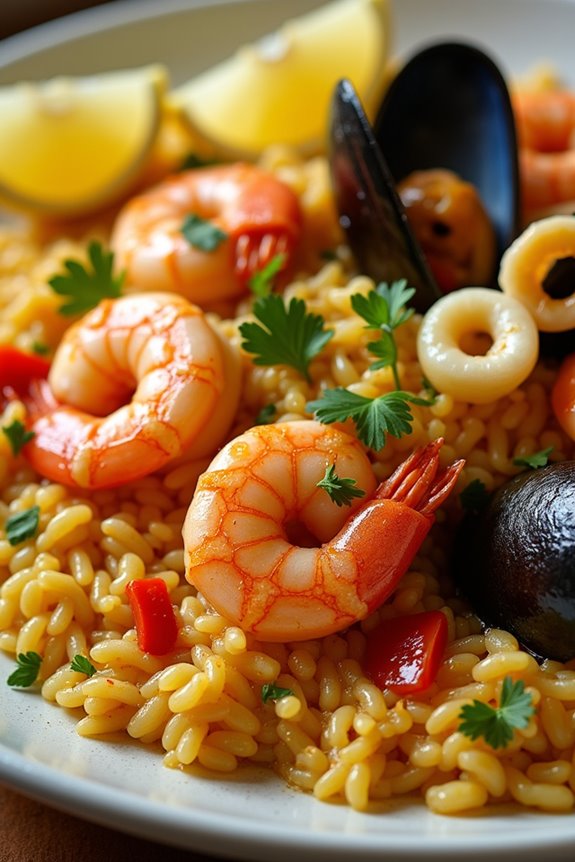
Arroz De Marisco, or seafood rice, is a beloved dish that embodies the coastal flavors of Portugal. This hearty, flavorful meal combines a variety of seafood with rice, resulting in a comforting dish that’s perfect for family gatherings or special occasions. The combination of fresh ingredients and aromatic spices makes every bite a delightful experience, transporting you straight to the shores of Portugal.
This dish isn’t only rich in flavor but also versatile, allowing you to use different types of seafood based on your preference and availability. Whether it’s shrimp, clams, mussels, or squid, each ingredient adds its unique touch to the dish. The key to a successful Arroz De Marisco is to achieve a creamy consistency while guaranteeing the rice is cooked perfectly, allowing it to absorb all the delicious flavors of the seafood and broth.
Ingredients (serves 4-6):
- 2 cups Arborio rice
- 1 lb shrimp, peeled and deveined
- 1 lb mussels, cleaned
- 1 lb clams, cleaned
- 1 lb squid, cleaned and cut into rings
- 1 large onion, finely chopped
- 3 cloves garlic, minced
- 1 bell pepper, diced (red or green)
- 1 cup diced tomatoes (fresh or canned)
- 4 cups fish or seafood broth
- 1 cup white wine
- 1 teaspoon paprika
- 1 teaspoon saffron (optional)
- 1 bay leaf
- Olive oil
- Salt and pepper to taste
- Fresh parsley, chopped (for garnish)
- Lemon wedges (for serving)
Cooking Instructions:
- Prepare the Broth: In a large pot, heat the seafood or fish broth over medium heat until it’s simmering. This will be used to cook the rice and seafood, so having it warm helps maintain the cooking temperature later on.
- Sauté the Aromatics: In a large skillet or paella pan, heat a generous splash of olive oil over medium heat. Add the chopped onion, garlic, and bell pepper. Sauté until the vegetables are soft and fragrant, about 5-7 minutes.
- Add the Tomatoes and Spices: Stir in the diced tomatoes, paprika, saffron (if using), and bay leaf. Cook for an additional 3-4 minutes, allowing the tomatoes to break down and the spices to infuse the mixture.
- Incorporate the Rice: Add the Arborio rice to the skillet, stirring well to coat the grains in the flavorful mixture. Toast the rice gently for about 2 minutes, which will enhance its nutty flavor.
- Deglaze with Wine: Pour in the white wine and cook, stirring frequently, until most of the liquid is absorbed. This step adds depth to the dish and helps to release any flavorful bits stuck to the skillet.
- Add the Broth: Gradually pour in the warm broth, stirring gently to combine all ingredients. Bring the mixture to a gentle simmer and season with salt and pepper to taste.
- Cook the Seafood: After about 10 minutes of cooking the rice, add the shrimp, mussels, clams, and squid to the skillet. Stir to incorporate, then cover and cook for an additional 10-15 minutes, or until the seafood is cooked through and the rice has absorbed most of the liquid.
- Finishing Touches: Once the rice is creamy and al dente, remove the skillet from heat. Let it rest for a few minutes, covered, to allow the flavors to meld.
- Serve and Garnish: Serve the Arroz De Marisco hot, garnished with fresh parsley and lemon wedges on the side for squeezing over the dish.
Extra Tips:
To enhance the flavor of your Arroz De Marisco, feel free to use homemade seafood broth, which adds depth to the dish. Additionally, make sure to adjust the cooking time based on the type and size of the seafood used to guarantee everything is cooked perfectly.
If you prefer a spicier kick, consider adding a pinch of red pepper flakes to the sautéed vegetables. Finally, for a more rustic presentation, serve the dish directly from the pan, allowing your guests to help themselves.
Enjoy your culinary journey through Portugal with this delightful dish!
Cataplana De Mariscos
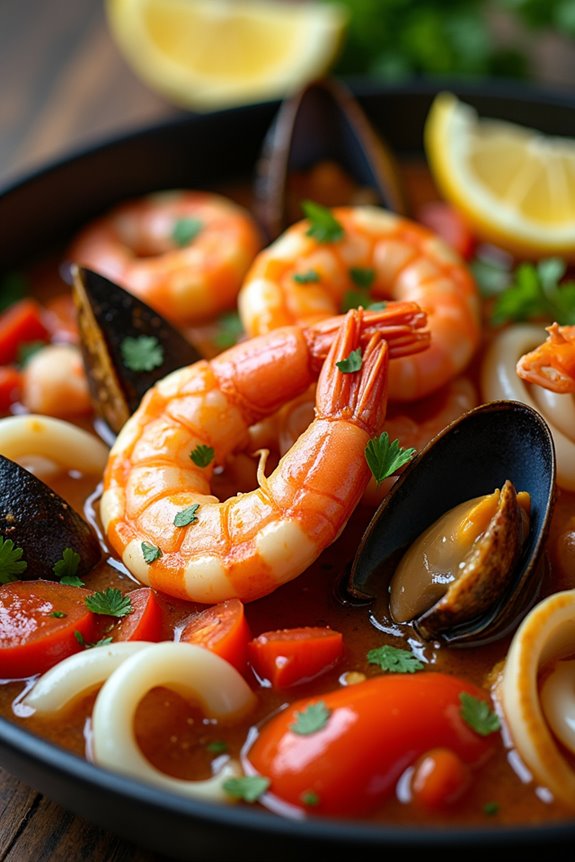
Cataplana de Mariscos, a traditional Portuguese seafood dish, originates from the Algarve region and is known for its unique cooking method using a cataplana, a clam-shaped copper or stainless steel cooking vessel. This dish showcases the vibrant flavors of the ocean, combining a rich variety of seafood with aromatic ingredients, making it a perfect representation of Portugal’s coastal cuisine.
The beauty of Cataplana de Mariscos lies not only in its taste but also in its presentation, as the colorful seafood and vegetables are visually striking when served directly from the cooking vessel.
Preparing Cataplana de Mariscos is a delightful experience that brings the essence of Portuguese cooking into your home. This dish is characterized by its aromatic broth, which is infused with garlic, onions, tomatoes, and herbs, creating a fragrant base that enhances the natural flavors of the seafood.
Whether you’re hosting a dinner party or enjoying a cozy meal at home, Cataplana de Mariscos is sure to impress your guests and satisfy your seafood cravings.
Ingredients (Serves 4-6):
- 500g (1 lb) large shrimp, peeled and deveined
- 500g (1 lb) clams, scrubbed
- 500g (1 lb) mussels, cleaned
- 300g (10 oz) squid, cleaned and cut into rings
- 1 large onion, finely chopped
- 4 cloves of garlic, minced
- 2 large tomatoes, chopped
- 1 bell pepper, chopped (red or green)
- 1 cup dry white wine
- 1 cup fish or seafood stock
- 2 tablespoons olive oil
- 1 teaspoon paprika
- 1 teaspoon dried oregano
- Salt and pepper to taste
- Fresh parsley, chopped (for garnish)
- Lemon wedges (for serving)
Cooking Instructions:
- Prepare the Ingredients: Start by cleaning and chopping all your seafood and vegetables. Confirm the shrimp are peeled and deveined, clams and mussels are scrubbed and cleaned, and the squid is cut into rings. Finely chop the onion, mince the garlic, and chop the tomatoes and bell pepper. This prep work guarantees that you can cook efficiently and enjoy the process without interruptions.
- Sauté the Vegetables: In a large cataplana or a deep skillet, heat the olive oil over medium heat. Add the chopped onion and sauté until translucent, about 5 minutes. Then, add the minced garlic and cook for an additional minute until fragrant. This step builds a flavorful base for your dish.
- Add Tomatoes and Bell Pepper: Incorporate the chopped tomatoes and bell pepper into the cataplana. Cook for about 5-7 minutes, stirring occasionally, until the tomatoes break down and release their juices. The mixture should become a thick, aromatic sauce at this point.
- Season the Mixture: Sprinkle in the paprika, dried oregano, salt, and pepper. Stir well to combine the spices with the vegetable mixture, allowing the flavors to meld together for a couple of minutes.
- Pour in the Wine and Stock: Add the dry white wine and seafood stock to the cataplana, stirring to combine. Bring the mixture to a gentle simmer, allowing it to cook for about 5 minutes. This step infuses the broth with rich flavors and helps to deglaze the pan.
- Add the Seafood: Gently nestle the shrimp, clams, mussels, and squid into the simmering broth. Close the cataplana lid (or cover the skillet) and let the seafood cook for about 5-7 minutes, or until the clams and mussels have opened and the shrimp are cooked through. Be careful not to overcook the seafood, as it can become tough.
- Garnish and Serve: Once the seafood is cooked, remove the cataplana from the heat. Open the lid and sprinkle fresh parsley over the top. Serve the Cataplana de Mariscos hot, accompanied by lemon wedges to squeeze over the dish for an extra burst of flavor.
Extra Tips:
When preparing Cataplana de Mariscos, it’s crucial to use the freshest seafood available for the best flavor. If you can’t find all types of seafood listed, feel free to substitute with other local varieties or adjust the quantities to your taste.
Additionally, soaking the clams and mussels in saltwater for about an hour before cooking can help them purge any sand, guaranteeing a cleaner bite. Finally, serving the dish with crusty bread is a great way to soak up the delicious broth!
Bifana Sandwich

The Bifana Sandwich is a classic Portuguese dish that showcases the rich culinary heritage of Portugal. It features marinated pork, usually served in a crusty roll, making it a popular street food and comfort food option. The dish is known for its flavorful, tender meat that’s often accompanied by a spicy mustard or piri-piri sauce, giving it an irresistible kick.
Whether enjoyed at a local tavern or made at home, the Bifana Sandwich is a delightful way to experience the flavors of Portuguese cuisine.
To prepare this dish, you’ll need to marinate the pork to infuse it with robust flavors before grilling or frying. The process is straightforward, yet the results are deliciously satisfying. Serve the Bifana Sandwich with a side of potato chips or a simple salad for a complete meal that will surely impress family and friends alike.
Ingredients (Serves 4-6):
- 1.5 lbs (680g) pork loin or pork shoulder, thinly sliced
- 4-6 crusty rolls (such as Portuguese bifana bread or bolos)
- 4 cloves garlic, minced
- 1 cup white wine
- 1/4 cup olive oil
- 2 tablespoons paprika (preferably smoked)
- 1 teaspoon salt
- 1 teaspoon black pepper
- 1 teaspoon dried oregano
- 1 teaspoon piri-piri sauce (optional for extra heat)
- Mustard or piri-piri sauce for serving
- Fresh cilantro or parsley for garnish (optional)
Cooking Instructions:
- Marinate the Pork: In a large mixing bowl, combine the minced garlic, white wine, olive oil, paprika, salt, black pepper, oregano, and piri-piri sauce (if using). Add the thinly sliced pork to the marinade, ensuring that all the pieces are well coated. Cover the bowl with plastic wrap and let it marinate in the refrigerator for at least 2 hours, preferably overnight for maximum flavor.
- Prepare the Grill or Skillet: If using a grill, preheat it to medium-high heat. For a skillet, place it over medium heat and add a splash of olive oil to coat the bottom. Allow the oil to heat until shimmering but not smoking.
- Cook the Pork: Remove the marinated pork from the refrigerator and allow it to come to room temperature for about 15 minutes. Place the pork slices on the grill or in the skillet in a single layer, ensuring not to overcrowd the pan. Cook for about 3-4 minutes on each side, or until the pork is cooked through and has a nice golden-brown crust.
- Toast the Rolls: While the pork is cooking, slice the crusty rolls in half. Once the pork is done, you can place the rolls on the grill or under the broiler for about 1-2 minutes, just until they’re lightly toasted.
- Assemble the Sandwiches: Layer the cooked pork slices generously on the bottom half of each roll. Drizzle with additional piri-piri sauce or spread mustard on top, if desired. Place the top half of the roll over the filling and gently press down.
- Serve: Serve the Bifana Sandwiches warm, garnished with fresh cilantro or parsley if you like. Enjoy with a side of crispy potato chips or a fresh salad.
Extra Tips:
When making Bifana Sandwiches, the key to tender and flavorful meat is the marination time. If you’re short on time, try to marinate for at least 30 minutes, but allow for longer if possible.
Additionally, feel free to customize your sandwich toppings—some people enjoy adding sautéed onions, pickled vegetables, or even cheese. Experiment with different sauces to find your ideal flavor balance, and enjoy this Portuguese delight with a cold beer or a glass of vinho verde.
Polvo À Lagareiro
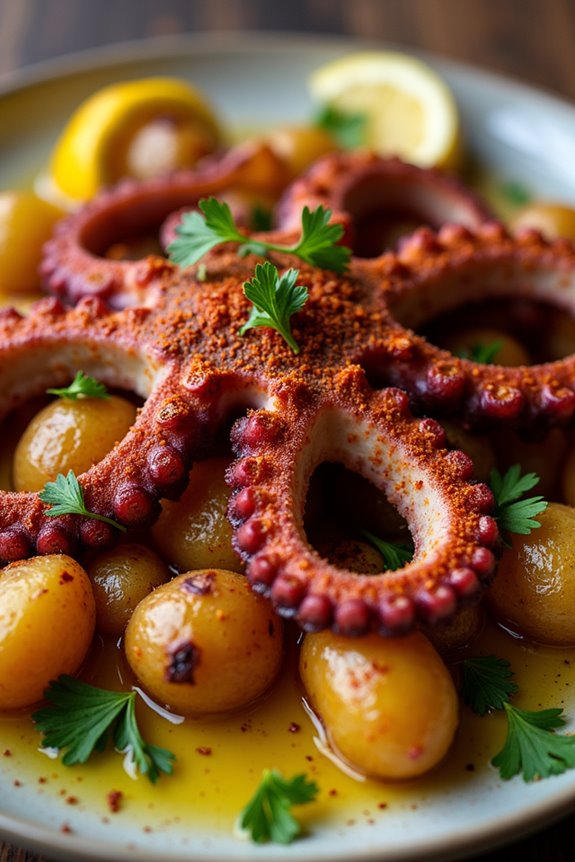
Polvo À Lagareiro, or Lagareiro-style Octopus, is a traditional Portuguese dish that highlights the country’s love for seafood, particularly octopus. The dish is known for its simple yet flavorful preparation, which features the octopus being boiled until tender and then roasted with garlic, olive oil, and potatoes.
This rustic recipe is a favorite in coastal regions of Portugal, where fresh octopus is abundant, and it perfectly encapsulates the Mediterranean flavors that define Portuguese cuisine.
Cooking Polvo À Lagareiro isn’t only about the ingredients but also about the technique. The key to achieving the perfect texture for the octopus lies in the boiling process, which guarantees it’s tender and juicy. Once boiled, the octopus is then roasted to develop a beautiful golden crust, all while being bathed in fragrant olive oil and garlic.
Served alongside roasted potatoes, this dish is a true celebration of simplicity and freshness, making it a delightful centerpiece for any gathering.
Ingredients (Serves 4-6)
- 1.5 kg (3.3 lbs) octopus
- 1 kg (2.2 lbs) small waxy potatoes
- 4 cloves of garlic, minced
- 100 ml (3.4 fl oz) olive oil
- 1 teaspoon paprika
- Salt and pepper, to taste
- Fresh parsley, chopped (for garnish)
- Lemon wedges (for serving)
Cooking Instructions
- Prepare the Octopus: Begin by cleaning the octopus if it isn’t already cleaned. This involves removing the beak and innards. Rinse it well under cold water to guarantee it’s free from any sand or impurities.
- Boil the Octopus: In a large pot, bring salted water to a boil. Once boiling, add the octopus and reduce the heat to a gentle simmer. Cook for approximately 45 minutes to 1 hour, or until the octopus is tender when pierced with a fork. The cooking time may vary depending on the size of the octopus.
- Cook the Potatoes: While the octopus is boiling, wash the potatoes and cut them in half if they’re large. Add them to a separate pot of boiling salted water and cook until fork-tender, about 15-20 minutes. Drain and set aside.
- Roast the Octopus and Potatoes: Preheat your oven to 200°C (400°F). Once the octopus is tender, remove it from the pot and let it cool slightly. Cut it into large pieces. In a baking dish, combine the octopus pieces and halved potatoes. Drizzle with olive oil, minced garlic, paprika, salt, and pepper, and toss to coat everything evenly.
- Bake: Place the baking dish in the preheated oven and roast for about 20-25 minutes, or until the octopus is golden and crispy, and the potatoes are lightly browned. Stir halfway through to guarantee even cooking.
- Serve: Remove from the oven and garnish with chopped parsley. Serve hot with lemon wedges on the side for an added zesty touch.
Extra Tips
When cooking Polvo À Lagareiro, it’s essential to confirm that the octopus is cooked just right to achieve the perfect texture. Avoid overcooking, as it can become rubbery.
If you have the time, consider chilling the octopus in the refrigerator after boiling, as this can help improve its texture during roasting. Additionally, feel free to experiment with the seasonings; adding a bit of chili flakes can introduce a nice heat if desired.
Enjoy this dish with a glass of Portuguese wine for a truly authentic experience!
Alheira Sausage

Alheira sausage is a traditional Portuguese dish that showcases the unique flavors and culinary heritage of Portugal. Originating from the northern regions of the country, this delectable sausage is made with a blend of meats, bread, and spices, resulting in a rich and savory flavor profile.
Often served grilled or fried, Alheira is perfect for a hearty meal and is frequently accompanied by sides such as sautéed greens or fried potatoes. The dish not only represents the rustic nature of Portuguese cuisine but also tells the story of the Jewish influence in the region during the Middle Ages, where ingredients were cleverly combined to create a satisfying meal.
In preparing Alheira sausage, it’s essential to choose high-quality ingredients, particularly the sausage itself, as this will considerably impact the final dish’s taste. While Alheira can be found pre-made in many markets, making it from scratch or sourcing it from a reputable butcher can elevate your dish to new heights.
The cooking process is simple, allowing the flavors to shine through while providing a delightful experience for anyone who enjoys this Portuguese delicacy.
Ingredients (Serves 4-6):
- 4-6 Alheira sausages
- 2 tablespoons olive oil
- 4 cloves garlic, minced
- 1 large onion, sliced
- 2 cups kale or collard greens, chopped
- Salt and pepper to taste
- Fresh parsley for garnish (optional)
Cooking Instructions:
- Prepare the Ingredients: Start by gathering all your ingredients. Make sure your Alheira sausages are defrosted if frozen. Chop the kale or collard greens and set them aside. Mince the garlic and slice the onion to have everything ready for cooking.
- Cook the Sausages: In a large skillet over medium heat, add the olive oil. Once the oil is hot, add the Alheira sausages to the skillet. Cook them for about 8-10 minutes, turning occasionally until they’re golden brown and cooked through. You want the outside to be crispy while the inside remains juicy.
- Sauté the Aromatics: After the sausages are cooked, remove them from the skillet and set them aside on a plate. In the same skillet, add the sliced onion and minced garlic. Sauté for about 5 minutes until the onion becomes translucent and fragrant. Stir frequently to prevent burning.
- Add the Greens: Once the onions and garlic are ready, add the chopped kale or collard greens to the skillet. Sauté the greens for an additional 5-7 minutes until they’re wilted and tender. Season with salt and pepper to taste.
- Combine and Serve: Slice the cooked Alheira sausages and add them back to the skillet with the sautéed greens. Toss everything together gently to combine the flavors. Allow it to heat through for another 2-3 minutes.
- Garnish and Enjoy: Transfer the mixture to a serving platter. If desired, garnish with freshly chopped parsley for added color and flavor. Serve warm, and enjoy your delicious Alheira sausage!
Extra Tips:
When cooking Alheira sausage, be mindful not to overcook it, as this can dry out the meat inside. If you prefer a more intense flavor, consider adding spices such as paprika or smoked paprika to the sautéed greens.
Additionally, pairing the dish with a side of roasted potatoes or crusty bread can complement the rich flavors beautifully. Enjoy the meal with a glass of Portuguese red wine for an authentic experience!
Tarte De Amêndoa

Tarte De Amêndoa, or Almond Tart, is a beloved Portuguese dessert that combines the rich flavors of almonds with a sweet, buttery crust. This delightful tart is perfect for special occasions or simply as a treat to enjoy with family and friends. The creamy almond filling, paired with the flaky crust, creates a wonderful contrast of textures that’s sure to impress anyone who takes a bite.
This dessert isn’t only delicious but also relatively easy to make. With a few simple ingredients and some careful preparation, you can create a stunning Tarte De Amêndoa that will be the centerpiece of your dessert table. Whether you’re an experienced baker or a novice in the kitchen, this recipe is accessible and rewarding.
Ingredients (Serves 4-6):
- 1 pre-made tart crust (9-inch)
- 1 cup almond flour
- 1 cup granulated sugar
- 4 large eggs
- 1 teaspoon vanilla extract
- 1/4 cup unsalted butter, melted
- 1/4 teaspoon salt
- 1/2 teaspoon almond extract
- Sliced almonds for topping (optional)
- Powdered sugar for dusting (optional)
Cooking Instructions:
- Preheat the oven: Begin by preheating your oven to 350°F (175°C). This step is essential as it guarantees that the tart bakes evenly and achieves a perfect golden color.
- Prepare the tart crust: If you’re using a pre-made tart crust, place it in a 9-inch tart pan and press it gently against the sides and bottom. If you prefer to make your own crust, combine flour, butter, sugar, and a pinch of salt in a bowl. Mix until crumbly and press into the tart pan. Prick the bottom with a fork to prevent bubbling.
- Mix the filling: In a large mixing bowl, combine the almond flour and granulated sugar. Whisk in the eggs one at a time, ensuring each is fully incorporated before adding the next. Then add the melted butter, vanilla extract, salt, and almond extract, mixing until smooth and well combined.
- Pour the filling: Pour the almond mixture into the prepared tart crust, spreading it evenly. This will allow for a uniform bake and guarantee every slice has the same delicious flavor.
- Add toppings: If desired, sprinkle sliced almonds over the top of the tart for added texture and a beautiful presentation. This step is optional but highly recommended for those who love almonds.
- Bake the tart: Place the tart in the preheated oven and bake for about 30-35 minutes, or until the filling is set and the top is lightly golden. Keep an eye on it to prevent over-baking. A toothpick inserted in the center should come out clean.
- Cool and serve: Once baked, remove the tart from the oven and allow it to cool in the pan for 10 minutes. Carefully transfer it to a wire rack to cool completely. Before serving, dust the top with powdered sugar for an elegant touch.
Extra Tips:
When making Tarte De Amêndoa, fresh ingredients will yield the best flavor and texture. Make sure your eggs are at room temperature, as this helps to create a smoother batter.
Additionally, if you have any leftover tart, it can be stored in an airtight container in the refrigerator for up to three days. Reheat it slightly before serving for an even more delightful experience. Enjoy your baking adventure!
Sopa De Pedra
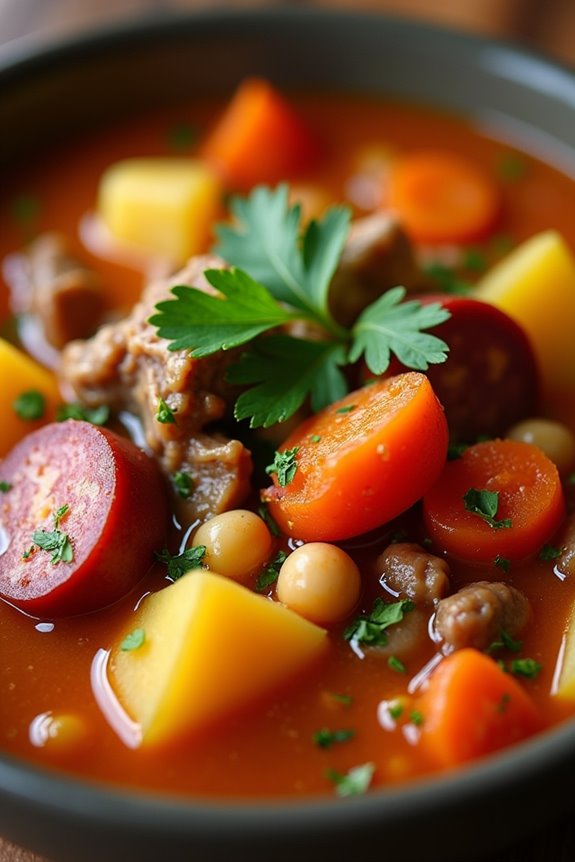
Sopa de Pedra, or Stone Soup, is a traditional Portuguese dish that stands out for its rich flavors and hearty texture. Originating from the region of Almeirim, this soup has a legendary backstory that revolves around the idea of collaboration and community. The tale tells of a hungry traveler who, with nothing more than a stone, cleverly tricks the townsfolk into contributing ingredients for a delicious soup, demonstrating how sharing can create abundance.
The dish has evolved over time and is now celebrated for its combination of meats, vegetables, and beans, making it a perfect comfort food for family gatherings or chilly evenings. This robust soup not only fills the belly but also warms the heart, inviting everyone to partake in its preparation.
The ingredients can vary based on availability and personal preference, allowing cooks to experiment and make the dish their own. Whether using traditional ingredients or adding a modern twist, Sopa de Pedra remains a beloved staple in Portuguese cuisine, showcasing the country’s culinary heritage and the spirit of togetherness it embodies.
Ingredients (Serving size: 4-6 people)
- 1 stone (optional, for tradition)
- 300g of chorizo sausage, sliced
- 300g of smoked bacon, diced
- 200g of beef, cut into cubes
- 1 large onion, chopped
- 2 cloves of garlic, minced
- 2 medium carrots, diced
- 1 large potato, diced
- 1 Bay leaf
- 1 teaspoon of paprika
- 1 can (400g) of chickpeas, drained and rinsed
- 1 can (400g) of diced tomatoes
- 1.5 liters of beef or vegetable broth
- Salt and pepper to taste
- Fresh parsley, chopped (for garnish)
Cooking Instructions
- Prepare the Ingredients: Begin by gathering all your ingredients. Chop the onion, garlic, carrots, and potatoes into small, manageable pieces. Slice the chorizo and dice the smoked bacon and beef. This preparation will guarantee a smoother cooking process and evenly distributed flavors.
- Sauté the Meats: In a large pot or Dutch oven, heat a splash of olive oil over medium heat. Add the diced bacon and chorizo, sautéing until they’re browned and their flavors are released, about 5-7 minutes. Then, add the beef cubes and cook until they’re browned on all sides. This step adds depth to the soup through the caramelization of the meats.
- Add Aromatics: Stir in the chopped onion and minced garlic to the pot, cooking until the onion is translucent, about 3-4 minutes. The aroma of the onions and garlic will enhance the soup’s overall flavor and create a fragrant base.
- Incorporate Vegetables: Add the diced carrots and potatoes to the pot. Stir well to combine all the ingredients, allowing them to heat through for about 2-3 minutes. This will soften the vegetables slightly before adding the liquids.
- Add Liquids and Seasonings: Pour in the beef or vegetable broth, and add the can of diced tomatoes and drained chickpeas. Toss in the Bay leaf and sprinkle in the paprika, salt, and pepper. Stir everything together, bringing the mixture to a gentle boil.
- Simmer the Soup: Reduce the heat to low and let the soup simmer for about 30-40 minutes. This allows the flavors to meld together beautifully. Stir occasionally to prevent sticking and to check the consistency. You can add more broth or water if it becomes too thick.
- Serve and Garnish: Once the soup is ready, taste and adjust the seasoning if necessary. Remove the Bay leaf, and ladle the soup into bowls. Garnish each serving with fresh parsley for a pop of color and added freshness.
Extra Tips
When making Sopa de Pedra, feel free to customize the ingredients based on your preferences or what you have on hand. You can add other vegetables like spinach, kale, or peas, or substitute the meats with chicken or turkey for a lighter version.
For a vegetarian option, simply omit the meats and add more beans and vegetables. Additionally, if you want a richer flavor, consider letting the soup sit for a few hours or overnight before serving, as this will deepen the flavors even further. Enjoy this soul-warming soup with crusty bread for a complete meal!