

There’s something so delightful about Mediterranean lemon recipes that instantly brightens my day.
From refreshing lemon-infused salads to tangy grilled fish, each dish adds a burst of sunshine to any occasion.
These vibrant flavors and fresh ingredients are ideal for summer get-togethers or a cozy weeknight dinner.
Ready to find your next lemony favorite?
Let’s explore these mouthwatering recipes together.
Lemon and Herb Grilled Chicken

Lemon and Herb Grilled Chicken is a delightful dish that captures the essence of Mediterranean flavors. The combination of fresh herbs, zesty lemon, and juicy chicken creates a mouthwatering meal that’s perfect for summer barbecues or weeknight dinners. This dish isn’t only simple to prepare but also brings a burst of rejuvenation to your table, making it a favorite among family and friends.
The bright citrus notes from the lemon complement the savory herbs, resulting in a harmonious blend that’s both aromatic and delicious.
To prepare this dish, you’ll need to marinate the chicken to allow the flavors to infuse. The marinade, made from lemon juice, olive oil, and an assortment of herbs, tenderizes the chicken while adding a rich depth of flavor. Once marinated, grilling the chicken achieves a beautiful char and keeps it juicy and succulent.
Serve this dish with a side of grilled vegetables or a fresh salad for a complete Mediterranean experience.
Ingredients (Serves 4-6)
- 4-6 boneless, skinless chicken breasts
- 1/4 cup olive oil
- 1/4 cup fresh lemon juice (about 2 lemons)
- 3 cloves garlic, minced
- 1 tablespoon fresh oregano, chopped
- 1 tablespoon fresh thyme, chopped
- 1 tablespoon fresh rosemary, chopped
- 1 teaspoon salt
- 1/2 teaspoon black pepper
- Lemon wedges (for serving)
- Fresh herbs (for garnish)
Cooking Instructions
- Prepare the Marinade: In a medium bowl, whisk together the olive oil, lemon juice, minced garlic, chopped oregano, thyme, rosemary, salt, and black pepper. This mixture will serve as the marinade, imparting flavor to the chicken.
- Marinate the Chicken: Place the chicken breasts in a large resealable plastic bag or a shallow dish. Pour the marinade over the chicken, guaranteeing all pieces are well coated. Seal the bag or cover the dish and refrigerate for at least 30 minutes, preferably 2 to 4 hours. This allows the flavors to penetrate the chicken for a more robust taste.
- Preheat the Grill: When you’re ready to cook, preheat your grill to medium-high heat (about 400°F or 200°C). This temperature is perfect for achieving a nice sear on the chicken while keeping it juicy inside.
- Grill the Chicken: Remove the chicken from the marinade, letting any excess drip off. Place the chicken on the grill and cook for 6-7 minutes per side, or until the internal temperature reaches 165°F (75°C). Avoid moving the chicken too much; let it sear to get those beautiful grill marks.
- Rest and Serve: Once cooked, remove the chicken from the grill and let it rest for about 5 minutes. This resting period allows the juices to redistribute throughout the meat. Serve the grilled chicken with lemon wedges and garnish with fresh herbs.
Extra Tips
For best results, use fresh herbs rather than dried, as they provide a more vibrant flavor. Also, consider using a meat thermometer to guarantee perfect doneness without overcooking.
If you want extra zing, you can zest the lemons before juicing them and add the zest to the marinade. Pairing the grilled chicken with a rejuvenating tzatziki sauce or a Mediterranean salad will elevate your meal even further!
Mediterranean Lemon Orzo Salad

Mediterranean Lemon Orzo Salad is a rejuvenating and vibrant dish that beautifully showcases the bright flavors of Mediterranean cuisine. This salad is perfect for warm weather gatherings, picnics, or as a side dish for grilled meats. The combination of zesty lemon, fresh vegetables, and tender orzo pasta makes this salad both satisfying and nutritious.
It’s also incredibly easy to prepare, making it an ideal choice for both novice and experienced cooks. This dish not only bursts with flavor but is also customizable with various ingredients. You can add your favorite Mediterranean elements such as olives, feta cheese, or roasted peppers to suit your taste.
The lemon dressing ties everything together, providing a tangy and aromatic finish that elevates the salad’s overall appeal. Whether served as a main course or a side, this Mediterranean Lemon Orzo Salad is sure to impress your family and friends.
Ingredients (Serves 4-6)
- 1 cup orzo pasta
- 1 ½ cups cherry tomatoes, halved
- 1 cucumber, diced
- 1 bell pepper, diced (any color)
- ¼ red onion, finely chopped
- ½ cup Kalamata olives, pitted and sliced
- ½ cup feta cheese, crumbled
- ¼ cup fresh parsley, chopped
- ¼ cup olive oil
- Zest and juice of 2 lemons
- Salt and pepper to taste
Cooking Instructions
- Cook the Orzo: Begin by bringing a large pot of salted water to a boil. Once boiling, add the orzo pasta and cook according to package instructions until al dente, usually about 8-10 minutes. Stir occasionally to prevent sticking.
- Drain and Rinse: Once the orzo is cooked, drain it in a colander and rinse under cold water to stop the cooking process. This will also help to cool the orzo down quickly, preventing it from becoming sticky.
- Prepare the Vegetables: While the orzo is cooking, prepare the fresh vegetables. Halve the cherry tomatoes, dice the cucumber and bell pepper, and finely chop the red onion. Place all the prepared vegetables in a large mixing bowl.
- Make the Lemon Dressing: In a small bowl, whisk together the olive oil, lemon zest, lemon juice, salt, and pepper. Adjust the seasoning to your preference, guaranteeing the dressing has a good balance of acidity and oil.
- Combine Ingredients: Once the orzo has cooled, add it to the bowl with the vegetables. Pour the lemon dressing over the mixture and gently toss everything together until well combined.
- Add Feta and Olives: Finally, fold in the Kalamata olives and crumbled feta cheese, being careful not to break the feta too much. This will add a creamy texture and rich flavor to the salad.
- Chill and Serve: Cover the salad and refrigerate for at least 30 minutes to allow the flavors to meld. Serve chilled or at room temperature, garnished with additional parsley if desired.
Extra Tips
For an extra layer of flavor, consider adding toasted pine nuts or walnuts for a crunchy texture. You can also substitute the feta cheese with goat cheese for a tangier taste or add cooked grilled chicken for a heartier option.
Feel free to experiment with other Mediterranean ingredients, such as artichokes or roasted vegetables, to make this salad your own. Always taste and adjust the lemon dressing before serving to guarantee that the flavors are balanced to your liking. Enjoy the freshness of your Mediterranean Lemon Orzo Salad!
Creamy Lemon Hummus
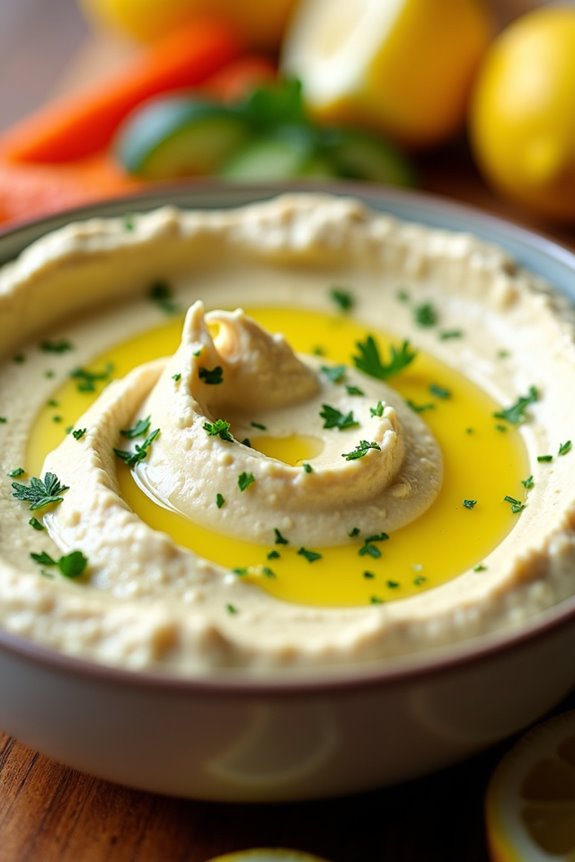
Creamy Lemon Hummus is a delightful Mediterranean dish that brings a zesty twist to the traditional hummus recipe. This invigorating dip is perfect for gatherings, parties, or simply a cozy night in. Packed with protein from chickpeas and enhanced with the bright flavor of fresh lemon juice, it’s both healthy and delicious. Serve it with pita bread, fresh veggies, or use it as a spread in wraps and sandwiches for a burst of flavor that everyone will love.
The creamy texture of this hummus is achieved by blending tahini, olive oil, and garlic with the chickpeas, creating a smooth and rich mixture. The addition of lemon not only adds a tangy flavor but also brightens the overall taste of the dish. Whether you’re a hummus enthusiast or trying it for the first time, this Creamy Lemon Hummus is sure to impress with its vibrant taste and easy preparation.
Ingredients (Serves 4-6):
- 1 can (15 oz) chickpeas, drained and rinsed
- 1/4 cup tahini
- 1/4 cup fresh lemon juice (about 2 lemons)
- 2 tablespoons extra virgin olive oil
- 2 cloves garlic, minced
- 1/2 teaspoon ground cumin
- Salt, to taste
- Water, as needed for consistency
- Fresh parsley, for garnish (optional)
- Lemon wedges, for serving (optional)
- Pita bread or vegetables, for dipping
Cooking Instructions:
- Prepare the Ingredients: Begin by gathering all the ingredients mentioned above. Drain and rinse the chickpeas to remove excess sodium and any preservatives, which will help enhance the flavor of your hummus.
- Blend the Base: In a food processor, combine the rinsed chickpeas, tahini, fresh lemon juice, minced garlic, and ground cumin. This combination of ingredients will form the base of your hummus. Secure the lid and pulse several times until the mixture is coarsely combined.
- Add Olive Oil and Season: With the food processor running, slowly drizzle in the extra virgin olive oil. This will help to create a creamy texture. After a few moments, stop and scrape down the sides of the bowl to guarantee an even blend. Add salt to taste and pulse again until smooth.
- Adjust Consistency: If the hummus is too thick, add water a tablespoon at a time while the food processor is running, until you reach your desired creamy consistency. The final texture should be smooth and spreadable.
- Taste and Adjust Flavors: Before transferring your hummus to a serving bowl, taste it for seasoning. You may want to add more lemon juice, garlic, or salt to suit your preferences. Blend again if you make any adjustments.
- Serve: Transfer the hummus to a serving bowl. If desired, drizzle a bit of olive oil on top and garnish with chopped fresh parsley. Serve with lemon wedges on the side and enjoy with pita bread or fresh vegetables.
Extra Tips:
For an even more flavorful hummus, consider roasting the garlic before adding it to the mix, as this will give it a sweet, mellow taste.
You can also experiment with additional flavors by incorporating ingredients like roasted red peppers, sun-dried tomatoes, or spices such as paprika for a smoky kick.
Store any leftovers in an airtight container in the refrigerator for up to a week, and remember to give it a good stir before serving again, as it may thicken upon chilling.
Lemon and Garlic Roasted Potatoes

Lemon and Garlic Roasted Potatoes are a delightful Mediterranean dish that brings together the zesty flavor of fresh lemons and the aromatic essence of garlic to transform ordinary potatoes into a mouthwatering side. Perfectly roasted, these potatoes are crispy on the outside while remaining tender and fluffy inside.
The vibrant flavor profile makes them an ideal accompaniment for any main course, whether grilled meats, fish, or even as part of a vegetarian spread. This recipe is simple yet delivers a burst of flavor that will impress your family and friends.
With just a few ingredients, you can create a dish that not only looks beautiful with its golden-brown hue but also fills your kitchen with an irresistible aroma. Serve these Lemon and Garlic Roasted Potatoes at your next gathering, and watch as they quickly become the star of the meal.
Ingredients (Serves 4-6 People):
- 2 pounds of baby potatoes (or any small potatoes)
- 4 tablespoons olive oil
- 3 cloves garlic, minced
- Zest of 1 lemon
- Juice of 1 lemon
- 1 teaspoon dried oregano
- 1 teaspoon salt
- ½ teaspoon black pepper
- Fresh parsley, chopped (for garnish)
Cooking Instructions:
- Preheat the Oven: Start by preheating your oven to 425°F (220°C). This high temperature is essential for achieving that perfectly crispy exterior on the potatoes.
- Prepare the Potatoes: Wash the baby potatoes thoroughly to remove any dirt. If they’re larger than bite-sized, cut them in half or quarters to guarantee even cooking. Place the potatoes in a large mixing bowl.
- Mix the Marinade: In a small bowl, whisk together the olive oil, minced garlic, lemon zest, lemon juice, dried oregano, salt, and pepper. This mixture will infuse the potatoes with flavor as they roast.
- Combine Potatoes and Marinade: Pour the marinade over the potatoes in the mixing bowl. Toss well to make sure all the potatoes are evenly coated with the mixture.
- Spread on Baking Sheet: Line a baking sheet with parchment paper or lightly grease it. Spread the coated potatoes in a single layer on the baking sheet, ensuring they aren’t overcrowded to allow for proper roasting.
- Roast the Potatoes: Place the baking sheet in the preheated oven and roast for about 30-35 minutes. Halfway through, flip the potatoes to guarantee they cook evenly and achieve a golden-brown color on all sides.
- Check for Doneness: After the roasting time is up, check the potatoes for doneness by piercing them with a fork; they should be tender inside and crispy outside. If they need more time, continue roasting for an additional 5-10 minutes.
- Serve: Once the potatoes are perfectly roasted, remove them from the oven. Garnish with chopped fresh parsley before serving to add a pop of color and freshness.
Extra Tips:
For an even more intense flavor, consider marinating the potatoes in the lemon and garlic mixture for 30 minutes before roasting them. This allows the potatoes to absorb more of the zesty goodness.
Additionally, feel free to customize the herbs; rosemary or thyme would also pair wonderfully with the lemon and garlic. Serve these potatoes hot for the best texture, and enjoy the delightful flavors that will transport you straight to the Mediterranean!
Zesty Lemon Tabbouleh
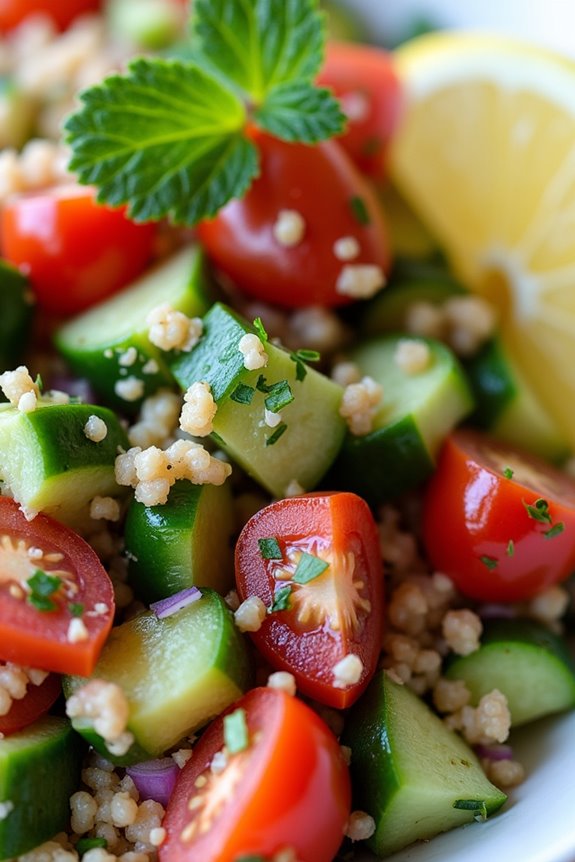
Zesty Lemon Tabbouleh is a revitalizing and vibrant dish that combines the earthy flavors of bulgur wheat with the bright, tangy essence of fresh lemon juice. This Middle Eastern salad isn’t only a delightful accompaniment to grilled meats but also a satisfying vegetarian option that can stand alone.
The crispness of fresh parsley, the juiciness of tomatoes, and the crunch of cucumber meld beautifully with the zesty dressing, making it a perfect dish for warm weather gatherings or as a light lunch.
This dish is incredibly versatile, allowing you to adjust the ingredients based on what you have on hand or your personal preferences. Whether you’re hosting a dinner party or enjoying a casual meal at home, Zesty Lemon Tabbouleh is sure to impress with its colorful presentation and invigorating taste.
It’s easy to prepare, and once you master the basic recipe, you can experiment with different herbs or add-ins to make it your own.
Ingredients (Serves 4-6)
- 1 cup bulgur wheat
- 1 ½ cups boiling water
- 1 ½ cups fresh parsley, finely chopped
- 1 cup ripe tomatoes, diced
- 1 cup cucumber, diced
- ½ cup red onion, finely chopped
- ½ cup fresh mint leaves, finely chopped
- 1/3 cup fresh lemon juice
- 1/3 cup extra-virgin olive oil
- Salt and pepper to taste
Cooking Instructions
- Prepare the Bulgur Wheat: In a medium-sized bowl, combine the bulgur wheat and boiling water. Cover the bowl with a lid or plastic wrap and let it sit for about 20-30 minutes until the bulgur absorbs the water and softens. Fluff with a fork once done.
- Chop the Vegetables and Herbs: While the bulgur is soaking, finely chop the parsley, tomatoes, cucumber, red onion, and mint leaves. Make sure to use fresh herbs for the best flavor.
- Combine Ingredients: In a large mixing bowl, combine the softened bulgur wheat with the chopped vegetables and herbs. Gently mix everything together to ensure an even distribution.
- Make the Dressing: In a small bowl, whisk together the fresh lemon juice, extra-virgin olive oil, salt, and pepper. Adjust the seasoning to taste, ensuring a good balance of acidity and richness.
- Dress the Tabbouleh: Pour the dressing over the bulgur mixture and toss gently to combine. Make sure all the ingredients are well coated with the dressing.
- Chill and Serve: For the best flavor, let the tabbouleh sit in the refrigerator for at least 30 minutes before serving. This allows the flavors to meld together beautifully. Serve chilled or at room temperature.
Extra Tips
When making Zesty Lemon Tabbouleh, it’s essential to use fresh ingredients for the best results. If you prefer a more pronounced lemon flavor, feel free to adjust the amount of lemon juice to your liking.
Additionally, for a more nutritious twist, consider adding other vegetables like bell peppers or carrots, or even some chickpeas for added protein. This salad can be made a day ahead; just keep it covered in the fridge to maintain freshness.
Enjoy your vibrant and zesty dish!
Lemon-Infused Olive Oil Pasta

Lemon-Infused Olive Oil Pasta is a delightful dish that perfectly embodies the vibrant flavors of the Mediterranean. This recipe combines the freshness of lemons with the richness of high-quality olive oil, creating a light yet satisfying meal that’s perfect for any occasion. The zesty lemon not only enhances the flavor of the pasta but also adds a revitalizing note that balances the dish beautifully.
Whether you’re serving it at a family dinner or a casual get-together with friends, this pasta is sure to impress. The simplicity of this recipe allows for versatility; you can easily add your favorite vegetables or proteins to customize it to your taste. It’s an ideal dish for warm weather dining, and the bright flavors are sure to awaken your palate.
With just a few ingredients, you can create a stunning meal that captures the essence of Mediterranean cuisine. Let’s plunge into how to prepare this tantalizing Lemon-Infused Olive Oil Pasta.
Ingredients (serving size: 4-6 people)
- 12 oz spaghetti or linguine
- 1/2 cup extra virgin olive oil
- Zest of 2 lemons
- Juice of 2 lemons
- 4 cloves garlic, minced
- 1/4 teaspoon red pepper flakes (optional)
- Salt, to taste
- Freshly ground black pepper, to taste
- 1/2 cup grated Parmesan cheese
- 1/4 cup fresh parsley, chopped
- Lemon wedges, for serving
Cooking Instructions
- Cook the Pasta: Bring a large pot of salted water to a boil. Add the spaghetti or linguine and cook according to package instructions until al dente. Reserve about 1 cup of the pasta cooking water, then drain the pasta and set aside.
- Prepare the Lemon-Infused Olive Oil: In a large skillet over medium heat, add the extra virgin olive oil and minced garlic. Sauté for about 2 minutes, until the garlic is fragrant but not browned. This step helps to infuse the oil with the aromatic flavor of garlic.
- Add Lemon Zest and Juice: Once the garlic is ready, add the lemon zest and lemon juice to the skillet. If you like a bit of heat, sprinkle in the red pepper flakes at this stage. Stir the mixture well, allowing the flavors to meld for about 1 minute.
- Combine Pasta and Sauce: Add the drained pasta to the skillet, tossing it gently to coat with the lemon-infused olive oil mixture. If the pasta seems dry, gradually add some reserved pasta cooking water until you reach your desired consistency.
- Season and Serve: Season the pasta with salt and freshly ground black pepper to taste. Remove from heat and fold in the grated Parmesan cheese and chopped parsley. Serve the pasta immediately with lemon wedges on the side for an extra burst of flavor.
Extra Tips
When preparing Lemon-Infused Olive Oil Pasta, using high-quality extra virgin olive oil is key to achieving the best flavor. You can also experiment with different types of pasta, such as whole wheat or gluten-free varieties, to suit your dietary preferences.
For added protein, consider tossing in grilled chicken, shrimp, or chickpeas. Finally, don’t hesitate to adjust the amount of lemon juice and zest to match your personal taste—more citrus can enhance the vitality of the dish!
Greek Lemon Rice Soup

Greek Lemon Rice Soup, known as Avgolemono, is a traditional and comforting dish that embodies the flavors of Mediterranean cuisine. This soup is characterized by its creamy texture and tangy lemon flavor, making it a perfect meal for any season. It combines the richness of chicken broth with the invigorating brightness of lemon and the heartiness of rice, resulting in a dish that’s both nourishing and satisfying.
The origins of Avgolemono date back to ancient Greece, where the use of eggs and lemon in cooking was popularized. This soup isn’t just a staple in Greek households; it has also transcended borders, becoming a beloved dish in various Mediterranean cultures. Whether served as an appetizer or a main course, Greek Lemon Rice Soup is sure to warm the heart and delight the palate.
Ingredients (serving size: 4-6 people)
- 6 cups chicken broth
- 1 cup uncooked long-grain rice
- 3 large eggs
- 1/2 cup fresh lemon juice (about 2-3 lemons)
- Zest of 1 lemon
- Salt and pepper to taste
- Fresh parsley or dill for garnish (optional)
Cooking Instructions
- Prepare the Chicken Broth: In a large pot, bring the chicken broth to a gentle boil over medium heat. This will be the base of your soup, providing depth and flavor.
- Cook the Rice: Once the broth is boiling, add the uncooked rice and stir. Reduce the heat to low, cover the pot, and let it simmer for about 15-20 minutes, or until the rice is tender and has absorbed some of the broth.
- Make the Avgolemono Mixture: In a separate bowl, whisk together the eggs, lemon juice, and lemon zest until well combined. This mixture will give the soup its signature creamy texture and tangy flavor.
- Temper the Egg Mixture: To prevent the eggs from curdling, you need to temper the egg-lemon mixture. Slowly ladle about a cup of the hot broth from the pot into the egg mixture while continuously whisking. This step gradually raises the temperature of the eggs.
- Combine the Mixtures: Once the egg mixture is tempered, slowly pour it back into the pot of soup, stirring continuously. This will create a creamy consistency without cooking the eggs too quickly.
- Season and Serve: Taste the soup and add salt and pepper as needed. Allow the soup to heat through for another 5 minutes on low heat, being careful not to let it boil. Once ready, ladle the soup into bowls and garnish with fresh parsley or dill if desired.
Extra Tips
When making Greek Lemon Rice Soup, it’s essential to use fresh lemons for the best flavor. Adjust the amount of lemon juice to your taste preference; if you like a more pronounced lemon flavor, feel free to add a bit more.
Additionally, if you prefer a thicker soup, let it sit for a few minutes after cooking to allow the rice to absorb more broth. Leftovers can be refrigerated, but be aware that the rice may absorb more liquid as it sits, so you might need to add a bit of broth when reheating. Enjoy this comforting dish with warm crusty bread for a complete meal!
Lemon and Feta Stuffed Peppers

Lemon and Feta Stuffed Peppers are a vibrant and flavorful dish that showcases the bright and zesty flavors typical of Mediterranean cuisine. This dish isn’t only visually appealing with its colorful bell peppers, but it also offers a delightful combination of textures and tastes. The tangy lemon and creamy feta cheese are perfectly balanced against the sweetness of the roasted peppers, making it a fantastic option for a light dinner or an impressive side dish at gatherings.
Preparing these stuffed peppers is simple and rewarding. The flavor profile can be easily adjusted to suit your taste, whether you prefer a more herbaceous touch with added spices or a heartier filling with grains or meats. This recipe is designed to serve 4-6 people, making it an ideal dish for family meals or entertaining friends. Let’s explore the ingredients and cooking instructions to create this Mediterranean delight!
Ingredients (Serves 4-6)
- 4 large bell peppers (any color)
- 1 cup cooked quinoa or couscous
- 1 cup crumbled feta cheese
- 1 medium lemon (zest and juice)
- 1 small red onion, finely chopped
- 2 cloves garlic, minced
- 1 cup cherry tomatoes, halved
- 1/4 cup fresh parsley, chopped
- 1/4 cup olive oil
- Salt and pepper to taste
- Optional: 1 teaspoon dried oregano or thyme
Cooking Instructions
- Preheat the Oven: Begin by preheating your oven to 375°F (190°C). This guarantees that the peppers roast evenly and become tender when baked.
- Prepare the Peppers: Wash the bell peppers thoroughly and slice them in half lengthwise. Remove the seeds and membranes to create a hollow space for the filling. Place the halved peppers cut-side up in a baking dish.
- Make the Filling: In a large mixing bowl, combine the cooked quinoa or couscous, crumbled feta cheese, lemon zest, lemon juice, chopped red onion, minced garlic, halved cherry tomatoes, and chopped parsley. Drizzle in the olive oil and season with salt, pepper, and optional dried herbs. Mix everything together until well combined.
- Stuff the Peppers: Carefully spoon the filling into each halved pepper, making sure to pack it in gently but firmly. Fill each pepper generously, allowing the mixture to slightly mound on top.
- Bake the Peppers: Once all the peppers are stuffed, cover the baking dish with aluminum foil and place it in the preheated oven. Bake for about 25-30 minutes. Remove the foil for the last 10 minutes of baking to allow the tops to brown slightly and become crispy.
- Serve: After baking, remove the peppers from the oven and let them cool for a few minutes. Serve warm, drizzled with a little extra olive oil if desired, and garnish with additional parsley or lemon wedges.
Extra Tips
For added richness, consider mixing in some cooked ground meat, such as lamb or turkey, into the stuffing for a heartier version.
If you prefer a vegetarian option, you can incorporate sautéed mushrooms or spinach to enhance the filling.
Feel free to experiment with other herbs like basil or dill to complement the lemon and feta flavors.
Finally, these stuffed peppers can be made in advance and reheated, making them a convenient option for meal prep or entertaining!
Bright Lemon Tahini Dressing
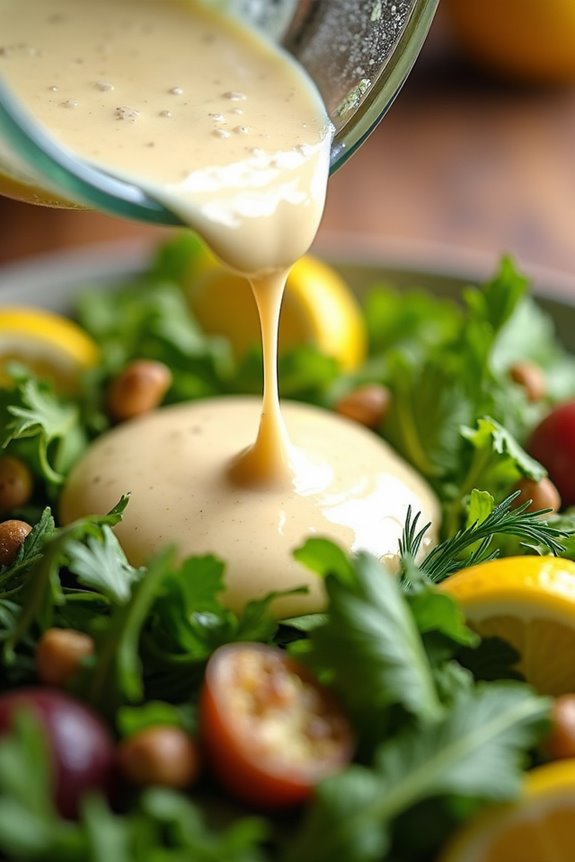
Bright Lemon Tahini Dressing is a versatile and zesty sauce that can elevate countless dishes with its creamy texture and invigorating citrus flavor. This dressing is perfect for drizzling over salads, roasted vegetables, or even as a dip for fresh pita bread. The combination of tahini, fresh lemon juice, garlic, and a hint of maple syrup creates a delightful balance of flavors that’s both tangy and nutty.
In addition to being delicious, this dressing is also packed with nutrients and healthy fats, making it a fantastic addition to your Mediterranean-inspired meals. Whether you’re looking to enhance a simple green salad or add a burst of flavor to your grain bowls, this Bright Lemon Tahini Dressing won’t disappoint. It’s easy to make, requires minimal ingredients, and can be prepared in just a matter of minutes.
Ingredients (serving size: 4-6 people)
- ½ cup tahini
- ¼ cup fresh lemon juice (about 2 lemons)
- 2 tablespoons maple syrup (or honey)
- 1-2 cloves garlic, minced
- ½ teaspoon salt (to taste)
- ½ teaspoon black pepper
- 3-4 tablespoons water (to thin, as needed)
- Optional: chopped fresh herbs (such as parsley or dill) for garnish
Instructions
- Prepare the Ingredients: Gather all your ingredients and measure them out. This includes tahini, fresh lemon juice, maple syrup, garlic, salt, pepper, and water. Having everything ready will make the mixing process smoother.
- Mix the Base: In a medium mixing bowl, combine the tahini, fresh lemon juice, maple syrup, minced garlic, salt, and black pepper. Use a whisk or a fork to blend the ingredients together until they’re well combined. The mixture should start to thicken slightly.
- Adjust Consistency: If the dressing is too thick for your liking, gradually add 1 tablespoon of water at a time, whisking continuously until you reach your desired consistency. It should be smooth and pourable, but not too runny.
- Taste and Adjust: Once the dressing is well mixed, taste it and adjust the seasoning if necessary. You can add more salt, lemon juice, or maple syrup depending on your flavor preference.
- Serve or Store: If you’re serving the dressing immediately, transfer it to a serving bowl or drizzle it over your desired dish. If you’re storing it for later use, pour it into an airtight container and refrigerate. The dressing can be stored in the fridge for up to a week.
Extra Tips
When preparing Bright Lemon Tahini Dressing, feel free to experiment with additional flavors such as a pinch of cayenne pepper for heat or a teaspoon of Dijon mustard for an extra layer of taste.
If you prefer a creamier texture, you can blend the ingredients in a food processor for a smoother consistency. Always remember to taste and adjust the ingredients to suit your personal preferences.
This dressing can also be used as a marinade for grilled chicken or tofu, adding a delightful Mediterranean twist to your meals.
Lemon Basil Pesto

Lemon Basil Pesto is a vibrant and zesty twist on the classic Italian pesto, combining the aromatic flavors of fresh basil with the bright acidity of lemon. This sauce is perfect for drizzling over pasta, spreading on sandwiches, or enhancing grilled vegetables. The addition of lemon not only elevates the taste but also adds a rejuvenating brightness that makes this pesto stand out.
Whether you’re hosting a summer dinner or looking for a quick weeknight meal, this Lemon Basil Pesto is sure to impress with its delicious flavor and simplicity.
Making Lemon Basil Pesto is a straightforward process that requires minimal ingredients and effort. By using fresh, high-quality components, you can create a sauce that bursts with flavor and can be stored for later use. This recipe is ideal for 4-6 servings, making it perfect for a family meal or a gathering with friends.
Let’s plunge into the ingredients and cooking instructions to whip up this delightful sauce!
Ingredients (Serves 4-6):
- 2 cups fresh basil leaves, packed
- 1/2 cup grated Parmesan cheese
- 1/2 cup olive oil
- 1/4 cup pine nuts (or walnuts)
- 2 cloves garlic, minced
- Zest of 1 lemon
- Juice of 1 lemon
- Salt and pepper, to taste
Cooking Instructions:
- Prepare the Ingredients: Start by gathering all your ingredients. Rinse the fresh basil leaves under cool water and pat them dry with a paper towel. Measure out the grated Parmesan, olive oil, pine nuts, minced garlic, lemon zest, and lemon juice.
- Toast the Pine Nuts: In a small skillet over medium heat, lightly toast the pine nuts for about 2-3 minutes, stirring frequently to prevent burning. Toasting enhances their flavor and gives the pesto a deeper nutty taste. Once golden and fragrant, remove them from heat and let cool.
- Blend the Ingredients: In a food processor, combine the fresh basil leaves, toasted pine nuts, minced garlic, lemon zest, and grated Parmesan cheese. Pulse a few times to break down the ingredients into smaller pieces.
- Add Olive Oil and Lemon Juice: With the food processor running, slowly drizzle in the olive oil. This will help emulsify the pesto and create a smooth consistency. After a few seconds, add the lemon juice and continue to process until the mixture is well-blended.
- Season to Taste: Stop the food processor and scrape down the sides to verify everything is well mixed. Taste the pesto and season with salt and freshly ground black pepper to your preference. If the pesto is too thick, you can add a little more olive oil or a splash of water to reach your desired consistency.
- Serve or Store: Once your Lemon Basil Pesto is ready, you can serve it immediately over cooked pasta or as a dip. If you’re not using it right away, transfer it to an airtight container, drizzle a thin layer of olive oil on top to prevent oxidation, and store it in the refrigerator for up to a week.
Extra Tips:
For an extra burst of flavor, consider adding a handful of toasted lemon zest, or a pinch of red pepper flakes for a subtle kick.
If you want to make this pesto vegan, simply omit the Parmesan cheese or substitute it with nutritional yeast for a cheesy flavor without the dairy. Additionally, this pesto can be frozen in ice cube trays for easy use later on—just pop out a cube whenever you need a quick sauce or spread!
Refreshing Lemon Mint Mojito

The Invigorating Lemon Mint Mojito is a delightful twist on the classic mojito, infusing the traditional minty flavor with the bright zestiness of fresh lemons. This beverage is perfect for warm Mediterranean evenings or any gathering, as it not only quenches your thirst but also energizes your senses.
With its vibrant color and invigorating taste, this drink is sure to impress your friends and family alike, making it a must-have for summer barbecues, pool parties, or simply a relaxing afternoon on the patio.
Making a Lemon Mint Mojito is easy and can be done in just a few simple steps. The combination of fresh mint, zesty lemons, and sparkling soda creates an invigorating drink that brings a taste of the Mediterranean right to your home.
Whether you’re serving it at a party or enjoying it as a personal treat, this mojito is a sure hit that keeps you cool and invigorated.
Ingredients (Serves 4-6)
- 1 cup fresh mint leaves
- 2 large lemons (juiced)
- 1/2 cup granulated sugar (adjust to taste)
- 2 cups white rum
- 4 cups soda water
- Ice cubes
- Lemon slices (for garnish)
- Extra mint sprigs (for garnish)
Cooking Instructions
1. Prepare the Mint: Start by rinsing the fresh mint leaves under cold water to remove any dirt. Pat them dry gently with a paper towel.
In a large pitcher, add the mint leaves and use a muddler or the back of a spoon to gently crush them. This releases the essential oils and enhances the mint flavor in your mojito.
2. Juice the Lemons: Cut the lemons in half and juice them using a citrus juicer or reamer. You should aim for about 1 cup of fresh lemon juice.
Pour the lemon juice into the pitcher with the muddled mint, and add the granulated sugar. Stir the mixture well until the sugar is completely dissolved.
3. Add the Rum: Next, pour in the white rum into the pitcher. Stir the mixture thoroughly to combine all the flavors.
This is where the magic happens, as the rum takes on the bright lemon and invigorating mint flavors.
4. Mix with Soda Water: Slowly pour the soda water into the pitcher, stirring gently to combine.
Be careful not to stir too vigorously, as this can cause the soda to lose its fizz. Adjust the sweetness by adding more sugar or lemon juice if desired.
5. Serve: Fill glasses with ice cubes and pour the Lemon Mint Mojito mixture over the ice.
Garnish each glass with a slice of lemon and an extra sprig of mint for a beautiful presentation. Serve immediately and enjoy the invigorating flavors.
Extra Tips
For an enhanced flavor experience, consider using a flavored sparkling water, such as lemon-lime or cucumber, to add an extra layer of invigorating essence to your Lemon Mint Mojito.
Additionally, if you prefer a non-alcoholic version, simply replace the rum with additional soda water or lemonade for a delicious mocktail.
Always taste and adjust the sweetness and tartness to your liking before serving, as the balance of flavors is key to a perfect mojito!
Lemon and Olive Oil Cake

Lemon and Olive Oil Cake is a delightful Mediterranean dessert that perfectly balances the bright zest of fresh lemons with the rich, fruity flavor of high-quality olive oil. This cake isn’t only moist and tender but also offers a unique twist on traditional cakes, making it a standout for any occasion.
The use of olive oil gives it a subtle depth of flavor while keeping the cake light and airy. With its invigorating citrus notes, this cake can be enjoyed as a simple dessert or dressed up for a special celebration.
This Lemon and Olive Oil Cake is incredibly easy to make, requiring just a few pantry staples and minimal effort. The cake is beautifully aromatic and pairs wonderfully with a dusting of powdered sugar or a light lemon glaze. It’s perfect for serving alongside coffee or tea, making it an ideal choice for brunch or an afternoon treat.
Ingredients (Serves 4-6):
- 1 cup all-purpose flour
- 1 teaspoon baking powder
- 1/2 teaspoon baking soda
- 1/4 teaspoon salt
- 1/2 cup granulated sugar
- 2 large eggs
- 1/2 cup extra virgin olive oil
- Zest of 2 lemons
- 1/4 cup fresh lemon juice
- 1 teaspoon vanilla extract
- Powdered sugar for dusting (optional)
Instructions:
- Preheat the Oven: Begin by preheating your oven to 350°F (175°C). This guarantees that your cake bakes evenly and rises properly once you place it in the oven.
- Prepare the Baking Pan: Grease a 9-inch round cake pan with olive oil or butter, and optionally line the bottom with parchment paper for easier removal after baking. This step prevents the cake from sticking to the pan.
- Combine Dry Ingredients: In a medium bowl, whisk together the all-purpose flour, baking powder, baking soda, and salt. Mixing these dry ingredients first ensures an even distribution of the leavening agents throughout the cake batter.
- Mix Wet Ingredients: In a large mixing bowl, beat the granulated sugar and eggs together until light and fluffy, about 2-3 minutes. Then, add in the olive oil, lemon zest, lemon juice, and vanilla extract, mixing until well combined. This creates a flavorful base for your cake.
- Incorporate Dry Ingredients: Gradually add the dry ingredient mixture to the wet ingredients, stirring gently until just combined. Be careful not to overmix, as this could lead to a dense cake.
- Pour and Bake: Pour the batter into the prepared cake pan, smoothing the top with a spatula. Bake in the preheated oven for 25-30 minutes, or until a toothpick inserted into the center comes out clean. The cake should be golden brown on top.
- Cool the Cake: Once baked, remove the cake from the oven and allow it to cool in the pan for about 10 minutes. Then, carefully transfer it to a wire rack to cool completely. This helps to prevent moisture buildup underneath the cake.
- Serve: Once the cake is completely cool, dust with powdered sugar if desired, slice, and serve. Enjoy your Lemon and Olive Oil Cake with a cup of coffee or tea!
Extra Tips:
For the best flavor, always use fresh lemons for zest and juice rather than bottled lemon juice. The quality of olive oil also makes a significant difference in the taste of the cake; choose a good quality extra virgin olive oil for the best results.
Additionally, you can enhance the cake by adding a simple lemon glaze made from powdered sugar and lemon juice poured over the top once it has cooled. This will add an extra layer of sweetness and a beautiful finish to your cake.
Citrus Lemon Tart

A Citrus Lemon Tart is a delightful Mediterranean dessert that captures the essence of fresh lemons, providing a rejuvenating and zesty flavor. This tart is characterized by a buttery, flaky crust that perfectly complements the smooth, tangy lemon filling. The contrast between the sweetness of the tart and the brightness of the citrus makes it an ideal treat for any occasion, from summer gatherings to festive dinners.
Its simplicity and elegance guarantee it will be a crowd-pleaser, while also being easy enough for a novice baker to tackle.
Creating a Citrus Lemon Tart allows you to showcase the vibrant flavors of Mediterranean lemons, which are often more fragrant and flavorful than other varieties. The filling combines fresh lemon juice and zest, sugar, and eggs to create a custard-like texture that sets beautifully in the oven. Topped with a dusting of powdered sugar or a dollop of whipped cream, this tart is sure to impress your guests and leave them craving more.
Ingredients (Serves 4-6)
- 1 ½ cups all-purpose flour
- ½ cup unsalted butter, softened
- ⅓ cup granulated sugar
- 1 egg yolk
- 1-2 tablespoons cold water (as needed)
- 1 cup granulated sugar (for filling)
- 3 large eggs
- ½ cup fresh lemon juice (about 2-3 lemons)
- 1 tablespoon lemon zest
- ¼ cup heavy cream
- Powdered sugar (for dusting)
Cooking Instructions
- Prepare the Crust: In a mixing bowl, combine the flour and granulated sugar. Cut in the softened butter using a pastry cutter or your fingers until the mixture resembles coarse crumbs. Add the egg yolk and cold water, mixing until the dough comes together. If the dough is too crumbly, add more cold water, one tablespoon at a time.
- Chill the Dough: Shape the dough into a disk, wrap it in plastic wrap, and refrigerate for at least 30 minutes. Chilling the dough helps to firm it up, making it easier to roll out and preventing shrinking during baking.
- Roll Out the Dough: On a floured surface, roll out the chilled dough to fit a 9-inch tart pan. Transfer the dough to the tart pan, pressing it into the bottom and up the sides. Trim any excess dough hanging over the edges.
- Blind Bake the Crust: Preheat your oven to 375°F (190°C). Place parchment paper over the crust and fill it with pie weights or dried beans. Bake for about 15-20 minutes, until lightly golden. Remove the parchment and weights and bake for an additional 5 minutes to confirm the crust is fully cooked. Set aside to cool.
- Prepare the Filling: In a mixing bowl, whisk together the granulated sugar and eggs until well combined. Add the fresh lemon juice, lemon zest, and heavy cream, mixing until smooth. Ascertain there are no lumps in the filling for a silky texture.
- Fill the Tart: Pour the lemon filling into the pre-baked tart shell, spreading it evenly. Bake in the oven at 350°F (175°C) for 25-30 minutes, or until the filling is set and slightly firm to the touch.
- Cool and Serve: Once baked, remove the tart from the oven and let it cool to room temperature before refrigerating for at least 2 hours. Just before serving, dust the top with powdered sugar for an elegant finish.
Extra Tips
When making a Citrus Lemon Tart, using freshly squeezed lemon juice will enhance the flavor considerably, so it’s worth the extra effort. Additionally, feel free to experiment with other citrus fruits like oranges or limes for a twist on the classic recipe.
If you enjoy a more intense lemon flavor, increase the lemon zest slightly. Finally, for a decorative touch, consider garnishing with fresh berries or mint leaves before serving.
Lemon Roasted Vegetables
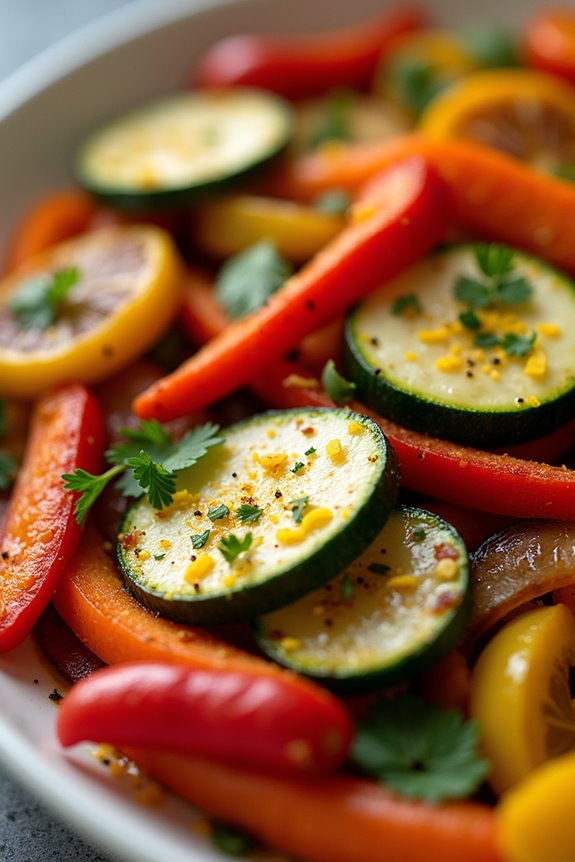
Lemon Roasted Vegetables are a delightful and vibrant side dish that captures the essence of Mediterranean cooking. The tangy brightness of lemon perfectly complements the natural sweetness of seasonal vegetables, making this dish an ideal addition to any meal.
Whether served alongside grilled meats, fish, or as a hearty vegetarian option, these roasted vegetables aren’t only colorful but also packed with flavor, making them a fantastic choice for family gatherings or casual dinners.
This recipe is incredibly versatile, allowing you to use whatever vegetables you have on hand. Common choices include zucchini, bell peppers, carrots, and red onions, all of which roast beautifully. The infusion of lemon juice and zest enhances the flavor, and a drizzle of olive oil guarantees that the vegetables have a lovely golden-brown finish.
Enjoy the delicious taste of the Mediterranean with this easy-to-follow recipe for Lemon Roasted Vegetables.
Ingredients (serving size: 4-6 people)
- 2 medium zucchinis, sliced into half-moons
- 1 red bell pepper, diced
- 1 yellow bell pepper, diced
- 2 medium carrots, peeled and sliced
- 1 red onion, cut into wedges
- 4 cloves garlic, minced
- 1/4 cup olive oil
- Juice and zest of 1 large lemon
- 1 teaspoon dried oregano
- 1 teaspoon salt
- 1/2 teaspoon black pepper
- Fresh parsley, chopped (for garnish)
Cooking Instructions
- Preheat the Oven: Begin by preheating your oven to 425°F (220°C). This high temperature will help to caramelize the vegetables, enhancing their flavors and creating a beautiful roasted exterior.
- Prepare the Vegetables: In a large mixing bowl, combine the sliced zucchinis, diced bell peppers, sliced carrots, and red onion wedges. Add the minced garlic to the bowl. Confirm that the vegetables are cut into similar sizes for even cooking.
- Mix the Dressing: In a small bowl, whisk together the olive oil, lemon juice, lemon zest, dried oregano, salt, and black pepper. This mixture will serve as the dressing that flavors the vegetables.
- Combine and Coat: Pour the dressing over the prepared vegetables in the mixing bowl. Toss everything together until the vegetables are evenly coated with the lemony olive oil mixture.
- Arrange on Baking Sheet: Spread the coated vegetables in a single layer on a large baking sheet. Make sure the vegetables aren’t overcrowded, as this can lead to steaming instead of roasting.
- Roast in the Oven: Place the baking sheet in the preheated oven and roast the vegetables for about 25-30 minutes, stirring halfway through. The vegetables should be tender and caramelized at the edges when done.
- Garnish and Serve: Once roasted, remove the baking sheet from the oven. Transfer the vegetables to a serving platter and sprinkle with fresh chopped parsley for a pop of color and freshness.
Extra Tips
For an additional flavor boost, consider adding other herbs such as thyme or rosemary, or even a pinch of red pepper flakes for a little heat.
You can also experiment with different vegetables based on the season or your personal preference—eggplant, asparagus, or cherry tomatoes can all work beautifully in this dish. Just be sure to adjust the cooking time as necessary, depending on the vegetables you choose.
Enjoy your Lemon Roasted Vegetables as a bright and healthy side dish!
Lemon and Honey Greek Yogurt Parfait

Indulging in a Lemon and Honey Greek Yogurt Parfait is like savoring sunshine in a bowl. This delightful dish balances the creamy richness of Greek yogurt with the zesty brightness of lemon and the natural sweetness of honey. Perfect for breakfast, brunch, or a light dessert, this parfait isn’t only delicious but also packed with nutrients, making it a great way to start your day or satisfy your sweet tooth without guilt.
Layering these ingredients creates an appealing visual treat that’s as good to look at as it’s to eat.
To prepare this parfait, you’ll need fresh, high-quality ingredients to guarantee the best flavor. The tartness of the lemon complements the sweetness of honey beautifully, while the granola provides a satisfying crunch. By using Greek yogurt, you add protein to this dish, making it filling and nutritious. This recipe is simple and can be made in just a few minutes, allowing you to enjoy a revitalizing and satisfying treat any time.
Ingredients (Serves 4-6):
- 2 cups Greek yogurt
- 2 tablespoons honey (plus extra for drizzling)
- Zest of 1 lemon
- Juice of 1 lemon
- 1 teaspoon vanilla extract
- 1 cup granola
- 1 cup mixed berries (such as strawberries, blueberries, and raspberries)
- Fresh mint leaves for garnish (optional)
Cooking Instructions:
1. Prepare the Yogurt Mixture**: In a mixing bowl, combine the Greek yogurt**, honey, lemon zest, lemon juice, and vanilla extract. Mix well until the ingredients are fully incorporated and the yogurt has a smooth and creamy texture.
This mixture will serve as the base of your parfait, so verify that the flavors are balanced to your preference—add more honey if you like it sweeter.
2. Layer the Ingredients: Take four to six serving glasses or bowls and start by spooning a layer of the lemon-honey yogurt mixture at the bottom of each glass. Use about 1/4 cup for each layer to guarantee even servings.
3. Add Granola: Next, sprinkle a layer of granola over the yogurt layer in each glass. This adds a delightful crunch to the parfait. Use approximately 2 tablespoons of granola per serving, ensuring it’s evenly distributed.
4. Incorporate Berries: Add a layer of mixed berries on top of the granola. Use a mix of strawberries, blueberries, and raspberries for a colorful and delicious addition. Aim for about 1/4 cup of berries in each glass.
5. Repeat Layers: Continue layering the yogurt mixture, granola, and berries until you reach the top of each glass. You can typically create two to three layers depending on the size of your glasses.
6. Finish with a Drizzle: Once you have filled each glass, finish off with a drizzle of honey on top and garnish with a few fresh mint leaves if desired. This adds a beautiful presentation and a revitalizing touch.
7. Serve and Enjoy: Serve the parfaits immediately, or refrigerate them for about 30 minutes if you prefer a chilled dessert. Enjoy this revitalizing treat while it’s fresh!
Extra Tips:
When preparing your Lemon and Honey Greek Yogurt Parfait, consider using seasonal fruits for the best flavor and texture. You can also customize the parfait by experimenting with different types of granola or adding nuts for extra crunch.
If you’re preparing this ahead of time, keep the granola separate until you’re ready to serve to maintain its crispness. Finally, feel free to adjust the sweetness of the yogurt mixture according to your taste, as some may prefer a more pronounced honey flavor or a tangier yogurt experience.