

Feta cheese is that secret ingredient that can make any dish pop. Its crumbly texture and salty tang add a special touch to even the simplest of ingredients. From refreshing salads to cozy pastries, feta’s versatility is unmatched. I’m excited to share some of my favorite Mediterranean recipes that highlight this delicious cheese. These dishes are sure to turn your meals into something irresistibly addictive.
Feta and Spinach Stuffed Pastry Bites

Feta and Spinach Stuffed Pastry Bites are a delightful Mediterranean snack that combines the rich, tangy flavor of feta cheese with the earthy taste of spinach, all wrapped in a flaky pastry.
These bite-sized treats are perfect for entertaining, serving as appetizers, or simply enjoying as a light meal. They’re easy to prepare and can be made ahead of time, making them a fantastic option for busy weeknights or gatherings with friends and family.
The combination of feta and spinach not only offers a burst of flavor but also provides a nutritious boost. Spinach is packed with vitamins and minerals, while feta adds a creamy texture and savory taste.
When baked, the pastry becomes golden and crispy, creating a delightful contrast to the warm, melty filling. Serve these pastry bites with a side of tzatziki or a simple yogurt dip for an extra burst of flavor.
Ingredients (serving size: 4-6 people):
- 1 package of puff pastry (2 sheets, thawed)
- 1 cup fresh spinach, chopped
- 1 cup feta cheese, crumbled
- 1/2 cup ricotta cheese
- 1 clove garlic, minced
- 1/4 cup onion, finely chopped
- 1 egg, beaten (for egg wash)
- 2 tablespoons olive oil
- Salt and pepper to taste
- Optional: 1 teaspoon dried oregano or dill
Cooking Instructions:
1. Preheat the Oven: Begin by preheating your oven to 400°F (200°C). This guarantees that your pastry bites will bake evenly and achieve a golden brown color.
2. Sauté the Vegetables: In a large skillet, heat the olive oil over medium heat. Add the chopped onion and minced garlic, sautéing until the onion becomes translucent, about 3-4 minutes.
Then, add the chopped spinach, cooking until wilted, around 2-3 minutes. Season with salt, pepper, and optional herbs. Remove from heat and let cool slightly.
3. Mix the Filling: In a mixing bowl, combine the sautéed spinach mixture with crumbled feta and ricotta cheese. Stir well until all ingredients are thoroughly mixed. Adjust seasoning if necessary.
4. Prepare the Pastry: On a lightly floured surface, roll out the puff pastry sheets to smooth them out. Cut each sheet into squares or rectangles, about 3×3 inches.
5. Fill the Pastry: Place a spoonful of the spinach and feta mixture in the center of each pastry square. Be careful not to overfill, as this may cause the pastries to burst while baking.
6. Fold and Seal: Fold the pastry over the filling to form a triangle or rectangle. Press the edges firmly to seal, and use a fork to crimp the edges for an extra secure seal.
Brush the tops with the beaten egg to give them a beautiful golden color when baked.
7. Bake: Arrange the stuffed pastry bites on a baking sheet lined with parchment paper. Bake in the preheated oven for 20-25 minutes, or until they’re puffed and golden brown.
8. Cool and Serve: Once baked, remove from the oven and let the pastry bites cool slightly before serving. They’re best enjoyed warm.
Extra Tips:
To elevate your Feta and Spinach Stuffed Pastry Bites, consider experimenting with additional ingredients such as sun-dried tomatoes, olives, or artichokes for added flavor and texture.
If you have leftover filling, it can be used as a delicious topping for salads or spread on toast. Additionally, for a twist on presentation, try cutting the pastries into bite-sized pieces before baking to create smaller, shareable snacks.
Always remember to keep an eye on the pastries as they bake, as oven temperatures can vary, and you want to prevent them from over-browning. Enjoy your delicious Mediterranean treat!
Mediterranean Feta Pasta Salad

Mediterranean Feta Pasta Salad is a vibrant and invigorating dish that perfectly encapsulates the flavors of the Mediterranean. Combining al dente pasta with fresh vegetables, aromatic herbs, and creamy feta cheese, this salad isn’t only delicious but also incredibly versatile. It can serve as a light lunch, a side dish for a barbecue, or even as a main course on a warm day. The dressing made from olive oil, lemon juice, and herbs elevates the flavors, making each bite a delightful experience.
This pasta salad isn’t only easy to prepare but also allows for customization based on personal preferences or seasonal ingredients. You can add grilled chicken for extra protein or toss in your favorite vegetables to make it your own. Whether served at a picnic or as a weeknight dinner, Mediterranean Feta Pasta Salad is bound to impress with its colorful presentation and delicious taste.
Ingredients (Serves 4-6)
- 12 oz (340 g) pasta (penne or fusilli)
- 1 cup cherry tomatoes, halved
- 1 cucumber, diced
- 1 bell pepper, diced (red or yellow)
- 1/2 red onion, finely chopped
- 1 cup Kalamata olives, pitted and halved
- 1/2 cup feta cheese, crumbled
- 1/4 cup fresh parsley, chopped
- 1/4 cup extra-virgin olive oil
- 2 tablespoons lemon juice
- 1 teaspoon dried oregano
- Salt and pepper to taste
Cooking Instructions
- Cook the Pasta: Begin by bringing a large pot of salted water to a boil. Add the pasta and cook according to the package instructions until al dente. Stir occasionally to prevent sticking. Once cooked, drain the pasta and rinse it under cold water to stop the cooking process and cool it down. Set aside.
- Prepare the Vegetables: While the pasta is cooking, wash and chop the vegetables. Halve the cherry tomatoes, dice the cucumber and bell pepper, and finely chop the red onion. Place all the prepared vegetables in a large mixing bowl.
- Make the Dressing: In a small bowl, whisk together the extra-virgin olive oil, lemon juice, dried oregano, salt, and pepper. Adjust the seasoning to taste. This dressing will enhance the flavors of your salad.
- Combine Ingredients: Add the cooked and cooled pasta to the bowl of vegetables. Pour the dressing over the pasta and vegetable mixture. Toss everything together until well combined, ensuring the dressing coats all the ingredients evenly.
- Add Feta and Herbs: Gently fold in the crumbled feta cheese and chopped parsley. Be careful not to break up the feta too much; you want it to remain in nice chunks.
- Chill and Serve: Cover the salad with plastic wrap or a lid and refrigerate for at least 30 minutes to allow the flavors to meld. Serve chilled or at room temperature, and enjoy!
Extra Tips
For added flavor and texture, consider toasting some pine nuts or walnuts and sprinkling them on top before serving. You can also experiment with different herbs such as basil or mint for a unique twist.
If you prefer a heartier salad, feel free to add grilled chicken, shrimp, or chickpeas for protein. This salad keeps well in the refrigerator and can be enjoyed for several days, making it an excellent option for meal prep!
Roasted Tomatoes With Feta and Herbs
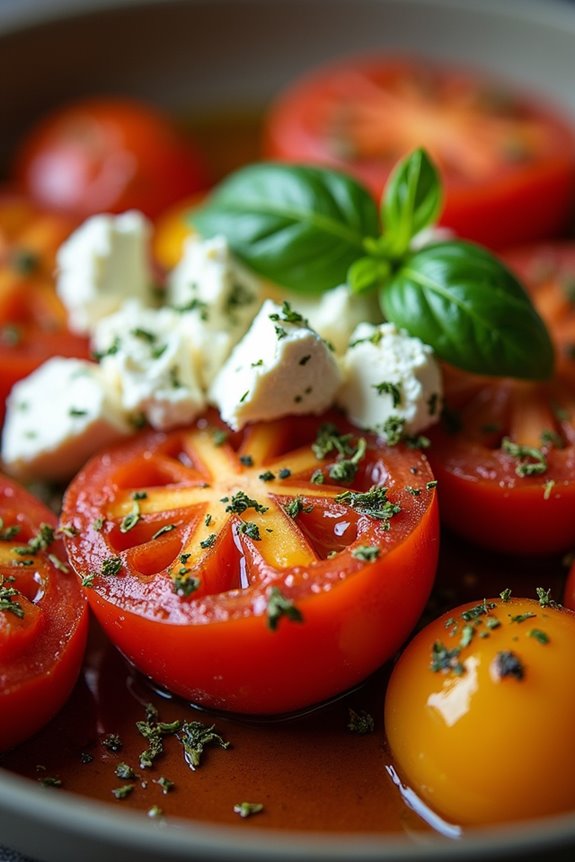
Roasted Tomatoes with Feta and Herbs is a delightful Mediterranean-inspired dish that brings out the natural sweetness of ripe tomatoes, combined with the creamy tang of feta cheese and the aromatic flavors of fresh herbs.
This dish can be served as a warm appetizer, a side dish, or even a topping for crusty bread, making it versatile enough for any occasion. The roasting process enhances the tomatoes’ flavor, while the feta adds a rich, salty contrast, creating a symphony of tastes that will transport you straight to the sun-drenched coasts of the Mediterranean.
This simple yet elegant recipe is perfect for gatherings or a cozy dinner at home. With just a handful of ingredients, you can create an impressive dish that showcases the freshness of seasonal produce.
Whether enjoyed on its own or as part of a larger Mediterranean feast, Roasted Tomatoes with Feta and Herbs is sure to become a favorite in your culinary repertoire.
Ingredients (Serves 4-6):
- 2 pounds ripe tomatoes (such as cherry or heirloom)
- 8 ounces feta cheese, crumbled
- 1/4 cup olive oil
- 4 cloves garlic, minced
- 1 teaspoon dried oregano
- 1 teaspoon dried thyme
- 1/2 teaspoon red pepper flakes (optional)
- Salt and pepper, to taste
- Fresh basil or parsley, for garnish
Cooking Instructions:
- Preheat the Oven: Start by preheating your oven to 400°F (200°C). This temperature is ideal for roasting, allowing the tomatoes to caramelize while keeping their shape.
- Prepare the Tomatoes: Rinse and dry the tomatoes thoroughly. If using larger heirloom tomatoes, cut them into quarters or halves. For cherry tomatoes, you can leave them whole. Place the tomatoes in a large mixing bowl.
- Add the Flavors: To the bowl with tomatoes, add the crumbled feta cheese, minced garlic, dried oregano, dried thyme, red pepper flakes (if using), olive oil, and a sprinkle of salt and pepper. Gently toss everything together, making sure that the tomatoes are well coated with the oil and seasonings.
- Transfer to Baking Dish: Pour the tomato mixture into a large baking dish or a rimmed baking sheet. Spread the tomatoes out in a single layer to guarantee even roasting.
- Roast the Tomatoes: Place the baking dish in the preheated oven and roast for about 25-30 minutes, or until the tomatoes are blistered and the feta is golden. Stir halfway through the cooking time for even roasting.
- Garnish and Serve: Once roasted, remove the dish from the oven and let it cool slightly. Garnish with fresh basil or parsley before serving. Enjoy warm, either on its own or with crusty bread.
Extra Tips:
For an added depth of flavor, consider adding sliced olives or capers to the tomato mixture before roasting.
If you prefer a creamier texture, you can use a block of feta instead of crumbled, allowing it to melt slightly during roasting.
This dish can be made ahead of time and served at room temperature, making it perfect for entertaining. Enjoy experimenting with different herbs or even drizzling with balsamic glaze before serving for an extra touch of sweetness!
Creamy Feta Dip With Olive Oil and Garlic
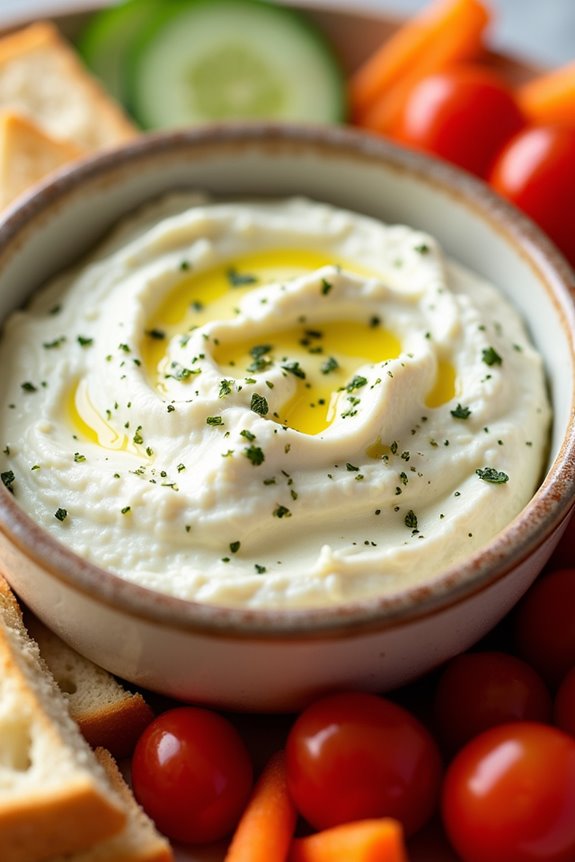
Creamy Feta Dip with Olive Oil and Garlic is a delightful Mediterranean-inspired appetizer that’s perfect for gatherings or as a snack. This dip combines the tangy flavor of feta cheese with the richness of olive oil and the aromatic essence of garlic, creating a smooth and savory blend.
Whether served with fresh vegetables, pita bread, or crackers, this dip is sure to impress your guests and elevate any occasion. It’s quick to prepare and requires minimal ingredients, making it an ideal dish for both experienced cooks and beginners alike.
The beauty of this creamy feta dip lies in its versatility. You can easily customize the flavor by adding herbs like oregano or dill, or even a pinch of red pepper flakes for a little heat. The combination of creamy feta and the warmth of fresh garlic creates a comforting and mouthwatering dip that’s perfect for sharing.
So, gather your ingredients and get ready to whip up a delicious dish that brings a taste of the Mediterranean to your table.
Ingredients (serving size: 4-6 people)
- 8 ounces feta cheese, crumbled
- 1/4 cup olive oil, plus more for drizzling
- 2 cloves garlic, minced
- 1 tablespoon lemon juice (freshly squeezed)
- 1 teaspoon dried oregano
- Salt and pepper, to taste
- Fresh parsley, for garnish (optional)
Cooking Instructions
- Prepare the Feta: In a mixing bowl, add the crumbled feta cheese. If you prefer a smoother texture, you can crumble it into smaller pieces using a fork or your fingers. This will help it blend more easily with the other ingredients.
- Add Olive Oil and Garlic: Pour in 1/4 cup of olive oil and add the minced garlic to the bowl with the feta. The olive oil adds richness, while the garlic infuses the dip with a wonderful aroma and flavor.
- Incorporate Lemon Juice and Oregano: Squeeze the juice of one tablespoon of fresh lemon into the mixture. This will brighten the flavors of the dip. Then, sprinkle in the dried oregano for an earthy, aromatic touch.
- Blend the Mixture: Using a fork, a hand mixer, or a food processor, blend the ingredients until you reach your desired consistency. If you like it creamy, blend until smooth; for a chunkier texture, mix just enough to combine.
- Season to Taste: Taste the dip and add salt and pepper as needed. Feta can be quite salty, so be sure to taste before adding too much salt.
- Serve: Transfer the dip to a serving bowl. Drizzle a bit of olive oil on top for presentation, and garnish with fresh parsley if desired. Serve with your choice of pita bread, crackers, or fresh veggies.
Extra Tips
For an extra layer of flavor, consider roasting the garlic before adding it to the dip. Roasting mellows the garlic’s sharpness and adds a sweet, caramelized note.
You can also experiment with different herbs, such as fresh dill or basil, to tailor the dip to your taste. If you want to make it ahead of time, store it in an airtight container in the refrigerator for up to 3 days, but be sure to bring it back to room temperature before serving for the best flavor and texture.
Enjoy your creamy feta dip!
Feta and Watermelon Salad
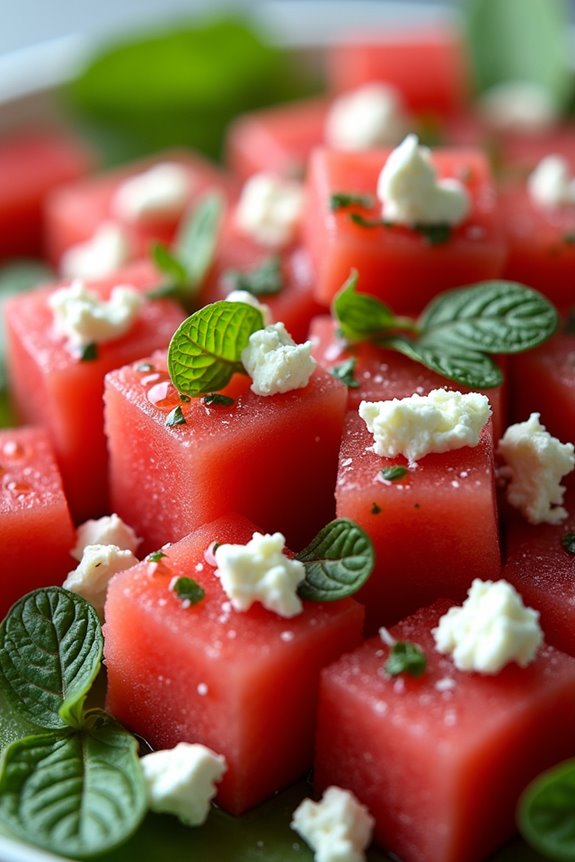
Feta and Watermelon Salad is a revitalizing dish that beautifully combines the sweetness of ripe watermelon with the salty tang of feta cheese. Perfect for summer gatherings or as a light appetizer, this salad isn’t only visually appealing but also packed with flavor. The contrasting textures and tastes make it a delightful experience for the palate, appealing to both casual diners and gourmet food lovers alike.
This salad is incredibly versatile and can be served as a side dish or a light main course. With only a handful of ingredients and minimal preparation time, it’s an excellent choice for those looking to whip up something delicious without spending hours in the kitchen. Plus, it showcases the best of Mediterranean flavors, making it a perfect fit for any Mediterranean-themed meal.
Ingredients (Serves 4-6)
- 4 cups of cubed seedless watermelon
- 1 cup of crumbled feta cheese
- 1/2 cup of fresh mint leaves, chopped
- 1/4 cup of extra virgin olive oil
- 2 tablespoons of balsamic vinegar
- Salt and black pepper to taste
- Optional: Arugula or mixed greens for serving
Cooking Instructions
- Prepare the Watermelon: Start by selecting a ripe, seedless watermelon. Cut it in half, then slice each half into quarters. Remove the rind and cut the watermelon into bite-sized cubes. Place the cubed watermelon in a large mixing bowl.
- Add the Feta Cheese: Take your crumbled feta cheese and sprinkle it generously over the watermelon in the bowl. The feta should be evenly distributed so that each bite has a bit of the creamy cheese.
- Incorporate Mint: Chop the fresh mint leaves finely and add them to the bowl. The mint will add a revitalizing flavor that complements the sweetness of the watermelon and the saltiness of the feta.
- Prepare the Dressing: In a small bowl or jar, whisk together the extra virgin olive oil and balsamic vinegar. This dressing will enhance the overall flavor of the salad. Season it with a pinch of salt and black pepper to taste.
- Combine the Ingredients: Drizzle the dressing over the watermelon, feta, and mint mixture. Gently toss everything together using a spatula or large spoon, being careful not to mash the watermelon or crumble the feta too much.
- Serve: If desired, serve the salad on a bed of arugula or mixed greens for added texture and nutrition. Drizzle a little extra balsamic vinegar over the top for garnish, and enjoy!
Extra Tips
For an added burst of flavor, consider including other ingredients such as sliced red onion or diced cucumber. You can also experiment with adding a sprinkle of chili flakes for a bit of heat or a handful of toasted nuts for crunch.
This salad is best served fresh but can be made a few hours ahead of time; just wait to add the dressing until you’re ready to serve to keep the watermelon crisp. Enjoy your Mediterranean Feta and Watermelon Salad!
Baked Feta With Honey and Thyme

Baked Feta with Honey and Thyme is a delightful Mediterranean dish that brings together the rich, creamy texture of feta cheese with the natural sweetness of honey and the aromatic flavor of fresh thyme. This simple yet elegant recipe is perfect for entertaining guests or enjoying a cozy night in. The combination of flavors creates a harmonious balance that’s certain to impress anyone who tastes it.
The beauty of this dish lies not only in its taste but also in its ease of preparation. In just a few steps, you can transform a block of feta cheese into a warm, melty treat that pairs beautifully with crusty bread, crackers, or fresh vegetables. Ideal for serving as an appetizer or a light meal, Baked Feta with Honey and Thyme is a must-try for cheese lovers and anyone looking to explore Mediterranean cuisine.
Ingredients (serving size: 4-6 people):
- 1 block (approximately 200g) of feta cheese
- 1/4 cup of honey
- 2 tablespoons of olive oil
- 2 teaspoons of fresh thyme leaves (or 1 teaspoon dried thyme)
- Freshly ground black pepper, to taste
- Optional: Sliced baguette or crackers for serving
- Optional: Fresh thyme sprigs for garnish
Cooking Instructions:
- Preheat the Oven: Begin by preheating your oven to 350°F (175°C). This guarantees that your feta cheese will melt perfectly when placed in the oven.
- Prepare the Feta: In an oven-safe dish, place the block of feta cheese. Make sure to choose a dish that’s slightly larger than the feta, as this will allow room for the honey and olive oil.
- Add Honey and Olive Oil: Drizzle the honey evenly over the feta cheese, making sure to cover it well. Follow this with a drizzle of olive oil, which adds richness and helps to meld the flavors together.
- Season with Thyme and Pepper: Sprinkle the fresh thyme leaves over the top of the feta, followed by a generous amount of freshly ground black pepper. The thyme will infuse the cheese with its aromatic flavor as it bakes.
- Bake the Feta: Place the dish in the preheated oven and bake for about 20-25 minutes, or until the feta is soft and slightly golden on top. Keep an eye on it to avoid overcooking.
- Serve Warm: Once baked, remove the dish from the oven and let it sit for a couple of minutes. Serve the warm feta with toasted baguette slices or crackers, allowing everyone to enjoy the melty cheese with a drizzle of the honey and oil mixture.
Extra Tips:
When preparing Baked Feta with Honey and Thyme, feel free to experiment with additional toppings such as crushed red pepper flakes for a bit of heat or a sprinkle of lemon zest for a revitalizing citrus twist.
For a more substantial appetizer, consider adding roasted vegetables or olives around the feta before baking. Additionally, this dish can be made ahead of time and simply reheated in the oven before serving, making it a convenient choice for gatherings. Enjoy the warmth and richness of this Mediterranean classic!
Grilled Vegetable Skewers With Feta

Grilled Vegetable Skewers With Feta is a vibrant and flavorful dish that brings the essence of the Mediterranean right to your backyard. Perfect for summer barbecues or as a wholesome side dish, these skewers are packed with colorful vegetables and topped with crumbled feta cheese, adding a delightful creaminess and tanginess. They aren’t only easy to make but also customizable according to your taste preferences and the vegetables you have on hand.
The beauty of this dish lies in its simplicity and versatility. You can mix and match various vegetables, marinate them for extra flavor, and grill them to perfection. This recipe serves 4-6 people, making it an ideal choice for family gatherings or outdoor parties. Serve these skewers with a side of tzatziki sauce or a fresh salad for a complete Mediterranean-inspired meal.
Ingredients
- 1 red bell pepper, cut into 1-inch pieces
- 1 yellow bell pepper, cut into 1-inch pieces
- 1 zucchini, sliced into thick rounds
- 1 red onion, cut into wedges
- 8 oz cherry tomatoes
- 1 cup mushrooms, halved
- 1/4 cup olive oil
- 2 tablespoons balsamic vinegar
- 2 teaspoons dried oregano
- Salt and pepper to taste
- 1 cup feta cheese, crumbled
- Skewers (metal or soaked wooden skewers)
Cooking Instructions
- Prepare the Skewers: If you’re using wooden skewers, soak them in water for at least 30 minutes to prevent them from burning on the grill. Metal skewers can be used directly.
- Marinate the Vegetables: In a large mixing bowl, combine the olive oil, balsamic vinegar, dried oregano, salt, and pepper. Whisk together until well blended. Add the chopped vegetables (bell peppers, zucchini, red onion, cherry tomatoes, and mushrooms) to the bowl and toss until they’re evenly coated in the marinade. Allow the vegetables to marinate for at least 15 minutes to absorb the flavors.
- Assemble the Skewers: Take the marinated vegetables and thread them onto the skewers, alternating between different types of vegetables to create a colorful arrangement. Leave a little space between each piece to guarantee even cooking.
- Preheat the Grill: While you’re assembling the skewers, preheat your grill to medium-high heat. Confirm the grill grates are clean and lightly oiled to prevent sticking.
- Grill the Skewers: Place the assembled vegetable skewers on the preheated grill. Cook for about 8-10 minutes, turning occasionally, until the vegetables are tender and have nice grill marks. The cooking time may vary depending on the thickness of the vegetables.
- Add Feta Cheese: Once the skewers are off the grill, sprinkle the crumbled feta cheese generously over the hot vegetables. The heat from the skewers will slightly soften the feta, enhancing its flavor.
- Serve: Carefully remove the skewers from the grill and serve immediately. Enjoy them warm with a side of tzatziki or your favorite dipping sauce.
Extra Tips
For added flavor, consider marinating the vegetables for a longer period, up to an hour or more, which will deepen the taste. You can also experiment with different vegetables such as eggplant, asparagus, or even fruits like pineapple for a sweet twist.
If you’re looking to make the dish even heartier, you can add cooked quinoa or couscous to the serving platter alongside the skewers. Just remember to keep an eye on the skewers while grilling to prevent any burning!
Feta and Olive Tapenade
Feta and Olive Tapenade is a vibrant and flavorful Mediterranean spread that combines the salty goodness of feta cheese with the rich, briny taste of olives. This dish isn’t only simple to prepare but also versatile, making it a perfect appetizer for gatherings or a delicious addition to a meze platter.
The contrasting textures of creamy feta and chunky olives create a delightful experience for the palate. The tapenade is typically served with crusty bread, pita chips, or fresh vegetables, allowing for a variety of dipping options. It can also be used as a topping for grilled meats or fish, adding a burst of flavor to your main courses.
This recipe is perfect for serving 4-6 people, making it an ideal choice for a small get-together or a casual family meal.
Ingredients (serving size: 4-6 people)
- 1 cup pitted Kalamata olives
- 1 cup green olives (such as Castelvetrano)
- 1 cup crumbled feta cheese
- 1/4 cup extra virgin olive oil
- 2 cloves garlic, minced
- 1 tablespoon fresh lemon juice
- 1 tablespoon fresh oregano, chopped (or 1 teaspoon dried oregano)
- Salt and pepper to taste
Cooking Instructions
1. Prepare the Olives: Start by rinsing the pitted Kalamata and green olives under cold water to remove excess brine. This step helps to balance the saltiness of the tapenade.
After rinsing, pat the olives dry with a paper towel to remove any moisture.
2. Combine Ingredients: In a food processor, add the rinsed olives, crumbled feta cheese, minced garlic, and fresh oregano. If you’re using dried oregano, add it at this stage as well.
The food processor will help to blend the flavors while maintaining some texture in the olives and feta.
3. Add Olive Oil and Lemon Juice: With the food processor running, slowly drizzle in the extra virgin olive oil and add the lemon juice.
This will create a smooth and creamy consistency while incorporating all the flavors. Stop processing when the mixture is combined but still slightly chunky, as you want to maintain some texture.
4. Season to Taste: Once your tapenade is blended, taste it for seasoning. Add salt and pepper as needed, keeping in mind that both the olives and feta can be salty.
Adjust the seasoning carefully to guarantee a balanced flavor.
5. Chill and Serve: Transfer the tapenade to a serving dish and refrigerate for at least 30 minutes to allow the flavors to meld together.
Serve the tapenade chilled or at room temperature with your choice of bread, crackers, or raw vegetables.
Extra Tips
For an added depth of flavor, consider incorporating sun-dried tomatoes or roasted red peppers into your tapenade.
You can also experiment with different types of olives or cheese for a unique twist. If you prefer a smoother texture, continue blending the mixture until it reaches your desired consistency.
Remember to taste as you go, adjusting flavors to suit your preferences. Enjoy your Mediterranean Feta and Olive Tapenade!
Savory Feta and Herb Muffins

Savory Feta and Herb Muffins are a delightful twist on the traditional muffin that combines the rich flavors of feta cheese with aromatic herbs. These muffins are perfect for breakfast, brunch, or as a simple snack throughout the day. With a moist texture and a burst of flavor from the feta and herbs, they’re sure to impress anyone who tries them.
The best part? They’re incredibly easy to whip up, making them a go-to recipe for busy days or last-minute gatherings. This recipe requires just a few simple ingredients, and you can easily customize it based on your herb preferences or the cheese you have on hand.
Whether you serve them warm straight out of the oven or at room temperature, these muffins are versatile enough to be paired with various dishes or enjoyed on their own. Let’s explore the ingredients and cooking instructions to get these savory muffins baking!
Ingredients (Serves 4-6):
- 1 ½ cups all-purpose flour
- 1 tablespoon baking powder
- ½ teaspoon salt
- ¼ teaspoon black pepper
- 1 cup crumbled feta cheese
- ¼ cup grated Parmesan cheese
- ½ cup chopped fresh herbs (such as parsley, dill, and chives)
- 1 cup milk
- 2 large eggs
- 1/3 cup olive oil
Cooking Instructions:
- Preheat the Oven: Begin by preheating your oven to 375°F (190°C). This guarantees that your muffins will bake evenly and rise nicely.
- Prepare the Muffin Tin: Grease a muffin tin or line it with paper liners. This step is essential to prevent the muffins from sticking and making it easier to remove them after baking.
- Mix Dry Ingredients: In a large mixing bowl, whisk together the flour, baking powder, salt, and black pepper. This helps to evenly distribute the leavening agent and season the flour before adding the wet ingredients.
- Incorporate Cheese and Herbs: Add the crumbled feta, grated Parmesan, and chopped herbs to the dry mixture. Gently toss them together to confirm they’re well coated with flour, which helps prevent them from sinking to the bottom during baking.
- Combine Wet Ingredients: In a separate bowl, whisk together the milk, eggs, and olive oil until fully combined. This mixture will add moisture and richness to your muffins.
- Combine Wet and Dry Ingredients: Pour the wet ingredients into the dry ingredients and stir gently until just combined. Be careful not to overmix, as this can lead to tough muffins. A few lumps are perfectly fine.
- Fill Muffin Tin: Spoon the batter into the prepared muffin tin, filling each cup about three-quarters full to allow room for rising.
- Bake: Place the muffin tin in the preheated oven and bake for 20-25 minutes, or until the tops are golden brown and a toothpick inserted into the center comes out clean.
- Cool and Serve: Allow the muffins to cool in the tin for about 5 minutes before transferring them to a wire rack to cool completely. Serve warm or at room temperature.
Extra Tips:
For a unique flavor profile, consider adding sun-dried tomatoes, olives, or different types of cheese to the muffin batter. You can also experiment with various herbs like basil or thyme to match your taste preferences.
These muffins freeze well, so making a double batch for future snacks or meals is a great idea. Just reheat them in the oven for a few minutes when you’re ready to enjoy!
Feta-Stuffed Chicken Breast With Lemon and Oregano
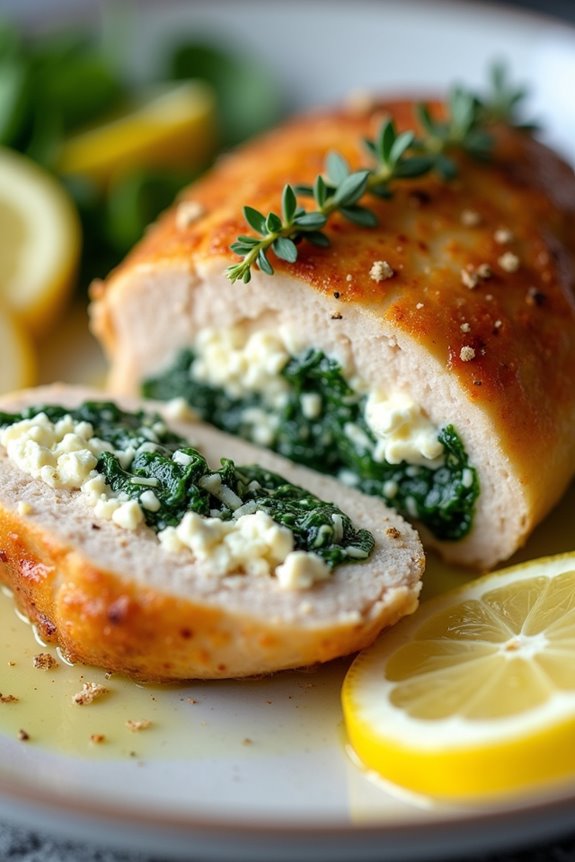
This Feta-Stuffed Chicken Breast with Lemon and Oregano is a delightful Mediterranean-inspired dish that bursts with flavor. The juicy chicken breasts are filled with a tangy feta cheese mixture, which is complemented by the bright notes of lemon and aromatic oregano. It’s a perfect option for a family dinner or a special gathering, guaranteeing everyone at the table enjoys a taste of the Mediterranean.
Cooking this dish isn’t only simple but also a great way to impress your guests with minimal effort. The combination of feta, lemon, and oregano creates a beautiful harmony of flavors that transforms a classic chicken breast into a gourmet meal. Serve it with a side of roasted vegetables or a fresh salad for a complete and satisfying dining experience.
Ingredients (Serves 4-6):
- 4 large boneless, skinless chicken breasts
- 1 cup crumbled feta cheese
- 1/2 cup freshly chopped spinach
- 2 tablespoons fresh oregano, chopped (or 1 tablespoon dried oregano)
- 1 lemon (zested and juiced)
- 3 cloves garlic, minced
- Salt and pepper to taste
- 2 tablespoons olive oil
- Lemon slices (for garnish)
Cooking Instructions:
- Preheat the Oven: Begin by preheating your oven to 375°F (190°C). This guarantees that your chicken cooks evenly and stays juicy.
- Prepare the Filling: In a mixing bowl, combine the crumbled feta cheese, chopped spinach, oregano, lemon zest, minced garlic, salt, and pepper. Mix until all ingredients are well incorporated, creating a flavorful filling for the chicken.
- Prepare the Chicken: Take each chicken breast and use a sharp knife to create a pocket. Carefully slice horizontally into the thickest part of the breast, making sure not to cut all the way through. This will hold the filling in place.
- Stuff the Chicken: Generously spoon the feta mixture into each chicken pocket. Use toothpicks to secure the openings if necessary to prevent the filling from leaking out during cooking.
- Sear the Chicken: In a large oven-safe skillet, heat the olive oil over medium-high heat. Once hot, add the stuffed chicken breasts and sear them for about 3-4 minutes on each side until they’re golden brown.
- Bake the Chicken: Once the chicken is seared, transfer the skillet to the preheated oven. Bake for 20-25 minutes or until the chicken is cooked through and reaches an internal temperature of 165°F (75°C).
- Rest and Serve: Once done, remove the skillet from the oven and let the chicken rest for about 5 minutes. Serve hot, garnished with fresh lemon slices.
Extra Tips:
For an extra layer of flavor, consider marinating the chicken breasts in olive oil, lemon juice, and herbs for a couple of hours before stuffing them. This not only enhances the taste but also guarantees that your chicken remains moist and tender.
Additionally, feel free to experiment with different herbs and greens in the filling, like sun-dried tomatoes or kalamata olives, to tailor the dish to your taste.