

There’s nothing quite like the delightful contrast of a crusty exterior and a soft, airy inside when it comes to Portuguese bread. From the robust Pão Alentejano to the gently sweet Pão Doce, each loaf offers its own unique story. These recipes strike the perfect balance between texture and flavor. I’ve curated 15 of my absolute favorites to share with you. Get ready to find your next baking obsession among them!
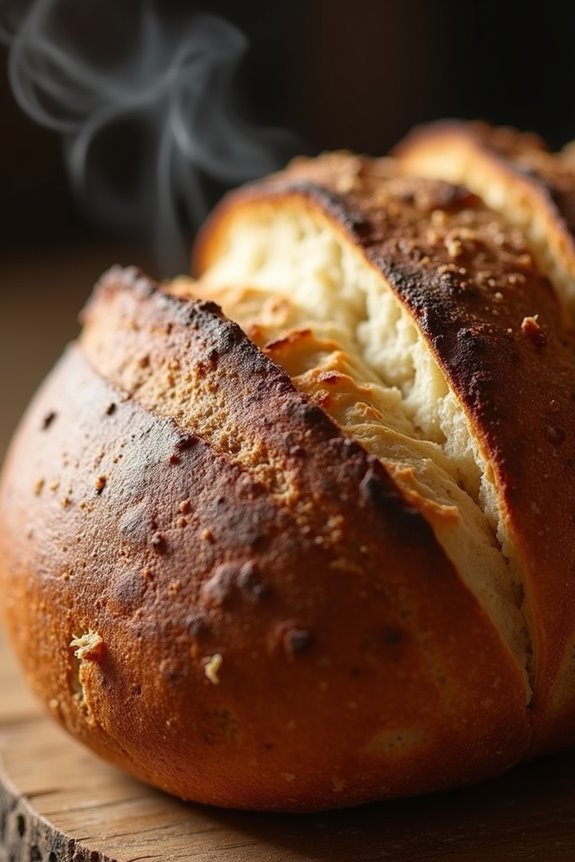
Traditional Portuguese Sourdough Bread
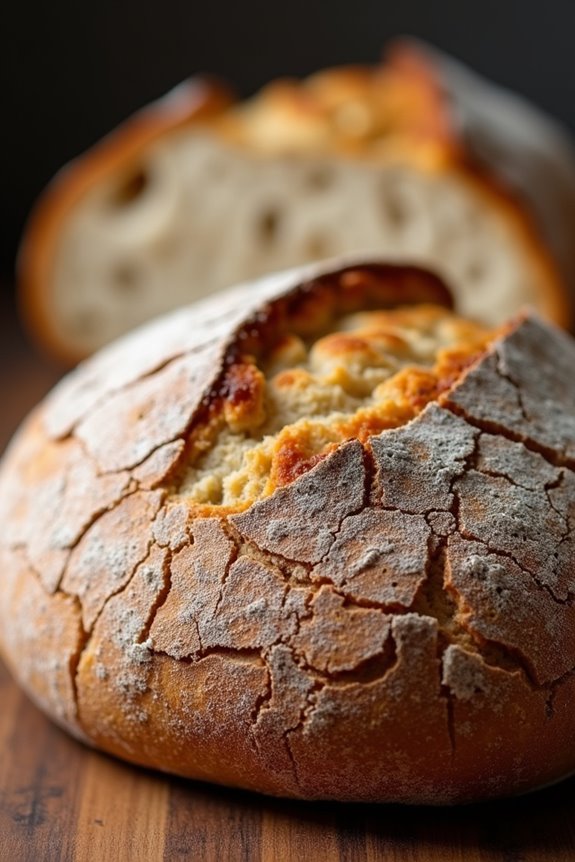
Traditional Portuguese Sourdough Bread, or “Pão Alentejano,” is a delightful staple that reflects the rich culinary heritage of Portugal. Characterized by its rustic crust and chewy interior, this bread is made using a natural leavening process that gives it a distinctive flavor and texture. The recipe relies on a sourdough starter, which is cultivated over time to develop the necessary yeast and bacteria for fermentation.
This bread pairs beautifully with a wide variety of dishes, from cheeses and cured meats to soups and stews, making it a versatile addition to any meal.
Making Portuguese Sourdough Bread is an art that requires patience and attention to detail, but the end result is incredibly rewarding. The slow fermentation process allows the flavors to deepen, resulting in a tangy, aromatic loaf that’s sure to impress your family and friends.
Whether you’re an experienced baker or a novice, this recipe will guide you through the steps to create your own batch of this beloved Portuguese bread.
Ingredients (Serves 4-6):
- 500g all-purpose flour
- 350ml water (room temperature)
- 100g sourdough starter (active and bubbly)
- 10g salt
Cooking Instructions:
- Prepare the Dough: In a large mixing bowl, combine the all-purpose flour and salt. Mix them together until evenly distributed. In a separate bowl, mix the active sourdough starter with the room temperature water until well combined. Gradually add this mixture to the flour while mixing with a wooden spoon or your hands until a shaggy dough forms.
- Autolyse: Cover the bowl with a damp cloth or plastic wrap and let it rest for about 30 minutes. This process, known as autolyse, allows the flour to absorb the water and begins gluten development, which is essential for the structure of the bread.
- Knead the Dough: After the autolyse, knead the dough in the bowl or on a lightly floured surface for about 10-12 minutes until it becomes smooth and elastic. If you prefer, you can use the stretch and fold technique—gently stretching the dough and folding it over itself every 30 minutes for about 2 hours.
- Bulk Fermentation: Transfer the kneaded dough to a clean bowl and cover it. Allow it to rise at room temperature for about 4-5 hours, or until it has doubled in size. This process encourages the development of flavor and texture.
- Shape the Dough: Once the dough has risen, gently turn it out onto a floured surface. Shape it into a round or oval loaf by folding the edges into the center and flipping it over. Create tension on the surface by gently pulling the dough towards you.
- Final Proofing: Place the shaped dough into a floured proofing basket or bowl, seam side up. Cover it with a cloth and let it proof for an additional 1-2 hours at room temperature, or overnight in the refrigerator for a more developed flavor.
- Preheat the Oven: About 30 minutes before baking, preheat your oven to 230°C (450°F) and place a Dutch oven (or a baking stone) inside to heat up.
- Bake the Bread: Carefully remove the hot Dutch oven from the oven. Gently flip the dough onto a piece of parchment paper and score the top with a sharp knife. Place the parchment with the dough into the hot Dutch oven, cover with the lid, and bake for 30 minutes. Remove the lid and bake for an additional 15-20 minutes, or until the crust is golden brown and the internal temperature reaches 90°C (194°F).
- Cool the Bread: Once baked, carefully transfer the bread to a wire rack to cool for at least an hour before slicing. This resting period allows the crumb to set, making it easier to cut.
Extra Tips:
For the best flavor, use high-quality flour and confirm your sourdough starter is active and bubbly before beginning the recipe. If you have time, try a longer fermentation in the refrigerator overnight; this will enhance the taste and texture of your bread.
Additionally, don’t rush the cooling process—slicing too soon can lead to a gummy interior. Enjoy your homemade Traditional Portuguese Sourdough Bread with your favorite accompaniments!
Pão Alentejano: Rustic Alentejo Bread

Pão Alentejano is a traditional rustic bread that hails from the Alentejo region of Portugal, known for its vast landscapes and rich agricultural heritage. This bread is characterized by its thick crust, soft crumb, and slightly sour flavor, achieved through a natural fermentation process.
It pairs beautifully with various Portuguese dishes, from hearty stews to simple butter and cheese, making it a staple in many households. Making Pão Alentejano at home allows you to experience the authentic taste of Portugal while filling your kitchen with the comforting aroma of freshly baked bread.
The recipe requires a bit of patience, as it involves a fermentation period, but the results are well worth the effort. With just a few simple ingredients, you can enjoy a loaf that captures the essence of the Alentejo region.
Ingredients (Serves 4-6):
- 500g bread flour
- 300ml water (room temperature)
- 10g salt
- 5g sugar
- 10g fresh yeast (or 3g active dry yeast)
- 1 tablespoon olive oil (optional)
Cooking Instructions:
- Prepare the Yeast Mixture: In a small bowl, dissolve the fresh yeast and sugar in 100ml of the room temperature water. Let it sit for about 10-15 minutes until it becomes frothy. If using active dry yeast, mix it with the flour instead of activating it first.
- Mix the Dough: In a large mixing bowl, combine the bread flour and salt. Make a well in the center and pour in the yeast mixture along with the remaining water. If using, add the olive oil. Using your hand or a wooden spoon, mix the ingredients until a rough dough forms.
- Knead the Dough: Transfer the dough onto a lightly floured surface and knead it for about 10-15 minutes. You want to develop the gluten to create a smooth and elastic dough. If the dough is too sticky, sprinkle a little more flour as needed.
- First Rise: Place the kneaded dough in a lightly oiled bowl, cover it with a damp kitchen towel or plastic wrap, and let it rise in a warm place for about 1 to 2 hours, or until it has doubled in size.
- Shape the Loaf: Once the dough has risen, punch it down gently to release the air. Transfer it to a floured surface and shape it into a round or oval loaf. Place the shaped dough on a floured baking sheet or a baking stone.
- Second Rise: Cover the shaped loaf with the damp towel again and let it rise for another 30-45 minutes until it has puffed up.
- Preheat the Oven: While the dough is rising for the second time, preheat your oven to 220°C (430°F). If you have a baking stone, place it in the oven to heat.
- Bake the Bread: Just before baking, make a few shallow cuts on the surface of the dough with a sharp knife. This allows the bread to expand while baking. Place the loaf in the preheated oven and bake for about 25-30 minutes or until the crust is golden brown and sounds hollow when tapped.
- Cool the Bread: Remove the bread from the oven and let it cool on a wire rack for at least 20 minutes before slicing. This helps to set the crumb and enhances the flavor.
Extra Tips:
To enhance the flavor of your Pão Alentejano, consider adding a small amount of sourdough starter if you have one on hand. This can intensify the sour notes and contribute to a more complex taste.
Additionally, for a crustier loaf, you can place a shallow pan of water at the bottom of the oven while baking to create steam. Always let the bread cool completely before slicing, as this helps the texture to settle and improves the overall taste. Enjoy your homemade rustic Alentejo bread with your favorite dishes or simply with a drizzle of olive oil!
Portuguese Cornbread: Pão De Milho
Pão De Milho, or Portuguese cornbread, is a delightful and traditional bread that hails from various regions of Portugal. Known for its rustic flavor and slightly crumbly texture, this bread is made primarily from cornmeal, which gives it a beautifully golden hue and a slightly sweet, earthy taste.
Often enjoyed as a side dish to complement hearty stews or simply served with butter, Pão De Milho is a staple that showcases the simplicity and richness of Portuguese cuisine.
The charm of this cornbread lies in its ease of preparation and the comforting aroma that fills your kitchen while it bakes. Whether you’re serving it at a gathering or enjoying it at a cozy family dinner, this recipe brings a taste of Portugal to your table.
With just a handful of ingredients and a few straightforward steps, you can create this delightful bread that’s bound to impress your guests and satisfy your craving for something warm and homemade.
Ingredients (Serves 4-6):
- 1 cup cornmeal
- 1 cup all-purpose flour
- 1 tablespoon baking powder
- 1 teaspoon salt
- 1/4 cup sugar
- 1/4 cup olive oil
- 1 cup milk
- 2 large eggs
Instructions:
- Preheat the oven: Begin by preheating your oven to 375°F (190°C). This guarantees that the bread will bake evenly and rise properly when placed inside.
- Prepare the baking dish: Grease an 8-inch square baking pan or a similar-sized oven-safe dish with olive oil or cooking spray. This will prevent the cornbread from sticking and make it easier to remove once it’s baked.
- Mix dry ingredients: In a large mixing bowl, combine the cornmeal, all-purpose flour, baking powder, salt, and sugar. Whisk these ingredients together until they’re evenly incorporated. This step is essential as it guarantees that the leavening agent (baking powder) is evenly distributed throughout the dry mixture.
- Combine wet ingredients: In a separate bowl, whisk together the olive oil, milk, and eggs until well combined. The liquid ingredients should be fully blended to create a smooth mixture, as they’ll be added to the dry ingredients.
- Combine wet and dry ingredients: Pour the wet mixture into the bowl with the dry ingredients. Gently stir the mixture using a spatula or wooden spoon until just combined. Be careful not to overmix, as this can result in a denser texture.
- Pour into the baking dish: Transfer the batter into the prepared baking dish, spreading it evenly with a spatula. This guarantees uniform baking and prevents the edges from cooking faster than the center.
- Bake the cornbread: Place the baking dish in the preheated oven and bake for 25-30 minutes, or until the top is lightly golden and a toothpick inserted into the center comes out clean. Keep an eye on it in the last few minutes to avoid overbaking.
- Cool and serve: Once baked, remove the cornbread from the oven and allow it to cool in the pan for about 10 minutes. Then, transfer it to a wire rack to cool completely. Slice and serve warm, optionally with butter or your favorite spread.
Extra Tips:
For an added depth of flavor, consider mixing in ingredients such as grated cheese, chopped herbs, or diced jalapeños to the batter before baking. This will enhance the overall taste and make the cornbread even more enjoyable.
Additionally, if you prefer a slightly sweeter cornbread, feel free to increase the sugar to half a cup. Pão De Milho is best enjoyed fresh, but you can also store leftovers in an airtight container for a few days and reheat them in the oven for a warm treat later on.
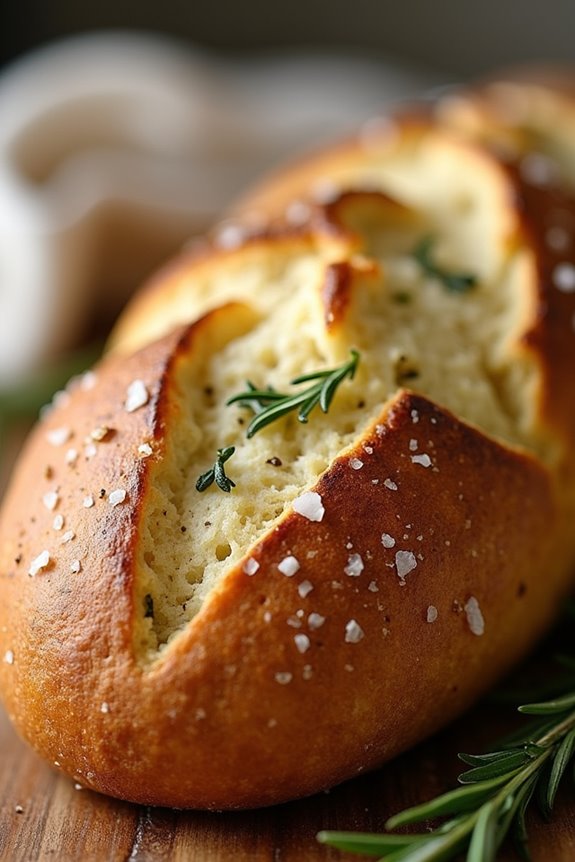
Focaccia With Portuguese Flavors

Focaccia is a versatile Italian bread that can be infused with various flavors, and when combined with Portuguese ingredients, it creates a delightful twist on the classic recipe. This Focaccia with Portuguese Flavors incorporates elements like olives, garlic, and fresh herbs, making it perfect as a side dish, an appetizer, or even as a base for a sandwich.
The light and airy texture of focaccia complements the rich flavors of the added ingredients, resulting in a dish that’s both comforting and satisfying. Making this focaccia at home allows you to control the flavors and ingredients, guaranteeing the freshest taste possible.
The process of preparing the dough is straightforward, and the addition of Portuguese elements will surely impress your family and friends. Whether you’re serving it with a meal or enjoying it on its own, this focaccia is bound to be a hit.
Ingredients (Serves 4-6):
- 2 cups all-purpose flour
- 1 cup warm water (about 110°F)
- 1 packet (2 1/4 teaspoons) active dry yeast
- 1 teaspoon sugar
- 1 teaspoon salt
- 3 tablespoons olive oil (plus extra for drizzling)
- 1/2 cup pitted black olives, chopped
- 2 cloves garlic, minced
- 1 tablespoon fresh rosemary, chopped
- 1 tablespoon fresh parsley, chopped
- Coarse sea salt, for sprinkling on top
Cooking Instructions:
- Activate the Yeast: In a small bowl, combine the warm water, sugar, and yeast. Stir gently and let the mixture sit for about 5-10 minutes until it becomes frothy. This step guarantees that the yeast is active and ready to leaven the dough.
- Prepare the Dough: In a large mixing bowl, combine the flour and salt. Once the yeast mixture is frothy, add it to the flour along with 3 tablespoons of olive oil. Mix until a shaggy dough forms.
- Knead the Dough: Transfer the dough onto a lightly floured surface and knead it for about 5-7 minutes until it becomes smooth and elastic. If the dough is too sticky, sprinkle a little more flour as needed.
- First Rise: Place the kneaded dough into a greased bowl, cover it with a damp cloth or plastic wrap, and allow it to rise in a warm place for about 1-1.5 hours, or until it has doubled in size.
- Prepare the Toppings: While the dough is rising, you can prepare the toppings. In a small bowl, mix the chopped olives, minced garlic, rosemary, and parsley together. This blend will add a burst of flavor to the focaccia.
- Shape the Dough: Once the dough has risen, punch it down to release any air bubbles. Transfer it to a greased baking sheet or a cast-iron skillet. Use your fingers to spread and gently press the dough into a rectangular or round shape, about 1/2 inch thick.
- Add Toppings: Make dimples in the surface of the dough using your fingers, then drizzle a bit of olive oil on top. Evenly sprinkle the olive-garlic-herb mixture over the dough. Finish by sprinkling coarse sea salt over the top for added flavor.
- Second Rise: Cover the dough again and let it rise for another 30-45 minutes, until slightly puffy.
- Preheat the Oven: While the dough is rising, preheat your oven to 425°F (220°C).
- Bake the Focaccia: Once the dough has completed its second rise, place it in the preheated oven and bake for 20-25 minutes, or until the focaccia is golden brown on top.
- Cool and Serve: Remove the focaccia from the oven and let it cool for a few minutes on a wire rack. Slice and serve warm, drizzling with additional olive oil if desired.
Extra Tips:
To enhance the flavor of your focaccia, consider experimenting with different types of olives or adding additional toppings such as sun-dried tomatoes or feta cheese.
You can also make the dough ahead of time and let it rise in the refrigerator overnight for a deeper flavor. Finally, be sure to check on the focaccia as it bakes, as oven temperatures can vary; you want it to be golden brown but not burnt.
Enjoy your deliciously flavored focaccia as a delightful addition to any meal!
Sweet Portuguese Bread: Pão Doce
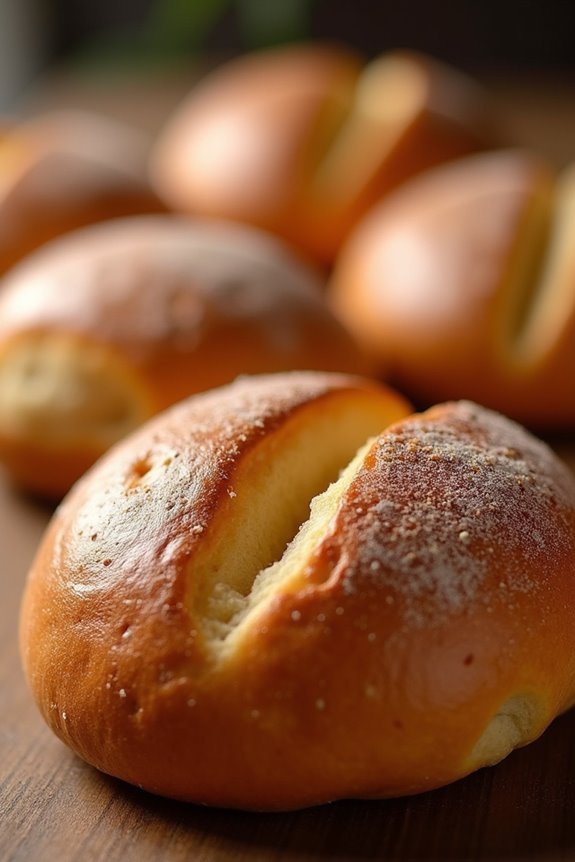
Pão Doce, or sweet Portuguese bread, is a delightful treat that showcases the rich culinary traditions of Portugal. This soft, slightly sweet bread is often enjoyed as a breakfast option or a snack, often accompanied by coffee or tea. With its tender crumb and subtly sweet flavor, Pão Doce is a favorite in many Portuguese households and is perfect for sharing with family and friends.
The process of making Pão Doce involves a few fundamental steps, but the end result is well worth the effort. This bread isn’t only delicious on its own but can also be enhanced with various toppings such as sugar, cinnamon, or even a drizzle of honey. Whether you’re baking it for a special occasion or simply to satisfy a craving, Pão Doce is sure to please everyone at the table.
Ingredients (Serves 4-6)
- 4 cups all-purpose flour
- 1 cup milk, warmed
- 1/3 cup granulated sugar
- 2 large eggs
- 1/4 cup unsalted butter, melted
- 1 tablespoon active dry yeast
- 1 teaspoon salt
- 1 teaspoon vanilla extract
- Zest of 1 lemon (optional)
- Extra sugar for sprinkling
Cooking Instructions
- Prepare the Yeast Mixture: In a small bowl, combine the warm milk (around 100°F), sugar, and active dry yeast. Stir gently to dissolve and let it sit for about 5-10 minutes until the mixture is frothy. This indicates that the yeast is activated and ready to use.
- Mix the Dough Ingredients: In a large mixing bowl, whisk together the flour and salt. Make a well in the center and add the activated yeast mixture, eggs, melted butter, vanilla extract, and lemon zest (if using). Mix with a wooden spoon or spatula until a rough dough begins to form.
- Knead the Dough: Transfer the dough to a lightly floured surface and knead for about 8-10 minutes until the dough is smooth and elastic. If the dough is sticky, sprinkle a little more flour as needed. This step is vital for developing the gluten which gives the bread its structure.
- First Rise: Place the kneaded dough in a greased bowl, cover it with a clean kitchen towel or plastic wrap, and let it rise in a warm place for about 1-2 hours or until it has doubled in size.
- Shape the Bread: Once the dough has risen, punch it down to release the air. Transfer it to a floured surface and divide it into equal pieces (you can make 2-3 larger loaves or several small rolls). Shape each piece into a round ball or desired shape and place them on a greased baking sheet.
- Second Rise: Cover the shaped dough again and let it rise for another 30-45 minutes or until they’ve puffed up considerably.
- Preheat the Oven: While the dough is rising, preheat your oven to 350°F (175°C).
- Bake the Bread: Once the dough has risen, sprinkle the tops with a little extra sugar if desired. Bake in the preheated oven for 25-30 minutes or until the bread is golden brown and sounds hollow when tapped on the bottom.
- Cool and Serve: Remove the bread from the oven and let it cool on a wire rack. Once cooled, slice and serve, enjoying the sweet, tender bread with your favorite beverages.
Extra Tips
When making Pão Doce, it’s crucial to verify that the milk is warm but not too hot, as excessive heat can kill the yeast.
Additionally, for a more flavorful bread, consider adding spices such as cinnamon or nutmeg to the dough. You can also experiment with fillings like chocolate or dried fruits for added sweetness.
Finally, for a beautiful finish, brush the top with melted butter right after baking and sprinkle with sugar for a delightful crunch. Enjoy your homemade Pão Doce!
Pão De Deus: Coconut Topped Bread
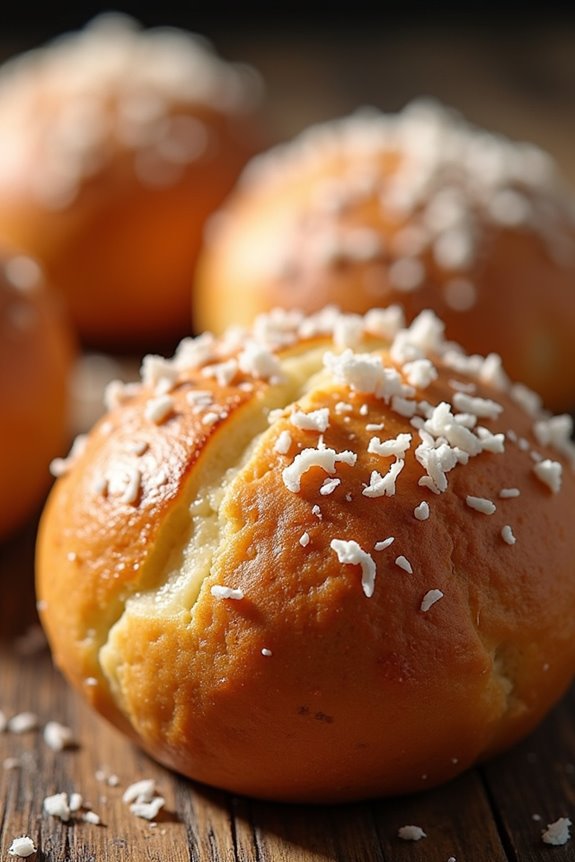
Pão De Deus, translating to “Bread of God,” is a delightful Portuguese treat that features a soft and fluffy bread base topped with a sweet coconut mixture. This bread is often enjoyed at breakfast or as a snack, making it a beloved choice for many families in Portugal and beyond.
The combination of the bread’s light texture with the rich coconut topping creates a wonderful harmony of flavors that will surely leave you wanting more.
Making Pão De Deus at home can be a rewarding experience, as the aroma of freshly baked bread fills your kitchen. The process may take some time, but the end result is well worth the effort. This recipe serves 4-6 people, making it perfect for sharing with loved ones or for enjoying throughout the week.
Ingredients
- 500g all-purpose flour
- 75g granulated sugar
- 10g salt
- 10g active dry yeast
- 250ml warm milk
- 75g unsalted butter, melted
- 2 large eggs
- 150g sweetened shredded coconut
- 100g powdered sugar
- 1 teaspoon vanilla extract
- 1 egg (for egg wash)
Cooking Instructions
1. Prepare the Dough: In a large mixing bowl, combine the warm milk, sugar, and yeast. Stir gently and let it sit for about 5-10 minutes until it becomes frothy. This indicates that the yeast is active.
Once frothy, add the melted butter, eggs, and salt. Mix until well combined.
2. Incorporate the Flour: Gradually add the all-purpose flour to the wet ingredients, mixing with a wooden spoon or your hands until a shaggy dough forms.
Once the dough comes together, transfer it to a floured surface and knead for about 8-10 minutes until it becomes smooth and elastic.
3. First Rise: Place the kneaded dough in a greased bowl, cover it with a clean kitchen towel or plastic wrap, and let it rise in a warm place for about 1-2 hours or until it has doubled in size.
4. Prepare the Coconut Topping: In a separate bowl, combine the shredded coconut, powdered sugar, and vanilla extract.
Mix well until everything is evenly combined. Set aside.
5. Shape the Bread: After the dough has risen, punch it down to release any air bubbles.
Divide the dough into 12 equal pieces and shape each piece into a ball. Place the balls on a lined baking tray, ensuring they’re spaced out to allow for further rising.
6. Second Rise: Cover the shaped dough balls with a kitchen towel and let them rise for another 30-45 minutes until they’ve puffed up.
7. Preheat the Oven: While the dough is rising, preheat your oven to 180°C (350°F).
8. Apply Egg Wash: Beat the egg in a small bowl and brush the tops of the dough balls with the egg wash.
This will give them a beautiful golden color once baked.
9. Add the Coconut Topping: Gently press the coconut mixture onto the tops of each dough ball, ensuring they’re well coated.
10. Bake the Bread: Place the baking tray in the preheated oven and bake for 20-25 minutes or until the bread is golden brown and sounds hollow when tapped on the bottom.
11. Cool and Serve: Once baked, remove the tray from the oven and let the Pão De Deus cool on a wire rack for a few minutes before serving.
Extra Tips
For the best results, verify your ingredients are at room temperature before starting, as this helps with the yeast activation and dough consistency.
If you prefer a richer flavor, consider adding a pinch of nutmeg or cinnamon to the coconut topping. Additionally, feel free to experiment with different types of toppings, such as chopped nuts or dried fruits, to give a personal twist to this classic recipe.
Enjoy your Pão De Deus fresh out of the oven or lightly toasted for an extra crispy texture!
Spiced Chorizo Bread Rolls

Spiced Chorizo Bread Rolls are a delightful fusion of Portuguese flavors, perfect for a cozy gathering or as a unique appetizer for any occasion. The combination of spicy chorizo sausage with soft, freshly baked bread creates a mouthwatering experience that’s hard to resist.
These rolls aren’t only packed with flavor, but they’re also relatively easy to make, making them a fantastic addition to your culinary repertoire. The dough is enriched with a hint of garlic and herbs, which complements the chorizo beautifully. As they bake, the aroma wafts through your kitchen, enticing everyone nearby.
Serve them warm with a side of butter or a spicy dipping sauce for an extra kick. These rolls are sure to impress your guests and become a staple in your bread-making adventures.
Ingredients (Serves 4-6):
- 2 cups all-purpose flour
- 1 cup warm water (about 110°F)
- 1 packet (2 ¼ teaspoons) active dry yeast
- 2 tablespoons olive oil
- 1 teaspoon sugar
- 1 teaspoon salt
- 1 teaspoon smoked paprika
- 1 teaspoon dried oregano
- 1 clove garlic, minced
- 6 ounces chorizo, diced
- 1 egg (for egg wash)
Cooking Instructions:
- Prepare the Yeast Mixture: In a small bowl, combine the warm water, sugar, and active dry yeast. Stir gently and let it sit for about 5-10 minutes until it becomes frothy. This activates the yeast, guaranteeing that your rolls will rise properly.
- Mix the Dough: In a large mixing bowl, combine the all-purpose flour, salt, smoked paprika, and dried oregano. Make a well in the center and add the yeast mixture along with the olive oil and minced garlic. Mix together until a rough dough forms.
- Knead the Dough: Transfer the dough to a floured surface and knead it for about 8-10 minutes until it becomes smooth and elastic. If the dough is too sticky, add a little more flour as needed. Kneading is essential to develop the gluten, which helps the rolls rise.
- Add the Chorizo: Once the dough is kneaded, flatten it slightly and add the diced chorizo. Fold the dough over the chorizo and knead gently until the chorizo is evenly distributed throughout the dough.
- Let It Rise: Place the dough in a lightly greased bowl, cover it with a clean kitchen towel, and let it rise in a warm place for about 1 hour, or until it has doubled in size. This step is vital for achieving soft and fluffy rolls.
- Shape the Rolls: After the dough has risen, punch it down to release the air. Divide the dough into 12 equal pieces and shape each piece into a ball. Place the rolls on a baking sheet lined with parchment paper, spacing them about 1 inch apart.
- Second Rise: Cover the shaped rolls with the kitchen towel again and let them rise for another 30 minutes. This second rise will give the rolls their final puff before baking.
- Preheat the Oven: While the rolls are rising, preheat your oven to 375°F (190°C). This guarantees that the rolls will bake evenly.
- Apply Egg Wash: In a small bowl, whisk the egg and brush it over the tops of the rolls. This will give them a beautiful golden color as they bake.
- Bake the Rolls: Bake the rolls in the preheated oven for 20-25 minutes, or until they’re golden brown and sound hollow when tapped on the bottom. Remove them from the oven and let them cool slightly before serving.
Extra Tips:
For an even more delicious flavor, consider adding some grated cheese to the dough along with the chorizo. Additionally, if you prefer a spicier kick, try using hot chorizo instead of mild.
These rolls are best enjoyed fresh out of the oven, but you can also store them in an airtight container for a couple of days. Reheat them in the oven for a few minutes to revive their freshness before serving. Enjoy your Spiced Chorizo Bread Rolls!
Olive Oil Bread With Herbs
Olive Oil Bread with Herbs is a delightful and aromatic bread that embodies the rich flavors of Mediterranean cuisine. This rustic bread is infused with the essence of olive oil and a medley of herbs, making it a perfect accompaniment to various meals or a delicious snack on its own. The simplicity of its ingredients allows the flavors to shine, while the addition of fresh herbs elevates the bread to a whole new level of taste.
This recipe is perfect for gatherings, family dinners, or even as a special treat for yourself. With a golden crust and a soft, airy texture, this bread will surely impress anyone who takes a bite. Whether you serve it warm with butter or alongside a bowl of olive oil for dipping, Olive Oil Bread with Herbs is a must-try for any bread lover.
Ingredients (Serves 4-6)
- 3 cups all-purpose flour
- 1 packet (2 ¼ teaspoons) active dry yeast
- 1 teaspoon salt
- 1 teaspoon sugar
- 1 cup warm water (about 110°F/43°C)
- ¼ cup extra virgin olive oil
- 2 tablespoons fresh rosemary, chopped
- 2 tablespoons fresh thyme, chopped
- 1 tablespoon fresh oregano, chopped
- 1 teaspoon garlic powder (optional)
- Coarse sea salt for topping
Cooking Instructions
- Activate the Yeast: In a small bowl, combine the warm water, sugar, and yeast. Stir gently and let it sit for about 5-10 minutes until it becomes frothy. This process activates the yeast, which will help the bread rise.
- Mix Dry Ingredients: In a large mixing bowl, combine the flour, salt, garlic powder (if using), and the chopped herbs (rosemary, thyme, and oregano). Stir the dry ingredients together until well mixed.
- Combine Wet Ingredients: Once the yeast mixture is frothy, add the olive oil to the bowl with the yeast. Mix well to combine.
- Form the Dough: Make a well in the center of the dry ingredients, then pour the yeast mixture into the well. Using a wooden spoon or your hands, mix the ingredients together until a sticky dough forms.
- Knead the Dough: Transfer the dough to a floured surface. Knead the dough for about 8-10 minutes, until it becomes smooth and elastic. If the dough is too sticky, sprinkle a little more flour as needed.
- First Rise: Place the kneaded dough in a lightly oiled bowl, covering it with a clean kitchen towel. Let it rise in a warm place for about 1 hour, or until it has doubled in size.
- Shape the Bread: After the first rise, punch down the dough to release any air bubbles. Shape it into a round loaf or divide it into smaller portions for individual rolls. Place the shaped dough onto a baking sheet lined with parchment paper.
- Second Rise: Cover the shaped bread with the kitchen towel again and let it rise for another 30-45 minutes until it has puffed up.
- Preheat the Oven: While the dough is rising, preheat your oven to 425°F (220°C).
- Prepare for Baking: Once the dough has risen, brush the top with a little olive oil and sprinkle coarse sea salt over it for added flavor.
- Bake the Bread: Place the baking sheet in the oven and bake for 20-25 minutes, or until the bread is golden brown and sounds hollow when tapped on the bottom.
- Cool Before Serving: Remove the bread from the oven and let it cool on a wire rack before slicing. This helps maintain its texture and flavor.
Extra Tips
For an added depth of flavor, consider experimenting with different herbs or adding grated cheese into the dough. You can also serve the bread warm with a side of flavored olive oil for dipping.
If you’re feeling adventurous, try adding sun-dried tomatoes or olives to the dough for an Italian twist. Storing the bread in an airtight container will help keep it fresh for a few days, but it’s best enjoyed the same day it’s made.
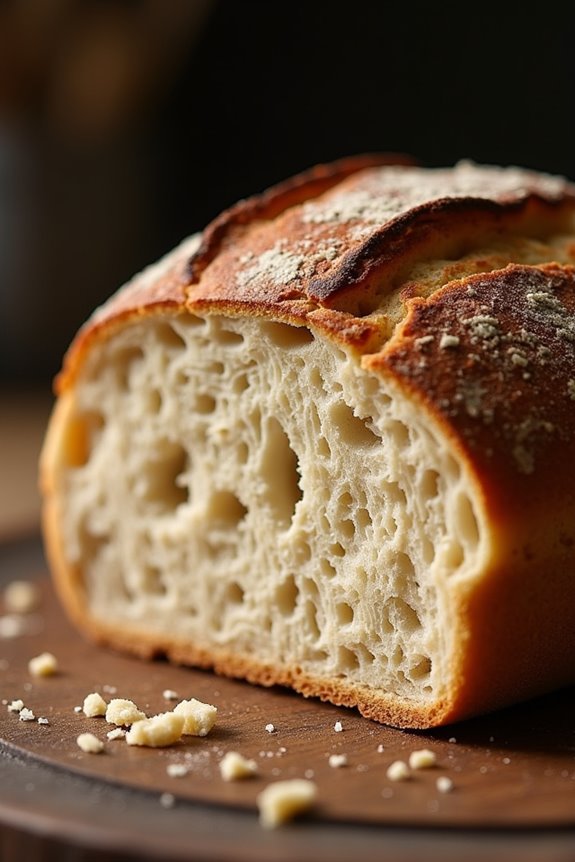
Pão Francês: Portuguese French Bread
Pão Francês, or Portuguese French Bread, is a beloved staple in Portugal that brings a taste of tradition to any table. Known for its crusty exterior and soft, airy interior, this bread is perfect for breakfast, sandwiches, or served alongside meals. The simplicity of the ingredients allows the flavors to shine, making it a favorite among both home bakers and professional chefs alike.
Whether you’re enjoying it with butter and jam or using it to soak up a hearty stew, this bread is sure to satisfy.
Making Pão Francês at home is a rewarding experience that fills your kitchen with the delightful aroma of freshly baked bread. With just a few basic ingredients and a little patience, you can create this delicious loaf that will impress your family and friends. This recipe yields 4-6 servings, making it ideal for gatherings or simply to enjoy throughout the week.
Ingredients
- 4 cups all-purpose flour
- 1 ½ cups warm water (about 110°F or 43°C)
- 2 teaspoons active dry yeast
- 2 teaspoons salt
- 1 tablespoon sugar
- 1 tablespoon olive oil
Cooking Instructions
- Activate the Yeast: In a small bowl, combine the warm water, sugar, and yeast. Stir gently and let it sit for about 5-10 minutes until it becomes frothy. This indicates that the yeast is active and ready to use.
- Mix the Dry Ingredients: In a large mixing bowl, add the flour and salt. Mix them together thoroughly to guarantee that the salt is evenly distributed within the flour.
- Combine Wet and Dry Ingredients: Once the yeast mixture is frothy, pour it into the bowl with the flour mixture along with the olive oil. Stir with a wooden spoon or spatula until a rough dough forms.
- Knead the Dough: Transfer the dough onto a lightly floured surface. Knead the dough for about 10-15 minutes until it’s smooth and elastic. If the dough is sticky, sprinkle a little more flour as needed.
- First Rise: Place the kneaded dough in a lightly oiled bowl, cover it with a damp cloth or plastic wrap, and let it rise in a warm, draft-free area for about 1-2 hours or until it has doubled in size.
- Shape the Bread: After the dough has risen, punch it down gently to release the air. Divide the dough into 2 or 3 equal pieces, depending on the size of the loaves you want. Shape each piece into a long, baguette-like loaf, tapering the ends slightly.
- Second Rise: Place the shaped loaves on a baking sheet lined with parchment paper. Cover them again with a damp cloth and let them rise for another 30-45 minutes until they puff up.
- Preheat the Oven: While the loaves are rising, preheat your oven to 425°F (220°C). Place a shallow pan with water on the bottom rack to create steam, which will contribute to a crusty exterior.
- Score and Bake: Once the loaves have risen, use a sharp knife or razor blade to make a few diagonal slashes on the top of each loaf. This allows steam to escape while baking. Bake the loaves in the preheated oven for about 20-25 minutes, or until they’re golden brown and sound hollow when tapped on the bottom.
- Cool the Bread: Remove the loaves from the oven and let them cool on a wire rack before slicing. This will help maintain the bread’s texture and flavor.
Extra Tips
When making Pão Francês, it’s essential to pay attention to the temperature of your water and the environment for rising. Too hot water can kill the yeast, while too cold may not activate it properly.
Additionally, patience is key; allowing the dough to rise sufficiently will result in a lighter, airier bread. If you want to experiment with flavors, consider adding herbs or a bit of garlic powder to the dough for a unique twist. Enjoy your freshly baked Pão Francês with your favorite toppings!
Cheesy Bread Sticks With Piri Piri

Cheesy Bread Sticks with Piri Piri are a delightful and spicy twist on traditional breadsticks that are perfect as a snack or appetizer. The combination of gooey cheese and the fragrant heat of piri piri sauce creates a flavor profile that’s both unique and satisfying.
These bread sticks are easy to make and can be enjoyed fresh out of the oven, making them a perfect addition to any meal or gathering. Whether you’re hosting a casual get-together or simply looking for a delicious treat to enjoy at home, these cheesy bread sticks are bound to impress.
The recipe is versatile, allowing you to adjust the level of spiciness to suit your taste, while the cheese adds a rich creaminess that complements the piri piri perfectly. Grab your ingredients and let’s get started on this mouthwatering snack!
Ingredients (Serves 4-6)
- 2 cups all-purpose flour
- 1 tablespoon baking powder
- 1 teaspoon salt
- 1 teaspoon garlic powder
- 1 teaspoon dried oregano
- 1 cup shredded mozzarella cheese
- 1/2 cup milk
- 1/4 cup olive oil
- 2 tablespoons piri piri sauce (adjust to taste)
- 1/2 cup grated Parmesan cheese (for topping)
- Fresh parsley (for garnish, optional)
Cooking Instructions
- Preheat the Oven: Begin by preheating your oven to 400°F (200°C). This guarantees that your bread sticks will bake evenly and develop a nice golden crust.
- Prepare the Dry Ingredients: In a large mixing bowl, combine the all-purpose flour, baking powder, salt, garlic powder, and dried oregano. Stir these ingredients together until they’re well mixed and there are no lumps.
- Incorporate the Cheese: Add the shredded mozzarella cheese to the dry mixture. Use your hands or a spatula to mix the cheese into the flour mixture, making sure it’s evenly distributed throughout the dry ingredients.
- Combine Wet Ingredients: In a separate bowl, whisk together the milk, olive oil, and piri piri sauce. Make certain everything is well blended before adding it to the dry ingredients.
- Mix the Dough: Pour the wet ingredients into the bowl with the dry ingredients. Stir gently until a dough begins to form. Be careful not to overmix; just mix until everything is combined.
- Shape the Bread Sticks: On a lightly floured surface, turn out the dough and knead it gently for a minute or two. Then, roll it out into a rectangle about 1/2 inch thick. Cut the dough into strips approximately 1 inch wide and 6 inches long for your bread sticks.
- Prepare for Baking: Place the cut bread sticks onto a baking sheet lined with parchment paper. Brush the tops with a little olive oil and sprinkle the grated Parmesan cheese over them for added flavor.
- Bake: Place the baking sheet in the preheated oven and bake for 15-20 minutes or until the bread sticks are golden brown and the cheese is bubbling.
- Garnish and Serve: Once baked, remove from the oven and let them cool slightly. Optionally, sprinkle some freshly chopped parsley on top for a pop of color before serving. Enjoy your cheesy bread sticks warm with additional piri piri sauce on the side!
Extra Tips
When making Cheesy Bread Sticks with Piri Piri, feel free to experiment with different types of cheese for added flavor, such as cheddar or pepper jack for a spicier kick.
Additionally, if you prefer a milder version, you can reduce the amount of piri piri sauce or substitute it with a mild chili sauce. Keep an eye on the bread sticks as they bake; oven temperatures can vary, and you want to avoid over-baking them.
Enjoy these bread sticks fresh for the best texture, but they can also be reheated in the oven to regain their crispiness.
Pumpkin Bread With Cinnamon
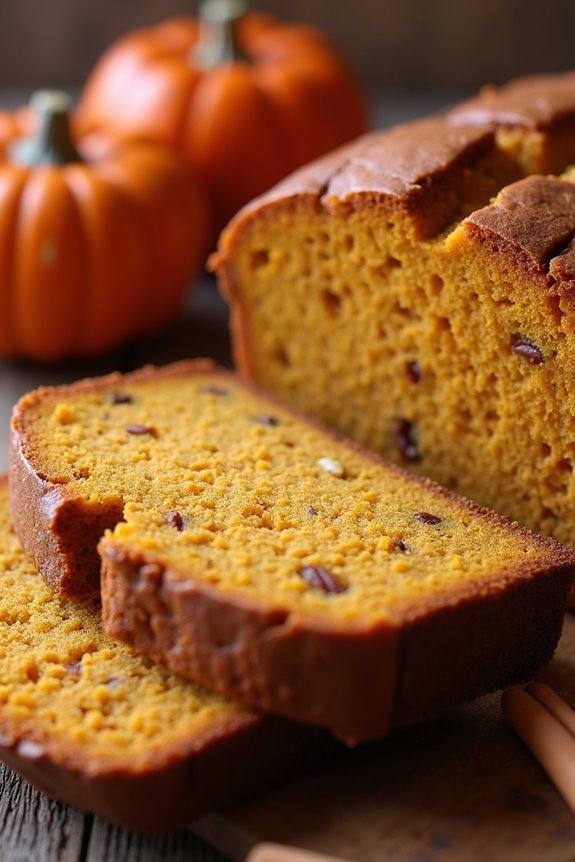
Pumpkin Bread with Cinnamon is a delightful and moist bread that captures the essence of autumn in every bite. This traditional Portuguese recipe combines the earthy sweetness of pumpkin with the warm, aromatic spice of cinnamon, making it a perfect treat for breakfast or as a snack with your afternoon tea.
The vibrant color of the pumpkin not only adds visual appeal but also contributes to the bread’s rich flavor profile and nutritional value. Making this bread is a wonderful way to utilize seasonal pumpkins, particularly when they’re fresh and abundant.
The process involves mixing simple ingredients to create a batter that’s both easy to work with and forgiving for novice bakers. Whether shared with friends and family or enjoyed alone, Pumpkin Bread with Cinnamon is sure to satisfy your taste buds and fill your kitchen with a delightful aroma.
Ingredients (serving size: 4-6 people)
- 1 cup pumpkin puree
- 1/2 cup vegetable oil
- 1 cup granulated sugar
- 2 large eggs
- 1 teaspoon vanilla extract
- 1 1/2 cups all-purpose flour
- 1 teaspoon baking soda
- 1/2 teaspoon baking powder
- 1 teaspoon ground cinnamon
- 1/2 teaspoon salt
- 1/2 teaspoon ground nutmeg (optional)
- 1/2 cup chopped walnuts or pecans (optional)
Cooking Instructions
- Preheat the Oven: Begin by preheating your oven to 350°F (175°C). This guarantees that the bread will bake evenly and thoroughly once you put it in the oven.
- Prepare the Baking Pan: Grease a 9×5-inch loaf pan with cooking spray or butter. This step is essential to prevent the bread from sticking and to make it easier to remove once baked.
- Mix Wet Ingredients: In a large mixing bowl, combine the pumpkin puree, vegetable oil, sugar, eggs, and vanilla extract. Use a whisk or electric mixer to blend the ingredients until they’re smooth and well incorporated.
- Combine Dry Ingredients: In a separate bowl, sift together the all-purpose flour, baking soda, baking powder, ground cinnamon, salt, and ground nutmeg (if using). Sifting helps to aerate the flour and guarantees that the baking powder and soda are evenly distributed.
- Combine Wet and Dry Mixtures: Gradually add the dry ingredient mixture to the wet mixture, stirring gently with a spatula or wooden spoon until just combined. Be careful not to overmix, as this can result in a dense bread.
- Add Nuts (Optional): If you choose to use nuts, fold them into the batter gently to avoid breaking them down too much. The nuts will add a lovely crunch and texture to the bread.
- Pour the Batter: Pour the batter into the prepared loaf pan, smoothing the top with a spatula. This will help guarantee that the bread rises evenly during baking.
- Bake: Place the loaf pan in the preheated oven and bake for 50-60 minutes, or until a toothpick inserted into the center comes out clean. Keep an eye on the bread towards the end of baking time to prevent over-browning.
- Cool: Once baked, remove the bread from the oven and let it cool in the pan for about 10 minutes. Then, transfer it to a wire rack to cool completely before slicing.
Extra Tips
For an enhanced flavor, consider adding a pinch of cloves or ginger to the dry ingredients for a spicier kick. Additionally, if you have leftover pumpkin puree, it can be frozen for later use, making it convenient for future baking sessions.
This bread can also be stored in an airtight container for up to a week or frozen for longer preservation. Enjoy your freshly baked Pumpkin Bread with Cinnamon warm or toasted, and feel free to spread a little butter on top for added richness!
Portuguese Rye Bread
Portuguese Rye Bread, known as “Pão de Centeio,” is a delightful variation of traditional bread that incorporates rye flour, giving it a unique flavor and texture. This bread is a staple in many Portuguese households and is often enjoyed with hearty meals or as a base for sandwiches.
The rich, earthy notes of the rye flour combined with a hint of sweetness from the addition of honey create a deliciously satisfying loaf that pairs well with a variety of toppings, from cheese to cured meats.
Making Portuguese Rye Bread at home is simpler than you might think. With just a few basic ingredients and some patience, you can create a fresh loaf that will fill your kitchen with an irresistible aroma. This recipe yields a loaf that serves 4-6 people, perfect for a family meal or to enjoy with friends.
Follow the instructions below to bring this traditional Portuguese bread to your table.
Ingredients
- 2 cups rye flour
- 1 cup all-purpose flour
- 1 ½ teaspoons salt
- 1 tablespoon sugar
- 1 packet (2 ¼ teaspoons) active dry yeast
- 1 ¼ cups warm water (about 110°F or 43°C)
- 2 tablespoons olive oil
- 1 tablespoon honey
Cooking Instructions
- Activate the Yeast: In a small bowl, combine the warm water, sugar, and active dry yeast. Stir gently and let it sit for about 5-10 minutes until it becomes foamy. This step guarantees that the yeast is active and ready to help the bread rise.
- Mix the Dry Ingredients: In a large mixing bowl, combine the rye flour, all-purpose flour, and salt. Mix well to confirm that the salt is evenly distributed throughout the flours.
- Combine Wet and Dry Ingredients: Once the yeast mixture is foamy, pour it into the bowl with the dry ingredients. Add the olive oil and honey. Mix everything together with a wooden spoon or a spatula until a rough dough forms.
- Knead the Dough: Turn the dough out onto a floured surface. Knead the dough for about 8-10 minutes until it becomes smooth and elastic. If the dough is too sticky, sprinkle a little more all-purpose flour as needed, but be careful not to add too much.
- First Rise: Shape the kneaded dough into a ball and place it in a lightly greased bowl. Cover the bowl with a clean kitchen towel or plastic wrap and let it rise in a warm place for about 1-2 hours or until it has doubled in size.
- Shape the Loaf: Once the dough has risen, punch it down to release the air. Turn it out onto a floured surface and shape it into a loaf. Place it into a greased loaf pan or onto a baking sheet lined with parchment paper.
- Second Rise: Cover the shaped loaf with a kitchen towel and let it rise again for about 30-45 minutes or until it has puffed up nicely.
- Preheat the Oven: While the loaf is rising, preheat your oven to 375°F (190°C). This guarantees that the bread will bake evenly.
- Bake the Bread: Once the second rise is complete, place the loaf in the preheated oven and bake for about 30-35 minutes or until the bread is golden brown and sounds hollow when tapped on the bottom.
- Cool the Bread: Remove the bread from the oven and allow it to cool in the pan for about 10 minutes. Then, transfer it to a wire rack to cool completely before slicing.
Extra Tips
When making Portuguese Rye Bread, feel free to experiment by adding seeds such as caraway or sunflower seeds for added texture and flavor.
Additionally, if you want a crustier loaf, place a small pan of water in the oven while the bread bakes; the steam will help create a beautiful crust.
Finally, this bread can be stored at room temperature for a few days or frozen for longer storage, making it a versatile addition to your baking repertoire. Enjoy!
Bread With Roasted Garlic and Thyme
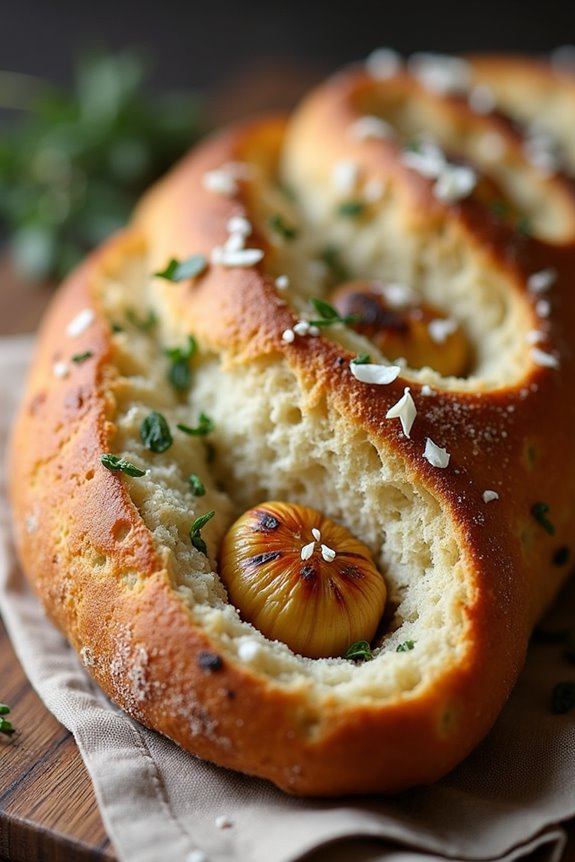
Bread With Roasted Garlic and Thyme is a delightful addition to any meal, offering a savory aroma and a rich flavor profile that complements various dishes. The combination of roasted garlic and fresh thyme creates a warm, inviting taste that’s perfect for sharing with family and friends.
Whether served as an appetizer, a side dish, or just enjoyed on its own with a drizzle of olive oil, this bread is sure to impress. Making this bread isn’t only a delightful culinary adventure but also a wonderful opportunity to fill your kitchen with the tantalizing scent of roasted garlic.
The process of roasting the garlic mellows its sharpness and enhances its sweetness, while the fresh thyme adds a fragrant, earthy note. Pair this bread with soups, salads, or your favorite entrees for a truly satisfying experience.
Ingredients (serves 4-6):
- 1 loaf of bread (preferably rustic or artisan)
- 1 whole bulb of garlic
- 3 tablespoons olive oil
- 2 tablespoons fresh thyme leaves (or 1 tablespoon dried thyme)
- Salt to taste
- Black pepper to taste
- Optional: grated Parmesan cheese for topping
Cooking Instructions:
- Preheat the Oven: Begin by preheating your oven to 400°F (200°C). This temperature is ideal for roasting the garlic and toasting the bread, ensuring a perfect golden-brown crust.
- Prepare the Garlic: Take the whole bulb of garlic and slice off the top (about 1/4 inch) to expose the cloves. Drizzle with 1 tablespoon of olive oil and wrap it in aluminum foil. This will trap the steam and allow the garlic to roast evenly, turning soft and sweet.
- Roast the Garlic: Place the wrapped garlic bulb on a baking sheet and roast in the preheated oven for about 30-35 minutes, or until the cloves are soft and golden brown. Once done, remove it from the oven and let it cool slightly.
- Mix the Topping: While the garlic is roasting, combine the remaining 2 tablespoons of olive oil with the fresh thyme leaves in a small bowl. Add salt and black pepper to taste. This mixture will be used to flavor the bread.
- Prepare the Bread: Cut the loaf of bread into thick slices, ensuring not to cut all the way through the bottom, so the loaf remains intact. This will help in keeping the bread together while baking.
- Incorporate the Garlic: Once the roasted garlic is cool enough to handle, squeeze the cloves out of their skins into a bowl. Mash the garlic with a fork until it forms a paste.
- Assemble the Bread: Spread the garlic paste generously between the slices of bread, using a knife or spatula. Then, brush the olive oil and thyme mixture over the top and sides of the bread. If desired, sprinkle grated Parmesan cheese on top for added flavor.
- Bake the Bread: Place the prepared bread on a baking sheet and return it to the oven. Bake for an additional 15-20 minutes, or until the bread is crispy and golden brown.
- Serve: Remove the bread from the oven, let it cool slightly, and serve warm. Enjoy the aromatic flavors of roasted garlic and thyme!
Extra Tips:
For an even more robust flavor, consider adding a pinch of red pepper flakes to the olive oil mixture for a hint of spice.
Additionally, using fresh thyme is highly recommended for its vibrant flavor, but if dried thyme is all you have on hand, it will still work well. This bread is best enjoyed fresh out of the oven, but you can also store leftovers wrapped in foil for a couple of days and reheat in the oven to revive its crusty texture.
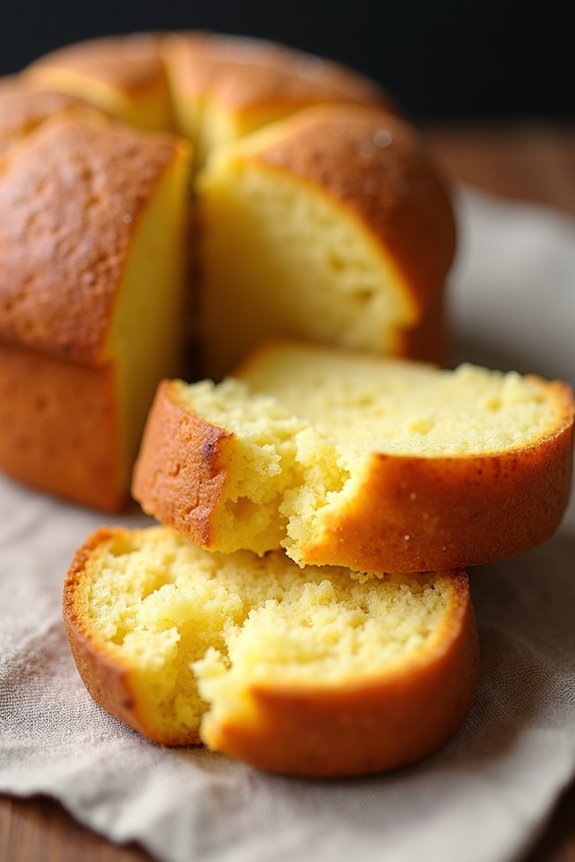
Pão De Ló: Fluffy Portuguese Cake Bread

Pão De Ló is a traditional Portuguese cake bread that’s renowned for its light and airy texture. It’s often enjoyed during special occasions and celebrations, but its simple ingredients make it a beloved everyday treat as well.
This cake is characterized by its rich egg flavor and can be served plain, dusted with powdered sugar, or paired with fresh fruits and whipped cream. The key to achieving its signature fluffiness lies in the technique used during the mixing and baking process.
Making Pão De Ló can be a rewarding experience, as the result isn’t only delicious but also visually appealing. This cake can be enjoyed on its own or used as a base for other desserts, such as trifles or layered cakes.
Whether you’re serving it at a family gathering or enjoying a quiet afternoon tea, this fluffy Portuguese cake bread is sure to impress.
Ingredients (Serving Size: 4-6 People)
- 6 large eggs
- 1 cup granulated sugar
- 1 cup all-purpose flour
- 1 teaspoon baking powder
- 1 teaspoon vanilla extract
- A pinch of salt
- Powdered sugar for dusting (optional)
Cooking Instructions
1. Preheat the Oven: Begin by preheating your oven to 350°F (175°C). This will guarantee that your cake bakes evenly once you have your batter ready.
2. Prepare the Baking Pan: Grease an 8-inch round cake pan with butter or non-stick spray. You can also line the bottom with parchment paper to prevent sticking.
3. Whisk the Eggs and Sugar: In a large mixing bowl, combine the eggs and granulated sugar. Using an electric mixer, beat the mixture on high speed for about 10 minutes until it becomes thick and pale, resembling a mousse.
This step is vital as it incorporates air into the batter, leading to the cake’s fluffiness.
4. Add Vanilla: Once the egg and sugar mixture has reached the desired consistency, add the vanilla extract and gently mix it in.
5. Combine Dry Ingredients: In a separate bowl, sift together the flour, baking powder, and a pinch of salt. Sifting helps to aerate the flour, which contributes to the cake’s light texture.
6. Fold in the Dry Ingredients: Gradually add the flour mixture to the egg mixture. Using a spatula, gently fold the dry ingredients in until just combined.
Be careful not to overmix; you want to maintain the airiness of the batter.
7. Pour into the Pan: Transfer the batter into the prepared cake pan, smoothing the top with a spatula if necessary.
8. Bake the Cake: Place the pan in the preheated oven and bake for approximately 25-30 minutes, or until the cake is golden brown and a toothpick inserted into the center comes out clean.
9. Cool the Cake: Once baked, remove the cake from the oven and allow it to cool in the pan for about 10 minutes.
Then, carefully remove it from the pan and transfer it to a wire rack to cool completely.
10. Serve: Once cooled, you can dust the top with powdered sugar if desired, slice, and serve your Pão De Ló. Enjoy it plain or with your favorite accompaniments!
Extra Tips
When making Pão De Ló, it’s important to ascertain that your eggs are at room temperature, as this helps them whip up better and increases volume.
Additionally, be sure not to open the oven door while the cake is baking, as this can cause it to collapse. If you want to add a twist, consider incorporating flavors such as lemon zest or almond extract into the batter for a unique variation.
Happy baking!
Sweet and Savory Bread Pudding

Bread pudding is a classic dish that has been enjoyed in various cultures around the world, including Portugal, where it’s often infused with local flavors and ingredients. This sweet and savory bread pudding is a delightful blend of textures and tastes, combining the richness of custard with the heartiness of bread. It can be served as a comforting dessert or a unique side dish for a festive meal, making it versatile for any occasion.
The beauty of this bread pudding lies in its adaptability. You can use leftover bread, whether it’s a rustic country loaf or Portuguese pão, which adds a unique flavor to the dish. Additionally, the combination of sweet elements like raisins and cinnamon with savory components like cheese and herbs creates a harmonious balance that will keep your taste buds guessing. Perfect for family gatherings or a cozy dinner at home, this recipe will surely impress.
Ingredients (Serves 4-6)
- 6 cups stale bread, cubed
- 2 cups milk
- 1 cup heavy cream
- 4 large eggs
- 1 cup granulated sugar
- 1 teaspoon vanilla extract
- 1 teaspoon ground cinnamon
- ½ teaspoon salt
- 1 cup raisins
- 1 cup grated cheese (such as queijo da serra or cheddar)
- ¼ cup chopped fresh herbs (such as parsley or thyme)
Cooking Instructions
- Preheat the Oven: Begin by preheating your oven to 350°F (175°C). This guarantees that the bread pudding cooks evenly and gets a nice golden crust on top.
- Prepare the Bread: In a large mixing bowl, combine the cubed stale bread with the raisins, grated cheese, and chopped herbs. Toss them together gently to distribute the ingredients evenly throughout the bread.
- Make the Custard Mixture: In another bowl, whisk together the milk, heavy cream, eggs, sugar, vanilla extract, ground cinnamon, and salt until well combined. This custard mixture will soak into the bread, giving it a rich flavor and texture.
- Combine Bread and Custard: Pour the custard mixture over the bread and gently stir to confirm all the bread pieces are well coated. Let the mixture sit for about 10-15 minutes to allow the bread to absorb the custard.
- Transfer to Baking Dish: Grease a baking dish (approximately 9×13 inches) with butter or cooking spray. Pour the soaked bread mixture into the prepared dish, spreading it out evenly.
- Bake: Place the baking dish in the preheated oven and bake for 40-45 minutes, or until the top is golden brown and a knife inserted in the center comes out clean.
- Cool and Serve: Once baked, remove the bread pudding from the oven and let it cool for about 10 minutes before serving. This will allow it to set slightly, making it easier to slice and serve.
Extra Tips
For an enhanced flavor profile, consider adding a splash of your favorite liqueur to the custard mixture, such as Port or Amaretto. You can also experiment with different types of cheese or herbs to suit your palate.
If you prefer a sweeter dish, feel free to increase the sugar or add a drizzle of honey or maple syrup when serving. Serve the bread pudding warm, possibly with a scoop of vanilla ice cream or a dollop of whipped cream for an extra indulgent treat. Enjoy your delicious sweet and savory bread pudding!