

Welcome to a cozy corner of Scandinavian baking where the rich, buttery aroma of cinnamon fills the air. These delightful recipes will wrap you in warmth and comfort, from the beloved Kanelbullar to enchanting cardamom cakes. Each treat carries a tale of tradition and the joy of sharing something sweet. Let’s explore these 13 irresistible recipes that promise to turn your kitchen into a haven of deliciousness. Get ready to embrace the magic of Scandinavian flavors in your home.
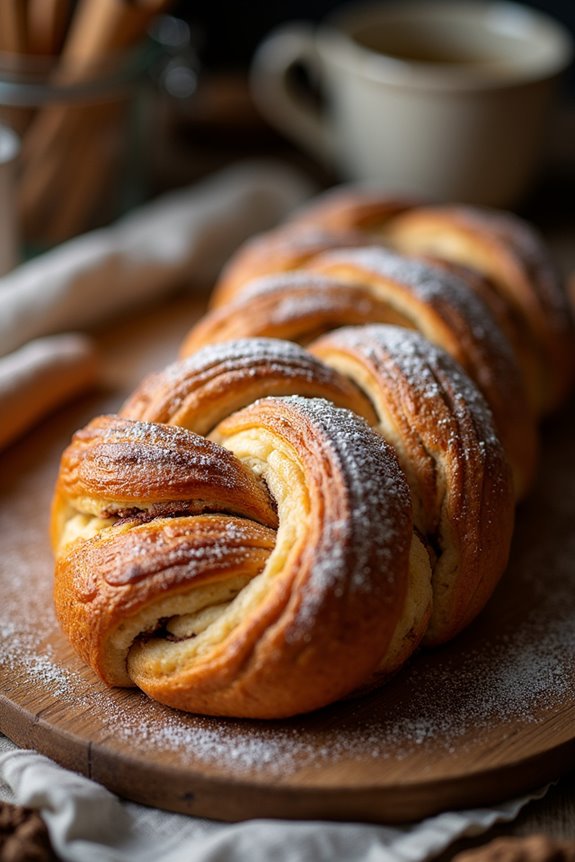
Cinnamon Bun (Kanelbullar)
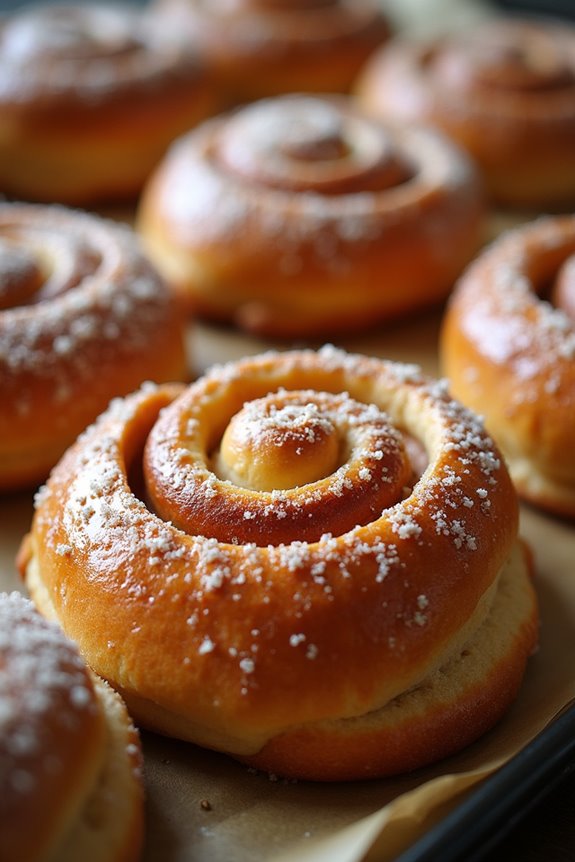
Cinnamon Buns, or Kanelbullar in Swedish, are a beloved pastry that embodies the cozy spirit of Scandinavian baking. These delightful treats are characterized by their soft, fluffy texture and the irresistible aroma of cinnamon and cardamom. Traditionally enjoyed with coffee during “fika,” a Swedish coffee break, Kanelbullar are perfect for sharing with friends and family.
Once you master this recipe, you’ll be able to whip up a batch that fills your home with warmth and sweetness. Making Kanelbullar isn’t only a rewarding experience but also an opportunity to hone your baking skills. The dough requires a brief resting period to rise, which allows the flavors to develop fully.
Rolling and shaping the buns may seem intricate, but the process is straightforward and fun. With a little patience and practice, you’ll have these lovely cinnamon rolls baked to perfection, ready to be savored warm from the oven.
Ingredients (Serves 4-6):
- 4 cups all-purpose flour
- 1/2 cup sugar
- 1 teaspoon ground cardamom
- 1 packet (2 1/4 teaspoons) instant yeast
- 1/2 teaspoon salt
- 1 cup milk
- 1/4 cup unsalted butter, melted
- 1 large egg
- 1/2 cup brown sugar
- 2 tablespoons ground cinnamon
- 1 tablespoon butter, softened (for spreading)
- 1 egg (for egg wash)
- Pearl sugar or chopped nuts (for topping, optional)
Cooking Instructions:
1. Prepare the Dough: In a large mixing bowl, combine 3 cups of flour, sugar, cardamom, instant yeast, and salt. In a small saucepan, heat the milk until warm (not hot) and then mix in the melted butter.
Pour the warm milk mixture into the dry ingredients, add the egg, and stir until combined. Gradually add the remaining cup of flour until a soft dough forms.
2. Knead the Dough: Turn the dough out onto a lightly floured surface and knead for about 5-7 minutes until smooth and elastic. If the dough is sticky, add a little more flour as needed.
Once kneaded, place the dough in a greased bowl, cover it with a clean kitchen towel, and let it rise in a warm place for about 1 hour or until doubled in size.
3. Make the Cinnamon Filling: In a small bowl, mix together the brown sugar and ground cinnamon. Set aside to use later.
4. Roll Out the Dough: After the dough has risen, punch it down to release the air. Roll it out into a large rectangle on a floured surface, approximately 16×24 inches.
Spread the softened butter evenly over the dough, leaving a small border around the edges.
5. Sprinkle the Filling: Evenly sprinkle the cinnamon-sugar mixture over the buttered dough, ensuring full coverage.
6. Shape the Buns: Starting from one long edge, carefully roll the dough into a tight log. Once rolled, cut the log into 12 equal pieces using a sharp knife or pizza cutter.
7. Arrange for Baking: Place the cinnamon rolls cut-side up in a greased baking dish or on a parchment-lined baking sheet. Make sure to leave some space between them as they’ll rise again.
8. Second Rise: Cover the rolls with a kitchen towel and let them rise for another 30-45 minutes until puffy.
9. Preheat the Oven: While the rolls are rising, preheat your oven to 375°F (190°C).
10. Egg Wash and Bake: Beat the additional egg and brush it over the tops of the buns for a shiny finish. If desired, sprinkle with pearl sugar or chopped nuts.
Bake in the preheated oven for 15-20 minutes, or until golden brown.
11. Cool and Serve: Once baked, remove the buns from the oven and let them cool slightly before serving. Enjoy warm or at room temperature.
Extra Tips: For an extra layer of flavor, consider adding a touch of vanilla extract to the dough or incorporating chopped nuts into the filling.
If you want to make these buns in advance, you can prepare the dough and shape the buns, then refrigerate them overnight before the second rise. Just remember to let them come to room temperature before baking. Enjoy your Kanelbullar fresh and warm with a cup of coffee or tea!
Swedish Cardamom Buns (Kardemummabullar)
Swedish Cardamom Buns, known as Kardemummabullar, are a delightful treat that captures the essence of Scandinavian baking. These soft, sweet buns are infused with aromatic cardamom, giving them a unique flavor that’s both comforting and fragrant.
Traditionally enjoyed during fika – the Swedish coffee break – these buns are perfect for sharing with friends and family over a warm cup of coffee or tea.
The dough is enriched with butter, milk, and sugar, making it irresistibly tender and fluffy. Once baked, the buns are brushed with a sweet glaze, adding a glossy finish that enhances their appeal.
Whether you’re baking for a special occasion or simply craving something delicious, Kardemummabullar are bound to impress both the bakers and the eaters alike.
Ingredients (Serves 4-6)
- 500g all-purpose flour
- 75g sugar
- 1 teaspoon ground cardamom
- 1/2 teaspoon salt
- 2 teaspoons active dry yeast
- 250ml milk, warmed
- 75g unsalted butter, melted
- 1 large egg
- 1 egg, for egg wash
- Pearl sugar, for topping
Cooking Instructions
1. Prepare the Dough: In a large mixing bowl, combine the all-purpose flour, sugar, ground cardamom, salt, and active dry yeast. Mix these dry ingredients well to guarantee even distribution of flavors.
Make a well in the center and pour in the warmed milk, melted butter, and one egg.
2. Knead the Dough: Using a wooden spoon or your hands, mix the ingredients until a shaggy dough forms. Transfer the dough onto a floured surface and knead for about 10 minutes until it becomes smooth and elastic.
If the dough is too sticky, add a little more flour as needed.
3. First Rise: Place the kneaded dough in a lightly greased bowl and cover it with a clean kitchen towel. Allow it to rise in a warm area for about 1-1.5 hours, or until it has doubled in size.
4. Shape the Buns: Once the dough has risen, punch it down to release the air. Roll it out on a floured surface into a rectangle approximately 1 cm thick.
Cut the rectangle into strips about 2.5 cm wide. Twist each strip into a spiral shape or tie them into knots. Place the shaped buns onto a baking tray lined with parchment paper.
5. Second Rise: Cover the shaped buns with the kitchen towel again and let them rise for another 30-45 minutes until they puff up.
6. Preheat and Prepare for Baking: Preheat your oven to 200°C (400°F). Beat the remaining egg in a small bowl and brush it over the tops of the buns for a shiny finish.
Sprinkle pearl sugar on top of each bun for added sweetness and texture.
7. Bake the Buns: Bake the Buns in the preheated oven for about 12-15 minutes, or until they’re golden brown. Keep an eye on them to prevent over-baking.
8. Cool and Serve: Remove the buns from the oven and allow them to cool on a wire rack for a few minutes before serving. Enjoy them warm or at room temperature.
Extra Tips
For the best flavor, use freshly ground cardamom if possible, as it enhances the aroma and taste remarkably.
If you find that the dough is too sticky during kneading, don’t be afraid to add a bit more flour, but be careful not to overdo it, as you want the buns to remain soft and fluffy.
You can also experiment with different fillings, such as almond paste or cinnamon, for a unique twist on this classic recipe. Enjoy your Swedish Cardamom Buns fresh from the oven for a truly authentic experience!
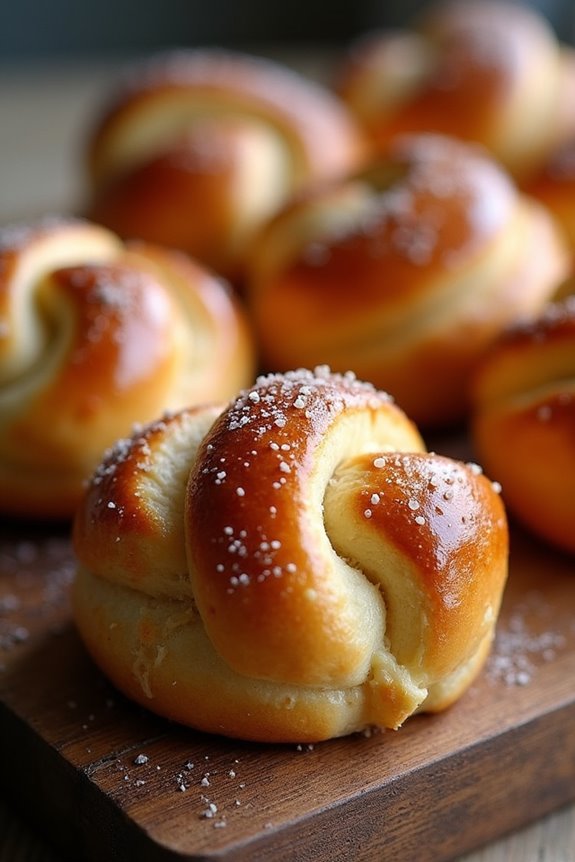
Norwegian Cinnamon Rolls (Kanelknuter)

Norwegian Cinnamon Rolls, or Kanelknuter, are a delightful treat that combines the warmth of cinnamon with the soft, fluffy texture of a sweet yeast dough. These rolls aren’t only a staple in Norwegian baking but also a favorite for coffee breaks and gatherings. The unique twist in their shape adds a special touch, making them visually appealing as well as delicious. A perfect balance of sweet and spicy, they’re sure to be a hit with family and friends alike.
The process of making Kanelknuter involves creating a rich dough that’s rolled out, filled with a cinnamon-sugar mixture, and then shaped into intricate knots. While they may seem intimidating at first, the steps are quite straightforward and rewarding. Once baked, these rolls emerge golden brown, with a fragrant aroma that fills your kitchen, inviting everyone to indulge in a taste of Norway.
Ingredients (Serves 4-6)
- 4 cups all-purpose flour
- 1/2 cup granulated sugar
- 1 packet (2 1/4 teaspoons) active dry yeast
- 1 cup whole milk
- 1/2 cup unsalted butter, melted
- 1/2 teaspoon salt
- 1 large egg
- 2 teaspoons ground cinnamon
- 1/4 cup brown sugar
- 1/4 cup chopped nuts (optional)
- 1 egg (for egg wash)
- Powdered sugar (for dusting)
Cooking Instructions
1. Prepare the Dough: In a small saucepan, warm the milk until it’s just lukewarm (about 110°F). Remove from heat and stir in the granulated sugar and yeast. Let it sit for about 5-10 minutes until it becomes frothy.
In a large bowl, combine the flour and salt. Make a well in the center and add the melted butter, egg, and the yeast mixture. Stir until the dough begins to come together.
2. Knead the Dough: Transfer the dough to a floured surface and knead it for about 8-10 minutes until it’s smooth and elastic. If the dough is sticky, you can add a little more flour as needed.
Form the dough into a ball and place it in a greased bowl, covering it with a clean kitchen towel. Let it rise in a warm place for about 1 hour, or until it has doubled in size.
3. Prepare the Filling: While the dough is rising, mix together the brown sugar, ground cinnamon, and chopped nuts (if using) in a small bowl. This mixture will be used to fill the rolls.
4. Roll Out the Dough: Once the dough has risen, punch it down to release the air. On a floured surface, roll it out into a rectangle about 1/4 inch thick.
Spread the filling evenly over the dough, leaving a small border around the edges.
5. Shape the Rolls: Starting from one long edge, roll the dough tightly into a log. Cut the log into 12 equal pieces.
Take each piece and twist it into a knot by crossing one end over the other and pulling it through the center. Place each knot on a lined baking sheet.
6. Second Rise: Cover the knots with a kitchen towel and let them rise again for about 30 minutes. Preheat your oven to 375°F while the rolls are rising.
7. Bake the Rolls: Whisk the remaining egg and brush it over the tops of the rolls. Bake them in the preheated oven for 15-20 minutes, or until they’re golden brown.
Remove them from the oven and let them cool on a wire rack.
8. Serve and Enjoy: Dust the cooled rolls with powdered sugar for an extra touch of sweetness before serving. Enjoy your homemade Norwegian cinnamon rolls with coffee or tea!
Extra Tips
For the best results, be sure to use fresh yeast, as expired yeast can affect the rise of your dough.
You can also experiment with different fillings, such as cardamom or vanilla, to give your Kanelknuter a unique twist.
If you’re short on time, you can prepare the dough ahead of time and refrigerate it overnight; just make sure to allow it to come to room temperature before rolling it out.
Enjoy your baking and the delicious aroma that fills your kitchen!
Danish Pastry (Wienerbrød)
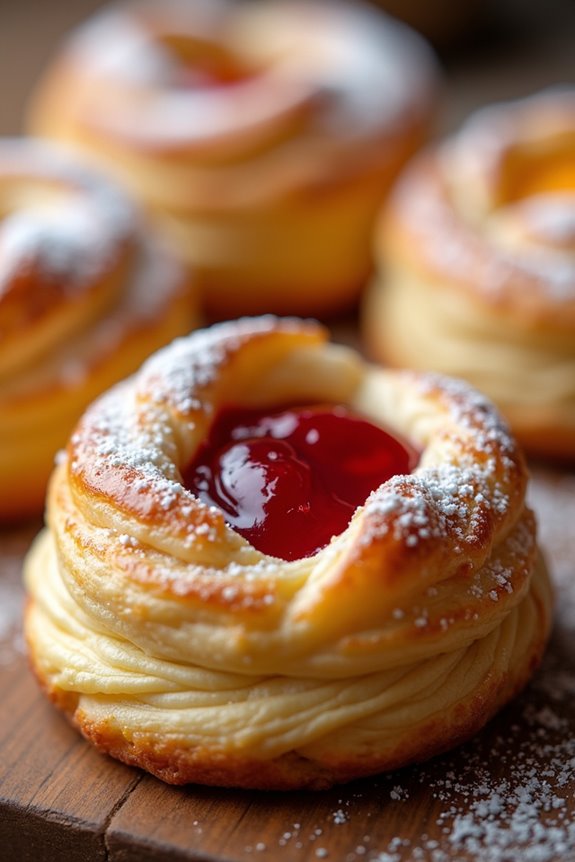
Danish pastry, known as Wienerbrød in its native land, is a delightful, flaky pastry that originates from Denmark. This delicious treat is characterized by its rich layers that are achieved through a process called lamination, where butter is folded into the dough multiple times.
Danish pastries can be filled with a variety of ingredients, from sweet fruit jams and custards to rich cream cheeses, making them versatile and perfect for any occasion. Whether you’re enjoying them at breakfast, as a snack, or for dessert, these pastries are sure to impress with their beautiful golden-brown appearance and scrumptious flavor.
The process of making Danish pastry does require some time and patience, but the results are well worth the effort. With the right ingredients and careful technique, you can create a batch of these delightful pastries that are flaky, buttery, and filled with your favorite fillings.
This recipe is designed to serve 4-6 people, making it ideal for a small gathering or a special treat for your family. So roll up your sleeves and get ready to indulge in the art of Danish baking!
Ingredients
- 2 ½ cups all-purpose flour
- 1/2 cup granulated sugar
- 1 teaspoon salt
- 1 tablespoon instant yeast
- 1 cup whole milk, warmed to about 110°F (43°C)
- 1 teaspoon vanilla extract
- 1 large egg
- 1 ½ sticks (12 tablespoons) unsalted butter, cold and cut into small cubes
- 1/2 cup fruit jam (raspberry, apricot, or your choice)
- 1/2 cup cream cheese, softened (optional)
- 1 egg (for egg wash)
- Powdered sugar (for dusting, optional)
Instructions
- Prepare the Dough: In a large mixing bowl, combine the flour, sugar, salt, and instant yeast. Mix until well combined. In a separate bowl, whisk together the warm milk, vanilla extract, and one egg. Gradually pour the wet ingredients into the dry ingredients, mixing until a soft dough forms.
- Incorporate the Butter: Turn the dough out onto a lightly floured surface and flatten it into a rectangle. Evenly distribute the cold butter cubes over the dough, then fold the dough over the butter to encase it. Using a rolling pin, gently roll out the dough into a larger rectangle, being careful not to let the butter escape.
- Lamination Process: Fold the dough into thirds (like a letter) and roll it out again into a rectangle. Repeat this folding and rolling process two more times, ensuring the butter remains cold and the dough is well-laminated. After the final roll, wrap the dough in plastic wrap and refrigerate for at least 1 hour.
- Shape the Pastries: Once chilled, remove the dough from the refrigerator and roll it out into a rectangle about 1/4 inch thick. Cut the dough into equal squares (about 4×4 inches). Place a tablespoon of fruit jam or a mixture of cream cheese and jam in the center of each square. Fold the corners of the square towards the center to create a pinwheel shape, or leave them open for a more rustic look.
- Prepare for Baking: Preheat your oven to 375°F (190°C). Line a baking sheet with parchment paper. Place the shaped pastries on the prepared baking sheet, leaving space between them. In a small bowl, whisk the remaining egg and brush it over the tops of the pastries for a golden finish.
- Bake: Bake the pastries in the preheated oven for 15-20 minutes, or until they’re puffed and golden brown. Remove from the oven and let them cool slightly on a wire rack.
- Serve: Dust the pastries with powdered sugar if desired, and serve warm or at room temperature. Enjoy your freshly baked Danish pastries!
Extra Tips
When making Danish pastries, be sure to keep your ingredients cold, especially the butter, as this will help maintain the flaky texture of the dough.
If you find the dough is getting too warm during the rolling and folding process, take breaks and refrigerate it as needed. Additionally, feel free to experiment with different fillings such as almond paste, chocolate, or seasonal fruits to customize your pastries.
Finally, for a touch of elegance, consider drizzling a simple icing made of powdered sugar and milk over the cooled pastries before serving.
Finnish Cinnamon Coffee Bread (Pulla)
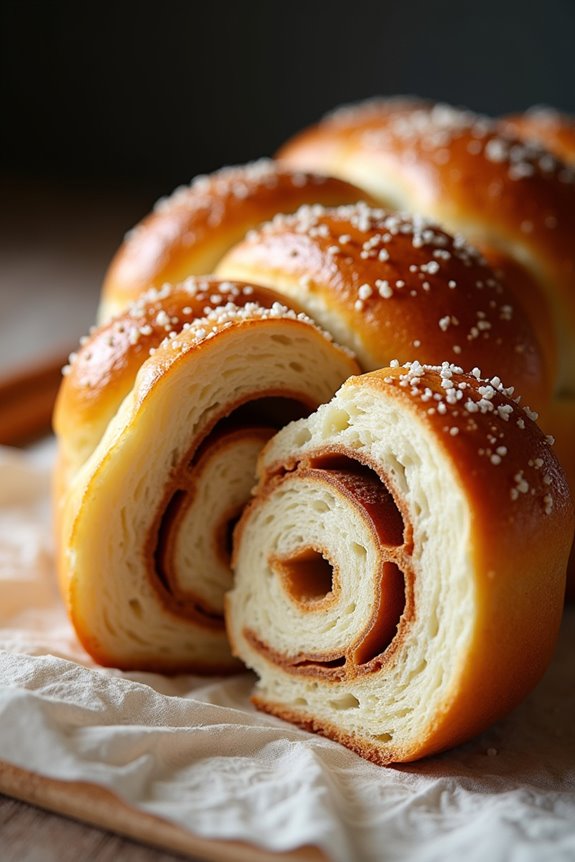
Finnish Cinnamon Coffee Bread, or Pulla, is a delightful treat that embodies the essence of Scandinavian baking. This soft, sweet bread is traditionally flavored with cardamom and cinnamon, making it a perfect companion for coffee or tea. The dough is enriched with milk and butter, creating a tender crumb that’s lightly sweetened and aromatic.
Often braided, Pulla isn’t just a bread but a stunning centerpiece for any gathering, embodying warmth and comfort in each slice. Making Pulla at home is a rewarding experience that brings the rich traditions of Finnish baking right to your kitchen. The process may take some time, but the wonderful aroma that fills your home as it bakes is well worth the effort.
Whether you serve it at a brunch or enjoy it as an afternoon snack, this coffee bread is sure to impress family and friends alike.
Ingredients (Serves 4-6):
- 1 cup milk
- 1/4 cup sugar
- 1 packet (2 1/4 teaspoons) active dry yeast
- 1/2 teaspoon salt
- 1/2 teaspoon ground cardamom
- 1/4 cup unsalted butter, melted
- 1 large egg
- 3 to 4 cups all-purpose flour
- 1/4 cup sugar (for filling)
- 1 tablespoon ground cinnamon (for filling)
- 1 egg (beaten, for egg wash)
- Pearl sugar (for topping, optional)
Cooking Instructions:
- Prepare the Dough: In a small saucepan, warm the milk over low heat until it’s lukewarm. Remove it from heat and stir in the sugar and yeast. Let the mixture sit for about 5-10 minutes until it becomes frothy, indicating that the yeast is active.
- Combine Ingredients: In a large mixing bowl, whisk together the salt, ground cardamom, and 2 cups of flour. Once the yeast mixture is frothy, add the melted butter and egg to the dry ingredients. Mix until well combined. Gradually add more flour, 1/2 cup at a time, until a soft dough forms.
- Knead the Dough: Transfer the dough onto a lightly floured surface and knead for about 5-7 minutes until it’s smooth and elastic. If the dough is sticky, add a little more flour as needed.
- First Rise: Place the kneaded dough in a greased bowl, cover it with a clean kitchen towel, and let it rise in a warm place until it doubles in size, about 1-1.5 hours.
- Prepare the Filling: In a small bowl, mix together the 1/4 cup sugar and ground cinnamon for the filling. Set aside.
- Shape the Bread: Once the dough has risen, punch it down to release the air. Divide it into three equal pieces. Roll each piece into a long rope, approximately 12 inches long. Lay the ropes side by side and braid them together, pinching the ends to secure them.
- Second Rise: Transfer the braided dough to a parchment-lined baking sheet. Cover it with a towel and let it rise again for about 30-45 minutes, until puffy.
- Preheat Oven: While the dough is rising, preheat your oven to 375°F (190°C).
- Egg Wash and Bake: Brush the risen dough with the beaten egg. If desired, sprinkle with pearl sugar for added texture and sweetness. Bake in the preheated oven for 20-25 minutes or until golden brown and the bread sounds hollow when tapped on the bottom.
- Cool and Serve: Remove the bread from the oven and allow it to cool on a wire rack. Slice and serve warm or at room temperature with coffee or tea.
Extra Tips:
When making Pulla, make certain that your milk is at the right temperature when activating the yeast—too hot can kill the yeast, while too cold can prevent it from rising.
For added flavor, you can experiment with other spices like nutmeg or vanilla in the dough. Finally, feel free to adjust the sweetness of the filling according to your taste, and enjoy this delicious bread fresh on the day it’s baked for the best texture and flavor.
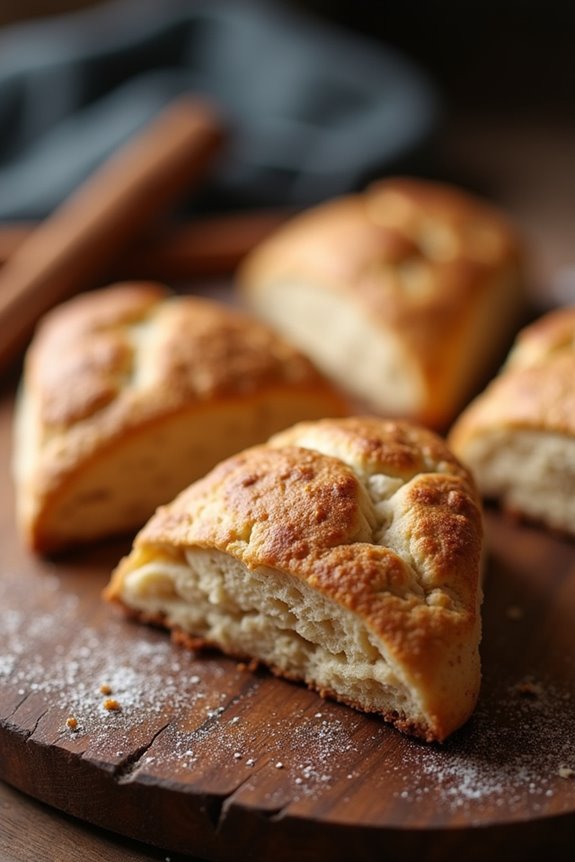
Icelandic Cinnamon Braid (Kleinur)
Icelandic Cinnamon Braid, or Kleinur, is a traditional pastry that beautifully combines the flavors of cinnamon and sugar with a soft, doughy texture. This delightful treat is often enjoyed during special occasions and holidays in Iceland, making it a beloved recipe among families.
The preparation of Kleinur involves a simple dough that’s rolled out, filled with a rich cinnamon mixture, and then braided to create a visually stunning and delicious pastry. Making Kleinur isn’t only a fun baking experience but also an opportunity to immerse yourself in Icelandic culture.
This pastry is perfect for breakfast, brunch, or as an afternoon snack with coffee or tea. With its warm spices and lovely aroma, the Icelandic Cinnamon Braid is sure to become a favorite in your home as well.
Ingredients (Serves 4-6)
- 3 cups all-purpose flour
- 1/2 cup granulated sugar
- 1 packet (2 1/4 teaspoons) instant yeast
- 1/2 teaspoon salt
- 1/2 teaspoon ground cinnamon
- 1/2 cup milk
- 1/4 cup unsalted butter, melted
- 2 large eggs
- 1/4 cup brown sugar
- 1 tablespoon ground cinnamon (for filling)
- 1 egg (for egg wash)
- Optional: powdered sugar for dusting
Cooking Instructions
1. Prepare the Dough: In a large mixing bowl, combine the all-purpose flour, granulated sugar, instant yeast, salt, and ground cinnamon. Mix well to guarantee all dry ingredients are evenly distributed.
In a separate bowl, warm the milk until it’s lukewarm (not hot), and then mix in the melted butter and eggs. Pour the wet mixture into the dry ingredients and stir until a dough forms.
2. Knead the Dough: Transfer the dough to a lightly floured surface and knead it for about 5-7 minutes, or until it becomes smooth and elastic. If the dough is too sticky, add a little more flour as needed.
Once kneaded, place the dough in a greased bowl, cover it with a clean kitchen towel, and let it rise in a warm place for about 1 hour or until it has doubled in size.
3. Prepare the Filling: In a small bowl, mix together the brown sugar and ground cinnamon to create the filling. Set aside.
4. Shape the Kleinur: Once the dough has risen, punch it down to release the air. Roll the dough out on a lightly floured surface into a rectangle about 1/4 inch thick. Evenly spread the cinnamon filling over the dough, leaving a small border around the edges.
5. Cut and Braid: Cut the dough into long strips about 1 inch wide. Take two strips and twist them together to form a braid. Place the braided dough on a baking sheet lined with parchment paper.
Repeat with the remaining strips until all the dough is braided.
6. Final Rise: Cover the braided dough with a kitchen towel and let it rise again for about 30 minutes. Meanwhile, preheat your oven to 350°F (175°C).
7. Egg Wash and Bake: Beat the remaining egg and brush it over the braided dough to give it a golden color when baking. Bake in the preheated oven for about 25-30 minutes, or until the Kleinur is golden brown.
8. Cool and Serve: Remove the Kleinur from the oven and let it cool on a wire rack. If desired, dust with powdered sugar before serving.
Extra Tips
When making Icelandic Cinnamon Braid, be sure to allow sufficient time for the dough to rise, as this greatly affects the final texture of the Kleinur.
Additionally, feel free to experiment with the filling by adding nuts or dried fruits for extra flavor and texture. If you want a softer crust, cover the Kleinur with a kitchen towel as it cools. Enjoy your homemade Kleinur with a cup of coffee or tea for a delightful treat!
Swedish Apple Cake (Äppelkaka)
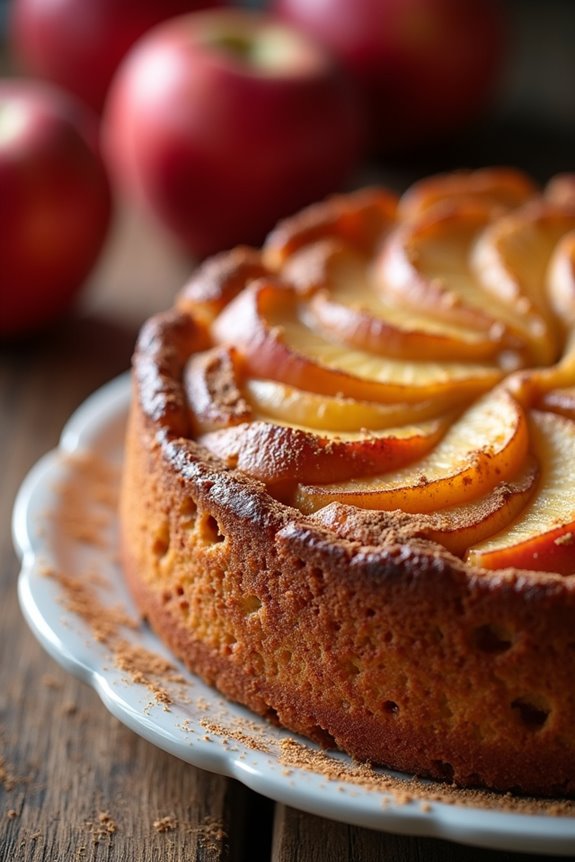
Swedish Apple Cake, or Äppelkaka, is a classic dessert that beautifully showcases the flavors of fresh apples combined with warm spices. This delightful cake isn’t only simple to make but also brings a taste of Swedish tradition right into your home. The tender cake, infused with cinnamon and topped with juicy apple slices, makes for a perfect treat during the fall season, or any time you’re in the mood for a comforting dessert.
This cake is incredibly versatile and can be served warm with a scoop of vanilla ice cream or cold with a dollop of whipped cream. It pairs wonderfully with a cup of coffee or tea, making it an ideal choice for a cozy gathering or a sweet end to any meal. Follow this easy recipe to create your own Swedish Apple Cake and impress your family and friends with a touch of Scandinavian baking!
Ingredients (Serves 4-6)
- 3 medium-sized apples (preferably Granny Smith or any tart variety)
- 100g (½ cup) unsalted butter, softened
- 150g (¾ cup) granulated sugar
- 2 large eggs
- 200g (1⅔ cups) all-purpose flour
- 1 tsp baking powder
- 1 tsp ground cinnamon
- ½ tsp salt
- 100ml (⅓ cup) milk
- 1 tsp vanilla extract
- Extra butter and sugar for greasing the pan and dusting
Cooking Instructions
- Preheat the Oven: Start by preheating your oven to 180°C (350°F). This guarantees that the cake bakes evenly and achieves a lovely golden color.
- Prepare the Apples: Wash, peel, and core the apples. Slice them thinly and set them aside. You can toss the apple slices in a little cinnamon and sugar if you prefer a sweeter flavor.
- Cream the Butter and Sugar: In a large mixing bowl, combine the softened butter and granulated sugar. Using an electric mixer, beat them together until the mixture is light and fluffy. This process incorporates air into the batter, which will help create a light texture in your cake.
- Add Eggs: Add the eggs one at a time, mixing well after each addition. This helps to emulsify the mixture and guarantees a smooth batter.
- Mix Dry Ingredients: In a separate bowl, whisk together the all-purpose flour, baking powder, ground cinnamon, and salt. This step is essential to evenly distribute the leavening agent and spices throughout the flour.
- Combine Dry and Wet Ingredients: Gradually add the dry mixture to the butter and sugar mixture, alternating with the milk and vanilla extract. Begin and end with the flour mixture. Mix until just combined; don’t overmix, as this can make the cake dense.
- Prepare the Baking Pan: Grease a round cake pan (approximately 9 inches in diameter) with butter and dust it with sugar. This will create a lovely caramelized crust on the bottom of the cake.
- Assemble the Cake: Pour half of the batter into the prepared pan and spread it evenly. Layer the apple slices on top of the batter, then pour the remaining batter over the apples. Finish by arranging any leftover apple slices on top for decoration.
- Bake: Place the cake in the preheated oven and bake for 30-40 minutes, or until the top is golden brown and a toothpick inserted into the center comes out clean. Keep an eye on the cake as baking times can vary based on your oven.
- Cool and Serve: Once baked, remove the cake from the oven and let it cool in the pan for about 10 minutes. Then, carefully transfer it to a wire rack to cool completely. Serve it warm or at room temperature, optionally with whipped cream or ice cream.
Extra Tips
When making Swedish Apple Cake, feel free to experiment with different types of apples to find your favorite flavor profile. You can also add nuts like walnuts or almonds for extra texture, or incorporate a splash of lemon juice over the apples to enhance their natural tartness.
If you want to make the cake ahead of time, it stores well in an airtight container for a few days and can be reheated in the oven or microwave for a quick treat. Enjoy your baking adventure!
Norwegian Spiced Cake (Krydderkake)
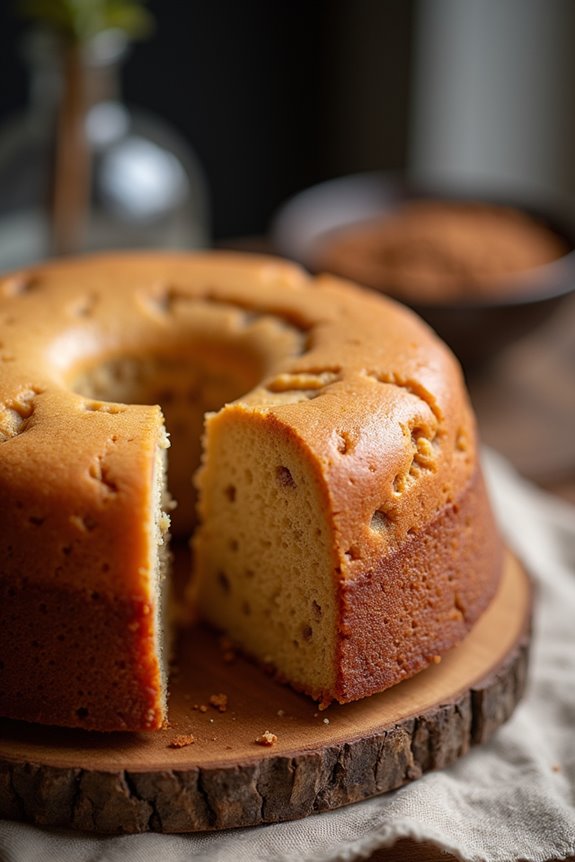
Norwegian Spiced Cake, or Krydderkake, is a delightful traditional dessert that embodies the cozy essence of Scandinavian baking. This cake is characterized by its warm spices, which often include cinnamon, ginger, and cloves, providing a fragrant aroma that fills the kitchen and evokes memories of home.
It’s perfect for special occasions or simply enjoyed with a cup of coffee or tea. The moist texture and rich flavors make this cake a beloved staple in many Norwegian households.
The preparation of Krydderkake is straightforward, making it accessible for both novice and experienced bakers. Whether you’re looking to impress guests at a gathering or treat your family to something special, this cake is sure to satisfy. With its simple yet delicious ingredients, you can create a comforting dish that brings a taste of Norway right to your table.
Ingredients (Serves 4-6):
- 2 cups all-purpose flour
- 1 teaspoon baking soda
- 1 teaspoon baking powder
- 1 teaspoon ground cinnamon
- 1 teaspoon ground ginger
- 1/2 teaspoon ground cloves
- 1/2 teaspoon salt
- 1/2 cup unsalted butter, softened
- 1 cup granulated sugar
- 2 large eggs
- 1 cup buttermilk
- 1 teaspoon vanilla extract
Cooking Instructions:
- Preheat the Oven: Begin by preheating your oven to 350°F (175°C). This step is essential as it guarantees that your cake bakes evenly and achieves the desired rise and texture.
- Prepare the Baking Pan: Grease and flour a 9-inch round cake pan or line it with parchment paper. This prevents the cake from sticking to the pan and allows for easy removal after baking.
- Mix Dry Ingredients: In a medium bowl, whisk together the flour, baking soda, baking powder, cinnamon, ginger, cloves, and salt. This step helps to evenly distribute the leavening agents and spices throughout the flour, guaranteeing a well-flavored cake.
- Cream Butter and Sugar: In a large mixing bowl, cream the softened butter and granulated sugar together until light and fluffy. This process incorporates air into the mixture, which is vital for creating a light and airy texture in the cake.
- Add Eggs: Beat in the eggs one at a time, mixing well after each addition. This helps to emulsify the mixture and contributes to the cake’s moisture.
- Combine Ingredients: Gradually add the dry ingredients to the butter mixture, alternating with the buttermilk. Start and end with the dry ingredients, mixing just until combined. Be careful not to overmix, as this can lead to a dense cake.
- Add Vanilla: Stir in the vanilla extract for added flavor. This step enhances the overall taste of the cake and complements the spices.
- Pour Batter into Pan: Pour the batter into the prepared cake pan, smoothing the top with a spatula.
- Bake the Cake: Place the cake in the preheated oven and bake for about 30-35 minutes, or until a toothpick inserted into the center comes out clean. Keep an eye on the cake to avoid overbaking, which can dry it out.
- Cool the Cake: Once baked, remove the cake from the oven and let it cool in the pan for about 10 minutes. Then, transfer it to a wire rack to cool completely before serving.
Extra Tips: For an added touch, consider dusting the cooled cake with powdered sugar or drizzling it with a simple glaze made from powdered sugar and milk.
You can also enhance the flavor by adding chopped nuts or raisins to the batter. If you prefer a richer taste, try substituting part of the buttermilk with sour cream. This cake also freezes well, so feel free to make it ahead of time and store it for later enjoyment!
Danish Cinnamon Snails (Kanel Snegle)
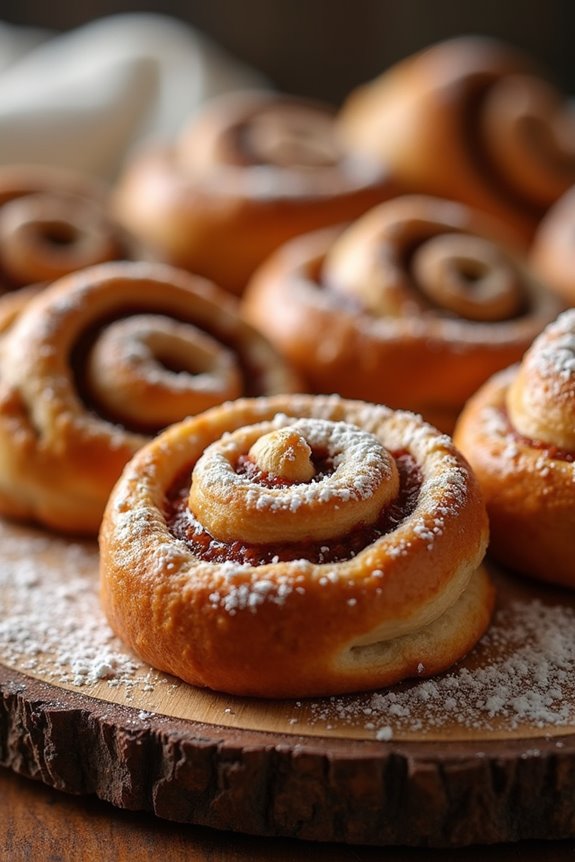
Danish Cinnamon Snails, or Kanel Snegle, are a delightful treat that perfectly captures the essence of Scandinavian baking.
These soft, sweet rolls are infused with aromatic cinnamon and sugar, then rolled up and sliced into spirals before being baked to golden perfection. The result is a warm, gooey pastry that’s sure to please your taste buds and fill your home with a comforting aroma.
Perfect for breakfast, brunch, or an afternoon snack, these cinnamon snails are a beloved staple in Denmark.
To make Kanel Snegle, you’ll work with a buttery dough that’s both tender and slightly sweet, creating a perfect base for the rich filling. The combination of cinnamon and sugar is a classic flavor pairing that elevates these pastries to a whole new level of deliciousness.
With a sprinkle of powdered sugar on top or a simple glaze, these Danish Cinnamon Snails aren’t only a feast for the palate but also for the eyes.
Ingredients (Serves 4-6 people)
- 500g all-purpose flour
- 75g granulated sugar
- 10g salt
- 10g instant yeast
- 250ml milk, warmed
- 75g unsalted butter, melted
- 1 large egg
- 100g brown sugar
- 2 tablespoons ground cinnamon
- 50g unsalted butter, softened (for filling)
- Powdered sugar (for dusting, optional)
Cooking Instructions
1. Prepare the Dough: In a large mixing bowl, combine the flour, granulated sugar, salt, and instant yeast. Mix well to distribute the dry ingredients evenly.
In a separate bowl, whisk together the warmed milk, melted butter, and egg. Pour the wet mixture into the dry ingredients and stir until a rough dough forms.
2. Knead the Dough: Transfer the dough to a lightly floured surface and knead it for about 5-7 minutes until it becomes smooth and elastic.
Alternatively, you can use a stand mixer with a dough hook. Once kneaded, shape the dough into a ball and place it in a lightly greased bowl. Cover with a clean kitchen towel and let it rise in a warm place for about 1 hour, or until it has doubled in size.
3. Prepare the Filling: In a small bowl, mix together the brown sugar and ground cinnamon. Set aside.
Once the dough has risen, punch it down to release the air and transfer it back to a floured surface.
4. Roll Out the Dough: Roll the dough into a rectangle about 1 cm thick, approximately 30 cm by 40 cm.
Spread the softened butter evenly over the surface of the dough, then sprinkle the cinnamon and sugar mixture generously over the buttered dough.
5. Shape the Snails: Starting from one long edge, carefully roll the dough tightly into a log.
Once rolled, slice the log into 12 equal pieces, each about 3 cm wide. Place the slices cut side up on a baking sheet lined with parchment paper, leaving space between each one.
6. Second Rise: Cover the baking sheet with a kitchen towel and allow the cinnamon snails to rise for another 30 minutes, until they puff up slightly.
7. Bake: Preheat your oven to 200°C (400°F).
Once preheated, bake the cinnamon snails for 15-20 minutes, or until they’re golden brown and cooked through. Keep an eye on them to prevent over-browning.
8. Cool and Serve: Remove the snails from the oven and let them cool slightly on a wire rack.
If desired, dust with powdered sugar before serving.
Extra Tips
For the best results, make sure that your ingredients are at room temperature, especially the butter and egg, as this will help the dough rise better and create a softer texture.
If you want to add a bit more flavor, consider incorporating some chopped nuts or raisins into the filling. For an even more decadent treat, drizzle a simple glaze made from powdered sugar and a splash of milk over the cooled cinnamon snails before serving.
Enjoy your baking experience!
Finnish Cinnamon Cookies (Kanelitortut)
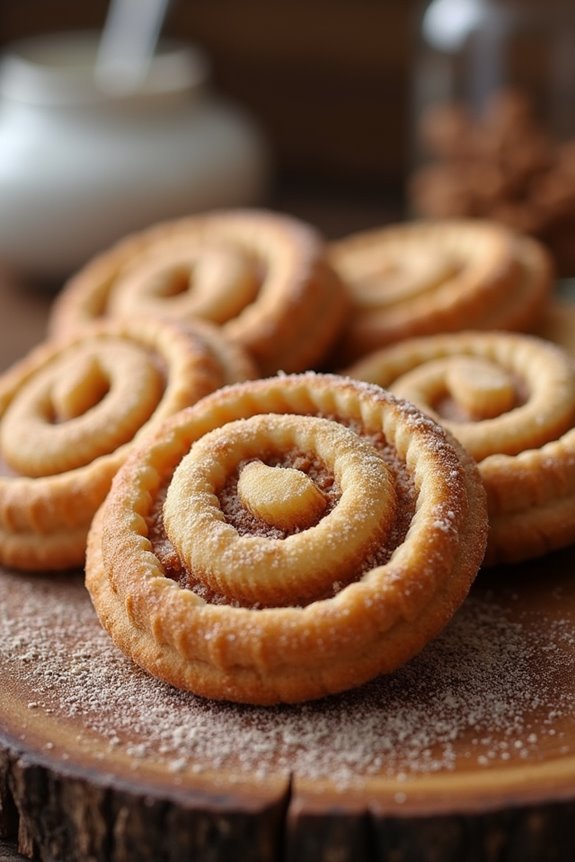
Finnish Cinnamon Cookies, known as Kanelitortut, are delightful pastries that perfectly embody the warm, inviting flavors of traditional Scandinavian baking. These cookies are often prepared during festive occasions and are known for their unique shape and rich cinnamon filling. The combination of buttery dough and sweet cinnamon makes these cookies a favorite among both children and adults.
With a hint of cardamom and a sprinkle of sugar on top, Kanelitortut aren’t only delicious but also visually appealing, making them an excellent treat for sharing with family and friends.
Making Finnish Cinnamon Cookies is a simple yet rewarding experience. The dough is easy to handle, and the filling can be adjusted to suit your taste. Whether you’re enjoying them with a cup of coffee or serving them at a gathering, these cookies will surely impress anyone who takes a bite. Follow this recipe to create your own batch of Kanelitortut, and enjoy the delightful aroma that fills your kitchen as they bake.
Ingredients (Serves 4-6 people):
- 3 cups all-purpose flour
- 1 cup unsalted butter, softened
- 1 cup granulated sugar
- 1 large egg
- 1 teaspoon vanilla extract
- 1 teaspoon ground cinnamon
- 1/2 teaspoon ground cardamom
- 1/4 teaspoon salt
- 1/4 cup milk
- 1/2 cup brown sugar, packed
- 1/4 cup chopped nuts (optional)
Cooking Instructions:
- Prepare the Dough: In a large mixing bowl, cream together the softened butter and granulated sugar until light and fluffy. This should take about 3-5 minutes. Once well combined, add the egg and vanilla extract, mixing until fully incorporated.
- Combine Dry Ingredients: In a separate bowl, whisk together the all-purpose flour, ground cinnamon, ground cardamom, and salt. Gradually add this dry mixture to the wet ingredients, alternating with the milk. Mix until a soft dough forms, but be careful not to overmix.
- Chill the Dough: Wrap the dough in plastic wrap and refrigerate for at least 30 minutes. Chilling the dough helps to firm it up, making it easier to roll out later.
- Preheat the Oven: While the dough is chilling, preheat your oven to 375°F (190°C). Line a baking sheet with parchment paper to prevent sticking.
- Roll Out the Dough: Once chilled, divide the dough into two portions. On a floured surface, roll out one portion into a rectangle about 1/8 inch thick. Repeat with the second portion if desired.
- Add the Filling: In a small bowl, mix together the brown sugar and chopped nuts (if using). Sprinkle this mixture evenly over the rolled-out dough. Then, using a sharp knife or pizza cutter, cut the dough into triangles.
- Shape the Cookies: Starting from the wide end of each triangle, roll the dough towards the point. Place each rolled cookie on the prepared baking sheet, leaving some space between them.
- Bake the Cookies: Bake in the preheated oven for about 12-15 minutes, or until the cookies are golden brown. Keep an eye on them to avoid overbaking.
- Cool and Serve: Once baked, allow the cookies to cool on the baking sheet for a few minutes before transferring them to a wire rack to cool completely. Serve warm or at room temperature.
Extra Tips:
For an added touch, you can brush the cookies with a bit of melted butter immediately after they come out of the oven and sprinkle some additional granulated sugar or cinnamon sugar on top. This will give them a delightful, shiny finish and enhance the flavor.
Additionally, if you want to experiment with flavors, try adding a touch of orange zest to the dough or filling for a revitalizing twist. Enjoy your baking!
Swedish Cinnamon Scones (Kanel Scones)
Swedish Cinnamon Scones, known as Kanel Scones, are a delightful treat that captures the essence of Scandinavian baking. These scones aren’t only fluffy and tender but also infused with the aromatic flavors of cinnamon and sugar. Perfect for breakfast or an afternoon snack, they’re best served warm with a pat of butter or a dollop of jam.
The combination of the sweet cinnamon filling and the buttery scone dough creates a harmonious balance that will surely be a hit at any gathering.
This recipe is straightforward and requires minimal ingredients, making it perfect for both novice and experienced bakers. With a preparation time of just 15 minutes and a baking time of around 20 minutes, you can have these delectable scones ready to enjoy in no time.
Gather your ingredients, preheat your oven, and get ready to indulge in a taste of Sweden right from your kitchen!
Ingredients (Serves 4-6 People)
- 2 cups all-purpose flour
- 1/4 cup granulated sugar
- 1 tablespoon baking powder
- 1/2 teaspoon salt
- 1/2 cup cold unsalted butter, cubed
- 1/2 cup milk
- 1 large egg
- 1 teaspoon vanilla extract
- 1 tablespoon ground cinnamon
- 2 tablespoons brown sugar
Cooking Instructions
- Preheat the Oven: Begin by preheating your oven to 400°F (200°C). This guarantees that your scones will bake evenly, achieving that perfect golden-brown color.
- Prepare the Dry Ingredients: In a large mixing bowl, combine the all-purpose flour, granulated sugar, baking powder, and salt. Whisk together until well blended. This step is essential for evenly distributing the leavening agent and making sure your scones rise properly.
- Cut in the Butter: Add the cubed cold butter to the dry mixture. Using a pastry cutter or your fingers, work the butter into the flour mixture until it resembles coarse crumbs. The pieces of butter should be about the size of peas, which will create a flaky texture in the scones.
- Mix the Wet Ingredients: In a separate bowl, whisk together the milk, egg, and vanilla extract. Pour this mixture into the dry ingredients, stirring gently until just combined. Be careful not to overmix, as this can lead to tough scones.
- Prepare the Cinnamon Filling: In a small bowl, mix together the ground cinnamon and brown sugar. This will be used to create the delightful cinnamon swirl in your scones.
- Shape the Dough: On a floured surface, transfer the dough and gently pat it into a rectangle, about 1 inch thick. Sprinkle the cinnamon and brown sugar mixture evenly over the dough.
- Roll and Cut the Scones: Starting from one edge, carefully roll the dough into a log shape. Once rolled, cut the log into equal pieces (about 8-10 scones) with a sharp knife. Place the scones on a baking sheet lined with parchment paper, leaving space in between each.
- Bake the Scones: Bake in the preheated oven for 15-20 minutes, or until golden brown. Keep an eye on them to make sure they don’t over-bake.
- Cool and Serve: Once baked, remove the scones from the oven and let them cool for a few minutes on a wire rack. Serve warm, optionally with butter or jam.
Extra Tips
For an added burst of flavor, consider incorporating chopped nuts or dried fruit into the scone dough.
Additionally, you can brush the tops of the scones with a little milk or an egg wash before baking to achieve a beautiful glossy finish. If you want to make these scones ahead of time, they can be frozen after cutting; just bake them directly from the freezer, adding a few extra minutes to the baking time.
Enjoy your delicious Swedish Cinnamon Scones!
Norwegian Cinnamon Raisin Bread (Kanel Og Rosiner Brød)
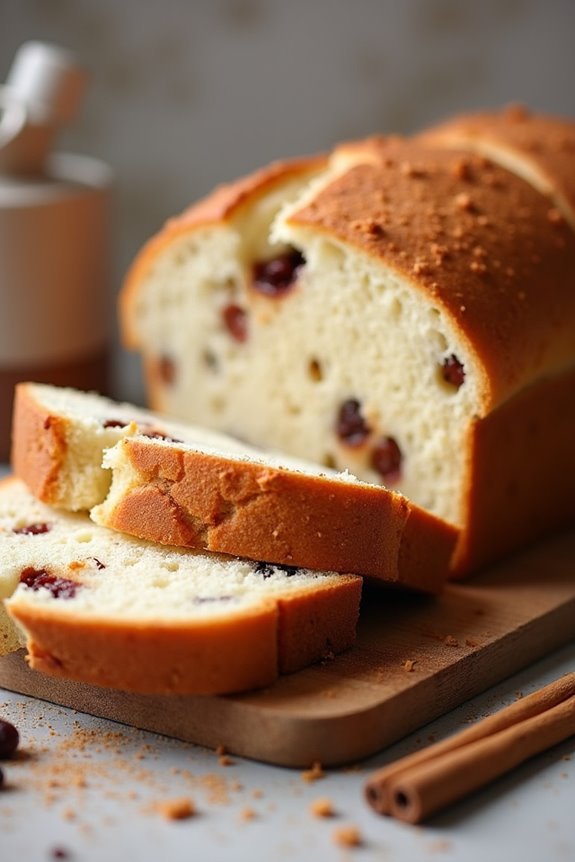
Norwegian Cinnamon Raisin Bread, or Kanel Og Rosiner Brød, is a delightful treat that embodies the warmth and comfort of Scandinavian baking. This soft, sweet bread is infused with the rich flavors of cinnamon and plump raisins, making it perfect for breakfast or as a cozy snack with a cup of tea or coffee.
Traditionally enjoyed during special occasions and holidays, this bread isn’t only delicious but also a wonderful way to gather friends and family around the table.
The beauty of this recipe lies in its simplicity and the fragrant spices that bring it to life. As the dough rises and bakes, your kitchen will be filled with an irresistible aroma that will have everyone enthusiastically awaiting a slice. This recipe yields enough for 4-6 people, making it an ideal choice for a family gathering or a cozy brunch with friends.
Let’s explore the ingredients and steps to create this mouthwatering bread.
Ingredients:
- 4 cups all-purpose flour
- 1 packet (2 ¼ teaspoons) active dry yeast
- 1 cup warm milk (about 110°F or 43°C)
- 1/4 cup granulated sugar
- 1/2 teaspoon salt
- 1/4 cup unsalted butter, melted
- 1 large egg
- 1 teaspoon ground cinnamon
- 1 cup raisins
- Additional flour for dusting
Cooking Instructions:
- Prepare the Yeast Mixture: In a small bowl, combine the warm milk and sugar. Sprinkle the yeast over the top and let it sit for about 5-10 minutes, or until it becomes frothy. This step activates the yeast, ensuring your bread rises properly.
- Mix the Dry Ingredients: In a large mixing bowl, whisk together the flour and salt. Create a well in the center of the flour mixture.
- Combine Wet Ingredients: In a separate bowl, beat the egg and then add the melted butter and the frothy yeast mixture. Mix until well combined.
- Form the Dough: Pour the wet ingredients into the well of the dry ingredients. Using a spoon or your hands, mix until a shaggy dough forms. If the dough is too sticky, gradually add more flour, one tablespoon at a time.
- Knead the Dough: Transfer the dough onto a lightly floured surface and knead for about 8-10 minutes, or until the dough is smooth and elastic. This process helps develop the gluten, giving your bread a lovely texture.
- Incorporate Raisins and Cinnamon: After kneading, flatten the dough slightly and sprinkle the cinnamon and raisins over the top. Fold the dough over the fillings and knead gently to incorporate them evenly throughout.
- First Rise: Place the dough in a greased bowl, cover it with a clean kitchen towel, and let it rise in a warm place for about 1 to 1.5 hours, or until it has doubled in size.
- Shape the Bread: Once risen, punch down the dough gently to release the air. Turn it out onto a floured surface and shape it into a loaf. Place the loaf into a greased 9×5 inch loaf pan.
- Second Rise: Cover the loaf with a towel and let it rise again in a warm place for about 30-45 minutes, or until it has puffed up.
- Bake the Bread: Preheat your oven to 350°F (175°C). Bake the bread for 25-30 minutes, or until it’s golden brown and sounds hollow when tapped on the bottom.
- Cool and Serve: Remove the bread from the oven and let it cool in the pan for 5 minutes. Then transfer it to a wire rack to cool completely before slicing.
Extra Tips:
To achieve the best flavor and texture in your Norwegian Cinnamon Raisin Bread, consider using fresh spices and high-quality raisins.
If you prefer a richer taste, you can substitute some of the milk with cream. Additionally, for a touch of sweetness, drizzle a simple icing made from powdered sugar and milk over the cooled loaf.
This bread can be frozen for later enjoyment; just make sure to wrap it tightly in plastic wrap and aluminum foil. Enjoy your baking adventure!
Icelandic Cinnamon Pudding (Kanelgrýla)

Icelandic Cinnamon Pudding, or Kanelgrýla, is a delightful dessert that embodies the cozy essence of Scandinavian baking. This creamy, comforting pudding is infused with the warm flavors of cinnamon, making it a perfect treat for chilly evenings or festive occasions.
Traditionally served chilled, Kanelgrýla can be topped with whipped cream, fruit, or even a sprinkle of extra cinnamon for that added touch of indulgence. This pudding isn’t only simple to prepare but also a versatile dish that can be enjoyed by the whole family.
With its rich flavor and smooth texture, Kanelgrýla is sure to impress your guests and can be made ahead of time for convenience. Enjoy creating this classic Icelandic dessert that combines the warmth of spices with the sweetness of rich vanilla.
Ingredients (Serves 4-6):
- 1 cup of milk
- 1 cup of heavy cream
- 1/2 cup of granulated sugar
- 1/4 cup of cornstarch
- 1 teaspoon of vanilla extract
- 2 teaspoons of ground cinnamon
- A pinch of salt
- Optional toppings: whipped cream, cinnamon sticks, or fresh fruit
Cooking Instructions:
- Prepare the Ingredients: Gather all the ingredients before you start cooking. Measure out the milk, heavy cream, sugar, cornstarch, vanilla extract, ground cinnamon, and salt. This guarantees a smooth cooking process as you won’t have to pause for gathering items during the preparation.
- Combine Dry Ingredients: In a medium-sized bowl, whisk together the granulated sugar, cornstarch, ground cinnamon, and a pinch of salt. This helps to evenly distribute the dry ingredients, which is essential for achieving a smooth pudding without lumps.
- Heat the Milk and Cream: In a saucepan over medium heat, combine the milk and heavy cream. Stir frequently to prevent scorching. Heat until the mixture is warm but not boiling, as boiling could affect the final texture of the pudding.
- Mix Dry Ingredients with the Milk: Gradually whisk the dry ingredient mixture into the warm milk and cream. It’s important to do this slowly to avoid clumps forming. Continue to stir until everything is well combined and the mixture thickens, which should take about 5-7 minutes.
- Add Vanilla: Once the pudding has thickened to a creamy consistency, remove it from the heat. Stir in the vanilla extract, which will enhance the flavor profile of the pudding. Mix well to guarantee the vanilla is evenly distributed.
- Cool the Pudding: Pour the pudding into individual serving dishes or a large bowl. Let it cool at room temperature for about 15 minutes before transferring it to the refrigerator. Chill for at least 2 hours until set.
- Serve: Once the pudding is chilled and firm, it’s ready to be served. Top with whipped cream, a sprinkle of cinnamon, or fresh fruit as desired. Enjoy this delightful Icelandic treat!
Extra Tips:
For the best results, always use fresh ingredients, particularly for the cream and milk, as they directly influence the flavor of the pudding.
If you prefer a thicker pudding, you can increase the amount of cornstarch slightly, but be cautious not to overdo it, as this can lead to a gummy texture.
Feel free to experiment with different flavors by adding a splash of almond extract or a bit of cocoa powder for a chocolate twist. Kanelgrýla can be made a day in advance, making it a convenient dessert option for gatherings!