

When I think of Copenhagen, the aroma of freshly baked pastries fills my mind. It’s not just the famous Wienerbrød that captures my heart. The vibrant array of dishes like Smørrebrød and Frikadeller tell a rich story of Danish culture. Each bite offers a glimpse into the warmth of local cafés. Curious about how to recreate these charming recipes at home? Let’s explore the delightful world of traditional Danish cuisine together.
Classic Danish Pastry (Wienerbrød)

Classic Danish pastry, known as Wienerbrød, is a delightful and flaky pastry that has become a beloved treat worldwide. Its origins trace back to the 19th century when Danish bakers adopted techniques from Austrian pastry-making. The result is a versatile pastry that can be filled with a variety of sweet ingredients, such as almond paste, fruit, or custard, and often topped with icing.
The process of creating Wienerbrød requires a bit of patience, as it involves making a laminated dough similar to puff pastry, which results in the signature layers and airy texture. This recipe is perfect for serving 4-6 people and is ideal for a special breakfast, brunch, or dessert. While it may take some time to prepare, the end result is a beautifully crafted pastry that will impress anyone who tastes it.
Gather your ingredients, roll up your sleeves, and get ready to indulge in the rich, buttery flavors of classic Danish pastry.
Ingredients:
- 500g all-purpose flour
- 50g granulated sugar
- 10g salt
- 10g instant yeast
- 300ml whole milk, warm
- 1 large egg
- 250g unsalted butter, chilled
- 1 teaspoon vanilla extract
- Filling options (e.g., almond paste, fruit preserves, custard)
- 1 egg (for egg wash)
- Powdered sugar (for icing, optional)
Instructions:
1. Prepare the Dough: In a mixing bowl, combine the flour, sugar, salt, and instant yeast. In a separate bowl, whisk together the warm milk and egg. Gradually add the milk mixture to the dry ingredients, mixing until a soft dough forms. Knead the dough on a floured surface for about 5-10 minutes until it becomes smooth and elastic.
Cover the dough with plastic wrap and let it rise in a warm place for about 1 hour or until it has doubled in size.
2. Incorporate the Butter: While the dough is rising, prepare the butter block. Place the chilled butter between two sheets of parchment paper and use a rolling pin to pound it into a rectangle approximately 1/2 inch thick. Chill the butter block in the refrigerator while the dough rises.
3. Laminate the Dough: Once the dough has risen, punch it down and roll it out on a floured surface into a large rectangle, about 1/4 inch thick. Place the chilled butter block in the center of the dough.
Fold the edges of the dough over the butter to encase it completely. Roll the dough out again into a long rectangle, then fold it into thirds (like a letter) and wrap it in plastic wrap. Refrigerate for 30 minutes.
4. Repeat the Lamination: Remove the dough from the refrigerator, roll it out again into a rectangle, and fold it into thirds. Repeat this step two more times, chilling the dough for 30 minutes between each fold. This process creates the flaky layers in the pastry.
5. Shape the Pastries: After the final refrigeration, roll the dough out into a 1/4 inch thick rectangle. Cut the dough into squares or triangles, depending on the shape you prefer.
Place a spoonful of your desired filling in the center of each piece. Fold the corners towards the center or shape them as desired. Place the pastries on a lined baking sheet.
6. Proof and Bake: Cover the shaped pastries with a clean kitchen towel and let them rise for about 30 minutes. Preheat the oven to 400°F (200°C). Beat the remaining egg and brush it over the tops of the pastries for a golden finish.
Bake in the preheated oven for 15-20 minutes or until golden brown.
7. Cool and Serve: Once baked, allow the pastries to cool on a wire rack. If desired, drizzle with icing made from powdered sugar and a little milk for extra sweetness before serving.
Extra Tips: To achieve the best results, make sure that your butter is properly chilled during the lamination process, as this is key to creating the flaky texture.
If you’re new to laminated dough, take your time and don’t rush through the folding and rolling steps. Experiment with different fillings to find your favorite combination, and consider making a batch ahead of time to freeze uncooked pastries; they can be baked directly from the freezer, making for a quick and delicious treat whenever you crave a homemade pastry.
Smørrebrød: Open-Faced Sandwiches
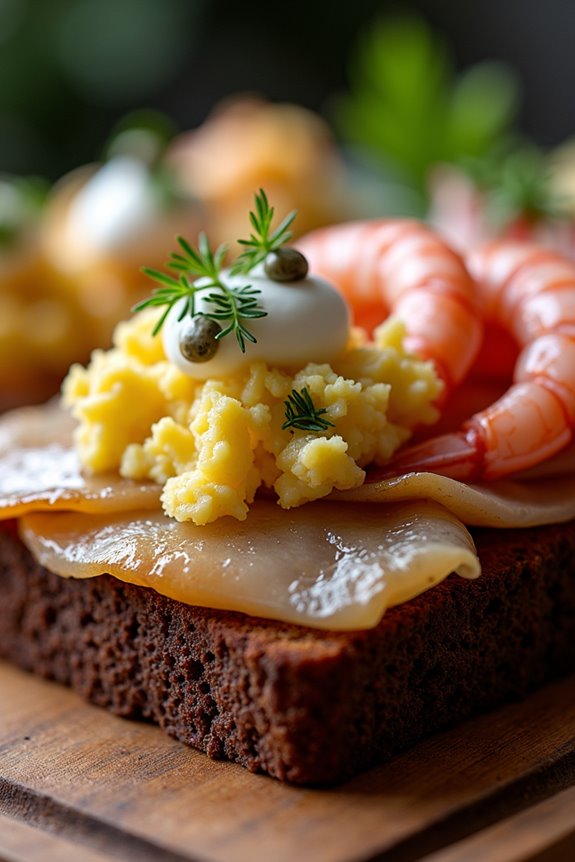
Smørrebrød, a classic Danish dish, is a delightful open-faced sandwich that showcases a variety of toppings on a slice of rye bread. This traditional meal isn’t only a staple in Danish cuisine but also a canvas for creativity, allowing you to mix and match ingredients to suit your taste.
Typically, these sandwiches are beautifully arranged and often served at gatherings, making them a perfect choice for both casual meals and festive occasions.
The key to a perfect smørrebrød lies in the quality of the ingredients and the art of presentation. A good slice of dense, dark rye bread serves as the foundation, while the toppings can range from pickled herring and roast beef to creamy egg salad and shrimp.
Each bite is an explosion of flavors, with a balance of textures that makes smørrebrød a favorite among food lovers around the world.
Ingredients (Serves 4-6)
- 8 slices of rye bread
- 200g of pickled herring
- 200g of roast beef, thinly sliced
- 150g of shrimp, peeled and deveined
- 3 hard-boiled eggs, sliced
- 1 cup of creamy mayonnaise
- 1 tablespoon of Dijon mustard
- Fresh dill, for garnish
- Sliced radishes, for garnish
- Capers, for garnish
- Salt and pepper, to taste
Cooking Instructions
- Prepare the Base: Start by laying out the slices of rye bread on a clean surface or a serving platter. The bread should be fresh and slightly toasted for a nice crunch. This will be the base for your smørrebrød.
- Make the Egg Salad: In a bowl, combine the sliced hard-boiled eggs with creamy mayonnaise and a tablespoon of Dijon mustard. Gently mix until the eggs are well coated but still chunky. Season with salt and pepper to taste. Set aside.
- Assemble the Toppings: Begin by adding a layer of pickled herring on two slices of bread. For another two slices, spread a generous portion of the egg salad you just prepared. On the remaining slices, lay down the thinly sliced roast beef.
- Add the Shrimp: For the shrimp topping, simply place a handful of peeled shrimp on top of the egg salad. You can add a dollop of mayonnaise on top of the shrimp for extra creaminess if desired.
- Garnish: Finish off your smørrebrød by garnishing each slice with fresh dill, sliced radishes, and a few capers for added flavor. The presentation is key, so take your time to arrange them beautifully.
- Serve: Once you have assembled all the sandwiches, serve them immediately on a large platter. Smørrebrød is best enjoyed fresh, so try to serve them as soon as they’re prepared.
Extra Tips
When preparing smørrebrød, feel free to get creative with your toppings! Other popular options include liver pâté, cucumber slices, and beetroot.
Always ascertain that your ingredients are fresh and of high quality, as they make a significant difference in flavor. Additionally, consider pairing your smørrebrød with a chilled Danish beer or a glass of aquavit for an authentic experience.
Enjoy your culinary journey into traditional Danish cuisine!
Danish Meatballs (Frikadeller)

Danish Meatballs, or Frikadeller, are a beloved staple in Danish cuisine, often enjoyed as a comforting dish in homes across Denmark. Traditionally made with a combination of ground pork and beef, these meatballs are seasoned with onions, spices, and sometimes even a touch of milk to guarantee a moist texture.
They can be served hot with a side of potatoes and gravy, or cold as part of a smorgasbord, making them versatile for any occasion.
Making Frikadeller is a straightforward process that requires minimal ingredients yet yields delicious results. They’re typically pan-fried for a wonderful crispy exterior while remaining tender and juicy inside. Whether you’re cooking for a family gathering or simply craving a taste of Denmark, these meatballs are sure to please any palate.
Ingredients (Serves 4-6):
- 500g ground pork
- 500g ground beef
- 1 medium onion, finely chopped
- 2 cloves garlic, minced
- 1 cup breadcrumbs
- 1/2 cup milk
- 1 large egg
- 1 teaspoon salt
- 1/2 teaspoon black pepper
- 1 teaspoon ground nutmeg
- 2 tablespoons fresh parsley, chopped (optional)
- 3 tablespoons butter (for frying)
- 2 tablespoons vegetable oil (for frying)
Cooking Instructions:
1. Prepare the Mixture: In a large mixing bowl, combine the ground pork and ground beef. Add the finely chopped onion, minced garlic, breadcrumbs, milk, egg, salt, black pepper, ground nutmeg, and parsley (if using).
Mix everything together using your hands or a wooden spoon until well combined, making sure not to overmix, which can make the meatballs tough.
2. Shape the Meatballs: With your hands, take a portion of the meat mixture and form it into a ball, about the size of a golf ball. Repeat this process until all the mixture is formed into meatballs, placing them on a plate or tray as you go.
3. Heat the Pan: In a large frying pan, heat the butter and vegetable oil over medium heat. The combination of butter and oil helps to achieve a rich flavor while preventing the butter from burning.
4. Cook the Meatballs: Once the pan is hot, carefully place the meatballs in the pan, making sure not to overcrowd them. Cook for about 4-5 minutes on each side, turning them occasionally until they’re golden brown and cooked through.
You may need to do this in batches depending on the size of your pan.
5. Check for Doneness: To verify the meatballs are fully cooked, use a meat thermometer to check that they’ve reached an internal temperature of 70°C (160°F). Alternatively, you can cut one open to check that the meat is no longer pink inside.
6. Serve: Once cooked, transfer the meatballs to a serving platter. They can be served immediately with boiled potatoes, gravy, and pickled cucumbers, or allowed to cool and served cold as part of a smorgasbord.
Extra Tips:
For added flavor, consider using fresh herbs like thyme or dill in the meat mixture. You can also experiment with different types of meat, such as ground turkey or chicken, for a lighter option.
If you prefer a slightly spicy kick, a pinch of cayenne pepper can be added to the mixture. Finally, serve the meatballs with a side of homemade gravy or a dollop of remoulade for an authentic Danish experience!
Aebleskiver: Danish Pancake Balls

Aebleskiver, the delightful Danish pancake balls, are a beloved treat in Denmark, often enjoyed during festive seasons or special occasions. These fluffy, spherical pastries are traditionally cooked in a special Aebleskiver pan, which gives them their unique shape. They can be enjoyed plain, dusted with powdered sugar, or filled with a variety of fillings such as fruit preserves, chocolate, or even apple slices, making them a versatile snack or dessert.
The name “Aebleskiver” translates to “apple slices” in Danish, although these pancake balls aren’t limited to apple filling. This recipe will guide you through making Aebleskiver from scratch, perfect for serving 4-6 people. Whether you serve them for breakfast, brunch, or as a dessert, these delightful treats are sure to impress your family and friends.
Ingredients:
- 2 cups all-purpose flour
- 1 tablespoon sugar
- 1 teaspoon baking powder
- 1/2 teaspoon baking soda
- 1/2 teaspoon salt
- 2 large eggs, separated
- 2 cups buttermilk
- 4 tablespoons melted butter
- 1 teaspoon vanilla extract
- Powdered sugar (for dusting)
- Filling of choice (e.g., fruit preserves, chocolate, or diced apples)
Cooking Instructions:
1. Prepare the Aebleskiver Batter: In a large mixing bowl, whisk together the flour, sugar, baking powder, baking soda, and salt until well combined. In another bowl, beat the egg yolks, then add the buttermilk, melted butter, and vanilla extract. Mix these wet ingredients until smooth.
Gently fold the wet mixture into the dry mixture until just combined. Avoid over-mixing; a few lumps are okay.
2. Whip the Egg Whites: In a separate clean bowl, beat the egg whites until they form stiff peaks. This step is essential as it will give the Aebleskiver their light and fluffy texture.
Carefully fold the whipped egg whites into the batter, using a spatula to maintain the airiness of the egg whites.
3. Heat the Aebleskiver Pan: Place your Aebleskiver pan over medium heat and allow it to heat up. Once hot, add a small amount of butter or oil to each of the round wells to prevent sticking.
4. Fill the Wells: Pour the batter into each well of the Aebleskiver pan, filling them about halfway. If you’re using a filling, add a small teaspoon of your chosen filling in the center of each pancake ball.
5. Cook the Aebleskiver: Allow the batter to cook for about 2-3 minutes, or until the bottom is golden brown. Use a skewer or a chopstick to flip each Aebleskiver over.
Cook for an additional 2-3 minutes on the other side until golden brown and cooked through.
6. Serve: Once cooked, remove the Aebleskiver from the pan and place them on a serving plate. Dust with powdered sugar before serving. Enjoy them warm with additional fillings or toppings on the side.
Extra Tips:
For the best results, guarantee your Aebleskiver pan is well-seasoned to prevent sticking. Experiment with different fillings to discover your favorite combinations—sweet or savory!
Also, keep the heat at medium to avoid burning the outside while leaving the insides raw. Aebleskiver are best enjoyed fresh, so try to serve them immediately after cooking for a superior experience.
Rødgrød Med Fløde: Red Berry Pudding
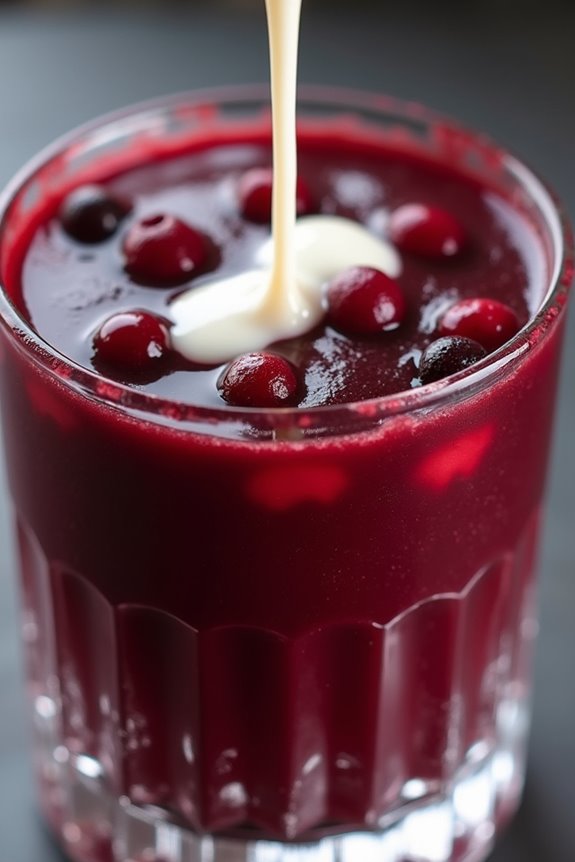
Rødgrød med fløde is a quintessential Danish dessert that captures the essence of summer with its vibrant colors and revitalizing flavors. This traditional dish is made with a variety of red berries, typically including strawberries, raspberries, and red currants, which are cooked down into a thick pudding-like consistency. The name “Rødgrød” translates to “red porridge,” and it’s often served with a generous drizzle of heavy cream (“fløde”) for added richness, making it a perfect treat for warm days and festive occasions.
Making Rødgrød med fløde is quite simple, and it requires minimal ingredients, allowing the natural sweetness and tartness of the berries to shine through. This dish not only offers a delightful burst of flavor but also presents beautifully with its deep red hue. Whether you’re entertaining guests or enjoying a quiet evening at home, this dish is sure to impress and satisfy.
Ingredients (serving size: 4-6 people)
- 400g mixed red berries (e.g., strawberries, raspberries, red currants)
- 150g sugar
- 2 cups water
- 2 tablespoons cornstarch
- 3 tablespoons cold water
- A pinch of salt
- Heavy cream (for serving)
Cooking Instructions
- Prepare the Berries: Begin by rinsing the mixed red berries under cold water. If you’re using strawberries, remove the stems and slice them into smaller pieces. This will help them cook down evenly and release their juices more effectively.
- Cook the Berries: In a medium saucepan, combine the rinsed berries, 150g of sugar, and 2 cups of water. Heat the mixture over medium heat, stirring occasionally until the sugar dissolves and the berries start to release their juices. Allow it to simmer for about 10 minutes, or until the berries are soft and the mixture has thickened slightly.
- Thicken the Mixture: In a small bowl, mix the cornstarch with 3 tablespoons of cold water until smooth. Once the berry mixture is simmering, slowly pour the cornstarch mixture into the saucepan while stirring constantly. This will help thicken the pudding. Continue to cook for an additional 2-3 minutes until the mixture is thick and glossy.
- Add Salt and Cool: Remove the saucepan from heat and add a pinch of salt to enhance the flavors. Allow the Rødgrød to cool at room temperature for about 30 minutes, then transfer it to the refrigerator to chill for at least 1 hour. This step is important as it helps the pudding set properly.
- Serve: Once chilled, spoon the Rødgrød into dessert bowls or glasses. Drizzle a generous amount of heavy cream on top before serving to create a beautiful contrast with the red pudding. Enjoy this delightful dessert with friends and family!
Extra Tips
When preparing Rødgrød med fløde, feel free to experiment with different combinations of berries based on what’s in season or available to you. You can also adjust the sugar according to your taste preference, especially if you prefer a more tart flavor.
Additionally, for a twist, consider adding a splash of vanilla extract or a few mint leaves for garnish. This dessert can be made ahead of time and stored in the refrigerator for a couple of days, making it a convenient option for gatherings. Enjoy the simplicity and vitality of this beloved Danish treat!
Koldskål: Chilled Buttermilk Soup

Koldskål is a traditional Danish chilled buttermilk soup that’s both invigorating and satisfying, making it a popular dish during the warm summer months. This delightful soup is often enjoyed as a light meal or dessert and is typically served with crispy biscuits or fresh fruit.
The creamy, tangy flavor of the buttermilk combined with the sweetness of sugar and the freshness of lemon create a unique taste that’s both comforting and revitalizing.
Making Koldskål is a simple process that involves mixing together a few key ingredients and allowing the flavors to meld. Once prepared, it can be served immediately or chilled for a bit longer, ensuring that every spoonful is cool and invigorating.
Whether served at a summer gathering or as a quick weeknight treat, Koldskål is sure to impress with its vibrant taste and smooth texture.
Ingredients (Serves 4-6):
- 1 liter buttermilk
- 250 ml sour cream
- 100 g sugar
- 1 tsp vanilla extract
- Juice and zest of 1 lemon
- 1 tsp finely chopped fresh mint (optional)
- Crushed biscuits or fresh berries for serving
Cooking Instructions:
- Combine Base Ingredients: In a large mixing bowl, pour in the buttermilk and sour cream. Using a whisk, gently mix them together until they’re well combined, ensuring there are no lumps.
- Add Sweetness and Flavor: Gradually add the sugar to the mixture, whisking continuously until it’s completely dissolved. Then, add the vanilla extract, lemon juice, and lemon zest. The lemon juice will provide a delightful tang that balances the sweetness.
- Incorporate Fresh Herbs (Optional): If you’re using fresh mint, finely chop it and add it to the mixture. This will give a subtle freshness that elevates the flavor profile of your Koldskål.
- Chill the Soup: Once all the ingredients are well combined, cover the bowl with plastic wrap or transfer the mixture to a pitcher. Place it in the refrigerator for at least 30 minutes to chill. This step allows the flavors to meld together beautifully.
- Serve: After chilling, give the Koldskål a good stir before serving. Ladle the soup into bowls or glasses and top with crushed biscuits or fresh berries for added texture and flavor.
Extra Tips:
For an added twist, you can experiment with different flavorings, such as adding a splash of elderflower syrup or using flavored yogurts instead of sour cream.
If you prefer a sweeter Koldskål, feel free to adjust the amount of sugar based on your taste. Additionally, serving it with homemade or store-bought Danish biscuits can enhance the traditional experience.
Enjoy this invigorating dish on hot days, and consider making a larger batch to keep on hand in the refrigerator for a quick snack or dessert!
Leverpostej: Liver Pâté
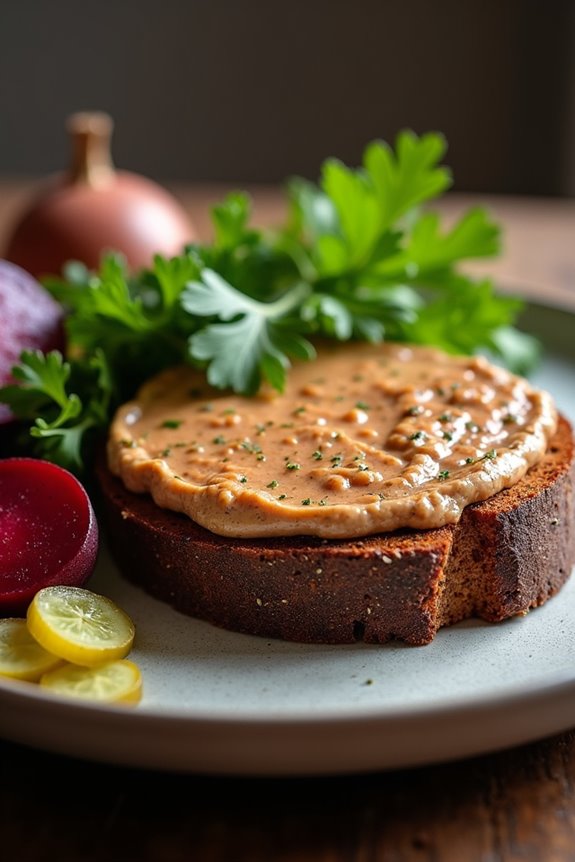
Leverpostej, a beloved staple in Danish cuisine, is a creamy and savory liver pâté that has been enjoyed for generations. Traditionally made from pork liver, this dish is seasoned with a variety of spices and often enhanced with onions and bacon, giving it both depth and richness.
It’s a versatile spread that can be served on rye bread, often garnished with pickles, beets, or fresh herbs, and is a popular choice for lunch or as part of a smorgasbord.
Making your own Leverpostej can be a rewarding experience, allowing you to customize flavors to your liking. While it may sound intimidating, the process is quite straightforward and requires only a few ingredients. Once prepared, this pâté can be stored in the fridge for several days, making it a convenient addition to your meal planning.
Ingredients (serving size: 4-6 people)
- 500g pork liver, cleaned and trimmed
- 100g bacon, diced
- 1 medium onion, finely chopped
- 2 cloves of garlic, minced
- 1 teaspoon ground allspice
- 1 teaspoon ground nutmeg
- 1 teaspoon salt
- ½ teaspoon black pepper
- 100ml heavy cream
- 2 tablespoons butter, plus extra for greasing the dish
- 2 tablespoons fresh parsley, chopped (for garnish)
Cooking Instructions
- Prepare the Ingredients: Begin by cleaning and trimming the pork liver, removing any visible membranes or connective tissue. Chop the bacon and onion finely, and mince the garlic. This step guarantees that all ingredients are evenly incorporated into the pâté.
- Cook the Bacon and Onions: In a large skillet, melt 2 tablespoons of butter over medium heat. Add the diced bacon and cook until crispy, about 5 minutes. Then, add the chopped onion and minced garlic to the skillet. Sauté until the onions are translucent and soft, approximately 4-5 minutes. This will build a foundation of flavor for the pâté.
- Cook the Liver: Add the cleaned pork liver to the skillet. Cook for about 5-7 minutes, turning occasionally, until the liver is browned on the outside but still slightly pink on the inside. Remove the skillet from heat and allow the mixture to cool slightly.
- Blend the Mixture: Transfer the cooked liver mixture to a food processor. Add the ground allspice, nutmeg, salt, and black pepper. Pour in the heavy cream and blend until smooth and creamy. You can adjust the seasoning to taste during this step.
- Bake the Pâté: Preheat your oven to 180°C (350°F). Grease a loaf pan with butter and pour the liver mixture into the pan, smoothing the top with a spatula. Cover the pan with aluminum foil and place it in a baking dish filled with water to create a water bath (bain-marie). Bake for about 45 minutes or until the pâté is set and a knife inserted in the center comes out clean.
- Cool and Serve: Once baked, remove the pâté from the oven and let it cool to room temperature. Refrigerate for at least a few hours or overnight to allow the flavors to meld. Serve chilled, garnished with fresh parsley and your choice of accompaniments.
Extra Tips
When making Leverpostej, feel free to experiment with additional herbs and spices to suit your taste. Some variations include adding a splash of brandy or port wine for extra flavor, or incorporating sautéed mushrooms for an earthy twist.
Always verify the liver is cooked properly, but avoid overcooking it to maintain a smooth texture. Finally, this pâté pairs wonderfully with traditional Danish rye bread, so have some on hand for an authentic experience!
Danish Rye Bread (Rugbrød)
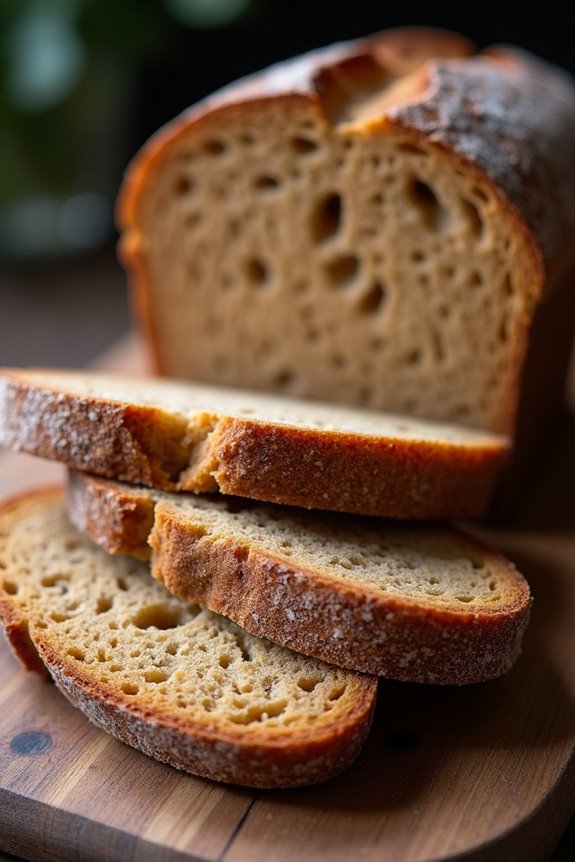
Danish Rye Bread, known as Rugbrød, is a staple in Danish cuisine and is cherished for its dense texture and rich, nutty flavor. Traditionally, this hearty bread is made with whole grain rye flour, which not only provides numerous health benefits but also gives the bread its characteristic deep color.
Rugbrød is often enjoyed as a base for open-faced sandwiches, known as “smørrebrød,” topped with various ingredients such as fish, meats, and vegetables.
Making Rugbrød at home may seem intimidating, but with a bit of patience and the right ingredients, you can create your own delicious loaf. The fermentation process, which can take up to 24 hours, is essential for developing the bread’s flavor and texture. Once baked, this bread can be stored for several days and even improves in taste as it ages, making it a perfect addition to your meal planning.
Ingredients (Serves 4-6):
- 500g (4 cups) rye flour
- 200g (1 ⅔ cups) whole grain rye flour
- 100g (½ cup) rolled oats
- 1 ½ teaspoons salt
- 1 tablespoon honey or molasses
- 1 packet (7g) active dry yeast
- 600ml (2 ½ cups) lukewarm water
- 100g (½ cup) sunflower seeds (optional)
- 50g (¼ cup) pumpkin seeds (optional)
Instructions:
- Prepare the Yeast Mixture: In a small bowl, combine the lukewarm water with the honey or molasses. Sprinkle the active dry yeast over the water and allow it to sit for about 10 minutes, or until it becomes frothy. This activates the yeast and guarantees your bread will rise properly.
- Mix the Dry Ingredients: In a large mixing bowl, combine the rye flour, whole grain rye flour, rolled oats, and salt. If using, add the sunflower seeds and pumpkin seeds for added texture and flavor. Mix these dry ingredients thoroughly until well combined.
- Combine Wet and Dry Ingredients: Once the yeast mixture is ready, pour it into the bowl with the dry ingredients. Stir the mixture with a wooden spoon or spatula until everything is well incorporated. The dough will be thick and sticky; that’s perfectly normal for rye bread.
- First Rise: Cover the bowl with a clean kitchen towel or plastic wrap and let the dough rise in a warm place for about 1-2 hours, or until it has doubled in size. This slow fermentation is essential for developing flavor in the bread.
- Shape the Dough: After the dough has risen, gently punch it down to release any trapped air. Transfer the dough to a well-greased loaf pan or a lined baking dish. Smooth the top with a spatula or your hands.
- Second Rise: Cover the loaf with a towel again and allow it to rise for another 30-60 minutes. The dough should rise slightly but not double in size.
- Preheat the Oven: While the dough is rising, preheat your oven to 200°C (390°F). This guarantees that the bread will bake evenly.
- Bake the Bread: Once the dough has completed its second rise, place it in the preheated oven and bake for 45-50 minutes. The bread should have a deep brown crust and sound hollow when tapped on the bottom.
- Cool the Bread: After baking, remove the bread from the oven and let it cool in the pan for about 10 minutes. Then transfer it to a wire rack to cool completely before slicing.
Extra Tips:
When making Rugbrød, consider using a mix of seeds for added flavor and nutrition; feel free to experiment with flaxseeds, sesame seeds, or even nuts.
To achieve a more complex flavor, you can also let the dough ferment overnight in the refrigerator after the first rise. This cold fermentation will enhance the taste and texture of the bread.
Finally, slice the bread thinly to fully enjoy its robust flavor, and store it wrapped in a cloth to maintain freshness. Enjoy your homemade Danish Rye Bread with your favorite toppings!
Risalamande: Rice Pudding With Almonds
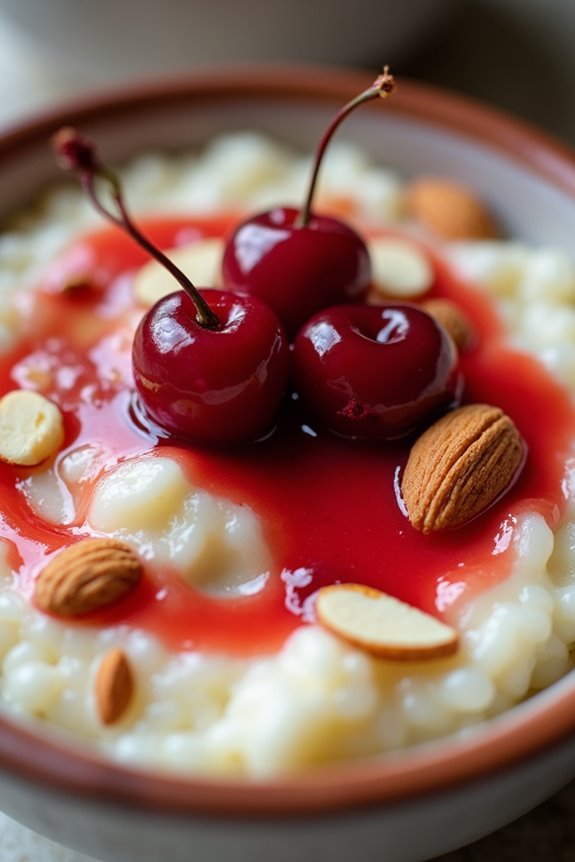
Risalamande is a traditional Danish dessert that brings the festive spirit to any table, particularly during Christmas celebrations. This creamy rice pudding, enriched with almond flavor and whipped cream, is often served with a cherry sauce, making it a delightful treat that balances sweetness with a touch of tartness. The dish is characterized by its smooth texture and the excitement of hidden whole almonds, which add an element of surprise and fun to the dining experience.
The origins of Risalamande trace back to the influence of French cuisine, but it has evolved into a beloved staple in Danish holiday traditions. Families often compete in a friendly game, where the person who finds the whole almond in their serving is awarded a prize. This charming custom adds to the joy of sharing this delicious dessert with loved ones.
Now, let’s plunge into making this delightful rice pudding with almonds at home!
Ingredients (Serves 4-6)
- 1 cup short-grain rice
- 4 cups whole milk
- 1/4 cup granulated sugar
- 1 teaspoon vanilla extract
- 1/2 teaspoon salt
- 1/2 cup sliced almonds (plus 1 whole almond for the game)
- 1 cup heavy whipping cream
- 2 tablespoons powdered sugar (for whipping cream)
- Cherry sauce (for serving)
Cooking Instructions
- Prepare the Rice: Rinse the short-grain rice under cold water to remove excess starch. This will help achieve a creamy texture during cooking. Place the rinsed rice in a large saucepan.
- Cook the Rice: Add the 4 cups of whole milk, 1/4 cup of granulated sugar, and 1/2 teaspoon of salt to the saucepan with the rice. Stir well to combine. Bring the mixture to a gentle boil over medium heat, then reduce the heat to low. Simmer for about 30-40 minutes, stirring occasionally, until the rice is tender and has absorbed most of the milk. Remove from heat and stir in 1 teaspoon of vanilla extract.
- Cool the Rice Mixture: Allow the rice pudding to cool to room temperature. Once cooled, cover it with plastic wrap and place it in the refrigerator for at least 2 hours, or until it’s well chilled.
- Prepare the Whipped Cream: In a mixing bowl, whip the heavy cream until soft peaks form. Gradually add 2 tablespoons of powdered sugar while continuing to whip until stiff peaks form. Be careful not to overwhip, as it can turn grainy.
- Combine Cream and Rice: Gently fold the whipped cream into the chilled rice pudding mixture. This will lighten the pudding and give it a fluffy texture. Make sure to do this carefully to maintain the airiness of the whipped cream.
- Add Almonds: Fold in the sliced almonds and the whole almond (which is hidden for the game). Mix just enough to distribute the almonds throughout the pudding without breaking them.
- Serve: Divide the Risalamande into serving bowls or glasses. Top each serving with a generous spoonful of cherry sauce. Enjoy the dessert chilled.
Extra Tips
When making Risalamande, it’s important to choose short-grain rice such as Arborio or sushi rice, as they create a creamier texture due to their higher starch content.
Additionally, if you prefer a richer flavor, consider using almond extract in place of some of the vanilla extract. To make the cherry sauce, you can use store-bought or homemade sauce; just confirm it’s tangy enough to balance the sweetness of the pudding.
Finally, be sure to keep the hidden almond tradition alive, as it adds an exciting twist to the meal!
Flødeboller: Cream Buns

Flødeboller, or cream buns, are a beloved Danish treat that combines a crunchy base with a light, fluffy topping and a glossy chocolate coating. Traditionally enjoyed with coffee or as a sweet snack, these delightful confections are perfect for any occasion, whether it’s a festive gathering or a casual afternoon treat. The combination of textures—from the crunchy biscuit base to the velvety cream filling and smooth chocolate glaze—makes flødeboller an irresistible dessert.
Making flødeboller can be a fun and rewarding experience, allowing you to impress friends and family with your culinary skills. While the process may seem a bit intricate, each step is manageable, and the results are well worth the effort. Once you’ve mastered this recipe, feel free to experiment with various toppings, flavors, or decorative elements to make your flødeboller unique.
Ingredients (Serves 4-6)
- 200g digestive biscuits (or any plain cookies)
- 100g unsalted butter, melted
- 4 egg whites
- 200g granulated sugar
- 1 tsp vanilla extract
- 1/4 tsp cream of tartar
- 200g dark chocolate, chopped
- 2 tbsp coconut oil (optional, for a glossier finish)
Cooking Instructions
- Prepare the Base: Start by preheating your oven to 180°C (350°F). Crush the digestive biscuits into fine crumbs, either by placing them in a zip-top bag and rolling them with a rolling pin or using a food processor. Combine the crushed biscuits with the melted butter in a bowl, mixing until well combined. Press the mixture into the bottom of tartlet cases or silicone molds, creating an even layer. Bake in the preheated oven for about 10 minutes, then allow to cool completely.
- Make the Meringue: In a large mixing bowl, add the egg whites and cream of tartar. Use an electric mixer to beat the egg whites on medium speed until soft peaks form. Gradually add the granulated sugar while continuing to beat on high speed until the meringue is glossy and stiff peaks form. This process usually takes about 5-7 minutes. Finally, mix in the vanilla extract until fully incorporated.
- Pipe the Meringue: Once the biscuit bases are completely cooled, it’s time to pipe the meringue. Using a piping bag or a zip-top bag with the corner snipped off, pipe the meringue onto each biscuit base in a swirl pattern, creating a nice height. You can make them as tall as you like, but aim for about 1-2 inches high.
- Bake the Meringue: Place the topped flødeboller back into the oven at 100°C (212°F) for about 1 hour. This will help to dry out the meringue and add a slight crispness to the outside. After an hour, turn off the oven and leave the flødeboller inside to cool completely.
- Prepare the Chocolate Coating: While the meringue cools, melt the dark chocolate and coconut oil together in a heatproof bowl set over a pot of simmering water (double boiler method). Stir until smooth and fully melted. Remove from heat and let cool slightly.
- Dip the Flødeboller: Once the meringue is completely cool, carefully dip each flødeboller into the melted chocolate, allowing the excess chocolate to drip off. Place them on a wire rack or parchment paper to set.
- Serve and Enjoy: Allow the chocolate to harden completely before serving. Flødeboller can be enjoyed immediately or stored in an airtight container for a few days.
Extra Tips
When making flødeboller, verify that your mixing bowls and utensils are completely free of any grease or fat, as this can affect the whipping of the egg whites.
For an extra twist, consider adding flavors to the meringue, such as a few drops of almond extract or a touch of lemon zest. Additionally, you can decorate the tops with sprinkles, shredded coconut, or crushed nuts for a more festive look.
Danish Cinnamon Buns (Kanelsnegle)
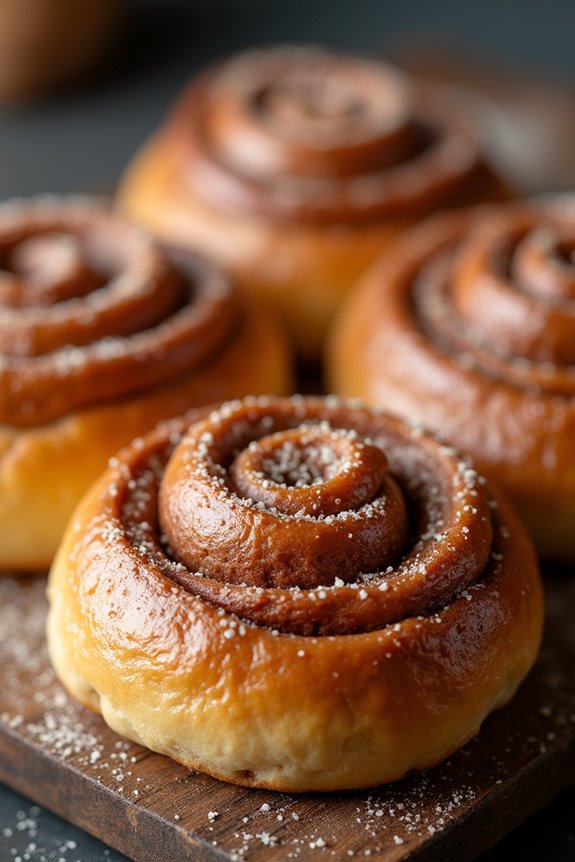
Danish Cinnamon Buns, or Kanelsnegle, are a beloved treat that embodies the warmth and comfort of Danish baking. These sweet, fluffy spirals are filled with a rich mixture of butter, sugar, and cinnamon, then rolled up and sliced into rounds before being baked to golden perfection. The result is a delightful pastry that’s soft on the inside with a slightly crispy exterior, often enjoyed fresh out of the oven or as a delightful accompaniment to coffee.
Making Kanelsnegle at home isn’t only rewarding but also fills your kitchen with an irresistible aroma. While it may seem intimidating at first, this recipe breaks down the process into manageable steps. With a little patience and love, you can create a batch of these delicious cinnamon buns that will surely impress family and friends.
Ingredients (Serves 4-6)
- 500g all-purpose flour
- 75g granulated sugar
- 10g salt
- 25g active dry yeast
- 250ml whole milk, lukewarm
- 75g unsalted butter, melted
- 1 large egg
- 100g brown sugar
- 2 tablespoons ground cinnamon
- 50g unsalted butter, softened (for filling)
- 1 egg (for egg wash)
- Pearl sugar or icing sugar (optional, for topping)
Cooking Instructions
1. Prepare the Dough: In a mixing bowl, combine the lukewarm milk and active dry yeast. Let it sit for about 5-10 minutes until it becomes frothy.
In a separate bowl, mix the flour, granulated sugar, and salt. Once the yeast is ready, add it to the flour mixture along with melted butter and the egg. Mix until a dough forms.
2. Knead the Dough: Transfer the dough onto a lightly floured surface and knead for about 8-10 minutes until the dough is smooth and elastic. You can also use a stand mixer with a dough hook attachment for this step.
Once kneaded, place the dough in a lightly greased bowl, cover it with a clean kitchen towel, and let it rise in a warm place for about 1 hour or until it has doubled in size.
3. Prepare the Filling: While the dough is rising, mix the softened butter, brown sugar, and ground cinnamon in a bowl until well combined. This will be your filling for the cinnamon buns.
4. Roll Out the Dough: After the dough has risen, punch it down to release the air. Roll it out on a floured surface into a rectangle approximately 40×60 cm (16×24 inches) and about 0.5 cm (1/4 inch) thick.
5. Spread the Filling: Evenly spread the cinnamon filling over the rolled dough, leaving a small border around the edges.
6. Roll and Cut the Dough: Starting from one long edge, carefully roll the dough into a tight log. Once rolled, slice the log into 12-15 equal pieces (about 3-4 cm each).
Place the sliced buns in a greased baking dish or lined with parchment paper, leaving some space in between for them to rise.
7. Second Rise: Cover the baking dish with a kitchen towel and let the buns rise again for about 30-45 minutes until they’ve puffed up.
8. Preheat the Oven: While the buns are rising, preheat your oven to 200°C (400°F).
9. Egg Wash: Beat the remaining egg and brush it over the tops of the buns for a golden finish.
10. Bake the Buns: Bake the cinnamon buns in the preheated oven for 15-20 minutes or until they’re golden brown and cooked through.
11. Cool and Serve: Once baked, remove the buns from the oven and let them cool slightly before serving.
If desired, sprinkle with pearl sugar or drizzle with icing sugar for an extra touch.
Extra Tips
For the best results, make sure that your milk is just warm, as hot milk can kill the yeast.
You can also experiment with different fillings by adding raisins or nuts to the mixture. If you prefer a richer flavor, consider adding a touch of vanilla extract to the filling.
These buns can be stored in an airtight container for a few days or frozen for longer storage, guaranteeing you can enjoy them anytime!
Boller I Karry: Meatballs in Curry

Boller I Karry, or meatballs in curry, is a beloved traditional Danish dish that infuses the comforting essence of meatballs with a warm, spicy curry sauce. This dish is perfect for both family dinners and gatherings, offering a delightful blend of flavors that appeal to both adults and children alike.
The meatballs are typically made with minced meat, seasoned with a mixture of spices, and simmered in a rich and creamy curry sauce, served alongside rice or potatoes. The dish’s origins can be traced back to the colonial times when spices were introduced to Danish cuisine, creating a unique fusion of flavors.
Today, Boller I Karry remains a staple in Danish households, cherished for its simplicity and heartiness. Whether you’re a seasoned cook or a beginner in the kitchen, this recipe will guide you through the steps to create this delicious dish.
Ingredients (Serves 4-6):
- 500g minced beef or pork
- 1 small onion, finely chopped
- 1 garlic clove, minced
- 1/2 cup breadcrumbs
- 1 egg
- Salt and pepper, to taste
- 2 tablespoons butter or oil for frying
- 2 tablespoons curry powder
- 400ml coconut milk
- 200ml beef or vegetable broth
- 1 tablespoon soy sauce
- 1 tablespoon flour (optional, for thickening)
- Fresh parsley or coriander, for garnish
- Cooked rice or potatoes, for serving
Cooking Instructions:
1. Prepare the Meatballs: In a large mixing bowl, combine the minced meat, finely chopped onion, minced garlic, breadcrumbs, egg, salt, and pepper. Mix well until all ingredients are thoroughly combined.
Form the mixture into small meatballs, about the size of a golf ball. Set aside.
2. Brown the Meatballs: Heat the butter or oil in a large skillet over medium heat. Once hot, add the meatballs in batches, being careful not to overcrowd the pan.
Cook for about 5-7 minutes or until they’re browned on all sides. Remove the meatballs from the skillet and set them aside on a plate.
3. Make the Curry Sauce: In the same skillet, add the curry powder and stir for about 30 seconds to release the flavors.
Then, pour in the coconut milk and beef or vegetable broth, stirring to combine. If you prefer a thicker sauce, you can sprinkle in the flour at this stage and whisk until smooth.
4. Simmer the Meatballs: Return the browned meatballs to the skillet with the curry sauce. Bring the mixture to a gentle simmer and let it cook for about 15-20 minutes, allowing the meatballs to cook through and absorb the flavors of the sauce.
Stir occasionally to prevent sticking.
5. Finish and Serve: Once the meatballs are cooked through, taste the sauce and adjust seasoning with soy sauce, salt, or pepper if needed.
Serve the Boller I Karry hot, garnished with fresh parsley or coriander, alongside cooked rice or potatoes.
Extra Tips:
When making Boller I Karry, feel free to experiment with the type of meat you use; chicken or turkey can also work well in place of beef or pork.
For an extra kick, consider adding a chopped chili or a splash of lime juice to the curry sauce. Additionally, let the dish sit for a few minutes after cooking; this allows the flavors to meld beautifully, making for an even more delicious meal. Enjoy your culinary journey into Danish cuisine!
Kartoffelsalat: Potato Salad
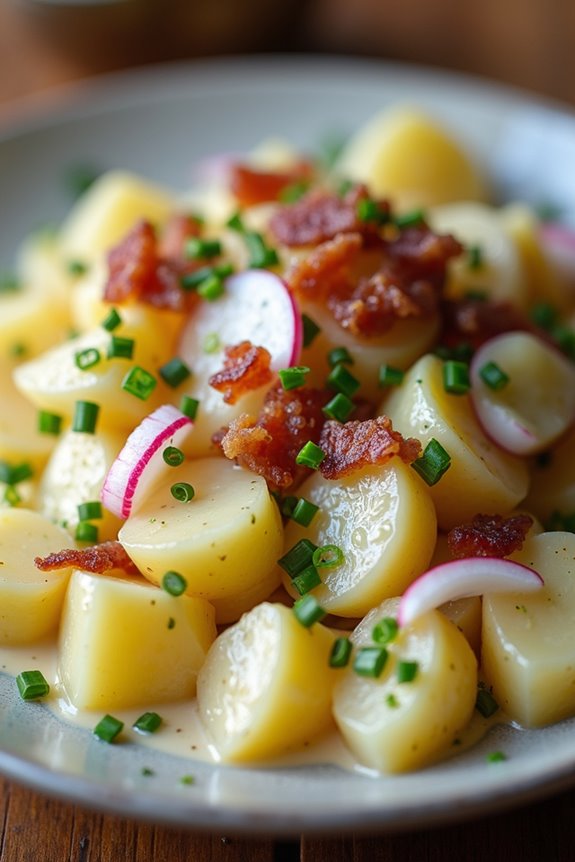
Kartoffelsalat, or Danish potato salad, is a beloved classic that brings comfort and nostalgia to many. This delightful dish features tender potatoes mixed with a creamy dressing, often accompanied by fresh herbs, onions, and sometimes even crispy bacon. Perfect for summer barbecues, picnics, or as a side dish for any meal, Kartoffelsalat is a versatile addition to your culinary repertoire. Its rich flavors and satisfying texture make it a favorite among both young and old.
This potato salad isn’t only delicious but also incredibly easy to make. With just a few simple ingredients, you can whip up a batch that will impress your family and friends. The key to a great Kartoffelsalat is using the right type of potatoes and allowing them to cool before mixing with the dressing. This recipe serves 4-6 people, making it ideal for gatherings or as a hearty side dish for your next meal.
Ingredients
- 1 kg (2.2 lbs) waxy potatoes (e.g., Yukon Gold or Red Bliss)
- 200 ml (about ¾ cup) mayonnaise
- 100 ml (about ⅓ cup) sour cream
- 1 tablespoon Dijon mustard
- 1 tablespoon apple cider vinegar
- 1 small red onion, finely chopped
- 3-4 radishes, thinly sliced
- 2-3 tablespoons fresh chives, chopped
- Salt and pepper to taste
- Optional: 100 g (3.5 oz) cooked bacon, chopped
Cooking Instructions
- Prepare the Potatoes: Start by washing the potatoes thoroughly to remove any dirt. Place them in a large pot and cover with cold water. Add a generous pinch of salt to the water. Bring to a boil over medium-high heat and cook until the potatoes are tender but still firm, about 15-20 minutes. Test doneness by inserting a fork; it should go in easily but not break apart.
- Cool the Potatoes: Once cooked, drain the potatoes in a colander and let them cool for about 10-15 minutes. This cooling period is crucial as it allows the potatoes to firm up a bit, making them easier to chop later.
- Make the Dressing: While the potatoes are cooling, prepare the dressing. In a mixing bowl, combine the mayonnaise, sour cream, Dijon mustard, and apple cider vinegar. Whisk the ingredients together until smooth and well blended. Season with salt and pepper to taste.
- Chop the Ingredients: Once the potatoes are cool enough to handle, peel them if desired (the skin can be left on for added texture) and cut them into bite-sized pieces. In a large bowl, add the chopped potatoes, red onion, radishes, and chives.
- Combine Everything: Pour the dressing over the potato mixture and gently fold everything together until the potatoes are well coated. Be careful not to mash the potatoes; you want to keep them intact for texture.
- Chill and Serve: Cover the bowl with plastic wrap and refrigerate for at least 1 hour before serving. This allows the flavors to meld beautifully. Before serving, give it a gentle stir and adjust seasoning if needed. If using, sprinkle the cooked bacon on top before serving.
Extra Tips
When making Kartoffelsalat, consider using a mix of potatoes for varied texture and flavor. Waxy potatoes hold their shape well, making them ideal for salads. For added freshness, you can include diced cucumbers or bell peppers. If you prefer a lighter version, substitute Greek yogurt for sour cream. Always taste and adjust the seasoning just before serving to ascertain the salad is perfectly seasoned.
Æbleflæsk: Apples and Bacon
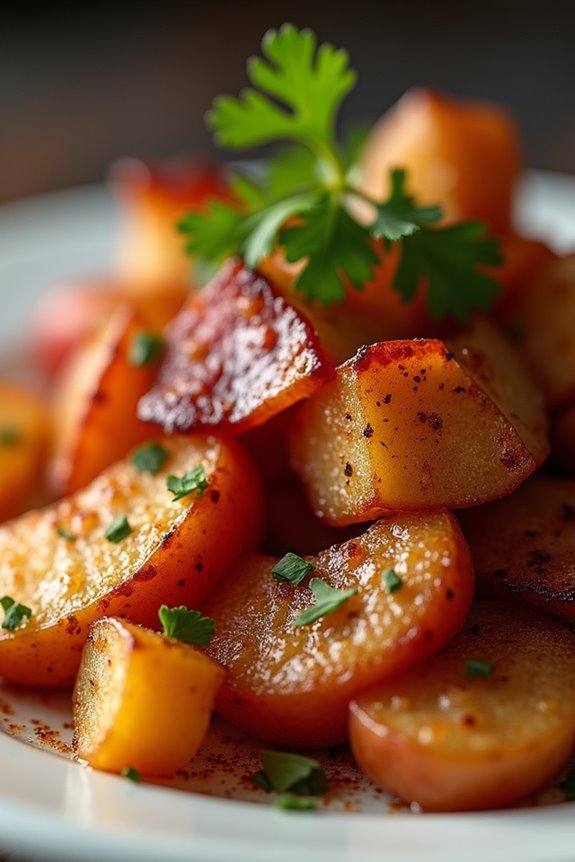
Æbleflæsk is a classic Danish dish that combines the savory flavor of bacon with the sweet and tangy taste of apples. This delightful dish has roots in traditional Danish cuisine, often served during festive occasions or family gatherings.
It’s a perfect blend of flavors and textures, making it a beloved comfort food in Denmark. The combination of crispy bacon and tender apples is both satisfying and delicious, appealing to a wide range of palates.
Making Æbleflæsk is relatively simple and requires only a handful of ingredients, yet it results in a dish that feels special and indulgent. This recipe will yield enough to serve 4-6 people, making it an ideal choice for a cozy dinner or a festive gathering.
Whether enjoyed on its own or as a side to a larger meal, Æbleflæsk is sure to captivate with its rich flavors and aromatic scent.
Ingredients (serving size: 4-6 people):
- 500g (about 1 lb) of thick-cut bacon
- 4 medium-sized apples (preferably tart varieties like Granny Smith or Jonagold)
- 2 tablespoons of brown sugar
- 1 teaspoon of ground cinnamon
- 2 tablespoons of butter
- Fresh parsley (for garnish, optional)
Cooking Instructions:
- Prepare the Ingredients: Start by gathering all the necessary ingredients. Slice the bacon into small pieces, about 1 inch in length. Core and slice the apples into wedges. This will guarantee even cooking and distribution of flavors.
- Cook the Bacon: In a large skillet over medium heat, add the sliced bacon. Cook the bacon for about 5-7 minutes, stirring occasionally, until it becomes crispy and golden brown. Once done, use a slotted spoon to remove the bacon from the pan and set it aside on a paper towel-lined plate to drain excess grease.
- Sauté the Apples: In the same skillet with the rendered bacon fat, reduce the heat to medium-low and add the butter. Once melted, add the apple wedges to the skillet. Sprinkle the brown sugar and cinnamon over the apples. Sauté the apples for about 8-10 minutes, stirring occasionally, until they’re tender and caramelized.
- Combine Bacon and Apples: Once the apples are cooked, return the crispy bacon to the skillet. Stir gently to mix the bacon with the sautéed apples, allowing the flavors to meld together. Cook for an additional 2-3 minutes.
- Serve and Garnish: Remove the skillet from the heat. Transfer the Æbleflæsk to a serving dish, and if desired, garnish with freshly chopped parsley for a burst of color and freshness. Serve warm.
Extra Tips:
When selecting apples for Æbleflæsk, aim for varieties that provide a balance of sweetness and tartness to complement the salty bacon.
If you prefer a bit of spice, consider adding a pinch of nutmeg or cardamom along with the cinnamon for an extra layer of flavor. This dish pairs wonderfully with rye bread or as a side to roasted meats, making it versatile for various occasions.
Enjoy your cooking experience and the delightful flavors of this traditional Danish recipe!