

With the holiday season just around the corner, the urge to bake delicious cookies is stronger than ever. The warm, comforting scent of spices wafting through the kitchen is pure joy, especially with German cookies on the menu. Santa might even prefer these chewy delights over his usual milk and cookies routine. If you’re looking for standout recipes, I’ve gathered some top picks that will surely make your holiday gatherings memorable. Let’s explore these festive treats together!
Lebkuchen: The Classic Spiced Gingerbread

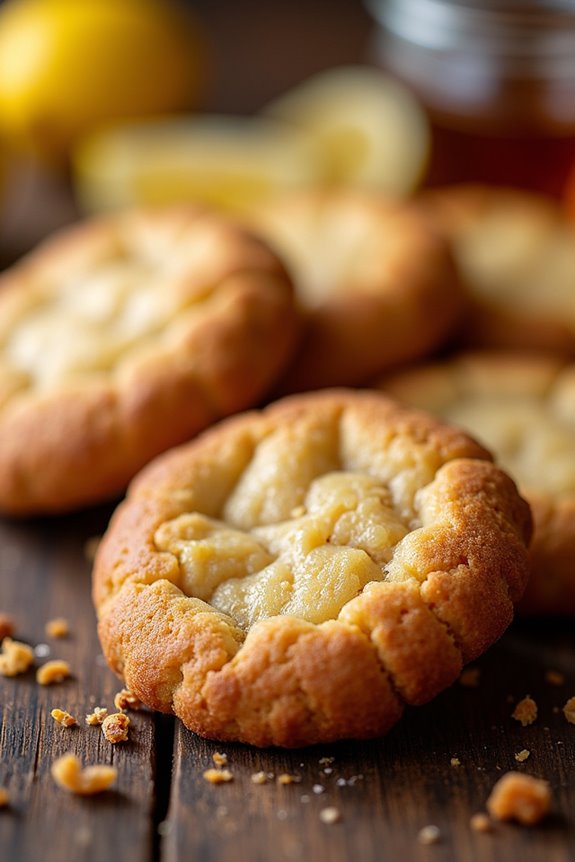
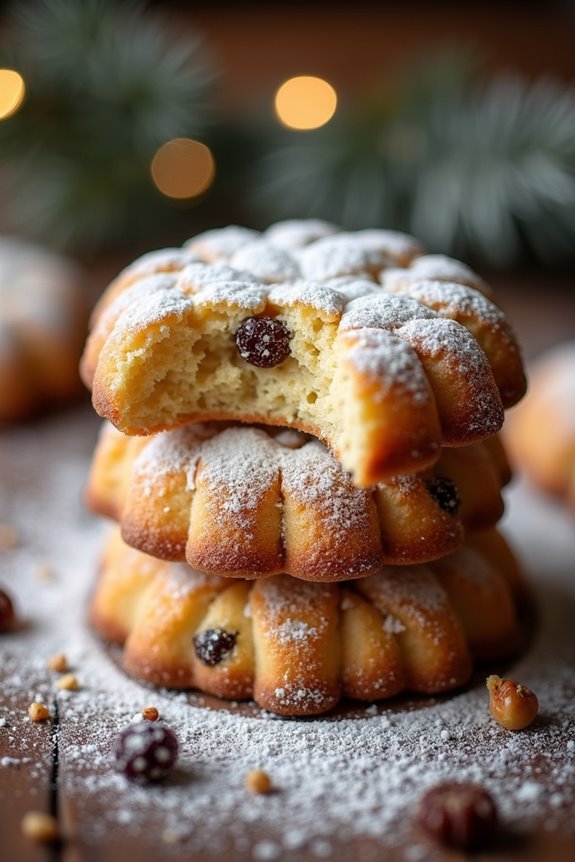
Lebkuchen, a traditional German cookie, is a delightful treat that captures the essence of the holiday season. Often associated with Christmas markets, these spiced gingerbread cookies come in various shapes and sizes, often decorated with icing or chocolate. The unique blend of spices—such as cinnamon, nutmeg, and cloves—combined with a hint of sweetness from honey and sugar, makes Lebkuchen a beloved favorite for many.
They aren’t just cookies; they’re a warm embrace of comfort and nostalgia, perfect for sharing with family and friends.
Making Lebkuchen is a delightful experience that fills your kitchen with enticing aromas. The dough can be made ahead of time, allowing the flavors to meld beautifully. Once baked, these cookies can be stored for weeks, and their flavors only improve with time.
Whether you enjoy them plain or adorned with icing, Lebkuchen is a classic treat that brings joy and warmth to any gathering.
Ingredients (Serves 4-6)
- 2 cups all-purpose flour
- 1 teaspoon baking powder
- 1 tablespoon ground cinnamon
- 1 teaspoon ground ginger
- 1/2 teaspoon ground cloves
- 1/2 teaspoon ground nutmeg
- 1/4 teaspoon salt
- 1/2 cup honey
- 1/2 cup brown sugar, packed
- 1 large egg
- 1 cup finely chopped nuts (walnuts or almonds)
- 1/2 cup candied orange peel, finely chopped (optional)
- Icing or chocolate for decoration (optional)
Cooking Instructions
- Prepare the Dry Ingredients: In a large mixing bowl, whisk together the flour, baking powder, spices (cinnamon, ginger, cloves, nutmeg), and salt. This step guarantees that the spices and leavening agent are evenly distributed throughout the flour, which is vital for the flavor and texture of the cookies.
- Mix the Wet Ingredients: In a separate bowl, combine the honey, brown sugar, and egg. Beat them together until the mixture is smooth and well combined. This step helps to dissolve the sugar and creates a cohesive mixture that will blend well with the dry ingredients.
- Combine Wet and Dry Mixtures: Gradually add the wet mixture to the dry ingredients, stirring until a sticky dough forms. If you find the dough too sticky, you can add a little more flour, but be careful not to overwork it. It’s important to achieve a dough that holds together but remains soft and pliable.
- Incorporate Nuts and Orange Peel: Gently fold in the chopped nuts and candied orange peel (if using) until they’re evenly distributed throughout the dough. This adds texture and depth of flavor to your Lebkuchen.
- Chill the Dough: Cover the bowl with plastic wrap and refrigerate the dough for at least 1 hour, or overnight if possible. Chilling the dough helps to firm it up, making it easier to shape and cut once ready to bake.
- Preheat the Oven: Preheat your oven to 350°F (175°C) and line baking sheets with parchment paper. A properly preheated oven guarantees that the cookies bake evenly.
- Shape the Cookies: Roll out the chilled dough on a floured surface to about 1/4 inch thick. Use cookie cutters to cut out shapes, or simply slice the dough into squares or rectangles. Place the cut cookies on the prepared baking sheets, leaving some space between them.
- Bake: Bake the cookies in the preheated oven for about 10-12 minutes, or until they’re lightly browned on the edges. Keep an eye on them to prevent overbaking. The cookies will firm up as they cool.
- Cool and Decorate: Allow the cookies to cool on the baking sheets for a few minutes before transferring them to a wire rack to cool completely. Once cooled, you can decorate them with icing or chocolate if desired.
Extra Tips
When making Lebkuchen, consider letting the cookies rest for a day or two before enjoying them. This allows the flavors to develop and intensify, making them even more delicious.
Additionally, you can experiment with different spices or add a dash of almond extract for a unique twist on the classic recipe. Store your Lebkuchen in an airtight container to keep them soft and chewy for weeks, and don’t hesitate to share them with loved ones to spread the joy!
Springerle: Anise-Flavored Delight

Springerle are traditional German cookies known for their beautiful designs and anise flavor. Originating from the regions of Germany, these cookies are often prepared during festive occasions and are cherished for their unique taste and texture. The dough is typically rolled out and stamped with intricate molds, creating visually appealing treats that are as delightful to look at as they’re to eat. The secret to their chewy texture lies in the resting period after baking, allowing the flavors to meld and the cookies to soften.
To make Springerle, you’ll need to gather a few simple ingredients that come together to create this classic treat. While the preparation may seem a bit involved, the process is quite rewarding. The distinct aroma of anise fills the kitchen as you whip up this delicious dough, and the anticipation of enjoying these cookies is half the fun. Whether shared with family and friends or enjoyed during the holidays, Springerle cookies are sure to become a beloved recipe in your collection.
Ingredients (Serves 4-6)
- 4 cups all-purpose flour
- 1 teaspoon baking powder
- 1 cup granulated sugar
- 4 large eggs
- 2 teaspoons anise extract
- 1 teaspoon finely grated lemon zest
- 1/4 cup whole anise seeds
- Powdered sugar (for dusting)
Cooking Instructions
- Prepare the Dough: In a mixing bowl, combine the flour and baking powder. In a separate bowl, beat the eggs and sugar together until the mixture is thick and light in color. Add the anise extract and lemon zest, mixing well. Gradually add the flour mixture to the egg mixture, stirring until a soft dough forms.
- Incorporate Anise Seeds: Gently fold in the whole anise seeds into the dough. This will enhance the flavor and provide little bursts of anise in every bite.
- Chill the Dough: Once the dough is well combined, wrap it in plastic wrap and refrigerate for at least 2 hours, or overnight. Chilling the dough helps to firm it up, making it easier to roll out.
- Roll Out and Cut: On a lightly floured surface, roll out the chilled dough to about 1/4 inch thickness. Use Springerle molds or cookie cutters to cut out shapes. Be sure to press firmly to create the designs.
- Dry the Cookies: Place the cut cookies on a baking sheet lined with parchment paper. Allow them to air dry for at least 24 hours. This step is crucial for achieving the characteristic texture of Springerle.
- Bake the Cookies: Preheat your oven to 350°F (175°C). Bake the cookies for about 12-15 minutes, or until they’re set but not browned. The cookies should retain their white color.
- Cool and Dust: Once baked, remove the cookies from the oven and allow them to cool on the baking sheet for a few minutes before transferring them to a wire rack. Once completely cool, dust with powdered sugar for an elegant finish.
Extra Tips
When making Springerle, it’s important to verify that your dough is well chilled before rolling it out to prevent it from becoming too sticky. Additionally, investing in quality molds can enhance the visual appeal of your cookies.
If you’re looking to experiment with flavors, you can infuse the dough with other spices such as cardamom or cinnamon. Storing the cookies in an airtight container will help maintain their freshness, and the flavors will continue to develop over time. Enjoy the process and the delightful aroma that fills your kitchen!
Zimtsterne: Cinnamon Stars
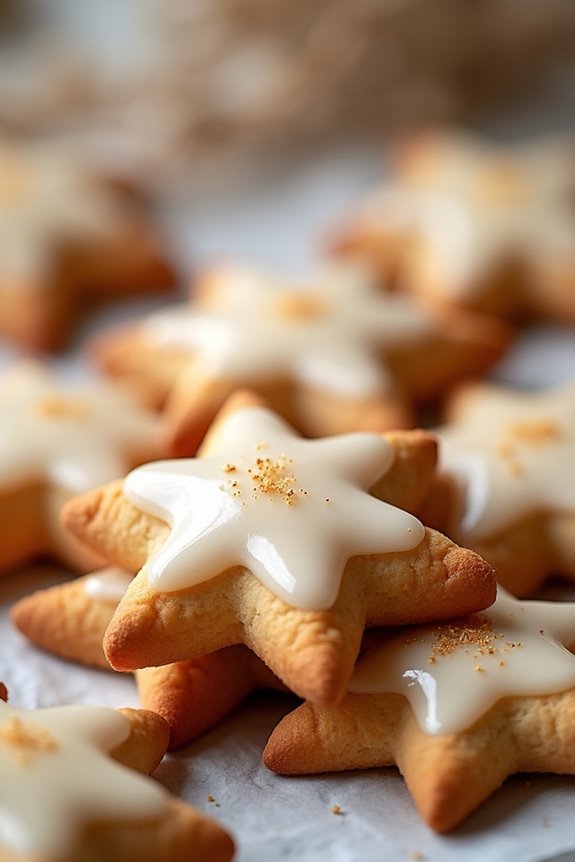
Zimtsterne, or cinnamon stars, are a delightful German cookie that captures the essence of holiday baking with their aromatic blend of spices and nutty flavor. These chewy, almond-based cookies aren’t only a festive treat but also a charming addition to any dessert table.
Traditionally enjoyed during Christmas, these cookies are easy to make and will fill your home with a warm, inviting scent that brings everyone together.
The star-shaped cookies are typically adorned with a sweet glaze made from egg whites and powdered sugar, adding a glossy finish that contrasts beautifully with their chewy texture. With their delicate balance of sweetness and spice, Zimtsterne are a must-try for anyone looking to indulge in a classic German treat this holiday season.
Ingredients (Serves 4-6):
- 2 cups ground almonds
- 1 cup powdered sugar
- 2 teaspoons ground cinnamon
- 2 large egg whites
- 1/2 teaspoon almond extract
- A pinch of salt
- Additional powdered sugar for dusting
Cooking Instructions:
- Prepare the Oven and Baking Sheet: Preheat your oven to 350°F (175°C). Line a baking sheet with parchment paper to prevent the cookies from sticking and to guarantee even baking.
- Mix Dry Ingredients: In a large bowl, combine the ground almonds, powdered sugar, and ground cinnamon. This mixture will form the base of your cookie dough, providing both flavor and texture.
- Whip Egg Whites: In a separate bowl, beat the egg whites until they form stiff peaks. This means when you lift the whisk, the peaks should hold their shape without collapsing. This step is vital for achieving the chewy texture of the cookies.
- Combine Mixtures: Gently fold the whipped egg whites into the dry almond mixture. Add the almond extract and a pinch of salt, then carefully mix until just combined. Be cautious not to deflate the egg whites too much while folding.
- Roll and Cut Out Cookies: Dust your work surface and rolling pin with powdered sugar to prevent sticking. Roll out the dough to about 1/4 inch thick. Use a star-shaped cookie cutter to cut out the cookies and place them on the prepared baking sheet.
- Glaze the Cookies: In a small bowl, prepare the glaze by mixing additional powdered sugar with a little water until it reaches a thick, spreadable consistency. Brush the glaze on top of each star-shaped cookie to give them a shiny finish.
- Bake: Place the baking sheet in the preheated oven and bake for about 10-12 minutes, or until the cookies are lightly golden and firm to the touch. Be careful not to overbake, as you want them to remain chewy.
- Cool and Serve: Once baked, remove the cookies from the oven and allow them to cool on the baking sheet for a few minutes before transferring them to a wire rack to cool completely. Enjoy your Zimtsterne with a warm beverage or as part of a festive dessert platter.
Extra Tips: When making Zimtsterne, it’s important to use finely ground almonds for the best texture. If you can’t find ground almonds, you can easily make your own by pulsing blanched almonds in a food processor until finely ground.
Also, for an extra burst of flavor, feel free to add a pinch of nutmeg or a drop of vanilla extract to the dough. These cookies are best enjoyed fresh but can be stored in an airtight container for up to a week, making them a perfect make-ahead treat for the holidays.
Vanillekipferl: Vanilla Crescent Cookies
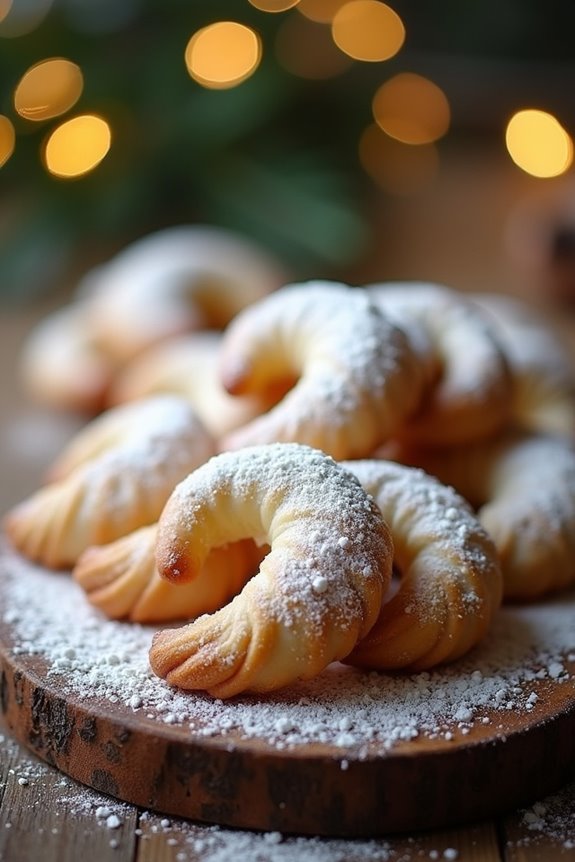
Vanillekipferl, or Vanilla Crescent Cookies, are a beloved traditional German treat that perfectly embody the essence of holiday baking. These delicate cookies are made from a simple dough enriched with ground almonds or hazelnuts, which gives them a lovely nutty flavor.
Once baked, they’re coated in a generous dusting of powdered sugar mixed with vanilla, resulting in a delightful sweetness that pairs beautifully with a cup of tea or coffee. Their crescent shape isn’t only charming but also makes them a fun project for bakers of all ages.
The key to perfect Vanillekipferl lies in the balance of ingredients and the technique used in shaping them. It’s important to handle the dough gently to keep the cookies tender and chewy.
These cookies are typically enjoyed during the festive season, but their delightful flavor makes them a year-round favorite. Whether you’re sharing them with loved ones or savoring them for yourself, Vanillekipferl will surely bring a touch of warmth and joy to your baking repertoire.
Ingredients (Serves 4-6 people)
- 1 cup (125g) all-purpose flour
- 1/2 cup (60g) ground almonds or hazelnuts
- 1/4 cup (30g) powdered sugar
- 1/2 cup (115g) unsalted butter, softened
- 1 teaspoon vanilla extract
- 1/4 teaspoon salt
- 1/2 cup (60g) powdered sugar (for dusting)
- 1 teaspoon vanilla sugar or additional vanilla extract (for dusting)
Cooking Instructions
1. Prepare the Dough: In a large mixing bowl, combine the all-purpose flour, ground almonds or hazelnuts, powdered sugar, and salt. Whisk the dry ingredients together until well-mixed.
Then, add the softened butter and vanilla extract to the dry mixture. Using your hands, mix until the dough comes together—it should be soft but not sticky.
2. Chill the Dough: Once the dough is combined, shape it into a ball and wrap it in plastic wrap. Refrigerate the dough for at least 30 minutes.
Chilling the dough will make it easier to handle when forming the cookies.
3. Shape the Cookies: Preheat your oven to 350°F (175°C) and line a baking sheet with parchment paper. Remove the chilled dough from the refrigerator.
Take small portions of dough (about a tablespoon) and roll them into small logs, then gently bend them into crescent shapes. Place the shaped cookies on the prepared baking sheet, leaving some space between each.
4. Bake the Cookies: Bake the Cookies in the preheated oven for approximately 10-15 minutes, or until they’re lightly golden on the edges.
Keep a close eye on them, as they can quickly turn too dark.
5. Dust with Sugar: While the cookies are baking, mix the powdered sugar and vanilla sugar (or extract) in a shallow dish.
Once the cookies are done, remove them from the oven and let them cool for a few minutes on the baking sheet. While they’re still warm, gently coat each cookie in the sugar mixture, affirming they’re well covered.
6. Cool and Store: Allow the cookies to cool completely on a wire rack before storing them in an airtight container.
They’ll keep well for several weeks, although they’re often eaten much sooner!
Extra Tips
For an added depth of flavor, consider toasting the ground nuts lightly before incorporating them into the dough.
This will enhance their nuttiness and give your Vanillekipferl an extra layer of richness. Additionally, if you’re feeling adventurous, try adding a pinch of cinnamon or a dash of almond extract to the dough for a unique twist.
Remember to handle the cookies gently, as they’re fragile; this will guarantee they maintain their lovely shape and tender texture. Enjoy your baking!
Pfeffernüsse: Spiced Pepper Nut Cookies
Pfeffernüsse, a beloved German cookie, are delightful treats that bring warmth and spice to your holiday gatherings. These chewy cookies are characterized by their unique blend of spices, including cinnamon, cloves, and nutmeg, which create a rich flavor profile that pairs perfectly with their slightly crisp exterior and soft, tender centers.
Traditionally enjoyed during the Christmas season, Pfeffernüsse are often dusted with powdered sugar, making them not only tasty but also visually appealing.
Making Pfeffernüsse is a delightful experience, as the aroma of spices fills your kitchen, transporting you to a festive atmosphere. With a straightforward recipe and easily accessible ingredients, you can whip up these charming cookies in no time.
Whether served alongside a steaming cup of tea or coffee or given as gifts, these cookies are sure to spread joy during the holiday season and beyond.
Ingredients (Serves 4-6 people):
- 2 cups all-purpose flour
- 1 teaspoon baking powder
- 1 teaspoon ground cinnamon
- 1 teaspoon ground cloves
- 1 teaspoon ground nutmeg
- 1/2 teaspoon ground ginger
- 1/4 teaspoon black pepper
- 1/4 teaspoon salt
- 1/2 cup unsalted butter, softened
- 1 cup granulated sugar
- 1 large egg
- 1/4 cup molasses
- 1/4 cup chopped nuts (such as almonds or hazelnuts)
- Powdered sugar (for dusting)
Cooking Instructions:
- Prepare the Dry Ingredients: In a large mixing bowl, combine the all-purpose flour, baking powder, ground cinnamon, ground cloves, ground nutmeg, ground ginger, black pepper, and salt. Whisk together these dry ingredients until well blended, guaranteeing that there are no lumps. This step is essential as it evenly distributes the spices throughout the dough.
- Cream the Butter and Sugar: In another bowl, beat the softened unsalted butter and granulated sugar together until the mixture is light and fluffy. This process usually takes about 3-4 minutes with an electric mixer. Creaming the butter and sugar properly creates a light texture in the cookies and helps them rise during baking.
- Incorporate the Egg and Molasses: Add the large egg and molasses to the butter-sugar mixture. Beat until fully combined, guaranteeing that the egg is thoroughly mixed in. This step adds moisture to the cookies and a rich flavor from the molasses.
- Combine Wet and Dry Ingredients: Gradually add the dry ingredients to the wet ingredients, mixing on low speed until just combined. Don’t overmix; you want the dough to be slightly sticky but firm enough to hold its shape. Fold in the chopped nuts at this stage for added texture and flavor.
- Chill the Dough: Cover the cookie dough with plastic wrap and refrigerate for at least 1 hour. Chilling the dough helps the flavors meld together and makes it easier to handle when shaping the cookies.
- Shape and Bake: Preheat your oven to 350°F (175°C). Once chilled, scoop tablespoon-sized portions of dough and roll them into small balls. Place them on a lined baking sheet, leaving space between each cookie to allow for spreading. Bake for 10-12 minutes or until the edges are firm but the centers remain soft.
- Dust with Powdered Sugar: After removing the cookies from the oven, allow them to cool on the baking sheet for a few minutes before transferring them to a wire rack. While still warm, dust them generously with powdered sugar for that classic appearance and added sweetness.
Extra Tips: When making Pfeffernüsse, feel free to adjust the spices to your liking; adding a bit more cinnamon or nutmeg can enhance the flavor. Confirm that your butter is at room temperature for easier creaming, and consider using fresh spices for a more intense flavor.
If you want to make these cookies ahead of time, they freeze well; just be sure to store them in an airtight container. Enjoy them fresh or allow them to sit for a day to let the flavors develop even further!
Keks Mit Schokolade: Chocolate-Dipped Cookies

Indulge in the delightful experience of Keks Mit Schokolade, a classic German treat that embodies the perfect combination of chewy texture and rich chocolate flavor. These cookies aren’t only simple to make, but they’re also a crowd-pleaser that can be enjoyed by friends and family alike.
The chocolate coating adds an extra layer of decadence, making them an irresistible addition to any dessert table or a sweet treat to enjoy with your afternoon coffee. This recipe yields approximately 4-6 servings, making it perfect for sharing or for enjoying over a few days if you can resist the temptation!
With a few staple ingredients and straightforward steps, you’ll be able to whip up these delicious cookies in no time. So, let’s plunge into the world of Keks Mit Schokolade and get those ovens preheated!
Ingredients:
- 1 cup (225g) unsalted butter, softened
- 1 cup (200g) granulated sugar
- 1/2 cup (100g) brown sugar, packed
- 2 large eggs
- 1 teaspoon vanilla extract
- 2 cups (240g) all-purpose flour
- 1/2 teaspoon baking soda
- 1/4 teaspoon salt
- 1 cup (175g) chocolate chips, semi-sweet or dark
- 1 cup (175g) chocolate for dipping (dark or milk chocolate)
Cooking Instructions:
1. Preheat the Oven: Begin by preheating your oven to 350°F (180°C). This step is essential as it guarantees that your cookies bake evenly and achieve that perfect chewy texture.
2. Cream the Butter and Sugars: In a large mixing bowl, combine the softened unsalted butter, granulated sugar, and brown sugar. Using an electric mixer or a whisk, cream the mixture until it becomes light and fluffy, which should take about 2-3 minutes.
This step incorporates air into the batter, leading to a lighter, chewier cookie.
3. Add Eggs and Vanilla: Beat in the eggs one at a time, making sure each egg is fully incorporated before adding the next. Add the vanilla extract and mix until combined.
The eggs help bind the ingredients together and contribute to the overall texture of the cookies.
4. Combine Dry Ingredients: In a separate bowl, whisk together the all-purpose flour, baking soda, and salt. Gradually add the dry mixture to the wet ingredients, mixing just until combined.
Avoid overmixing, as this can lead to tougher cookies.
5. Fold in Chocolate Chips: Gently fold in the chocolate chips until they’re evenly distributed throughout the dough.
The chocolate chips will melt slightly during baking, adding pockets of gooey chocolate to your cookies.
6. Scoop and Bake: Line a baking sheet with parchment paper. Using a cookie scoop or tablespoon, drop dollops of dough onto the prepared sheet, spacing them about 2 inches apart.
Bake in the preheated oven for 10-12 minutes, or until the edges are lightly golden. The centers may still look soft—this is what gives them that chewy texture!
7. Cool and Dip in Chocolate: Once baked, remove the cookies from the oven and allow them to cool on the baking sheet for 5 minutes before transferring them to a wire rack to cool completely.
Meanwhile, melt the chocolate for dipping in a microwave-safe bowl, heating in 30-second intervals and stirring until smooth.
8. Dip and Set: Once the cookies are cool, dip half of each cookie into the melted chocolate, allowing any excess to drip off.
Place the dipped cookies back on the wire rack or a parchment-lined tray. Let the chocolate set at room temperature, or speed up the process by placing them in the refrigerator for about 15-20 minutes.
Extra Tips:
When preparing Keks Mit Schokolade, be sure to use room temperature ingredients, as this helps achieve the desired texture.
If you want to experiment with flavors, consider adding a pinch of cinnamon or a handful of chopped nuts to the dough for added crunch. Additionally, if you find the dough too soft to scoop, chill it in the refrigerator for about 30 minutes.
These cookies can be stored in an airtight container for up to a week, making them a convenient treat to have on hand for unexpected guests or a sweet indulgence for yourself!
Nusstaler: Nutty Discs

Nusstaler, or Nutty Discs, are a delightful German treat that perfectly embodies the essence of homemade cookies. These chewy cookies aren’t only packed with the rich flavors of nuts, but they also have a satisfying texture that makes them hard to resist. Ideal for sharing with friends and family, Nusstaler are perfect for any occasion, whether it’s a cozy afternoon tea or a festive gathering.
With their unique shape and delectable taste, these cookies will surely impress everyone at the table. The combination of ground nuts and a hint of spice creates a warm, inviting aroma as they bake, making your kitchen feel like a cozy German bakery.
The recipe is straightforward, and with just a few simple ingredients, you’ll be able to whip up a batch that’s as enjoyable to make as it’s to eat. Gather your ingredients, roll up your sleeves, and let’s plunge into the world of Nusstaler!
Ingredients (Serves 4-6):
- 1 cup ground hazelnuts (or almonds)
- 1/2 cup all-purpose flour
- 1/2 cup powdered sugar
- 1/4 teaspoon ground cinnamon
- 1/4 teaspoon salt
- 2 large egg whites
- 1 teaspoon vanilla extract
- 1/2 cup chocolate chips (optional, for drizzling)
- Chopped nuts for topping (optional)
Cooking Instructions:
- Preheat the Oven: Begin by preheating your oven to 350°F (175°C). This guarantees that your cookies will bake evenly and have that perfect chewy texture when they come out.
- Mix Dry Ingredients: In a medium bowl, combine the ground hazelnuts, all-purpose flour, powdered sugar, cinnamon, and salt. Whisk these dry ingredients together until they’re well blended. This step helps to confirm that the flavors are evenly distributed throughout the dough.
- Prepare Egg Whites: In a separate bowl, beat the egg whites until they’re frothy, but not stiff. This helps to incorporate air into the mixture, giving the cookies a light and chewy texture.
- Combine Mixtures: Gently fold the frothy egg whites and vanilla extract into the dry ingredients. Use a spatula to mix until just combined. Be careful not to overmix, as this can lead to denser cookies.
- Shape the Cookies: Line a baking sheet with parchment paper. Using a spoon or cookie scoop, drop rounded tablespoons of the dough onto the prepared baking sheet, spacing them about 2 inches apart. If desired, sprinkle chopped nuts on top of each cookie for an added crunch.
- Bake: Place the baking sheet in the preheated oven and bake for about 15-20 minutes or until the cookies are lightly golden around the edges. Keep an eye on them to prevent overbaking.
- Cool and Drizzle: Once baked, remove the cookies from the oven and let them cool on the baking sheet for a few minutes before transferring them to a wire rack. If you want to add chocolate, melt the chocolate chips in a microwave-safe bowl and drizzle it over the cooled cookies.
Extra Tips:
When making Nusstaler, feel free to experiment with different types of nuts based on your personal preference; walnuts or pecans can also work beautifully.
Additionally, for a more intense flavor, consider toasting the nuts before grinding them. This will enhance their natural oils and give your cookies a richer taste.
Finally, storing the cookies in an airtight container will keep them fresh for longer, allowing you to enjoy your Nusstaler for days to come!
Butterplätzchen: Buttery Cut-Out Cookies
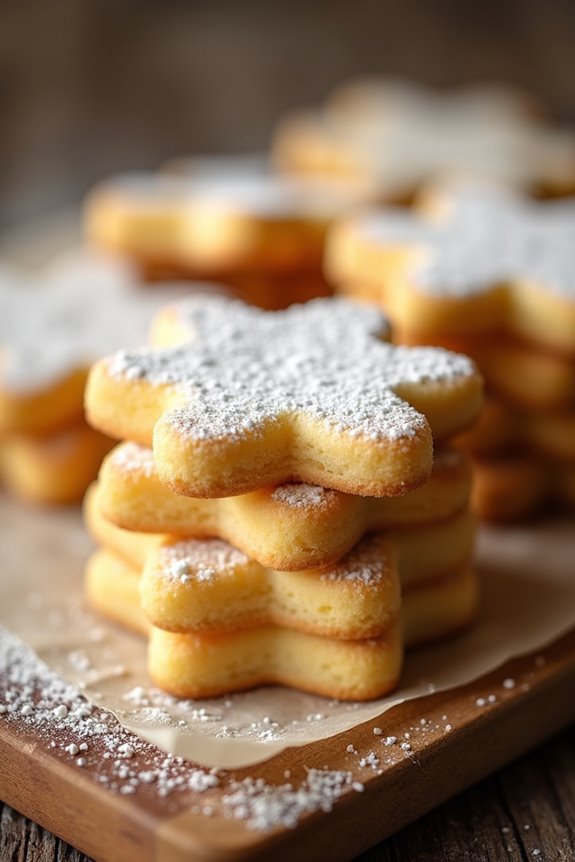
Butterplätzchen, or buttery cut-out cookies, are a beloved German treat that showcases the beauty of simplicity. With a rich, buttery flavor and a tender crumb, these cookies are perfect for any occasion, be it a festive celebration or a cozy afternoon snack. Their versatility allows for endless creativity in decorating, making them a favorite among both kids and adults. Traditionally, these cookies are cut into fun shapes and can be adorned with icing, sprinkles, or enjoyed plain with a dusting of powdered sugar.
Making Butterplätzchen is a straightforward process that requires only a few basic ingredients. The dough is easy to work with, and the cookies bake to a lovely golden hue. Once cooled, they can be stored in an airtight container, making them a perfect make-ahead treat. Whether you choose to serve them at a holiday gathering or simply enjoy them with a cup of tea, these cookies are sure to delight.
Ingredients (Serves 4-6 People)
- 250g (2 cups) all-purpose flour
- 125g (1/2 cup) unsalted butter, softened
- 100g (1/2 cup) granulated sugar
- 1 large egg
- 1 teaspoon vanilla extract
- 1/2 teaspoon baking powder
- A pinch of salt
- Powdered sugar (for dusting, optional)
Cooking Instructions
- Prepare the Dough: In a large mixing bowl, cream together the softened butter and granulated sugar using an electric mixer or a wooden spoon until the mixture is light and fluffy. This process incorporates air into the butter, which helps create a tender texture in the cookies.
- Add Egg and Vanilla: Once the butter and sugar are well combined, add the egg and vanilla extract to the mixture. Beat until fully incorporated. The egg adds moisture and richness, while the vanilla enhances the flavor.
- Combine Dry Ingredients: In a separate bowl, whisk together the all-purpose flour, baking powder, and a pinch of salt. This step guarantees that the leavening agent is evenly distributed throughout the flour, which is vital for achieving the right texture in your cookies.
- Mix Dry and Wet Ingredients: Gradually add the dry ingredient mixture to the butter mixture, stirring until the dough comes together. Be careful not to overmix; you want to combine the ingredients just until a soft dough forms.
- Chill the Dough: Wrap the dough in plastic wrap and refrigerate for at least 30 minutes. Chilling the dough firms it up, making it easier to roll out and cut into shapes.
- Preheat the Oven: While the dough is chilling, preheat your oven to 180°C (350°F). This guarantees a hot environment for baking, which helps the cookies rise and develop a nice golden color.
- Roll Out the Dough: After chilling, remove the dough from the refrigerator. On a lightly floured surface, roll out the dough to about 1/4 inch thickness. Use cookie cutters to cut out your desired shapes and place them on a baking sheet lined with parchment paper.
- Bake the Cookies: Bake the cookies in the preheated oven for 8-10 minutes, or until the edges are lightly golden. Keep an eye on them to avoid overbaking, as they can go from perfect to overly done quickly.
- Cool and Decorate: Once baked, remove the cookies from the oven and let them cool on the baking sheet for a few minutes before transferring them to a wire rack to cool completely. Once cooled, you can dust them with powdered sugar or decorate as desired.
Extra Tips
When making Butterplätzchen, it’s essential to confirm your butter is at room temperature for easier mixing. If you find the dough too sticky, you can add a little more flour, but be cautious not to add too much, as it can lead to tough cookies.
For added flavor, consider incorporating spices like cinnamon or nutmeg, or zesting a lemon or orange into the dough. Finally, these cookies freeze well, so feel free to make a double batch and store half for later enjoyment!
Honigkuchen: Honey Cake Cookies
Honigkuchen, or Honey Cake Cookies, are a delightful treat that beautifully combines the rich flavors of honey, spices, and a hint of citrus. Originating from Germany, these cookies are traditionally enjoyed during the festive season but are perfect for any occasion.
Their chewy texture and aromatic scent make them a favorite among both children and adults. The use of honey not only adds sweetness but also contributes to their moist and chewy consistency.
These cookies are simple to prepare and can be made ahead of time, allowing the flavors to meld beautifully. Perfect for sharing with family and friends, Honigkuchen are an excellent addition to any dessert table. Serve them warm or at room temperature, and watch them disappear in no time!
Ingredients (serving size: 4-6 people):
- 1 cup honey
- 1/2 cup brown sugar
- 2 1/2 cups all-purpose flour
- 1 teaspoon baking soda
- 1 tablespoon ground ginger
- 1 tablespoon ground cinnamon
- 1/2 teaspoon ground cloves
- 1/4 teaspoon ground nutmeg
- 1/2 teaspoon salt
- 1/4 cup unsalted butter, softened
- 1 large egg
- 1 teaspoon vanilla extract
- Zest of 1 lemon
Cooking Instructions:
- Preheat the Oven: Begin by preheating your oven to 350°F (175°C). This guarantees that your cookies bake evenly and achieve that perfect texture.
- Prepare Baking Sheets: Line two baking sheets with parchment paper. This will prevent the cookies from sticking and make for easy cleanup.
- Mix Wet Ingredients: In a mixing bowl, combine the honey, brown sugar, and softened butter. Beat them together until the mixture is smooth and creamy. This step helps to incorporate air into the mixture, giving your cookies a light texture.
- Add Egg and Vanilla: Mix in the egg and vanilla extract until well combined. The egg acts as a binding agent, helping to hold the cookie dough together.
- Combine Dry Ingredients: In a separate bowl, whisk together the flour, baking soda, spices (ginger, cinnamon, cloves, nutmeg), and salt. Mixing the dry ingredients separately helps to evenly distribute the baking soda and spices throughout the flour.
- Combine Wet and Dry Mixtures: Gradually add the dry ingredient mixture to the wet ingredients, stirring until just combined. Be careful not to overmix, as this can lead to tougher cookies.
- Add Lemon Zest: Fold in the lemon zest to add a fresh flavor that complements the sweetness of the honey.
- Scoop and Shape Cookies: Using a tablespoon or cookie scoop, drop rounded balls of dough onto the prepared baking sheets, leaving space between each cookie for spreading.
- Bake: Place the baking sheets in the preheated oven and bake for 10-12 minutes, or until the edges are lightly golden. Keep an eye on them to avoid overbaking, as you want the centers to remain soft and chewy.
- Cool: Once baked, remove the cookies from the oven and let them cool on the baking sheets for about 5 minutes before transferring them to a wire rack to cool completely.
Extra Tips:
For an extra touch, consider drizzling your cooled cookies with a simple icing made from powdered sugar and a splash of lemon juice. This adds a delightful sweetness and a beautiful finish to your Honigkuchen.
Additionally, these cookies can be stored in an airtight container for up to a week, making them perfect for enjoying later or gifting to friends. If you want to enhance the flavors, let the cookie dough rest in the refrigerator for a few hours or overnight before baking; this will deepen the taste and improve the texture.
Mürbeteigplätzchen: Shortcrust Cookies
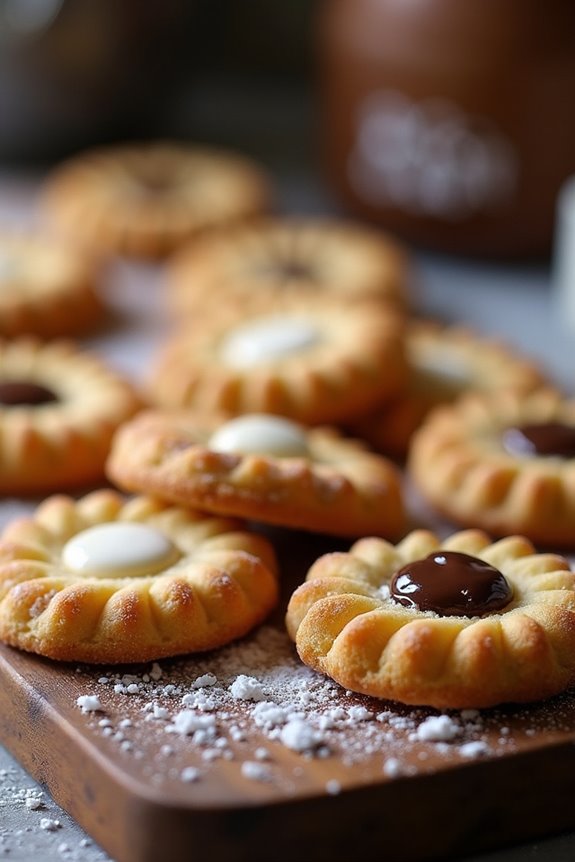
Mürbeteigplätzchen, or shortcrust cookies, are a beloved classic in German baking. These delightful treats are known for their crumbly texture and rich buttery flavor, making them a perfect companion for tea or coffee.
The beauty of these cookies lies in their simplicity; they can be enjoyed plain or decorated with icing, chocolate, or sprinkles. The versatility of Mürbeteigplätzchen allows for endless variations, including the addition of nuts, spices, or citrus zest, which can elevate their taste and appearance.
Making Mürbeteigplätzchen is a straightforward process, ideal for bakers of all levels. With just a few key ingredients, you can whip up a batch of these cookies in no time. Once baked, these cookies will be delectably chewy and irresistibly delicious, making them a hit with friends and family.
Let’s gather the ingredients and get started on this delightful baking adventure!
Ingredients (serving size: 4-6 people)
- 250g all-purpose flour
- 125g unsalted butter, softened
- 100g granulated sugar
- 1 large egg
- 1 teaspoon vanilla extract
- 1/2 teaspoon baking powder
- A pinch of salt
Cooking Instructions
1. Preheat the Oven: Start by preheating your oven to 180°C (350°F). This guarantees that your cookies bake evenly and achieve the perfect texture.
2. Prepare the Dough: In a large mixing bowl, cream together the softened butter and sugar until light and fluffy. This process incorporates air into the mixture, resulting in a tender cookie.
Add the egg and vanilla extract, and mix well until fully combined.
3. Combine Dry Ingredients: In a separate bowl, whisk together the flour, baking powder, and salt. Gradually add this dry mixture to the wet ingredients, mixing until a soft dough forms.
Be careful not to overmix, as this can lead to tough cookies.
4. Chill the Dough: Wrap the dough in plastic wrap and refrigerate for about 30 minutes. Chilling the dough helps to solidify the butter, which will result in a better texture when baking.
5. Shape the Cookies: Once chilled, remove the dough from the refrigerator and roll it out on a lightly floured surface to about 1/4 inch thickness. Use cookie cutters to cut out shapes and place them on a baking sheet lined with parchment paper.
6. Bake the Cookies: Bake the cookies in the preheated oven for 10-12 minutes, or until they’re slightly golden around the edges. Keep an eye on them to prevent overbaking.
7. Cool and Decorate: Allow the cookies to cool on the baking sheet for a few minutes before transferring them to a wire rack to cool completely.
Once cooled, you can decorate them with icing or enjoy them plain.
Extra Tips
To enhance the flavor of your Mürbeteigplätzchen, consider adding a teaspoon of lemon or orange zest to the dough for a revitalizing citrus twist.
You can also experiment with different toppings, such as melted chocolate or a dusting of powdered sugar, to personalize your cookies.
Store any leftovers in an airtight container to maintain their chewy texture, and enjoy them within a week for the best taste. Happy baking!
Schokoladenkekse: Chewy Chocolate Cookies
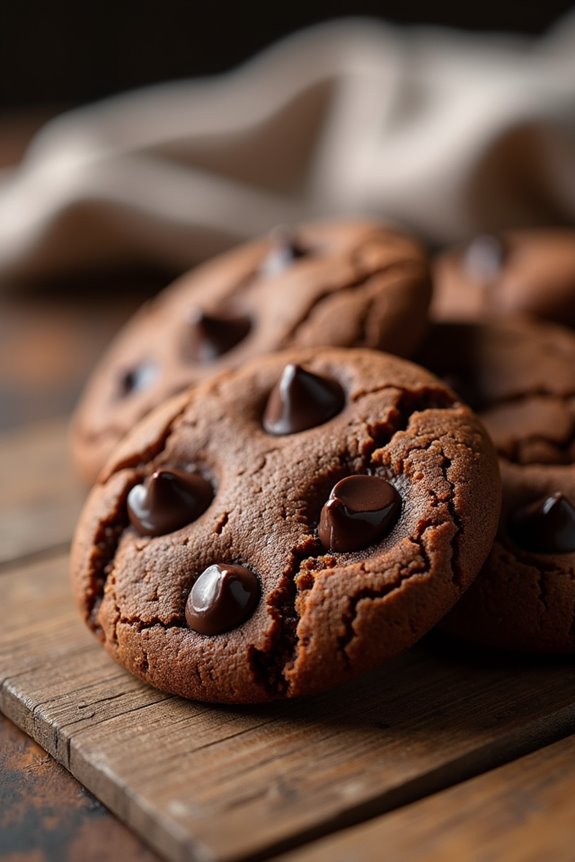
Schokoladenkekse, or chewy chocolate cookies, are a delightful treat that will satisfy any chocolate lover’s cravings. With their rich, soft texture and intense chocolate flavor, these cookies are perfect for any occasion, whether you’re hosting a gathering or simply indulging in a sweet snack at home.
The combination of dark and semi-sweet chocolate chips gives these cookies depth, while the brown sugar creates a chewy consistency that makes them utterly irresistible. Making these cookies isn’t only simple but also a fun activity to do with family or friends.
You’ll love the aroma that fills your kitchen as they bake, and the best part? They can be enjoyed warm right out of the oven, or stored for later enjoyment. So, gather your ingredients and get ready to make some delicious Schokoladenkekse!
Ingredients (serving size: 4-6 people)
- 1 cup (2 sticks) unsalted butter, softened
- 1 cup brown sugar, packed
- 1/2 cup granulated sugar
- 2 large eggs
- 2 teaspoons vanilla extract
- 2 cups all-purpose flour
- 1/2 cup unsweetened cocoa powder
- 1 teaspoon baking soda
- 1/2 teaspoon salt
- 1 1/2 cups chocolate chips (mix of dark and semi-sweet)
Cooking Instructions
1. Preheat the oven: Start by preheating your oven to 350°F (175°C). This guarantees that the cookies will bake evenly and achieve that perfect chewy texture when they go into the oven.
2. Cream the butter and sugars: In a large mixing bowl, combine the softened butter, brown sugar, and granulated sugar. Using a hand mixer or a stand mixer, beat the mixture on medium speed until it becomes light and fluffy.
This process incorporates air into the batter, which contributes to the cookie’s texture.
3. Add eggs and vanilla: Next, add the eggs one at a time, mixing well after each addition. Then, stir in the vanilla extract. This step adds moisture and flavor to the dough, making your cookies rich and delicious.
4. Mix dry ingredients: In a separate bowl, sift together the all-purpose flour, cocoa powder, baking soda, and salt. Sifting helps to aerate the flour and cocoa, guaranteeing there are no lumps and the dry ingredients are well combined.
5. Combine wet and dry ingredients: Gradually add the dry ingredient mixture to the wet mixture, stirring gently until just combined. Be careful not to overmix, as this can result in tough cookies.
You want the dough to be soft but not sticky.
6. Fold in chocolate chips: Gently fold in the chocolate chips using a spatula or wooden spoon. This step guarantees that the chocolate is evenly distributed throughout the cookie dough.
7. Scoop and bake: Line a baking sheet with parchment paper. Using a cookie scoop or tablespoon, drop rounded balls of dough onto the prepared baking sheet, leaving about 2 inches of space between each cookie.
Bake in the preheated oven for 10-12 minutes, or until the edges are set but the centers are still soft.
8. Cool the cookies: Once baked, remove the cookies from the oven and let them cool on the baking sheet for about 5 minutes before transferring them to a wire rack to cool completely.
This resting time allows them to firm up slightly while maintaining their chewy center.
Extra Tips
For the best results, make sure your butter is at room temperature for easy creaming with the sugars. You can also experiment with different types of chocolate chips or add nuts for extra texture.
If you prefer a more intense chocolate flavor, consider adding a tablespoon of espresso powder to the dry ingredients. These cookies can be stored in an airtight container at room temperature for up to a week, but they’re best enjoyed fresh out of the oven!
Kokosmakronen: Coconut Macaroons
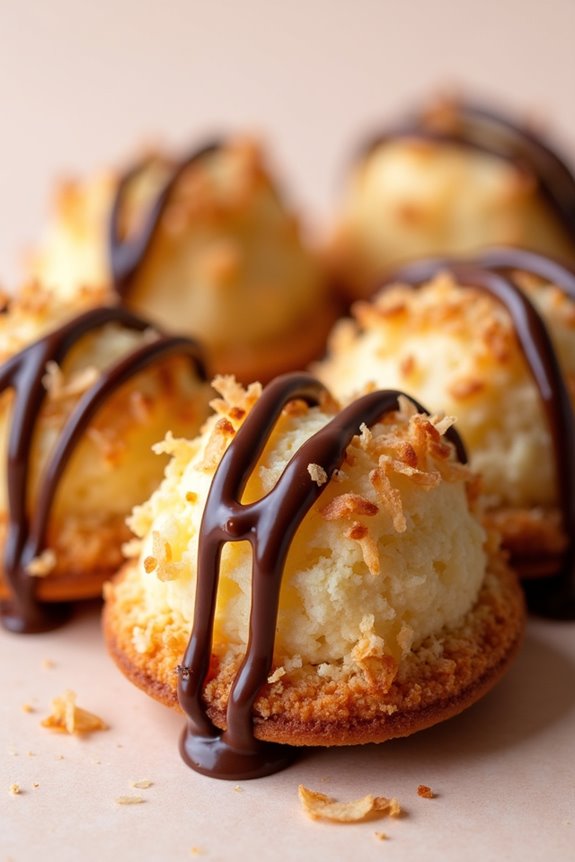
Kokosmakronen, or coconut macaroons, are a delicious treat that brings a taste of Germany right to your home. These chewy cookies are made primarily with shredded coconut, egg whites, and sugar, resulting in a delightful contrast of crispy edges and a soft, chewy center.
They aren’t only simple to prepare but also require minimal ingredients, making them a popular choice for both novice and experienced bakers alike. Perfect for any occasion, these macaroons can be dressed up with chocolate drizzles or left plain for a traditional touch.
Creating Kokosmakronen is a straightforward process that allows the natural flavor of coconut to shine through. A few key tips can enhance the texture and taste of these cookies, guaranteeing that you achieve that perfect chewiness.
With their delightful sweetness and rich coconut flavor, Kokosmakronen are sure to become a favorite in your household.
Ingredients (Serves 4-6)
- 2 ½ cups shredded coconut
- 2/3 cup granulated sugar
- 2 large egg whites
- 1 teaspoon vanilla extract
- ¼ teaspoon salt
- ½ cup semi-sweet chocolate chips (optional, for drizzling)
Cooking Instructions
- Preheat the Oven: Begin by preheating your oven to 325°F (165°C). This step is essential as it guarantees that the macaroons bake evenly and have the perfect texture.
- Prepare the Baking Sheet: Line a baking sheet with parchment paper. This will prevent the macaroons from sticking to the sheet and make clean-up much easier.
- Mix the Ingredients: In a large mixing bowl, combine the shredded coconut, granulated sugar, egg whites, vanilla extract, and salt. Stir the mixture well until all ingredients are fully incorporated. The egg whites will help bind the coconut together, creating a chewy texture.
- Shape the Macaroons: Using your hands or a spoon, scoop out small portions of the mixture and form them into mounds or balls. Place them on the prepared baking sheet, leaving some space between each macaroon to allow for spreading.
- Bake the Macaroons: Place the baking sheet in the preheated oven and bake for about 20-25 minutes, or until the tops are golden brown. Keep an eye on them to avoid over-baking, as you want that perfect chewy consistency inside.
- Cool the Macaroons: Once baked, remove the baking sheet from the oven and let the macaroons cool on the sheet for about 10 minutes. Then, transfer them to a wire rack to cool completely.
- Optional Chocolate Drizzle: If desired, melt the semi-sweet chocolate chips in a microwave-safe bowl in 30-second intervals, stirring until smooth. Drizzle the melted chocolate over the cooled macaroons for an extra touch of sweetness.
Extra Tips
When making Kokosmakronen, it’s important to use unsweetened shredded coconut for a more authentic flavor, as sweetened coconut can make the cookies overly sweet.
Additionally, make sure that the egg whites are at room temperature before beating them; this will help them whip up to a better volume. For an added depth of flavor, consider adding a pinch of almond extract along with the vanilla.
Store the macaroons in an airtight container at room temperature to maintain their chewy texture for several days. Enjoy your delicious Kokosmakronen!
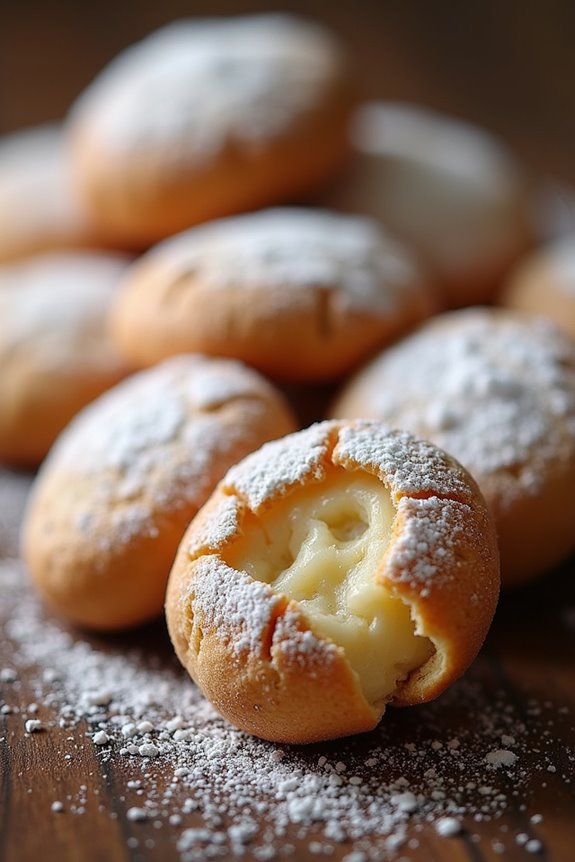
Quarkstollen: Creamy Quark Cookies
Quarkstollen is a delightful German cookie that combines the rich, creamy texture of quark cheese with aromatic spices and tender dough. This traditional recipe results in chewy, flavorful cookies that are perfect for sharing during the festive season or any time you crave a sweet treat. The addition of quark not only enhances the flavor but also contributes to a wonderfully moist texture that sets these cookies apart from others.
Making Quarkstollen is a straightforward process that will fill your kitchen with enticing aromas as they bake. This recipe yields about 4-6 servings, making it a great option for gatherings or simply for enjoying at home. With just a few simple ingredients and some patience, you can create these delicious cookies that are bound to impress your family and friends.
Ingredients
- 250g quark cheese
- 100g unsalted butter, softened
- 100g sugar
- 1 large egg
- 1 tsp vanilla extract
- 250g all-purpose flour
- 1 tsp baking powder
- 1/2 tsp ground cinnamon
- 1/4 tsp ground nutmeg
- 100g raisins or sultanas
- 50g chopped walnuts or almonds (optional)
- Powdered sugar for dusting
Instructions
- Preheat the Oven: Preheat your oven to 180°C (350°F). This is an essential step to guarantee that your cookies bake evenly and achieve that perfect chewy texture.
- Prepare the Dough: In a large mixing bowl, combine the softened butter and sugar. Beat them together until the mixture is light and fluffy. This process incorporates air into the dough, which helps in creating a chewy cookie.
- Add Quark and Egg: Stir in the quark cheese and the egg into the butter-sugar mixture. Add the vanilla extract and mix everything until smooth. The quark adds richness to the cookies, making them extra creamy.
- Combine Dry Ingredients: In a separate bowl, sift together the flour, baking powder, cinnamon, and nutmeg. This step guarantees that the leavening agent is well distributed and prevents clumping.
- Mix Dry with Wet Ingredients: Gradually add the dry ingredients to the wet mixture, folding gently until just combined. Be careful not to overmix, as this can lead to tougher cookies.
- Add Fruits and Nuts: Fold in the raisins (or sultanas) and chopped walnuts (if using). These add texture and flavor to the cookies, making them more delightful with every bite.
- Shape the Cookies: Using a spoon, scoop out portions of dough and place them on a baking sheet lined with parchment paper, leaving some space between each cookie as they’ll spread during baking.
- Bake: Place the baking sheet in the preheated oven and bake for 15-20 minutes, or until the edges are golden brown. Keep an eye on them, as baking times can vary depending on your oven.
- Cool and Dust: Once baked, remove the cookies from the oven and allow them to cool on a wire rack. Once cooled, dust the cookies with powdered sugar for a sweet finish.
Extra Tips
For the best results, make sure your butter is at room temperature before starting, as this will help create a smooth and creamy dough.
Feel free to experiment with different add-ins, such as chocolate chips or dried fruits, to customize your Quarkstollen cookies. They can also be stored in an airtight container for up to a week, making them a perfect treat for later enjoyment.
Enjoy your baking!
Spekulatius: Spiced Shortcrust Cookies

Spekulatius cookies, known for their rich spices and buttery texture, are a beloved treat in Germany, particularly during the holiday season. These delightful cookies boast a unique blend of aromatic spices such as cinnamon, nutmeg, and cloves, which infuse them with a warm, inviting flavor.
Traditionally, they’re shaped using intricate wooden molds, giving them their distinctive designs that are as beautiful as they’re delicious. Making Spekulatius at home allows you to enjoy their chewy texture and delightful spices fresh out of the oven, filling your kitchen with a heavenly aroma that will certainly impress family and friends.
The preparation of Spekulatius is a rewarding experience that combines simple ingredients with a touch of festive cheer. These cookies are perfect for sharing, whether at holiday gatherings, cookie exchanges, or simply as a sweet treat to enjoy with a cup of tea or coffee.
With a few key ingredients and some patience, you can whip up a batch of these spiced shortcrust cookies that will transport you straight to a cozy German Christmas market.
Ingredients (Servings: 4-6 people)
- 250g all-purpose flour
- 125g unsalted butter, softened
- 100g brown sugar
- 1 large egg
- 1 teaspoon ground cinnamon
- 1/2 teaspoon ground nutmeg
- 1/4 teaspoon ground cloves
- 1/4 teaspoon baking powder
- 1/4 teaspoon salt
- 100g chopped almonds (optional)
- Powdered sugar for dusting (optional)
Cooking Instructions
1. Prepare the Dough: In a large mixing bowl, cream together the softened butter and brown sugar until light and fluffy. This process incorporates air into the mixture, which is essential for achieving a chewy texture in your cookies.
Once well combined, add the egg and beat until fully incorporated.
2. Mix the Dry Ingredients: In a separate bowl, whisk together the all-purpose flour, ground cinnamon, nutmeg, cloves, baking powder, and salt. This step not only combines the dry ingredients but also guarantees that the spices are evenly distributed throughout the flour.
3. Combine Ingredients: Gradually add the dry mixture into the wet ingredients, mixing until a soft dough forms. If you’re adding chopped almonds, fold them into the dough at this stage.
The dough should be slightly sticky but manageable. If it’s too sticky, you can add a little more flour until it reaches the desired consistency.
4. Chill the Dough: Wrap the dough in plastic wrap and refrigerate for at least 1 hour. Chilling the dough helps to firm it up, making it easier to roll out and cut into shapes.
It also enhances the flavors as the spices meld together.
5. Preheat the Oven: Preheat your oven to 180°C (350°F). Confirm that your oven is fully preheated before baking to achieve even baking and a nice golden color on your cookies.
6. Roll and Cut the Cookies: On a lightly floured surface, roll out the chilled dough to about 5mm (1/4 inch) thickness. Use a cookie cutter or a Spekulatius mold to cut out shapes.
If you don’t have a mold, any shape will work just fine.
7. Bake the Cookies: Place the shaped cookies on a lined baking tray, leaving some space between each one. Bake in the preheated oven for 10-12 minutes or until the edges are lightly golden.
Keep an eye on them, as baking times can vary based on your oven and the size of your cookies.
8. Cool and Serve: Once baked, remove the cookies from the oven and allow them to cool on the tray for a few minutes before transferring them to a wire rack to cool completely.
If desired, dust with powdered sugar before serving for an elegant finish.
Extra Tips
When making Spekulatius, consider experimenting with the spice ratios to suit your personal taste; some people prefer a bit more cinnamon or a hint of cardamom for added warmth.
Additionally, if you don’t have a Spekulatius mold, using cookie cutters can yield equally enjoyable results. Remember that the dough can be made ahead of time and stored in the refrigerator for up to 3 days or frozen for up to a month, allowing for easy baking whenever the craving strikes.
Enjoy your homemade Spekulatius cookies with a cup of coffee or tea for the ultimate cozy experience!