

When the weekend arrives, there’s nothing quite like indulging in a cozy British breakfast to kick off a slow and buttery morning. From the hearty Full English Breakfast to the delightful scones topped with clotted cream, these recipes are all about bringing comfort to your table. Each dish offers a warm embrace that perfectly complements a leisurely day. If you’re looking to elevate your weekends with deliciously comforting flavors, join me as we explore some irresistible recipes that promise to make your mornings extra special. Let’s make those slow starts truly satisfying.
Full English Breakfast

The Full English Breakfast is a hearty and traditional meal that embodies the essence of British cuisine. This iconic dish typically features a delightful array of ingredients that are cooked to perfection, making it a popular choice for breakfast or brunch. It combines savory flavors from grilled sausages and bacon, alongside the comforting textures of eggs, baked beans, and toast, creating a satisfying start to any day.
Whether you’re looking to impress guests at a brunch gathering or simply want to indulge in a delicious home-cooked meal, the Full English Breakfast is sure to please. Each component adds its unique charm, and the combination of flavors and textures is truly unbeatable. Let’s explore the recipe to create this classic dish that can serve 4-6 people.
Ingredients (Serves 4-6)
- 8 pork sausages
- 8 slices of back bacon
- 4 large eggs
- 1 can (400g) of baked beans
- 2 large tomatoes, halved
- 4 medium-sized button mushrooms, cleaned and sliced
- 4 slices of thick-cut bread (for toast)
- Salt and pepper, to taste
- Olive oil or butter, for frying
Cooking Instructions
- Prepare the Ingredients: Begin by gathering all your ingredients and preheating your grill or frying pan over medium heat. This way, everything will be ready to cook efficiently. Make sure to drain the baked beans and set them aside for reheating later.
- Cook the Sausages and Bacon: Place the sausages in the frying pan or under the grill. Cook them for about 10-12 minutes, turning occasionally until they’re golden brown and cooked through. Once the sausages are nearly done, add the bacon to the pan and cook for about 4-5 minutes until crispy, making sure to turn them halfway through.
- Fry the Eggs: In a separate small frying pan, add a little olive oil or butter over medium heat. Crack the eggs into the pan and fry until the whites are set and the yolks are cooked to your liking. For sunny-side up, this will take about 3-4 minutes. If you prefer your yolks more cooked, you can flip them carefully and cook for an additional minute.
- Cook the Tomatoes and Mushrooms: While the eggs are cooking, add the halved tomatoes and sliced mushrooms to the pan with the sausages and bacon. Cook the mushrooms for about 3-4 minutes until they’re tender, and let the tomatoes cook for about 2-3 minutes until they’re slightly softened.
- Heat the Baked Beans: In a small saucepan, gently heat the baked beans over low heat until warmed through, stirring occasionally. This should take about 5 minutes.
- Toast the Bread: While everything else is cooking, toast the bread slices in a toaster or in the frying pan until golden and crispy. You can also butter the toast if desired.
- Assemble the Breakfast: Once all components are cooked, arrange them on a large plate or platter. Place the sausages, bacon, eggs, tomatoes, mushrooms, baked beans, and toast together in an appealing manner. Season with salt and pepper to taste.
Extra Tips
To elevate your Full English Breakfast, consider adding black pudding (blood sausage) or hash browns for an extra layer of flavor and texture. If you’re cooking for a larger group, you can keep the cooked items warm in a low oven while you finish the other components.
Additionally, feel free to customize your breakfast by including other favorites, such as avocado or sautéed spinach. Enjoy your hearty meal with a cup of tea or coffee for a true British experience!
Classic British Scones
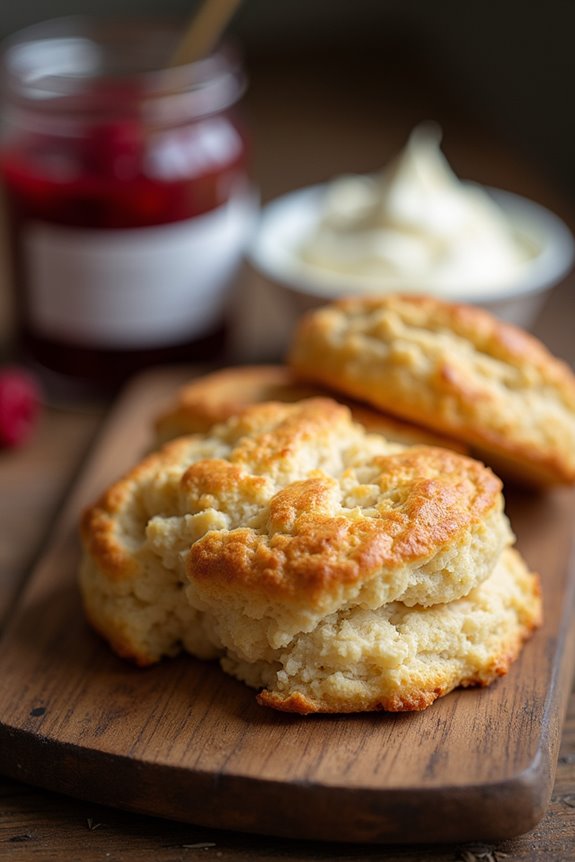
Nothing quite captures the essence of a cozy British breakfast like a warm, freshly baked scone. These delightful treats are perfect for enjoying with a cup of tea, slathered with clotted cream and jam. Traditionally served during afternoon tea, scones have become a beloved staple at breakfast tables across the UK. With their crumbly texture and rich buttery flavor, they’re sure to impress your family and friends.
Making Classic British Scones is a simple yet rewarding experience. The dough comes together quickly with only a few ingredients, making them an ideal choice for both seasoned bakers and those new to the kitchen. Whether you opt for plain scones or add in some dried fruits like currants or sultanas, the result will be a deliciously indulgent treat that will warm your heart and start your day off right.
Ingredients (Serves 4-6):
- 225g (8 oz) self-raising flour
- 75g (3 oz) unsalted butter, chilled and cubed
- 25g (1 oz) caster sugar
- A pinch of salt
- 150ml (5 fl oz) milk
- 1 large egg (for egg wash, optional)
Cooking Instructions:
- Preheat the Oven: Start by preheating your oven to 220°C (428°F). This high temperature will give your scones a lovely rise and a golden color as they bake.
- Prepare the Flour Mixture: In a large mixing bowl, sift the self-raising flour and add a pinch of salt. Sifting helps to aerate the flour, which is vital for achieving light and fluffy scones.
- Incorporate the Butter: Add the chilled, cubed unsalted butter into the flour mixture. Using your fingertips, rub the butter into the flour until the mixture resembles fine breadcrumbs. This step is essential as it helps to create a tender texture in the final scone.
- Add Sugar and Milk: Stir in the caster sugar, making sure it’s evenly distributed. Create a well in the center of the mixture and pour in the milk. Using a knife or a spatula, gently mix until the dough starts to come together. Be careful not to overwork the dough, as this can lead to tough scones.
- Shape the Dough: Turn the dough out onto a lightly floured surface. Gently knead it a couple of times until it’s smooth. Pat the dough into a thickness of about 2.5cm (1 inch).
- Cut the Scones: Using a round cutter, cut out scones from the dough. Place them on a baking tray lined with parchment paper. If desired, brush the tops with a beaten egg to give them a beautiful golden finish.
- Bake: Place the tray in the preheated oven and bake for 10-12 minutes or until the scones have risen and are golden brown. Keep an eye on them towards the end of the baking time to prevent over-browning.
- Cool and Serve: Once baked, remove the scones from the oven and allow them to cool slightly on a wire rack. Serve warm with clotted cream and your choice of jam.
Extra Tips:
For the best results, make sure your ingredients are as cold as possible, especially the butter and milk. This will help to create a flaky texture.
You can also experiment by adding different flavorings like vanilla extract or lemon zest to the dough for a unique twist. If you prefer fruit scones, consider folding in some dried fruit like raisins or cranberries before shaping the dough.
Serve your scones fresh out of the oven for the ultimate breakfast treat!
Welsh Rarebit

Welsh Rarebit is a delightful and indulgent dish that hails from the heart of Wales. This cheesy toast is perfect for breakfast or brunch and is sure to impress your family and friends with its rich flavors and comforting textures. Traditionally made with a mixture of Welsh cheddar cheese, beer, and spices, Welsh Rarebit takes the humble cheese on toast to a whole new level.
It’s a wonderful way to start your day or enjoy as a late-night snack, served alongside a fresh salad or a cup of hearty soup.
Making Welsh Rarebit is simple and requires just a few ingredients. The beauty of this dish lies in its versatility; you can tailor the seasonings and cheese according to your preference. The result is a creamy, savory topping that melts beautifully over toasted bread, creating a perfect balance of crispy and gooey textures.
Let’s plunge into this cozy British breakfast recipe and discover how to create your own delicious Welsh Rarebit at home.
Ingredients (Serves 4-6)
- 8 slices of good quality bread (e.g., sourdough or farmhouse)
- 2 cups grated sharp Welsh cheddar cheese
- 1 cup beer (preferably a pale ale)
- 2 tablespoons unsalted butter
- 1 tablespoon Worcestershire sauce
- 1 teaspoon Dijon mustard
- 1 teaspoon paprika
- Salt and pepper to taste
- 1 tablespoon chopped fresh parsley (for garnish)
Cooking Instructions
- Prepare the Bread: Start by preheating your oven to 400°F (200°C). While the oven is heating, lay out the slices of bread on a baking sheet. Toast the slices in the oven for about 5-7 minutes, or until they’re golden and crispy. This step guarantees that the bread can hold the cheesy topping without becoming soggy.
- Melt the Butter: In a medium saucepan, melt the butter over medium heat. Allow it to bubble but not brown, as you want a smooth base for the cheese mixture. This step helps to create a rich and creamy sauce for the Welsh Rarebit.
- Combine the Ingredients: Once the butter is melted, add the grated cheddar cheese, beer, Worcestershire sauce, Dijon mustard, paprika, salt, and pepper to the saucepan. Stir continuously until the cheese is fully melted and the mixture is smooth. This step is vital for confirming that all ingredients are well combined, resulting in a velvety cheese sauce.
- Top the Toast: Once the cheese mixture is ready, take the toasted bread out of the oven. Spoon the cheesy mixture generously over each slice of toast, ensuring an even coating. Be generous; you want each bite to be packed with flavor.
- Bake Again: Place the topped toasts back into the oven and bake for an additional 5-10 minutes, or until the cheese is bubbling and slightly golden. This step enhances the dish’s texture, creating a crispy top that contrasts beautifully with the creamy cheese underneath.
- Garnish and Serve: Remove the Welsh Rarebit from the oven and let it cool slightly. Sprinkle the chopped fresh parsley on top for a pop of color. Serve immediately while hot, and enjoy your cozy breakfast!
Extra Tips
When making Welsh Rarebit, feel free to experiment with different types of cheese to find the flavor combination that you love best. While sharp cheddar is traditional, you can mix in some Gruyère or even a touch of blue cheese for an extra punch.
Additionally, consider adding cooked mushrooms, sautéed onions, or crispy bacon for added depth and richness. Pair your Welsh Rarebit with a revitalizing side salad or a bowl of soup for a complete meal.
Bubble and Squeak

Bubble and Squeak is a delightful British breakfast dish traditionally made from leftover vegetables, primarily potatoes and cabbage. It’s often considered a comfort food, embodying the essence of frugality and resourcefulness in British cooking. The name “Bubble and Squeak” comes from the sounds the ingredients make while cooking in the pan: bubbling as they fry and squeaking as they brown. This dish is versatile, allowing you to incorporate a variety of leftover vegetables, making it a fantastic way to reduce food waste while enjoying a hearty meal.
To prepare a satisfying Bubble and Squeak, you’ll want to start with boiled or roasted potatoes and cooked greens, typically cabbage or Brussels sprouts, though other vegetables can be used as well. The key to achieving a crispy exterior while maintaining a fluffy interior is to fry the mixture in a hot pan with a generous amount of butter or oil. This dish isn’t only easy to make but also customizable, allowing you to experiment with different vegetable combinations and flavorings, making it a beloved classic in many households.
Ingredients (Serves 4-6):
- 500g (about 1 lb) potatoes, peeled and chopped
- 250g (about 9 oz) cooked cabbage or other greens
- 1 medium onion, finely chopped
- 2 tablespoons vegetable oil or butter
- Salt and pepper, to taste
- Optional: 1 teaspoon mustard or herbs (like thyme or parsley)
Cooking Instructions:
- Boil the Potatoes: Place the chopped potatoes in a large pot of salted water and bring to a boil. Cook until they’re tender, about 15-20 minutes. Drain them well and let them cool slightly before mashing.
- Prepare the Vegetables: If not already cooked, steam or boil the cabbage until tender. If using other vegetables, make certain they’re cooked and chopped into small pieces. Set aside.
- Mash the Potatoes: In a large mixing bowl, combine the drained potatoes with the cooked cabbage and any other vegetables. Use a potato masher or fork to mash the mixture lightly. You want to combine them while leaving some texture; don’t fully puree.
- Add Flavor: Stir in the finely chopped onion, salt, pepper, and any optional ingredients like mustard or herbs. Mix well until everything is evenly distributed.
- Fry the Mixture: Heat the vegetable oil or butter in a large skillet over medium-high heat. Once hot, add the potato and vegetable mixture to the pan, pressing it down into an even layer. Cook for about 5-7 minutes until the bottom is golden brown and crispy.
- Flip and Cook Again: Carefully flip the mixture over using a large spatula (you can divide it into sections if it’s easier) and cook the other side for another 5-7 minutes until crispy and browned. The more you fry, the crispier it will get.
- Serve: Once both sides are golden and crispy, transfer the Bubble and Squeak to a serving plate. Cut it into wedges and serve hot, perhaps with a fried egg on top or alongside baked beans for a full British breakfast experience.
Extra Tips:
For an even richer flavor, consider adding leftover meats such as bacon or sausage to the mixture before frying. You can also experiment with different herbs and spices to enhance the taste, such as paprika or garlic powder.
If you prefer a fully vegetarian option, feel free to load up on more seasonal vegetables. Don’t hesitate to make this dish your own by incorporating whatever leftovers you have on hand; the flexibility of Bubble and Squeak is one of its many charms!
Creamy Porridge With Honey

A traditional British breakfast wouldn’t be complete without a steaming bowl of creamy porridge. This wholesome dish isn’t only comforting but also incredibly nutritious, making it the perfect start to your day. The creamy texture, combined with the natural sweetness of honey, creates a delightful balance that appeals to both adults and children alike.
Whether enjoyed on a chilly morning or as a quick meal any time of day, creamy porridge is a staple that warms the soul.
Making creamy porridge is a simple yet rewarding process. With just a few ingredients, you can create a satisfying breakfast that can be customized with your favorite toppings. While the porridge itself is rich and creamy, the addition of honey not only enhances the flavor but also adds a touch of natural sweetness.
Feel free to experiment with different toppings such as fresh fruits, nuts, or a sprinkle of cinnamon to make it your own.
Ingredients (serving size: 4-6 people)
- 1 cup rolled oats
- 4 cups whole milk (or water for a lighter version)
- 1/4 teaspoon salt
- 2 tablespoons honey (plus extra for drizzling)
- Optional toppings: fresh fruits, nuts, seeds, or a sprinkle of cinnamon
Cooking Instructions
1. Combine Oats and Liquid: In a medium saucepan, combine the rolled oats, whole milk (or water), and salt. Stir gently to mix the ingredients together. This step is essential as it sets the base for your porridge.
2. Heat the Mixture: Place the saucepan over medium heat and bring the mixture to a gentle simmer. Stir occasionally to prevent the oats from sticking to the bottom of the pan. This process usually takes about 5-7 minutes.
Simmering helps to soften the oats and create a creamy consistency.
3. Cook Until Creamy: Once the mixture is simmering, reduce the heat to low and continue to cook for an additional 5-10 minutes, stirring frequently. The oats will absorb the liquid and thicken into a creamy porridge.
Keep an eye on the consistency; if it gets too thick, add a splash of milk or water to loosen it.
4. Add Honey: Once the porridge has reached your desired consistency, remove it from the heat and stir in the honey. This step not only sweetens the porridge but also adds a beautiful gloss to the finished dish.
Taste and adjust the sweetness if necessary.
5. Serve and Garnish: Spoon the creamy porridge into bowls and drizzle with additional honey, if desired. Top with your choice of fresh fruits, nuts, or a sprinkle of cinnamon for added flavor and texture.
Serve warm and enjoy your cozy breakfast!
Extra Tips
For a creamier texture, consider using whole milk or a combination of milk and cream. If you’re looking for a dairy-free option, almond or oat milk works beautifully as well.
To save time in the morning, you can prepare the oats the night before and let them soak in the liquid; this will reduce cooking time in the morning.
Don’t hesitate to get creative with your toppings—a handful of berries or a scoop of nut butter can elevate your porridge to new heights!
Eggs Benedict With Smoked Salmon

Eggs Benedict is a classic British breakfast that combines poached eggs, English muffins, and a creamy hollandaise sauce, creating a dish that’s both rich and comforting. Adding smoked salmon to the mix elevates this breakfast staple to new heights, infusing it with a delicate, savory flavor.
This delightful combination not only makes for a satisfying meal but also presents beautifully, making it a perfect choice for brunch gatherings or special occasions.
Creating Eggs Benedict with smoked salmon may seem challenging, but with a little practice, you can master this dish at home. The key is to perfectly poach the eggs and to make a smooth hollandaise sauce. Once you have these components down, you can impress your family and friends with a restaurant-quality breakfast that they’ll absolutely love.
Ingredients (serves 4-6):
- 4 large eggs
- 2 English muffins, split in half
- 200g smoked salmon
- 1 tablespoon white wine vinegar
- 1 tablespoon lemon juice
- 3 large egg yolks
- 200g unsalted butter, melted
- Salt and pepper to taste
- Fresh dill or chives, for garnish (optional)
Instructions:
- Prepare the Hollandaise Sauce: In a heatproof bowl, whisk together the egg yolks and lemon juice until pale and slightly thickened. Place the bowl over a pot of simmering water (double boiler method), ensuring the bowl doesn’t touch the water. Continue whisking while slowly drizzling in the melted butter until the sauce is thick and creamy. Season with salt and pepper to taste. Remove from heat and keep warm.
- Poach the Eggs: Fill a medium saucepan with water and add the white wine vinegar. Bring to a gentle simmer. Crack each egg into a small bowl. Create a gentle whirlpool in the simmering water and carefully slide the eggs one at a time into the center. Poach for about 3-4 minutes or until the whites are set but the yolks remain runny. Use a slotted spoon to carefully remove the eggs and place them on a paper towel to drain.
- Toast the English Muffins: While the eggs are poaching, toast the English muffins until golden brown. You can use a toaster or a grill for this step.
- Assemble the Dish: On each toasted muffin half, place a slice of smoked salmon. Top with a poached egg, and then generously drizzle with the hollandaise sauce.
- Garnish and Serve: Sprinkle with fresh dill or chives, if desired, and serve immediately while everything is still warm.
Extra Tips:
When poaching eggs, it’s important to keep the water at a gentle simmer; a rolling boil can break apart the eggs. Adding vinegar to the water helps the egg whites coagulate faster.
If you struggle with poaching eggs, try using a large ladle to create a small whirlpool in the water before adding the egg, which can help keep the whites together. Additionally, if you want to make the hollandaise sauce ahead of time, you can keep it warm in a thermos or over very low heat, stirring occasionally to maintain its consistency.
Traditional Crumpets

Crumpets are a beloved staple of British breakfasts, known for their unique texture and delightful flavor. Originating from the United Kingdom, these soft, spongy rounds are perfect for toasting and slathering with butter or your favorite spreads. With their signature holes that catch melted butter, crumpets make for a comforting addition to any morning meal. They can be enjoyed sweet or savory, making them versatile enough to suit anyone’s taste.
Making crumpets from scratch may seem challenging, but with a little patience and the right ingredients, you can whip up a batch that rivals those found in your favorite café. The key is to allow the batter to rise properly, resulting in that light and airy texture. Served warm, crumpets are a delicious way to start the day, especially when paired with a cup of tea or coffee.
Ingredients (Serves 4-6)
- 500g strong white flour
- 1 tsp salt
- 1 tsp sugar
- 10g instant yeast
- 400ml warm milk
- 200ml warm water
- 1/2 tsp baking powder
- Butter or oil for greasing the cooking surface
Cooking Instructions
- Prepare the Yeast Mixture: In a small bowl, combine the warm milk, warm water, and sugar. Sprinkle the instant yeast on top and let it sit for about 10 minutes until it becomes frothy. This step activates the yeast, which is essential for the crumpets to rise.
- Mix the Dry Ingredients: In a large mixing bowl, sift together the strong white flour and salt. Make a well in the center of the flour and pour in the frothy yeast mixture. Stir the mixture with a wooden spoon until it forms a thick batter.
- Incorporate Baking Powder: Add the baking powder to the batter and mix well until fully combined. The batter will be quite thick, but it should be smooth. Cover the bowl with a clean cloth and let it rise in a warm place for about 1 hour, or until it has doubled in size.
- Heat the Griddle: After the batter has risen, preheat a non-stick griddle or frying pan over low to medium heat. Lightly grease the cooking surface with butter or oil, ensuring it’s evenly coated.
- Cook the Crumpets: Using crumpet rings or egg rings, place them on the griddle and fill each ring about halfway with the batter. Allow the crumpets to cook for about 8-10 minutes or until bubbles form on the surface and the edges start to look set. Don’t flip them; crumpets are cooked only on one side.
- Finish Cooking: Once the tops of the crumpets are no longer wet, carefully remove the rings and continue to cook for an additional 2-3 minutes to brown the bottoms slightly. Transfer them to a wire rack to cool slightly before serving.
- Serve Warm: Serve the crumpets warm with butter, jam, honey, or any topping of your choice. Enjoy them fresh for the best taste.
Extra Tips
When making crumpets, the consistency of the batter is essential for achieving the perfect texture. If your batter is too thick, add a little more warm water to loosen it up.
Also, be patient while cooking; the bubbles on top indicate that they’re almost ready. If the heat is too high, the bottoms may burn before the tops set, so keep the temperature moderate for the best results.
Crumpets can also be frozen; simply toast them before serving for a quick and easy breakfast!
Baked Beans on Toast
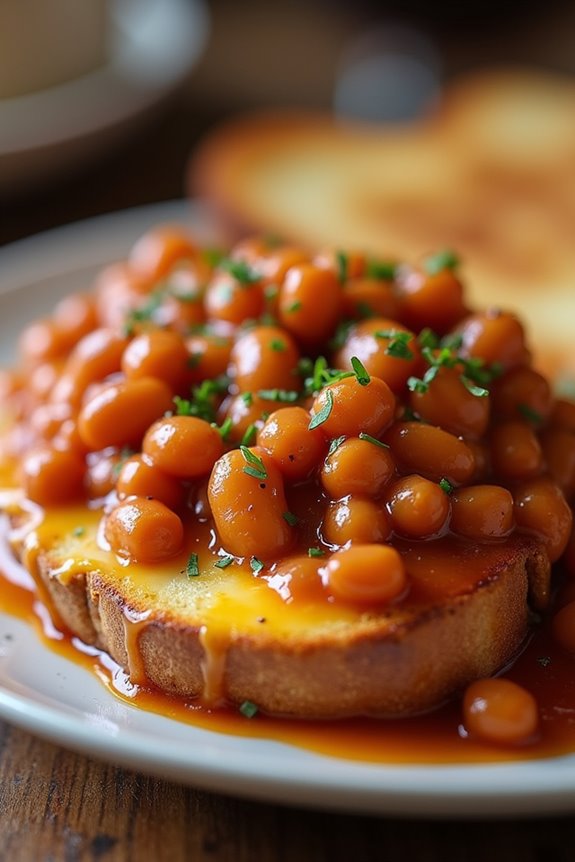
Baked beans on toast is a quintessential British breakfast dish that has warmed the hearts and bellies of many for generations. This simple yet satisfying meal consists of creamy, flavorful beans served atop crispy toasted bread, making it a perfect option for a hearty breakfast or a quick snack at any time of the day.
Whether you opt for homemade baked beans or store-bought, this dish is all about bringing comfort and simplicity to the table. The beauty of baked beans on toast lies in its versatility. You can enhance the flavors with various spices, herbs, or even add toppings like cheese, bacon, or a fried egg.
This dish isn’t only budget-friendly but also packed with protein and fiber, making it a wholesome choice for the whole family. Gather your ingredients, and let’s plunge into this cozy British staple!
Ingredients (serving size of 4-6 people):
- 2 cans (400g each) of baked beans
- 4-6 slices of bread (white or wholemeal)
- 1 tablespoon of olive oil or butter
- Salt and pepper, to taste
- 1 teaspoon of Worcestershire sauce (optional)
- 1 teaspoon of mustard (optional)
- Grated cheese, for topping (optional)
- Fresh parsley or chives, for garnish (optional)
Cooking Instructions:
- Prepare the Beans: Open the cans of baked beans and pour them into a saucepan. If you like your beans with extra flavor, add Worcestershire sauce and mustard at this stage. Stir the mixture and place it over medium heat to warm through. Stir occasionally to prevent sticking.
- Toast the Bread: While the beans are heating, place your slices of bread in a toaster or under a grill. Toast until golden brown and crispy. This will provide a sturdy base for the beans.
- Heat the Beans: Continue to cook the beans on medium heat for about 5-7 minutes, or until they’re hot and bubbling. Taste and season with salt and pepper as needed. If you find the beans too thick, you can add a splash of water to loosen them up.
- Assemble the Dish: Once the toast is ready and the beans are hot, take a slice of toast and place it on a plate. Spoon a generous portion of baked beans over the toast, ensuring that the beans are evenly distributed.
- Add Toppings: If you want to elevate your baked beans on toast, sprinkle some grated cheese on top of the beans while they’re hot, allowing it to melt slightly. You can also add fresh herbs like parsley or chives for an extra burst of flavor and color.
- Serve Immediately: Serve the baked beans on toast hot, and enjoy it right away for the best experience. You can pair it with a side of eggs or a slice of crispy bacon if desired.
Extra Tips:
For an even richer flavor, consider making your baked beans from scratch using dried beans and adding spices such as paprika or smoked bacon during cooking.
If you prefer a touch of sweetness, a dash of brown sugar or maple syrup can be added to the beans. Experiment with different types of bread to find your favorite combination—sourdough or rye can add an interesting twist.
Yorkshire Pudding With Sausages

Yorkshire Pudding with Sausages is a delightful dish that captures the essence of traditional British breakfasts. This hearty recipe combines the light and airy texture of Yorkshire pudding with the robust flavor of sausages, creating a dish that’s both satisfying and comforting.
Often served alongside gravy, this dish is perfect for a weekend brunch or a special family gathering, bringing everyone together around the table to enjoy a classic taste of British cuisine.
The beauty of Yorkshire Pudding lies in its simplicity, made from just a few basic ingredients that you probably already have in your pantry. When baked in a hot oven, the batter puffs up to create a delightful vessel for sausages, making it a perfect accompaniment to your breakfast spread.
Whether you choose to use pork, beef, or even vegetarian sausages, this dish promises to be a hit with everyone at the table.
Ingredients (Serves 4-6):
- 6-8 sausages (your choice of type)
- 1 cup all-purpose flour
- 1 cup milk
- 4 large eggs
- 1/2 teaspoon salt
- 1/2 teaspoon black pepper
- 4 tablespoons vegetable oil (or beef dripping)
Cooking Instructions:
- Preheat the Oven: Begin by preheating your oven to 425°F (220°C). A hot oven is essential for achieving the perfect rise in your Yorkshire pudding, so make sure it’s fully heated before you start cooking.
- Prepare the Sausages: In a large oven-safe skillet or baking dish, add the sausages and drizzle a tablespoon of vegetable oil over them. Place the skillet in the preheated oven and cook the sausages for about 10-15 minutes, or until they’re browned and starting to cook through. This step will also help the oil heat up for the batter.
- Make the Batter: While the sausages are cooking, prepare the Yorkshire pudding batter. In a mixing bowl, whisk together the flour, eggs, milk, salt, and pepper until smooth. It’s important to mix well to avoid any lumps, and the batter should be relatively thin.
- Combine and Bake: Once the sausages are ready, carefully remove the skillet from the oven (the oil will be very hot). Quickly pour the batter over the sausages, guaranteeing an even distribution. Return the skillet to the oven immediately and bake for 20-25 minutes, or until the batter has risen and turned golden brown.
- Serve: Once cooked, remove the Yorkshire pudding with sausages from the oven and let it cool for a minute. Cut into portions and serve immediately with gravy or your favorite breakfast condiments.
Extra Tips:
To make certain your Yorkshire pudding rises beautifully, it’s vital that the oil is extremely hot when you pour the batter in. For an even lighter texture, let the batter rest for about 30 minutes before pouring it into the skillet.
Additionally, avoid opening the oven door during the baking process as this can cause the pudding to deflate. Enjoy your Yorkshire Pudding with Sausages as part of a full English breakfast for a truly indulgent meal.
Fluffy Pancakes With Maple Syrup

Start your morning off right with a stack of fluffy pancakes drizzled with rich maple syrup. This classic British breakfast dish isn’t only easy to make but also incredibly satisfying. The light and airy texture of the pancakes makes them perfect for soaking up the sweet syrup, while the buttery flavor adds a comforting touch that’s sure to please everyone at the table.
Whether you enjoy them plain, topped with fresh fruit, or slathered with a dollop of cream, these pancakes are sure to become a favorite in your breakfast rotation.
To achieve the perfect fluffiness, it’s crucial to use fresh ingredients and allow the batter to rest briefly before cooking. This allows the gluten in the flour to relax, resulting in a lighter pancake. Additionally, cooking them on a preheated non-stick skillet guarantees they cook evenly and develop a lovely golden-brown exterior.
With just a few simple steps, you can whip up a delightful breakfast that will warm hearts and bellies alike.
Ingredients (Serves 4-6)
- 1 cup all-purpose flour
- 2 tablespoons sugar
- 1 teaspoon baking powder
- 1/2 teaspoon baking soda
- 1/4 teaspoon salt
- 1 cup buttermilk (or milk with 1 tablespoon vinegar)
- 1 large egg
- 2 tablespoons melted butter (plus extra for cooking)
- Maple syrup (for serving)
Cooking Instructions
- Prepare the Dry Ingredients: In a large mixing bowl, whisk together the all-purpose flour, sugar, baking powder, baking soda, and salt until well combined. This guarantees that the leavening agents are evenly distributed throughout the flour for ideal fluffiness.
- Mix the Wet Ingredients: In a separate bowl, combine the buttermilk, egg, and melted butter. Whisk until the mixture is smooth and homogenous. The buttermilk adds richness and acidity, which helps to tenderize the pancakes.
- Combine Wet and Dry Ingredients: Pour the wet mixture into the bowl with the dry ingredients. Gently fold the ingredients together using a spatula or wooden spoon until just combined. Be careful not to overmix; a few lumps are perfectly fine. This will help maintain the fluffiness of the pancakes.
- Rest the Batter: Allow the batter to rest for about 5-10 minutes. This resting period helps to hydrate the flour and relax the gluten, contributing to fluffier pancakes.
- Heat the Skillet: Preheat a non-stick skillet or griddle over medium heat. Add a little butter to coat the surface. Make sure the skillet is hot enough that a few drops of water sizzle when they hit the surface.
- Cook the Pancakes: Pour about 1/4 cup of batter onto the skillet for each pancake. Cook until bubbles form on the surface and the edges look set, about 2-3 minutes. Flip the pancakes gently and cook for another 2-3 minutes on the opposite side until golden brown.
- Serve: Remove the pancakes from the skillet and keep them warm in a low oven while you cook the remaining batter. Serve stacks of pancakes hot with generous drizzles of maple syrup.
Extra Tips
For added flavor, consider incorporating vanilla extract or a pinch of cinnamon into the wet ingredients. If you want to enhance the texture, you can also fold in some blueberries or chocolate chips just before cooking.
Always verify your skillet is adequately preheated before adding the batter, as this will help achieve the perfect golden-brown color. Finally, if you have any leftovers, they can be stored in the refrigerator and reheated in the toaster for a quick breakfast later on!
Avocado Toast With Poached Egg
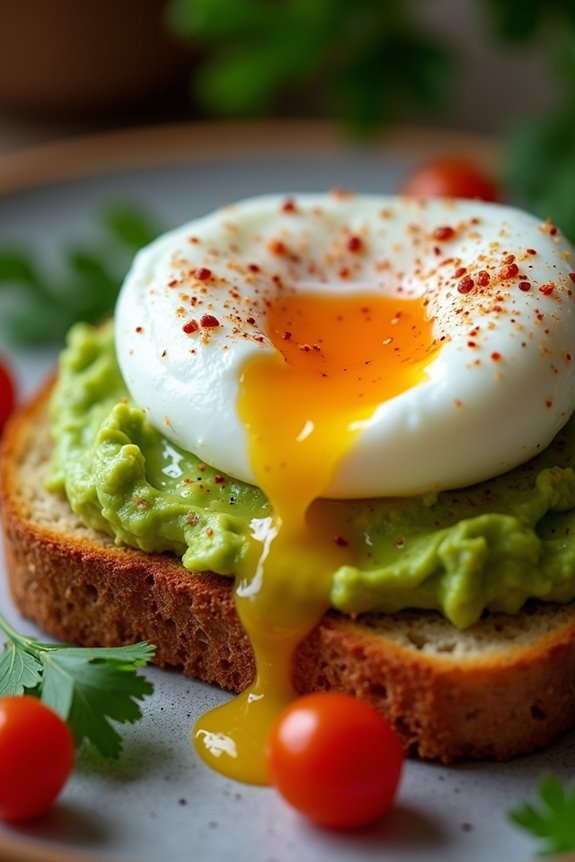
Avocado toast has become a beloved staple in British breakfasts, combining the richness of ripe avocados with the satisfying taste of perfectly toasted bread. This dish isn’t only delicious but also simple to prepare, making it a perfect option for both leisurely weekend breakfasts and quick weekday meals. Topped with a poached egg, the toast becomes a complete dish that’s packed with healthy fats, protein, and flavor.
To elevate your avocado toast, consider seasoning your avocado mixture with a pinch of salt, pepper, and a squeeze of lemon juice to enhance its natural taste. The poached egg adds a creamy texture that contrasts beautifully with the crunchy toast, creating a delightful breakfast experience. This recipe serves 4-6 people, making it ideal for family gatherings or brunch with friends.
Ingredients:
- 4 ripe avocados
- 8 slices of whole grain bread
- 4-6 large eggs
- 1 lemon (for juice)
- Salt, to taste
- Pepper, to taste
- Optional toppings: red pepper flakes, fresh herbs (like cilantro or parsley), cherry tomatoes
Cooking Instructions:
- Toast the Bread: Begin by toasting the slices of whole grain bread. You can use a toaster or a grill pan for this step. The goal is to achieve a golden brown color and a crunchy texture, which will serve as the base for your avocado topping.
- Prepare the Avocado: While the bread is toasting, cut the ripe avocados in half, remove the pit, and scoop the flesh into a mixing bowl. Mash the avocado with a fork until it reaches your desired level of creaminess. Add a squeeze of lemon juice, salt, and pepper to taste, stirring to combine.
- Poach the Eggs: In a medium saucepan, bring water to a gentle simmer. Add a splash of vinegar to help the eggs hold their shape. Crack each egg into a small bowl, then gently slide it into the simmering water. Poach the eggs for about 3-4 minutes for a runny yolk, or longer if you prefer a firmer yolk. Remove the eggs with a slotted spoon and let them drain on a paper towel.
- Assemble the Toast: Once the bread is toasted and the eggs are poached, it’s time to assemble your avocado toast. Spread a generous amount of the mashed avocado on each slice of toast. Top each with a poached egg, and sprinkle with additional salt, pepper, and any optional toppings you desire.
- Serve Immediately: Serve the avocado toast with poached eggs immediately while the toast is still warm. Enjoy this comforting breakfast with a side of fresh fruit or a cup of tea for a complete meal.
Extra Tips:
When preparing avocado toast with poached eggs, freshness is key. Choose avocados that are ripe but not overripe to guarantee a creamy texture without any browning.
To make poaching eggs easier, you can use the “swirl” method by stirring the simmering water in a circular motion before adding the egg, which helps it keep a nice shape.
If you find that poaching eggs is challenging, consider using a microwave poaching cup or an egg poacher for consistent results. Enjoy experimenting with different toppings like feta cheese or smoked salmon for added flavor!
Breakfast Tea and Shortbread Cookies

A cozy British breakfast wouldn’t be complete without a steaming cup of breakfast tea, perfectly paired with buttery shortbread cookies. This delightful combination not only warms the soul but also sets the right tone for the day ahead. The rich flavors of the tea complement the melt-in-your-mouth texture of the shortbread, creating a comforting experience that’s quintessentially British.
Whether you’re enjoying it alone or sharing with friends, this recipe is sure to become a beloved morning ritual.
Making breakfast tea is as much an art as it’s a science, and crafting the perfect shortbread cookies is straightforward yet satisfying. The key to great tea lies in the quality of the leaves and the steeping time, while the shortbread benefits from precise measurements and a gentle touch. Together, they create a harmonious balance that elevates your breakfast experience to new heights.
Let’s plunge into this delightful recipe that serves 4-6 people.
Ingredients
- For the Breakfast Tea:
- 4 cups of water
- 4 teaspoons of loose black tea leaves (or 4 tea bags)
- 4 teaspoons of sugar (optional)
- Milk (optional)
- For the Shortbread Cookies:
- 1 cup (226g) unsalted butter, softened
- ½ cup (60g) powdered sugar
- 2 cups (240g) all-purpose flour
- 1 cup (120g) cornstarch
- 1 teaspoon vanilla extract
- A pinch of salt
Cooking Instructions
- Prepare the Shortbread Dough: In a large mixing bowl, combine the softened unsalted butter and powdered sugar. Using an electric mixer or a wooden spoon, cream together until the mixture is light and fluffy. This process incorporates air into the butter, giving the cookies a tender texture.
- Add the Dry Ingredients: Gradually sift in the all-purpose flour and cornstarch into the creamed butter and sugar mixture. Add a pinch of salt and the vanilla extract. Mix gently until the dry ingredients are just incorporated. Be careful not to overmix, as this can lead to tougher cookies.
- Shape the Cookies: Once the dough comes together, turn it out onto a lightly floured surface. Roll it into a log shape, about 2 inches in diameter. Wrap the log in plastic wrap and refrigerate for at least 30 minutes to firm up. Chilling the dough helps the cookies maintain their shape during baking.
- Preheat the Oven: While the dough is chilling, preheat your oven to 350°F (175°C). This guarantees that the cookies bake evenly when they’re placed in the oven.
- Slice and Bake: After chilling, remove the dough from the refrigerator and slice it into ½-inch thick rounds. Place the rounds on a baking sheet lined with parchment paper, leaving some space between them. Bake in the preheated oven for 12-15 minutes or until the edges are lightly golden.
- Cool and Serve: Once baked, remove the cookies from the oven and let them cool on the baking sheet for a few minutes before transferring them to a wire rack. Serve the shortbread cookies warm or at room temperature alongside your freshly brewed breakfast tea.
Extra Tips
To enhance the flavor of your breakfast tea, consider using a good quality loose leaf tea for a more robust taste. If you prefer a stronger brew, allow the tea to steep for a few more minutes before serving.
Additionally, feel free to experiment with the shortbread by adding lemon zest, chocolate chips, or nuts for a twist on the classic recipe. Enjoy your cozy breakfast experience with loved ones, and don’t forget to savor each bite and sip!