

When the rain gently taps against the window, there’s nothing quite like the comforting embrace of British comfort food. A dish like Shepherd’s Pie, layered with savory lamb and creamy mash, feels like a warm hug on a chilly day. Then there’s the classic Bangers and Mash, smothered in rich onion gravy, offering that perfect touch of nostalgia. But beyond these favorites, there’s a world of sweet treats and hearty mains waiting to be explored. Each one is ready to wrap you in coziness and warmth.
Shepherd’s Pie

Shepherd’s Pie is a quintessential British comfort food that warms the soul and satisfies the palate. Traditionally made with minced lamb, this hearty dish features a savory filling of meat and vegetables topped with creamy mashed potatoes. The combination of flavors and textures makes it a beloved meal for families and friends, perfect for cozy gatherings or chilly evenings.
Whether you’re a seasoned cook or a beginner, this recipe will guide you through creating your own Shepherd’s Pie that will have everyone coming back for seconds.
Preparing Shepherd’s Pie isn’t only about the lovely layers of meat and potatoes but also about the love and care you put into each step. As the filling simmers, the aromas will fill your kitchen, inviting everyone to the dining table.
This dish is often served with a side of green peas or a fresh salad, making it a complete and balanced meal. Let’s explore the ingredients and instructions to create this classic dish.
Ingredients (Serves 4-6)
- 1 pound ground lamb (or beef, if preferred)
- 1 medium onion, finely chopped
- 2 carrots, diced
- 2 cloves garlic, minced
- 1 cup frozen peas
- 1 tablespoon tomato paste
- 1 tablespoon Worcestershire sauce
- 1 cup beef or lamb broth
- 1 teaspoon dried thyme
- 1 teaspoon dried rosemary
- Salt and pepper, to taste
- 4 large potatoes, peeled and quartered
- ½ cup milk
- 4 tablespoons butter
- 1 cup shredded cheddar cheese (optional)
Cooking Instructions
- Prepare the Mashed Potatoes: Begin by boiling the quartered potatoes in a large pot of salted water over medium heat. Cook for about 15-20 minutes, or until the potatoes are tender when pierced with a fork. Drain the potatoes and return them to the pot.
- Mash the Potatoes: Add the milk and butter to the drained potatoes. Mash the mixture until smooth and creamy. Season with salt and pepper to taste. Set aside while you prepare the filling.
- Cook the Meat and Vegetables: In a large skillet over medium heat, add the ground lamb. Cook until browned, breaking it apart with a spatula. Drain any excess fat, if necessary.
- Add Aromatics: To the browned meat, add the chopped onion, diced carrots, and minced garlic to the skillet. Cook for about 5-7 minutes, or until the vegetables are softened.
- Incorporate Remaining Ingredients: Stir in the tomato paste, Worcestershire sauce, and broth. Add the frozen peas, thyme, rosemary, salt, and pepper. Let the mixture simmer for about 10 minutes, allowing the flavors to meld together.
- Assemble the Shepherd’s Pie: Preheat your oven to 400°F (200°C). In a baking dish, spread the meat and vegetable mixture evenly at the bottom. Carefully layer the mashed potatoes on top, smoothing it out with a spatula. If desired, sprinkle shredded cheddar cheese on top for an extra cheesy finish.
- Bake: Place the assembled Shepherd’s Pie in the preheated oven and bake for about 25-30 minutes, or until the top is golden brown and the edges are bubbling.
- Serve: Remove the Shepherd’s Pie from the oven and let it cool for a few minutes before serving. Scoop out portions and enjoy this comforting dish with your loved ones.
Extra Tips
For an extra depth of flavor, consider adding a splash of red wine to the meat mixture while it’s simmering. You can also customize the vegetables based on your preference—parsnips or corn make great additions.
If you want a crispier topping, broil the pie for an additional 2-3 minutes after baking, but keep a close eye to prevent burning. Enjoy your Shepherd’s Pie with a side of gravy or pickled vegetables for an added tang!
Bangers and Mash

Bangers and Mash is a quintessential British comfort food that combines succulent sausages with creamy mashed potatoes, often served with a rich onion gravy. This dish isn’t only hearty and filling but is also incredibly simple to prepare, making it a favorite for weeknight dinners and special occasions alike.
The combination of savory sausages and smooth, buttery mash creates a satisfying meal that warms the soul, perfect for any cold evening or family gathering.
To elevate this dish, the choice of sausages can greatly influence the flavor. Traditional pork sausages are commonly used, but you can also experiment with different types such as chicken, lamb, or even vegetarian options.
The key to a delicious Bangers and Mash lies in the quality of the ingredients and the technique used to prepare the mash. With a few simple steps, you can create a comforting plate of Bangers and Mash that will have everyone asking for seconds.
Ingredients (Serves 4-6):
- 6-8 high-quality sausages (pork, chicken, or your choice)
- 2 pounds of potatoes (Yukon Gold or Russet)
- ½ cup of milk
- ¼ cup of unsalted butter
- Salt and pepper to taste
- 1 large onion, thinly sliced
- 2 tablespoons of olive oil
- 1 cup of beef or vegetable broth
- 1 tablespoon of Worcestershire sauce
- Fresh parsley (optional, for garnish)
Cooking Instructions:
1. Prepare the Potatoes: Begin by peeling the potatoes and cutting them into even-sized chunks. Place them in a large pot of salted cold water. Bring the water to a boil over high heat and then reduce to a simmer. Cook the potatoes for about 15-20 minutes, or until they’re fork-tender.
2. Cook the Sausages: While the potatoes are cooking, heat a large skillet over medium heat. Add the sausages and cook for about 10-12 minutes, turning occasionally, until they’re browned and cooked through. Once cooked, remove the sausages from the skillet and set them aside, keeping them warm.
3. Make the Onion Gravy: In the same skillet used for the sausages, add the olive oil and sliced onions. Sauté the onions for about 5-7 minutes, or until they’re caramelized and golden brown.
Then, stir in the beef or vegetable broth and Worcestershire sauce, scraping any browned bits from the bottom of the pan. Let the gravy simmer for about 5 minutes to thicken slightly.
4. Mash the Potatoes: Once the potatoes are cooked, drain them and return them to the pot. Add the milk and butter, then Mash the Potatoes until smooth and creamy. Season with salt and pepper to taste.
5. Assemble the Dish: To serve, place a generous scoop of mashed potatoes on each plate. Top with the sausages and pour the onion gravy over the top. Garnish with fresh parsley if desired.
Extra Tips:
For an added depth of flavor in your mashed potatoes, consider adding roasted garlic or cream cheese for extra creaminess.
If you prefer a thicker gravy, mix a teaspoon of cornstarch with a little cold water to make a slurry, then stir it into the simmering gravy. Additionally, feel free to customize your sausages by using different flavors, such as apple and sage or spicy chorizo, to give your Bangers and Mash a unique twist.
Chicken Tikka Masala

Chicken Tikka Masala is a beloved dish that beautifully marries Indian spices with British culinary traditions, making it a quintessential comfort food. This dish features marinated chicken that’s grilled or baked and then simmered in a creamy, spiced tomato sauce.
Originating from the Indian subcontinent, it has gained immense popularity in the UK, where it has been embraced as a staple in British cuisine. The rich flavors and comforting texture make it an ideal meal for any occasion, whether it’s a cozy dinner at home or a gathering with friends and family.
Making Chicken Tikka Masala from scratch isn’t only rewarding but also allows you to customize the spice levels to suit your taste preferences. The dish typically features tender pieces of chicken marinated in yogurt and spices, which is then cooked until perfectly tender and combined with a luscious, fragrant sauce.
Serve it alongside basmati rice or warm naan bread for an authentic experience that will transport you to the bustling streets of London or the vibrant markets of India.
Ingredients (Serves 4-6):
- 1.5 lbs (680g) boneless chicken thighs, cut into bite-sized pieces
- 1 cup plain yogurt
- 2 tablespoons garam masala
- 1 tablespoon ground cumin
- 1 tablespoon ground coriander
- 1 teaspoon turmeric powder
- 1 teaspoon cayenne pepper (adjust for heat preference)
- 2 tablespoons lemon juice
- 2 tablespoons vegetable oil
- 1 onion, finely chopped
- 4 cloves garlic, minced
- 1 tablespoon fresh ginger, minced
- 1 can (14 oz) crushed tomatoes
- 1 cup heavy cream
- Salt to taste
- Fresh cilantro, chopped (for garnish)
Cooking Instructions:
- Marinate the Chicken: In a large bowl, combine the yogurt, garam masala, ground cumin, ground coriander, turmeric, cayenne pepper, and lemon juice. Add the chicken pieces, ensuring they’re well coated. Cover and refrigerate for at least 1 hour, or ideally overnight, to allow the flavors to meld and the chicken to tenderize.
- Cook the Chicken: Preheat your grill or oven to 400°F (200°C). Thread the marinated chicken pieces onto skewers (if using a grill) or spread them on a baking sheet lined with parchment paper (if using the oven). Grill or bake the chicken for about 15-20 minutes, turning halfway through, until fully cooked and slightly charred. Remove from heat and set aside.
- Prepare the Sauce: In a large pan or skillet, heat the vegetable oil over medium heat. Add the chopped onion and sauté until it becomes soft and translucent, about 5-7 minutes. Stir in the minced garlic and ginger, cooking for another minute until fragrant.
- Add Tomatoes and Simmer: Pour in the crushed tomatoes and season with salt. Bring the mixture to a simmer and let it cook for about 10 minutes, allowing the flavors to develop and the sauce to thicken slightly.
- Incorporate the Cream: Reduce the heat to low and slowly stir in the heavy cream. Mix well to combine, and continue to simmer for an additional 5 minutes.
- Combine Chicken and Sauce: Add the grilled chicken pieces to the sauce, stirring to coat the chicken thoroughly. Let it simmer for another 5 minutes to heat through and allow the flavors to meld.
- Garnish and Serve: Remove from heat and garnish with chopped fresh cilantro. Serve hot with basmati rice or naan bread, and enjoy your comforting Chicken Tikka Masala!
Extra Tips:
When making Chicken Tikka Masala, feel free to adjust the spice levels according to your preference. If you want a milder dish, reduce the amount of cayenne pepper or omit it entirely.
Additionally, using chicken thighs instead of breasts will yield a juicier and more flavorful result, but if you prefer leaner meat, chicken breast can be used. For an extra depth of flavor, consider adding a pinch of sugar to the sauce to balance the acidity of the tomatoes. Enjoy your cooking!
Beef Wellington

Beef Wellington is a classic British dish that exudes elegance and comfort, making it a perfect centerpiece for any special occasion or family gathering. This delectable dish consists of a succulent beef tenderloin coated in a rich mushroom duxelles, wrapped in layers of prosciutto, and encased in flaky puff pastry. The combination of flavors and textures creates a truly unforgettable experience, bringing warmth and satisfaction to all who indulge in its buttery goodness.
To achieve the perfect Beef Wellington, it’s vital to focus on the quality of the ingredients and the cooking technique. The beef should be cooked to a perfect medium-rare, while the pastry needs to be golden and crisp. This dish not only showcases the artistry of cooking but also delights the palate with its savory fillings and tender beef. Whether it’s a festive dinner or a cozy Sunday meal, Beef Wellington is sure to impress your guests and leave them craving more.
Ingredients (Serves 4-6):
- 2 lb beef tenderloin
- Salt and pepper, to taste
- 2 tablespoons olive oil
- 8 oz mushrooms, finely chopped
- 2 cloves garlic, minced
- 2 tablespoons fresh thyme, chopped
- 1/4 cup Dijon mustard
- 8 slices prosciutto
- 1 sheet of puff pastry, thawed
- 1 egg, beaten (for egg wash)
Cooking Instructions:
- Prepare the Beef: Season the beef tenderloin generously with salt and pepper. In a large skillet, heat the olive oil over high heat. Sear the beef on all sides until it’s browned, about 2-3 minutes per side. Remove it from the skillet and let it rest. This step seals in the juices and enhances the flavor of the meat.
- Make the Mushroom Duxelles: In the same skillet, add the finely chopped mushrooms and cook over medium heat until they release their moisture and become golden brown, about 8-10 minutes. Add the minced garlic and chopped thyme, cooking for another 2-3 minutes. Season with salt and pepper to taste. Remove from heat and allow to cool completely. This mixture adds depth and richness to the Beef Wellington.
- Assemble the Wellington: On a clean surface, lay out the prosciutto slices in an overlapping pattern. Spread the cooled mushroom mixture evenly over the prosciutto. Place the beef tenderloin in the center and spread the Dijon mustard over the top. Carefully roll the prosciutto and mushroom around the beef, tightly wrapping it. This layer protects the beef and adds flavor.
- Wrap in Puff Pastry: Roll out the puff pastry on a floured surface to guarantee it’s large enough to envelop the beef. Place the wrapped beef in the center of the pastry. Fold the pastry over the beef, sealing the edges by pinching them together. Trim any excess pastry and confirm there are no gaps. This step is essential for maintaining the juiciness of the beef during cooking.
- Bake the Wellington: Preheat your oven to 400°F (200°C). Place the wrapped Beef Wellington on a baking sheet lined with parchment paper. Brush the top with the beaten egg to achieve a golden crust. Bake for 25-30 minutes, or until the pastry is golden brown and the internal temperature of the beef reaches 130-135°F (54-57°C) for medium-rare. Keeping an eye on the cooking time is vital to avoid overcooking the beef.
- Rest and Serve: Once baked, remove the Beef Wellington from the oven and let it rest for 10-15 minutes before slicing. This resting period allows the juices to redistribute, ensuring each slice is tender and juicy. Serve with your favorite sides, such as roasted vegetables or creamy mashed potatoes.
Extra Tips:
When preparing Beef Wellington, make sure to use high-quality ingredients, particularly the beef and mushrooms, to elevate the dish’s flavor. It’s also important to let the mushroom duxelles cool completely before wrapping it around the beef, as excess moisture could make the pastry soggy.
For an extra touch of flavor, consider adding a splash of brandy to the mushroom mixture or enhancing the seasoning with a bit of freshly ground pepper. Finally, if you want to make the dish ahead of time, you can assemble it in advance and store it in the refrigerator, just remember to add extra baking time if it goes into the oven chilled. Enjoy your cooking adventure!
Sticky Toffee Pudding
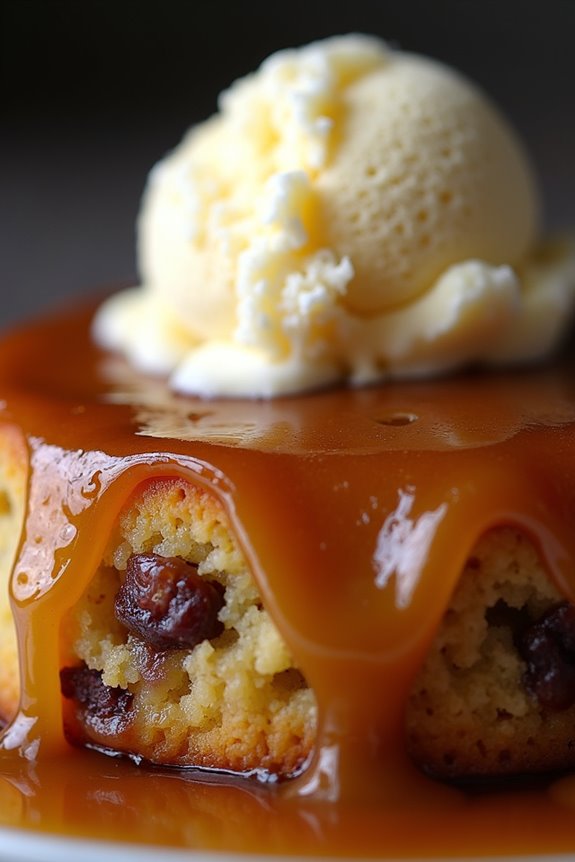
Sticky Toffee Pudding is a classic British dessert that perfectly embodies the essence of cozy comfort food. This indulgent treat is made from a moist sponge cake sweetened with dates and drizzled with a rich toffee sauce, making it a favorite among dessert lovers.
Traditionally served warm, it’s often accompanied by a scoop of vanilla ice cream or a generous dollop of clotted cream, adding to its sumptuousness.
The origins of Sticky Toffee Pudding are somewhat murky, but it’s believed to have been popularized in the 1960s, quickly becoming a staple in British pubs and restaurants. Its combination of sweet, sticky, and warm elements makes it a perfect ending to any meal, especially during the colder months.
Whether you’re hosting a dinner party or simply craving something sweet, this dessert is sure to impress.
Ingredients (Serves 4-6):
- 200g pitted dates, chopped
- 250ml boiling water
- 1 tsp baking soda
- 75g unsalted butter, softened
- 150g light brown sugar
- 2 large eggs
- 1 tsp vanilla extract
- 175g all-purpose flour
- 1 tsp baking powder
- A pinch of salt
- 200g brown sugar (for toffee sauce)
- 100g unsalted butter (for toffee sauce)
- 250ml double cream (for toffee sauce)
Cooking Instructions:
1. Prepare the Dates: In a bowl, combine the chopped dates and boiling water. Stir in the baking soda and let it sit for about 15 minutes. This will soften the dates and create a natural sweetness that’s vital for the pudding.
2. Make the Batter: Preheat your oven to 180°C (350°F). In a large mixing bowl, cream together the softened butter and light brown sugar until light and fluffy. This step is essential as it incorporates air into the mixture, resulting in a lighter sponge.
3. Add Eggs and Vanilla: Beat in the eggs one at a time, making sure each is fully incorporated before adding the next. Add the vanilla extract and mix until smooth.
4. Combine Dry Ingredients: In a separate bowl, sift together the flour, baking powder, and salt. Gradually fold this dry mixture into the wet ingredients using a spatula, being careful not to overmix, as this can lead to a dense pudding.
5. Incorporate the Dates: Add the softened date mixture (along with any remaining liquid) to the batter and gently fold until just combined. The dates will add moisture and a rich flavor to the pudding.
6. Bake the Pudding: Pour the batter into a greased baking dish (approximately 8×8 inches) and bake for 30-35 minutes, or until a skewer inserted into the center comes out clean. Keep an eye on it to prevent overbaking, which can dry out the pudding.
7. Prepare the Toffee Sauce: While the pudding is baking, make the toffee sauce by melting the butter in a saucepan over low heat. Stir in the brown sugar and double cream, mixing until the sugar has dissolved.
Increase the heat slightly and bring to a gentle boil, then simmer for a few minutes until the sauce thickens slightly.
8. Serve: Once the pudding is baked, allow it to cool slightly in the pan before inverting onto a serving plate. Drizzle generously with the warm toffee sauce and serve immediately, ideally with ice cream or clotted cream.
Extra Tips:
To guarantee your Sticky Toffee Pudding turns out perfect, consider soaking the dates longer if you prefer a richer flavor.
You can also experiment by adding a splash of whiskey or rum to the toffee sauce for an adult twist. If you want to make the pudding in advance, it can be stored, covered, in the fridge for a couple of days.
Simply reheat it gently before serving, and don’t forget to warm the toffee sauce as well for that ultimate cozy experience!
Fish and Chips
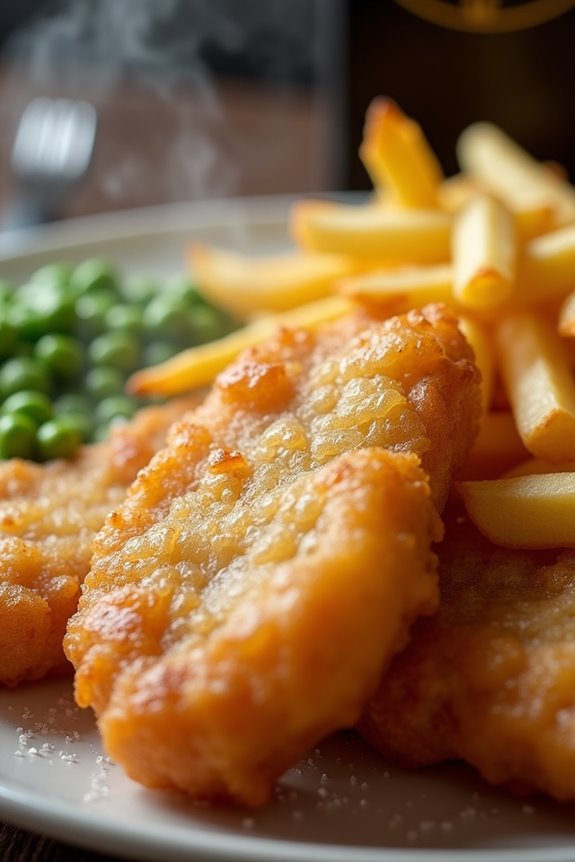
Fish and chips is an iconic British dish that has become beloved around the world. With its crispy battered fish and golden fries, it embodies the essence of cozy comfort food. Traditionally served with a side of mushy peas and tartar sauce, this meal is perfect for a casual dinner or a special occasion.
Making your own fish and chips at home allows you to customize the flavors and enjoy the freshness of the ingredients, giving you a taste of Britain right in your kitchen.
To achieve the perfect fish and chips, the key lies in the batter and the frying technique. A light, crispy batter is crucial for encasing the fish, while the chips need to be double-fried for that ideal crunch. Whether you choose cod, haddock, or another white fish, this recipe will guide you through creating a satisfying and delicious dish that captures the heartwarming spirit of British cuisine.
Ingredients (Serves 4-6):
- 4 large fillets of white fish (cod or haddock)
- 1 cup all-purpose flour (plus extra for dusting)
- 1 teaspoon baking powder
- 1 cup cold sparkling water
- Salt and pepper, to taste
- 4 large potatoes (for chips)
- Vegetable oil (for frying)
- Optional: malt vinegar, tartar sauce, and mushy peas for serving
Cooking Instructions:
- Prepare the Potatoes: Start by peeling the potatoes and cutting them into thick chips, about 1/2 inch wide. Rinse the chips in cold water to remove excess starch, then pat them dry with a kitchen towel. This step helps achieve crispy fries.
- Preheat the Oil: In a large, heavy-bottomed pot or deep fryer, heat vegetable oil to 320°F (160°C). Use a thermometer to verify the temperature is correct—too hot, and the chips will burn; too cool, and they’ll absorb too much oil.
- First Fry the Chips: Carefully add the chips to the hot oil in batches, frying them for about 5-6 minutes until they’re just tender but not browned. Remove the chips and drain them on paper towels. This first fry cooks the potatoes through without adding color.
- Make the Batter: In a mixing bowl, combine 1 cup of flour and baking powder. Gradually whisk in the cold sparkling water until you achieve a smooth, thick batter. Season with salt and pepper to taste. The bubbles in the sparkling water will help create a light and airy texture.
- Prepare the Fish: Pat the fish fillets dry with a paper towel and season with salt and pepper. Dust each fillet lightly with flour, which helps the batter adhere better during frying.
- Heat the Oil for Frying Fish: Increase the temperature of the oil to 350°F (180°C).
- Fry the Fish: Dip each floured fish fillet into the batter, allowing any excess to drip off. Carefully lower the fillets into the hot oil, frying them for about 4-5 minutes on each side, or until golden brown and cooked through. Use a slotted spoon to remove the fish and drain on paper towels.
- Second Fry the Chips: Once the fish is done, increase the oil temperature again to 375°F (190°C). Fry the pre-cooked chips a second time for about 2-3 minutes until they’re golden brown and crispy. Drain them on paper towels and season with salt.
- Serve: Serve the fish and chips hot, accompanied by malt vinegar, tartar sauce, and mushy peas on the side if desired.
Extra Tips:
For the best flavor, opt for fresh fish from a reliable source, and don’t hesitate to experiment with different types of fish.
Verify your oil is at the right temperature before frying; using a thermometer can help achieve this. If you want a healthier option, consider baking the chips instead of frying, or try using an air fryer.
Enjoy your homemade fish and chips with a crisp salad or a revitalizing drink for a complete meal!
Ploughman’s Lunch
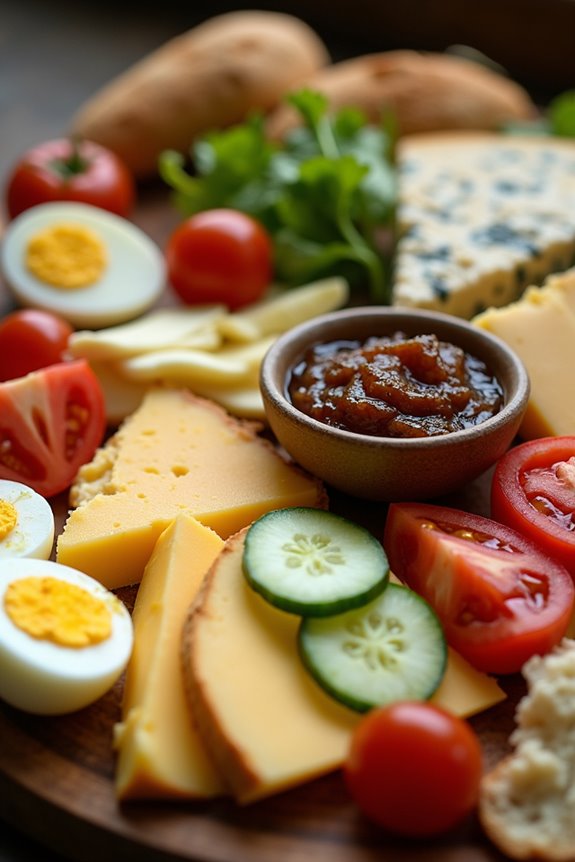
The Ploughman’s Lunch is a quintessential British dish that embodies the essence of comfort food with its simplicity and rustic charm. Traditionally enjoyed by farmers during their midday meal, this dish is a delightful assortment of ingredients that can be easily prepared and served cold. It typically includes a selection of cheeses, crusty bread, pickles, and seasonal vegetables, making it a hearty and satisfying option for lunch or a light dinner.
The beauty of the Ploughman’s Lunch lies in its versatility; you can customize it with your favorite cheeses and accompaniments to suit your palate. This dish isn’t only a feast for the eyes but also a fantastic way to engage with local produce and artisanal products. It encourages you to explore the flavors of British cheeses and homemade chutneys while enjoying the vibrant colors of fresh vegetables.
Perfect for a picnic or a cozy gathering, the Ploughman’s Lunch invites sharing and conversation, making it an ideal comfort food experience for family and friends.
Ingredients (Serves 4-6)
- 400g of mature Cheddar cheese, sliced
- 200g of Stilton cheese, crumbled
- 1 large baguette or rustic loaf, sliced
- 150g of butter, softened
- 1 jar of Branston pickle or any chutney
- 4-6 boiled eggs, halved
- 2-3 medium-sized tomatoes, sliced
- 1 cucumber, sliced
- A handful of mixed salad greens
- A selection of pickled onions or gherkins
- Fresh apples or pears, sliced (optional)
Cooking Instructions
- Prepare the Cheese: Start by slicing the mature Cheddar cheese into thick pieces and crumbling the Stilton cheese. Arrange the cheeses on a large serving platter, making sure to leave space for the other ingredients. This allows guests to help themselves and creates an inviting centerpiece for your Ploughman’s Lunch.
- Slice the Bread: Take your baguette or rustic loaf and slice it into thick pieces. You can toast the bread lightly if desired, but serving it fresh is a classic choice. Place the slices around the cheese on the serving platter to create a beautiful spread.
- Prepare the Accompaniments: Halve the boiled eggs and arrange them on the platter. Slice the tomatoes and cucumber, and add them to the presentation. These fresh vegetables not only enhance the flavor profile but also add a vibrant splash of color to the dish.
- Add the Pickles and Chutney: Spoon the Branston pickle or your chosen chutney into a small bowl and place it in the center of the platter. Surround it with pickled onions or gherkins to provide a tangy contrast to the richness of the cheeses.
- Garnish with Salad Greens and Fruits: Finally, scatter the mixed salad greens around the edges of the platter, and if you like, add sliced apples or pears for a sweet touch. This not only adds freshness but also elevates the visual appeal of your Ploughman’s Lunch.
- Serve and Enjoy: Serve the Ploughman’s Lunch with butter on the side for those who wish to spread it on their bread. Encourage your guests to create their own combinations of cheese, bread, and accompaniments to enjoy a truly personalized meal.
Extra Tips
When preparing a Ploughman’s Lunch, consider using a variety of cheeses to create an exciting tasting experience. Local artisanal cheeses can elevate the dish considerably. Additionally, feel free to incorporate seasonal vegetables or fruits for added freshness.
The key is to balance flavors and textures, so don’t hesitate to experiment with different types of bread, pickles, and chutneys. Remember, the Ploughman’s Lunch is all about enjoying good food and good company.
Cottage Pie
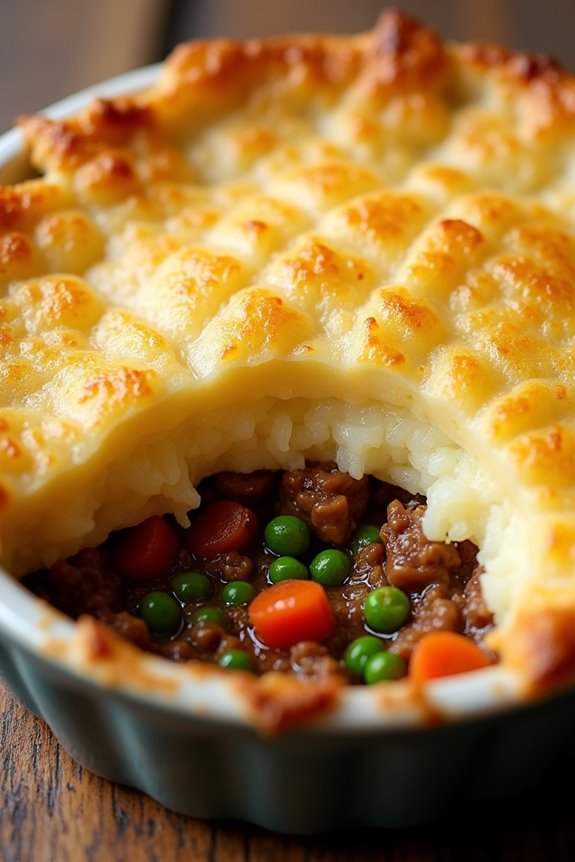
Cottage Pie is a warm and hearty British dish that has been a beloved staple for generations. Traditionally made with minced beef and topped with creamy mashed potatoes, this comforting meal is perfect for chilly evenings. The rich flavors of the seasoned meat combined with the smooth, buttery potato topping create a satisfying dish that warms both the body and soul.
While often associated with family gatherings, Cottage Pie is also great for meal prepping, as it can be easily stored and reheated. This dish’s history dates back to the late 18th century, when it was a way for families to utilize leftover meat. Over time, it has evolved into the classic we recognize today.
The versatility of Cottage Pie allows for various ingredients to be incorporated, including vegetables such as carrots, peas, and onions, adding both nutrition and flavor. Whether served with a side of green beans or simply on its own, Cottage Pie is sure to please everyone at the dinner table.
Ingredients (Serves 4-6):
- 1 lb (450g) ground beef
- 1 medium onion, finely chopped
- 2 medium carrots, diced
- 2 cloves garlic, minced
- 1 cup (150g) frozen peas
- 2 tablespoons tomato paste
- 1 tablespoon Worcestershire sauce
- 1 cup (240ml) beef broth
- 1 teaspoon dried thyme
- Salt and pepper to taste
- 2 lbs (900g) potatoes, peeled and cut into chunks
- 4 tablespoons butter
- ½ cup (120ml) milk
- Grated cheese (optional, for topping)
Cooking Instructions:
- Preheat the Oven: Begin by preheating your oven to 400°F (200°C). This guarantees that the Cottage Pie will bake evenly and develop a lovely golden crust when finished.
- Cook the Potatoes: In a large pot, add the peeled and chopped potatoes and cover them with cold water. Bring the water to a boil over medium-high heat, then reduce the heat and let the potatoes simmer until tender, about 15-20 minutes. Once cooked, drain the potatoes.
- Mash the Potatoes: Return the drained potatoes to the pot. Add the butter and milk, then mash until smooth and creamy. Season with salt and pepper to taste. Set aside while you prepare the meat filling.
- Sauté the Vegetables: In a large skillet over medium heat, add a splash of oil and the chopped onions and carrots. Sauté for about 5-7 minutes, or until the vegetables have softened. Add the minced garlic and cook for an additional minute, stirring frequently to avoid burning.
- Brown the Meat: Increase the heat to medium-high and add the ground beef to the skillet. Cook until browned, breaking it up with a wooden spoon as it cooks. Drain any excess fat if necessary.
- Add Flavorings: Stir in the tomato paste, Worcestershire sauce, beef broth, dried thyme, and frozen peas. Season with salt and pepper. Bring the mixture to a simmer and cook for about 5 minutes, allowing the flavors to meld together.
- Assemble the Pie: In a baking dish, spread the beef mixture evenly across the bottom. Top with the creamy mashed potatoes, spreading them out to cover the meat completely. Use a fork to create texture on the surface, which will help it crisp up in the oven.
- Bake the Cottage Pie: Place the assembled Cottage Pie in the preheated oven and bake for 25-30 minutes, or until the top is golden brown and crispy. If desired, sprinkle grated cheese on top during the last 5 minutes of baking for an extra cheesy finish.
- Serve and Enjoy: Once finished, remove the Cottage Pie from the oven and let it cool for a few minutes. Serve warm, and enjoy a hearty slice of this comforting dish!
Extra Tips:
For added flavor, consider incorporating a splash of red wine into the meat mixture while it simmers. You can also experiment with different vegetables, such as corn or mushrooms, to suit your taste preferences.
If you have leftovers, Cottage Pie can be stored in the refrigerator for up to three days and makes for a fantastic reheated meal. For a truly rustic touch, serve it with a side of crusty bread to soak up the delicious juices!
Full English Breakfast

A Full English Breakfast is the quintessential British comfort food that brings together a hearty combination of flavors and textures, making it a beloved choice for breakfast or brunch. This indulgent meal typically includes eggs, sausages, bacon, baked beans, tomatoes, and toast, showcasing the rich culinary heritage of Britain. Not only is it filling, but it also provides a delightful array of tastes that can be customized to suit your preferences.
Cooking a Full English Breakfast can be a straightforward process, but it does require some coordination to guarantee everything is cooked to perfection and served hot. This dish is perfect for a weekend brunch or a special occasion, allowing you to gather family and friends around the table for a nourishing start to the day. Once you have your ingredients ready and your cooking space organized, you’ll be on your way to serving up a classic British feast.
Ingredients (Serves 4-6):
- 8 pork sausages
- 8 slices of back bacon
- 4 large eggs
- 1 can (400g) of baked beans
- 4 large tomatoes, halved
- 4 slices of white or wholemeal bread
- 2 tablespoons of vegetable oil (for frying)
- Salt and pepper (to taste)
- Optional: black pudding, mushrooms, or hash browns for additional sides
Cooking Instructions:
- Prepare the Ingredients: Start by gathering all your ingredients and equipment. Make sure your sausages are at room temperature for even cooking. You can also prepare any optional ingredients like black pudding or mushrooms if you choose to include them.
- Cook the Sausages: In a large frying pan, heat 1 tablespoon of vegetable oil over medium heat. Add the sausages and cook them for about 10-12 minutes, turning occasionally until they’re browned and cooked through. You can also bake them in the oven if preferred, according to package instructions.
- Add the Bacon: Once the sausages are nearly done, push them to one side of the pan and add the slices of back bacon. Cook the bacon for about 4-5 minutes until crispy, flipping halfway through. If you’re using additional sides like black pudding or mushrooms, add them to the pan during this step as well.
- Prepare the Eggs and Tomatoes: In a separate pan, heat the remaining tablespoon of vegetable oil over medium heat. Crack the eggs into the pan and cook them to your liking (sunny side up, scrambled, or fried). In the final few minutes of cooking, add the halved tomatoes to the same pan, cut side down, to grill them until softened.
- Warm the Baked Beans: While the eggs and tomatoes are cooking, heat the baked beans in a small saucepan over low heat until warmed through, stirring occasionally to prevent sticking.
- Toast the Bread: Ultimately, toast the slices of bread in a toaster or on a griddle until golden brown. This can be done while the other components are finishing up.
- Serve the Breakfast: Once everything is cooked, arrange the sausages, bacon, eggs, tomatoes, and baked beans on plates. Serve with the toast on the side, and season with salt and pepper to taste.
Extra Tips:
For the best Full English Breakfast, timing is key. Start with the sausages and bacon as they take the longest to cook, then add the eggs and tomatoes toward the end to guarantee everything is hot and fresh when served.
You can also customize the breakfast by adding other favorites like sautéed mushrooms or hash browns. If you prefer a healthier option, consider grilling the sausages and bacon instead of frying.
Finally, pairing your breakfast with a nice cup of tea or coffee can elevate the experience even further!
Cornish Pasty

Cornish pasties are a delightful traditional British dish, originating from Cornwall, England. These hearty pastries are filled with a savory mixture of meat and vegetables, all enveloped in a golden, flaky crust. The pasty was originally a convenient meal for miners, who’d take them underground for their lunch – a complete meal in a portable package. Each bite brings a taste of history and comfort, making them a perfect addition to any cozy meal at home.
Making Cornish pasties from scratch may seem intimidating, but with the right ingredients and a bit of patience, you’ll be rewarded with a satisfying dish that warms the soul. The combination of tender beef, potatoes, and turnips, seasoned to perfection, all encased in a buttery pastry, is sure to please everyone at the table. Serve them with a side of your favorite chutney or a simple salad for a complete meal that embodies the essence of British comfort food.
Ingredients (Serves 4-6):
- 500g (1 lb) beef skirt or chuck, diced
- 2 medium potatoes, peeled and diced
- 1 medium onion, finely chopped
- 1 medium swede (or rutabaga), peeled and diced
- 2 tablespoons fresh parsley, chopped
- 1 teaspoon salt
- ½ teaspoon black pepper
- 1 tablespoon Worcestershire sauce
- 1 tablespoon beef stock (or water)
- 500g (about 4 cups) shortcrust pastry (store-bought or homemade)
- 1 egg, beaten (for egg wash)
Cooking Instructions:
1. Prepare the Filling****: In a large mixing bowl, combine the diced beef, potatoes, onion, swede, and parsley. Season the mixture with salt, pepper, and Worcestershire sauce, confirming everything is well combined.
Add the beef stock or water for moisture, which will help the filling stay juicy during baking. Set the filling aside to let the flavors meld while you prepare the pastry.
2. Make the Pastry: If using homemade shortcrust pastry, roll it out on a floured surface until it’s about 3mm thick. If using store-bought pastry, simply unroll it.
Cut out large circles, approximately 20cm (8 inches) in diameter, from the rolled pastry. You’ll need enough circles for each pasty, typically 4 to 6 depending on the size.
3. Assemble the Pasties: Place a generous amount of the filling onto one half of each pastry circle, leaving a border around the edge. Brush the edges with beaten egg to help seal the pasties.
Fold the other half of the pastry over the filling to create a semi-circle shape. Press the edges together firmly, then crimp with your fingers or a fork to confirm a tight seal.
4. Prepare for Baking: Preheat your oven to 200°C (400°F). Place the assembled pasties on a baking tray lined with parchment paper.
Brush the tops of the pasties with the remaining beaten egg to give them a beautiful golden color as they bake.
5. Bake the Pasties: Bake in the preheated oven for 30-35 minutes or until the pastry is golden brown and crisp.
If the edges start to brown too quickly, you can cover them with foil to prevent burning. Once baked, remove them from the oven and allow them to cool slightly before serving.
Extra Tips: When making Cornish pasties, feel free to adjust the filling based on your preferences. You can add or substitute vegetables like carrots or peas for a personal touch.
Additionally, confirm your pastry is chilled before rolling it out, as this will help achieve a flakier texture. For added flavor, consider infusing your beef with herbs such as thyme or rosemary.
Finally, these pasties can be frozen before baking, making them an excellent make-ahead meal option; just bake from frozen, adding a few extra minutes to the cooking time. Enjoy your homemade Cornish pasties!
Bread and Butter Pudding
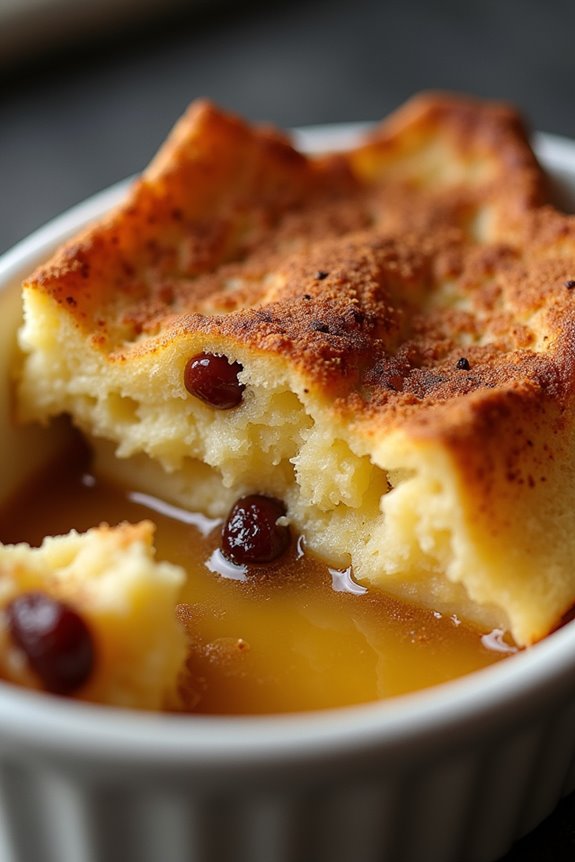
Bread and Butter Pudding is a quintessential British dessert that transforms stale bread into a rich, comforting treat. This classic dish is perfect for using up leftover bread, as the layers of buttered bread soak up a creamy custard mixture, resulting in a delightful texture and warming flavor that’s certain to satisfy.
The pudding is often enhanced with raisins or sultanas, and a sprinkle of nutmeg or cinnamon adds a fragrant touch that elevates the dish to a cozy indulgence.
This recipe for Bread and Butter Pudding is simple and requires minimal ingredients, making it an ideal choice for both novice and experienced cooks. It’s perfect for family gatherings or as a sweet ending to a comforting meal. Serve it warm with a drizzle of custard or a scoop of vanilla ice cream for that extra touch of indulgence.
Ingredients (serves 4-6):
- 6-8 slices of stale white bread (preferably brioche or challah)
- 75g (about 5 tablespoons) unsalted butter, softened
- 100g (about ½ cup) sugar
- 2 large eggs
- 500ml (about 2 cups) whole milk
- 150ml (about ⅔ cup) double cream
- 1 teaspoon vanilla extract
- 100g (about 1 cup) raisins or sultanas
- ½ teaspoon ground cinnamon (optional)
- A pinch of nutmeg (optional)
Cooking Instructions:
- Preheat the Oven: Preheat your oven to 180°C (350°F). This guarantees that your pudding will bake evenly and thoroughly.
- Prepare the Bread: Trim the crusts off the slices of bread if desired. Spread a generous layer of softened butter on one side of each slice. Cut the slices into triangles or quarters and set them aside.
- Arrange the Bread: In a buttered baking dish (approximately 8×8 inches), layer half of the bread, buttered side up. Sprinkle half of the raisins or sultanas over the bread. Repeat with the remaining bread and fruits, creating a second layer.
- Make the Custard Mixture: In a mixing bowl, whisk together the eggs and sugar until well combined. Gradually add the milk and double cream while continuing to whisk, guaranteeing the mixture is smooth. Stir in the vanilla extract, ground cinnamon, and nutmeg if using.
- Combine the Mixtures: Pour the custard mixture evenly over the layered bread in the baking dish. Gently press the bread down with a fork to guarantee it absorbs the custard. Allow it to soak for about 20 minutes to fully absorb the liquid.
- Bake the Pudding: Place the baking dish in the preheated oven and bake for 30-40 minutes, or until the top is golden brown and the custard has set. You can check for doneness by inserting a knife into the center; it should come out clean.
- Serve: Remove the pudding from the oven and allow it to cool slightly before serving. It can be enjoyed warm or at room temperature, with a drizzle of custard or a scoop of ice cream on the side.
Extra Tips:
When making Bread and Butter Pudding, using slightly stale bread helps to achieve the best texture, allowing it to soak up the custard without becoming too mushy.
Feel free to experiment with different types of bread or add-ins, such as chocolate chips or lemon zest, to customize the flavor to your preference. For an extra layer of flavor, consider adding a splash of brandy or whisky to the custard mixture.
Eton Mess

Eton Mess is a delightful British dessert that combines the sweetness of meringue, the richness of whipped cream, and the tartness of fresh berries. Traditionally served at Eton College’s annual cricket match against Harrow School, this dish is as simple as it’s delicious, making it a favorite for summer gatherings and picnics.
The beauty of Eton Mess lies in its no-fuss preparation and the ability to customize it with whatever berries are in season.
To create a perfect Eton Mess, the key is to achieve the right balance between the textures and flavors. You want the meringue to be crisp on the outside while remaining soft and chewy on the inside. The whipped cream should be light and fluffy, and the berries should be fresh and vibrant. Together, these elements create a dessert that isn’t only visually appealing but also a heavenly combination of flavors.
Ingredients (serves 4-6):
- 4 large egg whites
- 250g (9oz) caster sugar
- 500ml (17fl oz) heavy whipping cream
- 2 teaspoons vanilla extract
- 400g (14oz) mixed berries (such as strawberries, raspberries, and blueberries)
- A sprinkle of icing sugar (for serving)
Cooking Instructions:
- Prepare the Meringue: Preheat your oven to 120°C (250°F). In a clean, dry mixing bowl, whisk the egg whites until stiff peaks form. Gradually add the caster sugar, one tablespoon at a time, while continuing to whisk until the mixture is glossy and holds stiff peaks. This process can take about 8-10 minutes.
- Bake the Meringue: Line a baking tray with parchment paper. Using a spatula, spread the meringue mixture onto the parchment in a rough rectangle, about 1.5 cm thick. Bake in the preheated oven for about 1-1.5 hours until the meringue is crisp and dry. Once baked, turn off the oven and leave the meringue inside to cool completely.
- Prepare the Cream: In a separate bowl, pour the heavy whipping cream and add the vanilla extract. Using an electric mixer, whip the cream until it reaches soft peaks. Be careful not to over-whip, as you want a creamy texture rather than butter.
- Prepare the Berries: While the meringue cools, wash and prepare the mixed berries. If using strawberries, hull and slice them. Keep the raspberries and blueberries whole. You can sprinkle a little sugar over the berries and let them sit for a few minutes to draw out their juices if you prefer a sweeter taste.
- Assemble the Eton Mess: Once the meringue is completely cool, break it into large pieces. In a large mixing bowl, gently fold together the broken meringue, whipped cream, and prepared berries. Be careful not to over-mix, as you want to keep the airy texture.
- Serve: Spoon the Eton Mess into individual bowls or glasses. Dust a little icing sugar on top for an elegant finish. Serve immediately for the best texture, or chill briefly if needed.
Extra Tips: When making Eton Mess, feel free to experiment with different fruits based on the season. Peaches, cherries, or even a mix of tropical fruits can give your dessert a unique twist.
Additionally, you can add a splash of fruit puree or a drizzle of berry sauce for an extra layer of flavor. If you want to prepare the components ahead of time, you can make the meringues and whip the cream a day in advance, but assemble the dessert just before serving to maintain the crispness of the meringue.