

There’s something about the crispy allure of schnitzels that never fails to captivate. Each recipe carries a unique story, from the classic Wiener Schnitzel to inventive twists like zucchini schnitzel. They’re more than just meals; they’re experiences that bring people together. Picture the satisfying crunch as you take that first bite. Which schnitzel will you be excited to try making first?
Traditional German Wiener Schnitzel
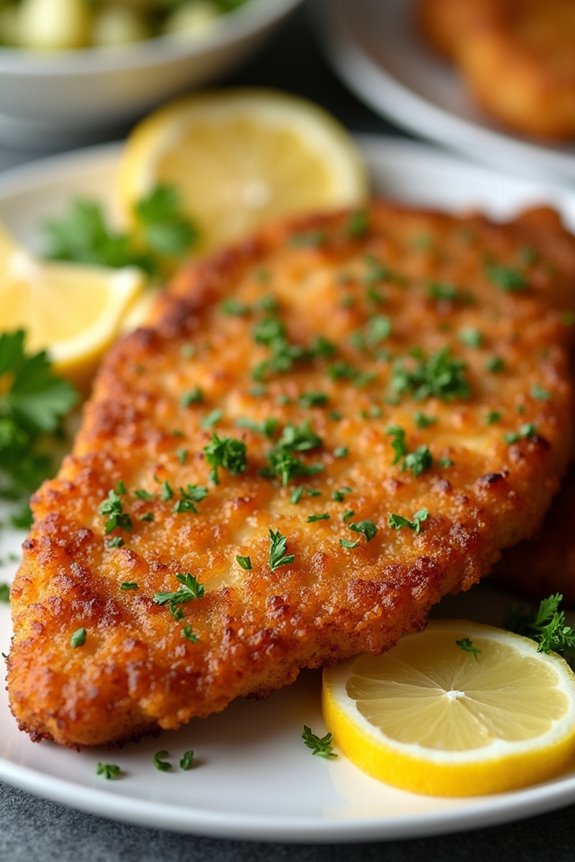
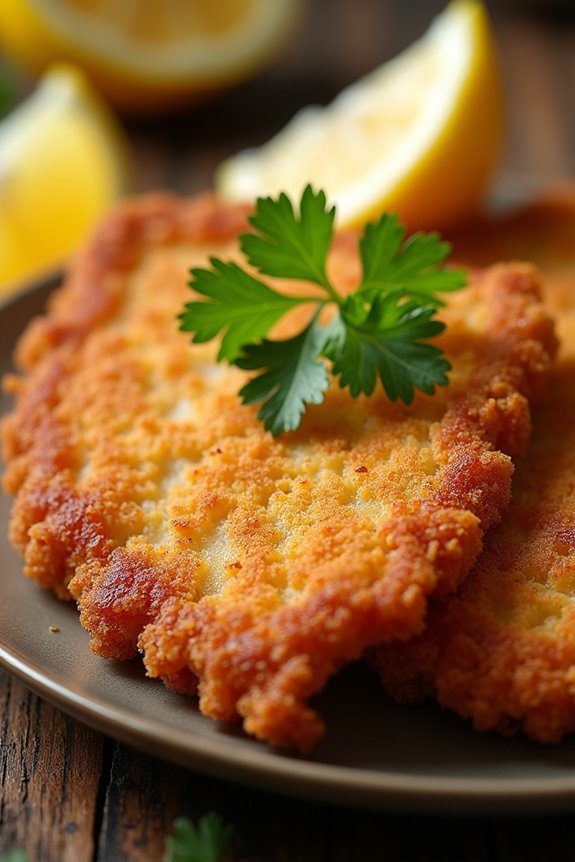
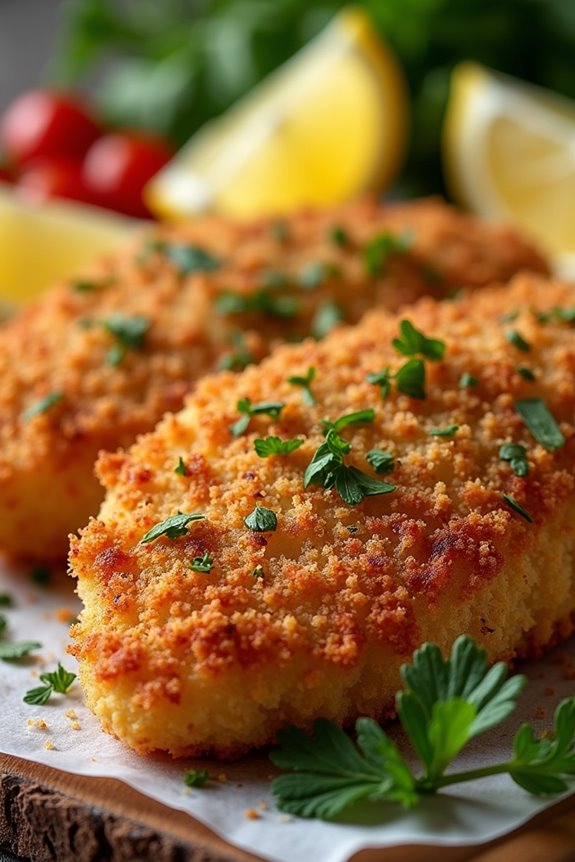
Wiener Schnitzel is a classic dish that hails from Austria but is beloved in Germany and beyond. This dish features thinly pounded veal that’s breaded and fried to perfection, resulting in a crispy exterior and tender, juicy meat inside. Traditionally served with a slice of lemon and often accompanied by potato salad or cucumber salad, Wiener Schnitzel captures the essence of comfort food while showcasing a delightful blend of flavors and textures.
To achieve the perfect Wiener Schnitzel, it’s vital to start with high-quality ingredients and follow the steps carefully to guarantee that the meat is tenderized properly and the breading adheres well. The schnitzel is a versatile dish that can also be adapted with different meats, but the traditional veal version remains the most iconic. Let’s explore the details of creating this delectable dish that’s sure to impress your family and friends.
Ingredients (serving size: 4-6 people):
- 4-6 veal cutlets (about 150-200 grams each)
- Salt and pepper, to taste
- 1 cup all-purpose flour
- 2 large eggs
- 1 cup breadcrumbs (preferably fresh)
- 1/2 cup unsalted butter (for frying)
- 2 tablespoons vegetable oil (for frying)
- Lemon wedges, for serving
- Fresh parsley, for garnish (optional)
Cooking Instructions:
1. Prepare the Veal Cutlets: Start by placing the veal cutlets between two sheets of plastic wrap or parchment paper. Using a meat mallet or rolling pin, pound the cutlets to about 1/4 inch thickness. This step is vital as it tenderizes the meat and allows for even cooking.
Once pounded, season both sides of the cutlets with salt and pepper to enhance the flavor.
2. Set Up the Breading Station: In three separate shallow dishes, place the flour in the first dish, beat the eggs in the second dish, and the breadcrumbs in the third dish. This setup will help you efficiently coat the cutlets. Make sure the breadcrumbs are evenly distributed to guarantee a uniform coating.
3. Coat the Cutlets: Take one cutlet and dredge it in the flour, ensuring it’s completely covered. Shake off any excess flour, then dip it into the beaten eggs, allowing any excess to drip off.
Finally, coat the cutlet with breadcrumbs, pressing gently to guarantee the breadcrumbs adhere well. Repeat this process with all the cutlets.
4. Heat the Oil and Butter: In a large skillet, melt the butter and vegetable oil over medium-high heat. The combination of butter and oil gives the schnitzels a rich flavor while also allowing for a higher smoke point, which is vital for achieving a crisp exterior.
5. Fry the Schnitzels: Once the oil is hot, carefully add the breaded cutlets to the skillet in batches, making sure not to overcrowd the pan. Fry for about 3-4 minutes on each side, or until golden brown and crispy.
Use tongs to flip the schnitzels, and adjust the heat as necessary to prevent burning.
6. Drain and Serve: Once cooked, remove the schnitzels from the skillet and place them on a plate lined with paper towels to absorb any excess oil. Serve immediately with lemon wedges on the side and garnish with fresh parsley if desired.
Extra Tips: For the best results, confirm your oil is at the right temperature before adding the schnitzels; you can test this by dropping a small piece of breadcrumb into the oil—if it sizzles immediately, you’re good to go.
Additionally, if you want to make the dish even more authentic, consider pairing your Wiener Schnitzel with traditional sides like potato salad or a simple green salad.
Finally, feel free to experiment with different proteins like chicken or pork, but remember that the classic Wiener Schnitzel is made with veal for the authentic taste and texture. Enjoy your culinary adventure!
Italian Cotoletta Alla Milanese
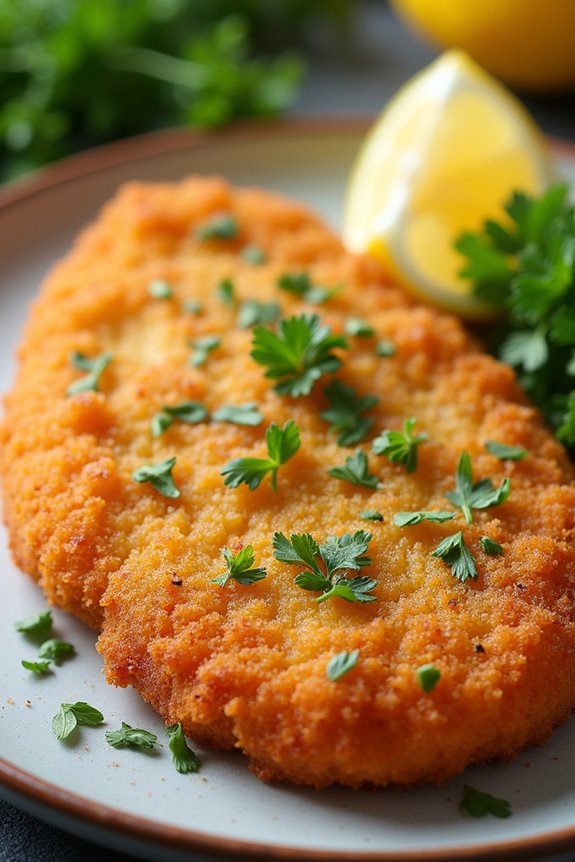
Cotoletta Alla Milanese is a classic Italian dish that hails from Milan, known for its deliciously crispy exterior and tender meat. This beloved recipe features a breaded veal cutlet, which is traditionally fried in butter, resulting in a rich and flavorful experience. The dish is often served with a wedge of lemon, which adds a revitalizing acidity that balances the savory notes of the fried meat.
It’s a staple in Italian cuisine and can easily be made at home for a comforting family meal or a special occasion.
To prepare Cotoletta Alla Milanese, it’s crucial to choose high-quality veal cutlets, ideally pounded thin to achieve that perfectly tender texture. The breading process is key to the dish’s success, with a combination of breadcrumbs and Parmigiano-Reggiano cheese providing a delightful crunch and depth of flavor.
This dish pairs beautifully with sides like arugula salad, roasted potatoes, or a light pasta, making it a versatile option for any dinner table.
Ingredients (Serves 4-6 people):
- 4-6 veal cutlets (about 1/2 inch thick)
- Salt and freshly ground black pepper, to taste
- 1 cup all-purpose flour
- 2 large eggs
- 1 cup breadcrumbs (preferably Italian-style)
- 1/2 cup grated Parmigiano-Reggiano cheese
- 1/2 cup unsalted butter (for frying)
- Lemon wedges (for serving)
- Fresh parsley, chopped (for garnish, optional)
Cooking Instructions:
1. Prepare the Veal Cutlets: Begin by tenderizing your veal cutlets if they aren’t already thin. Place the cutlets between two pieces of plastic wrap and gently pound them with a meat mallet until they’re about 1/2 inch thick. This guarantees even cooking and a tender bite.
Season both sides of the cutlets with salt and freshly ground black pepper.
2. Set Up the Breading Station: In three shallow dishes, prepare your breading station. In the first dish, add the all-purpose flour. In the second dish, whisk the eggs until well combined.
In the third dish, mix the breadcrumbs with the grated Parmigiano-Reggiano cheese. This setup will help you efficiently coat the cutlets.
3. Coat the Cutlets: Take each seasoned veal cutlet and dredge it in the flour, shaking off any excess. Next, dip it into the egg mixture, ensuring it’s fully coated.
Finally, press the cutlet into the breadcrumb mixture, covering it completely. Repeat this process for all cutlets and set them aside on a plate.
4. Heat the Butter for Frying: In a large skillet, melt the unsalted butter over medium heat. You want enough butter to generously coat the bottom of the pan, creating a frying environment that produces a golden, crispy crust.
Allow the butter to heat until it starts to foam, which indicates it’s hot enough for frying.
5. Fry the Cutlets: Carefully place the breaded cutlets into the hot butter in a single layer, making sure not to overcrowd the skillet. Fry them for about 3-4 minutes on each side, or until they’re golden brown and cooked through.
You may need to fry in batches depending on the size of your skillet. Once fried, transfer the cutlets to a paper towel-lined plate to absorb any excess grease.
6. Serve: To serve, arrange the Cotoletta Alla Milanese on a platter or individual plates. Garnish with fresh parsley if desired and serve with lemon wedges on the side for squeezing over the cutlets.
This adds a bright, zesty note that complements the richness of the dish.
Extra Tips: For an even more authentic experience, consider using Italian-style breadcrumbs instead of regular ones, as they often contain herbs and seasonings that enhance the flavor.
Additionally, frying the cutlets in a mix of butter and a splash of olive oil can add depth to the taste while preventing the butter from burning. Finally, if you want to get creative, try serving your Cotoletta Alla Milanese with a side of sautéed greens or a simple tomato salad for a revitalizing contrast!
Austrian Backhendl
Austrian Backhendl, or fried chicken, is a traditional dish that embodies the essence of Austrian cuisine. This crispy fried chicken is often seasoned with a blend of spices and coated in a crunchy breadcrumb crust, making it a beloved comfort food. Perfect for family gatherings or dinner parties, Backhendl is typically served with a side of potato salad or a fresh green salad, allowing for a delightful balance of flavors.
The dish is renowned for its golden-brown appearance and succulent meat, which is sure to impress your guests.
To prepare Austrian Backhendl, the chicken is marinated to infuse it with flavor before being coated in flour, egg, and breadcrumbs. This three-step breading process guarantees a crispy texture that’s simply irresistible. Whether you’re a seasoned cook or a novice in the kitchen, this recipe will guide you through the steps to achieve the perfect Backhendl that captures the heart of Austrian culinary tradition.
Ingredients for Austrian Backhendl (Serves 4-6):
- 1 whole chicken (about 3-4 lbs), cut into pieces
- 2 cups buttermilk
- 2 teaspoons paprika
- 1 teaspoon garlic powder
- 1 teaspoon onion powder
- Salt and pepper to taste
- 1 cup all-purpose flour
- 2 large eggs
- 2 cups breadcrumbs (preferably fresh)
- Oil for frying (such as vegetable or canola oil)
- Lemon wedges (for serving)
Cooking Instructions:
1. Marinate the Chicken: In a large bowl, combine the buttermilk, paprika, garlic powder, onion powder, salt, and pepper. Add the chicken pieces, making sure they’re fully submerged in the marinade. Cover and refrigerate for at least 2 hours, or preferably overnight.
This step helps to tenderize the chicken and infuse it with flavor.
2. Prepare the Breading Stations: Set up three shallow dishes for the breading process. In the first dish, place the flour. In the second dish, beat the eggs until smooth. In the third dish, pour in the breadcrumbs.
This will allow for a smooth changeover when coating the marinated chicken.
3. Coat the Chicken: Remove each piece of chicken from the marinade, allowing any excess liquid to drip off. First, dredge the chicken in the flour, making sure it’s fully coated. Then, dip it into the beaten eggs, allowing any excess to run off. Finally, roll the chicken in the breadcrumbs until it’s completely covered.
Place the breaded chicken on a tray and let it rest for about 15-20 minutes. This helps the coating adhere better during frying.
4. Heat the Oil: In a large, deep skillet or frying pan, heat about 1 inch of oil over medium-high heat. To test if the oil is ready, drop a small piece of bread into the oil; if it sizzles and browns, the oil is hot enough for frying.
5. Fry the Chicken: Carefully add the breaded chicken pieces to the hot oil, being cautious not to overcrowd the pan. Fry in batches if necessary. Cook for about 10-12 minutes on each side, or until the chicken is golden brown and the internal temperature reaches 165°F (75°C).
Use a slotted spoon to remove the chicken and place it on a paper towel-lined plate to drain excess oil.
6. Serve: Once all the chicken pieces are fried, serve them hot with lemon wedges on the side. The acidity from the lemon enhances the flavor of the crispy chicken.
Extra Tips: To achieve the crispiest Backhendl, make sure the oil temperature is maintained around 350°F (175°C). If the oil is too cool, the chicken will absorb more oil and become greasy.
Additionally, for added flavor, consider seasoning the flour with herbs like thyme or rosemary. Pairing the chicken with a tangy potato salad or a fresh cucumber salad will complement the dish beautifully. Enjoy your homemade Austrian Backhendl!
Hungarian Pork Schnitzel
Hungarian Pork Schnitzel, known locally as “Sertésszelet,” is a delightful variation of the classic schnitzel, featuring tender pork cutlets that are breaded and pan-fried to a golden perfection. This dish is a staple in Hungarian cuisine and is loved for its crispy exterior and juicy interior.
Often served with sides such as mashed potatoes, pickles, or a crisp salad, Hungarian Pork Schnitzel is a comforting meal that brings warmth to the dining table.
The preparation of this dish is straightforward, yet it requires attention to detail to guarantee that the pork remains tender while achieving that iconic crunch. The key to a successful schnitzel lies in the quality of the meat and the breading process. With just a few ingredients and some simple techniques, you can create a restaurant-quality dish right in your own kitchen.
Ingredients (serving size: 4-6 people):
- 4-6 pork loin cutlets (about 1/2 inch thick)
- Salt and pepper to taste
- 1 cup all-purpose flour
- 2 large eggs
- 1 cup breadcrumbs (preferably fresh)
- 1 teaspoon paprika
- 1 teaspoon garlic powder
- Vegetable oil (for frying)
- Lemon wedges (for serving)
- Fresh parsley (for garnish)
Cooking Instructions:
1. Prepare the Pork Cutlets: Start by placing the pork loin cutlets between two pieces of plastic wrap or parchment paper. Using a meat mallet or rolling pin, gently pound the cutlets to an even thickness of about 1/4 inch. This guarantees that they cook evenly and remain tender.
Season both sides of the cutlets generously with salt and pepper.
2. Set Up the Breading Station: In three separate shallow dishes, set up your breading station. In the first dish, add the flour. In the second dish, beat the eggs until they’re well combined.
In the third dish, mix the breadcrumbs with paprika, garlic powder, and a pinch of salt to enhance the flavor.
3. Bread the Cutlets: Take each seasoned pork cutlet and dredge it in the flour, guaranteeing it’s fully coated. Shake off any excess flour.
Next, dip the floured cutlet into the beaten eggs, allowing any excess to drip off. Finally, press the cutlet into the breadcrumb mixture, making sure to coat it thoroughly. Repeat this process for all cutlets.
4. Fry the Cutlets: In a large skillet, heat about 1/4 inch of vegetable oil over medium-high heat. Once the oil is hot (you can test it by dropping in a breadcrumb; it should sizzle), carefully add the breaded cutlets to the skillet, working in batches if necessary to avoid overcrowding.
Cook the cutlets for about 3-4 minutes on each side, or until they’re golden brown and cooked through. Use a slotted spatula to transfer the cooked schnitzels to a plate lined with paper towels to drain any excess oil.
5. Serve: Arrange the Hungarian Pork Schnitzels on a serving platter. Garnish with fresh parsley and serve with lemon wedges on the side.
The lemon adds a revitalizing touch that complements the rich flavor of the schnitzels beautifully.
Extra Tips: To achieve the best results, make sure your oil is appropriately heated before frying; this prevents the schnitzel from becoming greasy.
You can also experiment with different spices in the breadcrumb mixture for a unique twist. Additionally, letting the breaded schnitzels sit for a few minutes before frying can help the coating adhere better and result in a crispier texture. Enjoy your flavorful Hungarian Pork Schnitzel with your favorite sides!
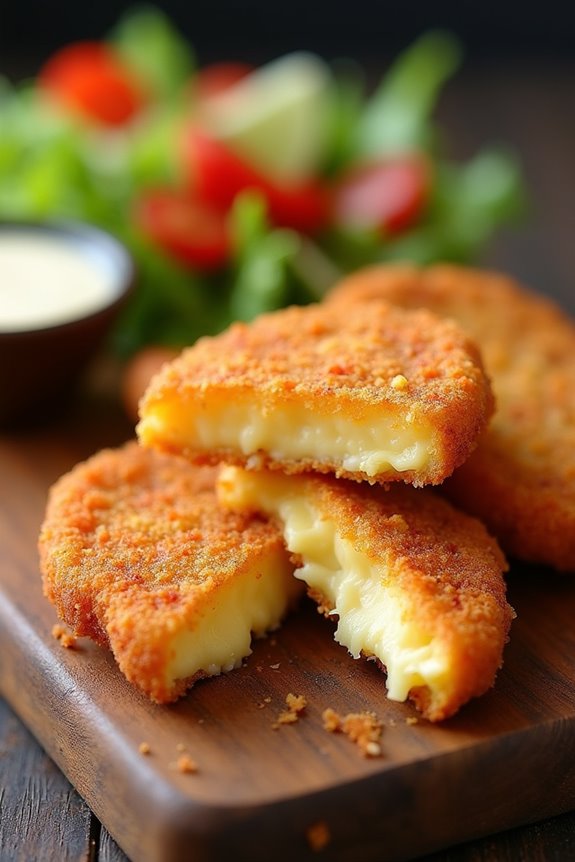
Czech Smažený Sýr
Czech Smažený Sýr, or Fried Cheese, is a beloved classic in Czech cuisine often enjoyed as a hearty snack or light meal. This dish typically features a thick slice of cheese, usually Edam or Hermelín, which is breaded and deep-fried to golden perfection. The crispy exterior contrasts beautifully with the melty, gooey interior, making it a favorite among both locals and visitors alike.
It’s commonly served with a side of tartar sauce or a simple salad, providing a delightful balance of flavors. Not only is Smažený Sýr simple to prepare, but it also requires minimal ingredients, making it a fantastic option for a quick and satisfying meal.
The dish has found its way into many Czech restaurants and pubs, where it’s often paired with a nice cold beer. Whether you’re enjoying it as street food or in a cozy restaurant, this delightful fried cheese is sure to please anyone’s palate.
Ingredients (Serves 4-6 people):
- 4 large slices of Edam or Hermelín cheese (about 1-inch thick)
- 1 cup all-purpose flour
- 2 large eggs
- 1 cup breadcrumbs (preferably panko for extra crunch)
- Salt and pepper to taste
- Vegetable oil for frying
- Tartar sauce (for serving)
- Lemon wedges (for garnish)
Cooking Instructions:
- Prepare the Cheese: Begin by ensuring that your cheese slices are thick enough to hold their shape during frying. If the slices are too thin, they may fall apart. Pat the cheese dry with a paper towel to remove excess moisture.
- Set Up the Breading Station: In three separate shallow bowls, place the flour, beaten eggs, and breadcrumbs. Season the flour with a pinch of salt and pepper. This setup allows for an efficient and organized breading process.
- Bread the Cheese: Take one slice of cheese and dredge it in the flour, ensuring it’s fully coated. Shake off any excess flour. Next, dip it into the beaten eggs, allowing the excess to drip off. Finally, coat the cheese in breadcrumbs, pressing gently to adhere. Repeat this process for all cheese slices.
- Heat the Oil: In a large frying pan, pour enough vegetable oil to cover the bottom by about 1/2 inch. Heat the oil over medium heat until it shimmers but isn’t smoking. You can test if the oil is ready by dropping a small piece of breadcrumb into it; if it sizzles, the oil is hot enough.
- Fry the Cheese: Carefully place the breaded cheese slices into the hot oil, making sure not to overcrowd the pan. Fry for about 3-4 minutes on each side or until they’re golden brown and crispy. Use a slotted spatula to flip the cheese carefully.
- Drain and Serve: Once fried, transfer the Smažený Sýr to a plate lined with paper towels to drain any excess oil. Serve hot with tartar sauce and lemon wedges on the side for a revitalizing touch.
Extra Tips:
When preparing Czech Smažený Sýr, it’s important to keep the oil at a consistent temperature to avoid soggy breading. If the oil is too cool, the cheese may absorb too much oil and become greasy. Conversely, if the oil is too hot, the breading may burn before the cheese melts.
You can also experiment with different cheeses and serve it with various dipping sauces to customize the dish to your taste. Enjoy your cooking!
Swiss Schnitzel With Cream Sauce
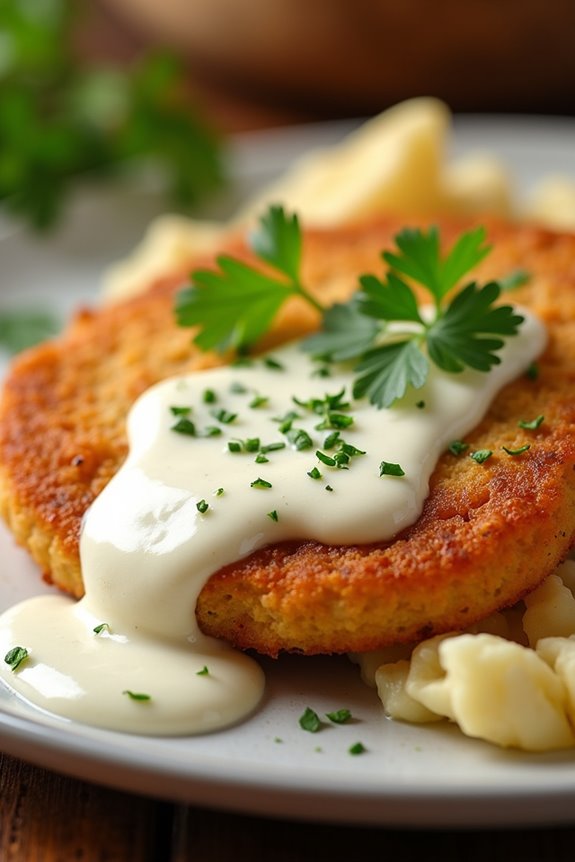
Swiss Schnitzel with Cream Sauce is a delightful and hearty dish that combines the tenderness of breaded meat with a rich and velvety sauce. This recipe is a staple in Swiss cuisine, showcasing a perfect balance between flavor and texture. The schnitzel is usually made with veal, pork, or chicken, and it’s served alongside an indulgent cream sauce that elevates the dish to a whole new level.
With its crispy exterior and creamy interior, this dish is perfect for family gatherings or special occasions. The secret to a great Swiss schnitzel lies in the preparation of the meat and the sauce. The meat should be pounded thinly to guarantee it cooks evenly, while the sauce requires just the right amount of seasoning and creaminess.
This dish isn’t only delicious but also relatively simple to prepare, making it an excellent choice for both novice cooks and seasoned chefs. Pair it with a side of potatoes or a fresh salad for a complete meal that everyone will enjoy.
Ingredients (Serves 4-6):
- 4-6 boneless veal, pork, or chicken cutlets
- Salt and pepper to taste
- 1 cup all-purpose flour
- 2 large eggs
- 1 cup breadcrumbs (preferably fresh)
- 4 tablespoons butter
- 4 tablespoons olive oil
- 1 cup heavy cream
- 1 cup chicken or vegetable broth
- 1 tablespoon Dijon mustard
- Fresh parsley, chopped (for garnish)
Cooking Instructions:
- Prepare the Meat: Start by placing the cutlets between two sheets of plastic wrap or parchment paper. Using a meat mallet, pound the meat to about 1/4 inch thickness. This helps tenderize it and guarantees even cooking. Season both sides of the cutlets generously with salt and pepper.
- Set Up Breading Station: In three separate shallow dishes, place the flour, beaten eggs, and breadcrumbs. The flour will help the egg adhere to the meat, while the breadcrumbs will create a crispy coating.
- Bread the Cutlets: Dredge each cutlet in flour, shaking off any excess. Next, dip it into the beaten eggs, guaranteeing it’s fully coated, and finally, press it into the breadcrumbs until well covered. Place the breaded cutlets on a plate and let them rest for about 10 minutes to help the coating stick.
- Cook the Cutlets: In a large skillet, heat the butter and olive oil over medium heat. Once hot, add the breaded cutlets in batches (do not overcrowd the pan). Cook for about 3-4 minutes on each side, or until golden brown and cooked through. Remove from the skillet and let them drain on paper towels.
- Make the Cream Sauce: In the same skillet, add the chicken or vegetable broth, scraping up any browned bits from the bottom. Stir in the heavy cream and Dijon mustard, bringing the mixture to a simmer. Cook for about 5 minutes, allowing the sauce to thicken slightly. Adjust seasoning with salt and pepper as needed.
- Serve: Place the cooked schnitzels on a serving platter and drizzle the cream sauce over the top. Garnish with freshly chopped parsley and serve immediately.
Extra Tips:
For an added depth of flavor, consider marinating the cutlets in a mixture of lemon juice, garlic, and herbs for a few hours prior to breading. Additionally, you can experiment with different types of cream or add a splash of white wine to the sauce for an extra layer of richness.
If you prefer a lighter version, you can bake the schnitzels instead of frying them by placing them on a baking sheet and cooking at 400°F (200°C) for about 20 minutes, flipping halfway through. Enjoy your Swiss Schnitzel with Cream Sauce with a side of roasted vegetables or a simple salad for a well-rounded meal!
Polish Sznycel
Polish Sznycel, also known as “sznycel wieprzowy,” is a delightful take on the classic schnitzel, featuring tender pork cutlets that are breaded and fried to golden perfection. This dish is cherished in Polish cuisine, often served with a side of potatoes or a fresh salad. Its roots can be traced back to various European schnitzel variations, but the Polish twist incorporates local flavors and ingredients that make it unique and delicious.
Preparing Polish Sznycel isn’t only an easy and straightforward process but also a great way to bring a taste of Poland into your kitchen. The combination of juicy pork, crispy coating, and simple seasonings makes this dish a favorite among families and friends alike. Whether you’re hosting a dinner party or enjoying a comforting meal at home, Polish Sznycel is sure to impress with its flavorful profile and satisfying crunch.
Ingredients (for 4-6 servings):
- 4-6 boneless pork chops (about 1/2 inch thick)
- 1 cup all-purpose flour
- 2 large eggs
- 1 cup breadcrumbs (preferably seasoned)
- Salt and pepper to taste
- 1 teaspoon garlic powder (optional)
- 1 teaspoon paprika (optional)
- Vegetable oil for frying
- Lemon wedges for serving (optional)
Cooking Instructions:
1. Prepare the Pork Chops: Begin by placing the pork chops between two sheets of plastic wrap or parchment paper. Use a meat mallet or rolling pin to gently pound the chops until they’re about 1/4 inch thick. This helps to tenderize the meat and guarantees even cooking.
Season both sides of the pork chops with salt, pepper, and any additional spices like garlic powder or paprika if desired.
2. Set Up the Breading Station: In three separate shallow dishes, place the flour in the first, beaten eggs in the second, and breadcrumbs in the third. This will allow you to coat the pork chops easily. Make sure each dish is wide enough to accommodate the size of the pork chops.
3. Bread the Pork Chops: Take one pork chop and dredge it in the flour, ensuring it’s fully coated. Shake off any excess flour, then dip it into the beaten eggs, allowing any excess egg to drip off.
Finally, coat the pork chop in breadcrumbs, pressing lightly to adhere the crumbs. Repeat this process for all the pork chops.
4. Heat the Oil: In a large frying pan, pour enough vegetable oil to cover the bottom of the pan (about 1/4 inch deep) and heat it over medium-high heat. To test if the oil is hot enough, drop a small piece of breadcrumb into the oil; if it sizzles and bubbles, the oil is ready.
5. Fry the Sznycel: Carefully place the breaded pork chops into the hot oil, making sure not to overcrowd the pan. Fry them for about 3-4 minutes on each side, or until they’re golden brown and cooked through.
You may need to do this in batches depending on the size of your pan.
6. Drain and Serve: Once cooked, transfer the fried pork chops to a plate lined with paper towels to drain off any excess oil. Serve hot with lemon wedges on the side, alongside your choice of sides such as mashed potatoes, salad, or sauerkraut.
Extra Tips:
For an extra layer of flavor, consider marinating the pork chops in a mixture of lemon juice, garlic, and herbs for a couple of hours before breading. This won’t only enhance the taste but also keep the meat tender and juicy.
Additionally, feel free to experiment with different types of breadcrumbs, such as panko, for an even crunchier texture. Remember to maintain the oil temperature while frying to achieve that perfect golden color without overcooking the meat. Enjoy your homemade Polish Sznycel!
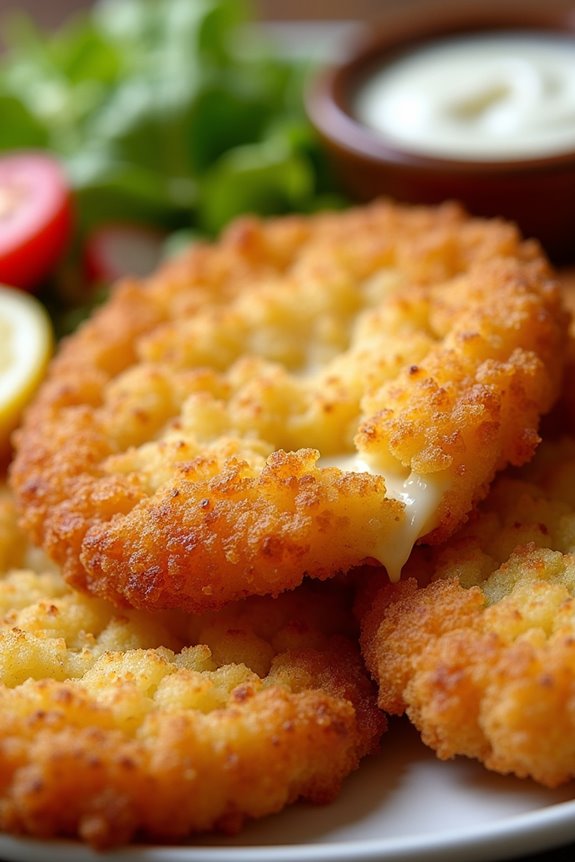
Slovakian Vyprážaný Syr
Vyprážaný Syr, or fried cheese, is a beloved Slovakian dish that brings comfort and indulgence to the table. It features a deliciously gooey cheese core encased in a crispy, golden-brown breading. This dish is often enjoyed as a snack or a main course, served with a side of tartar sauce or a crisp salad to balance the richness of the cheese.
Whether you’re exploring Slovakian cuisine or looking for a delightful twist on the classic schnitzel, Vyprážaný Syr is sure to please your taste buds.
This recipe is simple enough for home cooks of all levels. With just a few ingredients and straightforward steps, you can create a dish that showcases the unique flavors and textures of Slovakian fare. Perfect for serving 4-6 people, Vyprážaný Syr makes for an excellent party treat or a cozy family dinner, charming everyone with its crispy exterior and melty cheese center.
Ingredients (for 4-6 servings):
- 4-6 slices of Edam, Emmental, or another semi-hard cheese
- 1 cup all-purpose flour
- 2 large eggs
- 1 cup breadcrumbs (preferably panko for extra crunch)
- Salt, to taste
- Pepper, to taste
- Oil, for frying (vegetable or sunflower oil)
- Optional: Tartar sauce or a crisp salad for serving
Cooking Instructions:
- Prepare the Cheese: Start by slicing the cheese into thick slices, about 1/2 inch thick. If you prefer a stronger flavor, you can also use a cheese that has a bit more character, like a smoked cheese. Once sliced, you can season the cheese lightly with salt and pepper to enhance its flavor.
- Set Up the Breading Station: In three separate shallow bowls, place the flour in the first bowl, beat the eggs in the second bowl, and put the breadcrumbs in the third bowl. This setup will allow for easy coating of the cheese slices.
- Bread the Cheese: Take a slice of cheese and dip it into the flour, confirming it’s fully coated. Shake off any excess flour, then dip it into the beaten eggs, allowing the excess to drip off. Finally, coat the cheese slice in breadcrumbs, pressing gently to confirm the breadcrumbs stick well. Repeat this process for all cheese slices.
- Heat the Oil: In a large frying pan, pour enough oil to cover the bottom (about 1/4 inch deep) and heat it over medium heat. To check if the oil is hot enough, you can drop a small piece of bread into the oil; it should sizzle and brown quickly.
- Fry the Cheese: Once the oil is hot, carefully place the breaded cheese slices into the pan, making sure not to overcrowd them. Fry for about 3-4 minutes on each side or until they’re golden brown and crispy. Use a slotted spoon to flip the slices gently.
- Drain and Serve: Once cooked, remove the fried cheese from the pan and place it on a plate lined with paper towels to absorb any excess oil. Allow them to cool for a minute, then serve warm with tartar sauce or a crisp salad on the side.
Extra Tips:
For an extra layer of flavor, consider adding herbs or spices to your breadcrumbs, such as dried oregano or garlic powder. Additionally, confirm the oil is hot enough before frying; too cool oil may lead to soggy cheese instead of a crispy coating.
If you want to make the dish ahead of time, you can bread the cheese slices and refrigerate them for up to an hour before frying, which will help the breading adhere better during cooking. Enjoy your Vyprážaný Syr with an invigorating drink, and don’t forget to savor each bite!
Spanish Escalope
Spanish Escalope, a delightful twist on traditional schnitzel, combines the crispy, golden-brown coating of the meat with the robust flavors of Spanish cuisine. Typically made with pork or chicken, this dish is enhanced with a blend of spices and served with a zesty sauce, making it a perfect main course for family gatherings or casual dinners.
The combination of tender meat and a crunchy crust, along with the accompanying side dishes, provides a satisfying meal that’s bound to please everyone at the table.
This recipe isn’t only straightforward but also allows for some creativity. You can adjust the spices according to your preferences or add your favorite sides, such as roasted vegetables or a fresh salad. The key to a successful Spanish Escalope lies in the quality of the meat and the frying process, guaranteeing that the outside is crispy while the inside remains juicy and flavorful.
Ingredients (Serves 4-6)
- 4 boneless, skinless chicken breasts (or pork loin)
- 1 cup all-purpose flour
- 2 large eggs
- 1 cup breadcrumbs (preferably seasoned)
- 1 teaspoon smoked paprika
- 1 teaspoon garlic powder
- 1 teaspoon onion powder
- Salt and pepper to taste
- Vegetable oil (for frying)
- Lemon wedges (for serving)
- Fresh parsley (for garnish)
Cooking Instructions
- Prepare the Meat: Begin by placing the chicken breasts between two sheets of plastic wrap or parchment paper. Use a meat mallet or rolling pin to gently pound the meat to an even thickness of about 1/2 inch. This will help the meat cook evenly and stay tender.
- Set Up the Breading Station: In three separate shallow dishes, set up your breading station. In the first dish, place the flour, seasoned with a pinch of salt and pepper. In the second dish, beat the eggs until smooth. In the third dish, combine the breadcrumbs with smoked paprika, garlic powder, and onion powder.
- Bread the Escalopes: Take each pounded chicken breast and first coat it in the flour, shaking off any excess. Next, dip it into the beaten eggs, allowing any excess to drip off. Finally, coat the chicken in the breadcrumb mixture, pressing gently to guarantee the crumbs adhere well. Repeat this process for all the chicken breasts.
- Heat the Oil: In a large skillet, pour enough vegetable oil to cover the bottom of the pan by about 1/4 inch. Heat the oil over medium-high heat until it shimmers. You can test if the oil is ready by dropping a small piece of bread into the oil; if it sizzles immediately, it’s hot enough.
- Fry the Escalopes: Carefully place the breaded chicken breasts in the hot oil, making sure not to overcrowd the pan. Fry for about 4-5 minutes on each side, or until they’re golden brown and cooked through. Use a meat thermometer to guarantee they reach an internal temperature of 165°F (75°C).
- Drain and Serve: Once cooked, transfer the escalopes to a plate lined with paper towels to absorb any excess oil. Serve immediately with lemon wedges and a sprinkle of fresh parsley for garnish.
Extra Tips
When making Spanish Escalope, it’s important to maintain the oil temperature while frying. If the oil is too cool, the escalopes may absorb too much oil and become greasy. Conversely, if the oil is too hot, the outside may burn before the inside is cooked.
A good tip is to cook in batches if necessary and to always allow the oil to return to temperature between batches. Additionally, feel free to experiment with different seasoning blends in the breadcrumbs for a unique flavor profile!
Greek Chicken Schnitzel
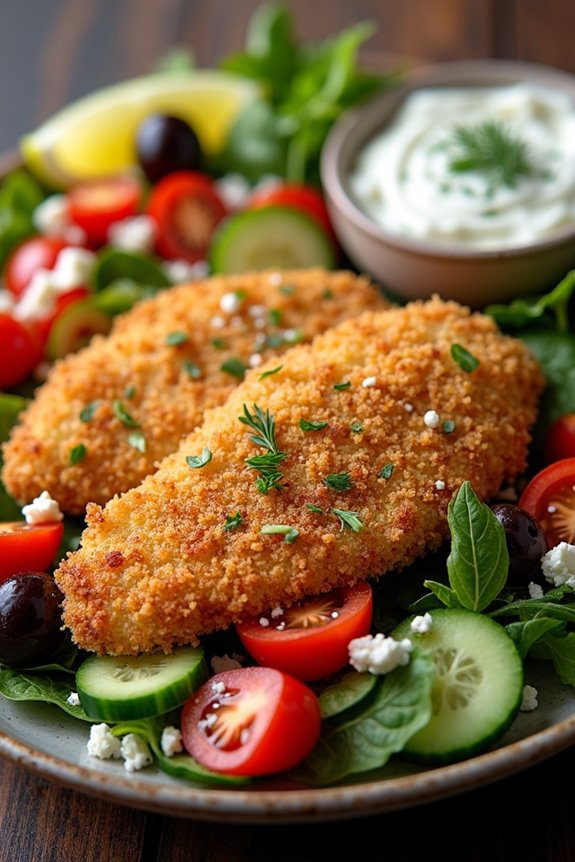
Greek Chicken Schnitzel is a delightful twist on the classic schnitzel, infusing it with the vibrant flavors of Greece. This dish features tender chicken breasts coated in a crispy, herb-infused breadcrumb crust, complemented by a revitalizing tzatziki sauce. The combination of lemon, garlic, and fresh herbs not only elevates the taste of the chicken but also brings a Mediterranean flair to your dining table. It’s perfect for a family dinner or a casual gathering with friends.
Preparing Greek Chicken Schnitzel is straightforward, making it an ideal recipe for both novice cooks and seasoned chefs. The key to success lies in the marination of the chicken for maximum flavor and tenderness, as well as guaranteeing the breadcrumbs are seasoned well. Serve it alongside a Greek salad or roasted vegetables for a complete meal that captures the essence of Greek cuisine.
Ingredients (Serves 4-6):
- 4 boneless, skinless chicken breasts
- 1 cup plain yogurt
- 2 tablespoons olive oil
- 2 tablespoons fresh lemon juice
- 3 cloves garlic, minced
- 1 teaspoon dried oregano
- 1 teaspoon salt
- ½ teaspoon black pepper
- 1 cup all-purpose flour
- 2 large eggs, beaten
- 1 cup panko breadcrumbs
- 1 teaspoon dried thyme
- 1 teaspoon dried parsley
- Olive oil for frying
Cooking Instructions:
- Marinate the Chicken: In a large bowl, combine the yogurt, olive oil, lemon juice, minced garlic, oregano, salt, and black pepper. Add the chicken breasts, guaranteeing they’re thoroughly coated. Cover and marinate in the refrigerator for at least 1 hour, preferably overnight, to allow the flavors to penetrate the meat.
- Prepare the Breading Station: Set up a breading station with three shallow dishes. In the first dish, place the flour. In the second dish, beat the eggs. In the third dish, combine the panko breadcrumbs, dried thyme, and dried parsley. Make sure to season each component to enhance the final flavor.
- Bread the Chicken: Remove the marinated chicken from the refrigerator. One at a time, dredge each chicken breast in the flour, shaking off any excess, then dip it into the beaten eggs, and finally coat it in the seasoned panko breadcrumbs. Press the breadcrumbs firmly onto the chicken to guarantee an even coating.
- Fry the Chicken: In a large skillet, heat a generous amount of olive oil over medium-high heat. Once the oil is hot, carefully place the breaded chicken breasts in the skillet, cooking in batches if necessary to avoid overcrowding. Fry each side for about 4-5 minutes or until golden brown and cooked through. Use a meat thermometer to guarantee the internal temperature reaches 165°F (75°C).
- Drain and Serve: Once cooked, remove the schnitzels from the skillet and place them on a plate lined with paper towels to drain any excess oil. Let them rest for a few minutes before serving.
- Prepare Tzatziki Sauce: While the chicken is resting, you can prepare a simple tzatziki sauce by mixing 1 cup of Greek yogurt with 1 small cucumber (grated and drained), 1 clove of minced garlic, 1 tablespoon of fresh dill, 1 tablespoon of lemon juice, and a pinch of salt. Serve alongside the schnitzel.
Extra Tips:
When cooking Greek Chicken Schnitzel, guarantee the oil is hot enough before adding the chicken to achieve that perfect golden crust. If you prefer a healthier version, consider baking the schnitzels in the oven at 400°F (200°C) for about 20-25 minutes, flipping halfway through.
Additionally, you can customize the seasoning in the breadcrumbs by adding grated cheese or spices that you enjoy, offering a personalized touch to the dish.
French Escalope De Veau

French Escalope De Veau is a classic dish that highlights the delicate flavor of veal, typically served in a light, crispy coating. This dish is synonymous with French culinary finesse and is often paired with a variety of sides, including a simple salad, mashed potatoes, or sautéed vegetables.
The key to mastering this dish lies in the quality of the veal, which should be tender and thinly sliced, allowing it to cook quickly and evenly.
The process of making Escalope De Veau involves preparing the veal cutlets, coating them in a mixture of seasoned flour, egg, and breadcrumbs, and then frying them to golden perfection. The combination of textures and flavors in this dish makes it a delightful main course for family gatherings or special occasions.
With just a few simple ingredients and techniques, you can create a restaurant-quality meal right in your own kitchen.
Ingredients (Serves 4-6):
- 4-6 veal cutlets, thinly sliced
- 1 cup all-purpose flour
- 2 large eggs
- 1 cup breadcrumbs (preferably fresh)
- Salt and pepper, to taste
- 1 teaspoon garlic powder (optional)
- 1 teaspoon dried thyme (optional)
- 4 tablespoons unsalted butter
- 2 tablespoons olive oil
- Lemon wedges, for serving (optional)
Cooking Instructions:
1. Prepare the Veal: Begin by gently pounding the veal cutlets between two sheets of plastic wrap or parchment paper using a meat mallet. The goal is to achieve an even thickness of about 1/4 inch, which will guarantee quick and uniform cooking.
Season both sides with salt and pepper, and if desired, add garlic powder and dried thyme for extra flavor.
2. Set Up Your Breading Station****: Prepare three shallow dishes for the breading process. In the first dish, place the flour and season it with salt and pepper. In the second dish, beat the eggs until well combined. In the third dish, add the breadcrumbs.
This setup will allow you to easily coat the veal cutlets.
3. Coat the Cutlets: Take each seasoned veal cutlet and dredge it in the flour, shaking off any excess. Then dip it into the beaten eggs, guaranteeing it’s fully coated.
Finally, press the cutlet into the breadcrumbs, making sure it’s evenly covered. Repeat this process for all the cutlets.
4. Heat the Pan: In a large skillet, heat the butter and olive oil over medium heat. The combination of butter for flavor and olive oil to prevent burning is ideal for frying.
Allow the mixture to become hot but not smoking.
5. Fry the Cutlets: Once the oil is hot, carefully place the breaded veal cutlets in the skillet, making sure not to overcrowd the pan. Fry the Cutlets for about 3-4 minutes on each side, or until they’re golden brown and cooked through.
You may need to do this in batches if your skillet isn’t large enough.
6. Drain and Serve: After frying, transfer the cooked cutlets to a plate lined with paper towels to absorb any excess oil. Serve the Escalope De Veau hot, garnished with lemon wedges if desired, and alongside your choice of sides.
Extra Tips:
For the best results, use fresh breadcrumbs from a baguette or loaf of bread, as they’ll provide a superior texture and flavor compared to store-bought versions.
Additionally, confirm that your oil is at the right temperature before adding the cutlets; if it’s too cool, the breading will become soggy, and if it’s too hot, the outside may burn before the inside is cooked.
Finally, for a gourmet touch, consider serving the dish with a light sauce, such as a lemon butter sauce or a simple caper sauce, to elevate the flavors even further.
British Chicken Kiev Schnitzel
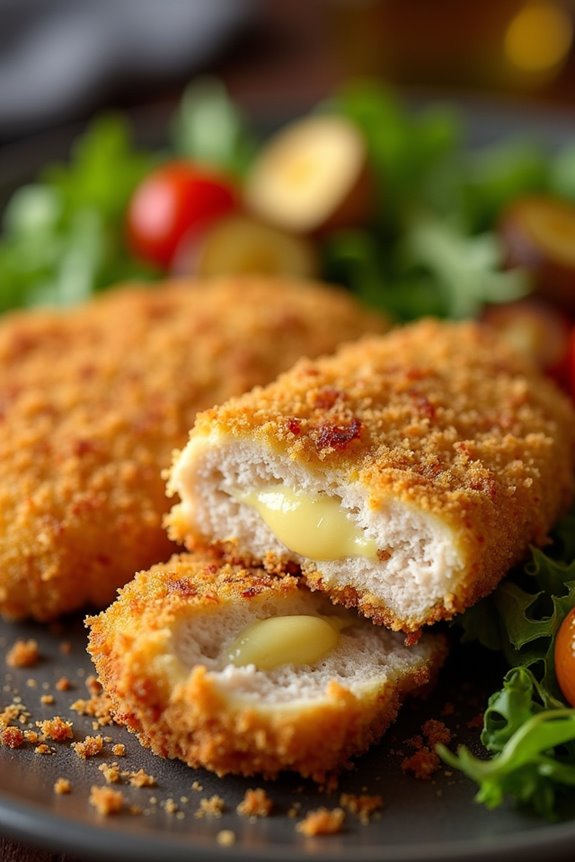
The British Chicken Kiev Schnitzel is a delightful fusion dish that combines the classic flavors of a traditional Chicken Kiev with the crispy texture of schnitzel. This dish not only boasts a rich and buttery garlic filling but also features a golden, crunchy exterior that will make it a hit at any dinner table.
Perfect for a cozy family meal or a casual gathering with friends, the Chicken Kiev Schnitzel is certain to impress.
Preparing this dish is straightforward and can be a fun cooking experience. The process involves flattening the chicken breasts, filling them with a savory garlic herb butter, and then coating them in breadcrumbs before frying to perfection. Serve it alongside a fresh salad or some roasted vegetables for a complete and satisfying meal.
Ingredients (Serves 4-6 People):
- 4 boneless, skinless chicken breasts
- 100g unsalted butter, softened
- 3 cloves garlic, minced
- 2 tablespoons fresh parsley, chopped
- 1 tablespoon fresh thyme, chopped
- 1 teaspoon lemon juice
- Salt and pepper, to taste
- 100g all-purpose flour
- 2 large eggs, beaten
- 200g breadcrumbs (preferably panko for extra crunch)
- Vegetable oil, for frying
- Lemon wedges, for serving
Cooking Instructions:
1. Prepare the Garlic Herb Butter: In a mixing bowl, combine the softened butter, minced garlic, chopped parsley, thyme, lemon juice, salt, and pepper. Mix well until all ingredients are evenly incorporated.
Once mixed, transfer the butter onto a piece of plastic wrap, shape it into a log, and refrigerate for at least 30 minutes until firm.
2. Prepare the Chicken: Place the chicken breasts between two sheets of plastic wrap or parchment paper. Using a meat mallet or rolling pin, gently pound the chicken until they’re about 1/2 inch thick.
Be careful not to tear the meat. This step guarantees even cooking and helps the chicken cook through without drying out.
3. Stuff the Chicken: Remove the garlic herb butter from the fridge and cut it into 4-6 equal pieces, depending on how many chicken breasts you’re using. Place a piece of the butter in the center of each flattened chicken breast.
Fold the sides of the chicken over the butter, then roll it up tightly, securing the ends with toothpicks if necessary.
4. Coat the Chicken: Set up a breading station with three shallow dishes: one with flour, one with beaten eggs, and one with breadcrumbs.
First, dip each rolled chicken breast in the flour, shaking off any excess. Next, dip it into the beaten eggs, allowing any excess to drip off, and finally coat it in breadcrumbs, pressing gently to adhere.
5. Fry the Chicken: In a large skillet, heat enough vegetable oil over medium-high heat to cover the bottom of the pan.
Once the oil is hot (around 180°C or 350°F), carefully add the breaded chicken rolls to the pan. Fry them for about 6-8 minutes on each side, or until they’re golden brown and cooked through. Use a meat thermometer to verify the internal temperature reaches 75°C (165°F).
6. Rest and Serve: Once cooked, transfer the Chicken Kiev Schnitzels to a paper towel-lined plate to drain any excess oil.
Let them rest for a few minutes before slicing to allow the butter to settle and prevent it from spilling out. Serve with lemon wedges for an added burst of flavor.
Extra Tips:
For an extra crispy texture, consider double-dipping the chicken in the egg and breadcrumbs. After the first coating, repeat the process for an additional layer of breadcrumbs.
Additionally, be mindful of the oil temperature while frying; too low will make the chicken greasy, while too high may burn the coating before the chicken is cooked through. Adjust the heat as needed, and enjoy your delicious British Chicken Kiev Schnitzel!
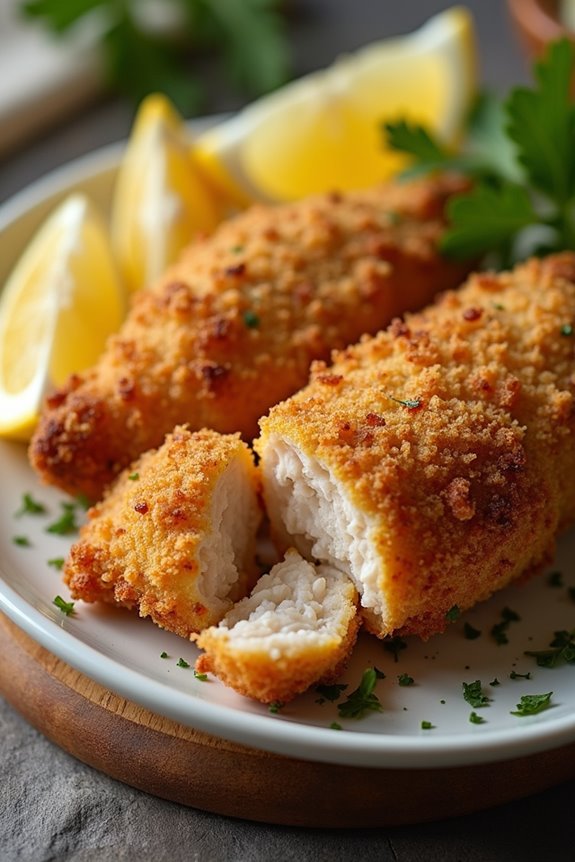
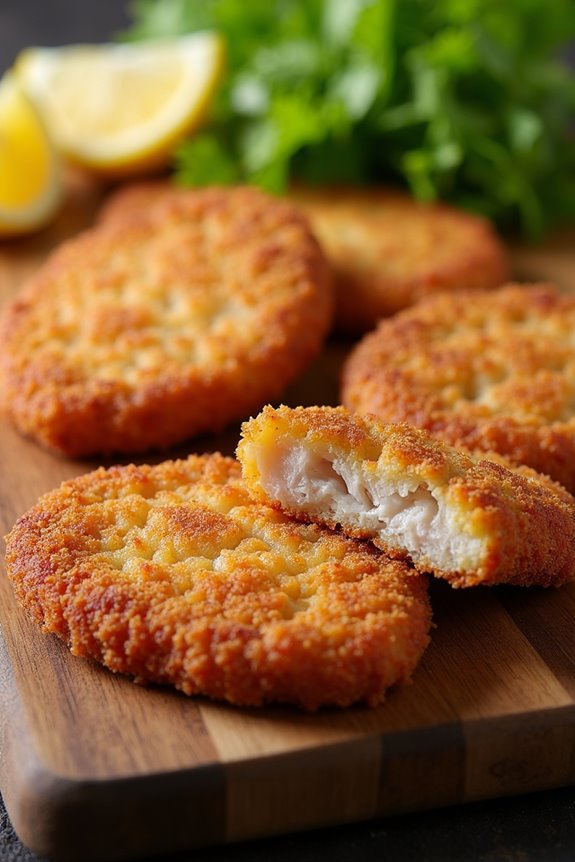
Scandinavian Fish Schnitzel

Scandinavian Fish Schnitzel is a delightful dish that beautifully combines the flavors of fresh fish with a crispy, golden-brown coating. This recipe pays homage to the Nordic tradition of using simple, high-quality ingredients to create satisfying meals. The fish is typically coated in breadcrumbs and pan-fried, producing a crunchy exterior while keeping the fish tender and moist inside. This dish is perfect for a family dinner or a gathering with friends, served alongside traditional sides such as boiled potatoes or a fresh salad.
In this recipe, we’ll use white fish like cod or haddock, which is commonly found in Scandinavian cuisine. The fish is seasoned and coated in breadcrumbs, giving it a delicious texture and flavor. Accompanying the schnitzel, a tangy sauce made from sour cream and dill enhances the dish, adding a revitalizing contrast to the richness of the fried fish. Prepare to impress your guests with this simple yet elegant Scandinavian Fish Schnitzel that showcases the best of Nordic flavors!
Ingredients (Serves 4-6):
- 4-6 pieces of white fish fillets (such as cod or haddock)
- 1 cup all-purpose flour
- 2 large eggs
- 1 cup breadcrumbs (preferably panko for extra crunch)
- Salt and pepper, to taste
- 1 teaspoon paprika (optional)
- Vegetable oil (for frying)
- Lemon wedges (for serving)
- Fresh dill (for garnish)
Cooking Instructions:
- Prepare the Fish: Rinse the fish fillets under cold water and pat them dry with paper towels. Season both sides of the fish with salt, pepper, and paprika if using. This step is essential as it infuses the fish with flavor before it’s cooked.
- Set Up the Breading Station: In three separate shallow bowls, place the flour, beaten eggs, and breadcrumbs. Make sure the bowls are wide enough to allow the fish fillets to be easily coated. This setup will help create a nice crust on the fish.
- Coat the Fish: Take one fillet at a time and first dredge it in the flour, shaking off any excess. Then dip it into the beaten eggs, allowing any excess egg to drip off. Finally, coat the fillet in breadcrumbs, pressing gently to confirm the coating adheres well. Repeat this process for all the fish fillets.
- Heat the Oil: In a large skillet, heat about 1/4 inch of vegetable oil over medium-high heat. To check if the oil is ready, drop a small piece of bread into the oil; if it sizzles and turns golden brown, the oil is hot enough.
- Fry the Fish: Carefully place the coated fish fillets into the hot oil, making sure not to overcrowd the pan. Fry for about 3-4 minutes on each side, or until they’re golden brown and cooked through. Use a spatula to flip the fish gently to avoid breaking the fillets.
- Drain and Serve: Once cooked, transfer the fish schnitzels to a plate lined with paper towels to drain excess oil. Serve immediately with lemon wedges and a sprinkle of fresh dill for garnish.
Extra Tips:
For an even more flavorful schnitzel, consider marinating the fish in a mixture of lemon juice, dill, and a pinch of salt for about 30 minutes before breading it.
Additionally, you can experiment with different herbs and spices in the breadcrumb mixture to customize the flavor to your liking. Serve the schnitzel with a side of creamy tartar sauce or a fresh cucumber salad for a revitalizing accompaniment. Enjoy your meal!
Mediterranean Zucchini Schnitzel

Mediterranean Zucchini Schnitzel is a delicious and healthy variation of the traditional schnitzel, swapping out meat for tender zucchini slices. This dish is perfect for those looking to enjoy a lighter meal without sacrificing flavor. The crispy, golden-brown zucchini is coated in a mixture of breadcrumbs and Mediterranean spices, giving it a unique twist that pairs beautifully with a side salad or tzatziki sauce.
Whether you’re a vegetarian or simply looking to incorporate more vegetables into your diet, this recipe will certainly delight your taste buds. This dish not only showcases the versatility of zucchini but also allows for a delightful crunch and rich flavor profile thanks to the herbs and spices used in the coating.
Perfect for a family dinner or a gathering with friends, Mediterranean Zucchini Schnitzel can be served as a main dish or an appetizer. Your guests will appreciate this creative take on a classic schnitzel!
Ingredients (Serves 4-6):
- 4 medium zucchini, sliced into 1/4 inch thick rounds
- 1 cup all-purpose flour
- 3 large eggs
- 1 cup breadcrumbs (preferably panko for extra crunch)
- 1/2 cup grated Parmesan cheese
- 1 teaspoon dried oregano
- 1 teaspoon dried basil
- 1/2 teaspoon garlic powder
- Salt and pepper, to taste
- Olive oil, for frying
- Fresh lemon wedges, for serving
Cooking Instructions:
1. Prepare the Zucchini: Begin by washing the zucchini thoroughly. Cut off the ends and slice them into rounds about 1/4 inch thick. Place the zucchini slices in a colander and sprinkle with salt to draw out excess moisture.
Allow them to sit for about 15-20 minutes, then pat them dry with paper towels to ascertain they aren’t watery.
2. Set Up the Breading Station****: In three separate shallow bowls, prepare your breading station. In the first bowl, add the flour and season with salt and pepper. In the second bowl, beat the eggs until well combined.
In the third bowl, mix the breadcrumbs, grated Parmesan, oregano, basil, garlic powder, and additional salt and pepper.
3. Bread the Zucchini: Take each zucchini slice and first dip it into the flour, ensuring it’s fully coated. Shake off any excess flour, then dip it into the beaten eggs, allowing any excess to drip off.
Finally, coat the zucchini in the breadcrumb mixture, pressing gently to adhere the crumbs to the surface. Repeat this process for all zucchini slices.
4. Fry the Zucchini: In a large skillet, heat a generous amount of olive oil over medium heat, ensuring the oil is hot but not smoking. Fry the breaded zucchini slices in batches, without overcrowding the pan, for approximately 3-4 minutes on each side or until they turn golden brown and crispy.
If needed, add more oil between batches.
5. Drain and Serve: Once fried, transfer the zucchini schnitzels to a plate lined with paper towels to absorb any excess oil. Serve hot with fresh lemon wedges on the side for squeezing over the schnitzels, adding a zesty finish to the dish.
Extra Tips:
For an extra layer of flavor, consider adding fresh herbs like parsley or dill to the breadcrumb mixture. If you prefer a gluten-free option, substitute all-purpose flour with a gluten-free flour blend and use gluten-free breadcrumbs.
Additionally, feel free to experiment with different spices or cheeses to customize the flavor to your liking. Enjoy your Mediterranean Zucchini Schnitzel as a delightful and nutritious meal!