

As December arrives, my kitchen becomes a haven of festive British recipes. The comforting aromas of Christmas pudding and mulled wine fill the air, creating a warm and inviting atmosphere. These traditional dishes are more than just food; they’re a celebration of heritage and togetherness. I love how they turn chilly winter nights into cozy gatherings. Let’s explore these seasonal favorites and bring a touch of British charm to our homes.
Classic Christmas Pudding

Classic Christmas pudding is a beloved festive dessert that has been a staple of British holiday celebrations for centuries. This rich and hearty dessert is packed with dried fruits, spices, and often a splash of alcohol, making it a perfect ending to a festive meal.
Traditionally, the pudding is steamed for several hours, allowing the flavors to meld beautifully, and it’s often served with a sprig of holly on top, adding a touch of festive cheer. The tradition of making Christmas pudding can be a delightful family activity, where everyone can take part in mixing the ingredients and making a wish as they stir.
The beauty of this recipe lies in its versatility; you can adjust the fruits and spices to suit your taste. Some families even add a little bit of brandy or stout for that extra depth of flavor. Once prepared, the pudding can be made well in advance, allowing the flavors to develop, and it can be easily reheated when the time comes to serve.
This classic dessert is typically served with a warm sauce, such as brandy butter or custard, making it a truly indulgent treat that embodies the spirit of Christmas.
Ingredients (Serves 4-6):
- 225g (8oz) mixed dried fruits (e.g., raisins, currants, sultanas)
- 100g (3.5oz) chopped dried apricots
- 100g (3.5oz) dark brown sugar
- 100g (3.5oz) fresh breadcrumbs
- 100g (3.5oz) grated suet (or vegetarian alternative)
- 1 medium apple, grated
- 1 medium carrot, grated
- 1 tsp mixed spice powder
- 1 tsp ground cinnamon
- 1/2 tsp ground nutmeg
- 2 large eggs
- 150ml (5oz) stout or dark beer
- 75ml (2.5oz) brandy (optional)
- Zest of 1 lemon
- Zest of 1 orange
- A pinch of salt
Cooking Instructions:
- Prepare the Ingredients: In a large mixing bowl, combine the mixed dried fruits, chopped dried apricots, dark brown sugar, fresh breadcrumbs, and grated suet. Verify all ingredients are evenly distributed.
- Add Grated Produce: Next, fold in the grated apple and carrot. These ingredients will add moisture and sweetness to the pudding. Mix until well incorporated.
- Season the Mixture: Sprinkle in the mixed spice powder, ground cinnamon, ground nutmeg, and a pinch of salt. Stir the spices thoroughly into the mixture, guaranteeing that every bite will be packed with flavor.
- Incorporate Wet Ingredients: In a separate bowl, whisk the eggs, stout, and brandy (if using). Gradually add this wet mixture to the dry ingredients, stirring continuously until everything is well combined.
- Add Citrus Zest: Finally, fold in the lemon and orange zest. The citrus will brighten the flavors of the pudding, giving it a delightful twist.
- Prepare for Steaming: Grease a 1.5-liter (2.5-pint) pudding basin and spoon the mixture into it. Press it down gently to eliminate any air pockets, and smooth the top.
- Cover the Pudding: Cut a circle of baking parchment to fit the top of the basin and place it on top of the pudding mixture. Secure it with a piece of kitchen twine. This will help protect the pudding from water during the steaming process.
- Steam the Pudding: Place the pudding basin in a large pot with boiling water, guaranteeing the water comes up to about halfway up the sides of the basin. Cover the pot with a lid and steam for about 6 to 8 hours. Check the water level occasionally and top up as needed.
- Cool and Store: Once the steaming is complete, remove the pudding from the pot and let it cool completely. You can store it in a cool, dark place until Christmas Day.
- Reheat and Serve: On Christmas Day, reheat the pudding by steaming it again for about 2 hours. When ready to serve, turn it out onto a serving plate, and if desired, warm some brandy and pour it over the pudding before igniting it for a dramatic presentation.
Extra Tips:
When making Christmas pudding, it’s important to use high-quality dried fruits for the best flavor and texture. Consider soaking the dried fruits in the brandy or stout overnight before mixing them into the batter; this adds depth and moisture to the pudding.
If you prefer a lighter pudding, you can substitute some of the suet with butter. Don’t forget to make a wish when stirring the mixture – it’s a fun tradition that adds a personal touch to this festive treat!
Mince Pies
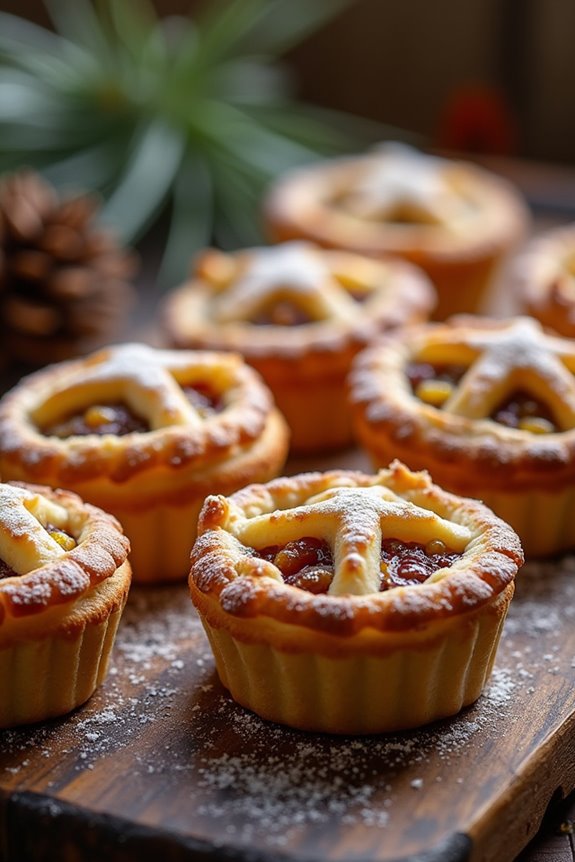
Mince pies are a quintessential part of British Christmas festivities, beloved for their rich flavors and delightful aroma that fills the air during the holiday season. Traditionally filled with a mixture of dried fruits, spices, and sometimes alcohol, these little pastries bring warmth and cheer, perfectly complementing the cold winter days.
Often enjoyed warm with a dollop of cream or custard, mince pies can evoke nostalgic memories, making them a must-have on any holiday table.
Making your own mince pies allows you to customize the filling according to your taste preferences, whether you prefer a more traditional mincemeat or something a bit different. This recipe will guide you through creating a batch of delicious mince pies that serve 4-6 people, ensuring that you can share them with loved ones or enjoy them yourself throughout the festive season.
Ingredients
- 225g all-purpose flour
- 100g unsalted butter, chilled and diced
- 50g icing sugar
- 1 large egg, beaten
- 400g mincemeat
- Zest of 1 lemon
- Zest of 1 orange
- A pinch of salt
- 1 egg yolk (for glazing)
- Icing sugar (for dusting, optional)
Instructions
- Make the Pastry: In a large mixing bowl, combine the flour, icing sugar, and a pinch of salt. Add the chilled, diced butter and rub it into the flour mixture with your fingers until it resembles breadcrumbs. This step is essential for achieving a light, flaky pastry.
- Form the Dough: Add the beaten egg to the mixture and combine until the dough starts to come together. If the dough is too dry, you can add a teaspoon of cold water. Once combined, shape the dough into a ball, wrap it in cling film, and refrigerate for at least 30 minutes to firm up.
- Prepare the Filling: While the pastry is chilling, mix the mincemeat with the lemon and orange zest in a bowl. This will enhance the fruity flavors and add a revitalizing citrus note to the filling.
- Roll Out the Pastry: Preheat the oven to 180°C (350°F). On a floured surface, roll out two-thirds of the chilled pastry to about 3mm thick. Using a round cutter, cut out circles large enough to fit into a muffin or tart tin.
- Assemble the Pies: Gently press the pastry circles into the muffin tin holes. Spoon a generous amount of mincemeat filling into each pastry case, filling them about three-quarters full to allow space for the pastry tops.
- Top the Pies: Roll out the remaining pastry and cut out smaller circles or stars to place over the filling. Alternatively, you can create a lattice if you prefer a decorative touch. Press the edges to seal and brush the tops with egg yolk for a golden finish.
- Bake: Place the muffin tin in the preheated oven and bake for 20-25 minutes or until the pastry is golden brown. Keep an eye on them to prevent burning.
- Cool and Serve: Once baked, remove the mince pies from the oven and allow them to cool in the tin for a few minutes before transferring them to a wire rack. Dust with icing sugar if desired and serve warm or at room temperature.
Extra Tips
For an extra touch of flavor, consider adding a splash of brandy or rum to the mincemeat mixture before filling the pies. You can also experiment with different spices, such as nutmeg or allspice, to create your unique twist on the classic recipe.
Additionally, if you’re short on time, you can use store-bought pastry to speed up the process, but homemade pastry truly elevates the mince pies. Enjoy your festive baking!
Roast Turkey With All the Trimmings
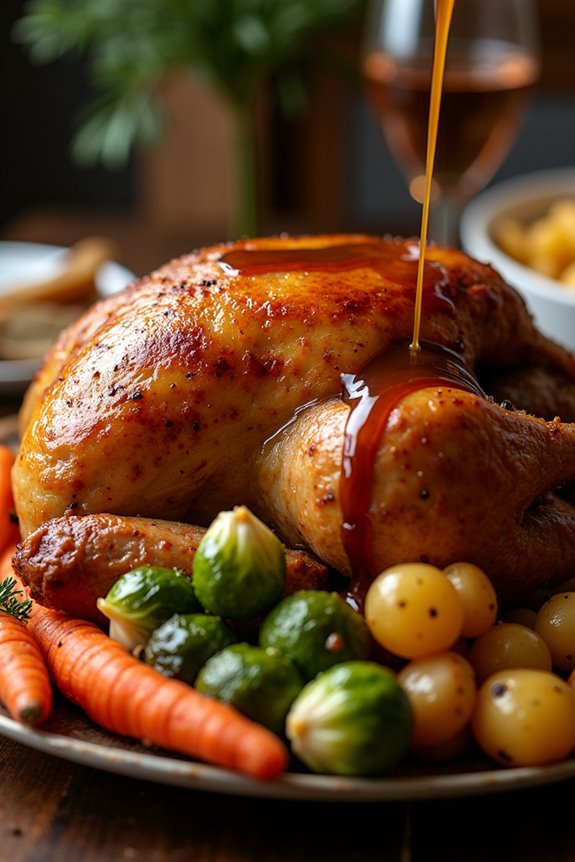
Christmas in Britain wouldn’t be complete without the iconic Roast Turkey with All the Trimmings. This festive centerpiece isn’t just a meal; it’s a tradition that brings family and friends together to celebrate the joyous season. A beautifully roasted turkey, golden brown and succulent, is accompanied by a variety of delicious sides that elevate the dining experience to a whole new level. From crispy roast potatoes to rich gravy, every element plays a significant role in making this dish memorable.
Preparing the perfect Roast Turkey requires careful planning and attention to detail, but the results are undeniably worth the effort. Starting with a high-quality turkey and confirming that it’s seasoned well will set the stage for a mouthwatering meal. The key is to roast the turkey to perfection, allowing it to rest before carving so that juices redistribute. Pair this majestic dish with traditional accompaniments, and you’ll find that this culinary delight is the highlight of your festive celebrations.
Ingredients (Serves 4-6)
- 1 whole turkey (4-6 kg)
- 100g unsalted butter, softened
- 2 teaspoons sea salt
- 1 teaspoon black pepper
- 1 onion, quartered
- 1 lemon, halved
- 4 sprigs of fresh thyme
- 2 sprigs of fresh rosemary
- 500g stuffing (your choice)
- 1 kg potatoes, peeled and chopped
- 500g Brussels sprouts, trimmed and halved
- 2 carrots, peeled and chopped
- 1 liter chicken stock
- 50g plain flour (for gravy)
- Optional: cranberry sauce and bread sauce for serving
Cooking Instructions
- Preheat the Oven: Begin by preheating your oven to 180°C (350°F). This guarantees that the turkey will roast evenly and achieve that perfect golden brown color.
- Prepare the Turkey: Remove the turkey from its packaging and pat it dry with paper towels. This step is essential for achieving crispy skin. Season the inside of the turkey cavity generously with salt and pepper.
- Stuff the Turkey: Fill the cavity of the turkey with the quartered onion, halved lemon, thyme, and rosemary. If you’re using stuffing, spoon it into the neck and body cavity of the turkey, packing it lightly to allow for expansion during cooking.
- Butter and Season the Skin: Rub the softened butter all over the skin of the turkey, making sure to cover every inch. This not only adds flavor but also helps the skin crisp up during roasting. Sprinkle salt and pepper over the turkey skin.
- Roast the Turkey: Place the turkey on a roasting tray, breast side up. Roast in the preheated oven for about 13-15 minutes per kilogram. For a 4-6 kg turkey, this will take approximately 2 to 2.5 hours. Baste the turkey every 30 minutes with the pan juices to keep it moist.
- Check for Doneness: To verify the turkey is cooked through, insert a meat thermometer into the thickest part of the thigh. The internal temperature should read at least 75°C (165°F). If the skin is browning too quickly, cover the turkey with aluminum foil.
- Rest the Turkey: Once cooked, remove the turkey from the oven and let it rest for at least 30 minutes. This resting period allows the juices to redistribute, ensuring that every slice is flavorful and juicy.
- Prepare the Trimmings: While the turkey is resting, boil the potatoes until tender, then roast them in the oven until golden. Cook the Brussels sprouts and carrots in the same pot after the potatoes for a delicious side.
- Make the Gravy: In the roasting tray, remove excess fat and sprinkle flour over the remaining juices. Stir and cook for a couple of minutes, then gradually add chicken stock, whisking until smooth. Simmer until thickened and season to taste.
- Serve: Carve the turkey and arrange on a platter. Serve with your roasted vegetables, stuffing, and gravy, along with optional cranberry and bread sauce.
Extra Tips
To make your Roast Turkey with All the Trimmings a success, consider brining your turkey the night before for added flavor and moisture. Use a simple brine of water, salt, and sugar, and let it soak in the refrigerator.
Additionally, remember to allow your turkey to reach room temperature before roasting for more even cooking. Finally, don’t rush the resting period after roasting; it’s vital for achieving juicy meat. Enjoy your festive feast!
Yorkshire Pudding
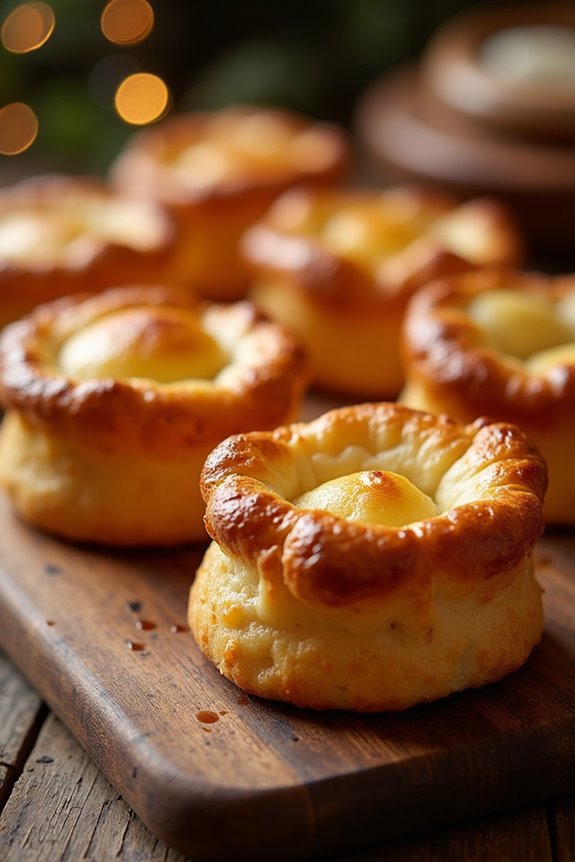
Yorkshire pudding is a classic British dish that has been enjoyed for generations, especially during festive occasions like Christmas. This delightful accompaniment is traditionally served alongside roast beef and gravy, making it a staple at any Sunday roast or holiday gathering.
Its airy and crisp texture, combined with a soft, chewy interior, perfectly complements hearty meats and rich sauces, creating a satisfying contrast that’s hard to resist.
The origins of Yorkshire pudding can be traced back to the 18th century, when it was first made as a way to utilize the fat drippings from roasting meat. Over time, it evolved into the beloved side dish we recognize today.
The batter is simple, made from basic pantry staples, yet the result is a deliciously fluffy pudding that rises dramatically in the oven. With just a few easy steps, you can create this iconic dish that will impress your guests and bring a touch of British tradition to your festive table.
Ingredients (Serves 4-6)
- 1 cup all-purpose flour
- 1 cup milk
- 3 large eggs
- ½ teaspoon salt
- ¼ cup beef drippings (or vegetable oil)
Cooking Instructions
1. Preheat the Oven: Begin by preheating your oven to 425°F (220°C). A hot oven is essential for achieving the perfect rise and texture in your Yorkshire puddings.
2. Prepare the Batter: In a mixing bowl, whisk together the flour and salt. In a separate bowl, beat the eggs and then add the milk, mixing until combined. Gradually pour the milk and egg mixture into the flour while whisking continuously to form a smooth batter.
Allow the batter to rest for at least 30 minutes at room temperature. This resting time helps the flour absorb the liquid, leading to a better rise.
3. Heat the Drippings: In a large muffin tin or Yorkshire pudding tray, pour a small amount of beef drippings (or vegetable oil) into each compartment, filling them about a quarter full.
Place the tray in the preheated oven for about 10 minutes, or until the drippings are sizzling hot.
4. Pour the Batter: Carefully remove the hot tray from the oven. Quickly and evenly pour the rested batter into each compartment, filling them to about half full.
The hot drippings will cause the batter to sizzle immediately.
5. Bake: Return the tray to the oven and Bake for 20-25 minutes, or until the Yorkshire puddings have risen and turned a golden brown.
Avoid opening the oven door during baking, as this can cause them to deflate.
6. Serve Immediately: Once baked to perfection, remove the Yorkshire puddings from the oven and serve them immediately with your favorite roast and gravy.
They’re best enjoyed fresh and hot.
Extra Tips
For an even more impressive Yorkshire pudding, make sure all your ingredients are at room temperature before mixing. This helps create a smoother batter and can contribute to a better rise.
Additionally, using beef drippings will add a rich flavor, but if you prefer a lighter option, vegetable oil works just as well.
Finally, avoid the temptation to open the oven door while baking, as this can prevent the Yorkshire puddings from rising properly. Enjoy your festive feast!
Mulled Wine

Mulled wine is a cherished festive beverage that has been enjoyed in Britain for centuries, especially during the chilly winter months. This aromatic drink combines red wine with a blend of spices, citrus, and sometimes even a splash of brandy, creating a warming concoction perfect for holiday gatherings and cozy nights.
The delightful fusion of flavors not only warms the body but also fills the air with a comforting scent that evokes the spirit of the season.
Preparing mulled wine is a straightforward process that allows for customization according to personal tastes. Whether you prefer it spicier or sweeter, the beauty of this recipe lies in its versatility. Gather your favorite spices, citrus fruits, and a good bottle of red wine, and you’ll be on your way to creating a delightful holiday drink that will impress your guests and elevate any festive occasion.
Ingredients (Serves 4-6)
- 1 bottle of red wine (750ml)
- 1 orange (sliced)
- 1 lemon (sliced)
- 1/4 cup of brandy (optional)
- 1/4 cup of sugar (adjust to taste)
- 2 cinnamon sticks
- 5-6 whole cloves
- 3-4 star anise
- 1/2 teaspoon of grated nutmeg
- 1-2 cups of water (depending on desired strength)
Cooking Instructions
- Combine Ingredients: In a large saucepan, pour in the entire bottle of red wine. Add the sliced orange and lemon, sugar, brandy (if using), cinnamon sticks, whole cloves, star anise, grated nutmeg, and water. The water helps to dilute the wine slightly and allows the flavors to meld beautifully.
- Heat the Mixture: Place the saucepan over low to medium heat. Gradually heat the mixture, stirring gently to dissolve the sugar. It’s essential to avoid boiling the wine, as this will evaporate the alcohol and alter the flavors. Aim for a gentle simmer.
- Infuse Flavors: Allow the wine to simmer for about 15-20 minutes. This simmering time lets the spices and fruits infuse their rich flavors into the wine. If you prefer a bolder flavor, you can let it simmer longer, but be sure to keep an eye on the temperature.
- Taste and Adjust: After simmering, taste the mulled wine. If it’s too strong, you can add a little more water or adjust the sweetness by adding more sugar if desired. Remember, the flavors will continue to develop as it sits, so finding the right balance is key.
- Strain and Serve: Once you’ve achieved your desired flavor, remove the saucepan from the heat. Use a fine mesh strainer to strain out the spices and fruit slices, pouring the mulled wine into heatproof mugs or glasses. Garnish with a fresh slice of orange or a cinnamon stick for an extra festive touch.
Extra Tips
When preparing mulled wine, feel free to experiment with different spices and fruits based on your preferences. Some may prefer to add a touch of vanilla or even a few apple slices for added sweetness.
Additionally, don’t hesitate to try different varieties of red wine; a fruity Merlot or a robust Cabernet Sauvignon can drastically change the final flavor profile. Serve your mulled wine warm and enjoy the festive atmosphere it brings!
Gingerbread Cookies

Gingerbread cookies are a delightful treat that evokes the spirit of Christmas and festive cheer. These spiced, aromatic cookies aren’t only delicious but also provide a great activity for families to engage in during the holiday season. The warm scent of ginger, cinnamon, and molasses wafting through your kitchen will surely bring a smile to everyone’s face.
Whether you enjoy them plain or decorated with icing, gingerbread cookies are a classic addition to the festive table. Making gingerbread cookies is a fun experience that can be enjoyed by both adults and children. From rolling out the dough to cutting out festive shapes, this recipe allows for creativity and personalization.
Once baked, the cookies can be decorated with icing, sprinkles, and other festive toppings, making them perfect for gifting or for a holiday cookie exchange. Get ready to embrace the holiday spirit with these delightful treats!
Ingredients (Serves 4-6):
- 3 1/4 cups all-purpose flour
- 1 teaspoon baking soda
- 1 tablespoon ground ginger
- 1 tablespoon ground cinnamon
- 1/2 teaspoon ground cloves
- 1/2 teaspoon salt
- 1 cup unsalted butter, softened
- 1 cup brown sugar, packed
- 1/2 cup molasses
- 1 large egg
- 1 teaspoon vanilla extract
- Royal icing (for decoration, optional)
Cooking Instructions:
- Prepare the Dry Ingredients: In a medium bowl, whisk together the flour, baking soda, ginger, cinnamon, cloves, and salt until well combined. This step guarantees that the spices and leavening agent are evenly distributed throughout the flour, which is essential for the flavor and texture of the cookies.
- Cream the Butter and Sugar: In a large mixing bowl, beat the softened butter and brown sugar together until the mixture is light and fluffy, about 3-5 minutes. This process incorporates air into the butter, which helps create a tender cookie.
- Add Molasses and Egg: Mix in the molasses, egg, and vanilla extract until fully combined. The molasses not only adds sweetness but also contributes to the rich color and flavor of the gingerbread, while the egg acts as a binding agent.
- Combine Wet and Dry Ingredients: Gradually add the dry ingredient mixture into the wet ingredients, mixing until a soft dough forms. Be careful not to overmix, as this can lead to tougher cookies.
- Chill the Dough: Divide the dough into two equal parts, flatten them into disks, wrap them in plastic wrap, and refrigerate for at least 1 hour. Chilling the dough helps firm it up, making it easier to roll out and cut into shapes.
- Roll and Cut the Cookies: Preheat your oven to 350°F (175°C). On a lightly floured surface, roll out one disk of dough to about 1/4 inch thick. Use cookie cutters to cut out shapes and place them on a baking sheet lined with parchment paper. Repeat with the remaining dough.
- Bake the Cookies: Bake the cookies in the preheated oven for 8-10 minutes or until the edges are firm but the centers are still soft. Keep an eye on them to avoid overbaking, as they’ll continue to harden as they cool.
- Cool and Decorate: Allow the cookies to cool on the baking sheet for a few minutes before transferring them to a wire rack to cool completely. Once cooled, feel free to decorate with royal icing or your choice of toppings.
Extra Tips:
When making gingerbread cookies, it’s vital to confirm that your butter is softened to room temperature for peak creaming. Additionally, consider using a combination of cookie cutters to create a variety of fun shapes, which can add to the festive atmosphere.
If you plan to decorate the cookies, make sure they’re completely cool before applying the icing, as warm cookies can cause the icing to melt. Finally, store the cookies in an airtight container to keep them fresh and soft for as long as possible. Enjoy baking and sharing these holiday delights!
Bread Sauce
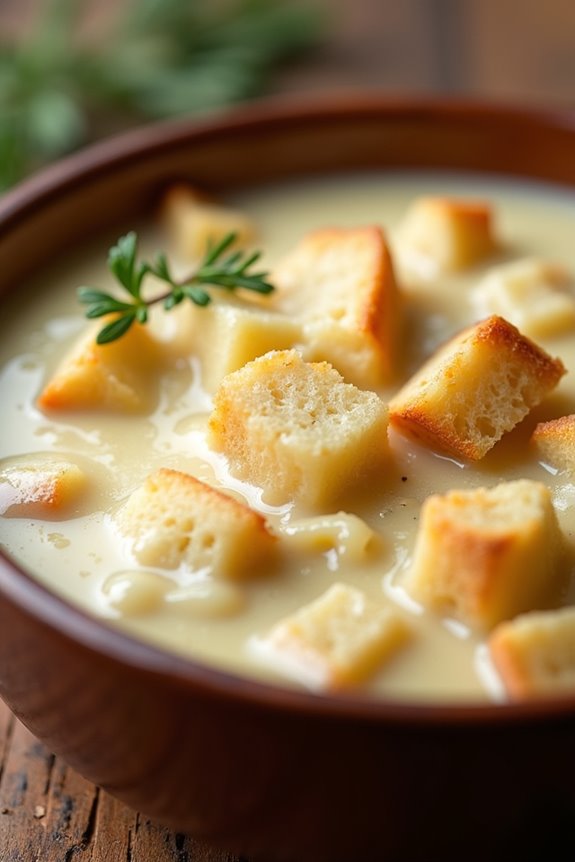
Bread sauce is a traditional British accompaniment that perfectly complements roasted meats, especially turkey, during the festive season. This rich and creamy sauce is made with simple ingredients, transforming stale bread into a delightful side dish that enhances the flavors of your Christmas feast. The infusion of aromatics such as onion, cloves, and bay leaves gives the sauce a depth of flavor that’s both comforting and festive.
Making bread sauce is straightforward and requires minimal prep time, making it an ideal dish for busy cooks during the holiday season. Its creamy texture and subtle taste make it a beloved staple on many British tables, ensuring that no morsel of turkey goes uneaten. With just a few simple ingredients, you can create a sauce that will impress your guests and bring warmth to your holiday gathering.
Ingredients (serving size: 4-6 people)
- 300ml whole milk
- 50g unsalted butter
- 1 onion, halved
- 4 cloves
- 2 bay leaves
- 200g stale white bread (preferably a crusty loaf), crusts removed and torn into pieces
- Salt and black pepper, to taste
- Freshly grated nutmeg (optional)
Cooking Instructions
- Infuse the Milk: In a medium saucepan, combine the whole milk, butter, halved onion, cloves, and bay leaves. Heat the mixture over medium heat until it begins to simmer, then reduce the heat to low. Allow it to infuse for about 10 minutes, ensuring that the flavors meld together.
- Prepare the Bread: While the milk is infusing, take the stale bread and tear it into small pieces. This will help the bread absorb the milk and create a smooth sauce. Place the torn bread into a mixing bowl.
- Combine Bread and Milk: After the milk has infused, remove the saucepan from the heat and strain the milk to discard the onion, cloves, and bay leaves. Pour the hot milk over the torn bread in the mixing bowl. Stir gently to combine, ensuring that all the bread pieces are soaked in the milk.
- Cook the Sauce: Allow the bread to soak for about 10-15 minutes, or until it has absorbed most of the milk and softened. Place the bowl over a saucepan of simmering water (a double boiler method) or return the mixture to the saucepan over low heat. Stir continuously for about 5-10 minutes until the sauce thickens and becomes creamy.
- Season and Serve: Once the sauce has reached your desired consistency, season with salt, black pepper, and freshly grated nutmeg, if desired. Stir well to combine and taste to adjust the seasoning. Serve warm alongside your festive roast.
Extra Tips
For an extra layer of flavor, consider adding herbs such as thyme or parsley to the sauce while it cooks. You can also substitute some of the milk with cream for a richer texture.
If you prefer a smoother sauce, use a hand blender to puree the mixture to your desired consistency. Bread sauce can be made ahead of time and gently reheated before serving; just add a splash of milk to loosen it if it thickens too much. Enjoy this classic accompaniment as a comforting addition to your festive meal!
Pigs in Blankets
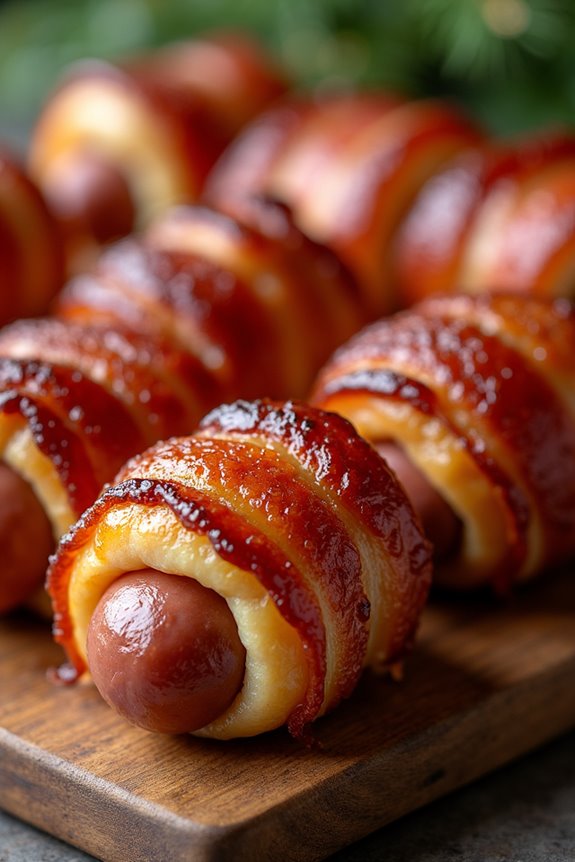
Pigs in Blankets are a quintessential British festive dish, often found nestled on the buffet table during Christmas gatherings and holiday parties. This delightful treat consists of succulent sausages wrapped in crispy bacon, creating a flavor combination that’s both savory and satisfying.
The beauty of this dish lies in its simplicity, allowing the rich flavors of the pork to shine through while the bacon adds a deliciously crispy texture. Whether served as an appetizer or a side dish, Pigs in Blankets are certain to be a crowd-pleaser.
Making Pigs in Blankets isn’t only easy but also entertaining, especially when you get the family involved in the preparation. It’s a versatile recipe too; you can choose different types of sausages or bacon to suit your taste.
As the aroma of the bacon sizzles in the oven, your kitchen will fill with a mouthwatering scent that will have everyone enthusiastic to dig in. Prepare yourself for a festive treat that will have your guests coming back for seconds!
Ingredients (Serves 4-6)
- 12 cocktail sausages
- 12 rashers of streaky bacon
- 1 tablespoon of honey (optional)
- 1 teaspoon of black pepper
- 1 teaspoon of dried thyme (or other herbs, optional)
- Toothpicks (for securing)
Cooking Instructions
- Preheat the Oven: Start by preheating your oven to 200°C (400°F). A hot oven is vital for crisping the bacon and guaranteeing the sausages cook through evenly.
- Prepare the Sausages: Take the cocktail sausages out of their packaging and place them in a bowl. If you want to add a touch of sweetness, drizzle the honey over the sausages and sprinkle with black pepper and thyme. Toss them gently to coat.
- Wrap with Bacon: Take a rasher of streaky bacon and wrap it around each sausage, starting at one end and spiraling it around to the other end. Confirm the bacon overlaps slightly as you wrap. Secure each bacon-wrapped sausage with a toothpick to prevent it from unraveling during cooking.
- Arrange on a Baking Tray: Place the wrapped sausages on a baking tray lined with parchment paper. Make sure they’re spaced out, allowing the hot air to circulate around them for even cooking.
- Bake in the Oven: Place the baking tray in the preheated oven and bake for 20-25 minutes, or until the bacon is crispy and the sausages are cooked through. You can turn them halfway through the cooking time for an even browning.
- Serve Hot: Once cooked, remove the Pigs in Blankets from the oven and let them cool for a couple of minutes. Serve hot, either on their own or with a side of dipping sauces like mustard or ketchup.
Extra Tips
For an added flavor kick, consider marinating the sausages in your favorite herbs or spices for a few hours before wrapping them in bacon.
Alternatively, you can experiment with different types of sausages, such as herbed or spicy varieties, to cater to your guests’ preferences. Keep an eye on the cooking time, as larger sausages may require a few extra minutes in the oven.
Finally, if you want to make a larger batch, simply multiply the ingredients while keeping an eye on oven space. Enjoy your cooking adventure and the delightful taste of these festive Pigs in Blankets!
Christmas Cake
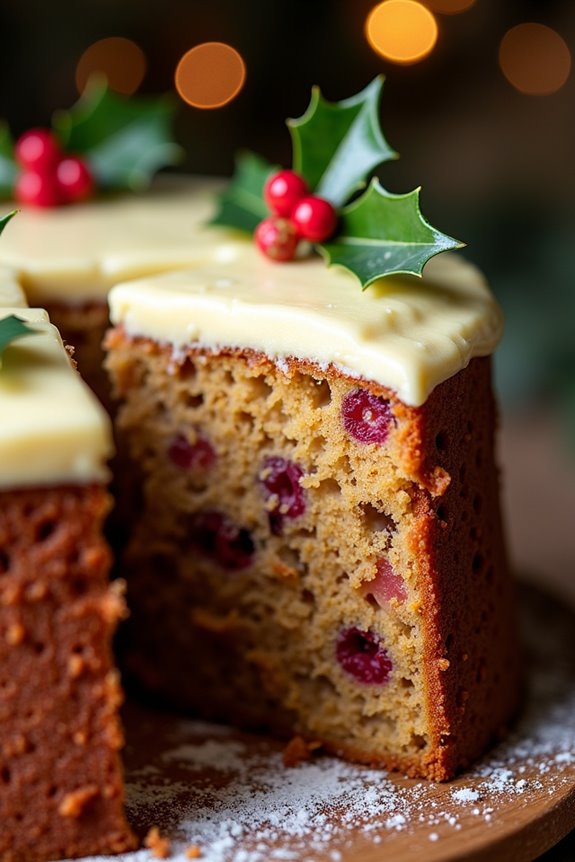
Christmas Cake is a beloved British tradition that epitomizes the festive spirit of the season. This rich, moist fruitcake is typically infused with a medley of dried fruits, nuts, and warming spices, making it a delightful centerpiece for any holiday table.
Often adorned with marzipan and icing, it isn’t just a treat for the taste buds but also a feast for the eyes, showcasing the care and love that goes into its preparation. Making a Christmas Cake isn’t only about baking; it’s about creating memories and enjoying the process with family and friends.
Traditionally, Christmas Cake is made well in advance of the festive season, allowing the flavors to deepen and mature. The cake is often soaked in alcohol, such as brandy or sherry, which helps preserve it and enhances the flavors over time.
Whether you plan to enjoy it with a warm cup of tea or serve it as a dessert after your Christmas dinner, this cake is sure to bring joy and warmth to your holiday celebrations.
Ingredients (Serves 4-6 people)
- 200g mixed dried fruits (raisins, sultanas, currants)
- 100g chopped dried apricots
- 100g mixed nuts (almonds, walnuts, hazelnuts)
- 150g unsalted butter, softened
- 150g light brown sugar
- 3 large eggs
- 200g all-purpose flour
- 1 tsp baking powder
- 1 tsp ground cinnamon
- 1/2 tsp ground nutmeg
- Zest of 1 lemon
- Zest of 1 orange
- 50ml brandy or orange juice
Cooking Instructions
- Prepare the Fruit Mixture: Begin by combining the mixed dried fruits and chopped dried apricots in a bowl. Pour the brandy or orange juice over them and leave to soak for at least 1 hour, or preferably overnight. This will plump up the fruits and infuse them with flavor.
- Preheat the Oven: Preheat your oven to 150°C (300°F). Line a round cake tin (approximately 20cm in diameter) with baking parchment, making certain that it goes up the sides. This will help prevent the cake from sticking and burning.
- Cream the Butter and Sugar: In a large mixing bowl, cream together the softened butter and light brown sugar until light and fluffy. This process incorporates air into the mixture, which helps the cake rise.
- Add the Eggs: Gradually add the eggs to the butter and sugar mixture, one at a time, mixing well after each addition. If the mixture starts to curdle, add a spoonful of flour to stabilize it.
- Mix the Dry Ingredients: In another bowl, sift together the all-purpose flour, baking powder, ground cinnamon, ground nutmeg, and the zest of the lemon and orange. This guarantees even distribution of the dry ingredients and introduces air.
- Combine Ingredients: Gently fold the dry mixture into the wet mixture, being careful not to overmix. Then, add the soaked fruits and mixed nuts, folding them in gently until evenly distributed throughout the batter.
- Bake the Cake: Pour the batter into the prepared cake tin and smooth the surface with a spatula. Bake in the preheated oven for about 1.5 to 2 hours, or until a skewer inserted into the center comes out clean. If the cake begins to brown too quickly, cover it loosely with foil.
- Cool and Store: Once baked, remove the cake from the oven and let it cool in the tin for 10 minutes before transferring it to a wire rack to cool completely. Once cooled, you can wrap the cake in parchment paper and foil, then store it in an airtight container. If desired, continue to feed the cake with a small amount of brandy every week until Christmas.
Extra Tips
When making your Christmas Cake, feel free to customize the dried fruits and nuts according to your preferences. You can add ingredients like glacé cherries, figs, or even chocolate chips for a unique twist.
Additionally, remember to avoid overmixing the batter after adding the flour to maintain a tender crumb. If you want to decorate your cake, consider using marzipan and royal icing for a classic look, but don’t hesitate to get creative with your decorations!
Figgy Pudding
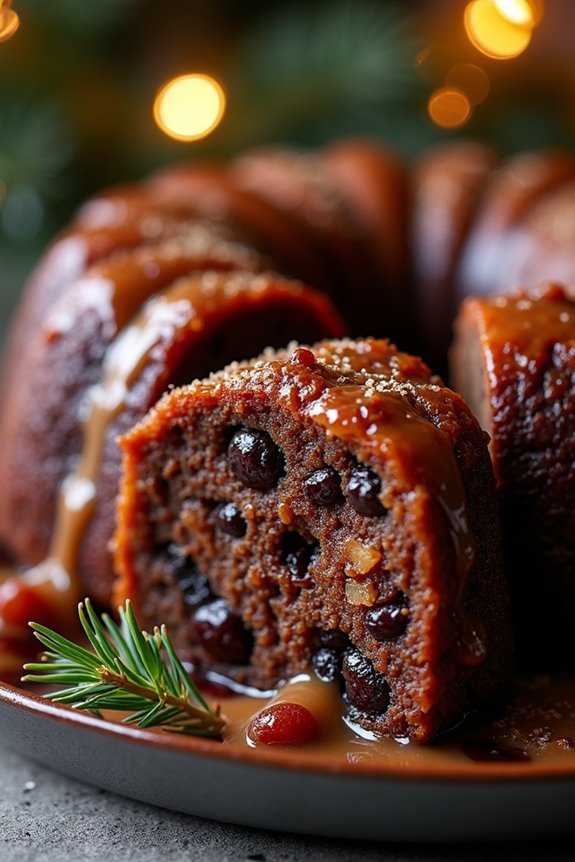
Figgy pudding, a traditional British dessert, is a rich and moist steamed cake that has been enjoyed for centuries, particularly during the Christmas season. It’s filled with dried fruits, spices, and often served with a warm sauce, making it a festive centerpiece for any holiday gathering.
The history of figgy pudding dates back to the Victorian era, where it was associated with the Christmas feast and often featured in carols. This delightful dessert isn’t only delicious but also a wonderful way to embrace British culinary traditions.
Making figgy pudding is a delightful experience that fills your kitchen with the warm aromas of spices and fruits. Although it may seem intimidating at first, the process is straightforward and rewarding.
The key to a perfect figgy pudding lies in the quality of your ingredients, particularly the dried fruits and spices. It’s best to prepare the pudding a day in advance to allow the flavors to meld beautifully. Serve it with a warm sauce or brandy butter for an extra touch of indulgence.
Ingredients (Serves 4-6):
- 200g dried figs, chopped
- 150g raisins
- 150g currants
- 100g chopped dates
- 100g unsalted butter, softened
- 150g brown sugar
- 2 large eggs
- 200g all-purpose flour
- 1 teaspoon baking powder
- 1 teaspoon ground cinnamon
- 1 teaspoon ground nutmeg
- 1 teaspoon mixed spice
- 100ml milk
- Zest of 1 lemon
- Zest of 1 orange
- A pinch of salt
Cooking Instructions:
- Prepare the Dried Fruits: In a medium bowl, combine the chopped figs, raisins, currants, and dates. Add a splash of warm water to moisten them slightly and set aside. This will help plump the fruits and enhance their flavor.
- Cream the Butter and Sugar: In a large mixing bowl, cream together the softened butter and brown sugar until light and fluffy. This process incorporates air into the mixture, resulting in a lighter pudding.
- Add the Eggs: Beat in the eggs one at a time, making sure that each egg is fully incorporated before adding the next. This step is essential for creating a smooth batter.
- Mix the Dry Ingredients: In another bowl, sift together the all-purpose flour, baking powder, ground cinnamon, ground nutmeg, mixed spice, and salt. This guarantees that the leavening agents and spices are evenly distributed throughout the flour.
- Combine Ingredients: Gradually fold the dry ingredients into the creamed butter and sugar mixture, alternating with the milk. This will prevent the batter from becoming too thick and provide a smooth consistency.
- Add Fruits and Zests: Gently fold in the prepared dried fruits, lemon zest, and orange zest into the batter. Be careful not to overmix, as this can lead to a dense pudding.
- Prepare the Steaming Setup: Grease a pudding basin or heatproof bowl with butter. Pour the pudding mixture into the basin, filling it about three-quarters full to allow room for rising. Cover the top with parchment paper and secure with kitchen twine.
- Steam the Pudding: Place the pudding basin in a large pot with a steamer rack or directly in a pot with water that reaches halfway up the sides of the basin. Bring the water to a gentle simmer and cover the pot. Steam for about 1.5 to 2 hours, checking occasionally to make sure the water doesn’t evaporate.
- Cool and Store: Once cooked, carefully remove the pudding from the pot and let it cool for a few minutes before turning it out onto a serving plate. You can serve it warm or store it in a cool, dark place for up to a week if you want to prepare it in advance.
Extra Tips:
When preparing figgy pudding, it’s important to allow the pudding to age for at least a day before serving to enhance the flavors. You can also soak the dried fruits in rum or brandy overnight for an extra festive kick.
Additionally, if you’d like a more intense flavor, try adding a splash of your favorite spirit to the batter. When ready to serve, warm the pudding gently and consider flambéing it with brandy for a stunning presentation!
Brussels Sprouts With Chestnuts
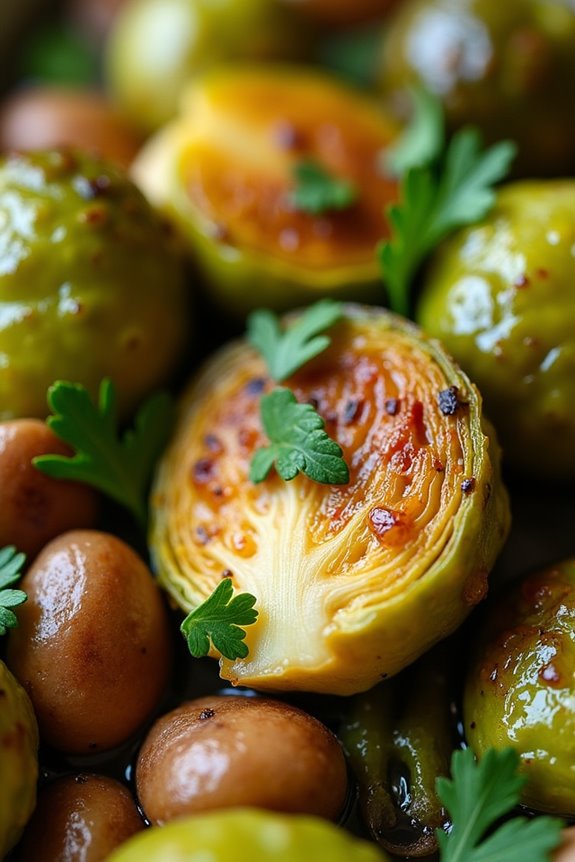
Brussels Sprouts with Chestnuts is a delightful dish that perfectly embodies the festive spirit of a British Christmas. The combination of tender Brussels sprouts and sweet, earthy chestnuts creates a symphony of flavors that complements any holiday meal. This dish not only adds a pop of color to your festive table but also provides a nutritious option that everyone can enjoy.
Cooking Brussels sprouts with chestnuts is a simple process that can be easily mastered by home cooks of any skill level. The key is to guarantee that the sprouts are cooked until tender, while the chestnuts provide a wonderful contrast in texture and flavor. Whether served as a side dish or a vegetarian main, this recipe is sure to be a hit during your holiday celebrations.
Ingredients (Serves 4-6)
- 500g Brussels sprouts, trimmed and halved
- 200g chestnuts, cooked and peeled (or vacuum-packed)
- 3 tablespoons olive oil
- 2 cloves garlic, minced
- Salt and pepper, to taste
- 1 tablespoon balsamic vinegar (optional)
- Fresh parsley, chopped (for garnish)
Cooking Instructions
- Prepare the Brussels Sprouts: Begin by trimming the Brussels sprouts by cutting off the stems and removing any yellow or damaged leaves. Then, cut each sprout in half to guarantee even cooking. Rinse them under cold water and drain.
- Cook the Chestnuts: If using fresh chestnuts, score the shells with a sharp knife and roast them in the oven until the shells split. Once cooked, peel and set aside. If you’re using pre-cooked, vacuum-packed chestnuts, simply chop them roughly and set aside for later use.
- Sauté the Brussels Sprouts: In a large skillet, heat the olive oil over medium heat. Add the halved Brussels sprouts to the skillet and season with salt and pepper. Sauté them for about 5-7 minutes, stirring occasionally, until they begin to brown and soften.
- Add Garlic and Chestnuts: Once the Brussels sprouts are lightly browned, add the minced garlic to the skillet. Cook for an additional minute until fragrant. Then, add the chopped chestnuts and continue to sauté for another 3-4 minutes, allowing the flavors to meld together.
- Finish with Balsamic Vinegar: If desired, drizzle the balsamic vinegar over the mixture and stir well to coat. This step adds a beautiful acidity that enhances the dish’s overall flavor. Cook for another minute to combine all the ingredients.
- Serve: Remove from heat and transfer the Brussels sprouts and chestnuts to a serving dish. Garnish with chopped fresh parsley for a touch of color and freshness. Serve warm as a delightful side dish.
Extra Tips
To elevate the flavor of your Brussels Sprouts with Chestnuts, consider adding a pinch of nutmeg or a sprinkle of grated Parmesan cheese just before serving. You can also experiment by incorporating crispy bacon bits or toasted almonds for added texture.
When preparing the dish in advance, store the Brussels sprouts and chestnuts separately until you’re ready to sauté them, guaranteeing that they retain their freshness and flavor. Enjoy this festive dish as part of your holiday feast!
Trifle
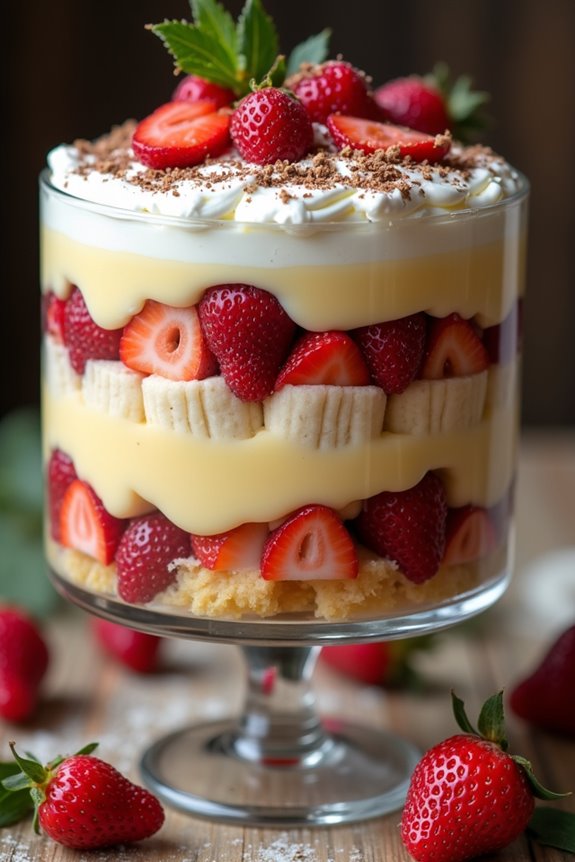
Trifle is a quintessential British dessert, especially during the festive season. This delightful layered dish is a feast for both the eyes and the palate, combining flavors and textures that create a truly indulgent experience.
Traditionally, a trifle features layers of sponge cake soaked in sherry or fruit juice, luscious custard, fresh fruit, and whipped cream, often garnished with nuts or chocolate shavings. It’s a celebration of flavors that embodies the spirit of Christmas gatherings, making it a perfect centerpiece for your holiday table.
Creating a festive trifle isn’t only about following a recipe but also embracing creativity with the ingredients. You can customize the layers according to your preferences, using seasonal fruits or incorporating your favorite sweets. This recipe serves 4-6 people, making it ideal for a small family gathering or a cozy dinner party.
Let’s explore this festive treat and impress your guests with a stunning trifle that’s sure to be the highlight of your festive feast!
Ingredients
- 1 ready-made sponge cake or ladyfingers
- 200ml sherry or fruit juice (like orange or apple)
- 500ml custard (made from scratch or store-bought)
- 300ml double cream
- 2 tablespoons icing sugar
- 1 teaspoon vanilla extract
- 300g mixed fresh fruits (such as strawberries, raspberries, and bananas)
- Chocolate shavings or nuts for garnish (optional)
Cooking Instructions
- Prepare the Sponge Layer: If using a ready-made sponge cake, slice it into even layers. If using ladyfingers, arrange them in a single layer at the bottom of your trifle dish. The sponge acts as the base of your trifle, soaking up the sherry or juice.
- Soak the Sponge: Drizzle the sherry or fruit juice evenly over the sponge layers. Allow it to soak for a few minutes, making sure the sponge is moist but not overly soggy. This step infuses the cake with flavor and keeps it deliciously soft.
- Add the Custard Layer: Pour the custard over the soaked sponge, spreading it gently to create an even layer. The creamy custard adds richness and balances the flavors of the dish. If you’re using store-bought custard, make certain it’s well-chilled for the best texture.
- Layer the Fresh Fruits: Chop the mixed fresh fruits into bite-size pieces, if necessary, and layer them on top of the custard. Choose a colorful mix for visual appeal, and the freshness of the fruit will complement the creaminess of the custard beautifully.
- Whip the Cream: In a mixing bowl, combine the double cream, icing sugar, and vanilla extract. Whip until soft peaks form, creating a light and airy whipped cream. This layer adds a delightful fluffiness to your trifle.
- Top with Whipped Cream: Spoon the whipped cream over the fruit layer, smoothing it out to create an appealing finish. This final layer adds volume and a luxurious texture to your trifle.
- Garnish and Chill: Finish your trifle with chocolate shavings or chopped nuts for an extra crunch, if desired. Cover the trifle with plastic wrap and refrigerate for at least 2-3 hours, or overnight for the best flavor melding.
Extra Tips
When preparing your trifle, consider making it a day ahead of your gathering. This not only saves you time but also allows the flavors to meld beautifully overnight.
Additionally, feel free to experiment with flavor combinations; using different fruits or even flavored liqueurs can give your trifle a unique twist. For a festive touch, consider adding some seasonal spices like cinnamon or nutmeg to your custard or cream.
Enjoy your holiday celebrations with this delightful dessert!