

Exploring gluten-free options can be both exciting and delicious, especially when it comes to German cuisine.
From hearty Sauerbraten to sweet Apple Strudel, you’ll find recipes that keep all the traditional flavors you adore.
These dishes are ideal for family gatherings or cozy nights at home.
Curious about how these classics can be gluten-free without losing their taste?
I’m thrilled to share the secrets behind these delightful adaptations.
Gluten-Free Sauerbraten

Sauerbraten, often referred to as Germany’s national dish, is a pot roast that’s typically marinated before slow-cooking to achieve its signature tangy flavor. Traditionally made with beef, this gluten-free version guarantees everyone can enjoy this deliciously rich and tender dish. The marinating process infuses the meat with a blend of spices and vinegar, creating a depth of flavor that’s both hearty and comforting.
This gluten-free adaptation uses ingredients that are easily sourced and substitutes gluten-containing items with alternatives that don’t compromise the dish’s authentic taste. Serve it with gluten-free dumplings or roasted potatoes for a complete meal that will impress your family and friends.
Ingredients (serves 4-6):
- 3 pounds beef roast (chuck or round)
- 2 cups beef broth (gluten-free)
- 1 cup red wine (gluten-free)
- 1 cup apple cider vinegar
- 1 large onion, sliced
- 2 carrots, chopped
- 2-3 cloves garlic, minced
- 2 bay leaves
- 1 tablespoon whole black peppercorns
- 1 tablespoon mustard seeds
- 1 teaspoon ground ginger
- Salt, to taste
- 2 tablespoons gluten-free soy sauce or tamari
- 1 tablespoon cornstarch (optional, for thickening)
- Fresh parsley, for garnish
Cooking Instructions:
- Prepare the Marinade: In a large bowl, combine beef broth, red wine, apple cider vinegar, sliced onion, chopped carrots, minced garlic, bay leaves, black peppercorns, mustard seeds, ground ginger, gluten-free soy sauce, and salt. Mix well to ascertain all ingredients are incorporated.
- Marinate the Beef: Place the beef roast into a large resealable plastic bag or a deep dish. Pour the marinade over the beef, guaranteeing it’s fully submerged. Seal the bag or cover the dish and refrigerate for at least 3 days, turning the meat every day to confirm even marination.
- Sear the Beef: After marination, remove the beef from the fridge and pat it dry with paper towels. In a large Dutch oven or heavy pot, heat a small amount of oil over medium-high heat. Sear the roast on all sides until browned, approximately 4-5 minutes per side. This step enhances the flavor through the Maillard reaction.
- Add the Marinade: Once the meat is browned, remove it from the pot and set it aside. Pour the marinade into the pot, scraping up any browned bits from the bottom. Bring to a simmer, then return the beef to the pot.
- Slow Cook: Cover the pot and reduce the heat to low. Allow the beef to cook gently for about 3-4 hours, or until it becomes fork-tender. Occasionally, check on the pot to make sure there’s enough liquid, adding more broth if necessary.
- Thicken the Sauce (optional): Once cooked, remove the beef from the pot and let it rest for 10 minutes before slicing. If you prefer a thicker sauce, mix cornstarch with a little cold water to create a slurry, then stir it into the simmering broth and cook until thickened.
- Serve: Slice the beef against the grain and serve with the sauce poured over. Garnish with fresh parsley for an added touch of color.
Extra Tips:
To elevate the flavor of your gluten-free Sauerbraten, consider adding fresh herbs like thyme or rosemary to the marinade.
Also, for a slightly sweeter sauce, you can include a tablespoon of brown sugar or honey. If you have leftovers, Sauerbraten tastes even better the next day as the flavors continue to meld, making it a fantastic dish for meal prep.
Kartoffelsalat (Potato Salad)
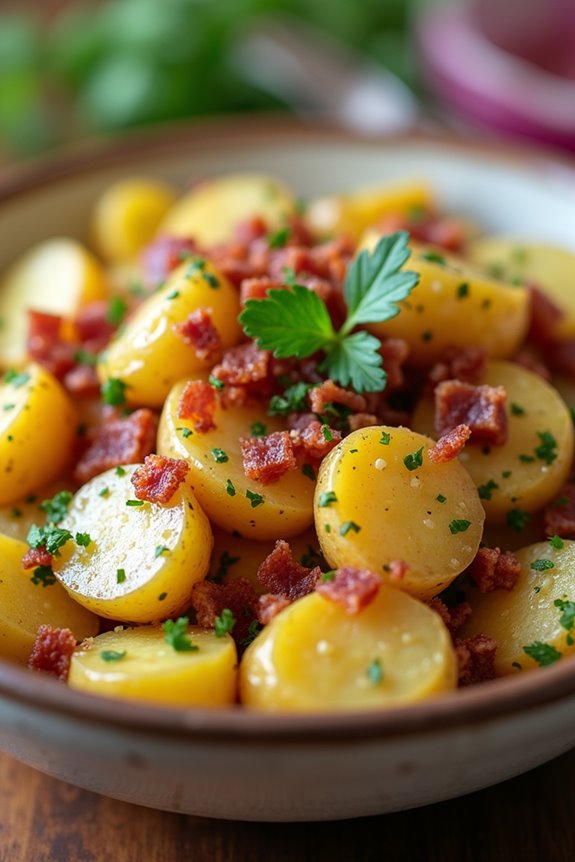
Kartoffelsalat, or German potato salad, is a beloved dish that showcases the versatility of potatoes combined with a flavorful dressing. Unlike the creamy versions common in other cultures, traditional German potato salad is typically made with a tangy vinegar-based dressing, which makes it a revitalizing and light side dish perfect for summer gatherings or hearty winter meals.
This salad is often served warm or at room temperature, allowing the flavors to meld beautifully, making it a delightful addition to any table. This gluten-free potato salad isn’t only easy to prepare but also can be customized to your liking. The use of fresh herbs, onions, and a touch of mustard gives it a distinct flavor profile that pairs wonderfully with grilled meats, sausages, or as a standalone dish.
Whether you’re hosting a barbecue or looking for a great side dish for dinner, this Kartoffelsalat is sure to impress your family and friends.
Ingredients (Serves 4-6):
- 2 pounds of small waxy potatoes
- 1/2 cup of diced red onion
- 1/4 cup of apple cider vinegar
- 1/4 cup of vegetable broth
- 2 tablespoons of Dijon mustard
- 1 tablespoon of sugar
- 1/4 cup of olive oil
- Salt and pepper to taste
- 1/4 cup of chopped fresh parsley
- Optional: 1/2 cup of cooked and crumbled bacon
Cooking Instructions:
- Prepare the Potatoes: Begin by washing the potatoes thoroughly to remove any dirt. Place them in a large pot and cover them with cold water. Add a pinch of salt to the water for flavor. Bring the pot to a boil over medium-high heat, then reduce the heat to low and simmer until the potatoes are fork-tender, about 15-20 minutes. Be careful not to overcook them, as they should hold their shape.
- Cool and Cut the Potatoes: Once the potatoes are cooked, drain them in a colander and let them cool slightly. When they’re cool enough to handle, slice them into bite-sized pieces, leaving the skins on for added texture and flavor. Place the sliced potatoes in a large mixing bowl.
- Make the Dressing: In a separate bowl, whisk together the apple cider vinegar, vegetable broth, Dijon mustard, sugar, and olive oil until well combined. This dressing will provide the tangy flavor that’s characteristic of German potato salad.
- Combine Ingredients: Pour the dressing over the warm potatoes in the mixing bowl. Gently toss everything together until the potatoes are well coated with the dressing. Be careful not to crush the potatoes while mixing.
- Add Onions and Seasoning: Add the diced red onion and chopped parsley to the potato mixture. Season with salt and pepper to taste. If desired, you can also add crumbled bacon for an extra layer of flavor. Toss gently to combine all ingredients evenly.
- Let it Rest: Allow the potato salad to sit for at least 30 minutes before serving. This resting time will help the flavors meld together and enhance the overall taste of the dish. You can serve it warm, at room temperature, or chilled.
Extra Tips:
For the best flavor, use waxy potatoes like Yukon Gold or red potatoes, as they hold their shape well after cooking. Feel free to experiment with additional ingredients, such as capers, diced pickles, or even fresh herbs like dill or chives, to tailor the salad to your taste.
If you prefer a lighter version, you can reduce the amount of olive oil or skip the bacon entirely. Enjoy your homemade Kartoffelsalat as a delicious and gluten-free accompaniment to any meal!
Zucchini Noodles With Pesto and Sausage
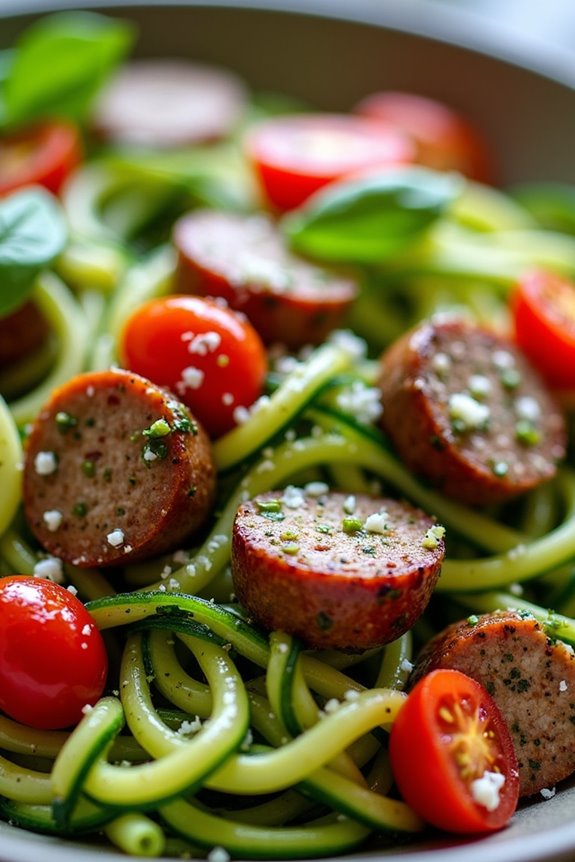
Zucchini Noodles with Pesto and Sausage is a delightful dish that captures the essence of Italian flavors while offering a gluten-free alternative to traditional pasta. The zucchini noodles, also known as “zoodles,” serve as a light and fresh base for the savory sausage and aromatic pesto. This dish isn’t only easy to prepare but also packed with nutrients, making it a perfect choice for a quick weeknight dinner or a gathering with friends.
In this recipe, you’ll learn how to create a satisfying meal that highlights the natural flavors of zucchini and the rich, herby notes of pesto. Whether you’re a seasoned chef or a novice in the kitchen, this dish is simple enough to execute while still impressing your guests. With a few fresh ingredients and just a little bit of time, you can create a hearty, gluten-free meal that everyone will love.
Ingredients (serves 4-6):
- 4 medium zucchinis
- 1 pound Italian sausage (remove casings if using links)
- 1 cup fresh basil pesto (store-bought or homemade)
- 1 cup cherry tomatoes, halved
- 2 tablespoons olive oil
- 1/4 teaspoon red pepper flakes (optional)
- Salt and pepper, to taste
- Grated Parmesan cheese, for serving (optional)
Cooking Instructions:
- Prepare the Zucchini: Start by washing the zucchinis thoroughly. Using a spiralizer or a vegetable peeler, create long, noodle-like strands from the zucchinis. If you prefer, you can also cut them into thin julienne strips. Set the zucchini noodles aside on a clean kitchen towel to absorb any excess moisture.
- Cook the Sausage: In a large skillet over medium heat, add the olive oil. Once hot, add the Italian sausage. Break the sausage into smaller pieces with a spatula and cook until browned and fully cooked through, about 5-7 minutes. If you prefer a bit of heat, sprinkle in the red pepper flakes while cooking.
- Add Tomatoes: Once the sausage is cooked, add the halved cherry tomatoes to the skillet. Sauté for an additional 2-3 minutes until the tomatoes start to soften and release their juices. Season with salt and pepper to taste.
- Combine Zoodles and Pesto: Add the prepared zucchini noodles to the skillet with the sausage and tomatoes. Toss everything together gently to combine. Cook for about 2-3 minutes, just until the zoodles are tender but still have a slight crunch.
- Finish with Pesto: Remove the skillet from the heat and stir in the fresh basil pesto. Toss everything together until the zoodles are evenly coated with the pesto. If the mixture appears dry, you can add a splash of olive oil.
- Serve: Plate the zucchini noodles with pesto and sausage immediately. If desired, sprinkle with grated Parmesan cheese for added flavor.
Extra Tips: When making Zucchini Noodles with Pesto and Sausage, remember to avoid overcooking the zucchini noodles as they can become mushy. If you want to enhance the flavors even more, consider adding some roasted pine nuts or sunflower seeds on top for a crunchy texture.
Additionally, feel free to customize the dish by adding your favorite vegetables or swapping out the sausage for a different protein, such as chicken or turkey. Enjoy this delicious, gluten-free meal!
Gluten-Free Pretzels

If you’ve been craving the soft, chewy goodness of traditional German pretzels but need to avoid gluten, you’re in luck! This gluten-free pretzel recipe perfectly captures the essence of the beloved snack while using a blend of gluten-free flours that make them just as delicious.
These pretzels are great for dipping in mustard, cheese sauce, or enjoying plain with a sprinkle of coarse salt. The best part? They’re easy to make and can be a fun activity for the whole family.
To achieve the classic pretzel shape, you’ll start with a simple dough that rises, giving it that nice fluffy texture. After forming your pretzels, a quick soak in a baking soda solution gives them their signature brown color and unique flavor. These gluten-free pretzels are perfect for game days, movie nights, or simply as a snack to satisfy your cravings.
Let’s explore the ingredients and steps to make these delicious treats!
Ingredients (serving size: 4-6 people)
- 2 cups gluten-free all-purpose flour
- 1 cup almond flour
- 1 teaspoon salt
- 1 tablespoon sugar
- 1 tablespoon instant yeast
- 1 cup warm water (110°F)
- 1/4 cup baking soda
- 1 egg (beaten, for egg wash)
- Coarse sea salt (for topping)
Cooking Instructions
- Prepare the Dough: In a large mixing bowl, combine the gluten-free all-purpose flour, almond flour, salt, sugar, and instant yeast. Mix the dry ingredients until they’re well combined. Gradually add warm water to the dry mixture, stirring until a soft dough forms. If the dough is too sticky, add a little more gluten-free flour until it reaches a workable consistency.
- Knead and Rise: Once the dough has come together, knead it gently on a clean surface for about 2-3 minutes. Form the dough into a ball and place it in a lightly greased bowl. Cover it with a clean kitchen towel or plastic wrap and let it rise in a warm place for about 30 minutes, or until it has doubled in size.
- Shape the Pretzels: After the dough has risen, punch it down to remove any air bubbles. Divide the dough into 8 equal pieces. Roll each piece into a long rope, about 24 inches long. To shape the pretzel, create a U-shape with the rope, then twist the ends together twice before folding them down to create the classic pretzel shape. Place the shaped pretzels on a parchment-lined baking sheet.
- Prepare the Baking Soda Bath: Preheat your oven to 425°F (220°C). In a large pot, bring 8 cups of water to a boil. Add the baking soda carefully (it will bubble up). Once boiling, gently drop each pretzel into the water for about 30 seconds. Use a slotted spoon to remove them and place them back on the baking sheet.
- Egg Wash and Bake: Brush each pretzel with the beaten egg to give them a beautiful golden color. Sprinkle coarse sea salt over the top. Bake the pretzels in the preheated oven for 12-15 minutes, or until they’re golden brown and have a nice crust.
- Cool and Serve: Once baked, remove the pretzels from the oven and let them cool on a wire rack for a few minutes. Serve warm with your favorite dips or enjoy them on their own!
Extra Tips
To enhance your gluten-free pretzels, consider experimenting with different toppings such as sesame seeds, poppy seeds, or everything bagel seasoning for added flavor.
Make sure to confirm your ingredients are certified gluten-free, as cross-contamination can occur. Additionally, if you want to make the process even easier, you can prepare the dough ahead of time and refrigerate it overnight; just allow it to come to room temperature before shaping and baking.
Enjoy your homemade gluten-free pretzels!
Rinderrouladen (Beef Roll-Ups)
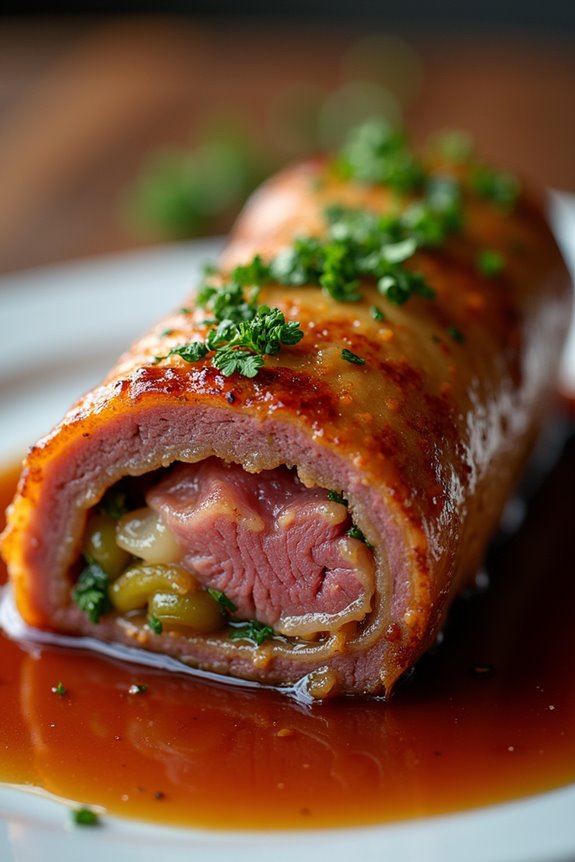
Rinderrouladen, or beef roll-ups, is a traditional German dish that showcases the art of slow-cooked, flavorful meat wrapped around savory fillings. Perfect for a family gathering or a cozy dinner, Rinderrouladen not only delivers on taste but also brings a sense of comfort and nostalgia.
The dish involves thinly sliced beef, usually from the round or flank, that’s filled with a delightful medley of ingredients such as bacon, onions, mustard, and pickles. Once rolled up and seared, these bundles are braised to perfection, allowing the flavors to meld beautifully.
This gluten-free version guarantees that anyone can enjoy this hearty dish without concern. Using gluten-free alternatives allows the rich taste and texture of the Rinderrouladen to shine through, providing a dish that’s both satisfying and accommodating for dietary restrictions.
Serve these delicious rolls with mashed potatoes, red cabbage, or a fresh salad for a complete meal that your guests will love.
Ingredients (Serves 4-6)
- 2 lbs beef round or flank steak, thinly sliced
- 4 slices of gluten-free bacon, chopped
- 1 large onion, finely chopped
- 4 tablespoons gluten-free mustard
- 4-6 dill pickles, cut into long strips
- Salt and pepper, to taste
- 2 tablespoons vegetable oil
- 1 cup beef broth
- 1 cup red wine (optional)
- Fresh parsley, for garnish
Cooking Instructions
- Prepare the Beef: Lay the thinly sliced beef on a clean cutting board. Use a meat mallet to gently pound the slices to an even thickness if necessary. This will help assure that the beef cooks evenly and is tender.
- Season the Beef: Spread a thin layer of gluten-free mustard on each slice of beef, then season with salt and pepper. This adds flavor and helps to tenderize the meat.
- Add Fillings: On one end of each beef slice, place a few strips of dill pickle, a sprinkle of chopped bacon, and a small amount of chopped onion. Be careful not to overfill, as the beef needs to roll up securely.
- Roll the Beef: Starting from the end with the fillings, carefully roll the beef tightly into a cylinder. Use toothpicks or kitchen twine to secure the ends to keep the filling from spilling out during cooking.
- Sear the Rolls: In a large skillet or Dutch oven, heat the vegetable oil over medium-high heat. Once hot, add the roll-ups and sear them on all sides until brown. This step locks in the flavors and gives the beef a nice crust.
- Deglaze the Pan: After searing, remove the roll-ups and set them aside. In the same pan, add the chopped onion and sauté until soft. If desired, pour in the red wine to deglaze, scraping any browned bits from the bottom of the pan to enhance the flavor.
- Braise the Rolls: Return the beef roll-ups to the pan, add the beef broth, and bring to a gentle simmer. Cover the pan with a lid and let it braise on low heat for about 1.5 to 2 hours, or until the beef is tender and the flavors have melded.
- Serve: Remove the roll-ups from the pan and let them rest for a few minutes. Remove toothpicks or twine before slicing each roll into bite-sized pieces. Pour some of the cooking liquid over the rolls for added flavor and garnish with fresh parsley before serving.
Extra Tips
When preparing Rinderrouladen, make certain that you choose high-quality beef for the best results.
If you have time, marinate the beef in a mixture of vinegar and spices for a few hours before assembly; this adds depth to the flavor.
For a richer sauce, consider adding a tablespoon of gluten-free flour to the sautéed onions before adding the broth and wine, allowing you to thicken the sauce.
Finally, serve with traditional sides like gluten-free spaetzle or potato dumplings for a complete German dining experience. Enjoy your delicious homemade Rinderrouladen!
Spätzle (German Egg Noodles)
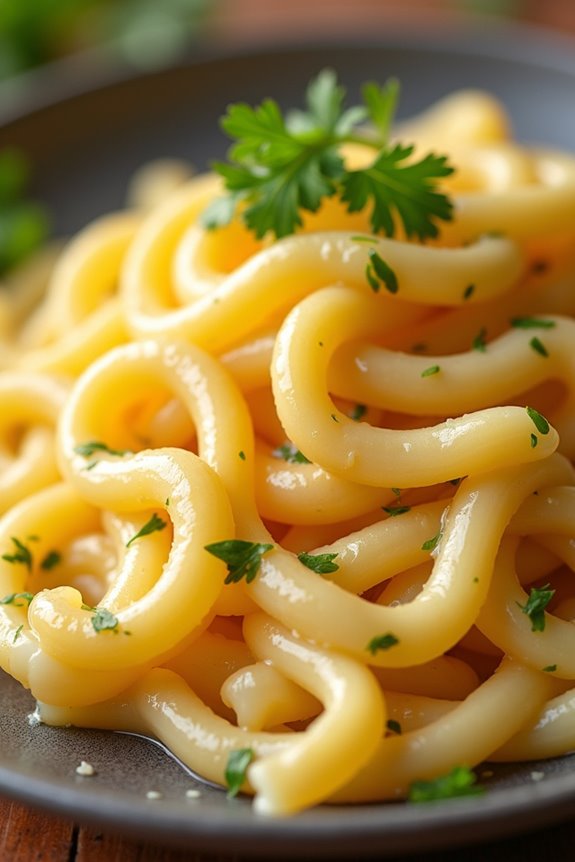
Spätzle is a traditional German dish that consists of small, soft egg noodles that are delightfully chewy and versatile. This gluten-free version is made using rice flour or a gluten-free flour blend, guaranteeing that everyone can enjoy this hearty comfort food. The dish is perfect as a side for meats, or can be enjoyed on its own with a sprinkle of cheese, herbs, or a drizzle of butter. Making Spätzle at home isn’t only fun, but it also allows you to customize the flavors and ingredients to your liking.
To create the perfect Spätzle, the dough must be light and airy, which is achieved by incorporating eggs and allowing the mixture to rest. The unique shape of Spätzle is often formed by either pressing the dough through a Spätzle maker or a colander, resulting in irregularly shaped noodles that capture sauces beautifully. With just a few simple ingredients, you can bring a taste of Germany to your kitchen.
Ingredients (serving size: 4-6 people):
- 2 cups gluten-free flour (such as rice flour or a gluten-free blend)
- 4 large eggs
- 1/2 cup milk or dairy-free alternative
- 1 teaspoon salt
- 1/4 teaspoon nutmeg (optional)
- 2 tablespoons butter or olive oil (for sautéing)
- Fresh parsley (for garnish, optional)
Cooking Instructions:
- Prepare the Dough: In a large mixing bowl, combine the gluten-free flour and salt. Make a well in the center and crack the eggs into it. Add the milk and nutmeg (if using). Whisk together until the mixture becomes a smooth, thick batter. It should be slightly thicker than pancake batter. Allow the dough to rest for about 10-15 minutes.
- Boil Water: In a large pot, bring salted water to a rolling boil. This is essential as the Spätzle will need to cook quickly in the boiling water.
- Shape the Spätzle: Using a Spätzle maker or a colander, push the dough through the holes into the boiling water. If you don’t have a Spätzle maker, you can use a spoon to drop small amounts of dough into the water. The noodles will sink to the bottom initially.
- Cook the Spätzle: Once the noodles float to the surface, they’re done cooking. This usually takes about 2-3 minutes. Remove the Spätzle with a slotted spoon and transfer them to a colander to drain.
- Sauté (Optional): In a large skillet, heat the butter or olive oil over medium heat. Add the cooked Spätzle and sauté for 2-3 minutes until they’re lightly golden and slightly crispy. This step adds flavor and texture.
- Serve: Transfer the Spätzle to a serving dish, garnish with fresh parsley if desired, and serve warm. Enjoy your homemade gluten-free Spätzle with your favorite sauce or as a side dish.
Extra Tips: When making Spätzle, feel free to experiment with flavors by adding herbs or spices into the dough. If the dough seems too thick, you can add a little more milk to reach the desired consistency. Additionally, you can prepare the noodles in advance and freeze them; just make sure they’re cooled completely before freezing. When ready to enjoy, simply reheat them by sautéing in butter or boiling briefly.
Chicken Schnitzel With Lemon
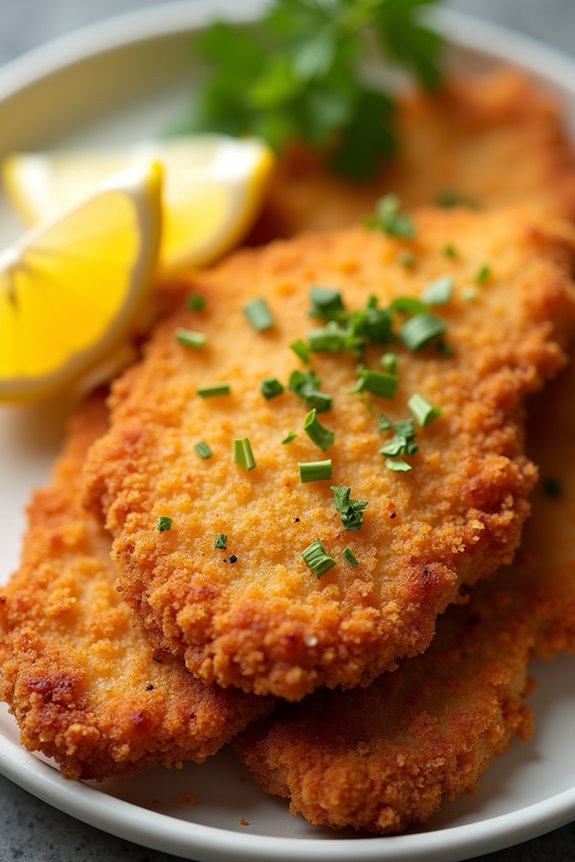
Chicken Schnitzel is a classic German dish that has gained popularity worldwide for its crispy texture and savory flavor. This gluten-free version allows everyone to enjoy this beloved meal without compromising on taste. The chicken is tenderized, coated with a flavorful gluten-free breading, and fried to golden perfection. Paired with a squeeze of fresh lemon juice, this dish isn’t only delicious but also brings a revitalizing zest that complements the richness of the fried chicken.
To make Chicken Schnitzel with Lemon, you’ll want to select high-quality chicken breasts and gluten-free breadcrumbs. This guarantees that the schnitzel is both flavorful and maintains the right texture when frying. The dish is often served alongside a simple side salad or roasted vegetables, making it a well-rounded meal that’s sure to impress your family and friends.
Ingredients (serving size of 4-6 people):
- 4 boneless, skinless chicken breasts
- 1 cup gluten-free breadcrumbs
- 1/2 cup all-purpose gluten-free flour
- 2 large eggs
- 1/4 cup milk (or a dairy-free alternative)
- 1 teaspoon garlic powder
- 1 teaspoon onion powder
- Salt and pepper, to taste
- Zest of 1 lemon
- 1/4 cup vegetable oil (for frying)
- Fresh lemon wedges, for serving
- Fresh parsley, chopped (for garnish)
Cooking Instructions:
- Prepare the Chicken: Begin by placing the chicken breasts between two pieces of plastic wrap or parchment paper. Using a meat mallet or rolling pin, gently pound the chicken to an even thickness of about 1/2 inch. This step helps the chicken cook evenly and remain tender.
- Set Up Breading Station: In three separate shallow bowls, set up your breading station. In the first bowl, add the gluten-free flour. In the second bowl, whisk together the eggs and milk until well combined. In the third bowl, mix together the gluten-free breadcrumbs, garlic powder, onion powder, lemon zest, salt, and pepper.
- Bread the Chicken: Take each chicken breast and dredge it in the gluten-free flour, making sure it’s fully coated. Shake off any excess flour, then dip it into the egg mixture, allowing the excess to drip off. Finally, coat the chicken in the breadcrumb mixture, pressing gently to guarantee the breadcrumbs adhere well to the chicken.
- Fry the Schnitzels: In a large skillet, heat the vegetable oil over medium-high heat. Once hot, carefully add the breaded chicken breasts to the skillet. Fry for about 3-4 minutes on each side, or until the schnitzels are golden brown and cooked through. You may need to do this in batches if your skillet isn’t large enough.
- Drain and Serve: Once cooked, remove the schnitzels from the skillet and place them on a plate lined with paper towels to absorb any excess oil. Serve immediately with fresh lemon wedges and garnish with chopped parsley for a pop of color.
Extra Tips:
When making Chicken Schnitzel, make sure that your oil is hot enough before adding the chicken; this helps create a crispy coating rather than a soggy one. Additionally, feel free to experiment with different seasonings in your breadcrumb mixture, such as paprika or dried herbs, for an extra layer of flavor. Serve with a side of lemon wedges for those who enjoy an extra zing!
Gluten-Free Black Forest Cake
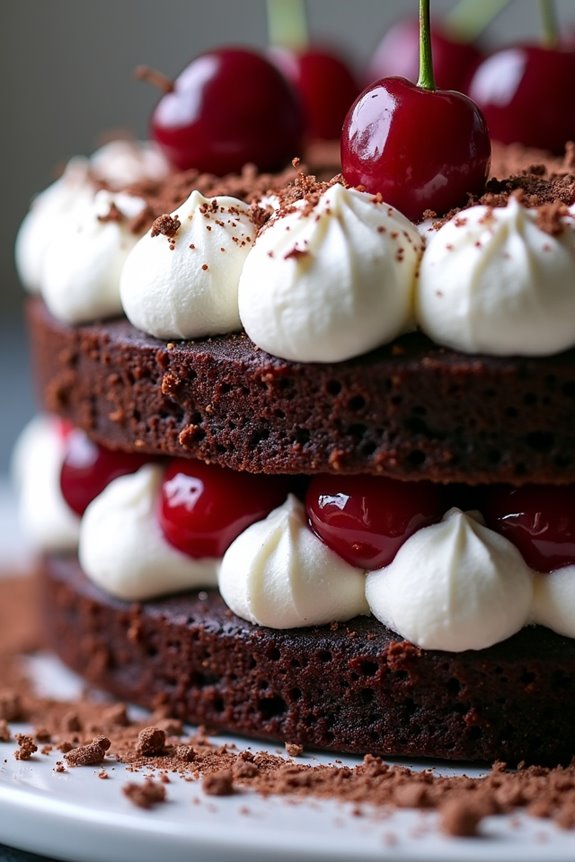
A traditional Black Forest Cake, or Schwarzwälder Kirschtorte, is a delightful German dessert known for its rich chocolate layers, luscious cherries, and creamy whipped topping. This gluten-free version retains all the flavors of the classic, guaranteeing that everyone can enjoy this scrumptious treat, regardless of dietary restrictions. The key to achieving the perfect texture and taste lies in using high-quality gluten-free flour and making certain that the cake layers are moist and flavorful.
In this recipe, you’ll experience the harmonious blend of dark chocolate, tart cherries, and whipped cream, all topped with chocolate shavings for that authentic Black Forest look. Whether you’re celebrating a special occasion or simply indulging your sweet tooth, this Gluten-Free Black Forest Cake will impress your family and friends with its stunning presentation and delicious taste.
Ingredients (Serves 4-6)
- 1 ½ cups gluten-free all-purpose flour
- 1 cup granulated sugar
- ½ cup unsweetened cocoa powder
- 1 teaspoon baking powder
- ½ teaspoon baking soda
- ¼ teaspoon salt
- ¾ cup unsalted butter, softened
- 3 large eggs
- 1 teaspoon vanilla extract
- ½ cup buttermilk
- 1 cup pitted dark cherries (fresh or jarred)
- 1 cup heavy whipping cream
- 2 tablespoons powdered sugar
- ½ teaspoon vanilla extract (for whipping cream)
- Chocolate shavings (for garnish)
Instructions
- Preheat the Oven: Begin by preheating your oven to 350°F (175°C). Grease and flour two 9-inch round cake pans with gluten-free flour. This will guarantee that the cakes release easily after baking.
- Mix Dry Ingredients: In a large mixing bowl, whisk together the gluten-free flour, granulated sugar, cocoa powder, baking powder, baking soda, and salt until well combined. This step guarantees even distribution of the leavening agents and flavor.
- Combine Wet Ingredients: In another bowl, cream together the softened butter, eggs, and vanilla extract until light and fluffy. Gradually add the buttermilk while continuing to mix until the mixture is smooth.
- Combine Mixtures: Slowly add the dry ingredient mixture to the wet ingredients, mixing until just combined. Be careful not to overmix, as this can affect the texture of the cake.
- Bake the Cakes: Divide the batter evenly between the prepared cake pans. Bake in the preheated oven for 25-30 minutes, or until a toothpick inserted into the center comes out clean. Allow the cakes to cool in the pans for about 10 minutes, then transfer them to wire racks to cool completely.
- Prepare the Whipped Cream: While the cakes are cooling, whip the heavy cream with the powdered sugar and ½ teaspoon of vanilla extract in a mixing bowl until soft peaks form. This will create a light and fluffy topping for the cake.
- Assemble the Cake: Once the cakes are completely cool, place one layer on a serving plate. Spread a layer of whipped cream on top, followed by half of the pitted cherries. Place the second layer on top and repeat the process, adding more whipped cream and cherries.
- Garnish: Finally, finish by spreading a thin layer of whipped cream over the top and sides of the cake. Top with chocolate shavings for garnish, and decorate with any remaining cherries for an elegant touch.
Extra Tips
For the best results, allow the cake to chill in the refrigerator for at least an hour before serving; this helps the flavors meld together and makes slicing easier.
If you prefer a more intense cherry flavor, consider soaking the cherries in a bit of Kirsch (cherry schnapps) before adding them to the cake.
Additionally, feel free to experiment with different types of gluten-free flour blends to find the one that works best for your taste and texture preferences. Enjoy your baking journey!
Bavarian Cream

Bavarian Cream, or “Bayerische Creme,” is a classic dessert that hails from Germany, known for its silky texture and rich flavor. This elegant treat is made with a base of pastry cream that’s lightened with whipped cream, resulting in a dessert that’s both airy and indulgent.
Traditionally, it’s flavored with vanilla, but variations can include chocolate, fruit purees, or liqueurs to suit different palates. This gluten-free version guarantees that everyone can enjoy this delightful dessert.
Making Bavarian Cream might seem a bit complex at first, but with the right ingredients and a bit of patience, you can create a stunning dish that will impress your family and friends. This dessert is perfect for special occasions, dinner parties, or simply as a sweet treat to enjoy at home.
Serve it with fresh berries or a fruit coulis for a fresh and vibrant contrast to the creamy texture.
Ingredients (serving size: 4-6 people)
- 2 cups heavy cream
- 1 cup whole milk
- 1/2 cup granulated sugar
- 1 tablespoon unflavored gelatin
- 1/4 cup cold water
- 1 teaspoon pure vanilla extract
- 4 large egg yolks
- Pinch of salt
Cooking Instructions
1. Prepare the Gelatin: In a small bowl, sprinkle the unflavored gelatin over the cold water and let it sit for about 5-10 minutes until it blooms and becomes spongy.
2. Make the Pastry Cream: In a medium saucepan, combine the milk, granulated sugar, and a pinch of salt. Heat over medium heat until the mixture is warm but not boiling.
In a separate bowl, whisk the egg yolks until they’re light in color. Once the milk mixture is warm, slowly pour it into the egg yolks while whisking continuously to temper the eggs. Return the mixture to the saucepan and cook over medium heat, stirring constantly until it thickens and coats the back of a spoon.
3. Incorporate the Gelatin: Remove the saucepan from heat and stir in the bloomed gelatin until it’s completely dissolved. Add the vanilla extract and mix well. Allow the pastry cream to cool to room temperature.
4. Whip the Cream: In a large mixing bowl, whip the heavy cream until soft peaks form. Be careful not to over-whip, as you want the cream to remain light and airy.
5. Combine the Mixtures: Gently fold the cooled pastry cream into the whipped cream using a spatula. Start by adding a small amount of whipped cream to the pastry cream to lighten it, and then gradually fold in the rest of the whipped cream.
Be careful to maintain the volume of the whipped cream.
6. Chill the Bavarian Cream: Pour the combined mixture into serving molds or individual cups. Cover with plastic wrap and refrigerate for at least 4 hours, or until set.
7. Serve: Once set, carefully unmold or Serve directly from the cups. Garnish with fresh berries, fruit coulis, or a dusting of powdered sugar for an elegant presentation.
Extra Tips
When making Bavarian Cream, the key to achieving a smooth texture is to ascertain that your pastry cream is completely cooled before folding in the whipped cream.
If you’re adding any flavors such as chocolate or fruit purees, make sure they’re at room temperature to avoid melting the whipped cream. Additionally, for an extra layer of flavor, consider infusing the milk with herbs such as mint or lemon zest before making the pastry cream.
Enjoy your Bavarian Cream as a delightful finish to any meal!
Cabbage Rolls With Meat Filling

Cabbage rolls, known as “Kohlrouladen” in German, are a traditional dish that combines tender cabbage leaves with a savory meat filling, often served with a rich tomato sauce. This hearty meal isn’t only comforting but also offers a wonderful way to include vegetables in your diet. For those with gluten sensitivities, this gluten-free version guarantees you can enjoy this classic without any worry.
The combination of spices and herbs in the filling gives the dish a delightful flavor, making it a favorite at family gatherings or cozy dinners.
Making cabbage rolls from scratch may seem intimidating, but the process is quite straightforward. The key is in the preparation of the cabbage leaves and the meat filling. With a little patience and care, you can create a delicious, wholesome dish that everyone will love.
The rolls can be baked in the oven or cooked on the stovetop, allowing for flexibility based on your kitchen setup. Whether you’re an experienced cook or a beginner, you’ll find this recipe approachable and satisfying.
Ingredients (Serves 4-6):
- 1 large head of green cabbage
- 1 cup rice (uncooked)
- 1 lb ground beef or ground turkey
- 1 small onion, finely chopped
- 2 cloves garlic, minced
- 1 egg
- 1 teaspoon salt
- 1 teaspoon black pepper
- 1 teaspoon paprika
- 1 teaspoon dried thyme
- 1 jar (24 oz) of gluten-free tomato sauce
- 1 tablespoon olive oil
- Fresh parsley for garnish (optional)
Cooking Instructions:
1. Prepare the Cabbage: Fill a large pot with water and bring it to a boil. Carefully remove the core from the cabbage and place the whole head in the boiling water. Blanch the cabbage for 2-3 minutes, until the outer leaves are pliable.
Remove the cabbage from the pot and let it cool slightly. Gently peel off 12-15 leaves, being careful not to tear them. Set aside.
2. Cook the Rice: In a medium saucepan, bring 2 cups of water to a boil. Add the uncooked rice and a pinch of salt, reduce the heat to low, cover, and simmer for about 15-20 minutes, or until the rice is tender and the water is absorbed.
Fluff with a fork and set aside to cool.
3. Make the Filling: In a large mixing bowl, combine the ground meat, cooked rice, chopped onion, minced garlic, egg, salt, black pepper, paprika, and dried thyme.
Mix thoroughly until all ingredients are well incorporated.
4. Assemble the Rolls: Take a cabbage leaf and place about 2-3 tablespoons of the meat filling at the base of the leaf. Fold in the sides and roll it up tightly, starting from the base.
Repeat this process until all the filling is used up.
5. Cook the Rolls: In a large skillet or Dutch oven, heat olive oil over medium heat. Place the cabbage rolls seam-side down in the skillet.
Pour the gluten-free tomato sauce over the rolls, ensuring they’re well coated. Cover and simmer on low heat for about 30-40 minutes, or until the meat is cooked through and the cabbage is tender.
6. Serve: Once cooked, gently remove the cabbage rolls from the skillet. Serve hot, garnished with fresh parsley if desired, and enjoy with additional tomato sauce on the side.
Extra Tips:
When cooking cabbage rolls, it’s crucial to select a large head of cabbage for ample leaves. If you’re short on time, you can use store-bought gluten-free rice or grain blends as a filling alternative.
To enhance the flavor, consider adding herbs like dill or basil to the meat mixture. Finally, for a creamier texture, a dollop of sour cream can be served on top before enjoying your cabbage rolls.
Apple Strudel With Gluten-Free Dough

Apple strudel is a classic dessert that hails from Austria but has made its way into German cuisine, becoming a beloved treat. Traditionally made with a thin, flaky pastry, this gluten-free version allows everyone to enjoy its delicious, warm flavors without the gluten. The combination of sweet, tart apples, cinnamon, and a hint of lemon zest wrapped in a delicate gluten-free dough creates a mouthwatering experience that’s sure to impress family and friends.
Making gluten-free apple strudel may seem intimidating at first, but with the right ingredients and some patience, you can create a delightful dessert that captures the essence of the original. This recipe is perfect for gatherings or just a cozy night in. Serve it warm with a dusting of powdered sugar and a scoop of vanilla ice cream for an added indulgence.
Ingredients (Serves 4-6):
- 2 cups gluten-free all-purpose flour
- 1/2 teaspoon salt
- 1/2 teaspoon xanthan gum
- 1/4 cup vegetable oil
- 1/4 cup cold water
- 4 large apples, peeled, cored, and thinly sliced
- 1/2 cup granulated sugar
- 1 teaspoon ground cinnamon
- 1 tablespoon lemon juice
- 1/2 cup raisins (optional)
- 1/4 cup breadcrumbs (gluten-free)
- Powdered sugar for dusting
- Butter (for greasing)
Instructions:
- Prepare the Dough: In a large mixing bowl, combine the gluten-free flour, salt, and xanthan gum. Mix well to combine. Create a well in the center and add the vegetable oil and cold water. Mix the ingredients until a dough forms. Knead the dough gently on a floured surface for a few minutes until smooth. Wrap the dough in plastic wrap and let it rest for at least 30 minutes at room temperature.
- Preheat the Oven: While the dough is resting, preheat your oven to 375°F (190°C). Prepare a baking sheet by greasing it lightly with butter or lining it with parchment paper.
- Prepare the Filling: In a large bowl, combine the sliced apples, granulated sugar, ground cinnamon, lemon juice, and raisins (if using). Mix until the apples are well-coated in the sugar and spices. Set aside to let the flavors meld.
- Roll Out the Dough: After the dough has rested, place it on a large piece of parchment paper. Using a rolling pin, roll the dough out into a thin rectangle, about 1/8 inch thick. Make sure to dust it with gluten-free flour to prevent sticking. The dough should be large enough to hold the filling, so try to keep it as rectangular as possible.
- Assemble the Strudel: Sprinkle the gluten-free breadcrumbs evenly over the rolled-out dough, leaving a border around the edges. This will help absorb excess moisture from the apples. Then, layer the apple filling evenly on top of the breadcrumbs. Carefully fold the edges of the dough over the filling, then roll it up tightly starting from one end, using the parchment paper to help you. Seal the edges to guarantee the filling stays inside.
- Bake the Strudel: Transfer the rolled strudel onto the prepared baking sheet, seam side down. Brush the top with melted butter for a golden finish. Bake in the preheated oven for 30-35 minutes or until the strudel is golden brown and crisp.
- Serve: Once baked, remove the strudel from the oven and let it cool slightly. Dust with powdered sugar before slicing into pieces. Serve warm, ideally with a scoop of vanilla ice cream or a dollop of whipped cream.
Extra Tips:
When making gluten-free apple strudel, it’s important to confirm that your gluten-free flour blend contains xanthan gum, which helps mimic the elasticity of traditional wheat flour. If you find the dough too sticky, you can add a bit more flour until it’s manageable.
Also, feel free to experiment with different apple varieties for varying sweetness and tartness. Granny Smith apples work well for a tangier flavor, while Honeycrisp adds a nice sweetness. Enjoy your baking adventure!
Goulash Soup
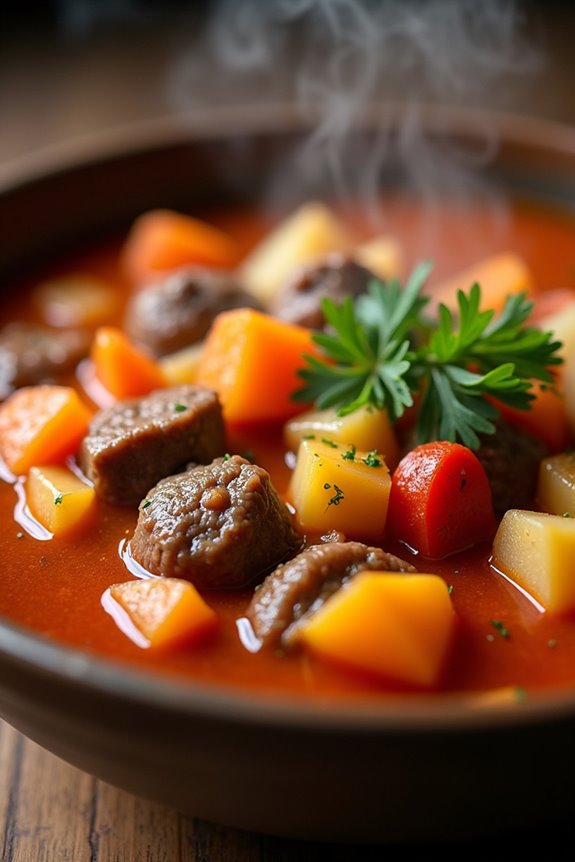
Goulash Soup is a hearty and flavorful dish that has its origins in Hungary but has been embraced by many cultures, including Germany. This gluten-free version captures all the traditional elements of this comforting soup while ensuring it’s suitable for those with gluten sensitivities.
With tender beef, a medley of vegetables, and a blend of spices, Goulash Soup is perfect for warming you up on a chilly day. This dish isn’t only delicious but also versatile, as you can adjust the ingredients based on personal preference or dietary needs.
It’s an excellent option for family gatherings or casual dinners, and it pairs wonderfully with gluten-free bread for soaking up the savory broth. Gather your ingredients, and let’s get started on this delightful Goulash Soup!
Ingredients (serving size: 4-6 people)
- 1 pound beef chuck, cut into bite-sized pieces
- 2 tablespoons olive oil
- 1 large onion, chopped
- 2 cloves garlic, minced
- 2 medium carrots, diced
- 2 medium potatoes, diced
- 1 bell pepper, chopped
- 1 can (14 oz) diced tomatoes
- 4 cups beef broth (gluten-free)
- 2 tablespoons paprika
- 1 teaspoon caraway seeds
- 1 teaspoon dried oregano
- Salt and pepper to taste
- Fresh parsley, chopped (for garnish)
Cooking Instructions
- Brown the Beef: In a large pot, heat the olive oil over medium-high heat. Add the beef chuck pieces and season with salt and pepper. Sear the beef until it’s browned on all sides, about 5-7 minutes. This step is essential as it develops flavor through the Maillard reaction.
- Sauté the Aromatics: Once the beef is browned, add the chopped onion and minced garlic to the pot. Stir and cook for about 3-4 minutes until the onion becomes translucent and fragrant. This will create a flavorful base for the soup.
- Add Vegetables: Stir in the diced carrots, potatoes, and bell pepper. Cook for another 5 minutes, allowing the vegetables to soften slightly and absorb the flavors from the beef and aromatics.
- Incorporate the Tomatoes and Spices: Add the canned diced tomatoes (with their juice), paprika, caraway seeds, and oregano to the pot. Stir well to combine all ingredients. The spices will infuse the soup with warmth and depth.
- Pour in the Broth: Carefully add the beef broth to the pot, ensuring all ingredients are covered. Bring the mixture to a boil, then reduce the heat to low and cover. Let it simmer for 1-1.5 hours, stirring occasionally, until the beef is tender and the flavors meld together beautifully.
- Final Adjustments: Taste the soup and adjust the seasoning with additional salt and pepper as needed. If you prefer a thicker soup, you can let it simmer uncovered for an additional 10-15 minutes.
- Serve: Ladle the Goulash Soup into bowls and garnish with fresh chopped parsley. This adds a touch of freshness and color to your dish.
Extra Tips
When making Goulash Soup, don’t hesitate to customize it to your liking. You can add other vegetables such as peas or green beans for added nutrition.
For a little heat, consider adding a pinch of cayenne pepper or some chopped chili peppers. If you have leftovers, they can be stored in the refrigerator for up to 3 days or frozen for later use.
Just remember to reheat gently to preserve the flavors and texture of the soup. Enjoy your delicious gluten-free Goulash Soup!
German Potato Pancakes
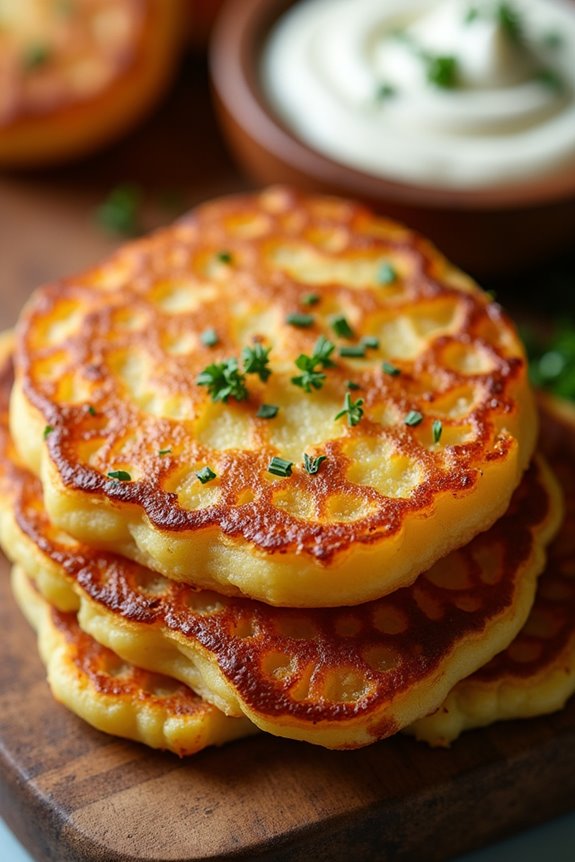
German Potato Pancakes, known as “Reibekuchen” or “Kartoffelpuffer,” are a delicious and crispy dish made from grated potatoes. Traditionally enjoyed during the colder months and at festive gatherings, these gluten-free pancakes aren’t only easy to make but also incredibly versatile. You can serve them with applesauce, sour cream, or even as a side to your favorite meat dishes.
The key to a perfect German Potato Pancake lies in the texture of the potatoes and the right blend of ingredients. The beauty of this dish is that it can be adapted to suit your taste. You can add onions, herbs, or spices to elevate the flavor. The pancakes are best enjoyed fresh off the skillet, giving you that golden-brown crunch on the outside while remaining soft and flavorful on the inside.
Gather your ingredients, and let’s get cooking!
Ingredients (Serves 4-6)
- 1.5 pounds (about 680g) of gluten-free potatoes (Yukon Gold or Russet)
- 1 small onion, finely grated
- 2 large eggs
- 1/4 cup gluten-free all-purpose flour
- 1 teaspoon salt
- 1/2 teaspoon black pepper
- 1/2 teaspoon garlic powder (optional)
- Vegetable oil (for frying)
Cooking Instructions
- Prepare the Potatoes: Peel the potatoes and rinse them under cold water. Grate the potatoes using a box grater or a food processor. After grating, place the potatoes in a clean kitchen towel and wring out the excess moisture. This step is essential for achieving crispy pancakes.
- Mix Ingredients: In a large mixing bowl, combine the grated potatoes, finely grated onion, eggs, gluten-free flour, salt, black pepper, and garlic powder if using. Mix well until all ingredients are thoroughly combined. The mixture should be moist but not too wet.
- Heat the Oil: In a large skillet, pour enough vegetable oil to cover the bottom of the pan (about 1/4 inch deep). Heat the oil over medium-high heat until it shimmers. You can test if the oil is ready by dropping a small amount of the potato mixture into the pan; it should sizzle immediately.
- Form and Fry the Pancakes: Using a spoon or your hands, scoop out a portion of the potato mixture and flatten it into a pancake shape. Carefully place it into the hot oil. Fry each pancake for about 3-4 minutes on each side or until golden brown and crispy. Don’t overcrowd the pan; fry in batches if necessary.
- Drain and Serve: Once the pancakes are cooked, transfer them to a paper towel-lined plate to absorb excess oil. Serve the German Potato Pancakes warm with your choice of applesauce, sour cream, or even a sprinkle of fresh herbs.
Extra Tips
For an extra crispy texture, make certain that you thoroughly drain the grated potatoes and don’t skip the step of wringing them out in a towel.
You can also experiment with different add-ins like grated carrots or herbs to customize the flavor. If you prefer a lighter pancake, consider using a combination of gluten-free and almond flour.
Additionally, keeping the cooked pancakes warm in an oven set to low heat can help maintain their crispiness while you finish frying the rest. Enjoy your cooking!
Poppy Seed Cake

Poppy Seed Cake is a delightful dessert that boasts a unique flavor profile thanks to the aromatic poppy seeds. This gluten-free version allows you to indulge in this traditional German treat without the worry of gluten, making it suitable for those with celiac disease or gluten intolerance.
With a moist and tender crumb, this cake is perfect for any occasion, whether it’s a family gathering, a coffee break, or simply a sweet treat for yourself.
The key to a perfect Poppy Seed Cake lies in the balance of ingredients and the proper preparation. The poppy seeds not only add a pleasant crunch but also bring a nutty flavor that complements the sweetness of the cake. This recipe is simple and straightforward, guaranteeing that even novice bakers can achieve a delicious result.
Ingredients (serving size: 4-6 people):
- 1 cup gluten-free all-purpose flour
- 1/2 cup ground poppy seeds
- 1 cup granulated sugar
- 1/2 cup unsalted butter, softened
- 3 large eggs
- 1/2 cup milk (or dairy-free alternative)
- 1 teaspoon vanilla extract
- 1 teaspoon baking powder
- 1/2 teaspoon salt
- Powdered sugar for dusting (optional)
Cooking Instructions:
- Preheat the Oven: Start by preheating your oven to 350°F (175°C). This guarantees that your cake will bake evenly and rise properly.
- Prepare the Baking Pan: Grease a 9-inch round cake pan with butter or cooking spray and lightly dust it with gluten-free flour. This step will prevent the cake from sticking to the pan.
- Mix Dry Ingredients: In a medium bowl, whisk together the gluten-free flour, ground poppy seeds, baking powder, and salt. This helps to evenly distribute the leavening agent and guarantees that your cake rises nicely.
- Cream Butter and Sugar: In a large mixing bowl, cream the softened butter and granulated sugar together until light and fluffy. This process incorporates air into the mixture, which contributes to the cake’s light texture.
- Add Eggs and Vanilla: Beat in the eggs one at a time, mixing well after each addition. Then stir in the vanilla extract. This will add flavor and moisture to the cake batter.
- Combine Wet and Dry Ingredients: Gradually add the dry mixture to the wet ingredients, alternating with the milk. Begin and end with the dry ingredients, mixing until just combined. Be careful not to overmix, as this could lead to a denser cake.
- Pour Batter into the Pan: Pour the batter into the prepared cake pan, smoothing the top with a spatula. This guarantees an even bake and a nice presentation.
- Bake the Cake: Place the cake in the preheated oven and bake for 30-35 minutes, or until a toothpick inserted into the center comes out clean. Keep an eye on the cake to prevent over-baking.
- Cool the Cake: Once baked, remove the cake from the oven and allow it to cool in the pan for about 10 minutes. Then, carefully transfer it to a wire rack to cool completely.
- Serve and Enjoy: Dust the cooled cake with powdered sugar if desired, slice, and serve. Enjoy the delightful flavors of this gluten-free Poppy Seed Cake!
Extra Tips: For a unique twist, consider adding a lemon glaze or a frosting made with cream cheese to enhance the flavors of your Poppy Seed Cake.
Also, make sure to use fresh poppy seeds for the best flavor and texture. If you’re preparing this cake in advance, it stores well in an airtight container at room temperature for a couple of days, or in the refrigerator for up to a week. Enjoy your baking!