

When it comes to Mediterranean cuisine, the flavors and textures are simply irresistible. I’ve gathered 15 gluten-free recipes that capture the essence of this vibrant culinary tradition without sacrificing taste. From a zesty Greek salad to creamy eggplant parmesan, these dishes are perfect for those sticking to a gluten-free diet. They’re not only satisfying, but they’ll also surprise even the most discerning palates. Let’s explore these delightful recipes together and elevate your dining experience.
Greek Salad With Lemon-Olive Oil Dressing
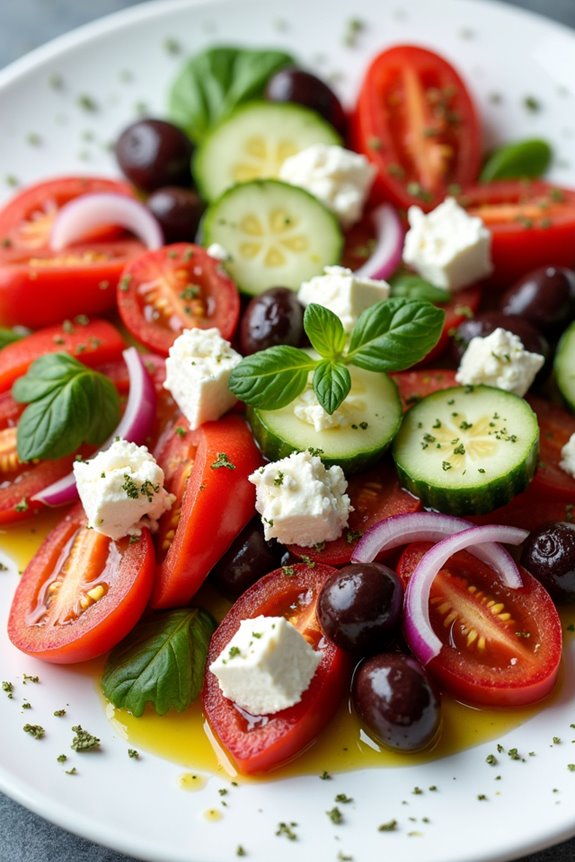
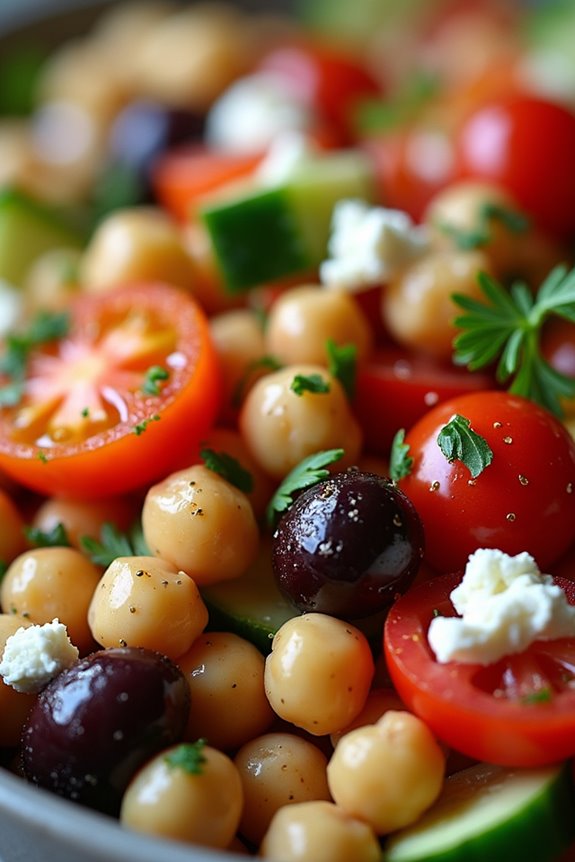
Greek Salad is a revitalizing and vibrant dish that embodies the essence of Mediterranean cuisine. This salad isn’t only gluten-free but also packed with wholesome ingredients, making it a perfect choice for a light lunch or a side dish at dinner.
With its colorful array of vegetables and a zesty dressing, Greek Salad is a delightful way to enjoy the flavors of Greece. The combination of ripe tomatoes, crisp cucumbers, and creamy feta cheese creates a harmony of textures and tastes.
The Lemon-Olive Oil Dressing adds a bright, tangy kick that ties all the ingredients together beautifully. Whether enjoyed on its own or as a complement to grilled meats, this Greek Salad is sure to impress your guests and satisfy your cravings for a healthy meal.
Ingredients (Serves 4-6):
- 4 cups of chopped romaine lettuce
- 2 large ripe tomatoes, diced
- 1 large cucumber, diced
- 1 bell pepper (red or green), diced
- 1 small red onion, thinly sliced
- 1 cup of Kalamata olives, pitted and halved
- 1 cup of feta cheese, crumbled
- 1/4 cup of extra virgin olive oil
- Juice of 1 large lemon
- 1 teaspoon of dried oregano
- Salt and pepper to taste
Cooking Instructions:
- Prepare the Vegetables: Start by washing and chopping your vegetables. Dice the tomatoes, cucumber, and bell pepper into bite-sized pieces. Thinly slice the red onion and set all the vegetables aside in a large mixing bowl.
- Add the Olives and Feta: Once the vegetables are prepared, add the Kalamata olives and crumbled feta cheese to the mixing bowl with the chopped vegetables. Gently combine them to guarantee even distribution without breaking the feta too much.
- Make the Dressing: In a separate small bowl, whisk together the extra virgin olive oil, fresh lemon juice, dried oregano, salt, and pepper. This dressing will bring a zesty flavor to your salad, so make sure it’s well combined.
- Combine Salad and Dressing: Pour the dressing over the salad mixture in the large bowl. Gently toss all the ingredients together until the vegetables are evenly coated with the dressing, being careful not to mash the feta cheese.
- Serve: Once the salad is well mixed, serve it immediately in individual bowls or on a large platter. You can optionally garnish with extra olives or feta on top for presentation.
Extra Tips:
When preparing Greek Salad, it’s important to use the freshest ingredients possible, as the quality of produce greatly affects the flavor of the dish.
If you’re making this salad ahead of time, consider keeping the dressing separate until you’re ready to serve to prevent the vegetables from becoming soggy. Additionally, feel free to customize the salad by adding other ingredients like avocados or artichoke hearts for a personal touch!
Quinoa Tabbouleh With Fresh Herbs
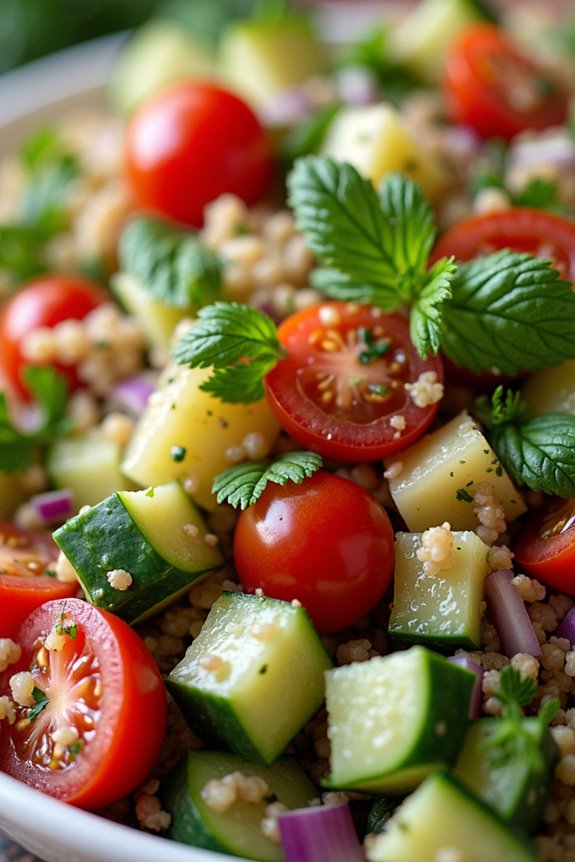
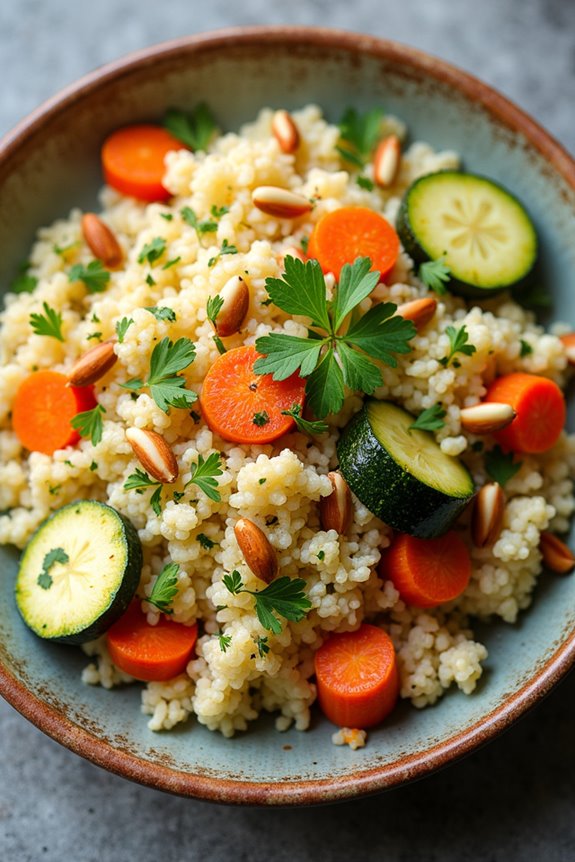
Quinoa Tabbouleh is a delightful twist on the traditional Middle Eastern salad, combining the nutty flavor of quinoa with vibrant fresh herbs and vegetables. This gluten-free recipe not only caters to those with dietary restrictions but also offers a nutritious and invigorating dish perfect for any occasion. Packed with protein, fiber, and essential vitamins, Quinoa Tabbouleh is a wonderful option for a light lunch, side dish, or even a potluck gathering.
The beauty of this dish lies in its versatility; you can easily adjust the ingredients to suit your taste preferences or seasonal availability. With fresh parsley, mint, tomatoes, and cucumbers, this salad bursts with flavor and color, making it visually appealing as well. Serve it chilled or at room temperature, and watch it disappear from the table!
Ingredients (Serves 4-6)
- 1 cup quinoa
- 2 cups water or vegetable broth
- 1 cup fresh parsley, finely chopped
- 1/2 cup fresh mint, finely chopped
- 1 cup cherry tomatoes, diced
- 1 medium cucumber, diced
- 1/4 cup red onion, finely chopped
- 1/4 cup olive oil
- 2 tablespoons fresh lemon juice
- Salt and pepper, to taste
Cooking Instructions
- Rinse the Quinoa: Place quinoa in a fine-mesh strainer and rinse it under cold water for about 2-3 minutes. This step helps to remove the natural coating called saponin, which can make the quinoa taste bitter.
- Cook the Quinoa: In a medium saucepan, combine the rinsed quinoa and water (or vegetable broth). Bring it to a boil over medium heat, then reduce the heat to low, cover the pot, and let it simmer for about 15 minutes or until all the liquid is absorbed. Once cooked, remove from heat and let it sit covered for an additional 5 minutes.
- Fluff the Quinoa: After resting, use a fork to fluff the quinoa gently, breaking up any clumps. Allow it to cool to room temperature for about 10-15 minutes.
- Prepare the Vegetables and Herbs: While the quinoa cools, chop the parsley, mint, cherry tomatoes, cucumber, and red onion. Make sure to chop them finely for a more cohesive salad.
- Combine Ingredients: In a large mixing bowl, combine the cooled quinoa, chopped parsley, mint, tomatoes, cucumber, and red onion.
- Dress the Salad: In a small bowl, whisk together the olive oil, lemon juice, salt, and pepper. Pour the dressing over the quinoa mixture and toss everything gently until well combined. Adjust the seasoning to taste.
- Serve: Let the tabbouleh sit for about 15 minutes before serving to allow the flavors to meld. Serve chilled or at room temperature.
Extra Tips
For added flavor, consider roasting the cherry tomatoes before adding them to the salad; this will bring out their natural sweetness.
Additionally, you can customize the ingredients by adding other vegetables like bell peppers or radishes, or even some chickpeas for extra protein.
If you prefer a tangier profile, increase the lemon juice slightly. Make sure to store any leftovers in an airtight container in the refrigerator; the flavors will continue to develop overnight!
Zucchini Noodles With Pesto and Cherry Tomatoes
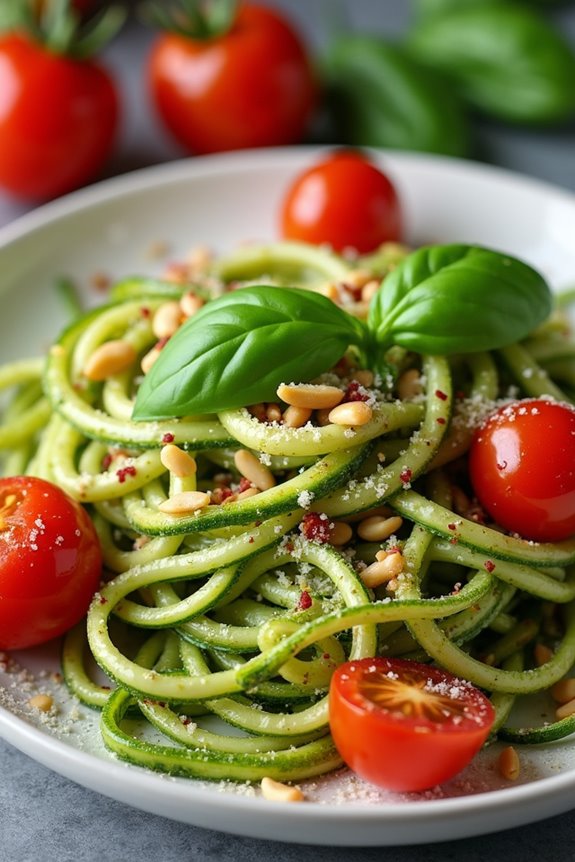
Zucchini Noodles with Pesto and Cherry Tomatoes is a vibrant and healthy dish that perfectly embodies the essence of Mediterranean cuisine. This gluten-free recipe isn’t only simple to prepare, but it also packs a punch of flavor and nutrition. Zucchini noodles, also known as “zoodles,” serve as a fantastic low-carb alternative to traditional pasta. When paired with a fresh basil pesto and sweet cherry tomatoes, this dish becomes a delightful meal that’s perfect for any occasion.
This recipe is ideal for serving 4-6 people, making it perfect for family gatherings or a casual dinner with friends. The combination of the fresh ingredients and the aromatic pesto creates a delicious taste that will satisfy both gluten-free and non-gluten-free eaters alike. Let’s plunge into the ingredients and cooking instructions for this delightful dish!
Ingredients:
- 4 medium zucchinis
- 2 cups cherry tomatoes, halved
- 1 cup fresh basil leaves
- 1/2 cup pine nuts (or walnuts)
- 1/2 cup grated Parmesan cheese (or nutritional yeast for a vegan option)
- 3 cloves garlic, minced
- 1/3 cup extra virgin olive oil
- Salt and pepper, to taste
- Optional: Red pepper flakes for added heat
Cooking Instructions:
- Prepare the Zucchini Noodles: Use a spiralizer or a vegetable peeler to turn the zucchinis into noodles. If you prefer thicker noodles, a vegetable peeler will give you wider strips. Once spiralized, place the zucchini noodles on a clean kitchen towel and lightly sprinkle with salt. Let them sit for about 10-15 minutes to draw out excess moisture.
- Make the Pesto: In a food processor, combine the fresh basil leaves, pine nuts, grated Parmesan cheese, and minced garlic. Pulse the mixture until it’s finely chopped. While the food processor is running, slowly drizzle in the olive oil until the pesto reaches a smooth, creamy consistency. Season with salt and pepper to taste.
- Cook the Cherry Tomatoes: In a large skillet, heat a tablespoon of olive oil over medium heat. Add the halved cherry tomatoes to the skillet and sauté for about 3-5 minutes until they start to soften and release their juices. This will enhance their sweetness and flavor.
- Combine Ingredients: Add the zucchini noodles to the skillet with the cherry tomatoes. Toss everything together gently to combine. Cook for an additional 2-3 minutes, just until the zucchini noodles are tender but still slightly crisp. Be careful not to overcook them, as they can become mushy.
- Mix in the Pesto: Remove the skillet from the heat and stir in the prepared pesto. Toss everything together until the zucchini noodles are evenly coated with the pesto and the cherry tomatoes are well distributed. Taste and adjust seasoning if necessary.
- Serve: Plate the Zucchini Noodles with Pesto and Cherry Tomatoes in bowls. You can sprinkle additional Parmesan cheese or red pepper flakes on top for added flavor if desired.
Extra Tips:
For added protein, consider incorporating grilled chicken or shrimp into the dish. If you want to enhance the flavor even more, consider adding other vegetables such as bell peppers or spinach along with the cherry tomatoes.
Remember that zucchini noodles cook quickly, so keep an eye on them to guarantee they maintain their texture. This dish can be served warm or at room temperature, making it versatile for various occasions. Enjoy your delicious and healthy Mediterranean meal!
Eggplant Parmesan With Almond Flour Crust
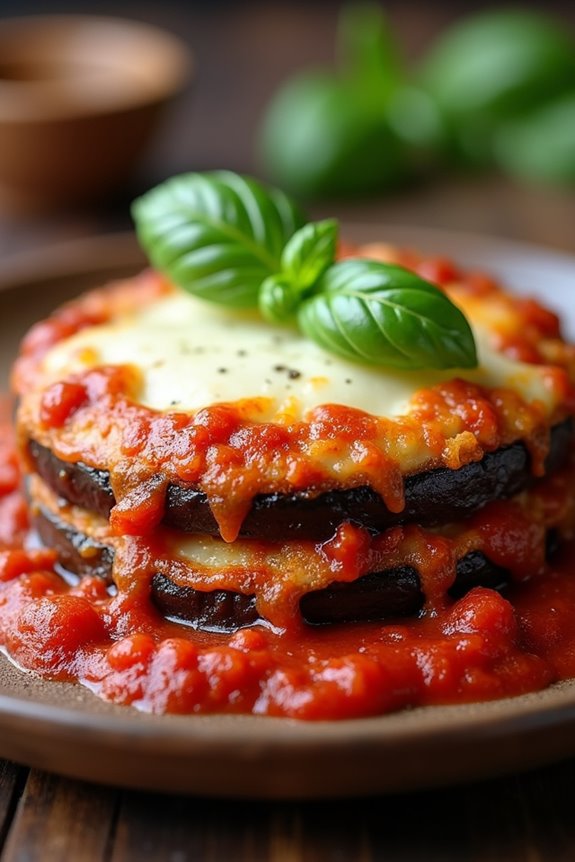
Eggplant Parmesan is a classic Italian dish that typically involves layers of breaded and fried eggplant, marinara sauce, and cheese. This gluten-free version utilizes almond flour for the crust, making it a delicious alternative for those avoiding gluten. The nutty flavor of the almond flour complements the eggplant beautifully, while the gooey cheese and rich tomato sauce create a comforting and satisfying meal.
Whether you’re gluten-free or simply looking to try something new, this Eggplant Parmesan will definitely impress your family and friends.
In addition to being gluten-free, this recipe is also packed with flavor and nutrients. Eggplants are rich in antioxidants and fiber, making them a great addition to your diet. By baking instead of frying the eggplant, you not only cut down on calories but also create a dish that feels lighter without sacrificing taste.
Serve this Eggplant Parmesan with a side salad or some gluten-free pasta for a complete Mediterranean-inspired meal.
Ingredients (serves 4-6):
- 2 large eggplants
- 1 cup almond flour
- 1 teaspoon garlic powder
- 1 teaspoon dried oregano
- 1 teaspoon salt
- 1/2 teaspoon black pepper
- 2 large eggs
- 2 cups marinara sauce
- 2 cups shredded mozzarella cheese
- 1/2 cup grated Parmesan cheese
- Fresh basil leaves for garnish (optional)
Cooking Instructions:
- Prepare the Eggplant: Start by washing and slicing the eggplants into 1/4-inch thick rounds. Lay the slices on a clean kitchen towel or paper towels, sprinkling salt over them. This will help draw out excess moisture and bitterness from the eggplant. Let them sit for about 30 minutes, then pat them dry with another towel.
- Preheat the Oven: While the eggplants are sweating, preheat your oven to 375°F (190°C). This will guarantee your dish cooks evenly and achieves a nice, golden crust.
- Make the Almond Flour Coating: In a mixing bowl, combine the almond flour, garlic powder, dried oregano, salt, and black pepper. In another bowl, whisk the eggs until well combined. This will be your breading station.
- Bread the Eggplant Slices: Dip each eggplant slice into the egg mixture, allowing any excess to drip off, then coat it thoroughly with the almond flour mixture. Place the breaded slices on a baking sheet lined with parchment paper. Repeat until all slices are coated.
- Bake the Eggplant: Bake the breaded eggplant slices in the preheated oven for about 25-30 minutes, turning halfway through, until they’re golden brown and crispy.
- Assemble the Dish: In a large baking dish, spread a layer of marinara sauce at the bottom. Layer half of the baked eggplant slices over the sauce, followed by a layer of mozzarella cheese and a sprinkle of Parmesan cheese. Repeat the layers with the remaining eggplant, sauce, and cheese.
- Final Bake: Cover the baking dish with aluminum foil and bake for another 25 minutes. Then, remove the foil and bake for an additional 15-20 minutes until the cheese is melted and bubbly, and the top is slightly golden.
- Garnish and Serve: Once out of the oven, let the dish sit for about 10 minutes to cool slightly. Garnish with fresh basil leaves if desired, then slice and serve hot.
Extra Tips:
When preparing this Eggplant Parmesan, consider using homemade marinara sauce for an extra burst of flavor. You can also experiment by adding layers of sautéed spinach or mushrooms for additional nutrition and taste.
If you want a crispier texture, you can broil the dish for a few minutes at the end of baking, but watch closely to avoid burning. This dish can be made ahead of time and reheats well, making it a great option for meal prep or gatherings.
Enjoy your delicious gluten-free Mediterranean feast!
Mediterranean Chickpea Salad
Mediterranean Chickpea Salad is a vibrant and invigorating dish that highlights the flavors of the Mediterranean region. Packed with protein-rich chickpeas, crunchy vegetables, and a zesty dressing, this salad isn’t only gluten-free but also incredibly nutritious. It makes for a perfect light lunch or a side dish for dinner, and it’s easy to prepare, requiring minimal cooking.
This salad is versatile and can be customized based on what you have on hand. You can add or substitute ingredients like bell peppers, cucumbers, or olives according to your preference. It’s a great way to incorporate a variety of colorful vegetables into your diet while enjoying the delicious tastes of Mediterranean cuisine.
Ingredients (Serves 4-6)
- 1 can (15 oz) chickpeas, drained and rinsed
- 1 cup cherry tomatoes, halved
- 1 cucumber, diced
- 1 bell pepper (red or yellow), diced
- 1/2 red onion, finely chopped
- 1/2 cup Kalamata olives, pitted and sliced
- 1/4 cup fresh parsley, chopped
- 1/4 cup feta cheese, crumbled (optional for a vegetarian version)
- 3 tablespoons olive oil
- 2 tablespoons red wine vinegar
- 1 teaspoon dried oregano
- Salt and pepper to taste
Cooking Instructions
- Prepare the Chickpeas: Begin by draining and rinsing the canned chickpeas under cold water. This helps remove excess sodium and improves the taste. Place the rinsed chickpeas in a large mixing bowl.
- Chop the Vegetables: Dice the cucumber, bell pepper, and finely chop the red onion. Halve the cherry tomatoes. Make sure to chop them into bite-sized pieces for easy eating. Add all the chopped vegetables to the bowl with the chickpeas.
- Add Olives and Herbs: Slice the Kalamata olives and add them to the bowl. Then, chop the fresh parsley and sprinkle it over the mixture. If you’re using feta cheese, crumble it on top as well.
- Make the Dressing: In a small bowl, whisk together olive oil, red wine vinegar, dried oregano, salt, and pepper. This dressing brings all the flavors together, so make sure to mix it well until it’s emulsified.
- Combine and Serve: Pour the dressing over the salad ingredients in the mixing bowl. Gently toss everything together until all the ingredients are well coated with the dressing. Taste and adjust seasoning if needed.
- Chill Before Serving: For the best flavor, let the salad sit in the refrigerator for about 30 minutes before serving. This allows the flavors to meld together beautifully.
Extra Tips
For added flavor and nutrition, consider including ingredients like avocado or roasted red peppers. If you want to make the salad more substantial, it pairs well with grilled chicken or shrimp.
This Mediterranean Chickpea Salad can be stored in the refrigerator for up to 3 days, making it an excellent option for meal prep. Enjoy it chilled or at room temperature, and feel free to get creative by adding your favorite Mediterranean ingredients!
Cauliflower Rice Pilaf With Pine Nuts
Cauliflower Rice Pilaf with Pine Nuts is a delightful and nutritious twist on traditional rice pilaf. This gluten-free recipe substitutes rice with cauliflower rice, which isn’t only lower in carbs but also packed with vitamins and minerals. The addition of pine nuts adds a lovely crunch and a nutty flavor that complements the dish beautifully.
It’s perfect as a side dish or a light main course, and can easily be customized with your favorite vegetables and herbs. This recipe isn’t only quick and easy to prepare but also incredibly versatile. You can enjoy it warm as a comforting meal or serve it cold as a revitalizing salad.
Whether you’re hosting a dinner party or just looking for a healthy weeknight meal, this Cauliflower Rice Pilaf with Pine Nuts is sure to impress your family and friends with its vibrant flavors and textures.
Ingredients (Serves 4-6):
- 1 medium head of cauliflower, grated or processed into rice-sized pieces
- 1/2 cup pine nuts
- 1 medium onion, finely chopped
- 2 cloves garlic, minced
- 1 medium carrot, diced
- 1 medium zucchini, diced
- 1/4 cup fresh parsley, chopped
- 1/4 cup olive oil
- 1 teaspoon salt
- 1/2 teaspoon black pepper
- 1/2 teaspoon cumin (optional)
- 1/2 teaspoon paprika (optional)
- Juice of 1 lemon
Cooking Instructions:
- Prepare the Cauliflower Rice: Begin by removing the leaves and stem from the cauliflower. Cut it into florets and then pulse in a food processor until it resembles rice. If you don’t have a food processor, you can use a box grater to achieve the same effect. Set aside.
- Toast the Pine Nuts: In a large skillet over medium heat, add the pine nuts without any oil. Toast them for about 3-5 minutes, stirring frequently, until they’re golden brown and fragrant. Be careful not to burn them. Once toasted, remove the pine nuts from the skillet and set aside.
- Sauté the Vegetables: In the same skillet, add the olive oil and heat over medium heat. Add the chopped onion and sauté for about 3-4 minutes until it becomes translucent. Add minced garlic and cook for an additional minute until fragrant.
- Add Carrots and Zucchini: Stir in the diced carrots and zucchini into the skillet. Cook for about 5-7 minutes until the vegetables are tender but still slightly crisp. Season with salt, black pepper, cumin, and paprika if using.
- Incorporate Cauliflower Rice: Add the prepared cauliflower rice to the skillet. Stir well to combine all the ingredients. Cook for about 5-7 minutes, stirring occasionally, until the cauliflower is tender and heated through.
- Finish with Pine Nuts and Parsley: Remove the skillet from heat. Stir in the toasted pine nuts, chopped parsley, and lemon juice. Mix well to combine all the flavors, adjusting seasoning as necessary.
- Serve: Transfer the Cauliflower Rice Pilaf to a serving dish. Garnish with additional parsley and lemon wedges if desired. Serve warm or at room temperature.
Extra Tips:
When making Cauliflower Rice Pilaf with Pine Nuts, feel free to experiment with different vegetables based on what you have on hand. Bell peppers, peas, or spinach can all be wonderful additions.
Additionally, for added flavor, you can substitute part of the olive oil with butter or add a splash of vegetable broth instead of water when cooking the cauliflower rice. This dish can be made ahead of time and stored in the refrigerator, making it a great option for meal prep!
Stuffed Bell Peppers With Feta and Spinach
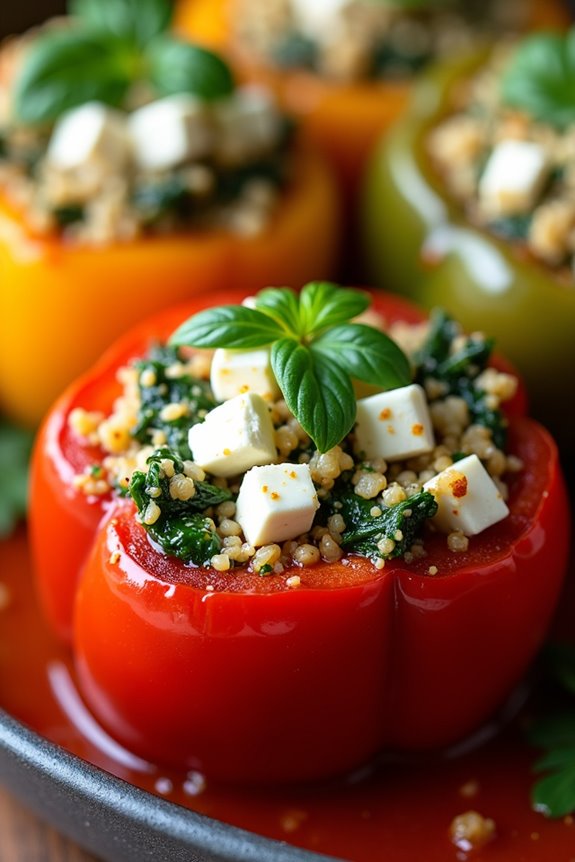
Stuffed bell peppers are a vibrant and nutritious dish that perfectly embodies the flavors of the Mediterranean. This gluten-free recipe isn’t only simple to prepare, but it also showcases the delightful combination of feta cheese and fresh spinach. The sweet, tender peppers serve as the perfect vessel for a savory filling, creating a colorful presentation that’s certain to impress at any dinner table.
Whether you’re serving it as a main course or a side dish, these stuffed bell peppers promise to be a crowd-pleaser.
In addition to being delicious, this recipe is versatile and can be easily adapted to include other ingredients you may have on hand. You can choose any color of bell pepper—red, yellow, or green—each adding its unique sweetness and texture. The addition of feta cheese brings a rich, tangy flavor, while the spinach adds a healthy touch.
This dish can be served warm or at room temperature, making it ideal for potlucks or family gatherings.
Ingredients (Serves 4-6)
- 4 large bell peppers (any color)
- 1 cup cooked quinoa or rice
- 1 cup fresh spinach, chopped
- 1 cup feta cheese, crumbled
- 1 small onion, finely chopped
- 2 cloves garlic, minced
- 1 tsp dried oregano
- 1 tsp dried basil
- 1/2 tsp salt
- 1/4 tsp black pepper
- 1 tablespoon olive oil
- 1/2 cup marinara sauce (optional, for serving)
- Fresh parsley for garnish (optional)
Cooking Instructions
- Preheat the Oven: Begin by preheating your oven to 375°F (190°C). This allows for an even cooking temperature for the stuffed peppers once they go in the oven.
- Prepare the Bell Peppers: Slice the tops off the bell peppers and remove the seeds and membranes. You can keep the tops to chop and add to the filling if desired. Place the hollowed peppers upright in a baking dish.
- Sauté the Onion and Garlic: In a skillet, heat the olive oil over medium heat. Add the chopped onion and garlic, sautéing for about 3-4 minutes until the onion is translucent and fragrant. This step enhances the flavors and guarantees a delicious filling.
- Mix the Filling: In a large bowl, combine the cooked quinoa or rice, sautéed onion and garlic, chopped spinach, crumbled feta cheese, oregano, basil, salt, and black pepper. Mix well until all ingredients are evenly incorporated.
- Stuff the Peppers: Carefully spoon the filling into each bell pepper, packing it tightly. Make sure to fill them to the top, as the filling will slightly shrink during cooking.
- Bake the Peppers: Cover the baking dish with aluminum foil and place it in the preheated oven. Bake for 25-30 minutes. After this time, remove the foil and bake for an additional 10-15 minutes until the peppers are tender and the tops are slightly golden.
- Serve and Garnish: Once cooked, remove the peppers from the oven. If desired, serve with marinara sauce drizzled over the top and garnish with fresh parsley for an extra pop of color.
Extra Tips
When preparing stuffed bell peppers, feel free to customize the recipe based on your preferences. You can add other vegetables, such as diced tomatoes or zucchini, or incorporate cooked ground meat for additional protein.
To make the dish even more flavorful, consider adding spices like cumin or paprika. Additionally, if you have leftover filling, it can be baked in a small dish alongside the peppers for a delicious side. Enjoy experimenting with different variations to make this recipe your own!
Grilled Lemon-Herb Chicken Skewers
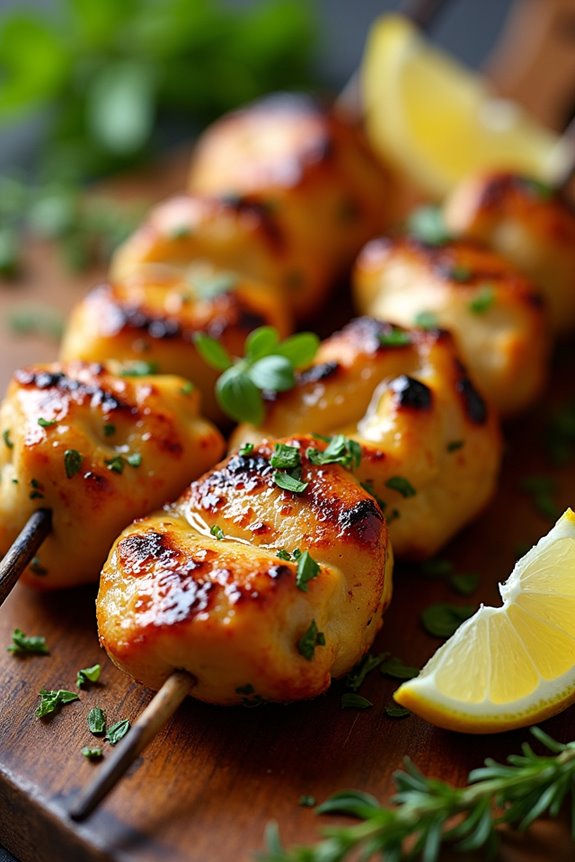
Grilled Lemon-Herb Chicken Skewers are a delightful Mediterranean-inspired dish that brings together the zesty flavors of lemon and the aromatic essence of fresh herbs. This dish is perfect for gatherings, family dinners, or a simple weeknight meal. The marinated chicken isn’t only gluten-free but also packed with protein, making it a healthy option that everyone will enjoy.
Pair these skewers with a fresh salad or grilled vegetables for a complete meal that transports you to the sunny coasts of the Mediterranean.
Preparing these skewers is straightforward and requires minimal ingredients, making it an ideal recipe for both novice and experienced cooks. The key to achieving that perfect grilled flavor lies in the marinade, which infuses the chicken with vibrant notes of lemon, garlic, and herbs.
So fire up the grill and get ready to enjoy a taste of the Mediterranean right in your own backyard!
Ingredients (Serves 4-6):
- 2 pounds boneless, skinless chicken breasts
- 1/4 cup olive oil
- 1/4 cup fresh lemon juice
- 4 cloves garlic, minced
- 2 teaspoons dried oregano
- 1 teaspoon dried thyme
- 1 teaspoon salt
- 1/2 teaspoon black pepper
- 1/4 teaspoon red pepper flakes (optional)
- Lemon wedges and fresh herbs for garnish
Cooking Instructions:
- Prepare the Chicken: Start by cutting the boneless, skinless chicken breasts into evenly sized cubes, about 1 to 1.5 inches in size. This will guarantee that they cook evenly on the grill. Place the chicken cubes in a large bowl or a resealable plastic bag.
- Make the Marinade: In a separate bowl, combine the olive oil, fresh lemon juice, minced garlic, dried oregano, dried thyme, salt, black pepper, and red pepper flakes (if using). Whisk the mixture until well combined. This marinade will infuse the chicken with delicious flavors.
- Marinate the Chicken: Pour the marinade over the chicken cubes, making sure that all pieces are well-coated. Cover the bowl with plastic wrap or seal the bag, and refrigerate for at least 30 minutes, or up to 2 hours for more intense flavor.
- Prepare the Skewers: If using wooden skewers, soak them in water for about 30 minutes to prevent burning on the grill. If using metal skewers, you can skip this step. Thread the marinated chicken pieces onto the skewers, leaving a little space between each piece for even cooking.
- Preheat the Grill: Preheat your grill to medium-high heat (about 400°F). Lightly oil the grill grates to prevent sticking.
- Grill the Skewers: Once the grill is hot, place the chicken skewers on the grill. Cook for about 4-5 minutes on each side, or until the chicken is cooked through and has nice grill marks. The internal temperature of the chicken should reach 165°F.
- Serve and Garnish: Remove the skewers from the grill and let them rest for a few minutes. Serve the grilled lemon-herb chicken skewers garnished with lemon wedges and fresh herbs for added flavor and presentation.
Extra Tips:
For the best results, make sure to marinate the chicken for at least 30 minutes, but if time allows, letting it sit for a couple of hours will enhance the flavors even more.
Feel free to customize the marinade by adding your favorite herbs or spices. Additionally, you can pair the skewers with a rejuvenating tzatziki sauce or a simple yogurt dip for a delicious contrast.
Enjoy your meal and the vibrant flavors of the Mediterranean!
Shrimp Saganaki With Feta and Tomatoes
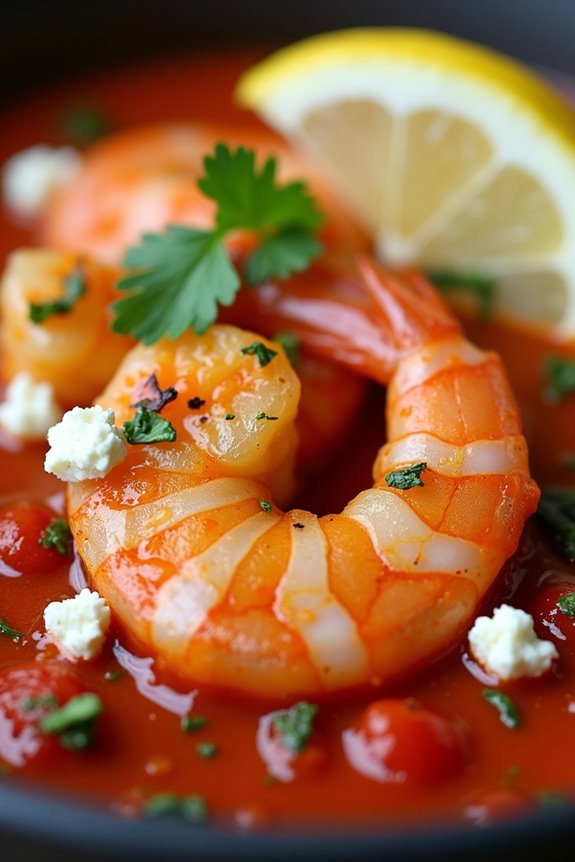
Shrimp Saganaki is a vibrant and flavorful Greek dish that showcases succulent shrimp cooked in a savory tomato sauce, complemented by the rich creaminess of feta cheese. This gluten-free Mediterranean recipe is perfect for a cozy dinner or a gathering with friends, as it brings the taste of the Mediterranean right to your table.
The combination of fresh herbs, garlic, and a hint of spice elevates the dish, making it a delightful experience for seafood lovers. This dish not only offers a unique blend of flavors but also is a quick and easy option for weeknight meals.
With the shrimp cooked to perfection and the feta adding a savory depth, Shrimp Saganaki is sure to impress. Serve it with a side of gluten-free bread for dipping, or over a bed of rice or gluten-free pasta to soak up the delicious sauce.
Ingredients (Serves 4-6):
- 1 pound large shrimp, peeled and deveined
- 2 tablespoons olive oil
- 1 medium onion, chopped
- 3 cloves garlic, minced
- 1 can (14.5 ounces) diced tomatoes, undrained
- 1 teaspoon dried oregano
- 1/2 teaspoon red pepper flakes (adjust for spice preference)
- Salt and pepper to taste
- 4 ounces feta cheese, crumbled
- Fresh parsley, chopped (for garnish)
- Lemon wedges (for serving)
Cooking Instructions:
- Prepare the Shrimp: Start by rinsing the shrimp under cold water and patting them dry with paper towels. This guarantees they’ll sear nicely in the pan.
- Sauté the Vegetables: In a large skillet, heat the olive oil over medium heat. Add the chopped onion and sauté for about 5 minutes, or until the onion becomes translucent. Stir in the minced garlic and cook for an additional minute until fragrant.
- Add Tomatoes and Seasonings: Pour in the diced tomatoes along with the juice from the can. Stir in the dried oregano, red pepper flakes, salt, and pepper. Let the mixture simmer for about 5-7 minutes, allowing the flavors to meld and the sauce to thicken slightly.
- Cook the Shrimp: Add the prepared shrimp to the skillet, stirring to coat them in the tomato mixture. Cook for about 3-5 minutes, or until the shrimp are pink and opaque. Be careful not to overcook them, as shrimp can become tough if cooked too long.
- Add Feta Cheese: Once the shrimp are cooked, sprinkle the crumbled feta cheese over the top of the dish. Allow it to melt slightly into the sauce for about 1-2 minutes.
- Garnish and Serve: Remove the skillet from heat and garnish with freshly chopped parsley. Serve the dish warm with lemon wedges on the side for an extra burst of flavor.
Extra Tips: When making Shrimp Saganaki, feel free to customize the dish by adding other vegetables such as bell peppers or spinach for added nutrition.
If you prefer a thicker sauce, you can reduce the diced tomatoes further by simmering them longer. Pairing the dish with gluten-free bread or a light salad can enhance the meal experience. Enjoy your Mediterranean culinary adventure!
Baked Falafel With Tahini Sauce

Baked Falafel with Tahini Sauce is a delightful and nutritious dish that brings the vibrant flavors of the Mediterranean right to your kitchen. This gluten-free recipe is perfect for those looking to enjoy the classic taste of falafel without the excess oil from frying. The falafel is made from chickpeas, fresh herbs, and spices, then baked until golden brown, resulting in a crispy exterior and a soft, flavorful interior.
Paired with a creamy tahini sauce, this dish isn’t only satisfying but also packed with plant-based protein, making it an excellent choice for lunch or dinner. Creating Baked Falafel is simple and can be done in under an hour. The ingredients come together quickly in a food processor, and the baking process allows for a healthier alternative without sacrificing flavor.
Serve these falafel balls in a pita, on a salad, or on their own as an appetizer. With the tahini sauce drizzled on top, you’ll have a delicious meal that’s sure to impress both family and friends.
Ingredients (Serves 4-6):
- 1 can (15 oz) chickpeas, drained and rinsed
- 1 small onion, chopped
- 2 cloves garlic, minced
- 1 cup fresh parsley, chopped
- 1/2 cup fresh cilantro, chopped
- 1 teaspoon ground cumin
- 1 teaspoon ground coriander
- 1/2 teaspoon salt
- 1/4 teaspoon black pepper
- 1/2 teaspoon baking powder
- 1/4 cup gluten-free flour (such as chickpea flour or oat flour)
- 2 tablespoons olive oil (for drizzling)
Tahini Sauce:
- 1/4 cup tahini
- 2 tablespoons lemon juice
- 1-2 tablespoons water (to thin)
- Salt to taste
Cooking Instructions:
- Preheat the Oven: Start by preheating your oven to 400°F (200°C). This guarantees that your falafel will cook evenly and get that nice crispy texture.
- Prepare the Falafel Mixture: In a food processor, add the drained chickpeas, chopped onion, minced garlic, parsley, cilantro, cumin, coriander, salt, pepper, and baking powder. Pulse the mixture until it’s coarsely blended but not pureed. You want a texture that holds together when formed into balls.
- Add Flour: Transfer the chickpea mixture to a bowl and stir in the gluten-free flour. This will help bind the falafel and give it a better texture when baked. Mix until fully combined.
- Shape the Falafel: Using your hands, form the mixture into small balls or patties, about 1-2 inches in diameter. Place them on a parchment-lined baking sheet, making sure there’s space between each falafel for even cooking.
- Drizzle with Olive Oil: Lightly drizzle the formed falafel with olive oil. This will help them crisp up in the oven.
- Bake the Falafel: Place the baking sheet in the preheated oven and bake for 25-30 minutes, flipping the falafel halfway through to guarantee they’re evenly browned and crispy on all sides.
- Prepare the Tahini Sauce: While the falafel is baking, prepare the tahini sauce. In a small bowl, whisk together the tahini, lemon juice, and enough water to reach your desired consistency. Season with salt to taste.
- Serve: Once the falafel are golden brown and crisp, remove them from the oven. Serve warm with a generous drizzle of tahini sauce, alongside pita bread, fresh vegetables, or a salad.
Extra Tips: To confirm your falafel holds together well, avoid over-processing the mixture; it should remain chunky. If you find the mixture too dry, add a splash of water or olive oil; if too wet, add a bit more flour.
For added flavor, you can also include spices like paprika or cayenne pepper. If you prefer a crunchier texture, broil the falafel for an additional 2-3 minutes at the end of baking. Enjoy experimenting with different serving styles and additional toppings like pickles, fresh tomatoes, or lettuce!
Roasted Vegetable and Hummus Wraps
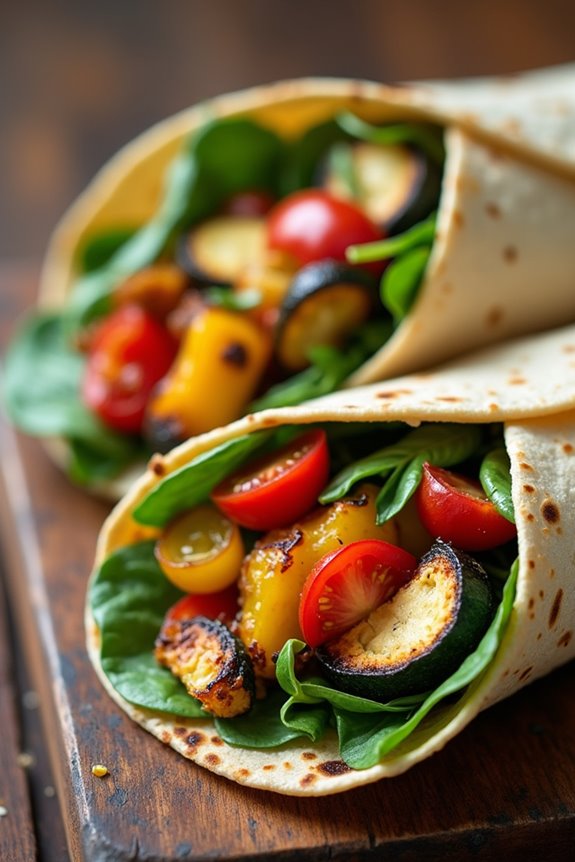
Roasted Vegetable and Hummus Wraps are a vibrant, healthy, and delicious option for a gluten-free meal that brings the flavors of the Mediterranean right to your table. Perfect for lunch or a light dinner, these wraps feature a medley of roasted vegetables, creamy hummus, and fresh greens all wrapped up in a gluten-free tortilla. Not only are they easy to prepare, but they also allow for versatility by using whatever vegetables you have on hand, making them a great choice for both meal prep and quick snacks.
The combination of roasted vegetables adds a depth of flavor and texture, while the hummus provides creaminess without the need for any dairy. You can customize the wraps with your favorite spices or add additional toppings such as feta cheese or olives if desired. Serve these wraps with a side of fresh fruit or a light salad for a complete meal that’s satisfying and nutritious.
Ingredients (Serves 4-6):
- 2 medium zucchini, sliced
- 1 red bell pepper, sliced
- 1 yellow bell pepper, sliced
- 1 medium red onion, sliced
- 2 cups cherry tomatoes, halved
- 3 tablespoons olive oil
- 1 teaspoon garlic powder
- 1 teaspoon dried oregano
- Salt and pepper to taste
- 4-6 gluten-free tortillas
- 1 cup hummus
- 2 cups fresh spinach or mixed greens
- Optional: crumbled feta cheese, olives, or fresh herbs for garnish
Cooking Instructions:
- Preheat the Oven: Begin by preheating your oven to 425°F (220°C). This high temperature is essential for roasting vegetables, as it helps to caramelize their natural sugars and enhance their flavors.
- Prepare the Vegetables: In a large mixing bowl, combine the sliced zucchini, red bell pepper, yellow bell pepper, red onion, and halved cherry tomatoes. Drizzle the olive oil over the vegetables, then sprinkle with garlic powder, dried oregano, salt, and pepper. Toss everything together until the vegetables are evenly coated.
- Roast the Vegetables: Spread the seasoned vegetables in a single layer on a baking sheet lined with parchment paper. Make sure not to overcrowd the pan, as this can lead to steaming rather than roasting. Place the baking sheet in the preheated oven and roast for about 20-25 minutes, or until the vegetables are tender and slightly caramelized, stirring halfway through for even cooking.
- Warm the Tortillas: While the vegetables are roasting, warm the gluten-free tortillas. You can do this by placing them in a dry skillet over low heat for a few seconds on each side or wrapping them in aluminum foil and placing them in the oven for a few minutes until they’re pliable.
- Assemble the Wraps: Once the vegetables are done roasting, remove them from the oven and let them cool slightly. Take a tortilla and spread a generous layer of hummus over the entire surface. Top with a handful of fresh spinach or mixed greens, followed by a portion of the roasted vegetables. If desired, sprinkle with crumbled feta cheese or olives before rolling the tortilla tightly.
- Serve: Cut the wraps in half diagonally and serve immediately, or wrap them in parchment paper for a portable meal option. Enjoy your delicious and nutritious Roasted Vegetable and Hummus Wraps!
Extra Tips: Feel free to experiment with different vegetables based on what’s in season or what you have in your fridge. Eggplant, asparagus, or mushrooms make excellent additions!
Additionally, if you’re prepping these wraps for later, keep the hummus and roasted vegetables separate until you’re ready to eat to prevent the tortillas from getting soggy. These wraps can also be made ahead of time and stored in the refrigerator for a quick grab-and-go meal.
Spanakopita With Gluten-Free Phyllo Dough
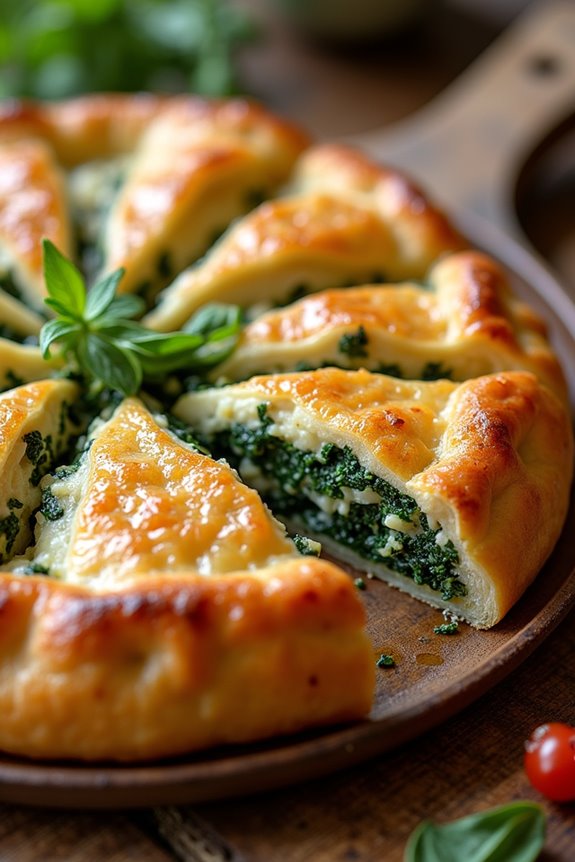
Spanakopita is a traditional Greek dish that features a flaky pastry filled with a delicious mixture of spinach, feta cheese, and aromatic herbs. While traditional spanakopita uses phyllo dough made with wheat flour, this gluten-free version allows everyone to enjoy this Mediterranean classic without compromising on flavor or texture.
Using gluten-free phyllo dough, you can create a crispy and satisfying dish that’s perfect for entertaining or a comforting family meal. Making spanakopita with gluten-free phyllo dough may seem intimidating at first, but with the right techniques and ingredients, you can achieve that signature crispy layer that makes this dish so beloved.
The combination of fresh spinach, creamy feta, and herbs creates a vibrant filling that pairs beautifully with the light and flaky pastry. This recipe serves 4-6 people, making it an ideal choice for gatherings or a hearty family dinner.
Ingredients
- 1 package gluten-free phyllo dough (about 16 oz)
- 1 pound fresh spinach, chopped (or 16 oz frozen spinach, thawed and drained)
- 1 cup feta cheese, crumbled
- 1 medium onion, finely chopped
- 2 cloves garlic, minced
- 2 large eggs, beaten
- 1/4 cup fresh dill, chopped (or 1 tablespoon dried dill)
- 1/4 cup olive oil, plus more for brushing
- Salt and pepper, to taste
- 1 teaspoon lemon zest (optional)
Cooking Instructions
1. Prepare the Filling: In a large skillet, heat 2 tablespoons of olive oil over medium heat. Add the chopped onion and sauté until translucent, about 5 minutes.
Add the minced garlic and cook for an additional minute until fragrant. Incorporate the chopped spinach, stirring until wilted (if using fresh) or heated through (if using frozen). Season with salt, pepper, and dill, and remove from heat. Allow the mixture to cool slightly.
2. Mix the Filling: In a large mixing bowl, combine the sautéed spinach mixture, crumbled feta cheese, beaten eggs, and lemon zest (if using). Stir until well combined and set aside.
3. Prepare the Phyllo Dough: Preheat your oven to 375°F (190°C). Unroll the gluten-free phyllo dough and cover it with a damp kitchen towel to prevent it from drying out.
Prepare a baking dish (approximately 9×13 inches) by brushing it with a bit of olive oil.
4. Layer the Phyllo: Place one sheet of phyllo dough in the baking dish, brushing it lightly with olive oil. Repeat this process, layering 5-6 sheets, brushing each layer with oil.
Make sure to keep the remaining phyllo covered with the damp towel to maintain its moisture.
5. Add the Filling: Once you have your base layer of phyllo, evenly spread the spinach and feta filling over it. Smooth it out with a spatula to guarantee an even layer.
6. Top with Phyllo: Continue layering more sheets of phyllo over the filling, brushing each layer with olive oil until you have used about 5-6 sheets.
Tuck in any overhanging edges and brush the top layer generously with olive oil.
7. Bake: Score the top layers of phyllo into squares or diamonds with a sharp knife to make serving easier. Place the spanakopita in the oven and Bake for 30-35 minutes, or until the top is golden brown and crispy.
8. Cool and Serve: Once baked, remove the spanakopita from the oven and let it cool for 10-15 minutes. Cut into pieces and serve warm or at room temperature.
Extra Tips
When working with gluten-free phyllo dough, be careful to handle it gently as it can be more delicate than traditional phyllo.
It’s best to work quickly and keep the dough covered while you layer it to prevent it from drying out. If you find the dough tearing, don’t worry! Simply layer it over the filling as best as you can; the crispy texture will still be delicious.
For added flavor, consider mixing in other herbs like parsley or mint, and serve with a side of Greek yogurt or a fresh salad for a complete meal. Enjoy your homemade gluten-free spanakopita!
Lemon Garlic Roasted Potatoes
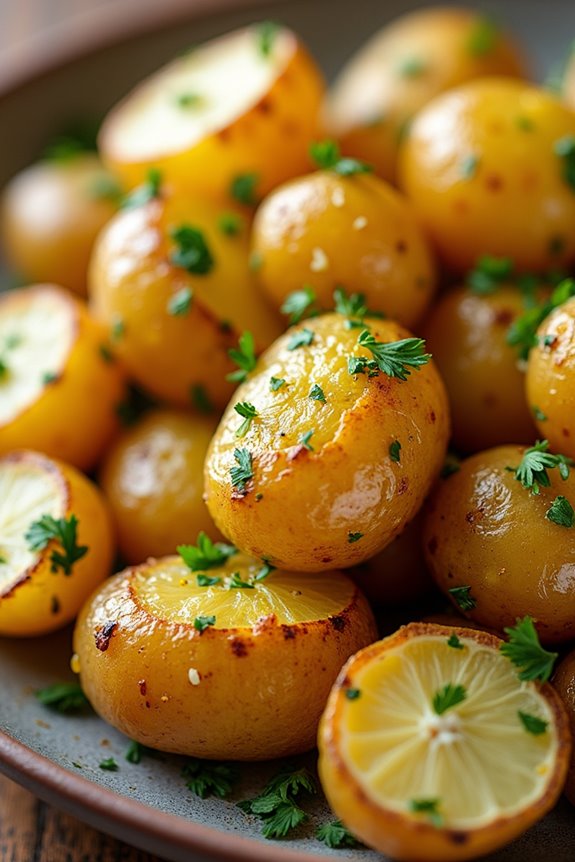
Lemon Garlic Roasted Potatoes are a delightful side dish that captures the vibrant flavors of the Mediterranean. This recipe combines the earthiness of potatoes with the fresh zing of lemon and the aromatic essence of garlic, creating a dish that perfectly complements grilled meats, fish, or even a simple salad.
The roasting process brings out the natural sweetness of the potatoes while infusing them with the bright flavors of lemon and garlic, making them irresistible.
This dish isn’t only gluten-free but also easy to prepare, making it a great addition to any meal. Whether you’re hosting a family dinner or looking for a delicious side for a casual weeknight meal, these roasted potatoes are bound to impress.
With just a few simple ingredients and minimal effort, you can create a flavorful and satisfying dish that everyone will love.
Ingredients (serving size: 4-6 people)
- 2 pounds of baby potatoes, halved or quartered
- 4 tablespoons olive oil
- 4 cloves garlic, minced
- Zest of 1 lemon
- Juice of 1 lemon
- 1 teaspoon dried oregano
- 1 teaspoon salt
- 1/2 teaspoon black pepper
- Fresh parsley, chopped (for garnish)
Cooking Instructions
- Preheat the Oven: Begin by preheating your oven to 425°F (220°C). This high temperature will help achieve a crispy exterior on the potatoes while keeping the inside fluffy.
- Prepare the Potatoes: In a large mixing bowl, combine the halved or quartered baby potatoes. Make sure they’re roughly the same size for even cooking.
- Make the Marinade: In a small bowl, whisk together the olive oil, minced garlic, lemon zest, lemon juice, dried oregano, salt, and black pepper. This mixture will create a flavorful coating for the potatoes.
- Coat the Potatoes: Pour the marinade over the potatoes in the mixing bowl. Toss the potatoes well to guarantee they’re evenly coated with the garlic and lemon mixture.
- Arrange on Baking Sheet: Spread the coated potatoes in a single layer on a baking sheet lined with parchment paper. Make sure there’s some space between each piece to allow for proper roasting.
- Roast the Potatoes: Place the baking sheet in the preheated oven and roast the potatoes for 25-30 minutes. Halfway through, give them a stir to guarantee they brown evenly. The potatoes should be golden and crispy on the outside and tender on the inside.
- Garnish and Serve: Once the potatoes are done roasting, remove them from the oven. Transfer to a serving dish and sprinkle with freshly chopped parsley for a pop of color and flavor. Serve warm.
Extra Tips
For an added depth of flavor, consider adding some fresh herbs such as rosemary or thyme to the marinade. If you prefer a spicier kick, a pinch of red pepper flakes can also be a great addition.
Make sure to adjust the cooking time based on the size of your potato pieces; smaller pieces will cook faster, while larger ones may need a bit more time. Enjoy these Lemon Garlic Roasted Potatoes as a versatile side that pairs wonderfully with many Mediterranean dishes!
Chocolate Olive Oil Cake
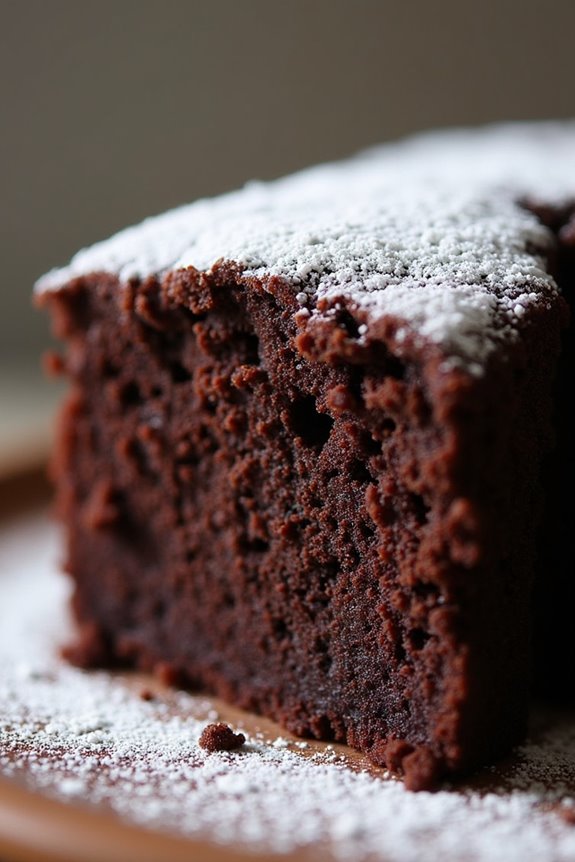
This decadent Chocolate Olive Oil Cake is a delightful twist on the traditional dessert, perfect for those following a gluten-free diet. The combination of rich cocoa and fruity olive oil lends an extraordinary depth of flavor to this moist and tender cake. Its simple yet sophisticated profile makes it a standout addition to any gathering or a special treat for yourself.
Serve it as is, or enhance your experience with a dusting of powdered sugar or a dollop of fresh whipped cream.
What sets this cake apart is its use of olive oil instead of butter, which not only makes it gluten-free but also adds a unique Mediterranean flair. The cake is incredibly easy to prepare, taking only a short time to whip together the ingredients, and it bakes to perfection in under an hour. This dessert is sure to impress both gluten-free eaters and those who aren’t, making it a win-win for any occasion.
Ingredients (Serves 4-6):
- 1 cup almond flour
- 1/2 cup unsweetened cocoa powder
- 1 cup granulated sugar
- 1/2 teaspoon salt
- 1 teaspoon baking powder
- 1/2 teaspoon baking soda
- 3 large eggs
- 1/2 cup extra virgin olive oil
- 1 teaspoon vanilla extract
- 1/2 cup hot water
Cooking Instructions:
- Preheat the Oven: Begin by preheating your oven to 350°F (175°C). This guarantees that the cake bakes evenly and rises properly once you place it in the oven.
- Prepare the Baking Pan: Grease an 8-inch round cake pan with olive oil and then line the bottom with parchment paper. This step will help in easily releasing the cake from the pan after it’s baked.
- Mix Dry Ingredients: In a large mixing bowl, combine the almond flour, cocoa powder, sugar, salt, baking powder, and baking soda. Whisk these dry ingredients together until they’re fully incorporated and there are no lumps.
- Combine Wet Ingredients: In a separate bowl, whisk together the eggs, olive oil, and vanilla extract until well combined. Make sure the mixture is smooth and all the ingredients are fully blended.
- Combine Dry and Wet Mixtures: Gradually pour the wet mixture into the bowl of dry ingredients, stirring gently. Once combined, slowly add the hot water into the batter, mixing until you achieve a smooth and glossy consistency.
- Pour into the Pan: Pour the batter into the prepared cake pan, spreading it evenly with a spatula. This guarantees even baking throughout the cake.
- Bake the Cake: Place the pan in the preheated oven and bake for approximately 30-35 minutes, or until a toothpick inserted into the center comes out clean. Keep an eye on it to avoid overbaking.
- Cool and Serve: After baking, remove the cake from the oven and allow it to cool in the pan for about 10 minutes. Then, transfer it to a wire rack to cool completely. Once cooled, you can dust it with powdered sugar or top it with whipped cream if desired.
Extra Tips: When making this Chocolate Olive Oil Cake, feel free to experiment with different types of olive oil for varied flavors; a robust oil will enhance the chocolate. Additionally, you can incorporate add-ins like chopped nuts or chocolate chips for added texture.
Be sure to store any leftovers in an airtight container at room temperature for up to three days. Enjoy this cake as a delightful dessert or a sweet snack throughout the day!
Greek Yogurt Parfait With Honey and Berries
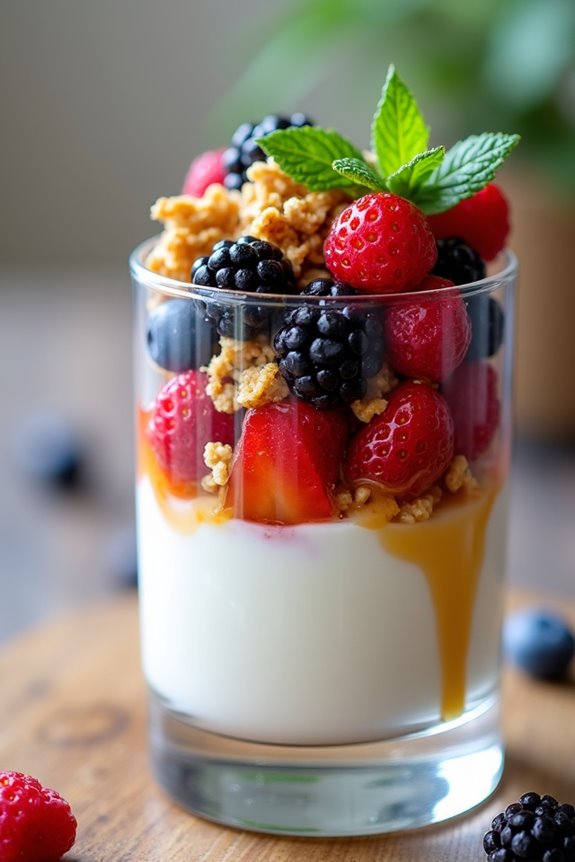
Greek Yogurt Parfait with Honey and Berries is a delightful and nutritious dessert or breakfast option that’s completely gluten-free. This dish layers creamy Greek yogurt with a vibrant assortment of fresh berries, all drizzled with sweet honey. It’s not only a feast for the eyes but also a wholesome treat that packs protein, vitamins, and antioxidants. Perfect for a family breakfast or as a light dessert, this parfait is easy to prepare and can be customized with your favorite fruits and toppings.
The combination of tangy Greek yogurt and the natural sweetness of honey creates a harmonious balance of flavors, while the berries add a rejuvenating burst of color and taste. This recipe isn’t only gluten-free but also versatile, allowing you to switch up the fruits depending on what’s in season. Whether you prefer strawberries, blueberries, raspberries, or a mix, this parfait is sure to please everyone at the table.
Ingredients (Serves 4-6):
- 4 cups Greek yogurt (plain, unsweetened)
- 2 cups mixed berries (strawberries, blueberries, raspberries, blackberries)
- 1/4 cup honey (or to taste)
- 1 teaspoon vanilla extract (optional)
- 1 cup granola (gluten-free, if needed)
- Fresh mint leaves for garnish (optional)
Cooking Instructions:
- Prepare the Berries: Start by rinsing the mixed berries under cold water. If you’re using strawberries, remove the stems and slice them into smaller pieces. Set the berries aside to drain in a colander while you prepare the other ingredients.
- Mix the Greek Yogurt: In a mixing bowl, combine the Greek yogurt with vanilla extract if using. Stir well to incorporate the vanilla, making the yogurt slightly sweeter and adding depth to the flavor profile.
- Layer the Parfait: Grab serving glasses or bowls and start layering the parfait. Begin with a generous scoop of Greek yogurt at the bottom. Follow this with a layer of mixed berries and then a drizzle of honey. If you’re using granola, sprinkle a layer on top of the honey to add some crunch.
- Repeat the Layers: Continue adding layers until your glasses or bowls are filled. Aim for at least two or three layers of yogurt, berries, honey, and granola. Finish with a final layer of yogurt on top, a handful of berries, and a drizzle of honey.
- Garnish and Serve: If desired, garnish each parfait with fresh mint leaves for an added touch of rejuvenation and color. Serve immediately or refrigerate for about 30 minutes to chill before serving.
Extra Tips:
For an even more decadent treat, consider adding a sprinkle of nuts or seeds for extra crunch and nutrition. You can also experiment with different sweeteners like agave syrup or maple syrup if you prefer something different from honey.
Additionally, feel free to adjust the sweetness of the yogurt by adding more or less honey according to your taste, making this parfait perfectly customizable for everyone’s preferences. Enjoy this delightful treat as a healthy start to your day or a satisfying finish to your meal!