

Scandinavian cuisine is a treasure trove of vibrant flavors, especially when it comes to pickling. There’s something wonderfully magical about those crunchy jars of Nordic sunshine that can brighten any meal. From classic Swedish pickled herring to the sweet tang of Danish pickled beets, each recipe shares a unique story. If you’re curious about how these delightful preserves can elevate your dishes, let’s explore the fragrant world of Scandinavian pickles together. Get ready to discover some amazing recipes that will add a delicious twist to your meals.
Classic Swedish Pickled Herring
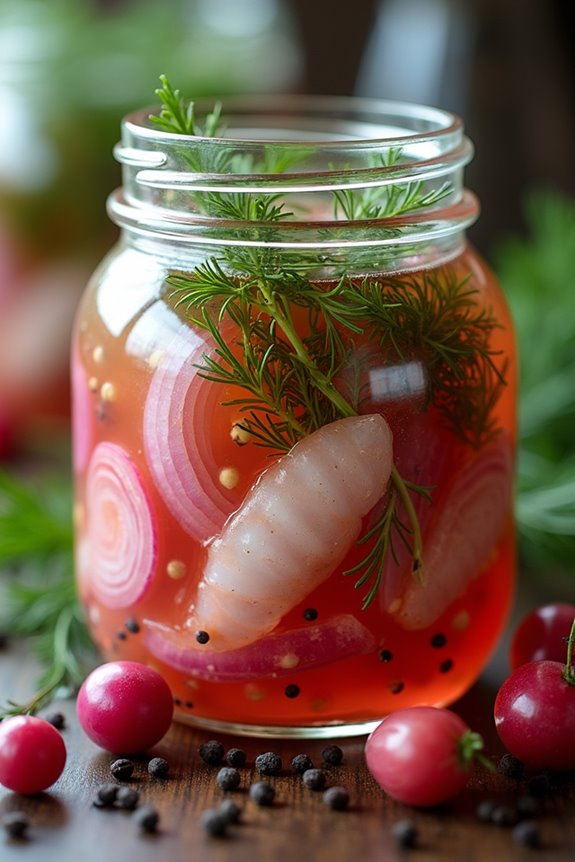
Classic Swedish pickled herring, or “Inlagd Sill,” is a beloved dish in Sweden that showcases the country’s affinity for seafood and preservation techniques. This dish features herring fillets that are marinated in a flavorful brine, typically made with vinegar, sugar, and spices.
It’s traditionally served as part of a smorgasbord during festive occasions such as Midsummer and Christmas, but it can also be enjoyed year-round as a delicious appetizer or topping for crispbread.
The beauty of pickled herring lies in its versatility; it can be flavored with various ingredients, including onion, dill, or mustard. The herring absorbs the flavors from the brine while retaining its natural texture, resulting in a dish that’s both tangy and savory.
Whether you’re hosting a gathering or simply wishing to enjoy a taste of Scandinavia at home, this classic recipe will definitely impress your guests and tantalize your taste buds.
Ingredients (Serves 4-6):
- 400g herring fillets (fresh or pickled)
- 1 cup white wine vinegar
- 1 cup water
- ½ cup granulated sugar
- 1 tablespoon salt
- 1 teaspoon whole black peppercorns
- 1 teaspoon mustard seeds
- 2 bay leaves
- 1 red onion, thinly sliced
- ½ cup fresh dill, chopped
- Optional: sliced boiled potatoes or crispbread for serving
Cooking Instructions:
1. Prepare the Herring: If using fresh herring fillets, rinse them under cold water and pat them dry with paper towels. If using pre-pickled herring, simply drain the fillets and set aside. Confirm that the fillets are free from bones for a more pleasant eating experience.
2. Make the Brine: In a medium saucepan, combine the white wine vinegar, water, granulated sugar, salt, black peppercorns, mustard seeds, and bay leaves. Heat the mixture over medium heat, stirring occasionally until the sugar and salt dissolve completely.
Once dissolved, remove the saucepan from heat and let the brine cool to room temperature.
3. Layer the Ingredients: In a clean glass jar or a shallow dish, place a layer of the sliced red onion at the bottom. Follow with a layer of herring fillets, then sprinkle some of the chopped dill on top.
Repeat the layering process until all the herring, onions, and dill are used, confirming that the last layer is onion and dill.
4. Add the Brine: Pour the cooled brine over the layered herring mixture, confirming that all the fish is submerged. If necessary, you can place a small weight on top of the herring to keep it submerged.
5. Chill and Marinate: Cover the jar or dish with a lid or plastic wrap and refrigerate for at least 24 hours before serving. This allows the herring to absorb the flavors of the brine fully.
For best results, allow it to marinate for up to 3 days.
6. Serve: When ready to serve, remove the herring from the refrigerator and enjoy it chilled. Serve it alongside boiled potatoes or on crispbread for a traditional Swedish experience.
Extra Tips: When making pickled herring, feel free to experiment with different spices and flavorings in the brine, such as allspice or cloves, to suit your taste preferences.
Additionally, if you prefer a sweeter pickled herring, you can increase the amount of sugar in the brine. Always store leftover herring in the refrigerator and consume it within a week for the best quality.
Danish Pickled Beets
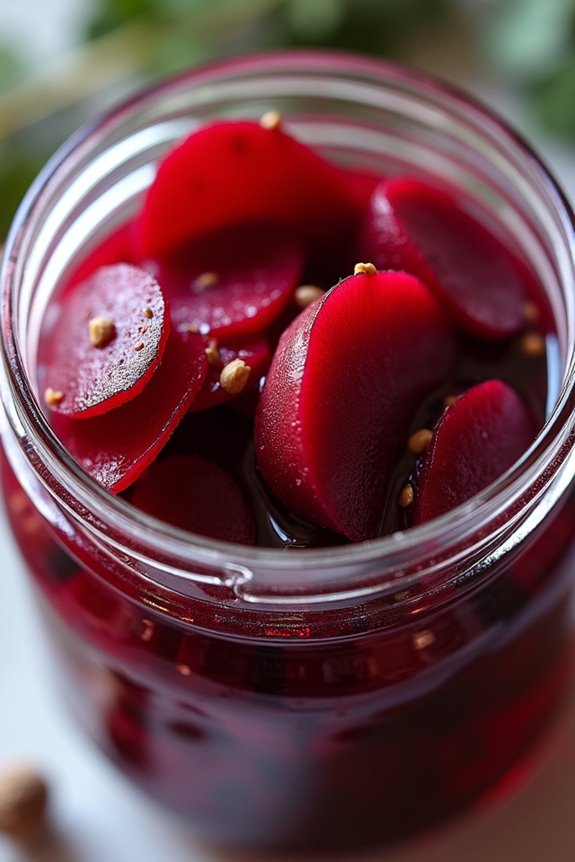
Danish Pickled Beets, or “Syltede Rødbeder,” are a beloved side dish in Denmark and across Scandinavia. Their vibrant color and sweet-tangy flavor make them a delightful addition to any meal, whether served alongside traditional Danish dishes or as part of a modern spread. The pickling process enhances the natural earthiness of the beets, creating a delicious contrast that can elevate the simplest of meals.
This recipe isn’t only easy to follow but also quick to prepare, making it a perfect choice for both novice cooks and seasoned chefs. With just a handful of ingredients and a bit of patience as they marinate, you can create a dish that captures the essence of Scandinavian cuisine. Serve these pickled beets chilled or at room temperature, and enjoy their unique flavor profile that pairs well with meats, cheeses, and salads.
Ingredients (Serves 4-6):
- 1 pound fresh beets
- 1 cup apple cider vinegar
- 1 cup water
- 1/2 cup granulated sugar
- 1 teaspoon salt
- 1 teaspoon whole cloves
- 1 teaspoon mustard seeds
- 1/2 teaspoon black peppercorns
- 1 bay leaf
Cooking Instructions:
- Prepare the Beets: Begin by washing the beets thoroughly under cold water to remove any dirt. Trim the tops and roots but leave the skins on to prevent bleeding during cooking. Place the beets in a pot, cover them with water, and bring to a boil. Reduce the heat and let them simmer for about 30-45 minutes, or until they’re tender when pierced with a fork.
- Cool and Peel the Beets: Once the beets are cooked, remove them from the pot and let them cool slightly. When they’re cool enough to handle, use your hands or a paper towel to rub off the skins. The skins should come off easily. Slice the beets into rounds or wedges, depending on your preference.
- Prepare the Pickling Brine: In a medium saucepan, combine the apple cider vinegar, water, granulated sugar, salt, whole cloves, mustard seeds, black peppercorns, and bay leaf. Heat the mixture over medium heat, stirring until the sugar and salt have dissolved completely. Bring the brine to a gentle boil, then remove it from the heat.
- Combine Beets and Brine: Place the sliced beets into a clean glass jar or container. Pour the hot pickling brine over the beets, ensuring they’re fully submerged. If necessary, add more vinegar or water to cover the beets completely. Seal the jar tightly with a lid.
- Let Them Pickle: Allow the beets to cool to room temperature before refrigerating them. For the best flavor, let the beets marinate in the refrigerator for at least 24 hours before serving. They’ll keep well for up to a month in the fridge.
Extra Tips: When preparing Danish Pickled Beets, consider using organic beets for the best flavor and quality. If you prefer a spicier kick, feel free to add a pinch of red pepper flakes to the brine. For added depth, you can also experiment with adding a few slices of onion or garlic to the jar before pouring in the brine. Enjoy these pickled beets as a vibrant side dish or as a unique topping for salads and sandwiches!
Norwegian Pickled Cucumbers
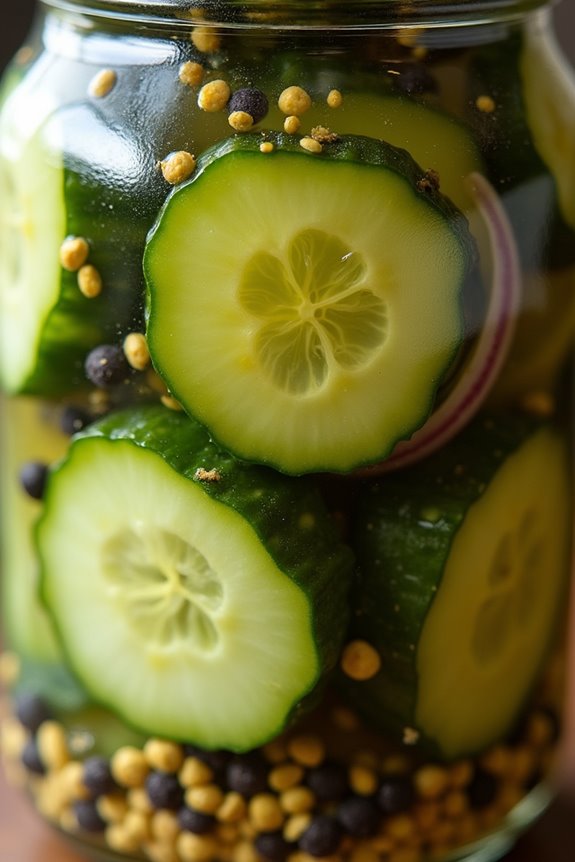
Norwegian pickled cucumbers, known as “syltede agurker,” are a delightful addition to any meal. Their crisp texture and tangy flavor make them a perfect side dish or condiment, enhancing the taste of meats, sandwiches, and even salads.
This traditional Scandinavian recipe embodies the essence of preserving summer’s bounty, allowing you to enjoy the bright flavors of fresh cucumbers year-round. The pickling process is simple yet rewarding, making it an accessible dish for both novice and experienced cooks alike.
To make Norwegian pickled cucumbers, you’ll need fresh cucumbers, vinegar, sugar, and a few spices. The combination of sweet and sour flavors is what sets this recipe apart, creating a perfect balance that tantalizes the taste buds.
Once prepared, these pickles can be stored in the refrigerator for up to a month, making them a convenient and tasty addition to your culinary repertoire.
Ingredients (Serves 4-6 people):
- 4 medium cucumbers
- 1 cup white vinegar
- 1 cup water
- 1/2 cup granulated sugar
- 1 teaspoon salt
- 1 teaspoon mustard seeds
- 1 teaspoon black peppercorns
- 1/2 teaspoon dill seeds (optional)
- 1 small onion, thinly sliced (optional)
Cooking Instructions:
1. Prepare the Cucumbers: Start by washing the cucumbers thoroughly under cold water. If you prefer, you can slice them into rounds, spears, or keep them whole depending on your preference. For a traditional Norwegian style, thinly slicing them into rounds is recommended.
2. Make the Pickling Brine: In a medium saucepan, combine the white vinegar, water, granulated sugar, and salt. Heat the mixture over medium heat, stirring occasionally until the sugar and salt completely dissolve.
Once dissolved, remove the saucepan from heat and allow the brine to cool slightly.
3. Add Spices: While the brine is cooling, prepare your spices. In a small bowl, mix the mustard seeds, black peppercorns, and dill seeds (if using). These spices will enhance the flavor of the pickles.
4. Combine Ingredients: In a clean glass jar or container, layer the cucumber slices and onion (if using). Pour the slightly cooled pickling brine over the cucumbers until they’re fully submerged. Make sure to evenly distribute the spices throughout the jar.
5. Seal and Refrigerate: Seal the jar tightly with a lid and place it in the refrigerator. Let the cucumbers pickle for at least 24 hours before serving for the best flavor, although they can be enjoyed after just a few hours.
6. Serve and Enjoy: After allowing the cucumbers to pickle, they’re ready to be served. Use them as a crunchy side dish or a tangy topping for sandwiches and salads.
Extra Tips:
For an added kick, consider incorporating sliced fresh chili peppers into your pickles. Additionally, if you prefer a sweeter profile, you can adjust the amount of sugar in the brine to suit your taste.
Always confirm the cucumbers are fully submerged in the brine to prevent spoilage, and store them in the refrigerator for maximum freshness. Enjoy these delicious pickled cucumbers as a staple in your Scandinavian-inspired meals!
Finnish Pickled Carrots
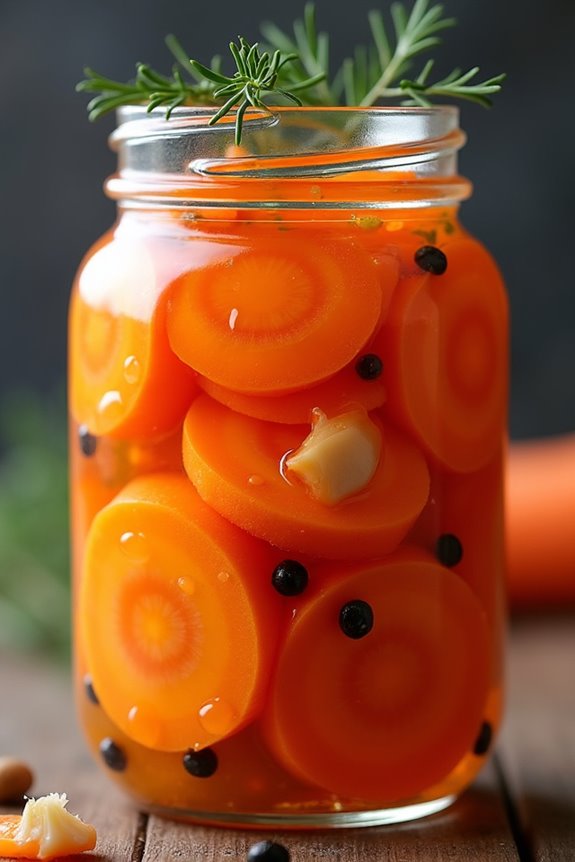
Finnish Pickled Carrots are a delightful dish that adds a vibrant splash of color and flavor to any meal. This simple yet delicious recipe brings together the natural sweetness of carrots with a tangy brine that enhances their taste, making them a popular accompaniment to various Finnish dishes or an invigorating snack on their own.
The balance of vinegar, sugar, and spices creates a perfect pickling solution that complements the carrots beautifully.
The beauty of this recipe lies in its versatility. You can adjust the sweetness and acidity according to your taste, and even experiment with additional spices like dill or mustard seeds for a unique twist.
These pickled carrots can be prepared in advance and stored in the refrigerator, allowing the flavors to deepen and develop over time. Serve them as a side dish, on a charcuterie board, or as a topping for sandwiches; the possibilities are endless!
Ingredients (serving size: 4-6 people)
- 4 medium carrots, peeled and sliced into thin rounds
- 1 cup water
- 1 cup white vinegar
- 1/2 cup granulated sugar
- 1 tablespoon salt
- 1 teaspoon black peppercorns
- 1 teaspoon mustard seeds (optional)
- 1 teaspoon dill seeds (optional)
- 2 cloves garlic, peeled and smashed
Cooking Instructions
1. Prepare the Carrots: Begin by peeling the carrots and slicing them into thin rounds, about 1/4 inch thick. This guarantees that they pickle evenly and absorb the brine flavor. Place the sliced carrots in a clean, sterilized glass jar or container.
2. Make the Pickling Brine**: In a medium saucepan, combine the water, white vinegar, granulated sugar, and salt. Bring the mixture to a boil over medium heat**, stirring occasionally to dissolve the sugar and salt completely.
Once boiling, remove from heat and let it cool for a few minutes.
3. Add Spices: Once the brine has cooled slightly, add the black peppercorns, mustard seeds, dill seeds, and smashed garlic cloves to the mixture. These spices will infuse the pickling brine with additional flavor, making your pickled carrots even more delicious.
4. Combine Brine and Carrots: Carefully pour the hot brine over the sliced carrots in the jar, making sure the carrots are fully submerged. If necessary, use a clean utensil to press them down gently.
Allow the jar to cool to room temperature before sealing it with a lid.
5. Refrigerate: Place the sealed jar in the refrigerator for at least 24 hours before consuming. This resting period allows the flavors to meld and the carrots to absorb the pickling brine.
The pickled carrots can be enjoyed for up to two weeks when stored properly in the fridge.
Extra Tips
When preparing Finnish Pickled Carrots, feel free to adjust the sugar and vinegar levels to suit your taste preference. If you prefer a less sweet pickle, reduce the sugar slightly, or for a tangier flavor, increase the vinegar.
Additionally, consider adding other vegetables like sliced radishes or cucumbers to the mix for a colorful pickled vegetable medley. Always verify your jars and utensils are properly sterilized to prolong freshness and safety.
Enjoy your homemade pickles as a crunchy snack or a gourmet side dish!
Icelandic Pickled Red Cabbage
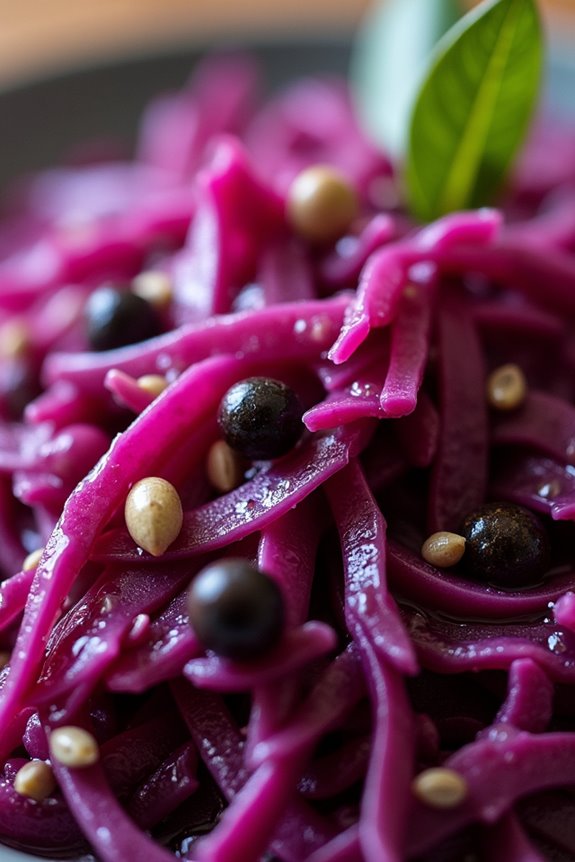
Icelandic Pickled Red Cabbage is a delicious and vibrant side dish that adds a tangy crunch to any meal. This dish isn’t only visually appealing but also offers a delightful balance of flavors, making it a perfect accompaniment to traditional Icelandic dishes such as roasted lamb or fish.
The pickling process preserves the cabbage while infusing it with a sweet and sour flavor profile that’s both revitalizing and satisfying.
The preparation of Icelandic Pickled Red Cabbage is quite simple, and it can be made ahead of time, making it a convenient choice for gatherings or family dinners. The combination of vinegar, sugar, and spices creates a delightful brine that enhances the natural sweetness of the red cabbage.
As the cabbage marinates, it develops a deeper flavor, making it even more enjoyable after a day or two in the refrigerator.
Ingredients (serving size: 4-6 people)
- 1 medium red cabbage, finely shredded
- 1 cup apple cider vinegar
- ½ cup granulated sugar
- 1 tablespoon salt
- 1 teaspoon whole black peppercorns
- 1 teaspoon mustard seeds
- ½ teaspoon ground allspice
- 2 cups water
- 1 bay leaf
Cooking Instructions
- Prepare the Cabbage: Start by removing the outer leaves of the red cabbage. Cut the cabbage in half, remove the core, and finely shred the halves using a sharp knife or a mandoline slicer. Place the shredded cabbage in a large mixing bowl and set aside.
- Make the Pickling Brine: In a medium saucepan, combine the apple cider vinegar, granulated sugar, salt, whole black peppercorns, mustard seeds, ground allspice, and water. Bring this mixture to a gentle boil over medium heat, stirring occasionally until the sugar and salt have completely dissolved.
- Combine Cabbage and Brine: Once the brine is boiling, pour it over the shredded cabbage in the mixing bowl. Add the bay leaf to the mixture. Confirm that the cabbage is fully submerged in the brine. If necessary, you can use a clean weight or plate to keep the cabbage submerged.
- Cool and Refrigerate: Allow the cabbage and brine mixture to cool to room temperature. Once cooled, transfer the mixture to a clean glass jar or airtight container. Seal it tightly and place it in the refrigerator.
- Marinate: Let the pickled cabbage marinate in the refrigerator for at least 24 hours before serving. This will allow the flavors to meld and the cabbage to soften slightly.
Extra Tips
For best results, try to let the cabbage pickle for a few days before serving, as this will enhance the flavor even more.
You can also customize the pickling spices to your liking by adding ingredients like cloves or cinnamon for a different twist. This pickled red cabbage can be stored in the refrigerator for up to two weeks, making it a great make-ahead option for meals or as a tangy addition to sandwiches and salads.
Spiced Pickled Red Onions
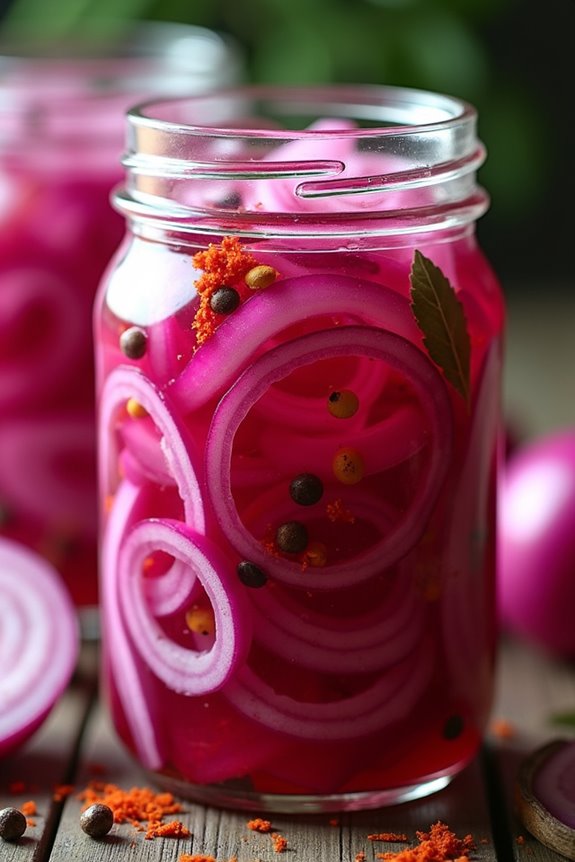
Spiced Pickled Red Onions are a vibrant and flavorful addition to any meal, bringing a zesty crunch that can elevate everything from sandwiches to salads. This Scandinavian-inspired recipe combines the natural sweetness of red onions with a blend of spices that create a tangy and aromatic pickling brine. The process is simple and straightforward, making it an ideal way to preserve onions while adding a delicious flavor to your dishes.
Perfect for serving 4-6 people, these pickled onions not only enhance the taste of your meals but also add a beautiful pop of color to your plate. Whether you’re preparing a traditional Scandinavian feast or just looking for a unique condiment to accompany your everyday meals, these Spiced Pickled Red Onions are sure to impress. Let’s explore the ingredients and the steps to make this delightful dish.
Ingredients
- 2 large red onions, thinly sliced
- 1 cup apple cider vinegar
- 1 cup water
- 3 tablespoons sugar
- 1 tablespoon salt
- 1 teaspoon black peppercorns
- 1 teaspoon mustard seeds
- 1 teaspoon coriander seeds
- 1 bay leaf
- 1/2 teaspoon red pepper flakes (optional)
Cooking Instructions
- Prepare the Onions: Begin by peeling the red onions and slicing them thinly. A mandoline slicer can be particularly helpful for achieving uniform slices. Place the sliced onions in a bowl and set aside.
- Make the Pickling Brine: In a medium saucepan, combine the apple cider vinegar, water, sugar, and salt. Heat the mixture over medium heat, stirring occasionally until the sugar and salt dissolve completely. This step is essential as it guarantees that the brine will effectively penetrate the onions.
- Add Spices: Once the brine is heated and mixed well, add the black peppercorns, mustard seeds, coriander seeds, bay leaf, and red pepper flakes (if using). Stir the mixture gently to incorporate the spices, and allow it to simmer for about 2-3 minutes. This will help to release the flavors from the spices into the brine.
- Combine Onions and Brine: Remove the saucepan from heat and pour the hot brine over the sliced onions in the bowl. Make sure all the onions are submerged in the liquid. If necessary, use a clean spoon to push the onions down into the brine.
- Cool and Store: Allow the mixture to cool to room temperature, then transfer it to a clean jar or airtight container. Seal tightly and refrigerate the pickled onions. For the best flavor, let them sit in the refrigerator for at least 24 hours before using, although they can be enjoyed sooner if desired.
Extra Tips
When making Spiced Pickled Red Onions, feel free to experiment with the spices according to your taste preferences. Adding additional spices like cloves or allspice can give your pickles a unique twist.
Also, these pickled onions can last in the refrigerator for up to 2 weeks, so make sure to enjoy them in various dishes throughout the week. Finally, don’t discard the leftover brine; it can be reused to pickle other vegetables or used as a tangy dressing in salads!
Sweet and Sour Pickled Cauliflower
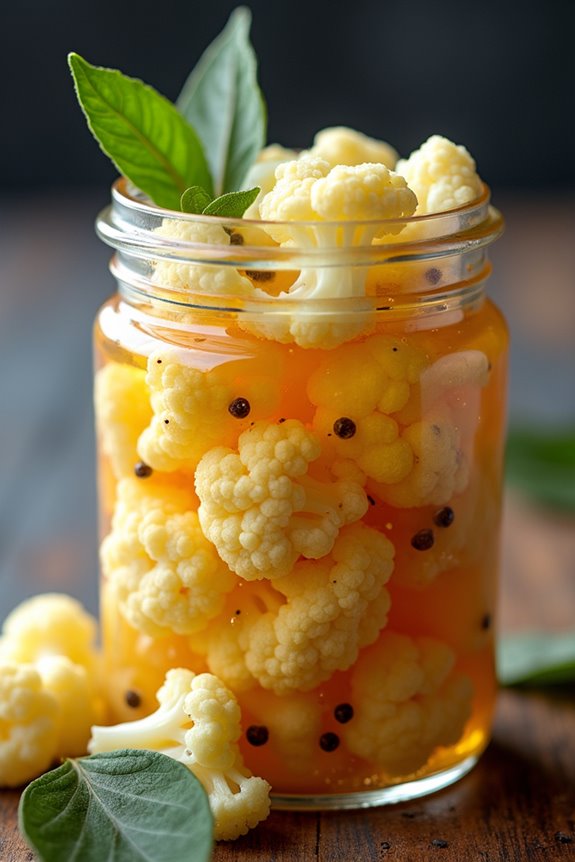
Sweet and Sour Pickled Cauliflower is a vibrant and tangy dish that perfectly complements a variety of meals or can be enjoyed on its own as a crunchy snack. This Scandinavian favorite is both simple to prepare and bursting with flavor, making it a delightful addition to your culinary repertoire.
The combination of sweet and tart elements in this recipe creates a harmonious balance that elevates the humble cauliflower into something truly special. The process of pickling not only enhances the taste of the cauliflower but also preserves its freshness for longer periods.
The sweet and sour brine, made from vinegar, sugar, and spices, infuses the cauliflower florets with a unique flavor that’s both invigorating and addictive. This recipe yields 4-6 servings and is perfect for serving at gatherings, barbecues, or as part of a Scandinavian-inspired meal.
Ingredients:
- 1 medium head of cauliflower, cut into florets
- 1 cup white vinegar
- 1 cup water
- 1/2 cup granulated sugar
- 1 tablespoon salt
- 1 teaspoon mustard seeds
- 1 teaspoon coriander seeds
- 1 teaspoon black peppercorns
- 1/2 teaspoon crushed red pepper flakes (optional for heat)
- 2 cloves garlic, peeled and smashed
- 1 bay leaf
Cooking Instructions:
- Prepare the Cauliflower: Begin by washing the cauliflower thoroughly. Cut it into bite-sized florets, making sure they’re uniform in size for even pickling. Set aside.
- Make the Brine: In a medium saucepan, combine the white vinegar, water, granulated sugar, and salt. Stir the mixture over medium heat until the sugar and salt have completely dissolved. Don’t bring it to a boil; just heat until combined.
- Add Spices: Once the brine has dissolved, add the mustard seeds, coriander seeds, black peppercorns, crushed red pepper flakes (if using), smashed garlic cloves, and bay leaf to the saucepan. Allow the mixture to simmer for about 5 minutes to let the spices infuse their flavors into the brine.
- Pack the Cauliflower: While the brine is simmering, prepare a clean glass jar or container with a tight-fitting lid. Pack the cauliflower florets tightly into the jar, leaving some space at the top.
- Pour the Brine: Carefully pour the hot brine over the packed cauliflower, ensuring that all the florets are submerged. If necessary, use a clean utensil to poke down the cauliflower and release any air bubbles.
- Cool and Refrigerate: Allow the jar to cool at room temperature for about 30 minutes. Once cooled, seal the jar and refrigerate it. For the best flavor, let the pickled cauliflower sit in the refrigerator for at least 24 hours before serving, although it can be enjoyed sooner.
- Serve and Enjoy: After the resting period, your Sweet and Sour Pickled Cauliflower is ready to be served. Use it as a side dish, a topping for salads, or simply enjoy it as a crunchy snack.
Extra Tips:
When making Sweet and Sour Pickled Cauliflower, feel free to customize the recipe by adding other vegetables such as carrots or bell peppers for added color and flavor. Always verify your jar and utensils are clean to prevent spoilage.
The pickled cauliflower can be stored in the refrigerator for up to two weeks, allowing you to enjoy this delicious treat over time. If you prefer a milder flavor, reduce the amount of vinegar or sugar according to your taste.
Pickled Green Tomatoes
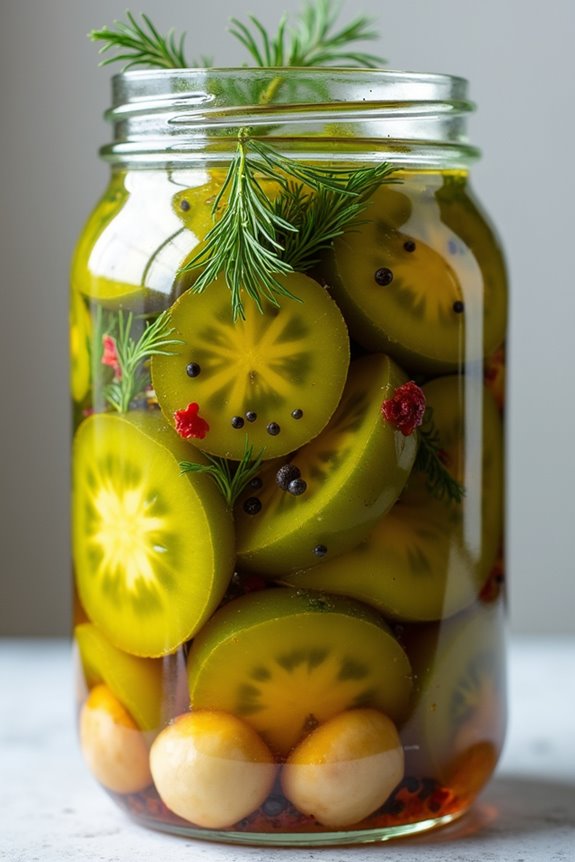
Pickled green tomatoes are a delightful Scandinavian delicacy that offers a tangy crunch that can brighten up any meal. They’re typically made with unripe tomatoes, which are preserved in a seasoned brine, providing a unique taste that pairs well with a variety of dishes. The process of pickling not only enhances the flavor of the tomatoes but also extends their shelf life, allowing you to enjoy the taste of summer long after the harvest season has ended.
This recipe is perfect for those looking to add an exciting twist to their condiment collection or to preserve their garden’s bounty.
The beauty of pickling green tomatoes lies in their versatility. They can be served as a side dish, added to sandwiches, or used as a garnish for salads and meats. The slight acidity balances out richer flavors, making them a great accompaniment to fatty or savory dishes. With a few simple ingredients and a bit of patience, you can create your own batch of pickled green tomatoes that are sure to impress family and friends.
Ingredients (Serves 4-6)
- 2 pounds green tomatoes, cut into wedges
- 2 cups distilled white vinegar
- 1 cup water
- 1 cup granulated sugar
- 1 tablespoon kosher salt
- 2 teaspoons mustard seeds
- 1 teaspoon black peppercorns
- 1 teaspoon crushed red pepper flakes
- 4 cloves garlic, peeled and smashed
- 1 tablespoon dill seeds or 4 sprigs fresh dill
- 1 jar (quart-sized) for storage
Cooking Instructions
- Prepare the Tomatoes: Rinse the green tomatoes under cold water and remove any stems. Cut them into wedges, approximately 1-inch thick. This sizing guarantees that the tomatoes will pickle evenly and absorb the brine well.
- Create the Brine: In a medium saucepan, combine the distilled white vinegar, water, granulated sugar, and kosher salt. Heat the mixture over medium heat, stirring occasionally until the sugar and salt have fully dissolved. This brine is essential for flavoring the tomatoes and preserving them.
- Add Spices: Once the brine is ready, add the mustard seeds, black peppercorns, crushed red pepper flakes, smashed garlic, and dill seeds (or fresh dill) to the pan. Allow the mixture to come to a gentle boil, then immediately remove it from heat. Let it cool slightly for about 10 minutes, allowing the spices to infuse their flavors into the brine.
- Pack the Jar: Place the tomato wedges into a clean quart-sized jar, packing them tightly but without crushing them. You want to make sure that the tomatoes are snug in the jar to prevent them from floating when the brine is added.
- Pour the Brine: Carefully pour the warm brine over the packed tomatoes in the jar, making sure that all the tomatoes are submerged. If necessary, use a clean utensil to push down any tomatoes that may be sticking out above the brine.
- Seal and Store: Seal the jar tightly with a lid and allow it to cool to room temperature for about 30 minutes. Once cooled, refrigerate the pickled green tomatoes. They’ll be ready to eat in about 48 hours but taste even better after a week as the flavors meld together.
Extra Tips
When making pickled green tomatoes, feel free to experiment with additional spices or herbs based on your flavor preferences. You can add ingredients like bay leaves, cloves, or even a splash of your favorite hot sauce for an extra kick.
Additionally, make sure your jar and lid are thoroughly cleaned and sterilized to prevent any unwanted bacteria during the pickling process. Once opened, store the pickles in the refrigerator, and they can last for several weeks, although they’re best enjoyed within a month for peak flavor.
Mustard Pickles From Scandinavia
Mustard pickles are a delightful addition to many Scandinavian meals, offering a unique blend of tanginess and sweetness that can elevate any dish.
These pickles are typically made with a variety of vegetables, including cucumbers and onions, all of which are coated in a zesty mustard sauce. The result is a crunchy, flavorful condiment that pairs beautifully with meats, cheeses, or even as a standalone snack.
Preparing mustard pickles at home allows you to customize the flavors and adjust the sweetness or spiciness to your liking.
In this recipe, we’ll guide you through the process of making mustard pickles that serve 4-6 people. The pickling process does require some time, but the end result is well worth the wait. You’ll find that once you try these homemade mustard pickles, you’ll want to keep a jar in your refrigerator at all times!
Ingredients
- 4 cups cucumbers, sliced (preferably pickling cucumbers)
- 1 cup onions, thinly sliced
- 1 cup white vinegar
- 1 cup granulated sugar
- 1 tablespoon mustard seeds
- 1 tablespoon turmeric powder
- 1 teaspoon ground mustard
- 1 teaspoon salt
- 1/2 teaspoon black pepper
- 1/4 teaspoon red pepper flakes (optional)
- 1 cup water
Cooking Instructions
1. Prepare the Vegetables: Begin by washing the cucumbers thoroughly. Slice them into thin rounds, about ¼ inch thick. Peel and thinly slice the onions.
Place both the cucumbers and onions in a large bowl. Sprinkle with salt and let them sit for about 1 hour. This process will help to draw out excess moisture.
2. Make the Pickling Liquid: While the vegetables are resting, combine the white vinegar, granulated sugar, water, mustard seeds, turmeric powder, ground mustard, black pepper, and red pepper flakes (if using) in a saucepan.
Heat the mixture over medium heat, stirring until the sugar has dissolved completely. Once dissolved, bring the mixture to a gentle boil and then remove it from the heat.
3. Combine and Pack: After the cucumbers and onions have sat for an hour, drain any excess liquid from the bowl.
Pour the hot pickling liquid over the vegetables, ensuring that they’re fully submerged. Allow the mixture to cool down to room temperature.
4. Transfer to Jars: Once cooled, transfer the cucumber and onion mixture into sterilized glass jars.
Make sure to pack the vegetables tightly but without crushing them. Pour any remaining pickling liquid over the top, making sure the vegetables are covered.
5. Refrigerate: Seal the jars tightly and place them in the refrigerator.
For the best flavor, allow the mustard pickles to sit for at least 24 hours before consuming. These pickles can be stored in the refrigerator for up to 2-3 weeks.
Extra Tips
When making mustard pickles, feel free to experiment with different vegetables such as bell peppers or carrots for added color and flavor.
Additionally, you can adjust the sweetness of the pickling liquid by varying the amount of sugar based on your taste preference. If you prefer a spicier kick, add more red pepper flakes or even a dash of hot sauce to the mix.
Remember that the flavors will intensify as the pickles sit, so patience is key for the best results!
Quick Pickled Bell Peppers

Quick pickled bell peppers are a vibrant and tangy addition to a variety of dishes, perfect for enhancing sandwiches, salads, or serving as a delightful snack. The beauty of this recipe lies in its simplicity and speed, as the peppers can be ready to enjoy in just a couple of hours.
With just a handful of ingredients, you can create a zesty flavor that complements the natural sweetness of the bell peppers, making them an excellent accompaniment for many meals.
This Scandinavian-inspired recipe isn’t only quick to prepare but also allows you to customize the level of sweetness and spice to your liking. By using a combination of vinegar, sugar, and spices, these pickled bell peppers provide a rejuvenating contrast to heavier dishes or can stand alone as a colorful addition to your appetizer spread.
Let’s explore the ingredients and instructions to get started on making these delicious quick pickled bell peppers for 4-6 people.
Ingredients:
- 4 medium bell peppers (any color)
- 1 cup apple cider vinegar
- ½ cup water
- ¼ cup granulated sugar
- 2 teaspoons salt
- 1 teaspoon mustard seeds
- ½ teaspoon black peppercorns
- 1 teaspoon crushed red pepper flakes (optional)
- 2 cloves garlic, thinly sliced
Cooking Instructions:
- Prepare the Bell Peppers: Start by washing the bell peppers thoroughly. Remove the stems, seeds, and membranes, then slice them into thin strips or rings, according to your preference. The thinner you slice them, the quicker they’ll pickle.
- Make the Pickling Liquid: In a medium saucepan, combine the apple cider vinegar, water, granulated sugar, and salt. Heat the mixture over medium heat, stirring occasionally until the sugar and salt have dissolved completely. This process will create a tangy and sweet brine that will flavor the peppers.
- Add the Spices: Once the brine is ready, add the mustard seeds, black peppercorns, crushed red pepper flakes (if using), and sliced garlic to the pot. Allow the mixture to simmer for about 2-3 minutes, letting the spices infuse their flavors into the brine.
- Combine and Cool: Place the sliced bell peppers in a clean glass jar or bowl. Pour the hot pickling liquid over the peppers, ensuring they’re fully submerged. If the peppers aren’t fully covered, you can weigh them down with a small plate or use a clean spoon to press them down. Allow the mixture to cool to room temperature.
- Refrigerate and Enjoy: Once the pickled bell peppers have cooled, seal the jar or cover the bowl with plastic wrap and place it in the refrigerator. Let the peppers pickle for at least 2 hours before serving, although they taste even better if left to marinate overnight.
Extra Tips:
For added flavor, feel free to experiment with different spices such as coriander seeds, dill seeds, or even a splash of citrus juice for a twist.
These quick pickled bell peppers can be stored in the refrigerator for up to two weeks, making them a fantastic make-ahead option for gatherings or meal prep. Enjoy them on their own, or use them as a vibrant topping to elevate your favorite dishes!
Garlic Dill Pickles

Garlic Dill Pickles are a quintessential Scandinavian delight that brings a burst of flavor and crunch to any meal. These pickles aren’t only easy to make but also perfect for those who appreciate the tangy, aromatic notes that garlic and dill provide.
With a combination of fresh cucumbers, spices, and vinegar, these pickles can enhance sandwiches, burgers, or simply serve as a revitalizing snack.
The beauty of homemade Garlic Dill Pickles lies in their versatility; you can adjust the garlic and dill to suit your taste, making them as garlicky or herby as you desire. The pickling process is straightforward, and once prepared, the pickles can be stored for weeks, allowing you to enjoy the flavors of summer even in the colder months.
Ingredients (Serves 4-6)
- 4 medium cucumbers (pickling varieties preferred)
- 4 cloves of garlic, peeled and crushed
- 1 cup distilled white vinegar
- 1 cup water
- ½ cup granulated sugar
- 2 tablespoons salt (preferably kosher salt)
- 1 tablespoon dill seeds (or 2-3 sprigs of fresh dill)
- ½ teaspoon black peppercorns
- ½ teaspoon red pepper flakes (optional, for heat)
Cooking Instructions
1. Prepare the Cucumbers: Start by washing the cucumbers thoroughly under cold water. Slice them into spears or rounds, depending on your preference.
For ideal crunch, you can soak the cucumbers in ice water for about 30 minutes before pickling.
2. Make the Pickling Brine: In a medium saucepan, combine the distilled white vinegar, water, granulated sugar, and salt. Heat the mixture over medium heat, stirring until the sugar and salt dissolve completely.
Once dissolved, remove the brine from heat and let it cool for a few minutes.
3. Pack the Jars: Take clean, sterilized jars and begin packing the cucumber slices tightly. Add the crushed garlic cloves, dill seeds (or fresh dill), black peppercorns, and red pepper flakes (if using) between the layers of cucumbers for maximum flavor.
4. Pour the Brine: Once the jars are packed with cucumbers and spices, carefully pour the cooled pickling brine over the contents, making sure that the cucumbers are fully submerged.
Leave a little space at the top of the jar to allow for expansion.
5. Seal and Refrigerate: Seal the jars with airtight lids and place them in the refrigerator. For the best flavor, allow the pickles to sit for at least 24 hours before consuming.
The flavors will deepen over time, and they can be enjoyed for up to 2-3 weeks.
Extra Tips
When making Garlic Dill Pickles, feel free to experiment with different spices or herbs to create your own signature flavor.
For a stronger garlic taste, add extra cloves or let the pickles marinate longer. If you prefer a sweeter pickle, adjust the amount of sugar in the brine.
Always use fresh, crisp cucumbers to guarantee the best texture, and consider using a mix of cucumber varieties for added flavor and color. Enjoy your homemade pickles as a delicious side or topping!
Honey Mustard Pickled Radishes
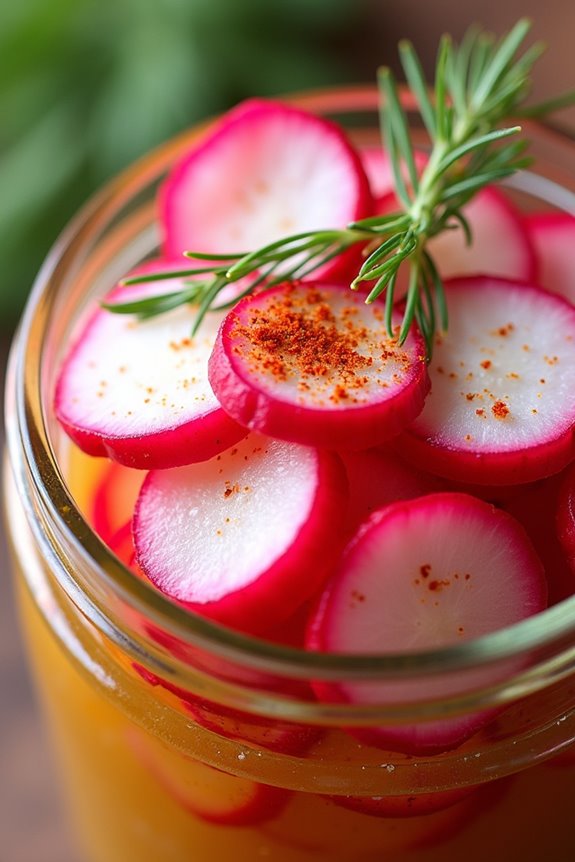
Honey Mustard Pickled Radishes are a delightful Scandinavian side dish that brings a sweet and tangy flavor to your table. This vibrant recipe combines the crunch of fresh radishes with a honey mustard marinade, creating a perfect accompaniment to sandwiches, salads, or grilled meats.
They aren’t only visually appealing but also add an invigorating zing to any meal, making them a must-try for those looking to elevate their dining experience.
Preparing these pickled radishes is simple and quick, requiring just a few ingredients and minimal effort. The honey adds a natural sweetness that balances the sharpness of the mustard and the peppery flavor of the radishes.
Whether you’re hosting a gathering or just looking for a unique snack, these Honey Mustard Pickled Radishes are sure to impress your guests and family alike.
Ingredients (Serves 4-6):
- 1 bunch of radishes (about 8-10 radishes)
- 1/2 cup white vinegar
- 1/4 cup honey
- 1/4 cup Dijon mustard
- 1 teaspoon salt
- 1/2 teaspoon black pepper
- 1/4 teaspoon crushed red pepper flakes (optional)
- 1 clove garlic, minced
- Fresh dill sprigs (for garnish)
Cooking Instructions:
- Prepare the Radishes: Start by washing the radishes thoroughly under cold water to remove any dirt. Trim the tops and tails, then slice the radishes into thin rounds or quarters, depending on your preference. The thinner the slices, the quicker they’ll pickle.
- Make the Pickling Brine: In a medium-sized bowl, combine the white vinegar, honey, Dijon mustard, salt, black pepper, crushed red pepper flakes (if using), and minced garlic. Whisk the mixture until the honey is fully dissolved and the ingredients are well incorporated. This brine will give the radishes their flavorful punch.
- Combine Radishes and Brine: Place the sliced radishes into a clean glass jar or container with a lid. Pour the honey mustard brine over the radishes, ensuring they’re fully submerged. If necessary, use a spoon to press the radishes down into the brine.
- Pickle the Radishes: Seal the jar tightly and place it in the refrigerator. Allow the radishes to pickle for at least 1 hour for quick pickling, or up to 24 hours for a more intense flavor. The longer they sit, the more flavorful they’ll become.
- Serve and Garnish: Once pickled, remove the radishes from the fridge. They can be served chilled as a side dish, on top of salads, or as a topping for sandwiches. Garnish with fresh dill sprigs for a pop of color and added flavor.
Extra Tips:
For an extra twist, feel free to experiment with different types of mustard, such as whole grain or spicy brown mustard.
You can also add other vegetables to the mix, such as sliced cucumbers or carrots, to create a colorful pickled vegetable medley. Store the pickled radishes in the refrigerator for up to 2 weeks, and enjoy the delightful crunch and flavor that this Scandinavian dish brings to your meals!
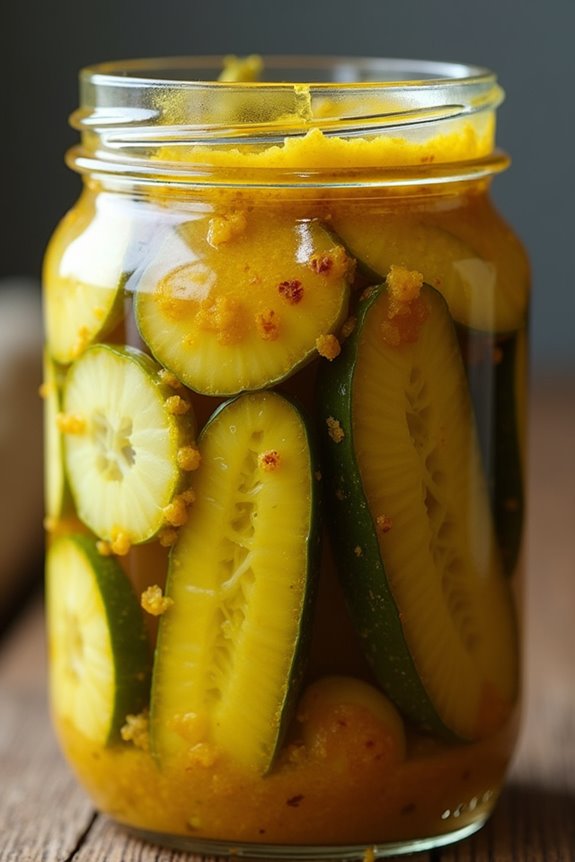
Spicy Pickled Zucchini
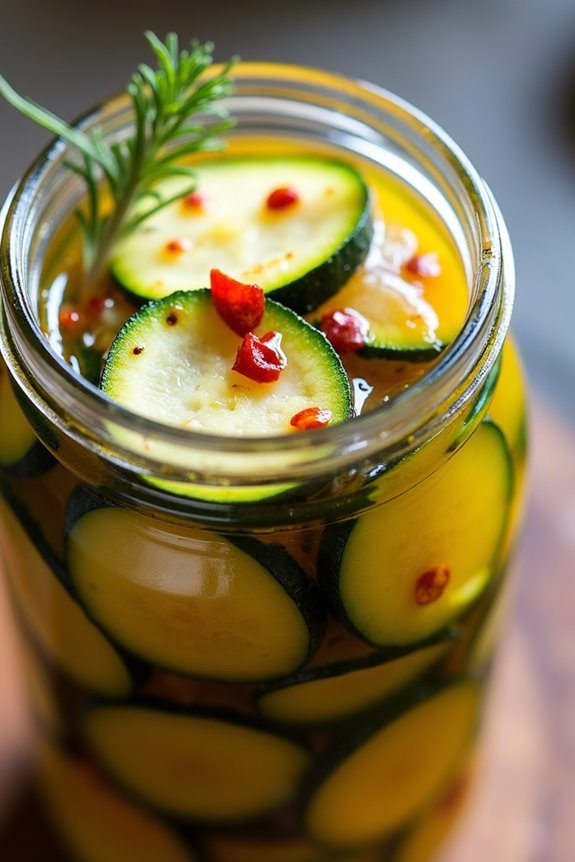
Spicy Pickled Zucchini is a delightful Scandinavian twist on traditional pickling methods. This recipe combines the fresh crunch of zucchini with a zesty, spicy kick, making it a perfect accompaniment to grilled meats, sandwiches, or even as a standalone snack. The vibrant flavors meld together beautifully as the zucchini absorbs the tangy brine, resulting in a tasty treat that can be enjoyed year-round.
This dish isn’t only simple to prepare but also offers a great way to preserve excess zucchini from your garden or local farmer’s market. The pickling process enhances the natural sweetness of the zucchini while adding a layer of heat that tantalizes the taste buds. Whether you’re hosting a summer barbecue or simply looking to spice up your meals, this Spicy Pickled Zucchini recipe is sure to impress.
Ingredients (Serves 4-6):
- 4 medium zucchinis, sliced into thin rounds
- 1 medium onion, thinly sliced
- 4 cloves garlic, minced
- 1 cup apple cider vinegar
- 1 cup water
- 1 tablespoon sugar
- 1 tablespoon salt
- 1 teaspoon red pepper flakes
- 1 teaspoon black peppercorns
- 2 teaspoons mustard seeds
- 1 teaspoon dill seeds (optional)
- Fresh dill sprigs for garnish (optional)
Cooking Instructions:
- Prepare the Vegetables: Wash the zucchinis thoroughly and slice them into thin rounds, about 1/4 inch thick. Place the zucchini slices in a large mixing bowl. Thinly slice the onion and add it to the bowl along with the minced garlic. Toss the vegetables together to mix evenly.
- Make the Pickling Brine: In a medium saucepan, combine the apple cider vinegar, water, sugar, salt, red pepper flakes, black peppercorns, mustard seeds, and dill seeds (if using). Bring the mixture to a gentle boil over medium heat, stirring occasionally until the sugar and salt dissolve completely.
- Pack the Jars: Sterilize your glass jars and lids by boiling them in water for 10 minutes or running them through the dishwasher. Once sterilized, pack the zucchini, onion, and garlic mixture tightly into the jars, leaving about 1/2 inch of headspace at the top.
- Add the Brine: Carefully pour the hot pickling brine over the packed vegetables in the jars, ensuring that they’re fully submerged. Use a clean utensil to remove any air bubbles by gently pressing the vegetables down. Wipe the rims of the jars with a clean cloth to remove any residue before sealing.
- Seal and Cool: Place the sterilized lids onto the jars and secure them tightly. Allow the jars to cool to room temperature before transferring them to the refrigerator. The pickled zucchini will be ready to enjoy after about 24 hours, but the flavors will continue to develop over the next few days.
- Serve: Enjoy your Spicy Pickled Zucchini as a tangy side dish or as a flavorful addition to salads, sandwiches, or charcuterie boards.
Extra Tips:
For an added layer of flavor, consider experimenting with different spices such as coriander seeds or a splash of lemon juice in the brine. If you prefer a milder flavor, you can adjust the amount of red pepper flakes according to your taste.
Keep in mind that the pickles will become spicier over time as they sit in the brine, so be sure to taste them before serving. Store the pickled zucchini in the refrigerator, where they’ll last for up to 2-3 weeks, but they’re best consumed within the first week for ideal crunch and flavor.