

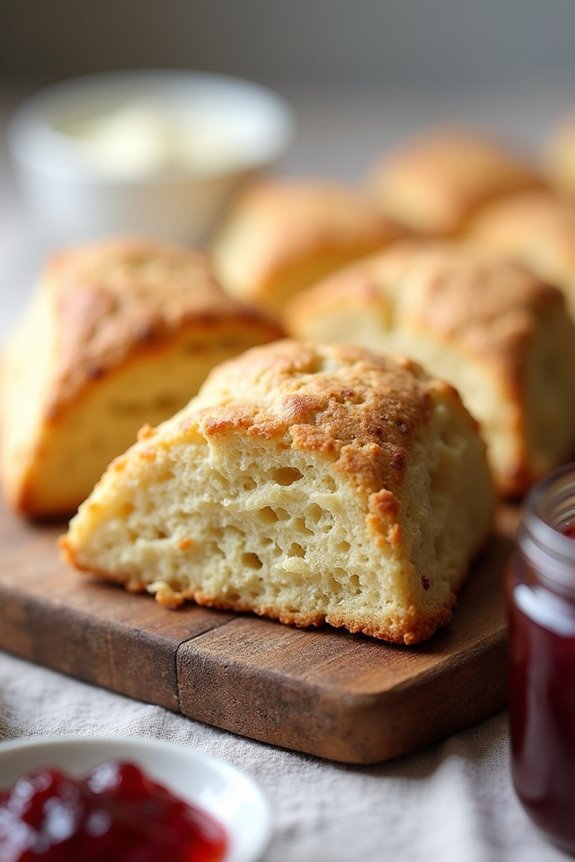
There’s something so comforting about the aroma of freshly baked scones wafting through the kitchen. Whether you’re a fan of the classic plain scone with clotted cream and jam or you’re intrigued by a zesty lemon-blueberry twist, this collection has something for everyone. Each recipe offers a delightful experience that’s sure to please any palate. Ready to find your next favorite scone? Let’s explore these scrumptious options together.
Classic British Plain Scones
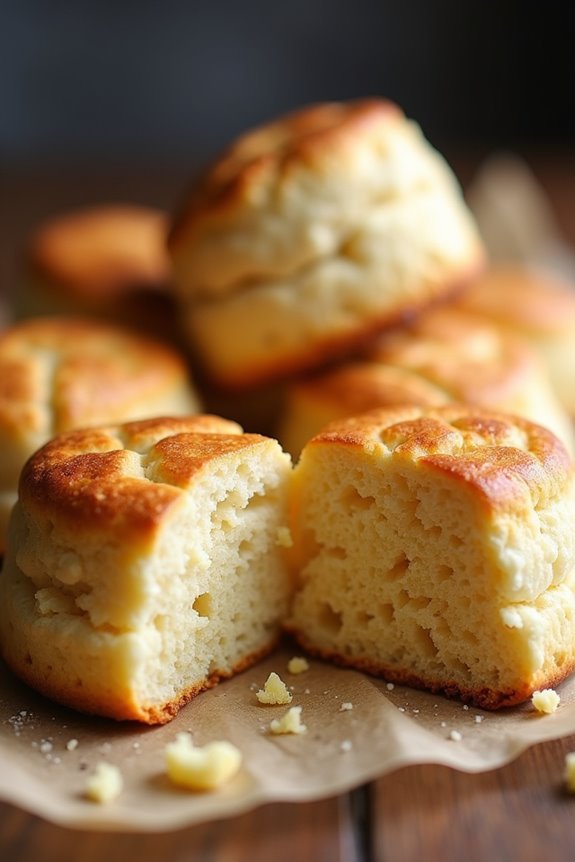
Classic British plain scones are a delightful treat that’s often enjoyed during afternoon tea. These scones are buttery, flaky, and mildly sweet, making them the perfect accompaniment to clotted cream and jam. The simplicity of the ingredients allows the buttery flavor to shine through, making them a staple in British baking traditions.
Whether you’re hosting a tea party or simply indulging in a cozy afternoon snack, these scones are bound to impress.
Making scones is a straightforward process, but the key is to handle the dough gently to guarantee a light and fluffy texture. These scones can be customized with a variety of additions, such as dried fruit or citrus zest, but this classic recipe focuses on the pure, simple flavor of the scone itself.
Serve them warm from the oven for the best experience, and watch as they become a favorite in your household.
Ingredients (Serves 4-6):
- 250g all-purpose flour
- 50g unsalted butter, cold and cubed
- 30g granulated sugar
- 1 tablespoon baking powder
- 1/2 teaspoon salt
- 150ml milk
- 1 large egg (for egg wash)
Cooking Instructions:
- Preheat the Oven: Begin by preheating your oven to 220°C (428°F). This high temperature is essential for achieving a nice rise on your scones, resulting in a fluffy interior and golden exterior.
- Prepare the Dry Ingredients: In a large mixing bowl, sift together the flour, baking powder, sugar, and salt. Sifting aerates the flour and guarantees that the baking powder is evenly distributed throughout the mixture, which contributes to a lighter scone.
- Incorporate the Butter: Add the cold, cubed butter to the dry ingredients. Using your fingertips, rub the butter into the flour mixture until it resembles coarse breadcrumbs. This process creates small pockets of fat that will help the scones rise and become flaky.
- Add the Milk: Make a well in the center of the flour mixture and pour in the milk. Using a fork, gently mix the ingredients together until a soft dough forms. Be careful not to overmix, as this can lead to tough scones.
- Shape the Dough: Turn the dough out onto a lightly floured surface. Gently knead it a few times to bring it together. Pat the dough into a round shape that’s about 2.5cm (1 inch) thick. Using a floured cutter, cut out scones and place them on a baking sheet lined with parchment paper.
- Egg Wash: Beat the egg in a small bowl and brush it lightly over the tops of the scones. This will give them a lovely golden color when baked.
- Bake: Place the baking sheet in the preheated oven and bake for 12-15 minutes, or until the scones are golden brown and have risen nicely. Keep an eye on them to prevent overbaking.
- Cool and Serve: Once baked, remove the scones from the oven and let them cool on a wire rack for a few minutes. Serve warm with clotted cream and your choice of jam.
Extra Tips:
To guarantee your scones are light and fluffy, use cold ingredients and work quickly to minimize the amount of time the dough is handled.
If you want to add a bit of flavor, consider incorporating lemon zest or dried fruits like raisins or currants into the dough before mixing in the milk. Additionally, for a sweeter scone, you can increase the amount of sugar slightly.
Always serve them fresh out of the oven or warm, as they taste best when they’re still slightly warm.
Fruity Strawberry Scones
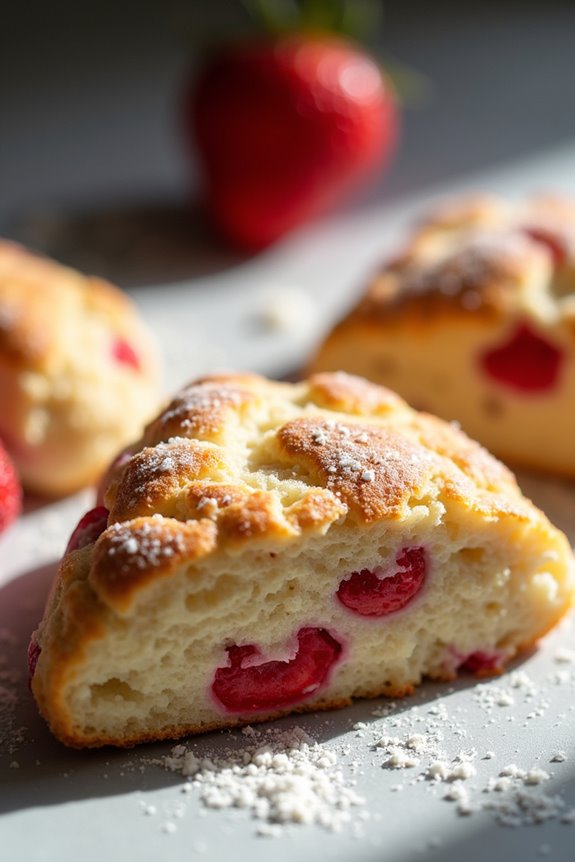
If you’re looking for a delightful treat that combines the freshness of strawberries with the warmth of freshly baked scones, then Fruity Strawberry Scones are the perfect choice.
These scones aren’t only easy to make but also provide a burst of flavor in every bite. Whether enjoyed warm from the oven with a pat of butter or as a sweet addition to your afternoon tea, these fruity delights are sure to impress your family and friends.
The secret to achieving the perfect scone lies in the balance of ingredients and the technique used during preparation. The dough should be mixed just enough to bring it together, guaranteeing that the final product is tender and flaky.
With juicy strawberries folded into the dough, these scones will remind you of sunny days and picnics in the park. Let’s explore the recipe and get ready to bake some delicious Fruity Strawberry Scones for 4-6 people.
Ingredients:
- 2 cups all-purpose flour
- 1/4 cup granulated sugar
- 1 tablespoon baking powder
- 1/2 teaspoon salt
- 1/2 cup unsalted butter, cold and cubed
- 1/2 cup heavy cream
- 1 large egg
- 1 teaspoon vanilla extract
- 1 cup fresh strawberries, hulled and chopped
- Additional flour for dusting
- Extra cream for brushing
- Extra sugar for sprinkling (optional)
Cooking Instructions:
- Preheat the Oven: Begin by preheating your oven to 400°F (200°C). This guarantees that your scones will bake evenly and achieve a lovely golden color.
- Mix Dry Ingredients: In a large mixing bowl, combine the all-purpose flour, granulated sugar, baking powder, and salt. Whisk them together until they’re evenly mixed, making sure no lumps remain. This step is vital for a uniform texture in your scones.
- Cut in the Butter: Add the cold, cubed unsalted butter to the dry mixture. Using a pastry cutter or your fingertips, work the butter into the flour until the mixture resembles coarse crumbs. The cold butter helps create that desirable flaky texture, so be careful not to overwork it.
- Combine Wet Ingredients: In a separate bowl, whisk together the heavy cream, egg, and vanilla extract until well combined. This mixture will add moisture and flavor to your scones.
- Combine Wet and Dry Ingredients: Pour the wet mixture into the dry ingredients and gently stir until just combined. Be cautious not to overmix; a few lumps are okay.
- Fold in Strawberries: Carefully fold in the chopped strawberries, making sure they’re evenly distributed throughout the dough. This adds a fresh, fruity flavor to your scones.
- Shape the Dough: Transfer the dough onto a floured surface. With floured hands, gently shape the dough into a circle about 1-inch thick. Use a sharp knife or bench scraper to cut the circle into wedges.
- Prepare for Baking: Place the scone wedges on a baking sheet lined with parchment paper. Brush the tops with extra cream and, if desired, sprinkle with a little sugar for added sweetness and crunch.
- Bake: Place the baking sheet in the preheated oven and bake for 15-20 minutes, or until the scones are golden brown on top. The aroma will be irresistible as they bake.
- Cool and Serve: Once baked, remove the scones from the oven and allow them to cool on the baking sheet for a few minutes before transferring them to a wire rack. Serve warm or at room temperature.
Extra Tips:
For the best results, make sure your butter is very cold before cutting it into the flour, as this helps create a flaky texture.
If fresh strawberries aren’t available, you can also use frozen strawberries; just be sure to thaw and drain them before adding to the dough.
To elevate the flavor, consider adding a pinch of lemon zest to the dough, which will complement the strawberries beautifully. Enjoy your baking!
Zesty Lemon and Blueberry Scones

If you’re looking to brighten up your morning routine or impress guests at brunch, these Zesty Lemon and Blueberry Scones are the perfect solution. Bursting with the invigorating flavor of lemons and the sweetness of fresh blueberries, these scones are both delightful and easy to make. The combination of zesty citrus and juicy berries creates a light and airy treat that pairs beautifully with a cup of tea or coffee.
These scones are incredibly versatile; you can enjoy them warm from the oven or store them for later. The recipe yields enough for 4-6 people, making it suitable for a small gathering or a family breakfast. With a few simple ingredients and straightforward instructions, you’ll have a batch of delicious scones in no time.
Ingredients
- 2 cups all-purpose flour
- 1/4 cup granulated sugar
- 1 tablespoon baking powder
- 1/2 teaspoon salt
- 1/2 cup unsalted butter, cold and cubed
- 1/2 cup blueberries (fresh or frozen)
- Zest of 1 lemon
- 1/2 cup heavy cream
- 1 large egg
- 1 teaspoon vanilla extract
- 1 tablespoon lemon juice
- Extra sugar for sprinkling on top
Cooking Instructions
- Preheat the Oven: Begin by preheating your oven to 400°F (200°C). This guarantees that the scones will bake evenly and develop a lovely golden color.
- Mix Dry Ingredients: In a large mixing bowl, combine the all-purpose flour, granulated sugar, baking powder, and salt. Whisk these ingredients together until well mixed, ensuring there are no lumps.
- Cut in Butter: Add the cold, cubed butter to the dry mixture. Using a pastry cutter or your fingers, work the butter into the flour until the mixture resembles coarse crumbs. This step is essential as it creates the flaky texture of the scones.
- Add Blueberries and Lemon Zest: Gently fold in the blueberries and lemon zest, being careful not to crush the berries. This will infuse the scones with flavor and provide bursts of sweetness.
- Combine Wet Ingredients: In a separate bowl, whisk together the heavy cream, egg, vanilla extract, and lemon juice. Make sure the mixture is well combined.
- Combine Wet and Dry Mixtures: Pour the wet mixture into the dry ingredients and stir until just combined. Avoid overmixing, as this can lead to tough scones. The dough should be soft but not sticky.
- Shape the Dough: Turn the dough out onto a lightly floured surface and gently press it into a circle about 1 inch thick. Use a sharp knife or a pastry cutter to slice the dough into 8 wedges.
- Prepare for Baking: Place the scones on a baking sheet lined with parchment paper. Brush the tops with a little extra heavy cream and sprinkle with sugar for a nice crust.
- Bake: Bake in the preheated oven for 15-20 minutes, or until the scones are golden brown. Keep an eye on them to avoid overbaking.
- Cool and Serve: Once baked, remove the scones from the oven and let them cool on the baking sheet for a few minutes before transferring them to a wire rack. Serve warm or at room temperature.
Extra Tips
For the best results, use fresh blueberries if possible, as they provide more flavor and moisture. If you’re using frozen blueberries, don’t thaw them before adding to the dough, as this can cause the batter to turn blue.
Additionally, for an extra zing, feel free to add a glaze made from lemon juice and powdered sugar on top of the cooled scones. Enjoy your homemade Zesty Lemon and Blueberry Scones!
Decadent Chocolate Chip Scones
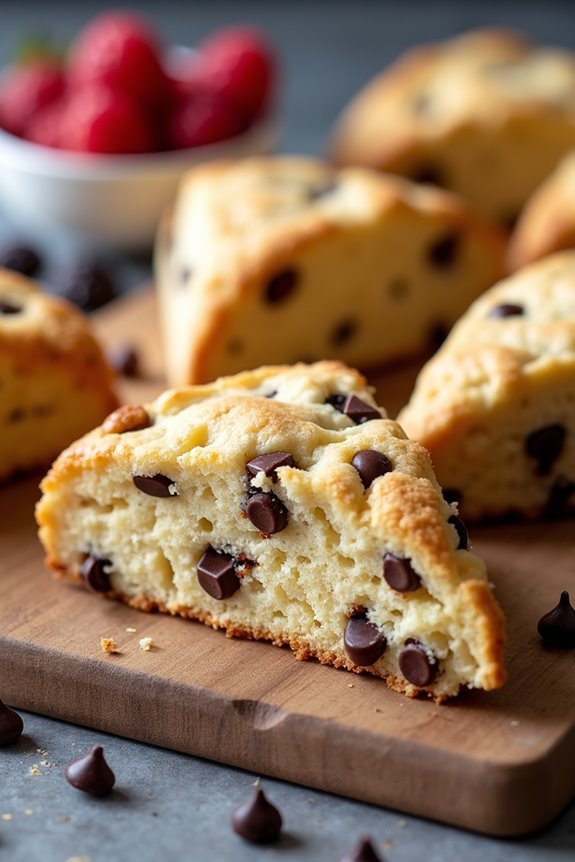
Indulge in the ultimate treat with these Decadent Chocolate Chip Scones that are sure to impress your family and friends. Perfect for breakfast, brunch, or a delightful afternoon tea, these scones are rich, buttery, and filled with gooey chocolate chips that melt in your mouth.
They’re quick to prepare and can be made in under 30 minutes, making them an excellent option for both special occasions and casual gatherings. The beauty of these scones lies in their versatility. You can enjoy them as-is, or elevate them even further by serving them with a dollop of whipped cream or a side of fresh berries.
Whether you’re a seasoned baker or a novice in the kitchen, these Decadent Chocolate Chip Scones are foolproof and will leave everyone asking for seconds. So, let’s get started on making this delicious treat!
Ingredients (Serves 4-6)
- 2 cups all-purpose flour
- 1/4 cup granulated sugar
- 1 tablespoon baking powder
- 1/2 teaspoon salt
- 1/2 cup unsalted butter, cold and cubed
- 1/2 cup heavy cream
- 1 large egg
- 1 teaspoon vanilla extract
- 1 cup semi-sweet chocolate chips
Cooking Instructions
- Preheat the Oven: Begin by preheating your oven to 400°F (200°C). This guarantees that the scones will bake evenly and develop a beautiful golden crust.
- Mix Dry Ingredients: In a large mixing bowl, combine the all-purpose flour, granulated sugar, baking powder, and salt. Whisk these dry ingredients together until they’re evenly blended.
- Cut in the Butter: Add the cold, cubed unsalted butter to the bowl. Use a pastry cutter or your fingers to rub the butter into the flour mixture until it resembles coarse crumbs. This step is essential as it creates the flaky texture of the scones.
- Combine Wet Ingredients: In a separate bowl, whisk together the heavy cream, egg, and vanilla extract. Make sure the egg is fully incorporated into the mixture.
- Combine Wet and Dry Ingredients: Pour the wet mixture into the dry ingredients, stirring gently until just combined. Be careful not to overmix; the dough should be slightly sticky.
- Add Chocolate Chips: Gently fold in the semi-sweet chocolate chips until they’re evenly distributed throughout the dough.
- Shape the Scones: Turn the dough out onto a lightly floured surface. Pat it into a circle about 1 inch thick. Use a sharp knife or a pastry cutter to cut the dough into 8 wedges, or use a round cutter for traditional scone shapes.
- Bake the Scones: Place the scones on a baking sheet lined with parchment paper, making sure to leave some space between each one. Bake in the preheated oven for 15-20 minutes, or until they’re golden brown on top.
- Cool and Serve: Once baked, remove the scones from the oven and let them cool on a wire rack for a few minutes. Serve warm or at room temperature, with optional toppings.
Extra Tips
To enhance the flavor of your Decadent Chocolate Chip Scones, consider adding a pinch of espresso powder or some orange zest to the dry ingredients. This will elevate the chocolate flavor and add a delightful twist.
Additionally, for a shiny finish, you can brush the tops of the scones with a little heavy cream before baking. Remember, the key to perfect scones isn’t to overwork the dough; treat it gently for a light and fluffy texture!
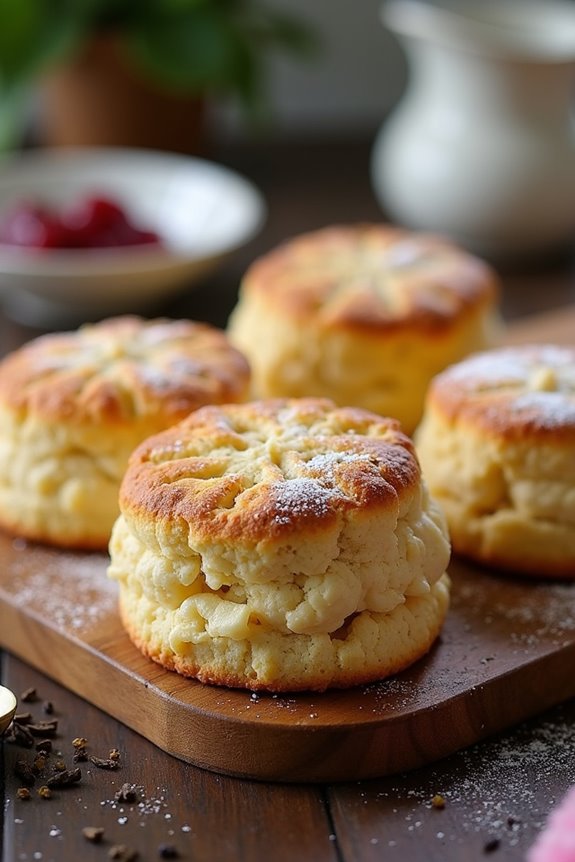
Creamy Vanilla Bean Scones
Scones are a delightful treat that can easily elevate your breakfast or afternoon tea experience. These Creamy Vanilla Bean Scones are particularly special, boasting a rich, buttery flavor complemented by the aromatic essence of vanilla bean. The addition of cream makes them incredibly tender and moist, guaranteeing that each bite melts in your mouth. Perfectly paired with clotted cream or jam, these scones are sure to impress your family and friends.
Making scones is a straightforward process that requires minimal ingredients, making them a great choice for both novice and experienced bakers alike. This recipe yields 4-6 scones, which can be enjoyed fresh out of the oven or stored for later. Follow these simple steps to achieve the perfect batch of Creamy Vanilla Bean Scones, and indulge in their luxurious taste.
Ingredients (serving size: 4-6 people)
- 2 cups all-purpose flour
- 1/3 cup granulated sugar
- 1 tablespoon baking powder
- 1/2 teaspoon salt
- 1/2 cup unsalted butter, chilled and cubed
- 1 cup heavy cream
- 1 vanilla bean, split and seeds scraped (or 1 teaspoon vanilla extract)
- 1 egg (for egg wash, optional)
Cooking Instructions
- Preheat the Oven: Start by preheating your oven to 400°F (200°C). This guarantees that your scones will bake evenly and develop a lovely golden-brown crust.
- Combine Dry Ingredients: In a large mixing bowl, whisk together the all-purpose flour, granulated sugar, baking powder, and salt. This helps to evenly distribute the leavening agent and sweetener throughout the flour.
- Cut in the Butter: Add the chilled and cubed butter to the dry mixture. Using a pastry cutter or your fingers, work the butter into the flour until the mixture resembles coarse crumbs. Be careful not to overwork the dough; the cold butter is essential for flaky scones.
- Mix Wet Ingredients: In a separate bowl, combine the heavy cream and the scraped seeds of the vanilla bean (or vanilla extract). Stir until well blended.
- Combine Wet and Dry Mixtures: Gradually pour the cream mixture into the dry ingredients. Use a spatula or wooden spoon to gently fold the mixture together until just combined. Be careful not to overmix, as this can lead to tough scones.
- Shape the Dough: Turn the dough out onto a lightly floured surface. Gently pat the dough into a circle about 1 inch thick. Use a sharp knife to cut the dough into 6 wedges, or use a round cutter for traditional scone shapes.
- Prepare for Baking: Place the scones on a parchment-lined baking sheet. If desired, brush the tops with a lightly beaten egg for a beautiful golden finish.
- Bake: Bake in the preheated oven for 15-20 minutes or until the scones are golden brown and a toothpick inserted into the center comes out clean.
- Cool and Serve: Once baked, remove from the oven and allow the scones to cool slightly on a wire rack. Serve warm with clotted cream, jam, or your favorite spread.
Extra Tips
To enhance the flavor of your Creamy Vanilla Bean Scones, consider adding mix-ins like chocolate chips, dried fruit, or nuts to the dough. Additionally, make sure that your butter is very cold to achieve the best texture in your scones.
If you have leftover scones, store them in an airtight container at room temperature for a couple of days or freeze them for longer storage. Enjoy your baking adventure!
Savory Cheese and Chive Scones

Savory Cheese and Chive Scones are a delightful twist on the classic scone, perfect for breakfast, brunch, or a tea-time snack. These flaky, buttery scones are packed with sharp cheese and fresh chives, making them a flavorful addition to any meal.
They’re simple to prepare and can be made in under 30 minutes, which makes them a convenient choice for gatherings or a quick snack at home. The combination of tangy cheese and aromatic chives creates a mouthwatering experience that pairs well with soups, salads, or can be enjoyed on their own.
Whether you’re a novice baker or a seasoned pro, these scones are sure to impress your family and friends. Serve them warm with a pat of butter for an irresistible treat that’s both savory and satisfying.
Ingredients (Serves 4-6 people):
- 2 cups all-purpose flour
- 1 tablespoon baking powder
- 1/2 teaspoon salt
- 1/4 cup unsalted butter, cold and cubed
- 1 cup shredded sharp cheddar cheese
- 1/4 cup chopped fresh chives
- 3/4 cup milk
- 1 large egg (for egg wash)
Cooking Instructions:
- Preheat the Oven: Begin by preheating your oven to 400°F (200°C). This guarantees that the scones will bake evenly and rise properly when placed in the oven.
- Prepare the Dry Ingredients: In a large mixing bowl, combine the flour, baking powder, and salt. Whisk the ingredients together until they’re evenly mixed. This step is essential as it helps to distribute the leavening agent throughout the flour.
- Cut in the Butter: Add the cold, cubed butter to the bowl with the dry ingredients. Using a pastry cutter, fork, or your fingertips, work the butter into the flour mixture until it resembles coarse crumbs. The cold butter is vital for achieving a flaky texture in the scones.
- Incorporate Cheese and Chives: Fold in the shredded cheddar cheese and chopped chives to the flour and butter mixture. Confirm that they’re evenly distributed throughout the mixture for balanced flavor in every bite.
- Add Milk: Make a well in the center of the mixture and pour in the milk. Stir gently with a wooden spoon or spatula until the dough comes together. Be careful not to overmix; it’s okay if the dough is a little sticky.
- Shape the Scones: Turn the dough out onto a lightly floured surface. Gently knead it a few times until it holds together. Pat the dough into a circle about 1-inch thick. Using a sharp knife or a pastry cutter, cut the dough into wedges or use a round cutter to create individual scones.
- Prepare for Baking: Place the scones on a parchment-lined baking sheet. Beat the egg and brush it over the tops of the scones to give them a beautiful golden color when baked.
- Bake: Bake in the preheated oven for 15-20 minutes, or until the scones are puffed up and golden brown. Keep an eye on them towards the end to confirm they don’t over-bake.
- Cool and Serve: Once baked, remove the scones from the oven and let them cool slightly on a wire rack. Serve them warm, either plain or with a bit of butter.
Extra Tips:
For the best results, make sure your ingredients, especially the butter, are cold. This will help achieve a flakier scone.
You can also experiment with different types of cheese or herbs to customize the flavor to your liking. If you prefer a richer flavor, try adding a pinch of garlic powder or a sprinkle of cayenne pepper to the dough.
These scones can be stored in an airtight container for a couple of days, but they’re best enjoyed fresh out of the oven!
Spiced Cinnamon Raisin Scones
Scones are a delightful treat that can be enjoyed at any time of day, whether for breakfast, brunch, or an afternoon snack. The Spiced Cinnamon Raisin Scones combine the warm flavors of cinnamon and nutmeg with the sweetness of raisins, creating a comforting and delicious pastry that’s sure to please.
These scones are easy to make and require simple ingredients that you may already have in your pantry. Whether you enjoy them plain or with a dollop of clotted cream or butter, they’re a fantastic way to elevate your tea time or coffee break.
To achieve the perfect texture, it’s important not to overwork the dough. The key to light and flaky scones lies in the careful blending of the ingredients. When you cut in the butter, aim for pea-sized pieces, which will help create those lovely flaky layers.
Once baked, these scones should have a golden-brown exterior and a soft, tender crumb on the inside. Serve them warm, and watch them disappear quickly!
Ingredients (serves 4-6):
- 2 cups all-purpose flour
- 1/3 cup granulated sugar
- 1 tablespoon baking powder
- 1 teaspoon ground cinnamon
- 1/2 teaspoon ground nutmeg
- 1/4 teaspoon salt
- 1/2 cup unsalted butter, cold and cubed
- 3/4 cup raisins
- 1/2 cup milk
- 1 large egg
- 1 teaspoon vanilla extract
Cooking Instructions:
- Preheat the Oven: Begin by preheating your oven to 400°F (200°C). This guarantees that your scones will bake evenly and achieve that lovely golden-brown color.
- Mix Dry Ingredients: In a large mixing bowl, combine the all-purpose flour, granulated sugar, baking powder, ground cinnamon, ground nutmeg, and salt. Whisk the ingredients together until well combined, making sure there are no lumps.
- Cut in the Butter: Add the cold, cubed unsalted butter into the flour mixture. Using a pastry cutter or your fingers, work the butter into the flour until the mixture resembles coarse crumbs with some pea-sized pieces of butter remaining. This step is essential for achieving a flaky texture.
- Add Raisins: Gently fold in the raisins into the butter-flour mixture, making certain they’re evenly distributed throughout.
- Combine Wet Ingredients: In a separate bowl, whisk together the milk, egg, and vanilla extract until well combined.
- Form the Dough: Pour the wet mixture into the dry ingredients and stir gently with a wooden spoon or spatula until just combined. Be careful not to overmix; the dough should be slightly sticky but hold together.
- Shape the Scones: Turn the dough out onto a lightly floured surface. Using your hands, gently pat the dough into a circle about 1 inch thick. Cut the dough into wedges or use a round cutter to create individual scones.
- Bake: Place the scones on a parchment-lined baking sheet, leaving some space between each scone. Bake in the preheated oven for 15-20 minutes, or until they’re golden brown and a toothpick inserted in the center comes out clean.
- Cool and Serve: Once baked, remove the scones from the oven and let them cool on a wire rack for a few minutes. Serve warm or at room temperature, optionally with clotted cream or butter.
Extra Tips:
For an added touch, consider brushing the tops of the scones with a little milk or an egg wash before baking to achieve a shiny finish.
Additionally, you can experiment with different add-ins such as chopped nuts or chocolate chips for a personalized twist. Store any leftovers in an airtight container to keep them fresh, and reheat them slightly in the oven or microwave before serving to enjoy their warmth and flavor again.
Nutty Almond and Honey Scones
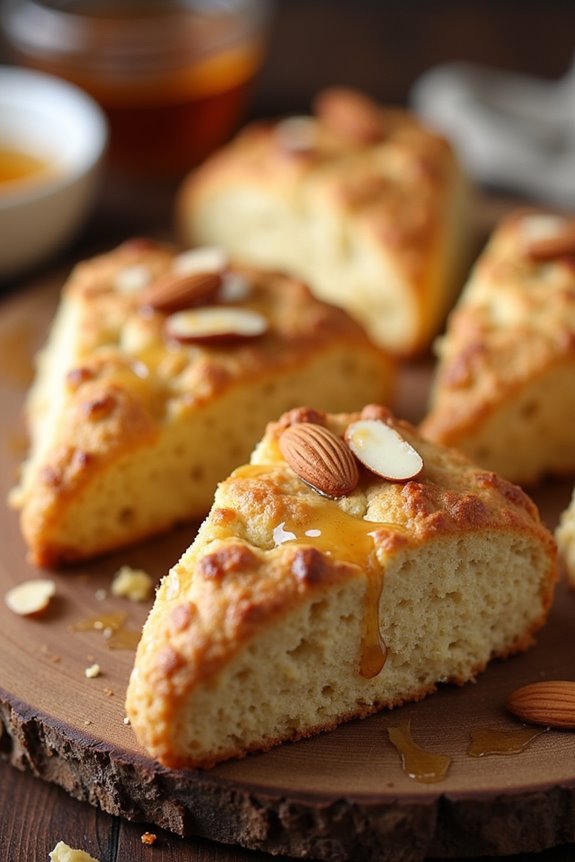
Nutty Almond and Honey Scones are a delightful twist on the classic scone, combining the rich flavors of toasted almonds with the natural sweetness of honey. The result is a tender, flaky pastry that makes for a perfect breakfast treat or a comforting afternoon snack. Ideal for serving with tea or coffee, these scones aren’t only easy to prepare but also offer a wonderful aroma that fills your kitchen, making it a warm and inviting space.
These scones are versatile and can be enjoyed plain or with a drizzle of additional honey or a spread of your choice. The nutty flavor of the almonds pairs beautifully with the sweetness of honey, creating a harmonious blend that will leave your taste buds wanting more. Whether you’re hosting a brunch or simply treating yourself, Nutty Almond and Honey Scones are sure to impress.
Ingredients (Serves 4-6)
- 2 cups all-purpose flour
- 1/4 cup granulated sugar
- 1 tablespoon baking powder
- 1/2 teaspoon salt
- 1/2 cup cold unsalted butter, cubed
- 1/2 cup sliced almonds, toasted
- 1/2 cup honey
- 1/2 cup buttermilk
- 1 large egg, lightly beaten (for egg wash)
Cooking Instructions
- Preheat the Oven: Begin by preheating your oven to 400°F (200°C). This guarantees that your scones bake evenly and achieve a golden-brown color.
- Prepare the Baking Sheet: Line a baking sheet with parchment paper. This prevents the scones from sticking and makes for easy cleanup after baking.
- Mix Dry Ingredients: In a large mixing bowl, combine the all-purpose flour, granulated sugar, baking powder, and salt. Whisk the ingredients together until they’re well incorporated, making sure there are no lumps.
- Cut in the Butter: Add the cubed cold butter to the flour mixture. Using a pastry cutter or your fingers, cut the butter into the flour until the mixture resembles coarse crumbs. This step is essential for achieving a flaky texture in your scones.
- Add Nuts and Honey: Gently fold in the toasted sliced almonds. Then, create a well in the center of the mixture and add the honey and buttermilk. Mix everything together until just combined. Be careful not to overmix, as this can lead to tough scones.
- Shape the Dough: Turn the dough out onto a lightly floured surface and knead it gently about 2-3 times until it comes together. Pat the dough into a circle about 1-inch thick.
- Cut the Scones: Use a sharp knife or a pizza cutter to slice the dough into 8 wedges. Alternatively, you can use a round cutter for a traditional scone shape. Place the scones on the prepared baking sheet, leaving space between each one.
- Egg Wash: Brush the tops of the scones with the lightly beaten egg. This will give them a beautiful golden finish as they bake.
- Bake: Place the baking sheet in the preheated oven and bake for 15-20 minutes, or until the scones are golden brown and a toothpick inserted into the center comes out clean.
- Cool and Serve: Once baked, remove the scones from the oven and let them cool on the baking sheet for a few minutes before transferring them to a wire rack. Serve warm, drizzled with additional honey if desired.
Extra Tips
For the best flavor, make sure to toast the almonds lightly in a dry skillet before adding them to the dough; this enhances their nuttiness. Additionally, if you don’t have buttermilk on hand, you can make a substitute by mixing milk with a tablespoon of lemon juice or vinegar and letting it sit for about 5-10 minutes.
Enjoy your Nutty Almond and Honey Scones fresh from the oven, or store any leftovers in an airtight container for up to 2 days. Reheat in the oven for a few minutes to revive their freshness.
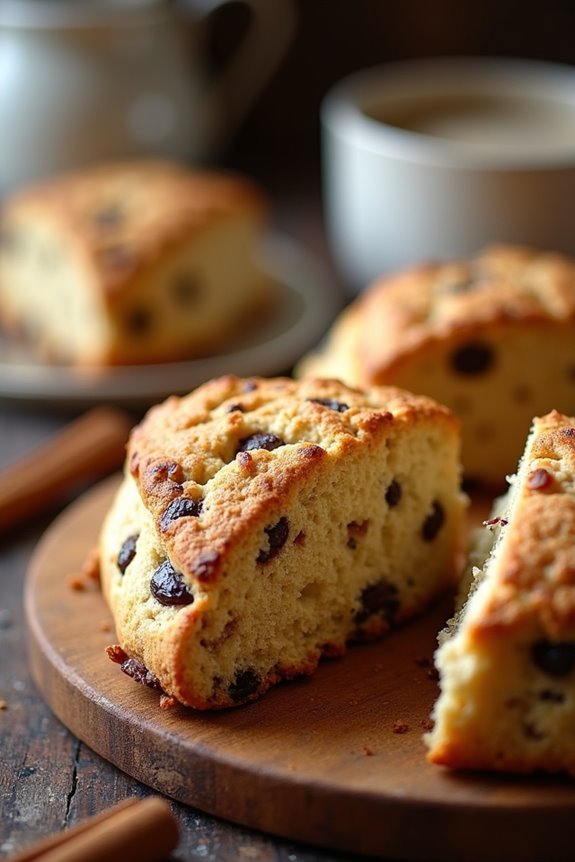
Indulgent Double Chocolate Scones

Indulgent Double Chocolate Scones are a delightful treat that perfectly blend the rich flavors of chocolate with the flaky texture of traditional scones. This decadent recipe is ideal for a brunch gathering or a cozy afternoon tea, where the aroma of chocolate fills the air and invites everyone to indulge in a sweet moment.
With a simple preparation process and a few quality ingredients, you can create a batch of scones that will impress your family and friends.
These scones aren’t only delicious but also easy to customize. You can add chocolate chips for an extra burst of chocolate flavor or even incorporate nuts for added texture. Whether enjoyed fresh out of the oven or warmed up later, these Indulgent Double Chocolate Scones are bound to become a favorite in your recipe repertoire.
Ingredients (serving size: 4-6 people):
- 2 cups all-purpose flour
- 1/4 cup unsweetened cocoa powder
- 1/4 cup granulated sugar
- 1 tablespoon baking powder
- 1/2 teaspoon salt
- 1/2 cup cold unsalted butter, cubed
- 1/2 cup semi-sweet chocolate chips
- 1/2 cup buttermilk (or milk with a splash of vinegar)
- 1 large egg
- 1 teaspoon vanilla extract
- Extra chocolate chips for topping (optional)
Cooking Instructions:
- Preheat the Oven: Begin by preheating your oven to 400°F (200°C). This step guarantees that the scones bake evenly and develop a nice golden crust.
- Mix Dry Ingredients: In a large mixing bowl, combine the all-purpose flour, cocoa powder, granulated sugar, baking powder, and salt. Whisk these dry ingredients together until they’re well mixed. This creates a uniform base flavor for your scones.
- Incorporate Butter: Add the cold, cubed butter to the dry mixture. Using a pastry cutter or your fingertips, cut the butter into the flour mixture until it resembles coarse crumbs. This technique helps create a flaky texture in the scones.
- Add Chocolate Chips: Gently fold in the semi-sweet chocolate chips into the flour and butter mixture. This will guarantee that the chocolate is evenly distributed throughout the scones for a delightful chocolatey bite.
- Combine Wet Ingredients: In a separate bowl, whisk together the buttermilk, egg, and vanilla extract until well combined. This mixture will provide moisture and richness to the scone dough.
- Form the Dough: Pour the wet ingredients into the dry ingredients and stir gently with a spatula until just combined. Be careful not to overmix; it’s okay if the dough is slightly crumbly and shaggy.
- Shape the Scones: Turn the dough out onto a lightly floured surface. With your hands, gently pat the dough into a circle about 1-inch thick. Use a sharp knife or a pizza cutter to cut the dough into wedges (like a pizza) or use a round cutter to make traditional scone shapes.
- Prepare for Baking: Place the scones on a baking sheet lined with parchment paper, ensuring they’re spaced apart. If desired, sprinkle extra chocolate chips on top for added decoration and flavor.
- Bake: Bake the scones in the preheated oven for about 15-20 minutes, or until they’re firm to the touch and have risen slightly. Keep an eye on them to avoid over-baking.
- Cool and Serve: Once baked, remove the scones from the oven and let them cool on a wire rack for a few minutes before serving. They’re best enjoyed warm and can be paired with butter, cream, or a dollop of jam.
Extra Tips:
When preparing Indulgent Double Chocolate Scones, confirm your butter is very cold to achieve the best flaky texture. You can even freeze the butter for about 10 minutes before cutting it into the flour mixture.
Additionally, for a touch of sophistication, consider drizzling melted chocolate over the cooled scones before serving, or dusting them with powdered sugar for an elegant finish. Enjoy these scones fresh, and feel free to experiment with different types of chocolate or add-ins to create your perfect flavor combination!
Refreshing Earl Grey Tea Scones
Scones are a delightful treat that can be enjoyed at any time of the day, but they take on a special charm when infused with the aromatic flavors of Earl Grey tea. These Invigorating Earl Grey Tea Scones are light, fluffy, and perfect for serving alongside a cup of tea or coffee. The subtle notes of bergamot, combined with the richness of cream and the sweetness of sugar, make these scones a delightful addition to any brunch or afternoon tea gathering.
Making these scones isn’t only simple but also allows for creativity in the kitchen. Whether you enjoy them plain or with a dollop of clotted cream and jam, these scones are sure to impress family and friends. With just a few key ingredients and straightforward steps, you can whip up a batch in no time.
Ingredients (Serves 4-6):
- 2 cups all-purpose flour
- 2 tablespoons granulated sugar
- 1 tablespoon baking powder
- 1/2 teaspoon salt
- 1/2 cup unsalted butter, cold and cubed
- 1 cup heavy cream
- 2 tablespoons loose Earl Grey tea leaves (or 2 tea bags)
- 1 large egg (for egg wash)
- Optional: additional sugar for sprinkling on top
Cooking Instructions:
- Preheat the Oven: Begin by preheating your oven to 400°F (200°C). This guarantees that your scones will bake evenly and achieve a nice golden color.
- Prepare the Dry Ingredients: In a large mixing bowl, whisk together the all-purpose flour, granulated sugar, baking powder, and salt. This combination of dry ingredients will form the base of your scones, providing structure and sweetness.
- Cut in the Butter: Add the cold, cubed unsalted butter to the bowl with the dry ingredients. Use a pastry cutter or your fingertips to incorporate the butter until the mixture resembles coarse crumbs. This step is essential as it creates a flaky texture in the scones.
- Infuse the Cream with Tea: In a small saucepan, gently heat the heavy cream until it’s warm (but not boiling). Add the loose Earl Grey tea leaves (or tea bags) to the cream and let it steep for about 5-7 minutes. This will infuse the cream with the fragrant flavors of the tea.
- Combine Wet and Dry Ingredients: Remove the tea leaves or tea bags from the cream and slowly pour the infused cream into the flour mixture. Stir gently with a spatula or wooden spoon until just combined. Be careful not to overmix, as this can lead to tough scones.
- Shape the Scones: Turn the dough out onto a lightly floured surface and gently knead it a few times until it comes together. Pat the dough into a circle about 1-inch thick. Using a sharp knife or a pizza cutter, cut the dough into wedges or use a round cutter for traditional scone shapes.
- Prepare for Baking: Place the scone wedges on a baking sheet lined with parchment paper. In a small bowl, whisk the egg and brush the mixture over the tops of the scones. If desired, sprinkle a little extra sugar on top for added sweetness and crunch.
- Bake the Scones: Bake the scones in the preheated oven for 15-20 minutes, or until they’re golden brown and a toothpick inserted in the center comes out clean. Keep an eye on them towards the end of baking to avoid over-browning.
- Cool and Serve: Once baked, remove the scones from the oven and allow them to cool slightly on a wire rack. Serve warm or at room temperature with your favorite accompaniments.
Extra Tips:
For the best results, use cold ingredients, especially the butter and cream, as this helps create a flaky texture in the scones. If you want to experiment with flavors, you can add citrus zest, chocolate chips, or dried fruits to the dough.
These scones are best enjoyed fresh but can be stored in an airtight container for a couple of days. Reheat them in the oven for a few minutes to restore their warmth and texture before serving.
Seasonal Pumpkin Spice Scones
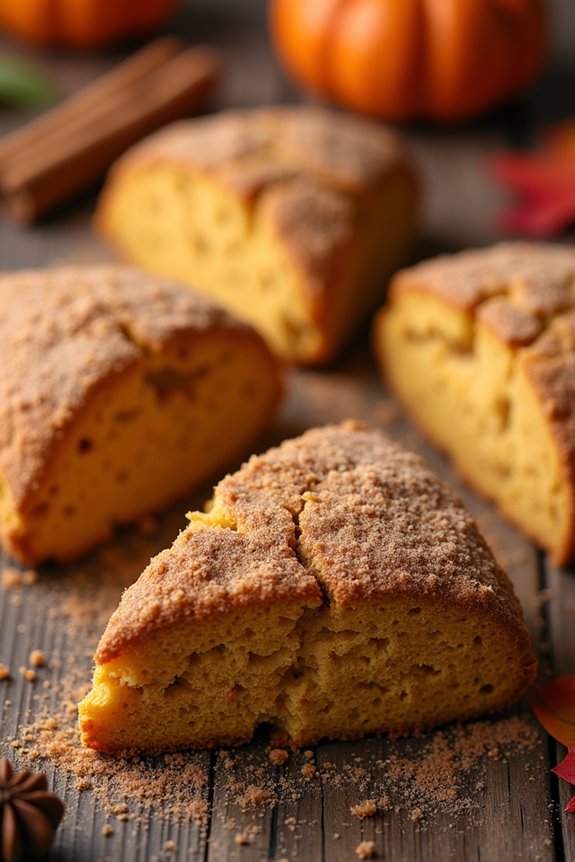
As the leaves begin to change and the air turns crisp, there’s nothing quite like savoring a warm scone fresh from the oven.
Seasonal Pumpkin Spice Scones are the perfect treat to embrace the flavors of fall, combining the richness of pumpkin with the warm spices of cinnamon, nutmeg, and ginger.
These scones aren’t only delightful with a cup of tea or coffee but also make for a wonderful breakfast or an afternoon snack. Whether you’re hosting a cozy gathering or simply enjoying a moment of solitude, these scones will undoubtedly elevate your mood.
Making these scones is a breeze, and the aroma of pumpkin spice wafting through your kitchen will have everyone excitedly awaiting a taste.
With a tender, flaky texture and a hint of sweetness, they’re sure to be a crowd-pleaser. Follow this recipe, and you’ll have a delicious batch of Seasonal Pumpkin Spice Scones ready to enjoy in no time.
Ingredients (Serves 4-6):
- 2 cups all-purpose flour
- 1/2 cup granulated sugar
- 1 tablespoon baking powder
- 1 teaspoon ground cinnamon
- 1/2 teaspoon ground nutmeg
- 1/2 teaspoon ground ginger
- 1/2 teaspoon salt
- 1/2 cup unsalted butter, cold and cubed
- 3/4 cup canned pumpkin puree
- 1/4 cup heavy cream
- 1 teaspoon vanilla extract
- 1 egg, beaten (for egg wash)
- Optional: 1/2 cup chopped nuts or chocolate chips
Cooking Instructions:
1. Preheat the oven: Start by preheating your oven to 400°F (200°C). This guarantees that the scones bake evenly and develop a lovely golden color.
2. Mix the dry ingredients****: In a large mixing bowl, combine the all-purpose flour, granulated sugar, baking powder, ground cinnamon, ground nutmeg, ground ginger, and salt.
Whisk the ingredients together until they’re well-combined.
3. Cut in the butter: Add the cold, cubed unsalted butter to the dry ingredients.
Using a pastry cutter or your fingertips, work the butter into the flour mixture until it resembles coarse crumbs. This step is essential for achieving a flaky texture in your scones.
4. Combine wet ingredients: In a separate bowl, mix together the canned pumpkin puree, heavy cream, and vanilla extract until smooth.
5. Incorporate the wet into dry: Pour the pumpkin mixture into the dry ingredients.
Gently fold the mixture together using a spatula or wooden spoon until just combined. Be careful not to overmix; it’s okay if there are a few lumps.
6. Shape the dough: Transfer the dough onto a lightly floured surface.
Pat it into a circle about 1-inch thick. If you’re adding nuts or chocolate chips, sprinkle them on top and gently fold the dough to incorporate them.
7. Cut the scones: Using a sharp knife or a bench scraper, cut the dough into wedges (like a pizza).
Alternatively, you can use a biscuit cutter for round scones. Place the scones on a parchment-lined baking sheet, leaving some space between each.
8. Egg wash and bake: Brush the tops of the scones with the beaten egg for a shiny finish.
Bake in the preheated oven for 15-20 minutes, or until they’re golden brown and a toothpick inserted in the center comes out clean.
9. Cool and serve: Once baked, remove the scones from the oven and let them cool on a wire rack for a few minutes before serving.
Enjoy them warm, plain, or with a spread of butter.
Extra Tips:
For an added touch, consider sprinkling a little cinnamon sugar on top of the scones before baking for extra sweetness and crunch.
If you prefer a bit more moisture, you can add a tablespoon of milk to the pumpkin mixture.
These scones can also be stored in an airtight container for a few days, making them a perfect make-ahead option.
Enjoy experimenting with variations like adding dried cranberries or swapping out spices to suit your taste.