

Scandinavian cuisine is a beautiful blend of comfort and simplicity. From savory Swedish meatballs to the fresh tang of Norwegian salmon gravlax, each dish has its own story. What I adore is how these recipes are perfect for beginners. They’re easy to make and so rewarding. Let me share some favorites that will inspire you to create something special.
Swedish Meatballs
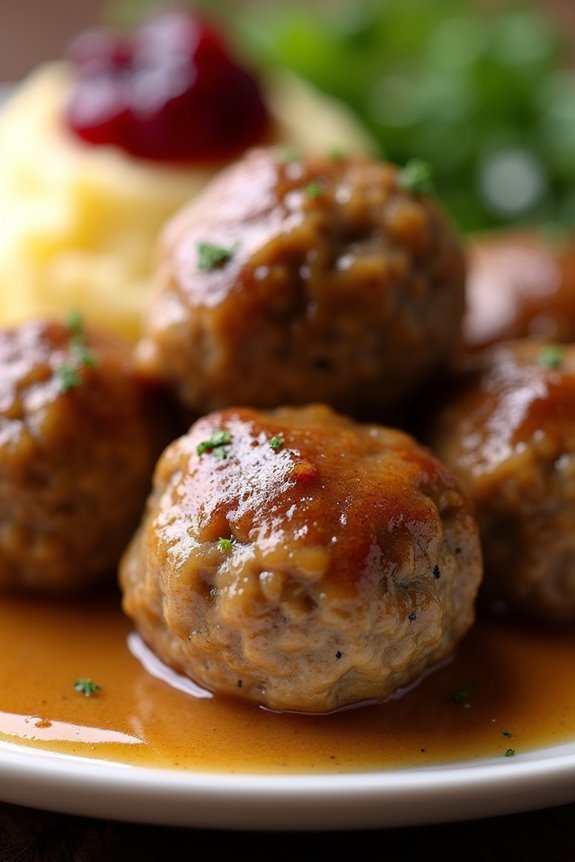
Swedish Meatballs, or “Köttbullar,” are a beloved traditional dish that has captured the hearts and taste buds of many around the world. These tender, flavorful meatballs are typically served with creamy gravy and are often accompanied by lingonberry sauce and mashed potatoes, making for a comforting and satisfying meal.
Originating from Sweden, these delightful morsels have become a staple in Scandinavian cuisine, showcasing a harmonious blend of spices and ingredients that create a truly irresistible dish.
In addition to their delicious taste, Swedish Meatballs are also quite versatile. They can be enjoyed as a main course, an appetizer at gatherings, or even as a part of a festive holiday spread. Whether you’re preparing a cozy dinner for family or hosting a gathering with friends, this recipe is sure to impress.
Let’s explore making these delectable meatballs that are perfect for serving 4-6 people.
Ingredients:
- 1 pound ground beef
- 1/2 pound ground pork
- 1/2 cup breadcrumbs
- 1/4 cup milk
- 1/4 cup finely chopped onion
- 1/4 teaspoon ground nutmeg
- 1/4 teaspoon ground allspice
- 1 teaspoon salt
- 1/2 teaspoon black pepper
- 1 large egg
- 3 tablespoons butter (for frying)
- 2 cups beef broth
- 1 cup heavy cream
- 2 tablespoons all-purpose flour
- Lingonberry sauce (for serving, optional)
Cooking Instructions:
1. Prepare the Meat Mixture: In a large mixing bowl, combine the ground beef, ground pork, breadcrumbs, milk, chopped onion, nutmeg, allspice, salt, pepper, and the egg. Use your hands or a spoon to mix everything together until well combined.
Be careful not to overmix, as this can make the meatballs tough.
2. Form the Meatballs: Once the mixture is well combined, take a small amount and roll it between your palms to form a meatball about 1 inch in diameter. Repeat this process until all the mixture is shaped into meatballs, placing them on a tray or plate as you go.
3. Cook the Meatballs: In a large skillet, melt the butter over medium heat. Once the butter is melted and bubbling, add the meatballs in batches, being sure not to overcrowd the pan.
Cook the meatballs for 5-7 minutes, turning them occasionally, until they’re browned on all sides. Once cooked, transfer the meatballs to a plate and set aside.
4. Make the Gravy: In the same skillet, add the flour to the remaining drippings and stir to create a roux. Cook the flour for about 1 minute until it turns light brown. Gradually add the beef broth while stirring continuously to avoid lumps.
Bring the mixture to a simmer and cook until it thickens slightly, about 3-5 minutes.
5. Combine Meatballs with Gravy: Once the gravy has thickened, add the heavy cream and stir to combine. Gently return the meatballs to the skillet, ensuring they’re coated in the gravy.
Cover and simmer for an additional 10 minutes, allowing the flavors to meld together.
6. Serve: Once the meatballs are cooked through and the gravy is rich and creamy, Serve them hot. Pair with mashed potatoes and lingonberry sauce for a traditional presentation.
Extra Tips:
When preparing Swedish Meatballs, consider using a mix of meats for added flavor—combining beef with pork or even veal can enhance the taste and texture.
Also, don’t be afraid to adjust the spices to your preference; a little extra nutmeg or allspice can add a lovely warmth. If you have leftovers, they can be stored in the refrigerator for a few days and taste even better the next day, as the flavors continue to develop.
Enjoy your culinary adventure with these delicious Swedish Meatballs!
Danish Smørrebrød
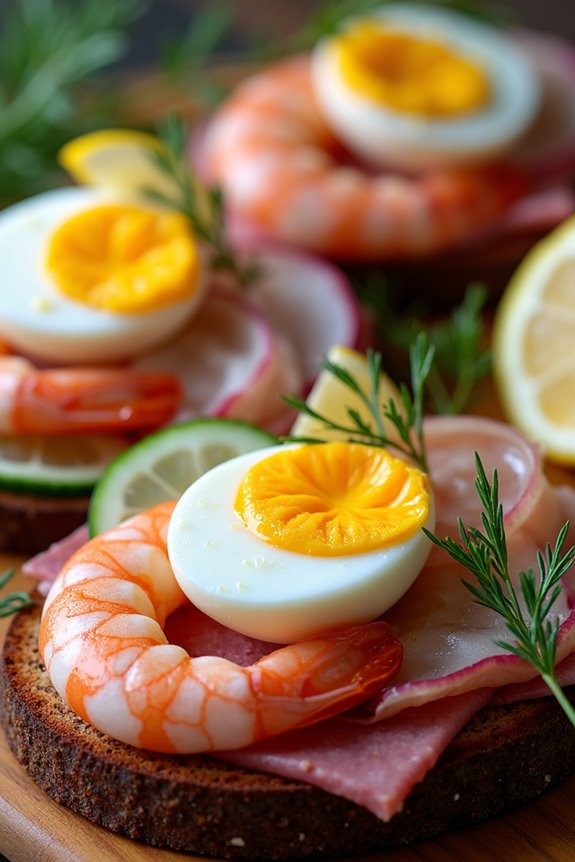
Danish Smørrebrød, or open-faced sandwiches, are a quintessential part of Denmark’s culinary heritage. These delightful creations consist of a slice of rye bread topped with a variety of ingredients, ranging from cured meats to fresh seafood and vibrant vegetables. Not only are they visually stunning, but they also offer a myriad of flavors and textures that are sure to impress anyone who tries them.
The beauty of Smørrebrød lies in its versatility, allowing you to mix and match various toppings according to your taste preferences or seasonal availability.
To make a traditional Danish Smørrebrød, start with a sturdy base of dark rye bread, which provides a nutty flavor and a robust texture. From there, the sky’s the limit; you can layer on ingredients like pickled herring, roast beef, shrimp, or even soft-boiled eggs, all garnished with fresh herbs and condiments. This dish is perfect for gatherings, as it encourages sharing and showcases a variety of flavors on one plate.
Let’s plunge into crafting this delicious dish that serves 4-6 people.
Ingredients:
- 1 loaf of dark rye bread
- 200g pickled herring (or other fish of choice)
- 200g roast beef, thinly sliced
- 200g shrimp, peeled and deveined
- 4 soft-boiled eggs
- 1 small red onion, thinly sliced
- 1 cucumber, thinly sliced
- Fresh dill, for garnish
- Horseradish sauce
- Mayonnaise
- Lemon wedges, for serving
- Salt and pepper, to taste
Cooking Instructions:
- Prepare the Rye Bread: Start by slicing the dark rye bread into thick slices, roughly 1 inch thick. This bread acts as the sturdy foundation for your Smørrebrød, so verify the slices are even and well-cut to hold the toppings without falling apart.
- Cook the Eggs: For the soft-boiled eggs, bring a pot of water to a gentle boil. Carefully add the eggs and boil for about 6-7 minutes for a slightly runny yolk. After cooking, transfer the eggs to a bowl of ice water to stop the cooking process. Once cooled, peel the eggs and slice them in half.
- Arrange the Toppings: Begin assembling your Smørrebrød by spreading a thin layer of mayonnaise on each slice of rye bread. This adds moisture and flavor. Next, layer the pickled herring on a few slices, followed by the roast beef on others. Place the shrimp on another slice, and finish with the soft-boiled egg halves on the last pieces.
- Add Vegetables and Garnishes: Top the herring with thinly sliced red onion and cucumber for a rejuvenating crunch. For the roast beef, you might want to add a dollop of horseradish sauce for an extra kick. Finally, place a sprig of fresh dill on each open sandwich for a fragrant touch.
- Season and Serve: Before serving, sprinkle a pinch of salt and pepper on top of each sandwich to enhance the flavors. Arrange the Smørrebrød on a serving platter and garnish with lemon wedges for an extra zing.
Extra Tips:
When preparing Danish Smørrebrød, feel free to get creative with your toppings! You can customize your sandwiches with other ingredients like sliced avocados, beets, or various types of cheese.
Presentation is key, so take your time to arrange the ingredients beautifully. Also, consider serving your Smørrebrød with a side of pickles or a light salad for a complete meal. Enjoy the process of making and sharing this traditional Scandinavian dish!
Norwegian Salmon Gravlax
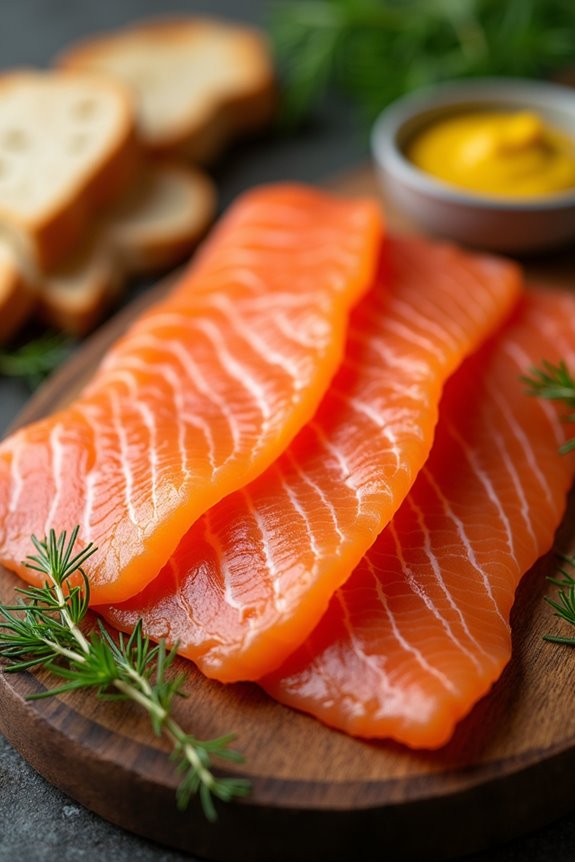
Norwegian Salmon Gravlax is a deliciously simple dish that combines the rich flavors of fresh salmon with a sweet and savory curing mixture. This traditional Scandinavian delicacy is perfect for serving as an appetizer or a light meal.
Gravlax is typically made by curing salmon with a mixture of salt, sugar, and dill, allowing the fish to absorb these flavors while also preserving it. The result is a tender, flavorful, and elegant dish that can be enjoyed on its own or with accompaniments such as mustard sauce and crisp bread.
Making gravlax at home is surprisingly easy and requires very little cooking, making it an ideal choice for a special occasion or a casual gathering. The curing process takes about 48 hours, but the hands-on time is minimal. Once it’s ready, you can slice the gravlax thinly and present it beautifully on a platter, impressing your guests with your culinary skills and the freshness of the ingredients.
Ingredients (Serves 4-6):
- 1 kg (2.2 lbs) fresh salmon fillet, skin on
- 100 g (1/2 cup) coarse sea salt
- 75 g (1/3 cup) granulated sugar
- 1 bunch fresh dill, roughly chopped
- 1 teaspoon black peppercorns, crushed
- 1 teaspoon juniper berries, crushed (optional)
- 1 tablespoon vodka or aquavit (optional)
Cooking Instructions:
- Prepare the Salmon: Rinse the salmon fillet under cold water and pat it dry with paper towels. Make certain to check for any pin bones and remove them with tweezers.
- Mix the Curing Ingredients: In a mixing bowl, combine the coarse sea salt, granulated sugar, chopped dill, crushed black peppercorns, and crushed juniper berries (if using). This mixture will form the curing rub for the salmon.
- Create the Curing Layer: Place a large piece of plastic wrap on a clean surface. Spread half of the curing mixture onto the plastic wrap in a layer that’s slightly larger than the salmon fillet.
- Cure the Salmon: Place the salmon fillet skin-side down on top of the curing mixture. Cover the top of the salmon with the remaining curing mixture, making sure that it’s evenly coated. If desired, drizzle the vodka or aquavit over the salmon for added flavor.
- Wrap and Weigh Down: Tightly wrap the salmon in the plastic wrap. Place the wrapped salmon on a tray or dish and weigh it down with a heavy object (such as a cast iron skillet or a can) to help the curing process.
- Refrigerate: Place the weighted salmon in the refrigerator for 48 hours. During this time, the salt and sugar will cure the fish, drawing out moisture and infusing it with flavor.
- Slice and Serve: After 48 hours, unwrap the salmon and rinse off the curing mixture under cold water. Pat the salmon dry. Use a sharp knife to slice the gravlax thinly at a diagonal angle. Serve with accompaniments such as mustard sauce, bread, or crackers.
Extra Tips:
When making gravlax, freshness is key. Always choose the highest quality, freshest salmon you can find, and ascertain it’s sushi-grade if you plan to eat it raw.
Additionally, feel free to experiment with flavorings—some people like to add citrus zest, herbs, or spices to the curing mixture for a unique twist. Gravlax can be stored in the refrigerator for up to a week, making it a great make-ahead option for gatherings.
Finnish Karjalanpiirakka (Karelian Pies)
Karjalanpiirakka, or Karelian pies, are a traditional Finnish pastry that hails from the Karelia region, which spans parts of Finland and Russia.
These delightful pastries have a rye crust filled with a creamy rice porridge or mashed potatoes, and they’re often served with egg butter, a mixture of butter and hard-boiled eggs. The unique flavor and texture of the crust, combined with the savory filling, make these pies a beloved dish for both special occasions and everyday meals in Finnish culture.
Making Karelian pies might seem challenging at first, but with the right ingredients and technique, you can create these delicious pastries at home. The key to a perfect Karjalanpiirakka lies in the dough’s thinness and the filling’s creaminess. Once you master the basic recipe, feel free to experiment with different fillings, such as barley or buckwheat, to give your pies a personal touch.
Ingredients (Serves 4-6):
- 2 cups rye flour
- 1 cup all-purpose flour
- 1 teaspoon salt
- 1 cup water (approximately)
- 1 cup short-grain rice
- 2 cups milk
- 2 tablespoons butter
- 2 hard-boiled eggs
- 4 tablespoons butter (for egg butter)
- Salt to taste
Cooking Instructions:
- Prepare the Dough: In a large mixing bowl, combine the rye flour, all-purpose flour, and salt. Gradually add water, mixing until a soft yet firm dough forms. Knead the dough on a floured surface until it becomes smooth, about 5 minutes. Cover with a cloth and let it rest for about 30 minutes.
- Cook the Rice Filling: Rinse the rice under cold water and then combine it with milk in a saucepan. Bring to a boil, then reduce the heat and let it simmer, stirring occasionally, until the rice is tender and the mixture is creamy (about 20-25 minutes). Remove from heat, stir in the butter, and let it cool.
- Roll Out the Dough: Once the dough has rested, divide it into equal pieces (about 10-12). On a floured surface, roll each piece into a thin oval shape (about 5-6 inches long). The thinner, the better, as it will give the pastries a crispy texture.
- Fill the Pastries: Place a spoonful of the rice filling in the center of each oval. Fold the edges of the dough over the filling, pinching and pleating to secure it, leaving the center exposed. This traditional method adds a rustic charm to the pies.
- Bake the Pies: Preheat your oven to 450°F (230°C). Line a baking sheet with parchment paper. Place the filled pies on the sheet and bake for 15-20 minutes, or until the crust is lightly browned.
- Prepare Egg Butter: While the pies are baking, finely chop the hard-boiled eggs and mix them with soft butter and a pinch of salt until well combined. Set aside.
- Serve: Once the pies are baked, remove them from the oven and let them cool slightly. Serve warm with egg butter spread on top.
Extra Tips:
For the best results, make sure to roll out the dough as thinly as possible to achieve a delightful crispness.
If you find the dough difficult to handle, you can cover it with a damp cloth to prevent it from drying out.
Additionally, experimenting with different fillings can lead to exciting variations of this classic dish; try adding sautéed mushrooms or spinach for a twist.
Karjalanpiirakka can also be refrigerated and reheated, making them perfect for meal prep!
Icelandic Lamb Soup
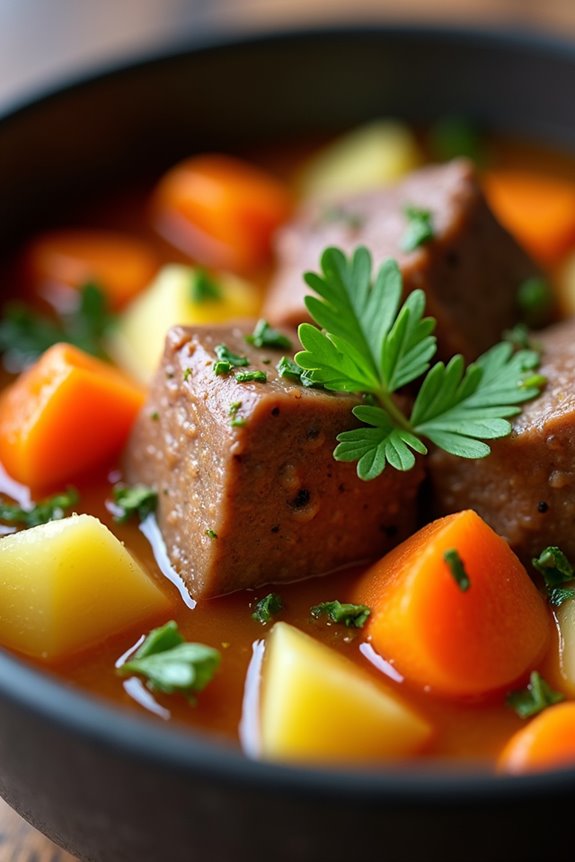
Icelandic Lamb Soup, or “Kjötsúpa,” is a hearty and comforting dish that embodies the flavors of Icelandic cuisine. Traditionally prepared using the freshest ingredients, this soul-warming soup is perfect for chilly days or whenever you need a nourishing meal. The combination of tender lamb, root vegetables, and aromatic herbs creates a dish that’s both satisfying and full of flavor.
This recipe is easy to follow, making it an excellent choice for both novice and experienced cooks looking to explore Scandinavian culinary traditions. The beauty of Icelandic Lamb Soup lies in its simplicity. The lamb is simmered slowly to develop its rich flavor, while the vegetables contribute a natural sweetness and texture to the dish.
This recipe serves 4-6 people, making it ideal for family gatherings or cozy dinners with friends. By using fresh, high-quality ingredients, you’ll create a delightful bowl of soup that brings a taste of Iceland to your kitchen.
Ingredients (Serves 4-6):
- 1.5 lbs lamb shoulder, cut into cubes
- 1 onion, chopped
- 2 carrots, diced
- 2 potatoes, peeled and cubed
- 1 parsnip, diced
- 1 cup cabbage, chopped
- 4 cups water or lamb broth
- 2 teaspoons dried thyme
- 2 bay leaves
- Salt and pepper to taste
- Fresh parsley, chopped (for garnish)
Cooking Instructions:
- Prepare the Lamb: Start by trimming any excess fat from the lamb shoulder and cutting it into bite-sized cubes. This will facilitate even cooking and make it easier to eat once the soup is ready.
- Sauté the Onions: In a large pot, heat a tablespoon of oil over medium heat. Add the chopped onions and sauté until they’re translucent, about 5 minutes. This step helps to build a flavorful base for your soup.
- Brown the Lamb: Increase the heat to medium-high and add the lamb cubes to the pot. Brown the meat on all sides, which will enhance the flavor of the soup through the Maillard reaction.
- Add Water or Broth: Pour in the 4 cups of water or lamb broth, making sure that the meat is covered. Bring the mixture to a boil, then reduce the heat to a simmer. This gentle cooking method allows the flavors to meld beautifully.
- Incorporate the Vegetables: Once the broth is simmering, add the diced carrots, potatoes, parsnip, and chopped cabbage. These ingredients will add heartiness and nutrition to your soup.
- Season with Herbs: Stir in the dried thyme, bay leaves, salt, and pepper. These seasonings will infuse the soup with aromatic flavors as it cooks. Let the mixture simmer for about 1 hour, or until the lamb is tender and the vegetables are cooked through.
- Final Adjustments: Taste the soup and adjust the seasoning if necessary. Remove the bay leaves before serving, as they aren’t meant to be eaten.
- Garnish and Serve: Ladle the soup into bowls and garnish with freshly chopped parsley for a pop of color and freshness. Serve hot with some crusty bread on the side.
Extra Tips:
For an even richer flavor, consider marinating the lamb in some herbs and spices a few hours before cooking. Feel free to add any other root vegetables you enjoy, such as turnips or rutabagas, to personalize the soup further.
Leftovers can be stored in the refrigerator and often taste even better the next day, as the flavors continue to develop. Enjoy your Icelandic Lamb Soup!
Swedish Cinnamon Buns

Swedish Cinnamon Buns, or “Kanelbullar,” are a beloved treat in Sweden, known for their delightful aroma and warm, spicy flavor.
These soft, sweet, and cinnamon-infused pastries are perfect for an afternoon fika, a traditional Swedish coffee break, or any time you crave a comforting and delicious snack. The dough is enriched with butter and milk, giving the buns a tender crumb, while the cinnamon filling adds a sweet and spicy punch. Topped with a sprinkle of sugar, these buns aren’t only tasty but also visually appealing.
Making Swedish Cinnamon Buns may seem intimidating at first, but with a little patience and care, you can create these delightful pastries at home. The process involves preparing a yeast-based dough, allowing it to rise, rolling it out, spreading the cinnamon filling, and forming the buns.
Once baked, you’ll be rewarded with a tray of beautifully golden, aromatic cinnamon buns that are sure to impress family and friends.
Ingredients (Serves 4-6)
- 4 cups all-purpose flour
- 1 packet (2 ¼ tsp) active dry yeast
- ½ cup milk (warm)
- ¼ cup sugar
- ¼ cup unsalted butter (melted)
- 1 large egg
- ½ tsp salt
- 2 tsp ground cinnamon
- ½ cup brown sugar
- 1 egg (for egg wash)
- Pearl sugar (for topping)
Cooking Instructions
1. Prepare the Dough: In a mixing bowl, combine the warm milk and sugar. Sprinkle the yeast on top and let it sit for about 5-10 minutes until it becomes frothy.
In another bowl, mix the flour and salt, then create a well in the center. Add the melted butter, the frothy yeast mixture, and the egg into the well. Stir until a soft dough forms.
2. Knead the Dough: Transfer the dough to a lightly floured surface and knead it for about 5-7 minutes until it’s smooth and elastic. If the dough is too sticky, add a little more flour as needed.
Once kneaded, place the dough in a greased bowl, cover it with a clean cloth, and let it rise in a warm place for about 1 hour or until it has doubled in size.
3. Prepare the Filling: While the dough rises, mix the brown sugar and ground cinnamon in a small bowl. Set aside.
4. Roll Out the Dough: After the dough has risen, punch it down to remove the air. On a floured surface, roll the dough into a large rectangle, approximately 1/4 inch thick.
5. Spread the Filling: Brush the rolled-out dough with melted butter, then evenly sprinkle the cinnamon-sugar mixture over the top, leaving a small border around the edges.
6. Shape the Buns: Starting from one long edge, roll the dough tightly into a log. Once rolled, slice the log into 12 equal pieces.
Place the slices in a greased baking dish or on a lined baking tray, cut side up.
7. Second Rise: Cover the shaped buns with a cloth and let them rise for another 30 minutes until they puff up slightly.
8. Preheat the Oven: While the buns are rising, preheat your oven to 375°F (190°C).
9. Egg Wash and Bake: Beat the additional egg and brush it over the tops of the buns for a shiny finish. Sprinkle with pearl sugar.
Bake in the preheated oven for 15-20 minutes or until golden brown.
10. Cool and Serve**: Allow the buns to cool slightly on a wire rack before serving. Enjoy warm or at room temperature with your favorite coffee or tea**.
Extra Tips
For the best results, make sure your milk is warm but not hot when activating the yeast, as too much heat can kill the yeast.
You can also experiment with different fillings, such as cardamom or almond paste, to give your buns a unique twist. Additionally, these cinnamon buns can be stored in an airtight container for a few days or frozen for longer storage. Just reheat them in the oven for a few minutes to enjoy them warm!
Norwegian Brown Cheese
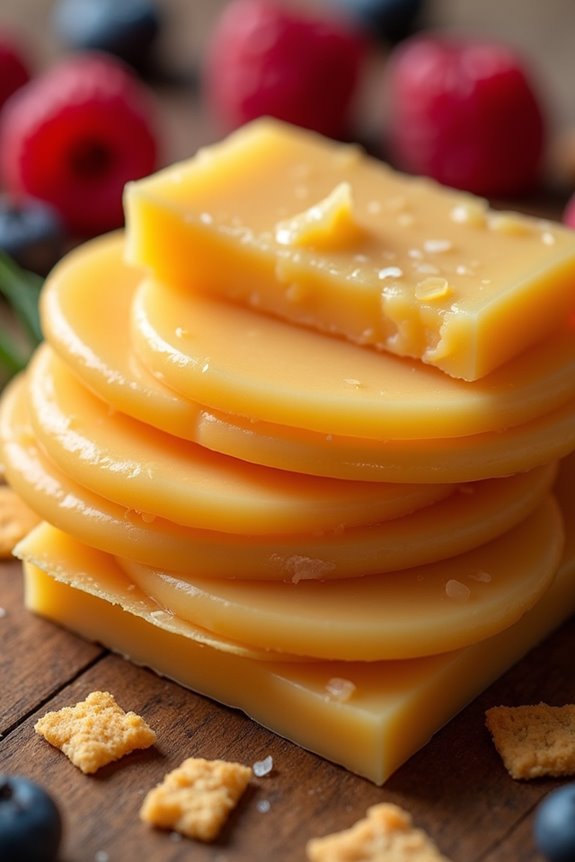
Norwegian Brown Cheese, or “Brunost,” is a unique and beloved staple in Norway. Made primarily from whey, milk, and cream, this cheese has a sweet, caramel-like flavor that sets it apart from traditional cheeses. Often enjoyed on bread or crispbread, it can also be used in various dishes or simply enjoyed on its own. The cheese’s distinctive brown color comes from the caramelization of lactose during the cooking process, giving it a rich, complex taste that many find irresistible.
Making Norwegian Brown Cheese at home may sound intimidating, but the process is quite straightforward and rewarding. This recipe will guide you through creating approximately 4-6 servings of this delightful cheese that can elevate any breakfast or snack. Simple ingredients and a little patience are all you need to replicate this Scandinavian treat in your own kitchen.
Ingredients (serving size: 4-6 people)
- 4 cups whey (or a combination of whey and whole milk)
- 1 cup heavy cream
- 1 cup sugar
- 1/2 teaspoon salt
- 1/2 teaspoon ground cardamom (optional)
Cooking Instructions
- Prepare the Ingredients: Begin by gathering all your ingredients. If you don’t have whey, you can use a mixture of whey and whole milk, but whey is preferred for a more authentic flavor. Measure out the cream, sugar, salt, and optional spices.
- Combine Ingredients: In a large, heavy-bottomed pot, combine the whey and heavy cream. Stir them together gently to guarantee the mixture is homogeneous. If you’re using any spices, add them at this stage.
- Cook the Mixture: Place the pot over medium heat and bring the mixture to a gentle simmer, stirring frequently to prevent it from sticking to the bottom. Continue to cook for about 1.5 to 2 hours. The goal is to reduce the liquid by about half while allowing the lactose to caramelize. You’ll know it’s ready when the mixture thickens and turns a golden brown color.
- Add Sugar and Salt: Once the mixture has thickened, gradually stir in the sugar and salt. Continue to cook for another 30 minutes to 1 hour, stirring constantly. The mixture will become thicker and darker as the sugar caramelizes further.
- Mold the Cheese: Once the mixture reaches a thick, spreadable consistency, pour it into a greased loaf pan or any mold of your choice. Smooth the top with a spatula and allow it to cool at room temperature for about 30 minutes.
- Chill and Set: After the cheese has cooled, cover it with plastic wrap and place it in the refrigerator. Allow it to chill for at least 4 hours or overnight. This will help it set properly.
- Slice and Serve: Once set, remove the Norwegian Brown Cheese from the mold and slice it into thin pieces. Serve it with crispbread, toast, or alongside your favorite fruits.
Extra Tips
When preparing Norwegian Brown Cheese, patience is key, as the cooking process requires time to achieve the right consistency and flavor. Be sure to stir regularly during the cooking stages to prevent burning and to promote even caramelization.
If you want to experiment with flavors, consider adding spices like cinnamon or nutmeg for a unique twist. Store any leftovers in an airtight container in the fridge, and enjoy your homemade Brunost as a delicious treat for days to come!
Danish Æbleskiver
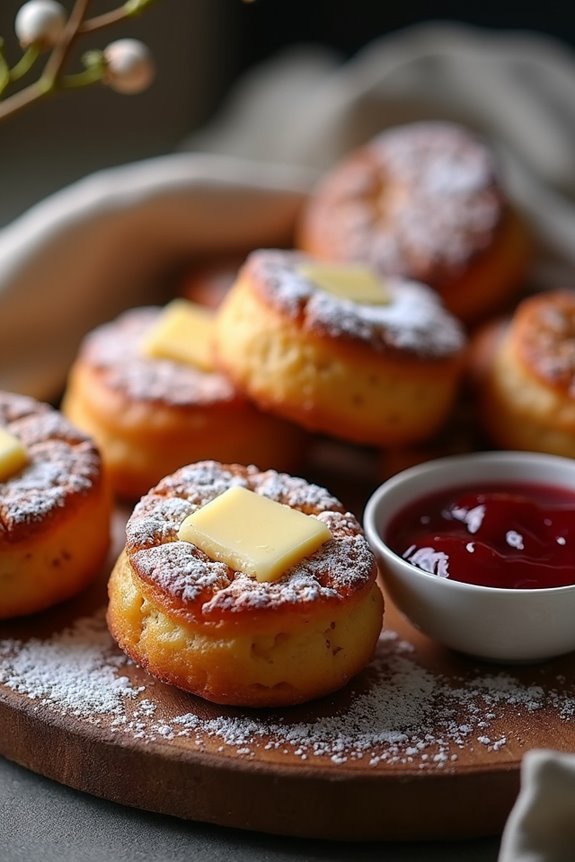
Danish Æbleskiver, often referred to simply as æbleskiver, are delightful, round pancake-like treats traditionally enjoyed in Denmark, especially during the winter months and around Christmas.
These fluffy, spherical delights are typically served with powdered sugar and jam, making them a perfect sweet snack or dessert. The name “æbleskiver” translates to “apple slices,” which is a nod to the original recipe that included apple pieces. However, modern variations often feature a variety of fillings, from chocolate to fruit preserves.
Making æbleskiver isn’t only a fun cooking experience but also a great way to gather family and friends around the table. The key to achieving that perfect fluffy texture lies in the unique cooking method, which uses a special pan called an æbleskiver pan or pancake ball pan.
This pan has several small, round depressions that allow the batter to cook evenly, creating a delightful outer crust while keeping the inside soft and airy. Once you master this recipe, you’ll be ready to impress your loved ones with this Scandinavian delicacy!
Ingredients (Serves 4-6)
- 2 cups all-purpose flour
- 1/2 teaspoon baking powder
- 1/2 teaspoon baking soda
- 1/4 teaspoon salt
- 2 tablespoons sugar
- 1 teaspoon ground cinnamon
- 2 large eggs, separated
- 2 cups buttermilk
- 1/4 cup melted butter
- 1 teaspoon vanilla extract
- Powdered sugar, for serving
- Jam or fruit preserves, for serving
Cooking Instructions
1. Prepare the Batter: In a large mixing bowl, whisk together the flour, baking powder, baking soda, salt, sugar, and cinnamon until well combined.
In another bowl, beat the egg yolks, then mix in the buttermilk, melted butter, and vanilla extract until smooth. Gradually add the wet mixture to the dry ingredients and stir until just combined, being careful not to overmix.
2. Whip the Egg Whites: In a separate bowl, beat the egg whites until stiff peaks form. This step is essential as it will help make the æbleskiver light and fluffy.
Gently fold the whipped egg whites into the batter using a spatula, taking care not to deflate the mixture.
3. Heat the Æbleskiver Pan: Place your æbleskiver pan on the stove over medium heat. Add a small amount of butter to each depression in the pan.
Allow the butter to melt and slightly bubble, ensuring that the pan is evenly coated.
4. Cook the Æbleskiver: Once the pan is hot, fill each depression about 2/3 full with batter. Cook for about 2-3 minutes or until the bottom is golden brown.
Using a skewer or fork, carefully turn each æbleskiver over to cook the other side. Cook for an additional 2-3 minutes until golden brown and cooked through.
5. Serve Warm: Once cooked, transfer the æbleskiver to a serving plate. Dust with powdered sugar and serve with jam or fruit preserves on the side for dipping.
Enjoy them warm for the best flavor and texture!
Extra Tips
When making æbleskiver, it’s important to keep the heat at a medium level. If the pan is too hot, the outside may cook too quickly while leaving the inside raw.
Additionally, experimenting with fillings can enhance your æbleskiver experience; try adding a small piece of apple or chocolate in the center of the batter before cooking for a delightful surprise!
Make sure to serve them immediately, as they’re best enjoyed fresh and hot.
Finnish Rye Bread

Finnish Rye Bread, known as “Ruisleipä,” is a staple in Finnish cuisine that embodies the essence of traditional Nordic baking. With its dense texture and rich flavor, this bread isn’t only nutritious but also incredibly versatile, making it perfect for sandwiches or enjoyed simply with butter.
The use of rye flour gives it a distinctive taste that’s both hearty and slightly tangy, thanks to the fermentation process. Making this bread from scratch is a rewarding experience that allows you to connect with the culinary traditions of Finland.
The process of baking Finnish Rye Bread may seem intimidating at first, but it’s quite straightforward once you gather the ingredients and follow the steps. The key to achieving the perfect loaf lies in allowing the dough to rise properly and in baking it at the right temperature.
This recipe will guide you through making a delicious, homemade Finnish Rye Bread that serves 4-6 people.
Ingredients:
- 3 cups rye flour
- 1 cup all-purpose flour
- 1 teaspoon salt
- 1 tablespoon sugar
- 2 teaspoons active dry yeast
- 2 cups lukewarm water (about 110°F or 43°C)
- 1 tablespoon caraway seeds (optional)
- 1 tablespoon olive oil (optional)
Instructions:
- Activate the yeast: In a small bowl, combine the lukewarm water with the sugar and active dry yeast. Stir gently and let it sit for about 10 minutes until it becomes frothy. This step confirms that the yeast is active and will help the bread rise.
- Mix the dry ingredients: In a large mixing bowl, combine the rye flour, all-purpose flour, salt, and caraway seeds (if using). Mix the dry ingredients thoroughly to confirm that the salt and seeds are evenly distributed throughout the flour.
- Combine wet and dry ingredients: Once the yeast mixture is frothy, pour it into the bowl with the dry ingredients. Stir with a wooden spoon or spatula until a shaggy dough forms. If using olive oil, add it at this stage for added flavor and moisture.
- Knead the dough: Turn the dough out onto a floured surface and knead it for about 5-10 minutes until it becomes smooth and elastic. The dough will be sticky, so you may need to keep your hands floured to prevent sticking.
- First rise: Place the kneaded dough into a lightly greased bowl, cover it with a damp cloth or plastic wrap, and let it rise in a warm place for about 1-2 hours or until it has doubled in size.
- Shape the loaf: Once the dough has risen, punch it down to release the air. Turn it out onto a floured surface again and shape it into a loaf. You can also shape it into rolls if you prefer.
- Second rise: Place the shaped loaf onto a baking sheet lined with parchment paper or into a greased loaf pan. Cover it again and let it rise for another 30-60 minutes until it has puffed up.
- Preheat the oven: While the dough is rising for the second time, preheat your oven to 425°F (220°C). This confirms that the oven is hot enough to create a good crust on the bread.
- Bake the bread: Once the dough has risen, place it in the preheated oven and bake for about 25-30 minutes or until the bread sounds hollow when tapped on the bottom and has a deep brown color.
- Cool and enjoy: Remove the bread from the oven and let it cool on a wire rack. Once cooled, slice and serve with your favorite toppings!
Extra Tips:
When making Finnish Rye Bread, it’s essential to keep a close eye on the dough during the rising stages. If your kitchen is too cold, consider placing the dough in a slightly warm oven (turned off) to encourage rising.
Additionally, for a more robust flavor, allow the bread to cool completely before slicing, as this helps the flavors to meld together beautifully. Enjoy your homemade Finnish Rye Bread with butter, cheese, or your favorite spreads!
Swedish Potato Pancakes
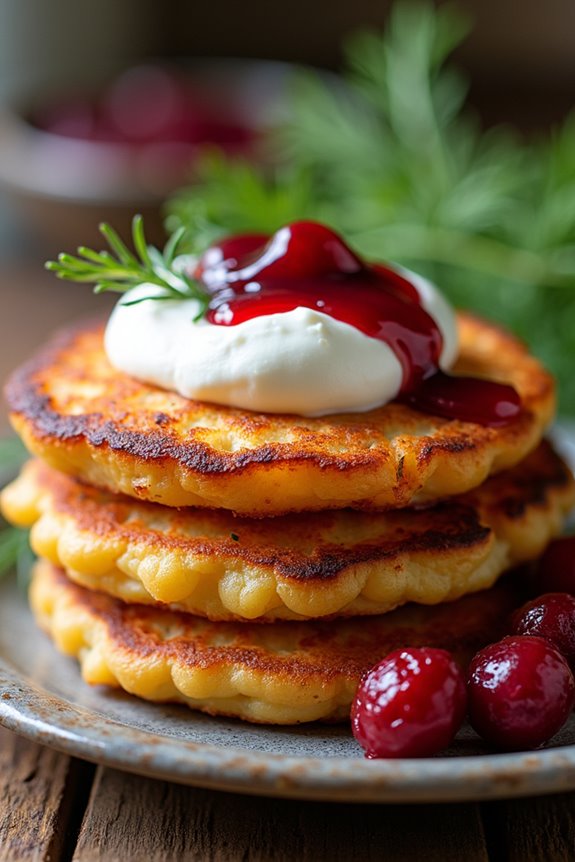
Swedish Potato Pancakes, or “Raggmunk,” are a beloved dish in Sweden, known for their crispy exterior and soft, flavorful interior. These pancakes are made from grated potatoes, combined with flour and eggs, creating a delightful balance of textures. Traditionally served with lingonberry sauce and sour cream, they make for a perfect breakfast, brunch, or light dinner option. Their simplicity and deliciousness have made them a staple in Scandinavian cuisine.
The beauty of Swedish Potato Pancakes lies not only in their taste but also in their versatility. You can enjoy them as a side dish or even as a main course, depending on your preference. The pancakes are best served immediately after cooking while they’re still warm and crispy. Whether you’re hosting a family meal or just craving a comforting dish, these potato pancakes will surely satisfy your appetite.
Ingredients (Serves 4-6):
- 4 medium-sized potatoes
- 1 small onion (optional)
- 1 cup all-purpose flour
- 2 large eggs
- 1 teaspoon salt
- 1/2 teaspoon black pepper
- 1/4 cup milk (or water)
- Butter or oil for frying
- Lingonberry sauce (for serving)
- Sour cream (for serving)
Cooking Instructions:
1. Prepare the Potatoes: Start by peeling the potatoes and, if using, the onion. Using a grater or food processor, grate the potatoes and onion together. If you prefer a smoother texture, you can use a food processor to finely chop the ingredients instead.
Place the grated mixture in a clean kitchen towel or cheesecloth and wring out excess moisture to guarantee the pancakes are crispy.
2. Make the Batter: In a large mixing bowl, combine the grated potatoes and onion with the flour, eggs, salt, pepper, and milk. Stir until the mixture is well combined and has a thick, batter-like consistency.
Be careful not to overmix, as this can make the pancakes dense.
3. Heat the Pan: In a large skillet, heat a few tablespoons of butter or oil over medium heat. You want enough fat in the pan to guarantee the pancakes don’t stick and get that beautiful golden-brown color.
Allow the pan to get hot but not smoking.
4. Cook the Pancakes: Once the skillet is hot, drop a large spoonful of the batter onto the pan, flattening it gently with the back of the spoon to form a pancake about 1/4 inch thick.
Cook for 3-4 minutes on one side until golden brown, then flip and cook for another 3-4 minutes on the other side.
Repeat with the remaining batter, adding more butter or oil as needed.
5. Serve: Once cooked, transfer the pancakes to a plate lined with paper towels to absorb any excess oil.
Serve immediately while hot, accompanied by lingonberry sauce and sour cream for an authentic Swedish experience.
Extra Tips:
For an added depth of flavor, consider incorporating spices such as nutmeg or allspice into your batter.
Additionally, make sure your pan is hot enough before adding the batter to achieve the perfect crispiness.
If you have leftovers, they can be stored in the refrigerator and reheated in a toaster or skillet for a quick meal. Enjoy your Swedish Potato Pancakes!
Icelandic Skyr With Berries
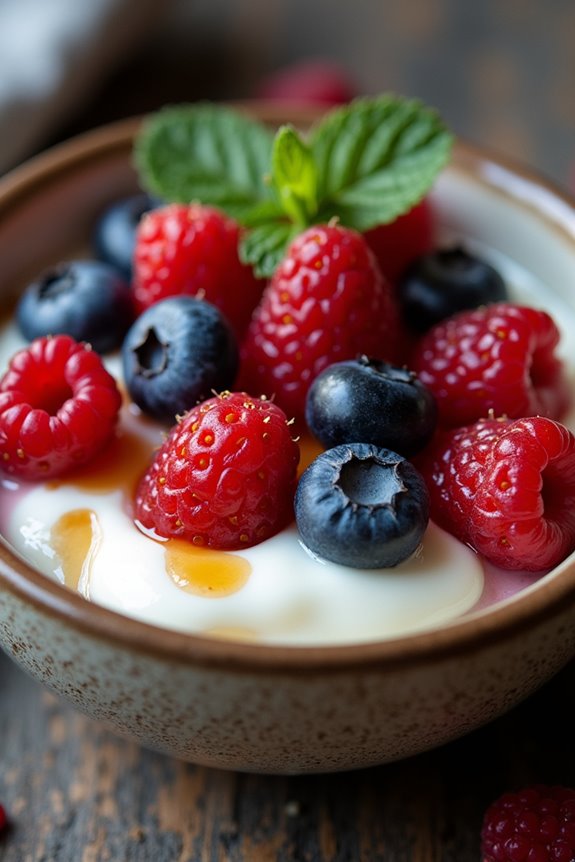
Icelandic Skyr is a deliciously creamy yogurt-like dairy product that has been a staple in Icelandic cuisine for centuries. Its rich texture and tangy flavor make it the perfect base for a variety of dishes, but it shines particularly when paired with fresh berries. This dessert isn’t only easy to prepare but also packed with nutrients, making it a great choice for breakfast, a snack, or a light dessert. With simple ingredients and minimal preparation, you can bring a touch of Iceland to your table.
This delightful recipe for Icelandic Skyr with Berries combines the unique flavor of skyr with the natural sweetness of fresh berries, creating a colorful and invigorating dish that’s sure to impress. Whether you’re using strawberries, blueberries, or a mix of seasonal fruits, this dish is as versatile as it’s delicious. Serve it in individual bowls or as a shared dessert for a cozy gathering, and enjoy a taste of Scandinavian simplicity.
Ingredients (Serves 4-6):
- 4 cups Icelandic skyr
- 2 cups mixed berries (strawberries, blueberries, raspberries)
- 2 tablespoons honey or maple syrup (optional)
- 1 teaspoon vanilla extract
- 1 tablespoon lemon juice
- Mint leaves for garnish (optional)
Cooking Instructions:
- Prepare the Berries: Rinse the mixed berries under cold water. If using strawberries, hull and slice them into smaller pieces. Combine all the berries in a mixing bowl. If you prefer sweeter berries, you can sprinkle a little sugar over them and let them sit for about 10 minutes to release their juices.
- Mix the Skyr: In a separate large bowl, add the Icelandic skyr. To enhance the flavor, stir in the vanilla extract and lemon juice. If you like your skyr a bit sweeter, you can also add honey or maple syrup at this point. Mix everything well until it’s smooth and creamy.
- Layer the Ingredients: In serving bowls or glasses, start by adding a layer of skyr at the bottom. Next, add a layer of the prepared mixed berries on top of the skyr. You can alternate layers of skyr and berries as desired to create a visually appealing presentation.
- Garnish and Serve: Once you have layered the skyr and berries to your liking, finish off with a few additional berries on top and a sprig of mint for garnish. Serve immediately or refrigerate for a short while before serving, allowing the flavors to meld together.
- Enjoy: Dig in and enjoy your Icelandic Skyr with Berries as a nutritious breakfast, a healthy snack, or a light dessert that everyone will love!
Extra Tips:
When preparing Icelandic Skyr with Berries, feel free to experiment with different types of berries or even add granola or nuts for added texture and crunch. You can also incorporate a drizzle of fruit puree or a sprinkle of cinnamon for an extra burst of flavor.
If you want to make it a bit more indulgent, consider adding a dollop of whipped cream on top. This dish is highly customizable, so let your creativity shine while staying true to its simple, wholesome roots!
Danish Potato Salad
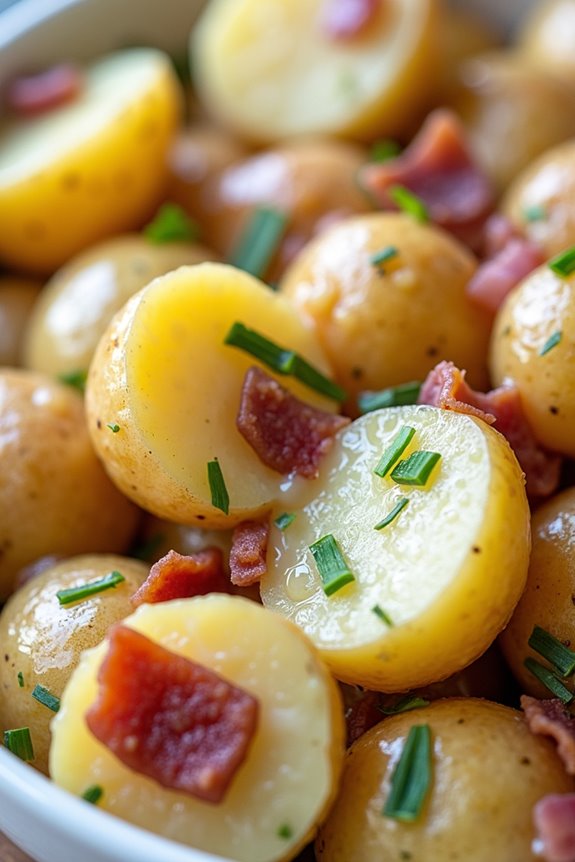
Danish Potato Salad, known as “Kartoffelsalat,” is a delightful dish that embodies the simplicity and freshness of Scandinavian cuisine. This salad isn’t only a staple in Danish households but is also a favorite for gatherings, picnics, and barbecues due to its creamy texture and vibrant flavors. The key ingredients include tender potatoes, fresh herbs, and a tangy dressing that brings everything together, making it a comforting yet invigorating side dish.
This potato salad is easy to prepare and can be made ahead of time, allowing the flavors to meld beautifully. It pairs wonderfully with grilled meats, fish, or can be enjoyed as a light meal on its own. The balance of creaminess and zest makes it an appealing dish for everyone at the table. Let’s explore the ingredients and preparation to bring this classic Danish dish to your next meal.
Ingredients (Serves 4-6):
- 1 kg (2.2 lbs) baby potatoes
- 1 cup sour cream
- 1/2 cup mayonnaise
- 1 tablespoon Dijon mustard
- 2 tablespoons apple cider vinegar
- 1 small red onion, finely chopped
- 2-3 tablespoons fresh dill, chopped
- 2 tablespoons fresh chives, chopped
- Salt and pepper, to taste
- Optional: 1/2 cup cooked bacon, crumbled (for extra flavor)
Cooking Instructions:
- Prepare the Potatoes: Begin by washing the baby potatoes thoroughly under cold running water to remove any dirt. In a large pot, add the potatoes and cover them with cold water. Add a generous pinch of salt to the water. Bring it to a boil over medium-high heat, then reduce the heat and let it simmer until the potatoes are tender, about 15-20 minutes. You can test them by piercing with a fork; they should be soft but not falling apart.
- Drain and Cool: Once the potatoes are cooked, carefully drain them in a colander and let them cool for a few minutes. You can also rinse them under cold water to stop the cooking process and cool them down faster. Once cooled, cut the potatoes into halves or quarters, depending on their size, and place them in a large mixing bowl.
- Prepare the Dressing: In a separate bowl, combine the sour cream, mayonnaise, Dijon mustard, and apple cider vinegar. Whisk together until smooth and creamy. This dressing will add richness and a tangy flavor to the salad.
- Combine Ingredients: To the bowl of potatoes, add the finely chopped red onion, fresh dill, and chives. Pour the dressing over the potato mixture and gently fold everything together until the potatoes are evenly coated. Be careful not to break the potatoes while mixing.
- Season and Chill: Taste the salad and season with salt and pepper to your liking. If you’re using bacon, fold it in at this stage. Cover the bowl with plastic wrap and refrigerate for at least an hour before serving. This allows the flavors to meld together and enhances the overall taste of the salad.
Extra Tips:
When making Danish Potato Salad, feel free to customize the ingredients to suit your taste. For a lighter version, you can substitute Greek yogurt for sour cream or mayonnaise. Additionally, adding chopped pickles or capers can provide an extra layer of flavor.
Remember to adjust the seasoning after chilling, as the flavors can mellow. Serve the salad chilled and garnish with extra fresh herbs for a pop of color. Enjoy your delightful Danish Potato Salad at your next gathering!
Norwegian Fish Cakes

Norwegian fish cakes, or “fiskekaker,” are a delicious and traditional dish from Norway, renowned for their delicate flavor and satisfying texture. These cakes are primarily made from fresh fish, typically cod or haddock, combined with a few simple ingredients to create a light and fluffy result.
Often served with boiled potatoes, carrots, or a creamy sauce, they make for a delightful and hearty meal that’s both comforting and nutritious.
Making Norwegian fish cakes is a straightforward process that allows the fresh fish to shine through. The mixture is typically seasoned with a hint of nutmeg and white pepper, giving it a unique flavor profile. The cakes can be pan-fried to achieve a crispy exterior while retaining a moist and tender inside.
Whether you’re familiar with Scandinavian cuisine or trying it for the first time, these fish cakes will definitely impress your family and friends.
Ingredients (Serves 4-6):
- 500g fresh cod or haddock fillets, skinned and deboned
- 250ml heavy cream
- 1 small onion, finely chopped
- 1 egg
- 100g all-purpose flour
- 1 teaspoon salt
- ½ teaspoon white pepper
- ¼ teaspoon ground nutmeg
- 2 tablespoons fresh parsley, chopped (optional)
- Butter or oil for frying
Cooking Instructions:
- Prepare the Fish: Start by cutting the fish fillets into smaller pieces to make them easier to blend. If using frozen fish, verify it’s fully thawed and dried with paper towels to remove excess moisture.
- Mix the Ingredients: In a food processor, combine the fish pieces, chopped onion, egg, salt, white pepper, and nutmeg. Pulse until the mixture is smooth but still has some texture. Gradually add the heavy cream while blending until fully incorporated.
- Add Flour and Seasoning: Transfer the fish mixture to a mixing bowl. Fold in the all-purpose flour gently until just combined. If using, add the chopped parsley for an extra touch of flavor and color.
- Shape the Cakes: With wet hands, form the mixture into small patties or cakes, about 2-3 inches in diameter. This will help prevent the mixture from sticking to your hands.
- Heat the Pan: In a large frying pan, heat a generous amount of butter or oil over medium heat. Verify the pan is hot enough that a small amount of the fish mixture sizzles when added.
- Fry the Fish Cakes: Carefully place the fish cakes in the hot pan, making sure not to overcrowd them. Fry for about 3-4 minutes on each side or until they’re golden brown and cooked through. Adjust the heat as necessary to prevent burning.
- Drain and Serve: Once cooked, transfer the fish cakes to a plate lined with paper towels to absorb any excess oil. Serve them warm with your choice of sides, such as boiled potatoes, a fresh salad, or a tangy remoulade sauce.
Extra Tips:
When preparing Norwegian fish cakes, using fresh fish will yield the best flavor and texture. If you can’t find fresh fish, verify any frozen fish is high quality and well-thawed.
For added moisture, you can experiment with substituting some of the cream with milk or adding a bit of mashed potato to the mixture. These cakes also freeze well, so feel free to make a larger batch and store them for a quick meal later.
Enjoy your culinary journey into Scandinavian cuisine!
Swedish Lingonberry Jam
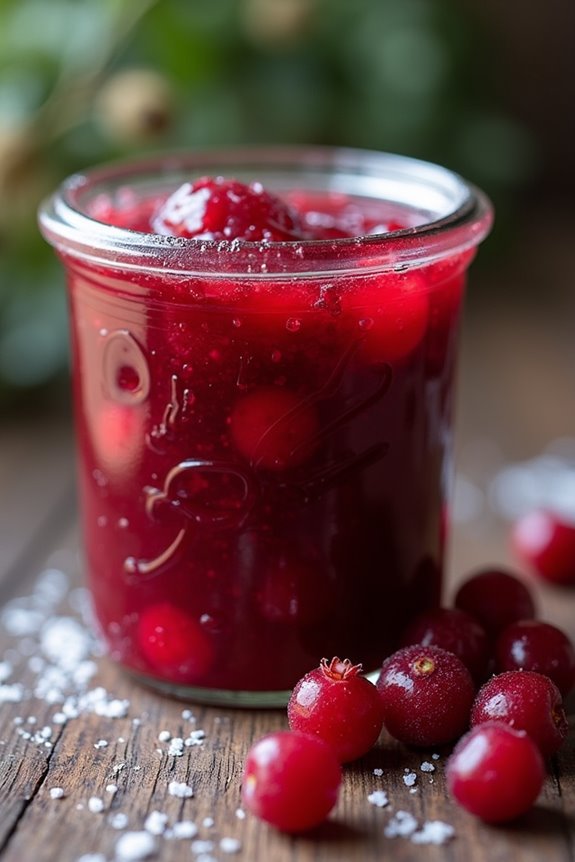
Swedish Lingonberry Jam is a beloved staple in Scandinavian cuisine, often enjoyed as a sweet and tangy condiment that perfectly complements a variety of dishes. Made from fresh lingonberries, this jam captures the essence of Swedish forests and adds a burst of flavor to meats, breads, and desserts. The process of making lingonberry jam is straightforward, requiring only a few ingredients and a bit of patience. The result is a vibrant, ruby-red spread that will elevate your meals and bring a taste of Sweden into your home.
Lingonberries are small, tart berries that thrive in the northern climates, making them a cherished fruit in Sweden. The jam isn’t only delicious but also versatile; it can be served with Swedish meatballs, pancakes, or even as a topping for yogurt. Whether you’re preparing a traditional Swedish feast or simply looking to add a unique flavor to your breakfast, this homemade lingonberry jam is sure to impress. With the following recipe, you can create a delightful batch that serves 4-6 people.
Ingredients:
- 2 cups fresh or frozen lingonberries
- 1 cup granulated sugar
- 1/4 cup water
- 1 tablespoon lemon juice
- 1/2 teaspoon ground cinnamon (optional)
Cooking Instructions:
- Prepare the Lingonberries: If using fresh lingonberries, rinse them thoroughly under cold water to remove any debris. If using frozen berries, allow them to thaw completely. This step guarantees that the berries are clean and ready for cooking.
- Combine Ingredients: In a medium-sized saucepan, combine the lingonberries, sugar, water, lemon juice, and ground cinnamon (if using). Stir the mixture gently until the sugar begins to dissolve. This helps to evenly distribute the flavors before cooking.
- Cook the Jam: Place the saucepan over medium heat and bring the mixture to a gentle boil. Once boiling, reduce the heat to low and let it simmer for about 15-20 minutes. Stir occasionally to prevent the jam from sticking to the bottom of the pan. The berries will burst and release their juices, creating a thickened jam.
- Check the Consistency: After 20 minutes of simmering, check the consistency of the jam. It should be thick enough to coat the back of a spoon. If it’s too runny, continue cooking for a few more minutes until it reaches your desired thickness.
- Cool and Store: Once the jam has reached the desired consistency, remove it from heat and allow it to cool for a few minutes. Transfer the jam into sterilized glass jars while still warm, leaving a little space at the top. Seal the jars and let them cool completely at room temperature before refrigerating.
Extra Tips:
When making Swedish Lingonberry Jam, using high-quality, ripe lingonberries will yield the best flavor. If you prefer a smoother texture, consider blending the jam with an immersion blender after cooking.
Additionally, this jam can be stored in the refrigerator for several weeks or processed in a water bath canner for long-term storage. Remember to always sterilize your jars to guarantee the jam stays fresh and safe to eat!