

When it comes to indulgent desserts that won’t weigh you down, Mediterranean cuisine is a delightful source of inspiration. Think creamy Greek yogurt with a touch of honey or a refreshing citrus sorbet that brightens any day. These recipes are packed with flavor and use wholesome ingredients that make them feel both satisfying and guilt-free. Ready to explore some sweet treats that are as good for your soul as they are for your body? Here are ten mouthwatering Mediterranean dessert recipes that will transform your dessert routine.
Greek Yogurt With Honey and Walnuts
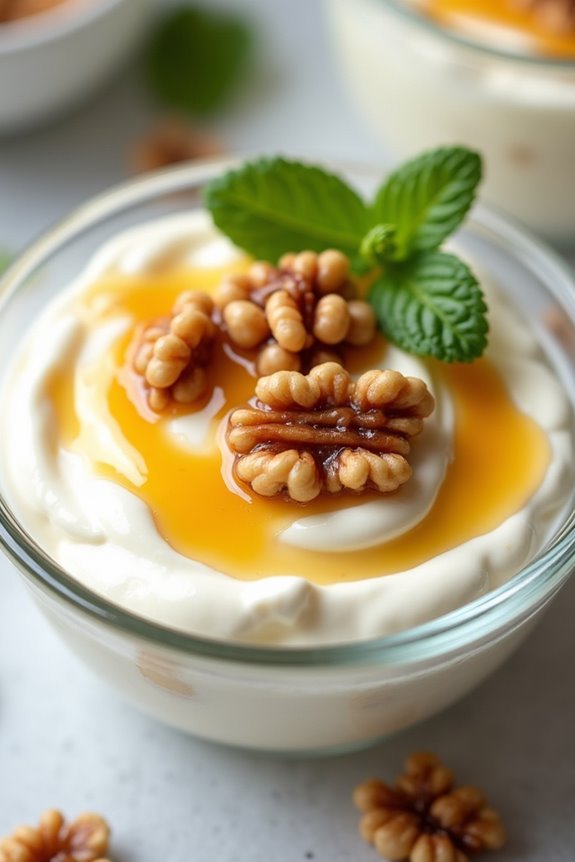
Greek Yogurt With Honey and Walnuts is a delightful and simple dessert that embodies the essence of Mediterranean cuisine. This dish combines the creamy texture of Greek yogurt with the rich sweetness of honey and the crunchy texture of walnuts, creating a perfect balance of flavors and textures. Not only is it delicious, but it also offers a nutritious treat that can be enjoyed at any time of the day, whether as a light dessert after a meal or as a rejuvenating snack.
The beauty of this recipe lies in its simplicity and the quality of ingredients used. Choosing a good quality Greek yogurt is essential, as it serves as the base of the dish. The honey adds natural sweetness, while the walnuts provide a satisfying crunch and a dose of healthy fats. This dessert isn’t only easy to prepare, but it also allows for variations such as adding seasonal fruits or a sprinkle of cinnamon for an extra layer of flavor.
Ingredients (serves 4-6):
- 4 cups of Greek yogurt
- 1/2 cup of honey
- 1 cup of walnuts, chopped
- 1 teaspoon of vanilla extract (optional)
- Fresh mint leaves for garnish (optional)
Instructions:
- Prepare the Yogurt Base: In a large mixing bowl, scoop the Greek yogurt. If you prefer a sweeter yogurt, you may mix in the vanilla extract at this stage, which adds an additional layer of flavor. Stir until well combined, ensuring a smooth consistency.
- Plate the Yogurt: Divide the Greek yogurt into serving bowls or glasses. This not only makes for an attractive presentation but also helps with portion control. Aim for about 2/3 cup of yogurt in each serving.
- Add Honey: Drizzle a generous amount of honey over each yogurt serving. The honey should coat the yogurt, allowing its sweetness to permeate the dish. Feel free to adjust the amount of honey according to your taste preferences.
- Sprinkle with Walnuts: Evenly distribute the chopped walnuts over the honey-drizzled yogurt. The walnuts will add a delightful crunch and a nutty flavor that complements the creamy yogurt and sweet honey.
- Garnish and Serve: For an elegant touch, garnish with fresh mint leaves if desired. This step can enhance the visual appeal and add a refreshing note to the dish. Serve immediately to enjoy the contrasting textures while the walnuts remain crunchy.
Extra Tips:
When making Greek Yogurt With Honey and Walnuts, consider using fresh, high-quality ingredients for the best flavor. If you want to add even more variety, you can incorporate seasonal fruits like berries, figs, or pomegranate seeds for a burst of color and additional nutrients.
Additionally, if you’re preparing this dessert ahead of time, keep the walnuts separate until just before serving to maintain their crunchiness. Enjoy this delightful Mediterranean treat!
Almond Flour Olive Oil Cake

Almond Flour Olive Oil Cake is a delightful dessert that captures the essence of Mediterranean flavors. This cake isn’t only gluten-free but also incredibly moist and flavorful, thanks to the use of almond flour and high-quality olive oil. The combination of these ingredients brings a rich nutty flavor that pairs beautifully with a simple citrus glaze or fresh fruits.
Perfect for any occasion, this cake is sure to impress your guests with its elegant presentation and delicious taste.
Baking this cake is a straightforward process, making it accessible for both novice and experienced bakers. The use of olive oil lends a unique depth to the cake, and the almond flour provides a tender crumb that melts in your mouth. Serve it with a dusting of powdered sugar or a drizzle of honey for an extra touch of sweetness.
Whether you’re enjoying it with a cup of coffee or serving it at a gathering, Almond Flour Olive Oil Cake is a wonderful addition to your dessert repertoire.
Ingredients (serves 4-6):
- 1 ½ cups almond flour
- ½ cup granulated sugar
- ½ teaspoon baking powder
- ¼ teaspoon salt
- 3 large eggs
- ½ cup extra virgin olive oil
- 1 teaspoon vanilla extract
- Zest of 1 lemon
- ¼ cup fresh lemon juice
- Powdered sugar (for dusting, optional)
Instructions:
- Preheat the Oven: Begin by preheating your oven to 350°F (175°C). This guarantees the cake bakes evenly and rises properly throughout the cooking process.
- Prepare the Baking Pan: Grease an 8-inch round cake pan with olive oil or butter and line the bottom with parchment paper. This step prevents the cake from sticking to the pan, making it easier to remove once baked.
- Mix Dry Ingredients: In a large mixing bowl, combine the almond flour, granulated sugar, baking powder, and salt. Whisk these ingredients together until they’re well combined, guaranteeing an even distribution of the baking powder and salt.
- Combine Wet Ingredients: In another bowl, whisk together the eggs, olive oil, vanilla extract, lemon zest, and lemon juice until well blended. This mixture will add moisture and flavor to the cake.
- Combine Wet and Dry Mixtures: Pour the wet mixture into the dry ingredients and gently fold everything together using a spatula. Be careful not to overmix; stop as soon as there are no dry patches. This will help keep the cake light and airy.
- Transfer to Baking Pan: Pour the batter into the prepared cake pan, smoothing the top with a spatula. This guarantees an even bake and a nice appearance when it comes out of the oven.
- Bake the Cake: Place the cake in the preheated oven and bake for 30-35 minutes, or until the top is golden and a toothpick inserted into the center comes out clean. Keep an eye on it to avoid overbaking, which can result in a dry cake.
- Cool and Serve: Once baked, remove the cake from the oven and allow it to cool in the pan for about 10 minutes. Then, carefully remove it from the pan and let it cool completely on a wire rack. Dust with powdered sugar before serving, if desired.
Extra Tips:
For a twist on flavor, consider adding a handful of sliced almonds or dried fruits like apricots or figs to the batter.
Additionally, pairing the cake with a dollop of Greek yogurt or a scoop of gelato can elevate the dessert experience. Remember to store any leftovers in an airtight container at room temperature for up to three days, or refrigerate to extend freshness. Enjoy your Mediterranean-inspired dessert!
Citrus and Olive Oil Sorbet

Citrus and Olive Oil Sorbet is a revitalizing dessert that perfectly encapsulates the vibrant flavors of the Mediterranean. This sorbet isn’t only a delightful treat for hot summer days, but it also offers a unique twist with the addition of high-quality olive oil. The citrus fruits provide a refreshing tartness that balances beautifully with the rich, smooth notes of the olive oil.
This dessert is light, airy, and surprisingly sophisticated, making it the perfect ending to a Mediterranean meal or a charming stand-alone treat. The sorbet is simple to make yet impressive in taste and presentation. With just a few ingredients, you can create a silky, frozen dessert that will surely wow your guests.
The combination of lemon, orange, and a hint of olive oil is reminiscent of the sun-kissed groves of the Mediterranean, transporting you to a warm, sunny locale with each bite. Enjoy this delightful sorbet as a palate cleanser or a sweet finish to any meal.
Ingredients (Serves 4-6):
- 1 cup fresh orange juice (about 3-4 oranges)
- 1/2 cup fresh lemon juice (about 2-3 lemons)
- 1 cup granulated sugar
- 1 cup water
- 1/4 cup high-quality extra-virgin olive oil
- Zest of 1 orange
- Zest of 1 lemon
- A pinch of salt
Cooking Instructions:
- Prepare the Citrus Juices: Start by juicing the oranges and lemons until you have the required amount of juice. Strain the juices through a fine mesh sieve to remove any pulp and seeds, ensuring a smooth sorbet texture.
- Make the Simple Syrup: In a small saucepan, combine the sugar and water. Heat over medium heat, stirring occasionally until the sugar has completely dissolved. Remove from heat and allow to cool slightly.
- Mix Ingredients: In a mixing bowl, combine the strained citrus juices, simple syrup, olive oil, lemon zest, orange zest, and a pinch of salt. Whisk gently until all ingredients are well combined.
- Chill the Mixture: Place the mixture in the refrigerator and let it chill for at least 1 hour. This step is important to enhance the flavors and prepare the mixture for freezing.
- Freeze the Sorbet: Pour the chilled mixture into an ice cream maker and churn according to the manufacturer’s instructions until it reaches a soft-serve consistency. If you don’t have an ice cream maker, you can pour the mixture into a shallow dish and place it in the freezer.
- Final Freeze (if needed): If using the shallow dish method, stir the mixture every 30 minutes for about 2-3 hours, until it reaches a firm and scoopable consistency.
- Serve: Once the sorbet is fully frozen, scoop it into serving bowls or glasses. Drizzle a little extra olive oil over the top if desired, and garnish with a slice of citrus or a sprig of mint for an elegant presentation.
Extra Tips: For the best flavor, use high-quality, fresh-squeezed juice and a premium extra-virgin olive oil. The olive oil adds a unique creaminess and depth to the sorbet, so don’t skip it!
If you prefer a sweeter sorbet, adjust the sugar according to your taste. Additionally, you can experiment with other citrus fruits, like grapefruit or lime, to create different flavor profiles. Enjoy your homemade sorbet as a revitalizing treat, and feel free to store any leftovers in an airtight container in the freezer for up to a week.
Fresh Fig and Ricotta Tart

The Fresh Fig and Ricotta Tart is a delightful Mediterranean dessert that perfectly marries the sweetness of fresh figs with the creamy richness of ricotta cheese. This elegant tart isn’t only visually appealing but also offers a burst of flavors that captures the essence of Mediterranean cuisine.
With a buttery crust and a luscious filling, this dessert is perfect for special occasions or simply enjoying a sweet treat at home. Making this tart is a straightforward process that allows the natural flavors of the figs to shine through.
The combination of the delicate ricotta and the fresh figs creates a rejuvenating balance that’s sure to impress your family and friends. Whether served at a dinner party or as a weekend indulgence, the Fresh Fig and Ricotta Tart is a delightful way to celebrate the bounty of seasonal produce.
Ingredients (Serves 4-6):
- 1 pre-made tart shell (9-inch)
- 1 cup ricotta cheese
- 1/4 cup powdered sugar
- 1 teaspoon vanilla extract
- 1 tablespoon lemon juice
- 8-10 fresh figs, sliced
- 2 tablespoons honey (for drizzling)
- Fresh mint leaves (for garnish)
Cooking Instructions:
- Prepare the Tart Shell: If using a frozen tart shell, bake according to package instructions until golden brown. Allow it to cool completely on a wire rack before filling. If making a homemade tart shell, roll out the dough, fit it into a tart pan, and blind bake until lightly golden. Let it cool.
- Make the Ricotta Filling: In a medium mixing bowl, combine the ricotta cheese, powdered sugar, vanilla extract, and lemon juice. Using a spatula or a hand mixer, blend the ingredients until smooth and creamy. Taste and adjust sweetness if needed by adding more powdered sugar.
- Assemble the Tart: Once the tart shell is completely cool, spoon the ricotta filling into the tart shell. Use a spatula to spread it evenly across the bottom of the shell.
- Add the Fresh Figs: Arrange the sliced fresh figs artfully on top of the ricotta filling. You can overlap the slices or create a pattern that appeals to your aesthetic.
- Drizzle with Honey: Lightly drizzle honey over the figs and ricotta filling, allowing it to enhance the sweetness and add a glossy finish.
- Chill and Serve: Place the tart in the refrigerator for at least 30 minutes to allow the flavors to meld and the filling to set slightly. Before serving, garnish with fresh mint leaves for an added touch of color and flavor.
Extra Tips:
For the best flavor and texture, use ripe, fresh figs when they’re in season. If figs aren’t available, consider substituting them with other seasonal fruits such as pears or peaches.
You can also experiment with flavored ricotta by adding a hint of orange zest or a pinch of cinnamon for an extra layer of complexity. Serve the tart chilled for a rejuvenating dessert that’s perfect for warm evenings, and don’t hesitate to pair it with a scoop of vanilla ice cream or a dollop of whipped cream for added indulgence!
Lemon and Rosemary Olive Oil Muffins

These delightful Lemon and Rosemary Olive Oil Muffins are a perfect fusion of Mediterranean flavors, offering a revitalizing twist on traditional muffins. The combination of zesty lemon and aromatic rosemary creates a unique taste profile that elevates these muffins beyond your regular breakfast treat.
Made with olive oil, they’re moist and tender, making them an excellent choice for a light dessert or a satisfying snack any time of the day. The use of olive oil instead of butter not only adds a rich flavor but also results in a healthier option that’s still indulgent.
Whether you enjoy them warm from the oven or at room temperature, these muffins are sure to impress your family and friends. Pair them with a cup of tea or coffee for a delightful afternoon pick-me-up or serve them at brunch for a sophisticated touch.
Ingredients (Serves 4-6)
- 1 ½ cups all-purpose flour
- ½ cup granulated sugar
- 2 teaspoons baking powder
- ½ teaspoon baking soda
- ½ teaspoon salt
- 1 tablespoon fresh rosemary, finely chopped
- Zest of 1 lemon
- ½ cup extra virgin olive oil
- 2 large eggs
- ½ cup buttermilk
- 1 teaspoon pure vanilla extract
- 2 tablespoons fresh lemon juice
Cooking Instructions
- Preheat the Oven: Begin by preheating your oven to 350°F (175°C). This guarantees that your muffins will bake evenly and rise nicely once the batter is ready.
- Prepare Muffin Pan: Lightly grease a muffin pan with olive oil or line it with muffin liners. This prevents the muffins from sticking and makes for easy removal once they’re baked.
- Mix Dry Ingredients: In a large mixing bowl, whisk together the all-purpose flour, granulated sugar, baking powder, baking soda, salt, chopped rosemary, and lemon zest. This will help evenly distribute the leavening agents and guarantee a uniform texture in the muffins.
- Combine Wet Ingredients: In a separate bowl, whisk together the olive oil, eggs, buttermilk, vanilla extract, and fresh lemon juice. Mixing these ingredients separately allows for a smoother batter when combined with the dry ingredients.
- Combine Wet and Dry Ingredients: Pour the wet mixture into the bowl with the dry ingredients. Stir gently with a spatula or wooden spoon until just combined. Be careful not to overmix, as this can result in dense muffins. A few lumps are perfectly fine.
- Fill Muffin Tin: Using a spoon or ice cream scoop, divide the batter evenly among the muffin cups, filling each about two-thirds full. This allows space for the muffins to rise without overflowing.
- Bake: Place the muffin pan in the preheated oven and bake for 18-20 minutes, or until a toothpick inserted into the center of a muffin comes out clean. Keep an eye on them towards the end to avoid over-baking.
- Cool and Serve: Once baked, remove the muffins from the oven and allow them to cool in the pan for about 5 minutes. Then, transfer them to a wire rack to cool completely. Enjoy them warm or at room temperature.
Extra Tips
For an added layer of flavor, consider drizzling a bit of honey or a lemon glaze on top of the muffins once they’ve cooled. You can also experiment with different herbs, like thyme or basil, if you wish to modify the flavor profile.
Storing the muffins in an airtight container at room temperature will keep them fresh for several days, or you can freeze them for longer storage. Just remember to let them cool completely before freezing.
Avocado Chocolate Mousse

Avocado Chocolate Mousse is a rich and creamy dessert that combines the healthy fats of avocados with the decadence of chocolate. This delightful treat isn’t only indulgent but also surprisingly nutritious, making it a perfect option for those who want to enjoy a sweet dessert without compromising on health.
The natural creaminess of the avocado lends itself to a smooth texture that mimics traditional mousse, while the cocoa powder and sweetener provide that classic chocolate flavor we all love. This dessert is incredibly easy to prepare and can be whipped up in no time, making it an ideal choice for entertaining guests or simply enjoying a guilt-free treat at home.
With the addition of ingredients like maple syrup or honey, you can adjust the sweetness to your liking, and by using high-quality cocoa powder, you can elevate the chocolate flavor even further. Serve it chilled, and watch as everyone falls in love with this unique twist on a classic dessert.
Ingredients (Serves 4-6):
- 2 ripe avocados
- 1/2 cup unsweetened cocoa powder
- 1/4 cup maple syrup or honey
- 1/4 cup almond milk (or any milk of choice)
- 1 teaspoon vanilla extract
- A pinch of sea salt
- Optional toppings: fresh berries, chopped nuts, or shredded coconut
Cooking Instructions:
- Prepare the Avocados: Cut the ripe avocados in half, remove the pit, and scoop the flesh into a blender or food processor. Make sure the avocados are well-ripened for the best creamy consistency.
- Add the Ingredients: To the blender, add the unsweetened cocoa powder, maple syrup or honey, almond milk, vanilla extract, and a pinch of sea salt. These ingredients will create the rich flavor and creamy texture of the mousse.
- Blend Until Smooth: Blend the mixture on high speed until it’s completely smooth and creamy. Scrape down the sides of the blender as needed to guarantee all ingredients are well incorporated. This step is essential for achieving the right mousse texture.
- Taste and Adjust: Once blended, taste the mousse. If you prefer it sweeter, add a little more maple syrup or honey and blend again until fully combined. Adjusting the sweetness allows you to tailor the dessert to your preference.
- Chill the Mousse: Spoon the mousse into serving bowls or cups and refrigerate for at least 30 minutes to allow it to set and chill. This will enhance the flavors and improve the texture.
- Serve and Garnish: Once chilled, serve the avocado chocolate mousse topped with your choice of fresh berries, chopped nuts, or shredded coconut for added texture and flavor.
Extra Tips:
When preparing Avocado Chocolate Mousse, confirm that the avocados are perfectly ripe for ideal creaminess. If you want to enhance the chocolate flavor, consider adding a teaspoon of espresso powder, which will intensify the cocoa without imparting a coffee taste.
This dessert can be made in advance and stored in the refrigerator for up to 3 days, making it a convenient option for meal prep or last-minute gatherings. Enjoy your delicious and healthy treat!
Poached Pears in Red Wine
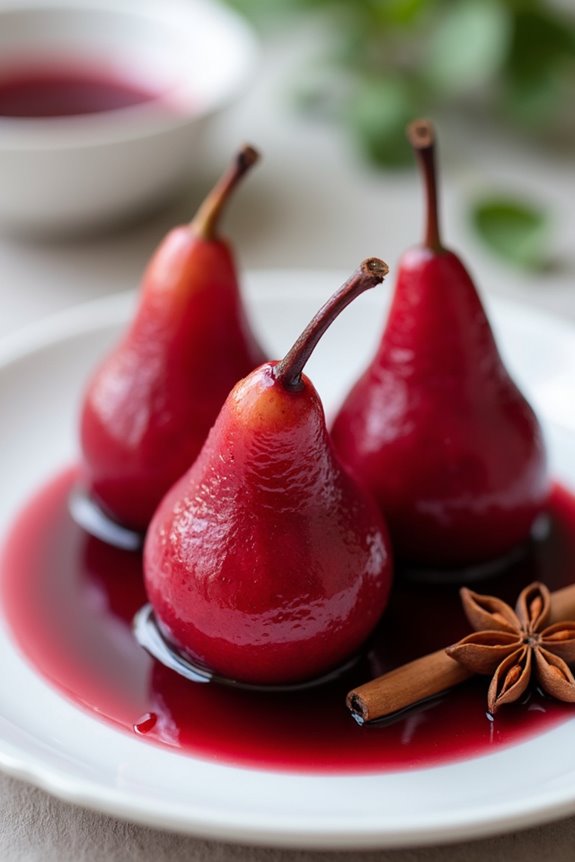
Poached Pears in Red Wine is a classic Mediterranean dessert that’s both elegant and simple to prepare. This dish is perfect for dinner parties or a romantic evening at home, as it combines the sweetness of ripe pears with the rich, complex flavors of red wine and aromatic spices. The result is a visually stunning dessert that’s as delightful to the palate as it’s to the eyes.
This recipe allows the pears to soak up the flavors of the wine, creating a tender and flavorful treat that can be served warm or chilled. The poaching process not only enhances the natural sweetness of the fruit but also adds a beautiful ruby hue to the pears, making them an impressive addition to any dessert table. Serve them as they are, or with a dollop of whipped cream, vanilla ice cream, or a sprinkle of nuts for added texture.
Ingredients (Serves 4-6)
- 4 medium-sized ripe pears, preferably Bosc or Anjou
- 1 bottle (750ml) of dry red wine
- 1 cup granulated sugar
- 1 cup water
- 1 cinnamon stick
- 4 whole cloves
- 1 star anise (optional)
- Zest of 1 orange
- Zest of 1 lemon
- Juice of 1 lemon
Cooking Instructions
- Prepare the Pears: Begin by peeling the pears, leaving the stems intact for presentation. Cut a small slice from the bottom of each pear to create a flat base, facilitating they can stand upright in the pot. To prevent browning, you can rub the pears with lemon juice after peeling.
- Make the Poaching Liquid: In a large saucepan, combine the red wine, sugar, water, cinnamon stick, cloves, star anise (if using), and the zests of orange and lemon. Bring the mixture to a gentle simmer over medium heat, stirring occasionally to dissolve the sugar.
- Poach the Pears: Once the poaching liquid is simmering, carefully place the pears upright into the saucepan. Confirm they’re fully submerged; if not, add a bit more water or wine until they’re covered. Reduce the heat to low and let them poach gently for about 30-40 minutes, or until the pears are tender when pierced with a knife.
- Cool and Infuse: After the pears are tender, remove them from the pot and set them aside on a plate. Increase the heat to medium-high and allow the poaching liquid to boil and reduce until it thickens slightly, about 10-15 minutes. This will concentrate the flavors. Once it has reached the desired consistency, remove the pot from heat and let it cool slightly.
- Serve: To serve, place each pear on a dessert plate and drizzle with the reduced poaching liquid. You can serve them warm or allow them to cool in the refrigerator for a few hours for a chilled dessert. Pair with whipped cream or ice cream if desired.
Extra Tips
For an extra layer of flavor, consider adding some vanilla extract or a vanilla bean to the poaching liquid. You can also experiment with different spices, such as nutmeg or cardamom, to match your personal taste.
Poached pears can be made a day ahead, as their flavor deepens while sitting in the poaching liquid overnight. Just be sure to store them in the refrigerator and reheat gently before serving if desired.
Coconut and Date Energy Bites

Coconut and Date Energy Bites are a delicious and nutritious treat that epitomize the vibrant flavors of Mediterranean cuisine. These little bites are perfect for a quick snack, a post-workout boost, or a healthy dessert option. They combine the natural sweetness of dates with the rich, creamy texture of coconut, making them not only satisfying but also energizing. The best part is that they require no baking, allowing you to whip them up in just a few minutes.
With a handful of simple ingredients, these energy bites are easy to customize according to your taste preferences. You can add nuts, seeds, or a touch of vanilla to elevate the flavor profile. Perfect for sharing, these energy bites make a delightful addition to gatherings or a wholesome treat for yourself. Let’s explore this simple recipe that serves 4-6 people.
Ingredients:
- 1 cup pitted Medjool dates
- 1 cup unsweetened shredded coconut
- 1/2 cup rolled oats
- 1/4 cup almond butter (or any nut butter of your choice)
- 1 teaspoon vanilla extract
- A pinch of sea salt
- Optional: 1/4 cup chopped nuts or seeds (e.g., almonds, walnuts, chia seeds)
Cooking Instructions:
- Prepare the Dates: If your Medjool dates are hard or slightly dried out, soak them in warm water for about 10 minutes to soften them. Drain and pat them dry before using. This step is vital as it helps in achieving a smooth texture in the final mixture.
- Combine Ingredients: In a food processor, add the softened dates, shredded coconut, rolled oats, almond butter, vanilla extract, and sea salt. If you’re using any optional ingredients like chopped nuts or seeds, add them at this stage as well. This mixture will provide flavor and texture to your energy bites.
- Blend the Mixture: Pulse the food processor until all ingredients are well combined and form a sticky dough. You may need to scrape down the sides occasionally to confirm everything is evenly mixed. The mixture should be moist enough to hold together but not overly sticky.
- Form the Energy Bites: Once the mixture has reached the desired consistency, use your hands to roll small portions of the mixture into bite-sized balls, about 1 inch in diameter. This step allows you to shape the bites and gives them a nice, uniform appearance.
- Coat in Coconut: For an extra touch, roll each energy bite in additional shredded coconut to coat the outside. This adds an appealing texture and enhances the coconut flavor.
- Chill and Serve: Place the energy bites on a plate or baking sheet lined with parchment paper. Refrigerate for at least 30 minutes to firm up. Once chilled, they’re ready to enjoy. Store any leftovers in an airtight container in the refrigerator for up to one week.
Extra Tips:
When making Coconut and Date Energy Bites, feel free to experiment with different nut butters or add-ins like cacao nibs for a chocolatey twist. If you prefer a sweeter bite, you can also incorporate a drizzle of honey or maple syrup.
To make these bites more festive, consider adding spices such as cinnamon or cardamom for an aromatic flavor. Enjoy these bites as a portable snack or a delightful dessert that aligns perfectly with a Mediterranean-inspired diet!
Semolina and Orange Blossom Pudding
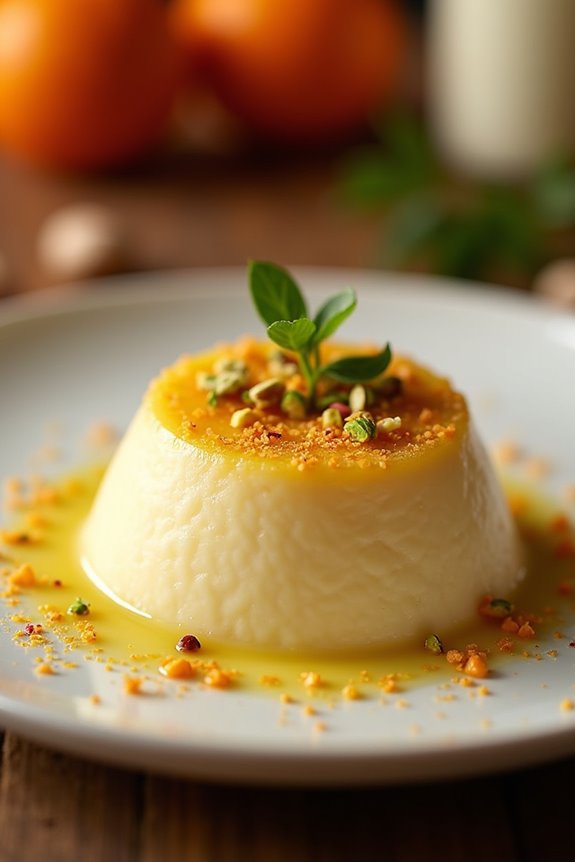
Semolina and Orange Blossom Pudding is a delightful Mediterranean dessert that combines the creamy texture of semolina with the fragrant aroma of orange blossom water. This dish is simple to prepare and is perfect for impressing guests at a dinner party or simply enjoying as a comforting treat at home. The pudding is typically served chilled, allowing the flavors to meld beautifully, making it a revitalizing conclusion to any meal.
This dessert celebrates the vibrant flavors of the Mediterranean, showcasing the sweet and floral notes of orange blossom. The semolina provides a unique texture that contrasts with the smoothness of the pudding, creating a delightful mouthfeel. Garnished with crushed pistachios or almonds, this pudding not only tastes good but also looks stunning on the table.
Ingredients (serving size: 4-6 people)
- 1 cup semolina
- 4 cups milk
- 1 cup sugar
- 1/4 cup orange blossom water
- 1/2 teaspoon vanilla extract
- 1/4 teaspoon salt
- 1 tablespoon butter
- Chopped pistachios or almonds for garnish (optional)
- Extra orange blossom water for drizzling (optional)
Cooking Instructions
- Prepare the Milk Mixture: In a medium saucepan, combine the milk, sugar, and salt. Heat the mixture over medium heat until it begins to simmer, stirring occasionally to prevent it from scorching. This step guarantees that the sugar dissolves completely, enhancing the sweetness of the pudding.
- Add Semolina: Gradually whisk in the semolina while continuously stirring to prevent lumps from forming. Continue to cook the mixture on low heat, stirring constantly for about 10-15 minutes, or until it thickens to a pudding-like consistency. Cooking it slowly allows the semolina to absorb the milk and achieve a creamy texture.
- Incorporate Flavors: Once the mixture has thickened, remove it from the heat. Stir in the butter, vanilla extract, and orange blossom water. Mixing these ingredients after cooking helps retain their flavors and aromatic qualities, contributing to the overall taste of the pudding.
- Set the Pudding: Pour the pudding into individual serving dishes or a large serving bowl. Smooth the top with a spatula and allow it to cool at room temperature for about 15 minutes before transferring it to the refrigerator. Refrigerate for at least 2-3 hours or until set. Chilling helps the pudding firm up and allows the flavors to meld.
- Serve and Garnish: Before serving, garnish the pudding with chopped pistachios or almonds for added texture and visual appeal. If desired, drizzle a little extra orange blossom water on top for a delightful finishing touch. This step adds a lovely fragrance and enhances the overall presentation of the dessert.
Extra Tips
When preparing Semolina and Orange Blossom Pudding, it’s essential to whisk continuously while adding the semolina to avoid clumping. If you prefer a sweeter pudding, feel free to adjust the sugar according to your taste.
Additionally, for a twist, you can experiment with other flavors, such as rose water or lemon zest, to create a unique variation of this classic dessert. Be sure to serve it chilled for the best taste experience!
Watermelon Salad With Feta and Mint
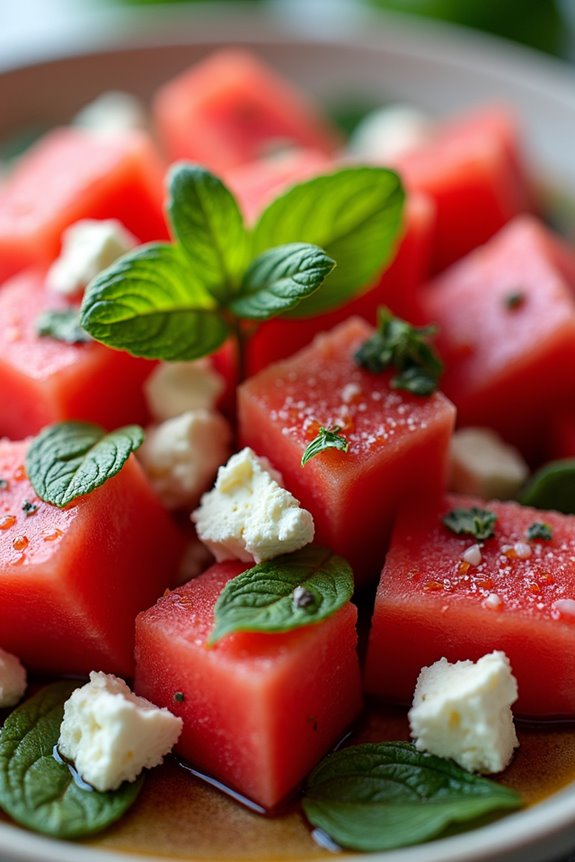
Watermelon Salad with Feta and Mint is a rejuvenating and vibrant Mediterranean dish that perfectly combines sweet, juicy watermelon with the tangy flavor of feta cheese and the aromatic freshness of mint.
This salad isn’t only a feast for the eyes, with its bright colors, but it also provides a delightful contrast of flavors and textures. Ideal for summer gatherings, picnics, or as a light dessert, this salad is easy to prepare and sure to impress your guests.
The ingredients in this salad come together to create a harmonious blend that’s both satisfying and invigorating. The crispness of the watermelon pairs beautifully with the creaminess of the feta, while the mint adds a burst of freshness.
Drizzle a bit of balsamic reduction or olive oil over the top, and you have a dish that’s both simple and sophisticated.
Ingredients (serves 4-6):
- 4 cups watermelon, cubed
- 1 cup feta cheese, crumbled
- 1/2 cup fresh mint leaves, roughly chopped
- 2 tablespoons olive oil
- 1 tablespoon balsamic reduction (optional)
- Salt and pepper, to taste
Cooking Instructions:
- Prepare the Watermelon: Begin by selecting a ripe watermelon. Cut the watermelon into quarters, remove the rind, and then cube the flesh into bite-sized pieces. Place the cubed watermelon in a large mixing bowl.
- Add Feta Cheese: Next, take the feta cheese and crumble it using your fingers or a fork. Sprinkle the crumbled feta over the watermelon cubes in the bowl, ensuring an even distribution for maximum flavor in every bite.
- Incorporate Mint: Wash the fresh mint leaves thoroughly and pat them dry. Roughly chop the mint leaves and add them to the bowl with the watermelon and feta. The mint will provide a fresh aroma and flavor that complements the sweetness of the watermelon.
- Dress the Salad: Drizzle the olive oil over the salad mixture. If desired, add balsamic reduction for an extra layer of flavor. Gently toss the salad with two large spoons, being careful not to mash the watermelon, but ensuring all ingredients are well combined.
- Season to Taste: Finally, season the salad with a pinch of salt and pepper. Taste the salad and adjust the seasoning if necessary, keeping in mind that feta cheese is already salty.
- Serve and Enjoy: Transfer the salad to a serving platter or individual bowls. For an elegant presentation, you can garnish with extra mint leaves or a sprinkle of feta on top. Serve immediately and enjoy the delightful flavors!
Extra Tips: When preparing Watermelon Salad with Feta and Mint, try to use the freshest ingredients available for the best taste.
Choosing a seedless watermelon will make preparation easier and more enjoyable. If you want to prepare the salad ahead of time, consider adding the mint just before serving to maintain its vibrant color and flavor.
Also, you can experiment with different types of cheese, such as goat cheese, for a unique twist on the classic recipe.