

When I think of Portuguese cuisine, the vibrant colors and rich flavors of their vegetarian dishes come to mind. From the comforting warmth of Caldo Verde to the sweet indulgence of Pastéis De Nata, there’s a luxurious charm in every bite. These recipes transform humble ingredients into something extraordinary, proving that plant-based cooking can be both exquisite and satisfying. Curious about which dishes will elevate your next meal?
Caldo Verde: A Hearty Portuguese Kale Soup
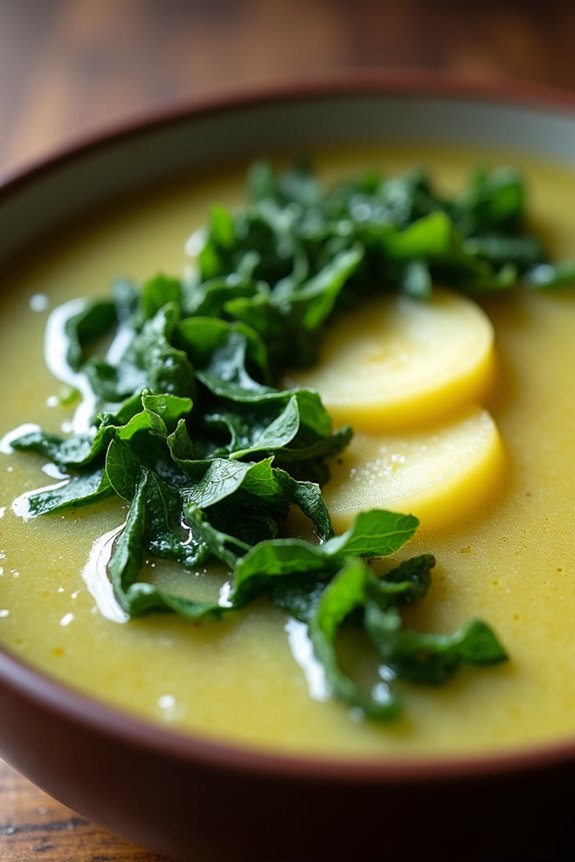
Caldo Verde is a traditional Portuguese soup known for its comforting warmth and delightful flavors. This dish is a staple in Portuguese cuisine, often served at family gatherings and celebrations. The base of this hearty soup consists of potatoes, onions, and kale, offering a nourishing combination that warms the soul.
The simplicity of the ingredients allows for a rich and flavorful broth that can be enjoyed on its own or paired with crusty bread. This vegetarian version of Caldo Verde maintains the essence of the original while ensuring it’s suitable for all diets. The addition of olive oil and a hint of garlic enhances the flavor profile, making this dish not only healthy but also incredibly satisfying.
Perfect for chilly evenings or as a light lunch, this soup is sure to please both vegetarians and meat-eaters alike.
Ingredients (Serves 4-6)
- 1 tablespoon olive oil
- 1 medium onion, finely chopped
- 2 cloves garlic, minced
- 4 medium potatoes, peeled and diced
- 6 cups vegetable broth
- 1 bunch kale, stems removed and leaves thinly sliced
- Salt and black pepper to taste
- Optional: Chorizo or smoked paprika for flavor enhancement (omit for strict vegetarian)
Cooking Instructions
1. Sauté the Aromatics
In a large pot, heat the olive oil over medium heat. Add the finely chopped onion and sauté until it becomes translucent, about 5 minutes. Stir in the minced garlic and cook for an additional minute until fragrant. This step builds the foundation of flavor for your soup.
2. Cook the Potatoes
Add the diced potatoes to the pot and stir well to combine with the onions and garlic. Pour in the vegetable broth, ensuring the potatoes are fully submerged. Bring the mixture to a boil, then reduce the heat to a simmer. Cook the potatoes until they’re tender, which should take about 15-20 minutes.
3. Blend the Soup
Once the potatoes are cooked, use an immersion blender to puree the soup until smooth. If you don’t have an immersion blender, you can carefully transfer the soup in batches to a countertop blender. This step helps create a creamy texture while still allowing for some potato chunks.
4. Add the Kale
Stir in the sliced kale and let the soup simmer for an additional 5-7 minutes, or until the kale is tender. Season the soup with salt and black pepper to taste. If desired, you can add chorizo or a pinch of smoked paprika for an extra layer of flavor.
5. Serve and Enjoy
Ladle the soup into bowls and serve hot. For a comforting touch, accompany it with crusty bread or a drizzle of olive oil on top. Enjoy your delicious Caldo Verde!
Extra Tips
For the best results, choose fresh, vibrant kale and make sure to wash it thoroughly to remove any grit. If you prefer a thicker soup, blend a portion of the kale along with the potatoes for added creaminess.
Additionally, feel free to customize the recipe by adding other vegetables like carrots or leeks for extra nutrition. This soup stores well in the refrigerator and can be reheated, making it perfect for meal prep.
Pimentos Padrón: Blistered Green Peppers

Pimentos Padrón are a delightful Spanish delicacy that has made their way into Portuguese cuisine, offering a burst of flavor in each bite. These small, green peppers are known for their mild heat and unique taste, making them an excellent choice for a vegetarian dish. When blistered in a hot skillet, they develop a smoky flavor that pairs perfectly with a sprinkle of sea salt.
This dish isn’t only easy to prepare but also serves as a prime appetizer or side dish for any meal, showcasing the beauty of simple ingredients.
To prepare Pimentos Padrón, you’ll need minimal ingredients and a few simple steps. This recipe serves 4-6 people, making it perfect for sharing with friends and family. Whether you’re hosting a gathering or just looking for a quick snack, these blistered peppers will impress everyone at the table and can be enjoyed warm or at room temperature.
Ingredients:
- 500 grams Pimentos Padrón
- 2 tablespoons olive oil
- Sea salt, to taste
- Lemon wedges (for serving, optional)
Cooking Instructions:
- Prepare the Peppers: Rinse the Pimentos Padrón under cold water to remove any dirt. Pat them dry with a kitchen towel to guarantee they blister properly in the pan.
- Heat the Oil: In a large skillet, heat the olive oil over medium-high heat. Make sure the oil is hot enough before adding the peppers; this will allow them to blister quickly and evenly.
- Cook the Peppers: Carefully add the Pimentos Padrón to the hot skillet in a single layer. Allow them to cook undisturbed for about 2-3 minutes, until the skin starts to blister and turn darker.
- Stir and Continue Cooking: After the initial cook time, stir the peppers gently to guarantee they blister on all sides. Continue cooking for another 2-3 minutes, or until the peppers are tender and have a nice char.
- Season and Serve: Once cooked, remove the skillet from heat and transfer the blistered peppers to a serving dish. Sprinkle with sea salt to taste. If desired, serve with lemon wedges on the side for a bright, zesty contrast.
Extra Tips:
For the best results, make sure to use fresh Pimentos Padrón that are firm and vibrant in color. If you find some peppers that are particularly large, you might want to cut them in half to guarantee even cooking.
Additionally, be aware that while most Padrón peppers are mild, occasionally you may come across one that packs a bit of heat—embrace the surprise! These peppers are best enjoyed fresh, so try to serve them immediately after cooking for maximum flavor and texture.
Bifana De Seitan: Vegan Seitan Sandwich

Bifana De Seitan is a delightful Portuguese dish that has been lovingly adapted to suit a vegan diet. Traditionally made with marinated pork, this version uses seitan, which is a protein-rich meat substitute made from wheat gluten. The result is a satisfying sandwich that mimics the texture and flavors of the original while being entirely plant-based.
This dish is perfect for casual lunches, picnics, or even as a hearty dinner option, and it’s sure to please both vegans and non-vegans alike.
In this recipe, the seitan is marinated in a savory mixture of spices, garlic, and vinegar, bringing out its umami flavors. Once cooked, it’s placed in a crusty bread roll and topped with sautéed onions and mustard, creating a deliciously layered sandwich. Serve it with a side of crispy potatoes or a fresh salad to make it a complete meal.
Let’s explore the ingredients and cooking instructions, and get started on making this delectable Bifana De Seitan!
Ingredients (Serves 4-6)
- 1 lb (450g) seitan, sliced thinly
- 4 cloves garlic, minced
- 1 onion, sliced
- 1/4 cup apple cider vinegar
- 1/4 cup soy sauce
- 2 tablespoons olive oil
- 1 teaspoon paprika
- 1 teaspoon ground cumin
- 1 teaspoon black pepper
- 1 teaspoon salt
- 1/2 teaspoon chili powder (optional for heat)
- 4-6 crusty bread rolls
- Mustard, for serving
- Fresh parsley, for garnish (optional)
Cooking Instructions
1. Marinate the Seitan: In a large bowl, combine the minced garlic, apple cider vinegar, soy sauce, olive oil, paprika, cumin, black pepper, salt, and chili powder. Whisk until well mixed.
Add the sliced seitan to the marinade, ensuring each piece is well coated. Cover the bowl and let it marinate in the refrigerator for at least 30 minutes, or up to 2 hours for more flavor.
2. Cook the Onions: In a large skillet, heat a tablespoon of olive oil over medium heat. Add the sliced onions and sauté for about 5-7 minutes until they become soft and translucent.
Stir occasionally to prevent them from burning. Once cooked, remove them from the skillet and set aside.
3. Sauté the Seitan: In the same skillet, add another tablespoon of olive oil if needed. Remove the marinated seitan from the bowl, allowing excess marinade to drip off, and add it to the skillet.
Cook over medium-high heat, stirring occasionally, for about 8-10 minutes, or until the seitan is heated through and slightly crispy on the edges.
4. Assemble the Sandwiches: Slice the crusty bread rolls in half. Layer the sautéed seitan evenly on the bottom half of each roll.
Top with the sautéed onions and a generous spread of mustard. Place the top half of the roll over the filling to complete the sandwich.
5. Serve: Serve the sandwiches warm, garnished with fresh parsley if desired. Pair them with crispy potatoes or a light salad for a delightful meal.
Extra Tips
For an extra burst of flavor, consider adding additional toppings such as sliced pickles, roasted peppers, or fresh arugula to your Bifana De Seitan sandwiches.
Additionally, if you prefer a spicier kick, increase the amount of chili powder or add some sliced jalapeños. Remember that the longer you let the seitan marinate, the more flavorful your sandwich will be, so don’t rush this step!
Enjoy your cooking!
Arroz De Tomate: Tomato Rice Delight

Arroz De Tomate, or Tomato Rice, is a beloved dish in Portuguese cuisine that showcases the simplicity and richness of tomatoes. This vegetarian delight isn’t only vibrant in color but also packed with flavor, making it a perfect side dish or a light main course. The dish is often prepared using fresh, ripe tomatoes, which lend their natural sweetness and acidity, resulting in a comforting and hearty meal that can be enjoyed by everyone.
The preparation of Arroz De Tomate is straightforward, yet it requires attention to detail to guarantee that the rice absorbs all the delicious tomato flavor. Traditionally, this dish is served alongside grilled vegetables or a fresh salad, making it an ideal addition to any vegetarian meal. With its aromatic herbs and spices, this dish is sure to impress your family and friends with its authentic Portuguese taste.
Ingredients (Serves 4-6):
- 2 cups long-grain rice
- 4 medium ripe tomatoes, chopped
- 1 large onion, finely chopped
- 2 cloves garlic, minced
- 4 cups vegetable broth
- 2 tablespoons olive oil
- 1 teaspoon paprika
- 1 teaspoon salt (to taste)
- 1/2 teaspoon black pepper
- Fresh parsley or cilantro, chopped (for garnish)
Cooking Instructions:
- Prepare the Base: In a large pot, heat the olive oil over medium heat. Once hot, add the chopped onion and garlic. Sauté them for about 5 minutes, or until the onion becomes translucent and fragrant. This step is vital as it builds the flavor base for the rice.
- Add the Tomatoes: Stir in the chopped tomatoes, paprika, salt, and black pepper. Cook for about 10 minutes, allowing the tomatoes to break down and release their juices. Stir occasionally to prevent sticking. This step enhances the dish’s flavor by allowing the tomatoes to caramelize slightly.
- Incorporate the Rice: Once the tomatoes are soft, add the long-grain rice to the pot. Stir well to coat the rice with the tomato mixture. This step guarantees that the rice absorbs all the flavors during cooking.
- Pour in the Broth: Carefully add the vegetable broth to the pot. Stir to combine all ingredients. Increase the heat to high until the mixture reaches a boil, then reduce the heat to low and cover the pot. This step allows the rice to cook evenly while absorbing the rich tomato broth.
- Cook the Rice: Let the rice simmer for about 15-20 minutes, or until the liquid is absorbed and the rice is tender. Avoid lifting the lid too often, as it can disrupt the cooking process. This step is essential for achieving the perfect texture in the rice.
- Fluff and Serve: Once cooked, remove the pot from heat and let it sit for 5 minutes covered. Then, fluff the rice with a fork and garnish with fresh parsley or cilantro before serving. This step adds a fresh note to the dish and enhances its presentation.
Extra Tips:
When preparing Arroz De Tomate, using high-quality, ripe tomatoes will greatly enhance the dish’s flavor. If fresh tomatoes aren’t available, consider using canned tomatoes for convenience.
Additionally, feel free to add your favorite vegetables, such as bell peppers or peas, to the rice during the cooking process for added nutrition and color.
Finally, let the dish rest for a few minutes after cooking; this allows the flavors to meld together beautifully before serving.
Feijoada: Black Bean Stew With Vegetables
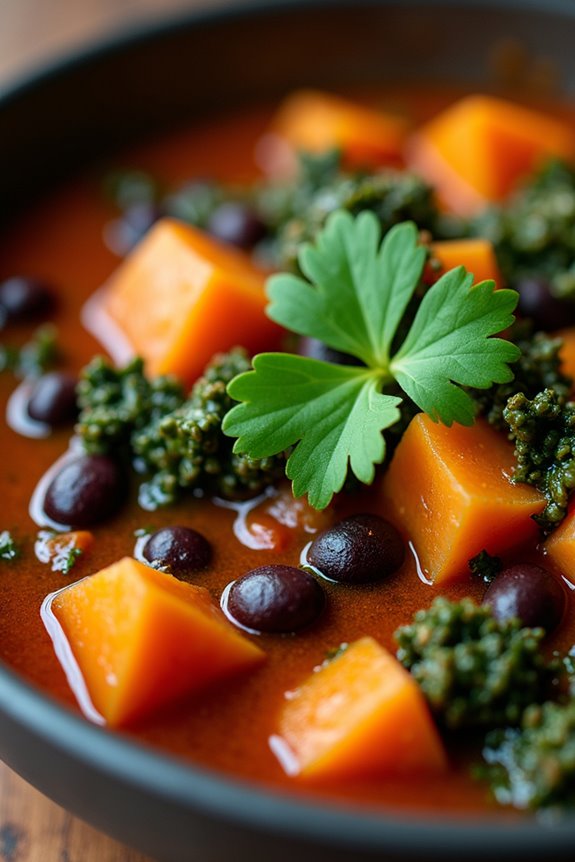
Feijoada is a hearty and flavorful black bean stew that has its roots in Portuguese cuisine, often celebrated for its rich taste and comforting nature. Traditionally, it’s made with a variety of meats; however, this vegetarian version highlights the robust flavors of vegetables and spices, making it a delicious option for those seeking a meat-free meal.
The combination of black beans, sweet potatoes, and hearty greens creates a satisfying dish that can be enjoyed on its own or served alongside rice and crusty bread. This vegetarian feijoada isn’t only packed with protein and fiber but also showcases the vibrant colors and textures of fresh vegetables.
The addition of smoked paprika and bay leaves infuses the stew with a smoky flavor that mimics the traditional preparation while keeping it completely plant-based. It’s perfect for a cozy family dinner or a gathering with friends, allowing everyone to indulge in a classic dish that’s both nourishing and full of flavor.
Ingredients (Serves 4-6):
- 2 cups black beans (soaked overnight and drained)
- 1 large onion, diced
- 3 cloves garlic, minced
- 2 medium carrots, diced
- 1 bell pepper (red or green), diced
- 1 sweet potato, peeled and cubed
- 2 cups kale or collard greens, chopped
- 4 cups vegetable broth
- 2 tablespoons olive oil
- 1 tablespoon smoked paprika
- 2 bay leaves
- Salt and pepper to taste
- Fresh parsley for garnish (optional)
Cooking Instructions:
- Prepare the Beans: After soaking the black beans overnight, drain and rinse them thoroughly. Cooking them first will guarantee they’re tender and absorb all the flavors from the stew. You can use canned beans if short on time, but dried beans provide a better texture.
- Sauté the Aromatics: In a large pot, heat the olive oil over medium heat. Add the diced onion and sauté for about 5 minutes until it becomes translucent. This step builds the flavor base of the stew.
- Add Garlic and Vegetables: Stir in the minced garlic, diced carrots, and bell pepper. Cook for an additional 3-4 minutes until the vegetables start to soften. This enhances the overall flavor profile of the stew.
- Incorporate Sweet Potatoes and Spices: Add the cubed sweet potato, smoked paprika, and bay leaves to the pot. Stir well to combine and allow the spices to toast slightly for about a minute. This deepens the flavor of the spices.
- Cook the Beans: Pour in the vegetable broth and add the soaked black beans. Bring the mixture to a boil, then reduce the heat to low. Cover the pot and let it simmer for about 30-40 minutes, or until the beans and sweet potatoes are tender. Stir occasionally to warrant even cooking.
- Add Greens: Once the beans and sweet potatoes are cooked through, stir in the chopped kale or collard greens. Cook for an additional 5-10 minutes until the greens are wilted and tender. This adds a nice color and nutritional boost to your stew.
- Season and Serve: Remove the bay leaves, taste the stew, and adjust the seasoning with salt and pepper as needed. Ladle the feijoada into bowls and garnish with fresh parsley if desired. Serve it warm with rice or crusty bread on the side.
Extra Tips:
For an added depth of flavor, consider adding a splash of liquid smoke or a few drops of hot sauce to the stew while it cooks. This will enhance the smoky notes that are characteristic of traditional feijoada.
Additionally, feel free to customize the vegetables based on what you have on hand or what’s in season. Zucchini, mushrooms, or even spinach can be great additions. Leftovers can be stored in the refrigerator for several days and often taste even better the next day as the flavors meld together.
Grilled Vegetable Espetadas: Skewered Veggies
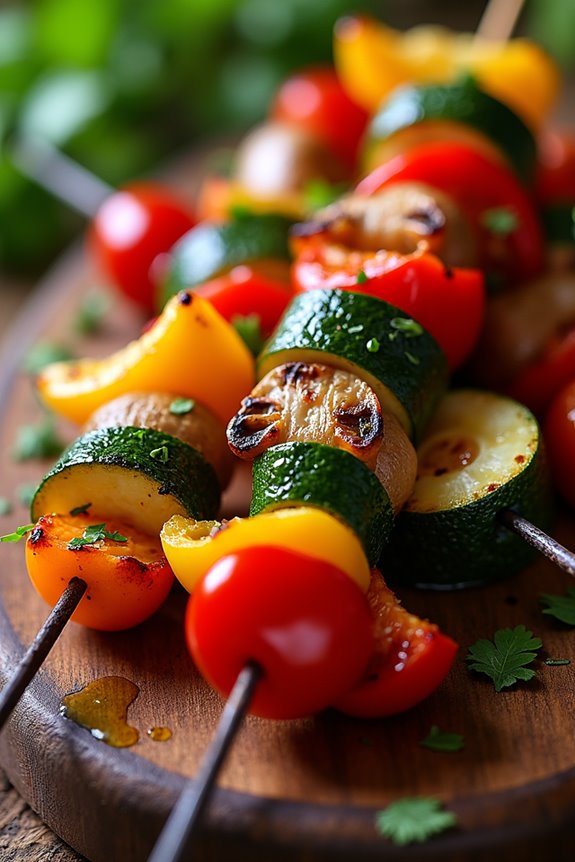
Grilled Vegetable Espetadas, a delightful Portuguese dish, celebrates the vibrant flavors of fresh vegetables tossed in aromatic herbs and grilled to perfection. The word “espetada” refers to skewering, a traditional method of cooking in Portugal. This dish not only showcases the beauty of seasonal veggies but also embodies the spirit of outdoor cooking and sharing meals with family and friends.
Perfect for summer barbecues or a cozy dinner, these colorful skewers are bound to impress vegetarians and meat-lovers alike.
The beauty of Grilled Vegetable Espetadas lies in its versatility. You can customize the vegetables based on your preferences or what’s in season. Common choices include bell peppers, zucchini, cherry tomatoes, and onions, all of which can be marinated in a simple yet flavorful herb-infused olive oil.
When grilled, these veggies become tender and slightly charred, offering a smoky taste that enhances their natural sweetness. Serve these skewers with a side of rice or a fresh salad for a complete meal.
Ingredients (Serves 4-6):
- 2 bell peppers (red and yellow), cut into bite-sized pieces
- 1 medium zucchini, sliced into thick rounds
- 1 red onion, cut into wedges
- 1 cup cherry tomatoes
- 1 cup mushrooms, whole or halved
- 1/4 cup olive oil
- 2 tablespoons fresh parsley, chopped
- 1 tablespoon fresh oregano, chopped
- 2 cloves garlic, minced
- Salt and pepper to taste
- Skewers (metal or soaked wooden)
Cooking Instructions:
- Prepare the Skewers: If using wooden skewers, soak them in water for at least 30 minutes before grilling to prevent burning. This will help them hold up during the grilling process and guarantee even cooking.
- Chop the Vegetables: While the skewers are soaking, wash and chop the bell peppers, zucchini, red onion, cherry tomatoes, and mushrooms into uniform sizes. This will help them cook evenly on the grill.
- Make the Marinade: In a bowl, combine the olive oil, chopped parsley, oregano, minced garlic, salt, and pepper. Whisk the mixture until well blended. This marinade will infuse the vegetables with flavor and help them caramelize on the grill.
- Marinate the Vegetables: Add the chopped vegetables to the bowl with the marinade. Toss them gently to guarantee all pieces are coated. Allow the vegetables to marinate for at least 20 minutes to absorb the flavors.
- Assemble the Skewers: Thread the marinated vegetables onto the skewers, alternating between different types to create a colorful and appealing presentation. Leave a little space between each piece to allow for even cooking.
- Preheat the Grill: Preheat your grill to medium-high heat. If using a grill pan, place it over medium heat on the stovetop.
- Grill the Skewers: Place the skewers on the grill and cook for about 10-15 minutes, turning occasionally. The vegetables should be tender and slightly charred. Keep an eye on them to avoid burning.
- Serve: Once cooked, remove the skewers from the grill and let them rest for a few minutes. Serve warm as a side dish or a main course with rice or a fresh salad.
Extra Tips:
For an added depth of flavor, consider adding a splash of balsamic vinegar or lemon juice to the marinade. You can also experiment with different vegetables, such as eggplant or asparagus, or even add tofu for a protein boost.
If you love a bit of spice, sprinkle some red pepper flakes into the marinade for a kick. Serve your Grilled Vegetable Espetadas with a zesty dipping sauce made from yogurt and herbs for an extra layer of flavor. Enjoy your cooking experience!
Sopa De Legumes: Traditional Vegetable Soup
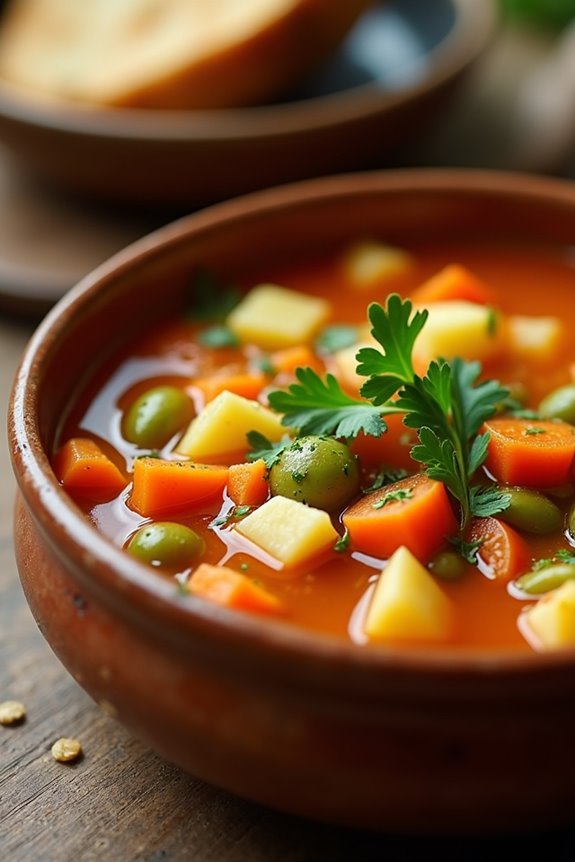
Sopa De Legumes, a traditional Portuguese vegetable soup, is a comforting dish that showcases the rich flavors of fresh vegetables. This hearty soup isn’t only nutritious but also versatile, as you can use a variety of seasonal vegetables to suit your taste. The combination of herbs and spices gives it a unique flavor profile that’s sure to warm you up on a chilly day.
Perfect as an appetizer or a light main course, Sopa De Legumes can be enjoyed by everyone, whether vegetarian or not.
Making Sopa De Legumes is a straightforward process that allows you to explore the natural flavors of vegetables. The key is to use fresh, high-quality ingredients and allow them to simmer slowly to create a rich broth. With just a few simple steps, you can create a delicious and satisfying soup that brings the essence of Portuguese cuisine right to your kitchen.
Ingredients (Serves 4-6):
- 2 tablespoons olive oil
- 1 medium onion, chopped
- 2 cloves garlic, minced
- 2 medium carrots, diced
- 2 medium potatoes, diced
- 1 zucchini, diced
- 1 bell pepper, diced
- 1 cup green beans, trimmed and cut into 1-inch pieces
- 1 can (14 oz) diced tomatoes
- 6 cups vegetable broth
- 1 bay leaf
- 1 teaspoon dried thyme
- Salt and pepper to taste
- Fresh parsley, chopped (for garnish)
Cooking Instructions:
- Sauté the Aromatics: In a large pot, heat the olive oil over medium heat. Add the chopped onion and minced garlic. Sauté until the onion becomes translucent and fragrant, about 5 minutes. This step builds the foundation of flavor for your soup.
- Add the Vegetables: Stir in the diced carrots, potatoes, zucchini, bell pepper, and green beans. Cook for an additional 5-7 minutes, stirring occasionally. This allows the vegetables to soften slightly and start mingling their flavors before adding the liquid.
- Incorporate the Tomatoes and Broth: Add the can of diced tomatoes (with their juice) and the vegetable broth to the pot. Stir well to combine all the ingredients. The tomatoes add acidity and depth to the soup, balancing the sweetness of the vegetables.
- Season and Simmer: Add the bay leaf, dried thyme, salt, and pepper to taste. Bring the soup to a boil, then reduce the heat to low and let it simmer for about 30 minutes. This slow cooking process helps the flavors meld together beautifully.
- Final Touches: After 30 minutes, remove the bay leaf from the pot. Taste the soup and adjust the seasoning if needed. If you prefer a thicker soup, you can use an immersion blender to blend a portion of the soup to your desired consistency.
- Serve: Ladle the soup into bowls and garnish with fresh chopped parsley. Serve hot, accompanied by crusty bread if desired.
Extra Tips:
To enhance the flavor of your Sopa De Legumes, consider adding a splash of lemon juice or a sprinkle of smoked paprika before serving.
You can also experiment with different herbs, such as basil or oregano, to give the soup your own twist. For a heartier version, add cooked lentils or chickpeas for added protein. This soup stores well, so feel free to make a larger batch and enjoy it throughout the week!
Ratatouille À Portuguesa: Portuguese Ratatouille
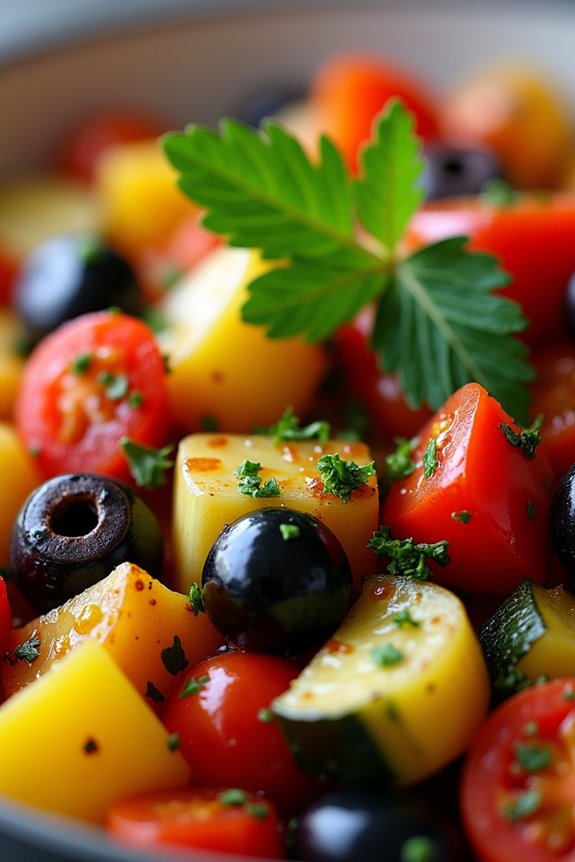
Ratatouille À Portuguesa is a delightful twist on the classic French dish, incorporating the vibrant flavors and fresh produce typical of Portuguese cuisine. This hearty vegetable medley isn’t only a feast for the eyes but also a wholesome meal that can be enjoyed as a main dish or a side. The combination of eggplant, bell peppers, zucchini, and tomatoes, seasoned with aromatic herbs, creates a rich and flavorful experience that perfectly captures the essence of summer.
In this recipe, we’ll not only honor the traditional elements of ratatouille but also incorporate some unique Portuguese additions, such as a touch of piri-piri and olives for a hint of spice and brininess. This dish is perfect for a family gathering or a cozy dinner with friends, served warm or at room temperature. Whether you’re a seasoned vegetarian or trying to incorporate more plant-based meals into your diet, Ratatouille À Portuguesa is sure to impress.
Ingredients (Serves 4-6):
- 1 large eggplant, diced
- 2 medium zucchinis, diced
- 1 large bell pepper (red or yellow), diced
- 1 large onion, chopped
- 3 cloves of garlic, minced
- 4 ripe tomatoes, chopped
- 1 cup of black olives, pitted and halved
- 2 tablespoons of olive oil
- 1 tablespoon of piri-piri sauce (adjust to taste)
- 1 teaspoon of dried oregano
- 1 teaspoon of dried basil
- Salt and pepper to taste
- Fresh parsley, chopped (for garnish)
Cooking Instructions:
- Prepare the Vegetables: Start by washing and chopping all the vegetables. Dice the eggplant, zucchinis, and bell pepper into uniform pieces to guarantee even cooking. Chop the onion and mince the garlic. Set all the vegetables aside.
- Sauté the Aromatics: In a large skillet or saucepan, heat the olive oil over medium heat. Add the chopped onion and sauté for about 3-4 minutes until it becomes translucent. Then, add the minced garlic and cook for an additional minute until fragrant, being careful not to burn it.
- Cook the Eggplant: Add the diced eggplant to the skillet and sauté for about 5-7 minutes, stirring occasionally. This will allow the eggplant to soften and absorb the flavors from the onion and garlic.
- Add the Remaining Vegetables: Once the eggplant is tender, add the diced zucchinis and bell pepper to the skillet. Stir well and cook for another 5 minutes, allowing the vegetables to soften slightly.
- Incorporate the Tomatoes and Seasoning: Add the chopped tomatoes to the skillet, along with the piri-piri sauce, dried oregano, and basil. Stir everything together, guaranteeing all the vegetables are well coated. Season with salt and pepper to taste.
- Simmer the Ratatouille: Reduce the heat to low and cover the skillet. Let the ratatouille simmer for about 15-20 minutes, stirring occasionally. This allows the flavors to meld together and the vegetables to become tender.
- Finish with Olives and Garnish: Once the vegetables are cooked to your liking, stir in the halved black olives. Cook for an additional 2-3 minutes to heat the olives through. Remove from heat and garnish with fresh parsley before serving.
Extra Tips: When making Ratatouille À Portuguesa, feel free to experiment with seasonal vegetables or to add a splash of balsamic vinegar for extra depth of flavor. This dish can be stored in the refrigerator for up to three days, and the flavors often deepen after a day, making it a great make-ahead option. Serve it alongside crusty bread or over a bed of rice or quinoa for a complete meal!
Torta De Alfarroba: Carob Cake

Torta De Alfarroba, or carob cake, is a delightful Portuguese dessert that showcases the unique flavor of carob, a naturally sweet and nutritious alternative to chocolate. This cake isn’t only delicious but also a fantastic choice for those seeking a vegetarian-friendly treat.
The rich, earthy tones of carob blend beautifully with the moist texture of the cake, making it a perfect dessert for any occasion. Whether you’re celebrating a special event or simply indulging in a sweet craving, this cake will surely impress your friends and family.
Making Torta De Alfarroba is quite straightforward and requires a handful of simple ingredients. It’s a versatile dessert that can be served on its own, dusted with powdered sugar, or paired with a dollop of whipped cream. The combination of the nutty flavor of carob and the softness of the cake creates a memorable dessert experience.
Follow this recipe to create a delicious Torta De Alfarroba that yields approximately 4-6 servings.
Ingredients
- 1 cup carob powder
- 1 cup all-purpose flour
- 1 cup sugar
- 1/2 cup vegetable oil
- 1 cup water
- 1 teaspoon baking powder
- 1 teaspoon baking soda
- 1/2 teaspoon salt
- 1 teaspoon vanilla extract
- 1/2 cup chopped nuts (optional, such as walnuts or almonds)
Cooking Instructions
- Preheat the Oven: Begin by preheating your oven to 350°F (175°C). This guarantees that the cake will bake evenly and rise properly once you have the batter ready.
- Prepare the Baking Pan: Grease a 9-inch round cake pan or line it with parchment paper. This will prevent the cake from sticking and make it easier to remove once it’s baked.
- Mix Dry Ingredients: In a large mixing bowl, sift together the carob powder, all-purpose flour, sugar, baking powder, baking soda, and salt. Sifting helps to incorporate air into the dry ingredients, resulting in a lighter cake.
- Combine Wet Ingredients: In a separate bowl, mix together the vegetable oil, water, and vanilla extract. Stir until well combined, making sure that the oil is fully incorporated into the mix.
- Combine Wet and Dry Mixtures: Slowly add the wet mixture to the dry ingredients, stirring gently until just combined. Be careful not to overmix, as this can lead to a denser cake.
- Add Nuts (Optional): If you’re using chopped nuts, fold them into the batter gently. Nuts add an extra layer of flavor and texture to the cake.
- Pour into the Pan: Pour the batter into the prepared cake pan, smoothing the top with a spatula to guarantee an even surface.
- Bake the Cake: Place the cake in the preheated oven and bake for 30-35 minutes, or until a toothpick inserted into the center comes out clean. Keep an eye on the cake towards the end of the baking time to avoid over-baking.
- Cool and Serve: Once baked, remove the cake from the oven and allow it to cool in the pan for about 10 minutes. Then, transfer it to a wire rack to cool completely. Once cool, you can dust it with powdered sugar or serve it as is.
Extra Tips
When making Torta De Alfarroba, feel free to experiment with the flavors by adding spices such as cinnamon or nutmeg to the dry ingredients for an extra kick.
Additionally, using high-quality carob powder will enhance the overall flavor of the cake. If you’re looking for a gluten-free version, you can substitute the all-purpose flour with a gluten-free flour blend. Enjoy your baking adventure and savor the delightful taste of this Portuguese classic!
Açorda: Bread Soup With Garlic and Herbs

Açorda is a traditional Portuguese dish that showcases the simplicity and heartiness of rustic cuisine. This comforting bread soup is particularly popular in coastal regions, where it’s often made with leftover bread, garlic, and aromatic herbs.
The dish is unique in its ability to transform humble ingredients into a warm and satisfying meal, making it a staple in many Portuguese households. The flavors meld beautifully, creating a rich broth that’s both savory and fragrant.
This dish isn’t only delicious but also versatile. While the classic version features a base of bread, garlic, and herbs, you can easily adapt the recipe by adding seasonal vegetables or protein options for a more filling meal.
Perfect for sharing with family and friends, Açorda brings a taste of Portugal to your table and is especially comforting on chilly days.
Ingredients (Serving Size: 4-6 People)
- 6 cups vegetable broth
- 4 cups stale bread, torn into pieces
- 6 cloves garlic, minced
- 1 cup fresh cilantro, chopped
- 1/2 cup olive oil
- 2 large eggs
- Salt and pepper, to taste
- 1 teaspoon smoked paprika (optional)
- Lemon wedges, for serving
Cooking Instructions
1. Prepare the Broth: In a large pot, bring the vegetable broth to a gentle simmer over medium heat. This will serve as the base for your soup, so it’s important to get it nice and warm before adding other ingredients.
2. Sauté the Garlic: In a separate skillet, heat the olive oil over medium heat. Add the minced garlic and sauté for about 2-3 minutes, stirring frequently until the garlic is fragrant and lightly golden.
Be cautious not to burn the garlic, as this will impart a bitter flavor to the soup.
3. Combine Ingredients: Once the garlic is ready, carefully add the sautéed garlic and oil mixture to the simmering vegetable broth. Stir well to combine the flavors, then add the torn stale bread pieces to the pot.
Allow the bread to soak in the broth for about 5-10 minutes, stirring occasionally until it becomes soft and mushy.
4. Incorporate Herbs and Seasoning: Stir in the chopped cilantro, salt, pepper, and smoked paprika (if using) into the pot. Continue to simmer for another 5 minutes, allowing the herbs to infuse their flavors into the soup.
5. Poach the Eggs: In a separate pan, bring a small pot of water to a gentle simmer. Carefully crack the eggs into the simmering water one at a time and poach them for about 3-4 minutes or until the whites are set but the yolks are still runny.
Remove the eggs with a slotted spoon and set aside.
6. Serve the Açorda: Ladle the bread soup into bowls, making sure to include plenty of the broth and soft bread in each serving. Top each bowl with a poached egg and serve with lemon wedges on the side for an extra burst of flavor.
Extra Tips
When preparing Açorda, feel free to experiment with different herbs and spices to personalize the flavor profile. Common additions include parsley or mint, which can brighten the dish even more.
If you’re looking for a heartier version, consider adding cooked beans or chickpeas for added protein. Finally, serving the soup with a drizzle of extra virgin olive oil or a sprinkle of chili flakes can elevate the dish and give it an extra kick!
Pastéis De Nata: Vegan Custard Tarts

Pastéis de Nata, the beloved Portuguese custard tart, has found a new life in the vegan culinary scene. Traditionally made with egg and cream, these delightful pastries can be transformed into a plant-based version that retains all the creamy, sweet flavor of the classic treat.
The combination of a flaky pastry shell with a rich custard filling is a match made in heaven and is sure to impress both vegans and non-vegans alike. Whether you’re serving them at a dinner party or enjoying them with your morning coffee, vegan pastéis de nata are a delightful way to celebrate Portuguese cuisine.
Making vegan pastéis de nata isn’t as intimidating as it may seem. With a few simple substitutions and some patience, you can whip up a batch of these delectable tarts in no time. The key to achieving that signature creamy custard texture lies in the use of silken tofu, plant-based milk, and a touch of cornstarch.
The result is a luscious filling that perfectly complements the buttery pastry. Let’s explore this recipe that serves 4-6 people!
Ingredients
- 1 package of vegan puff pastry (about 400g)
- 1 cup of silken tofu
- 1 cup of unsweetened almond milk (or any plant-based milk)
- 1 cup of granulated sugar
- 1/4 cup of cornstarch
- 1 teaspoon of vanilla extract
- 1/2 teaspoon of ground cinnamon
- Pinch of salt
- Lemon zest (from 1 lemon)
Instructions
- Preheat the Oven: Start by preheating your oven to 400°F (200°C). This guarantees that the pastry will be perfectly flaky when it bakes.
- Prepare the Pastry Shells: Roll out the vegan puff pastry on a lightly floured surface. Cut the pastry into circles that are large enough to fit into your muffin tin. Press each circle into the greased muffin tin, making sure the pastry rises up the sides to form a shell.
- Make the Custard Filling: In a blender, combine the silken tofu, almond milk, sugar, cornstarch, vanilla extract, ground cinnamon, salt, and lemon zest. Blend until the mixture is completely smooth and creamy. This step is vital as it guarantees a silky custard texture.
- Fill the Pastry Shells: Carefully pour the custard filling into each prepared pastry shell, filling them about three-quarters full. This allows enough space for the custard to puff up slightly while baking.
- Bake the Tarts: Place the muffin tin in the preheated oven and bake for about 25-30 minutes, or until the pastry is golden brown and the custard has set. You may notice a slight jiggle in the custard, which will firm up as it cools.
- Cool and Serve: Once baked, remove the tarts from the oven and allow them to cool in the tin for about 10 minutes. Carefully transfer them to a wire rack to cool completely. Serve warm, dusted with powdered sugar or a sprinkle of cinnamon if desired.
Extra Tips
When making vegan pastéis de nata, it’s important to use high-quality vegan puff pastry to achieve that flaky texture.
Be sure to let the tarts cool completely before serving, as the custard will continue to set as it cools. If you want to add a twist, consider experimenting with different flavors by incorporating spices like nutmeg or adding a splash of orange zest for a citrusy note.
These tarts are best enjoyed fresh but can be stored in an airtight container in the refrigerator for a couple of days. Enjoy your delicious homemade vegan pastéis de nata!
Salada De Grão-De-Bico: Chickpea Salad
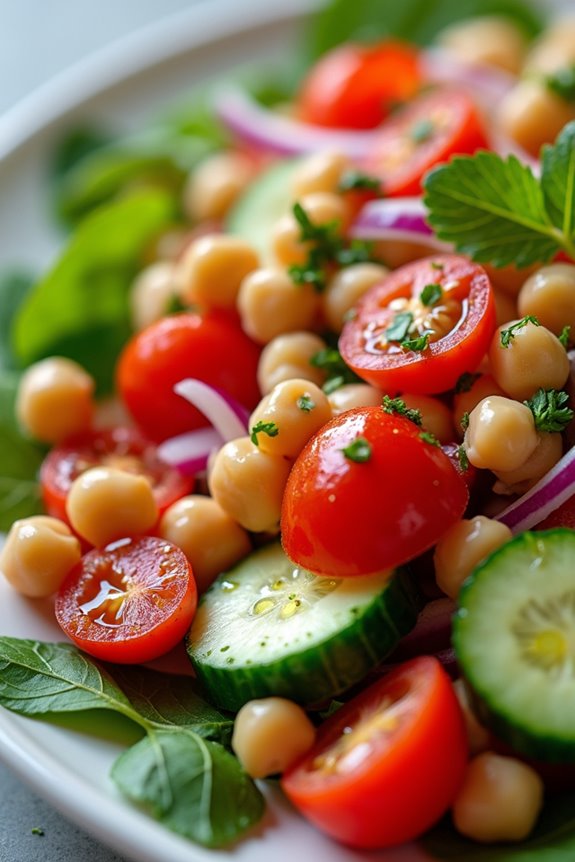
Salada De Grão-De-Bico, or Chickpea Salad, is a vibrant and nutritious dish that showcases the versatility of chickpeas. This Portuguese-inspired salad not only highlights the creamy texture and nutty flavor of chickpeas but also incorporates fresh vegetables and herbs, making it a perfect addition to any meal.
Whether served as a side dish or a light main course, this salad is packed with protein, fiber, and a medley of flavors that will delight your taste buds. This dish is incredibly easy to prepare and is ideal for gatherings or meal prep. The combination of fresh ingredients can be adjusted to suit your personal preferences, allowing you to create a salad that’s both satisfying and invigorating.
The tangy dressing brings all the elements together, creating a delightful experience in every bite. Perfect for warm weather or anytime you crave something light and healthy, Salada De Grão-De-Bico is sure to become a staple in your vegetarian repertoire.
Ingredients (Serves 4-6):
- 2 cans (15 oz each) of chickpeas, drained and rinsed
- 1 medium red bell pepper, diced
- 1 medium cucumber, diced
- 1 small red onion, finely chopped
- 1 cup cherry tomatoes, halved
- 1/4 cup fresh parsley, chopped
- 1/4 cup olive oil
- 2 tablespoons red wine vinegar
- 1 teaspoon Dijon mustard
- Salt and pepper to taste
- Optional: 1/2 teaspoon cumin for added flavor
Cooking Instructions:
- Prepare the Chickpeas: Begin by draining and rinsing the canned chickpeas under cold water. This helps to remove excess sodium and any canning liquid. Once rinsed, place the chickpeas in a large mixing bowl.
- Chop the Vegetables: Dice the red bell pepper and cucumber into bite-sized pieces, and finely chop the red onion. Halve the cherry tomatoes. It’s important to keep the pieces uniform for even distribution of flavors throughout the salad.
- Combine Ingredients: Add the diced bell pepper, cucumber, chopped onion, halved cherry tomatoes, and chopped parsley to the bowl with the chickpeas. Gently mix all the ingredients using a spoon, ensuring that everything is well combined.
- Prepare the Dressing: In a small bowl, whisk together the olive oil, red wine vinegar, Dijon mustard, salt, and pepper. If you’re using cumin for added depth of flavor, mix it in as well. The dressing should be tangy yet balanced, complementing the chickpeas and vegetables.
- Dress the Salad: Pour the dressing over the chickpea and vegetable mixture. Toss gently to coat all the ingredients evenly with the dressing. Be careful not to mash the chickpeas while mixing; you want them to remain whole for texture.
- Chill and Serve: Ideally, let the salad sit in the refrigerator for at least 30 minutes before serving. This allows the flavors to meld together beautifully. Serve chilled or at room temperature, and enjoy your invigorating Salada De Grão-De-Bico!
Extra Tips:
For added crunch and flavor, consider incorporating some diced avocado or toasted nuts, such as walnuts or almonds, into the salad. You can also experiment with other herbs like cilantro or mint for a different twist.
Additionally, this salad can be made a day in advance, making it a great option for meal prep or potlucks. Just remember to give it a good stir before serving, as the dressing may settle.
Arroz Doce: Sweet Rice Pudding

Arroz Doce, or Sweet Rice Pudding, is a beloved traditional Portuguese dessert that’s both creamy and comforting. This delightful dish is often served during festive occasions, family gatherings, or simply as a treat to enjoy at the end of a meal. With its rich flavors of cinnamon and lemon, Arroz Doce isn’t only a feast for the palate but also a nostalgic reminder of home for many. The creamy texture and sweet aroma make it a perfect dessert for all ages.
Making Arroz Doce is a simple yet rewarding process that involves cooking rice slowly in milk until it reaches a creamy consistency. This method allows the rice to absorb the flavors from the lemon zest and cinnamon, making every bite a delicious experience. Whether you’re preparing it for a special occasion or just to satisfy a sweet tooth, this recipe will guide you through creating the perfect Arroz Doce that embodies the essence of Portuguese cuisine.
Ingredients (Serves 4-6):
- 1 cup short-grain rice
- 4 cups whole milk
- 1 cup sugar
- Zest of 1 lemon
- 1 cinnamon stick
- 1 teaspoon vanilla extract
- Ground cinnamon (for garnish)
- A pinch of salt
Cooking Instructions:
- Rinse the Rice: Start by rinsing the short-grain rice under cold water. This step helps remove excess starch, which can make the pudding too sticky. Rinse until the water runs clear, then drain the rice well.
- Cook the Rice: In a medium saucepan, add 1 cup of water and a pinch of salt. Bring it to a boil, then add the rinsed rice. Lower the heat to a simmer, cover the pot, and let it cook for about 15 minutes or until the rice has absorbed most of the water. Stir occasionally to prevent sticking.
- Add Milk and Flavorings: Once the rice is cooked, add the 4 cups of whole milk, the sugar, lemon zest, and the cinnamon stick to the saucepan. Stir well to combine all the ingredients.
- Simmer the Mixture: Increase the heat to medium and bring the mixture to a gentle simmer. Once simmering, reduce the heat to low, and cook uncovered for about 30-40 minutes, stirring frequently. This will allow the rice to absorb the milk and become creamy. Keep an eye on it to prevent it from sticking to the bottom of the pan.
- Finish with Vanilla and Serve: Once the mixture has thickened to your desired creamy consistency, remove the saucepan from heat. Stir in the vanilla extract. Discard the cinnamon stick and let the pudding cool slightly before serving.
- Garnish: To serve, spoon the Arroz Doce into individual bowls or a large serving dish. Sprinkle some ground cinnamon on top for garnish. You can also add additional lemon zest for extra flavor if desired.
Extra Tips:
When preparing Arroz Doce, patience is key. Allowing the rice to simmer slowly in milk guarantees a creamy texture, so avoid rushing the cooking process.
If you prefer a thicker pudding, you can reduce the amount of milk, but be cautious not to dry it out. Additionally, feel free to experiment with other flavorings, such as almond extract or a touch of nutmeg, to customize your Arroz Doce to your taste.
Enjoying it chilled or warm is a matter of personal preference, so try it both ways to discover your favorite!