

When dreaming of hygge, I picture evenings filled with warmth, comfort, and delightful food. This collection of Scandinavian vegetarian recipes embodies that feeling perfectly. Each dish, from hearty root vegetable stew to vibrant beet salad, celebrates seasonal flavors that bring people together. Explore how these plant-based meals turn any gathering into a joyful feast. You won’t want to miss what’s coming up next.
Hearty Root Vegetable Stew

Hearty Root Vegetable Stew is a comforting and nourishing dish that embodies the essence of Scandinavian cuisine. This vegetarian stew brings together a medley of root vegetables, fragrant herbs, and robust flavors, making it the perfect meal for chilly evenings.
It’s not only satisfying but also packed with nutrients, showcasing the natural sweetness of the vegetables. The stew is versatile, allowing you to use whatever root vegetables are in season or available, making it an excellent choice for any time of the year.
This stew is ideal for sharing, serving 4-6 people, and can be easily adapted to accommodate various dietary preferences. Pair it with crusty bread or a simple salad for a complete meal that will warm your soul. With its earthy flavors and hearty texture, this Hearty Root Vegetable Stew is sure to become a favorite in your household.
Ingredients:
- 4 medium potatoes, peeled and diced
- 3 medium carrots, sliced
- 2 parsnips, peeled and diced
- 1 large onion, chopped
- 3 cloves garlic, minced
- 4 cups vegetable broth
- 1 cup diced tomatoes (canned or fresh)
- 2 tablespoons olive oil
- 1 teaspoon dried thyme
- 1 teaspoon dried rosemary
- Salt and pepper to taste
- Fresh parsley for garnish (optional)
Cooking Instructions:
- Prepare the Vegetables: Begin by peeling and dicing the potatoes, parsnips, and carrots. Chop the onion and mince the garlic. The uniformity in size will guarantee even cooking and enhance the stew’s presentation.
- Sauté the Aromatics: In a large pot, heat the olive oil over medium heat. Add the chopped onion and minced garlic, and sauté for about 5 minutes until the onion is translucent and fragrant. This step helps to build the base flavor of the stew.
- Add the Root Vegetables: Stir in the diced potatoes, parsnips, and sliced carrots into the pot. Cook for another 5 minutes, stirring occasionally. This initial cooking will help to soften the vegetables slightly and infuse the oil with their flavors.
- Incorporate Liquids and Seasonings: Pour in the vegetable broth and diced tomatoes. Add the dried thyme, rosemary, salt, and pepper to taste. Stir everything together, making sure the vegetables are fully immersed in the liquid.
- Simmer the Stew: Bring the mixture to a boil, then reduce the heat to low. Cover the pot and let the stew simmer for about 30-40 minutes, or until the root vegetables are tender. Stir occasionally to prevent sticking and guarantee even cooking.
- Final Taste and Garnish: Once the vegetables are tender, taste and adjust the seasoning if needed. If the stew is too thick, you can add a little more broth or water. Serve hot, garnished with fresh parsley if desired.
Extra Tips:
When preparing the Hearty Root Vegetable Stew, feel free to experiment with different root vegetables like turnips or sweet potatoes for added flavor and variety.
Additionally, you can enhance the stew by adding a splash of balsamic vinegar or a teaspoon of brown sugar to balance the flavors. For a heartier option, consider adding lentils or beans to the mix, which will also boost the protein content.
Enjoy your cooking experience, and feel free to make this recipe your own!
Creamy Mushroom Risotto
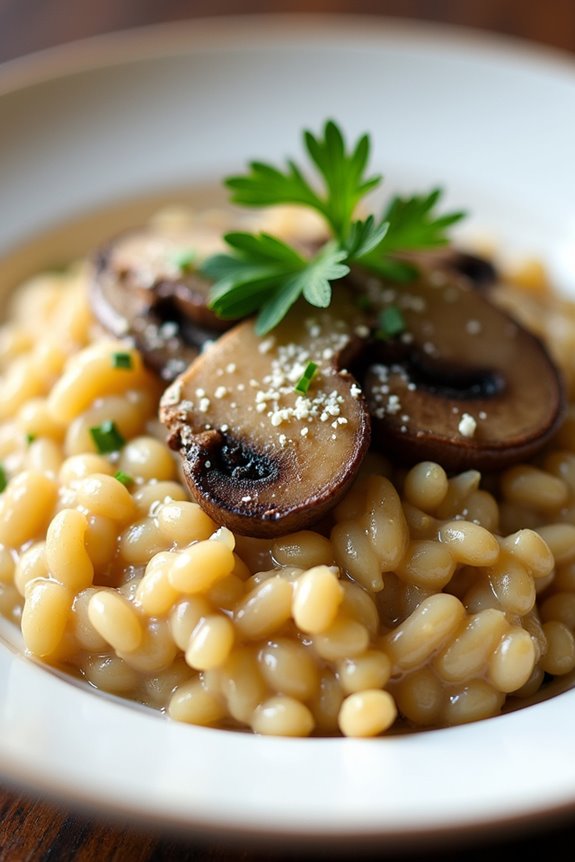
Creamy Mushroom Risotto is a classic Italian dish that has found its way into the hearts of many, and it’s a perfect fit for those looking to enjoy a comforting vegetarian meal. This risotto is rich in flavor and texture, thanks to the earthy mushrooms, creamy Arborio rice, and a hint of white wine. It’s a delightful dish that can be served as a main course or as a side, making it versatile for various dining occasions.
Cooking risotto may seem intimidating, but with a bit of patience and attention, it can be mastered by anyone. The key to a perfect risotto lies in the slow and steady addition of broth to the rice, allowing it to absorb the flavors fully and achieve that desirable creamy consistency. This Creamy Mushroom Risotto isn’t only delicious but also a great way to incorporate more vegetables into your diet, making it a wholesome choice for any meal.
Ingredients (Serves 4-6)
- 1 ½ cups Arborio rice
- 4 cups vegetable broth
- 1 cup white wine (optional)
- 2 cups mushrooms (button or cremini), sliced
- 1 medium onion, finely chopped
- 3 cloves garlic, minced
- ½ cup grated Parmesan cheese (or nutritional yeast for a vegan option)
- ¼ cup heavy cream (or coconut cream for a vegan option)
- 2 tablespoons olive oil
- 2 tablespoons butter (or vegan butter)
- Salt and pepper to taste
- Fresh parsley, chopped (for garnish)
Cooking Instructions
- Prepare the Broth: In a medium saucepan, heat the vegetable broth over low heat. Keep it warm throughout the cooking process, as adding cold broth will slow down the cooking of the rice.
- Sauté the Vegetables: In a large skillet, heat the olive oil and butter over medium heat. Add the chopped onion and cook until it becomes translucent, about 3-4 minutes. Then add the minced garlic and sliced mushrooms, sautéing until the mushrooms are golden brown and have released their moisture, approximately 5-7 minutes.
- Toast the Rice: Stir in the Arborio rice to the skillet, allowing it to toast lightly for about 2 minutes. This step enhances the nutty flavor of the rice and helps it absorb the liquid more effectively.
- Add Wine: If using, pour in the white wine and stir continuously until the liquid is mostly absorbed by the rice. This will add depth of flavor to the risotto.
- Gradually Add Broth: Begin adding the warm vegetable broth one ladle at a time, stirring frequently. Wait until the liquid is almost fully absorbed before adding the next ladle. This process should take about 20-25 minutes until the rice is creamy and al dente.
- Finish the Risotto: Once the rice is cooked, remove the skillet from heat. Stir in the grated Parmesan cheese and heavy cream. Season with salt and pepper to taste. If the risotto is too thick, you can add a little more broth to reach the desired consistency.
- Serve: Garnish the risotto with freshly chopped parsley and serve immediately while it’s hot and creamy.
Extra Tips
For an extra flavor boost, consider adding a splash of lemon juice or zest at the end of cooking for brightness. You can also experiment with different types of mushrooms, such as shiitake or portobello, to vary the taste.
To make this dish vegan, simply substitute the Parmesan cheese and heavy cream with nutritional yeast and coconut cream, respectively. Remember to stir the risotto often but gently, as this helps to release the starch from the rice, resulting in a creamier texture.
Enjoy your homemade Creamy Mushroom Risotto!
Nordic-Inspired Beet Salad
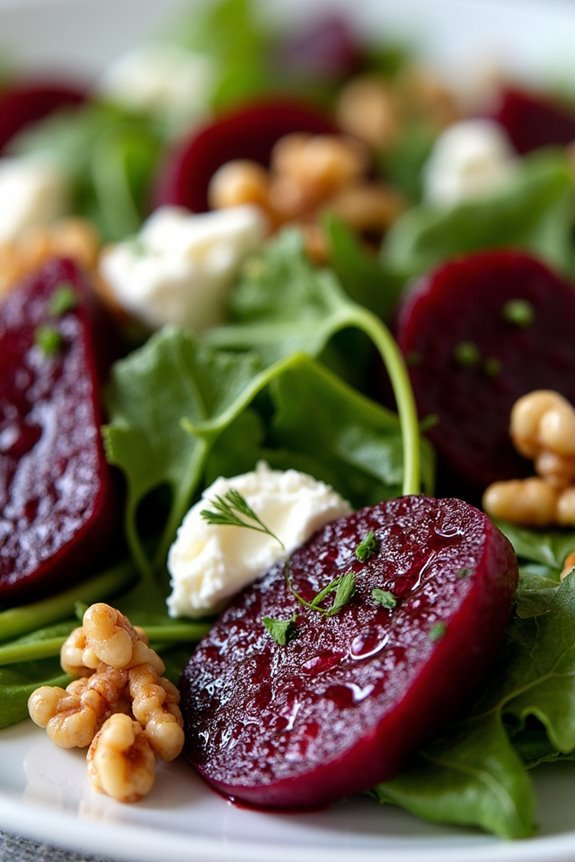
Nordic cuisine often highlights the beauty and flavors of seasonal ingredients, and a beet salad is a perfect representation of this philosophy. This Nordic-Inspired Beet Salad isn’t only vibrant and visually appealing, but it also combines earthy flavors with a hint of sweetness that’s characteristic of Scandinavian dishes.
Beets, being the star of the show, are rich in nutrients and add a lovely depth of flavor, making this salad a wholesome choice for any meal or as a side dish. The salad features roasted beets complemented by a tangy dressing, fresh herbs, and creamy cheese, providing a delightful contrast in textures and tastes.
This dish is an excellent way to showcase the simple, yet elegant approach of Scandinavian cooking, allowing the natural flavors of the ingredients to shine. Whether served alongside a hearty main or as a standalone dish, this Nordic-Inspired Beet Salad is sure to impress your guests and family alike.
Ingredients (Serves 4-6):
- 4 medium-sized beets
- 1 tablespoon olive oil
- Salt, to taste
- 1/4 cup crumbled goat cheese (or feta cheese)
- 1/4 cup walnuts, toasted and roughly chopped
- 2 cups mixed greens (such as arugula, spinach, or kale)
- 2 tablespoons balsamic vinegar
- 1 tablespoon honey (or maple syrup for a vegan option)
- Fresh dill or parsley for garnish
Cooking Instructions:
1. Roast the Beets: Preheat your oven to 400°F (200°C). Wash the beets thoroughly to remove any dirt, then wrap each beet individually in aluminum foil. Place the wrapped beets on a baking sheet and roast in the preheated oven for about 45-60 minutes, or until they’re tender when pierced with a fork.
Once done, allow them to cool before peeling the skin off.
2. Prepare the Dressing: While the beets are roasting, whisk together the balsamic vinegar, honey (or maple syrup), and a pinch of salt in a small bowl. Gradually add the olive oil while whisking to emulsify the dressing. Set it aside so the flavors can meld.
3. Toast the Walnuts: In a dry skillet over medium heat, add the chopped walnuts. Toast them for about 5 minutes, stirring frequently, until they’re golden brown and fragrant. Be careful not to burn them. Once toasted, remove them from the heat and let them cool.
4. Assemble the Salad: Once the beets are cool enough to handle, slice them into wedges or cubes, depending on your preference. In a large mixing bowl, combine the mixed greens, roasted beets, crumbled goat cheese, and toasted walnuts. Drizzle the prepared dressing over the salad and gently toss to combine all ingredients.
5. Serve: Transfer the salad to a serving platter or individual plates. Garnish with fresh dill or parsley for added flavor and presentation. Enjoy your Nordic-Inspired Beet Salad as a rejuvenating side dish or a light main course!
Extra Tips:
When preparing this salad, feel free to experiment with different toppings or ingredients based on your taste preferences. Adding elements such as sliced apples or pears can introduce a revitalizing sweetness, while a sprinkle of pumpkin seeds can add a delightful crunch.
Additionally, for a more robust flavor, consider marinating the beets in the dressing for a few hours before serving. This salad can be made ahead of time; just store the components separately and assemble right before serving to keep everything fresh and crisp.
Savory Cabbage Rolls

Savory cabbage rolls are a cherished dish in Scandinavian cuisine, offering a hearty and wholesome meal that’s both comforting and nutritious. Typically filled with a mixture of grains, vegetables, and sometimes plant-based proteins, these rolls are enveloped in tender cabbage leaves, making them a perfect option for vegetarians and anyone looking to enjoy a flavorful dish. The combination of herbs and spices adds depth to the filling while the cabbage provides a natural sweetness that balances the flavors beautifully.
This dish isn’t only delicious but also versatile. You can customize the filling with your favorite grains, legumes, or vegetables, making it an ideal way to use up leftovers. Whether served with a rich tomato sauce or a creamy plant-based dressing, savory cabbage rolls can be a satisfying meal for family gatherings, cozy dinners, or meal prep for the week ahead.
Ingredients (Serves 4-6)
- 1 large head of green cabbage
- 1 cup cooked quinoa
- 1 cup cooked brown rice
- 1 cup finely chopped mushrooms
- 1 medium onion, finely chopped
- 2 cloves garlic, minced
- 1 cup grated carrots
- 1 teaspoon dried thyme
- 1 teaspoon dried dill
- 1 teaspoon smoked paprika
- Salt and pepper, to taste
- 2 cups vegetable broth
- 1 can (15 oz) diced tomatoes
- 1 tablespoon olive oil
- Fresh parsley, for garnish
Cooking Instructions
- Prepare the Cabbage Leaves: Bring a large pot of water to a boil. Carefully peel off 12-15 leaves from the cabbage head. Blanch the leaves in boiling water for about 2-3 minutes until they’re pliable. Remove them from the water and place them on a clean kitchen towel to drain and cool.
- Make the Filling: In a large skillet, heat the olive oil over medium heat. Add the chopped onions and garlic, sautéing until the onions are translucent, about 3-4 minutes. Then, add the chopped mushrooms and grated carrots, cooking for an additional 5 minutes until the vegetables are tender. Stir in the cooked quinoa, brown rice, thyme, dill, paprika, salt, and pepper. Mix well and remove from heat.
- Assemble the Rolls: Lay one cabbage leaf on a clean surface. Place about 2-3 tablespoons of the filling at the base of the leaf. Fold the sides in and roll the leaf from the base to the tip, securing the filling inside. Repeat with the remaining leaves and filling.
- Prepare the Sauce: In a large baking dish, combine the diced tomatoes with vegetable broth. Mix well and spread evenly across the bottom of the dish.
- Bake the Cabbage Rolls: Arrange the cabbage rolls seam-side down in the baking dish on top of the tomato sauce. Cover the dish with aluminum foil and bake in a preheated oven at 350°F (175°C) for 30-35 minutes, until the rolls are heated through.
- Serve: Once baked, remove the dish from the oven and let it cool slightly. Garnish with fresh parsley before serving.
Extra Tips
To enhance the flavor of your savory cabbage rolls, consider adding a splash of soy sauce or lemon juice to the filling mixture for an extra zing. Additionally, you can experiment with different herbs and spices based on your taste preferences—adding fresh herbs like basil or using spicy seasonings can give a unique twist to the dish.
Leftover rolls can be stored in the refrigerator for up to three days or frozen for longer preservation, making them a fantastic make-ahead meal option!
Rustic Potato and Leek Soup

Rustic Potato and Leek Soup is a comforting and hearty dish that embodies the essence of Scandinavian cooking. This soup combines the earthy flavors of potatoes and leeks, enhanced by fresh herbs and a creamy base, making it a perfect meal for chilly days. Not only is it simple to prepare, but it also showcases the natural goodness of its ingredients, allowing you to savor the wholesome taste of each component.
In Scandinavian cuisine, soups are often a staple, providing warmth and nourishment. This Rustic Potato and Leek Soup is no exception. It can be enjoyed as a light lunch, dinner, or even as an appetizer for a special gathering. Pair it with a slice of crusty bread or a simple salad for a complete meal that celebrates the rich culinary heritage of the region.
Ingredients (Serves 4-6)
- 4 medium potatoes, peeled and diced
- 3 leeks, cleaned and sliced (white and light green parts only)
- 1 medium onion, chopped
- 3 tablespoons olive oil or unsalted butter
- 4 cups vegetable broth
- 1 cup heavy cream (or a plant-based alternative)
- Salt and pepper to taste
- Fresh parsley for garnish (optional)
Cooking Instructions
- Prepare the Vegetables: Start by peeling and dicing the potatoes into small, even-sized pieces to guarantee they cook uniformly. Clean the leeks thoroughly, slicing them lengthwise and rinsing under cold water to remove any grit. Chop the onion finely.
- Sauté the Aromatics: In a large pot, heat the olive oil or butter over medium heat. Add the chopped onion and sliced leeks, sautéing them for about 5-7 minutes until they’re softened and fragrant. Stir occasionally to prevent them from browning.
- Add the Potatoes: Once the onions and leeks are softened, add the diced potatoes to the pot. Stir everything together, allowing the potatoes to coat in the oil and mingle with the aromatics for about 2 minutes.
- Pour in the Broth: Add the vegetable broth to the pot, confirming that the potatoes are fully submerged. Increase the heat to bring the mixture to a gentle boil, then reduce the heat to low and let it simmer for about 20-25 minutes, or until the potatoes are tender.
- Blend the Soup: Once the potatoes are cooked through, use an immersion blender to purée the soup until smooth. If you prefer a chunkier texture, you can blend only half of the soup and leave the rest as is. Alternatively, transfer the soup in batches to a standard blender.
- Add Cream and Season: After blending, return the soup to the pot (if using a standard blender) and stir in the heavy cream. Heat gently until warmed through, but don’t let it boil. Season with salt and pepper to taste.
- Serve and Garnish: Ladle the soup into bowls and garnish with freshly chopped parsley, if desired. Serve it warm with crusty bread on the side for a complete meal.
Extra Tips
For added depth of flavor, consider roasting the potatoes beforehand or adding a splash of white wine after sautéing the leeks and onions. If you want to make the soup heartier, you can include diced carrots or celery along with the leeks.
Additionally, feel free to experiment with different herbs such as thyme or dill to personalize the flavor profile to your liking. Enjoy your Rustic Potato and Leek Soup!
Spiced Carrot and Apple Cake

If you’re looking for a delightful dessert that showcases the sweet and earthy flavors of the Nordic region, then the Spiced Carrot and Apple Cake is a perfect choice. This moist and flavorful cake combines the natural sweetness of carrots and apples with warming spices like cinnamon and nutmeg. The result is a comforting treat that’s perfect for any occasion, whether it’s a cozy afternoon tea or a festive gathering.
What makes this cake particularly special is its versatility. It can be enjoyed plain, dusted with powdered sugar, or frosted with a cream cheese icing for an extra indulgence. This recipe serves 4-6 people, making it an ideal dessert for a small gathering or family dinner. Prepare to impress your friends and family with this Scandinavian-inspired delight!
Ingredients:
- 2 cups grated carrots (about 2-3 medium carrots)
- 1 cup grated apple (about 1 medium apple, peeled)
- 1 cup all-purpose flour
- 1 cup brown sugar
- 1/2 cup granulated sugar
- 1/2 cup vegetable oil
- 3 large eggs
- 1 teaspoon baking powder
- 1 teaspoon baking soda
- 1 teaspoon ground cinnamon
- 1/2 teaspoon ground nutmeg
- 1/4 teaspoon salt
- 1/2 cup chopped walnuts or pecans (optional)
- Powdered sugar for dusting (optional)
Cooking Instructions:
- Preheat the oven: Begin by preheating your oven to 350°F (175°C). This guarantees that your cake will bake evenly and rise properly.
- Prepare the baking pan: Grease and flour a 9-inch round cake pan or line it with parchment paper. This will prevent the cake from sticking and make it easier to remove once baked.
- Mix dry ingredients: In a large bowl, whisk together the all-purpose flour, baking powder, baking soda, ground cinnamon, ground nutmeg, and salt. This step helps to evenly distribute the leavening agents and spices throughout the flour.
- Combine wet ingredients: In another bowl, beat the eggs, then add the brown sugar and granulated sugar. Mix well until the sugars are dissolved. Add the vegetable oil and continue to mix until everything is combined.
- Add grated ingredients: Fold in the grated carrots and apple into the wet mixture. This adds moisture and flavor to your cake.
- Combine wet and dry mixtures: Gradually add the dry mixture to the wet ingredients, stirring gently until just combined. Be careful not to overmix as this can lead to a dense cake. If desired, fold in the chopped nuts for added texture.
- Pour the batter into the pan: Transfer the batter into the prepared cake pan, smoothing the top with a spatula.
- Bake the cake: Place the cake in the preheated oven and bake for 30-35 minutes, or until a toothpick inserted into the center comes out clean. Keep an eye on it towards the end of the baking time to prevent overbaking.
- Cool the cake: Once baked, remove the cake from the oven and let it cool in the pan for about 10 minutes before transferring it to a wire rack to cool completely.
- Serve: Once cooled, dust with powdered sugar if desired, cut into slices, and serve. Enjoy the delicious flavors of your Spiced Carrot and Apple Cake!
Extra Tips:
For an extra kick of flavor, consider adding a pinch of ground ginger or cloves to the batter. Additionally, you can enhance the cake with a simple cream cheese frosting made by mixing softened cream cheese, butter, powdered sugar, and a splash of vanilla extract.
This frosting pairs beautifully with the spices in the cake, elevating it to a new level of deliciousness. Make certain to store any leftovers in an airtight container at room temperature for up to three days, or refrigerate for a longer shelf life.
Berry and Oat Crumble

Berry and Oat Crumble is a delightful Scandinavian dessert that marries the sweet-tart flavors of seasonal berries with a crunchy oat topping. This dish isn’t only simple to prepare but also allows for a variety of berry combinations, making it a versatile dessert choice.
Whether you opt for fresh blueberries, raspberries, or blackberries, the result is always a comforting and satisfying treat, perfect for cozy evenings or gatherings with friends and family.
The oat crumble topping adds a wholesome texture that complements the juicy berries beautifully. Served warm with a scoop of vanilla ice cream or a dollop of whipped cream, it transforms into a comforting dessert that’s certain to impress. This recipe serves 4-6 people, making it an excellent choice for family dinners or entertaining guests.
Ingredients
- 2 cups mixed berries (fresh or frozen)
- 1 tablespoon sugar (adjust based on berry sweetness)
- 1 teaspoon vanilla extract
- 1 cup rolled oats
- 1/2 cup all-purpose flour
- 1/3 cup brown sugar
- 1/2 teaspoon ground cinnamon
- 1/4 teaspoon salt
- 1/2 cup unsalted butter (melted)
Cooking Instructions
1. Preheat the oven: Begin by preheating your oven to 350°F (175°C). This allows the oven to reach the appropriate temperature for baking, guaranteeing that your crumble cooks evenly.
2. Prepare the berry filling: In a mixing bowl, combine the mixed berries, sugar, and vanilla extract. If you’re using frozen berries, allow them to partially thaw before mixing. Gently fold the ingredients together until the berries are well coated with the sugar and vanilla.
Transfer the berry mixture into a greased baking dish, spreading it evenly across the bottom.
3. Make the crumble topping: In a separate bowl, mix together the rolled oats, all-purpose flour, brown sugar, ground cinnamon, and salt. Confirm the dry ingredients are well combined.
Next, pour the melted butter into the dry mixture and stir until the mixture is crumbly and all the ingredients are evenly coated with butter.
4. Assemble the crumble: Evenly distribute the oat topping over the berry mixture in the baking dish. Make sure to cover the berries completely, but you can leave some gaps for a rustic look.
This will allow the topping to crisp up nicely while baking.
5. Bake the crumble: Place the baking dish in the preheated oven and bake for 30-35 minutes or until the topping is golden brown and the berries are bubbling.
Keep an eye on it towards the end of the baking time to prevent burning.
6. Cool and serve: Once baked, remove the crumble from the oven and allow it to cool for a few minutes before serving.
This will help the juices settle slightly, making it easier to scoop and serve.
Extra Tips
For a unique twist, you can experiment with different types of nuts or seeds in the crumble topping, such as chopped almonds or sunflower seeds, for added crunch and nutrition.
Additionally, feel free to mix and match the berries based on what you have available, or even add a few slices of apples or pears for extra flavor.
This dish can be made ahead of time and reheated before serving, making it a convenient option for busy days. Enjoy your delightful Scandinavian Berry and Oat Crumble!
Traditional Swedish Flatbread

Traditional Swedish flatbread, known as “knäckebröd,” is a staple in Swedish cuisine, cherished for its crisp texture and versatility. This flatbread can be enjoyed as a side with meals, a base for open-faced sandwiches, or simply paired with butter and cheese. The dough typically consists of whole grain flour and is rolled out thin before being baked until crisp. Its history is deeply rooted in Swedish culture, often enjoyed during festive occasions and family gatherings.
Making this flatbread at home isn’t only rewarding but also allows you to customize the flavors and textures to your preference. While the traditional recipe uses rye flour, you can experiment with different flours or even add seeds and herbs for a unique twist. The process may seem labor-intensive, but the result is a batch of delicious flatbreads that can be stored for weeks, making it well worth the effort.
Ingredients (Serves 4-6)
- 4 cups whole rye flour (or a mix of rye and wheat flour)
- 1 teaspoon salt
- 1 tablespoon baking powder
- 1 tablespoon caraway seeds (optional)
- 1 ½ cups water
- 3 tablespoons melted butter or neutral oil
- Extra flour for rolling out
Cooking Instructions
- Prepare the Dough: In a large mixing bowl, combine the whole rye flour, salt, baking powder, and caraway seeds (if using). Mix the dry ingredients thoroughly to guarantee an even distribution of the baking powder and salt.
- Add Liquid Ingredients: Gradually add the water and melted butter (or oil) to the dry ingredients. Stir using a wooden spoon or your hands until the mixture forms a cohesive dough. If the dough feels too sticky, add a little more flour until it reaches a workable consistency.
- Knead the Dough: Transfer the dough onto a lightly floured surface. Knead it gently for about 5 minutes until it becomes smooth and elastic. This step helps develop the gluten in the dough, which is important for achieving a good texture in the flatbread.
- Divide and Roll Out: Divide the dough into small portions, about the size of a golf ball. Take one portion and flatten it slightly with your hands. Use a rolling pin to roll it out into a thin circle, about 1/8 inch thick. Make sure to dust the surface with flour to prevent sticking. Repeat this process with the remaining portions.
- Bake the Flatbreads: Preheat your oven to 450°F (232°C). Place the rolled-out flatbreads on a baking sheet lined with parchment paper. Bake for 5-7 minutes, or until they’re golden brown and crisp. Keep an eye on them, as they can burn quickly.
- Cool and Store: Once baked, remove the flatbreads from the oven and let them cool on a wire rack. Once cooled, store them in an airtight container at room temperature to keep them crisp.
Extra Tips
To enhance the flavor of your traditional Swedish flatbread, consider adding seeds like sunflower, sesame, or flaxseed into the dough. If you prefer a more rustic texture, try using a combination of whole grain and all-purpose flour.
Additionally, you can experiment with different herbs such as dill or thyme for added depth. Remember to roll the dough evenly to guarantee uniform baking and crispiness. Finally, serve your flatbread with various toppings like cheese, cured vegetables, or spreads for a delightful treat!
Roasted Cauliflower With Dill

Roasted Cauliflower With Dill is a delightful Scandinavian vegetarian dish that beautifully showcases the natural flavors of the cauliflower while infusing it with the aromatic freshness of dill. This dish isn’t only simple to prepare but also celebrates the essence of Scandinavian cuisine, which emphasizes quality ingredients and straightforward cooking techniques. Perfect as a side or even as a main vegetarian dish, the roasted cauliflower pairs wonderfully with grains or salads, making it a versatile option for any meal.
The roasting process caramelizes the cauliflower, bringing out its inherent sweetness and creating a lovely texture that contrasts with the tender florets. Dill, a herb commonly used in Scandinavian cooking, adds a distinctive flavor that enhances the overall profile of the dish. This recipe serves 4-6 people, making it ideal for family gatherings or dinner parties where you want to impress your guests with a vegetarian option that’s both satisfying and flavorful.
Ingredients:
- 1 large head of cauliflower, cut into florets
- 3 tablespoons olive oil
- 1 teaspoon salt
- 1/2 teaspoon black pepper
- 1 tablespoon fresh lemon juice
- 1/4 cup fresh dill, chopped
- 2 tablespoons grated Parmesan cheese (optional)
Cooking Instructions:
- Preheat the Oven: Start by preheating your oven to 425°F (220°C). A hot oven is essential for roasting, as it helps to achieve that golden-brown, crispy exterior while keeping the inside tender.
- Prepare the Cauliflower: Wash the cauliflower under cold water and pat it dry with a clean kitchen towel. Cut it into even-sized florets to guarantee they cook uniformly. This helps prevent some pieces from burning while others remain undercooked.
- Season the Cauliflower: In a large mixing bowl, combine the cauliflower florets with olive oil, salt, and black pepper. Toss the florets until they’re evenly coated with the oil and seasonings. The oil helps with the roasting process and adds flavor, while salt and pepper enhance the natural taste of the cauliflower.
- Roast the Cauliflower: Spread the seasoned cauliflower evenly on a baking sheet lined with parchment paper. Make sure not to overcrowd the pan, as this can lead to steaming instead of roasting. Place it in the preheated oven and roast for about 25-30 minutes, turning the florets halfway through. You want them to be golden brown and crispy on the edges.
- Add Dill and Lemon Juice: Once the cauliflower is roasted, remove it from the oven and transfer it back to the mixing bowl. Drizzle fresh lemon juice over the hot cauliflower and sprinkle with chopped dill. If you like, you can also add grated Parmesan cheese at this stage for an extra layer of flavor. Toss gently to combine everything.
- Serve: Transfer the roasted cauliflower to a serving platter. You can garnish it with additional dill or a sprinkle of lemon zest for an appealing presentation. Serve immediately while hot.
Extra Tips: To elevate the flavors further, consider adding other herbs such as parsley or thyme along with the dill. For a bit of heat, you can sprinkle some red pepper flakes before roasting the cauliflower. If you’re looking for a nutty crunch, try adding some toasted pine nuts or slivered almonds just before serving.
This dish is best enjoyed fresh, but leftovers can be stored in an airtight container in the refrigerator for a couple of days and reheated in the oven for a quick meal.
Vegan Swedish Meatballs

Vegan Swedish Meatballs offer a delightful twist on the traditional Scandinavian dish, making it accessible for those who follow a plant-based diet. These meatballs are made with wholesome ingredients that not only mimic the texture of classic meatballs but also pack a punch of flavor. Served with creamy vegan gravy and a side of lingonberry sauce, they make for a comforting meal that can be enjoyed by everyone, regardless of dietary preferences.
In addition to being delicious, this recipe is versatile and can be paired with various sides, including mashed potatoes, pasta, or even served in a sub for a hearty sandwich. Whether you’re hosting a dinner party or looking for a cozy weeknight meal, Vegan Swedish Meatballs are sure to impress. Not only do they satisfy cravings for comfort food, but they also bring the essence of Scandinavian cuisine to your table without any animal products.
Ingredients (Serves 4-6):
- 1 cup lentils (green or brown), cooked
- 1 cup mushrooms, finely chopped
- 1 medium onion, finely chopped
- 2 cloves garlic, minced
- 1/2 cup breadcrumbs (gluten-free if necessary)
- 1/4 cup nutritional yeast
- 2 tablespoons soy sauce or tamari
- 1 tablespoon Dijon mustard
- 1 teaspoon dried thyme
- 1 teaspoon smoked paprika
- Salt and pepper to taste
- 2 tablespoons olive oil (for frying)
For the Vegan Gravy:
- 2 tablespoons vegan butter
- 2 tablespoons all-purpose flour
- 2 cups vegetable broth
- 1 tablespoon soy sauce or tamari
- Salt and pepper to taste
Cooking Instructions:
- Prepare the Lentils: If you haven’t done so already, cook the lentils according to the package instructions until tender. This usually takes about 20-30 minutes. Drain any excess water and let them cool slightly before using.
- Sauté Vegetables: In a large skillet, heat 1 tablespoon of olive oil over medium heat. Add the finely chopped onions and mushrooms, and sauté for about 5-7 minutes until they’re soft and the moisture from the mushrooms has evaporated. Stir in the minced garlic and cook for an additional minute until fragrant.
- Combine Ingredients: In a mixing bowl, combine the cooked lentils, sautéed onion and mushroom mixture, breadcrumbs, nutritional yeast, soy sauce, Dijon mustard, thyme, smoked paprika, salt, and pepper. Mix well until all ingredients are evenly incorporated. If the mixture is too wet, add a bit more breadcrumbs.
- Form the Meatballs: Using your hands, shape the mixture into small meatballs, about 1 inch in diameter. Place them on a plate or baking sheet as you go.
- Cook the Meatballs: In the same skillet, heat the remaining tablespoon of olive oil over medium heat. Add the meatballs in batches, making sure not to overcrowd the pan. Cook for about 5-7 minutes, turning occasionally until they’re golden brown on all sides. Remove them from the skillet and set aside.
- Make the Gravy: In the same skillet, melt the vegan butter over medium heat. Whisk in the flour to create a roux, cooking for about 1 minute. Gradually add the vegetable broth while whisking continuously to avoid lumps. Stir in the soy sauce, and season with salt and pepper. Allow the gravy to simmer for about 5 minutes until it thickens.
- Serve: Return the cooked meatballs to the skillet with the gravy and gently coat them. Serve hot with your choice of sides, such as mashed potatoes or pasta, and a dollop of lingonberry sauce.
Extra Tips:
When preparing Vegan Swedish Meatballs, feel free to experiment with different herbs and spices to suit your taste preferences. If you want a spicier kick, you can add a pinch of chili flakes or cayenne pepper to the mixture.
Additionally, these meatballs can be made ahead of time; simply store them in the refrigerator for up to three days or freeze them for longer storage. Reheat them gently in the gravy for a quick and satisfying meal anytime!