

When it comes to desserts that can brighten any day, Portuguese sweets are at the top of my list. Each treat offers a unique story and flavor that delights the senses. From the creamy Pastéis De Nata to the decadent Toucinho do Céu, these recipes are a true celebration of taste. Curious to try making these delightful sweets in your own kitchen? Let’s explore the magic behind these ten playful Portuguese desserts together!
Pastéis De Nata: the Iconic Custard Tart
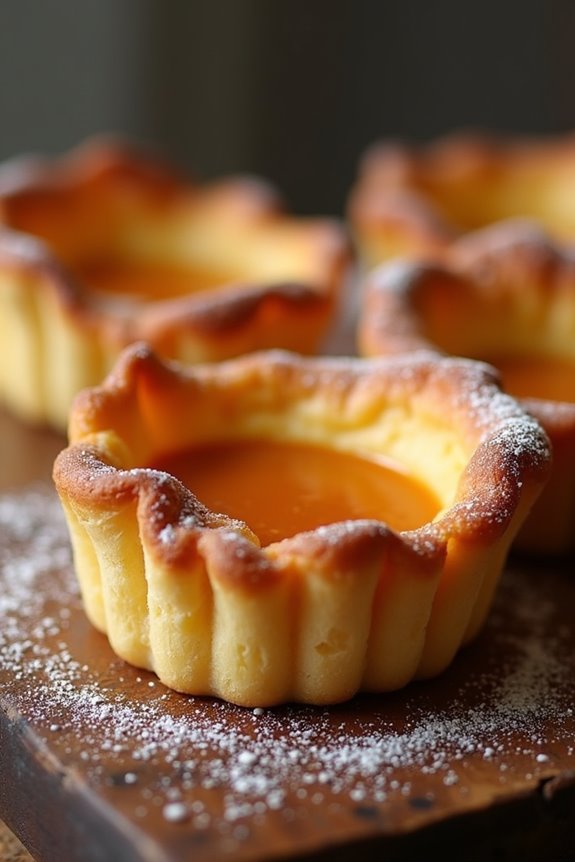
Pastéis de Nata, also known as Portuguese custard tarts, are a beloved sweet treat that hails from Lisbon, Portugal. These delightful pastries feature a flaky, crisp pastry shell filled with a rich and creamy custard that’s often caramelized on top for an extra touch of sweetness.
Originating from the Jerónimos Monastery in the 18th century, these tarts have become a staple in Portuguese cuisine and are enjoyed by people all over the world. Their unique combination of textures and flavors makes them a must-try for any dessert lover.
Making Pastéis de Nata at home may seem intimidating, but with a little practice and patience, you can recreate this iconic dessert in your own kitchen. The key to achieving the perfect custard filling lies in the balance of cream, egg yolks, and sugar, while the pastry shell benefits from being rolled and folded multiple times to create its signature layers.
Whether you enjoy them warm from the oven, dusted with cinnamon and powdered sugar, or chilled, these tarts are sure to impress.
Ingredients (serving size: 4-6 people):
- 1 package of puff pastry (thawed if frozen)
- 1 cup heavy cream
- 1 cup whole milk
- 2/3 cup granulated sugar
- 1/4 cup all-purpose flour
- 6 large egg yolks
- 1 teaspoon vanilla extract
- Zest of 1 lemon
- Cinnamon (for dusting)
- Powdered sugar (for dusting)
Cooking Instructions:
- Prepare the Pastry: Preheat your oven to 475°F (245°C). Roll out the puff pastry on a lightly floured surface to smooth it out. Then, fold it into thirds like a letter. Turn it 90 degrees and roll it out again, repeating the folding process. This creates layers in the pastry. Cut the pastry into circles that are slightly larger than the molds you’ll be using.
- Grease the Tart Molds: Lightly grease a muffin tin or individual tartlet pans with butter or cooking spray. Press the pastry circles into each mold, making sure that they’re deep enough to hold the custard filling.
- Make the Custard Filling: In a saucepan, combine the heavy cream, whole milk, and sugar. Heat over medium heat until the sugar dissolves. In a separate bowl, whisk together the flour and egg yolks until smooth. Gradually add the warm milk mixture to the egg yolk mixture, whisking constantly to prevent curdling.
- Cook the Custard: Pour the combined mixture back into the saucepan and cook over medium-low heat, stirring continuously until it thickens to a custard-like consistency. Remove from heat, then stir in the vanilla extract and lemon zest.
- Fill the Pastry Shells: Pour the custard filling into each prepared pastry shell, filling them about three-quarters full.
- Bake: Place the muffin tin in the preheated oven and bake for about 15-20 minutes, or until the custard is set and the tops are caramelized and golden brown. Keep an eye on them to avoid burning.
- Cool and Serve: Once baked, remove the Pastéis de Nata from the oven and allow them to cool in the pan for a few minutes before transferring to a wire rack. Serve warm or at room temperature, dusted with cinnamon and powdered sugar if desired.
Extra Tips:
When making Pastéis de Nata, it’s important to not rush the baking process. The high temperature is what creates that beautiful caramelization on the top, so make sure your oven is fully preheated before placing the tarts inside.
Additionally, for a more authentic flavor, consider using a touch of almond extract or even a splash of port wine in the custard mixture. Make sure to keep any leftover tarts stored in the refrigerator, and they can be enjoyed cold or lightly reheated for a warm treat.
Bolo De Bolacha: Biscuit Cake With Coffee

Bolo De Bolacha is a classic Portuguese dessert that offers a delightful combination of flavors and textures. This no-bake cake is made primarily from layered biscuits and a rich coffee-flavored cream that brings a unique twist to traditional cake recipes. The simplicity of the ingredients combined with the ease of preparation makes it a favorite among many dessert lovers.
Whether you’re hosting a gathering or simply want to indulge in a sweet treat, this biscuit cake is sure to impress.
The beauty of Bolo De Bolacha lies in its versatility. You can customize the flavors by adjusting the type of coffee or adding additional ingredients such as chocolate or nuts. This dessert isn’t only delicious but also visually appealing, with its layers creating a stunning presentation.
Perfect for any occasion, this cake is a reflection of the sweet side of Portuguese cuisine.
Ingredients (serving size: 4-6 people):
- 200g (about 14-16 pieces) of Maria biscuits
- 1 cup strong brewed coffee (cooled)
- 250g cream cheese
- 200ml heavy cream
- 100g powdered sugar
- 1 teaspoon vanilla extract
- Cocoa powder (for dusting)
Cooking Instructions:
- Brew the Coffee: Start by brewing a strong cup of coffee. Let it cool to room temperature. This will be used to soak the biscuits, infusing them with a rich coffee flavor.
- Prepare the Cream Mixture: In a mixing bowl, combine the cream cheese, heavy cream, powdered sugar, and vanilla extract. Using a hand mixer or stand mixer, beat the mixture on medium speed until it becomes smooth and creamy with soft peaks. This will form the creamy layer of the cake.
- Soak the Biscuits: Take each Maria biscuit and quickly dip it into the cooled coffee. Make sure to soak each biscuit just enough to absorb the coffee without making it too soggy. This step is essential as it adds flavor and moisture to the cake.
- Layer the Cake: In a rectangular dish or a round cake pan, start layering the ingredients. Begin by placing a layer of soaked biscuits at the bottom. Then, spread a generous layer of the cream mixture over the biscuits. Repeat this process, alternating between layers of biscuits and cream until you have used all the ingredients, finishing with a layer of the cream mixture on top.
- Chill the Cake: Once the layering is complete, cover the dish with plastic wrap and refrigerate the cake for at least 4 hours, or ideally overnight. Chilling allows the flavors to meld and the cake to set properly.
- Serve and Garnish: After chilling, remove the cake from the fridge. Dust the top with cocoa powder for a decorative finish and slice into individual servings. Enjoy this delicious Bolo De Bolacha with a cup of coffee or tea!
Extra Tips: When preparing Bolo De Bolacha, consider using a strong espresso for a more intense coffee flavor. Additionally, you can add a splash of coffee liqueur to the cream mixture for an extra kick. If you prefer a sweeter cake, adjust the amount of powdered sugar to taste.
Remember that the longer the cake sits in the refrigerator, the better the flavors will develop, making it a great make-ahead dessert option.
Arroz Doce: Creamy Rice Pudding

Arroz Doce is a traditional Portuguese dessert that captivates the senses with its creamy texture and aromatic flavors. This delightful rice pudding is often enjoyed at family gatherings and festive occasions, evoking warm memories and a sense of comfort. Made with simple ingredients, it’s a dish that combines the richness of milk with the subtle sweetness of sugar and a hint of cinnamon, making it a beloved treat for both young and old.
To prepare Arroz Doce, short-grain rice is typically used, as it absorbs the milk beautifully and lends a delightful creaminess to the pudding. The dessert is usually garnished with a sprinkle of cinnamon and sometimes lemon zest, which adds a revitalizing twist to the overall flavor. Whether served warm or chilled, Arroz Doce is certain to please anyone with a sweet tooth!
Ingredients (Serves 4-6)
- 1 cup short-grain rice
- 4 cups whole milk
- 1 cup sugar
- 1 cinnamon stick
- 1 lemon peel (optional)
- 1/4 teaspoon salt
- Ground cinnamon (for garnish)
- 1 tablespoon butter (optional)
Cooking Instructions
- Rinse the Rice: Begin by rinsing the short-grain rice under cold water in a fine mesh sieve. This step removes excess starch and helps prevent the pudding from becoming too sticky. Drain the rice well.
- Cook the Rice: In a medium saucepan, combine the rinsed rice, salt, and 2 cups of water. Bring the mixture to a boil over medium heat. Once boiling, reduce the heat to low, cover the pan, and let it simmer for about 15 minutes or until the rice is tender and most of the water has been absorbed.
- Add Milk and Sugar: Once the rice is cooked, carefully add the milk, sugar, and the cinnamon stick to the saucepan. If using, add the lemon peel as well. Stir the mixture gently to combine all the ingredients.
- Simmer the Mixture: Increase the heat to medium-low and let the mixture simmer uncovered for about 25-30 minutes, stirring frequently. This is essential to prevent the rice from sticking to the bottom of the pan and to ascertain a creamy consistency. The rice will absorb the milk and thicken the pudding.
- Finish the Pudding: Once the mixture has thickened to your desired consistency, remove it from the heat. If you used a cinnamon stick and lemon peel, remove them at this stage. If you want a richer flavor, stir in the butter until melted.
- Cool and Serve: Transfer the Arroz Doce to serving bowls or a large dish. Let it cool for a bit before serving. You can serve it warm or chilled, depending on your preference. Before serving, sprinkle ground cinnamon on top for garnish.
Extra Tips
When making Arroz Doce, it’s important to stir frequently to avoid burning the mixture, especially as it thickens. If you prefer a thicker pudding, let it simmer longer, but keep an eye on it to prevent it from drying out.
For added flavor, consider incorporating a splash of vanilla extract or a pinch of nutmeg. Arroz Doce can be stored in the refrigerator for a few days, making it a perfect make-ahead dessert for gatherings. Enjoy your creamy treat!
Pão De Ló: Fluffy Sponge Cake
Pão De Ló is a traditional Portuguese sponge cake known for its light, airy texture and subtle sweetness. This delightful dessert is often enjoyed on special occasions, but its simplicity makes it a great choice for any day.
With its fluffy layers and golden crust, Pão De Ló is perfect for pairing with fresh fruit, whipped cream, or simply dusted with powdered sugar for a classic finish. The recipe is straightforward, allowing even novice bakers to create this elegant treat with ease.
To achieve the perfect Pão De Ló, the key lies in the technique used to whip the eggs and sugar, which contributes to the cake’s signature fluffiness. The use of high-quality ingredients is also vital, as they enhance the flavor and texture of the final product.
Once baked, this cake can be enjoyed on its own or used as a base for other desserts, making it a versatile addition to your baking repertoire.
Ingredients (Serves 4-6):
- 4 large eggs
- 1 cup granulated sugar
- 1 cup all-purpose flour
- 1/2 teaspoon baking powder
- 1/4 teaspoon salt
- 1 teaspoon vanilla extract
- Zest of 1 lemon (optional)
Cooking Instructions:
- Preheat the Oven: Begin by preheating your oven to 350°F (175°C). This guarantees that the cake bakes evenly and rises properly.
- Prepare the Baking Pan: Grease a round 9-inch cake pan with butter or cooking spray, and then line the bottom with parchment paper for easy removal after baking.
- Whip the Eggs and Sugar: In a large mixing bowl, combine the eggs and granulated sugar. Using an electric mixer, beat the mixture on high speed for about 8-10 minutes until it becomes pale and triples in volume. This step is vital as it incorporates air into the batter, giving the cake its light texture.
- Sift the Dry Ingredients: In a separate bowl, sift together the all-purpose flour, baking powder, and salt. Sifting helps to aerate the flour and remove any lumps, guaranteeing a smooth batter.
- Combine the Mixtures: Gradually fold the dry ingredients into the whipped egg mixture using a spatula. Be gentle to avoid deflating the batter. If you’re using lemon zest or vanilla extract, fold them in at this stage as well.
- Transfer to the Pan: Pour the batter into the prepared cake pan, smoothing the top with a spatula. Make sure the batter is evenly distributed.
- Bake the Cake: Place the cake in the preheated oven and bake for 25-30 minutes, or until the top is golden and a toothpick inserted in the center comes out clean.
- Cool and Serve: Once baked, remove the cake from the oven and let it cool in the pan for about 10 minutes. Then, carefully transfer it to a wire rack to cool completely. Slice and serve as desired.
Extra Tips:
For the best results, make sure all your ingredients are at room temperature before you begin. This helps them combine more easily and results in a lighter cake.
Additionally, be careful not to overmix the batter after adding the dry ingredients, as this can lead to a denser cake. If you want to add a twist, consider incorporating cocoa powder for a chocolate version or experimenting with different citrus zests for added flavor.
Queijadas: Sweet Cheese Tarts

Queijadas are a delightful traditional Portuguese dessert that combines the rich flavors of cheese with the sweetness of sugar and the creaminess of milk. Originating from the Azores, these little tarts aren’t only easy to prepare but also a crowd-pleaser, making them perfect for gatherings or an indulgent treat after dinner.
With their crispy outer crust and soft, sweet filling, queijadas offer a unique taste experience that showcases the culinary heritage of Portugal.
To make these sweet cheese tarts, you’ll need a few simple ingredients that are likely already in your pantry. The combination of fresh cheese, eggs, and a splash of vanilla creates a rich filling that pairs beautifully with the buttery crust.
Whether served warm or at room temperature, queijadas are certain to satisfy your sweet tooth and transport you to the sunny shores of Portugal.
Ingredients (Serves 4-6 people):
- 1 cup fresh cheese (ricotta or farmer’s cheese)
- 1 cup sugar
- 2 large eggs
- 1/2 cup milk
- 1/4 cup unsalted butter, melted
- 1 teaspoon vanilla extract
- 1 cup all-purpose flour
- 1 teaspoon baking powder
- 1/4 teaspoon salt
- Butter or oil for greasing the muffin tin
Cooking Instructions:
- Preheat the oven: Begin by preheating your oven to 350°F (175°C). This guarantees that the queijadas will bake evenly and achieve a nice golden color.
- Prepare the muffin tin: Grease a muffin tin with butter or oil to prevent the queijadas from sticking. You can also use cupcake liners for easier removal.
- Mix the cheese filling: In a large mixing bowl, combine the fresh cheese, sugar, and eggs. Using a whisk or a hand mixer, blend these ingredients until they’re smooth and well combined.
- Add wet ingredients: Pour in the milk, melted butter, and vanilla extract into the cheese mixture. Stir well until everything is fully incorporated.
- Combine dry ingredients: In a separate bowl, whisk together the flour, baking powder, and salt. This helps to evenly distribute the leavening agent throughout the flour.
- Combine wet and dry mixtures: Gradually add the dry ingredients to the wet cheese mixture. Stir gently until there are no visible lumps, but don’t overmix as this can make the tarts tough.
- Fill the muffin tin: Carefully pour the batter into the prepared muffin tin, filling each cup about two-thirds full. This allows room for the queijadas to rise.
- Bake: Place the muffin tin in the preheated oven and bake for 20-25 minutes, or until the tops are lightly golden and a toothpick inserted into the center comes out clean.
- Cool and serve: Once baked, remove the queijadas from the oven and allow them to cool in the muffin tin for about 10 minutes. Then, transfer them to a wire rack to cool completely before serving.
Extra Tips:
For an added touch of flavor, consider incorporating lemon zest or cinnamon into the batter for a unique twist on the classic queijadas.
Additionally, you can experiment with different types of cheese to find your preferred flavor profile. Storing these sweet cheese tarts in an airtight container will keep them fresh for a few days, making them perfect for enjoying later or sharing with friends and family.
Toucinho Do Céu: Heavenly Almond Cake
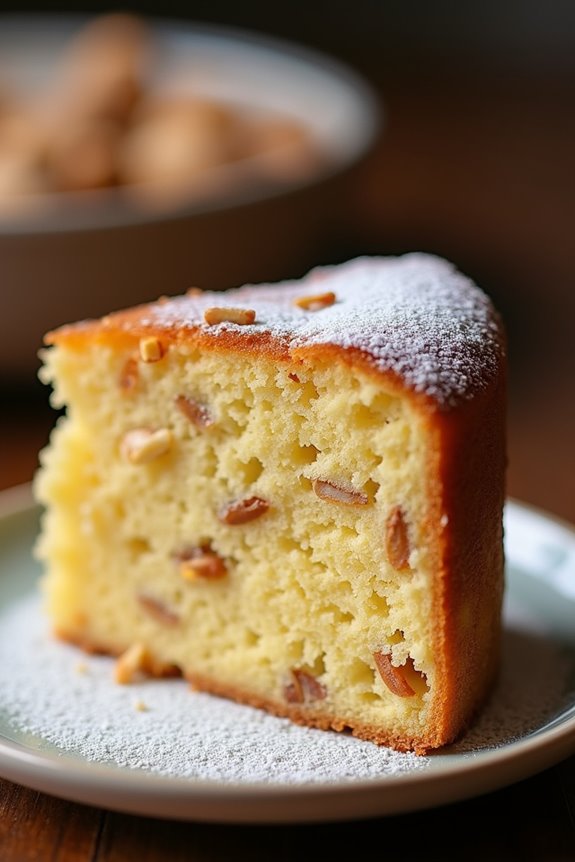
Toucinho do Céu, which translates to “Bacon from Heaven,” is a delightful Portuguese almond cake that’s rich in flavor and history. Originating from the region of Alentejo, this dessert is traditionally made with simple yet high-quality ingredients. Almonds are the star of the show, providing a nutty flavor and a moist texture that’s bound to impress anyone who tries it. The cake is often enjoyed during special occasions, but it’s also a wonderful treat for everyday enjoyment.
The preparation of Toucinho do Céu isn’t overly complicated, but it does require some attention to detail to guarantee the perfect balance of flavors and textures. This cake is typically sweetened with sugar and flavored with cinnamon and lemon zest, making it a fragrant and inviting dessert that showcases the wonderful flavors of Portuguese cuisine. Whether served at a family gathering or enjoyed with a cup of coffee, Toucinho do Céu is bound to become a favorite in your dessert repertoire.
Ingredients (Serves 4-6):
- 200g ground almonds
- 200g granulated sugar
- 4 large eggs
- 1/2 cup (120ml) water
- 1 tsp lemon zest
- 1/2 tsp ground cinnamon
- 50g unsalted butter, melted
- A pinch of salt
- Powdered sugar for dusting (optional)
Cooking Instructions:
- Prepare the Baking Pan: Preheat your oven to 180°C (350°F). Grease an 8-inch round cake pan with butter and line the bottom with parchment paper. This will help prevent the cake from sticking and make it easier to remove once baked.
- Mix the Dry Ingredients: In a large mixing bowl, combine the ground almonds, granulated sugar, ground cinnamon, and a pinch of salt. Stir the mixture until well combined, guaranteeing the ingredients are evenly distributed.
- Whisk the Eggs: In a separate bowl, crack the eggs and whisk them together until they’re frothy. This will help incorporate air into the batter, giving the cake a light and fluffy texture.
- Combine Wet Ingredients: In a saucepan, combine the water and lemon zest. Heat the mixture over medium heat until it comes to a gentle boil, then remove from heat. Allow it to cool slightly before mixing in the melted butter.
- Combine All Ingredients: Slowly pour the egg mixture into the dry ingredients, stirring continuously. Then, add the warm water and lemon mixture to the bowl. Mix everything together until you have a smooth batter, making sure there are no lumps.
- Pour into the Pan: Transfer the batter into the prepared cake pan, spreading it evenly. Tap the pan gently on the countertop to remove any air bubbles.
- Bake the Cake: Place the pan in the preheated oven and bake for about 30-35 minutes, or until the top is golden brown and a toothpick inserted into the center comes out clean. Keep an eye on the cake to prevent over-browning.
- Cool and Serve: Once baked, remove the cake from the oven and allow it to cool in the pan for about 10 minutes before transferring it to a wire rack. Once completely cooled, dust the top with powdered sugar if desired, then slice and serve.
Extra Tips:
For the best flavor, consider using fresh almonds and grinding them yourself, as this will enhance the cake’s nuttiness. Additionally, you can experiment with adding a splash of orange zest or a few drops of almond extract for an extra layer of flavor.
This cake can be stored in an airtight container for a few days, but it’s best enjoyed fresh. Serve it with a side of whipped cream or a scoop of vanilla ice cream for a delightful treat!
Pudim Flan: Portuguese Caramel Custard

Pudim Flan is a beloved dessert in Portuguese cuisine, known for its silky texture and rich caramel flavor. This delightful caramel custard is a staple at family gatherings and festive occasions, often enjoyed after a hearty meal. The combination of eggs, milk, and sugar creates a creamy base that pairs perfectly with the sweet, golden caramel topping. Making Pudim Flan is a rewarding experience that brings the sweet taste of Portugal to your kitchen.
The process of making Pudim Flan may seem intimidating at first, but with careful attention and a few simple steps, you can create this impressive dessert. Once baked, the flan is chilled and then inverted to reveal its luscious caramel glaze. Serve it chilled for a revitalizing end to any meal, and watch your family and friends savor each delectable bite.
Ingredients (Serves 4-6):
- 1 cup granulated sugar (for caramel)
- 1 can (14 oz) sweetened condensed milk
- 2 cups whole milk
- 4 large eggs
- 1 tablespoon vanilla extract
- A pinch of salt
Cooking Instructions:
- Prepare the Caramel: In a medium saucepan over medium heat, add 1 cup of granulated sugar. Stir continuously until the sugar melts and turns a deep amber color. Be careful not to let it burn. Once ready, immediately pour the caramel into a round baking dish, tilting the dish to coat the bottom evenly. Set aside to cool and harden.
- Mix the Custard Base: In a blender or mixing bowl, combine the sweetened condensed milk, whole milk, eggs, vanilla extract, and a pinch of salt. Blend or whisk until the mixture is smooth and well combined, ensuring there are no egg lumps.
- Bake the Flan: Preheat your oven to 350°F (175°C). Pour the custard mixture over the hardened caramel in the baking dish. Place the baking dish inside a larger roasting pan, and fill the roasting pan with hot water until it reaches halfway up the sides of the flan dish. This water bath will help cook the flan gently and evenly.
- Cooking Time: Bake in the preheated oven for about 50-60 minutes, or until the flan is set but still slightly jiggly in the center. You can check for doneness by inserting a knife into the center; it should come out clean.
- Cool and Unmold: Once baked, remove the flan from the oven and let it cool to room temperature. Then, refrigerate for at least 4 hours or overnight. To serve, run a knife around the edges of the flan, place a serving plate on top, and carefully invert the dish to release the flan onto the plate. The caramel will flow over the top, creating a beautiful glaze.
Extra Tips:
For the best results, use fresh eggs and high-quality milk for a richer flavor. If you prefer a lighter texture, you can substitute some of the whole milk with evaporated milk.
Additionally, be patient when making the caramel; it can go from perfectly golden to burnt very quickly. If you’re feeling adventurous, try adding a hint of citrus zest or a splash of liqueur to the custard mixture for a unique twist on this classic dessert!
Bolo Rei: King Cake for Festive Celebrations
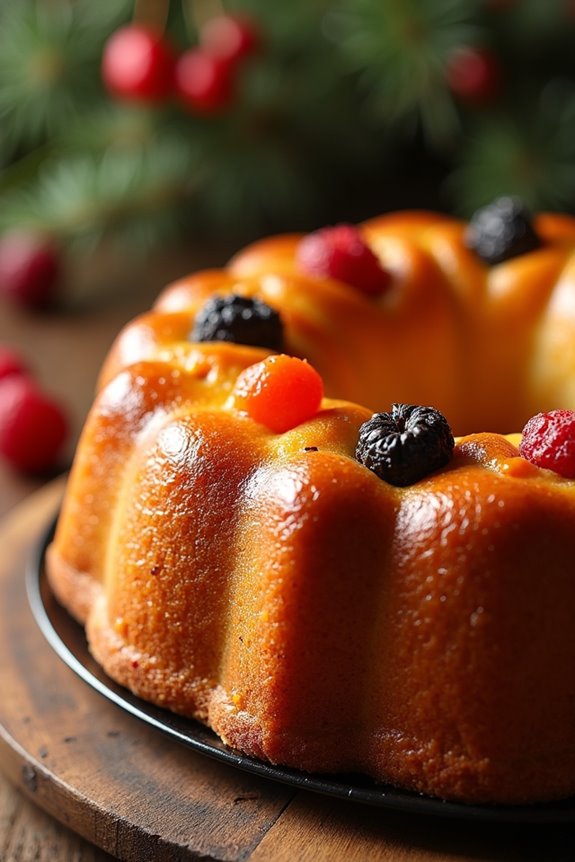
Bolo Rei, or King Cake, is a traditional Portuguese dessert that’s especially popular during the Christmas season and Epiphany celebrations. This colorful and festive cake is known for its rich flavors and beautiful presentation, often adorned with candied fruits and nuts that symbolize the treasures of the Magi.
The cake is typically baked in a circular shape, representing the crown of the Three Kings, and is filled with a delightful blend of dried fruits and nuts, making it a treat that embodies the joy of the festive season.
The preparation of Bolo Rei can be a rewarding experience, as it combines both baking and creativity. As you commence on making this cake, you’ll find that the combination of flavors and textures—from the sweetness of the fruits to the crunch of the nuts—creates a deliciously indulgent dessert.
Whether you’re celebrating with family or friends, serving Bolo Rei is sure to bring a sense of togetherness and joy to your festive gatherings.
Ingredients (Serves 4-6 people)
- 500g all-purpose flour
- 150g sugar
- 150ml milk
- 100g unsalted butter, softened
- 3 large eggs
- 25g fresh yeast (or 7g dry yeast)
- 1 tsp salt
- 1 tsp ground cinnamon
- 100g mixed candied fruits (such as cherries, oranges, and figs)
- 100g raisins
- 50g chopped nuts (such as almonds and walnuts)
- Zest of 1 lemon
- Zest of 1 orange
- 1 egg, beaten (for egg wash)
Cooking Instructions
- Prepare the Yeast Mixture: If you’re using fresh yeast, dissolve it in warm milk (not hot) with a tablespoon of sugar and let it sit for about 10 minutes until it becomes frothy. If using dry yeast, mix it directly with the flour and skip this step.
- Mix Dry Ingredients: In a large bowl, combine the all-purpose flour, sugar, salt, and ground cinnamon. Mix well to guarantee that all dry ingredients are evenly distributed.
- Create the Dough: Make a well in the center of the flour mixture. Add the softened butter, eggs, and the yeast mixture (or the warm milk if using dry yeast). Mix together until a dough forms. Knead the dough on a floured surface for about 10 minutes until it becomes smooth and elastic.
- Incorporate Fruits and Nuts: Gently fold in the mixed candied fruits, raisins, chopped nuts, and the lemon and orange zests into the dough. Confirm they’re evenly distributed throughout the dough.
- First Rise: Shape the dough into a ball and place it in a lightly greased bowl, covering it with a damp cloth. Let it rise in a warm place for about 1-2 hours, or until it has doubled in size.
- Shape the Cake: Once the dough has risen, punch it down to release the air. Shape it into a round cake and create a hole in the middle to form a ring. Place the ring on a baking sheet lined with parchment paper.
- Second Rise: Cover the shaped dough with a cloth and let it rise again for about 30-45 minutes until it puffs up.
- Preheat the Oven: While the dough is rising, preheat your oven to 180°C (350°F).
- Egg Wash and Bake: Brush the top of the dough with the beaten egg for a golden finish. Bake in the preheated oven for about 25-30 minutes, or until the cake is golden brown and sounds hollow when tapped on the bottom.
- Cool and Serve: Allow the cake to cool on a wire rack before serving. Traditionally, a small figurine or a dried bean is hidden inside the cake, and whoever finds it’s said to have good luck for the year.
Extra Tips
When making Bolo Rei, you can customize the ingredients to your liking by adding different types of dried fruits or nuts. Additionally, for a more intense flavor, consider soaking the dried fruits in rum or brandy overnight before incorporating them into the dough.
Bola De Berlim: Portuguese Cream-Filled Doughnuts

Bola De Berlim are a delightful Portuguese treat, often enjoyed as a snack or dessert. These luscious cream-filled doughnuts are a popular street food, usually found at fairs and markets across Portugal. They boast a light and airy texture, encasing a rich and creamy filling that makes every bite a heavenly experience.
Traditionally, they’re dusted with sugar and sometimes filled with a decadent custard or pastry cream. Making these doughnuts at home allows you to savor their deliciousness fresh from the fryer.
To create the perfect Bola De Berlim, patience and attention to detail are key. The dough requires time to rise, guaranteeing that the doughnuts are fluffy and light. While the frying might seem intimidating, the result is worth it, as the golden-brown exterior gives way to a soft, pillowy interior filled with creamy goodness.
Serve them warm, and prepare to be transported to the sun-kissed streets of Lisbon with each bite.
Ingredients (serving size: 4-6 people):
- 2 cups all-purpose flour
- 1/4 cup granulated sugar
- 1/2 teaspoon salt
- 1 tablespoon active dry yeast
- 3/4 cup milk, warmed
- 2 large eggs
- 2 tablespoons unsalted butter, melted
- 1 teaspoon vanilla extract
- Oil for frying (vegetable or canola)
- Powdered sugar for dusting
- 1 cup pastry cream or custard (for filling)
Cooking Instructions:
- Prepare the Yeast Mixture: In a small bowl, combine the warm milk and active dry yeast. Allow it to sit for about 5-10 minutes until it becomes frothy. This step activates the yeast, guaranteeing the dough will rise properly.
- Mix Dry Ingredients: In a large mixing bowl, combine the flour, granulated sugar, and salt. Whisk them together to evenly distribute the ingredients.
- Combine Wet Ingredients: In another bowl, whisk the eggs, melted butter, and vanilla extract together. Once the yeast mixture is frothy, add it to the wet mixture.
- Form the Dough: Pour the wet mixture into the bowl with the dry ingredients. Mix until a rough dough forms. Then, knead the dough on a lightly floured surface for about 8-10 minutes until it’s smooth and elastic.
- First Rise: Place the kneaded dough in a greased bowl, cover it with a clean kitchen towel, and let it rise in a warm place for about 1-2 hours, or until it has doubled in size.
- Shape the Doughnuts: Once the dough has risen, punch it down to release the air. Divide the dough into equal pieces (about 12-15) and shape each piece into a ball. Place them on a floured surface, cover them, and let them rise for another 30-45 minutes.
- Heat the Oil: In a deep pot, heat the oil to approximately 350°F (175°C). You can test the temperature by dropping a small piece of dough; it should sizzle upon contact.
- Fry the Doughnuts: Carefully place a few dough balls into the hot oil, making sure not to overcrowd the pot. Fry them for about 2-3 minutes on each side, until they’re golden brown. Use a slotted spoon to remove them and drain on paper towels.
- Fill with Cream: Once the doughnuts are cool enough to handle, use a pastry bag fitted with a round tip to fill each doughnut with pastry cream or custard.
- Dust with Sugar: Finally, dust the filled doughnuts with powdered sugar before serving.
Extra Tips:
When making Bola De Berlim, be mindful of the oil temperature as it can greatly affect the doughnut’s texture. If the oil is too hot, the outside will brown quickly while the inside remains raw; if it’s too cool, they’ll absorb too much oil and become greasy.
To test the pastry cream for filling, guarantee it’s thick and smooth for easy piping. Enjoy these doughnuts fresh for the best flavor, and feel free to experiment with different fillings, such as chocolate or fruit jams, to add your personal touch!
Dom Rodrigo: Delightful Egg Yolk Confections

Dom Rodrigo is a traditional Portuguese dessert that showcases the rich flavors and textures of egg yolks combined with sugar and ground almonds. Originating from the Algarve region, this sweet treat is often enjoyed during festive occasions and celebrations. The confection is characterized by its unique shape and vibrant color, making it not only a delicious indulgence but also a visually appealing addition to any dessert platter.
This dessert is a wonderful representation of Portuguese culinary heritage, often evoking nostalgia among those who’ve tasted it. The combination of sweet egg yolks and the nutty flavor of almonds creates a harmonious balance that’s simply irresistible. The preparation of Dom Rodrigo may seem elaborate, but the end result is well worth the effort, providing a taste of Portugal‘s rich dessert culture in each bite.
Ingredients (Serves 4-6)
- 8 large egg yolks
- 1 cup granulated sugar
- 1 cup ground almonds
- 1 teaspoon vanilla extract
- 1/4 teaspoon ground cinnamon
- Zest of 1 lemon
- A pinch of salt
- Powdered sugar for dusting (optional)
Cooking Instructions
- Prepare the Almond Mixture: In a medium mixing bowl, combine the ground almonds, lemon zest, and ground cinnamon. Mix well to guarantee the flavors are evenly distributed. This mixture will provide the essential nutty flavor to your Dom Rodrigo.
- Whisk the Egg Yolks: In a separate large mixing bowl, whisk the egg yolks until they become smooth and slightly frothy. This process introduces air into the yolks, which will help create a light texture in the final product.
- Cook the Sugar Syrup: In a small saucepan, combine the granulated sugar with 1/2 cup of water over medium heat. Stir until the sugar dissolves and the mixture begins to boil. Once boiling, reduce the heat to low and let it simmer for about 5 minutes until it thickens slightly.
- Combine the Mixtures: Gradually pour the hot sugar syrup into the whisked egg yolks while continuously stirring. This step is essential as it prevents the yolks from cooking too quickly and forming lumps.
- Add the Almond Mixture: Once the syrup is fully incorporated, add the almond mixture and a pinch of salt to the egg yolks. Stir well until everything is combined, forming a thick batter.
- Shape the Confections: Using your hands, take small portions of the mixture and shape them into oval or round pieces. Place them on a parchment-lined baking sheet. Be sure to leave space between each piece for even cooking.
- Bake: Preheat your oven to 350°F (175°C) and bake the shaped confections for about 10-12 minutes or until they’re lightly golden. Keep an eye on them to avoid overcooking.
- Cool and Serve: Once baked, remove the Dom Rodrigo from the oven and let them cool completely on a wire rack. Dust with powdered sugar before serving for an elegant touch.
Extra Tips
When preparing Dom Rodrigo, using fresh eggs will enhance the flavor and texture of the dessert. Additionally, verify that you incorporate the sugar syrup into the egg yolks slowly to maintain a smooth consistency without scrambling the yolks.
Feel free to experiment with different flavorings, such as orange zest or a splash of almond extract, to customize the taste to your liking. Finally, these confections can be stored in an airtight container for up to a week, allowing you to enjoy them longer!