

Hosting a memorable gathering? Mediterranean cuisine is your best friend. The vibrant flavors and beautiful presentations never disappoint. Picture your guests enjoying roasted red pepper hummus or flaky spanakopita. Ready to impress? Here are 13 showstopping recipes to turn your table into a Mediterranean feast.
Mediterranean Mezze Platter
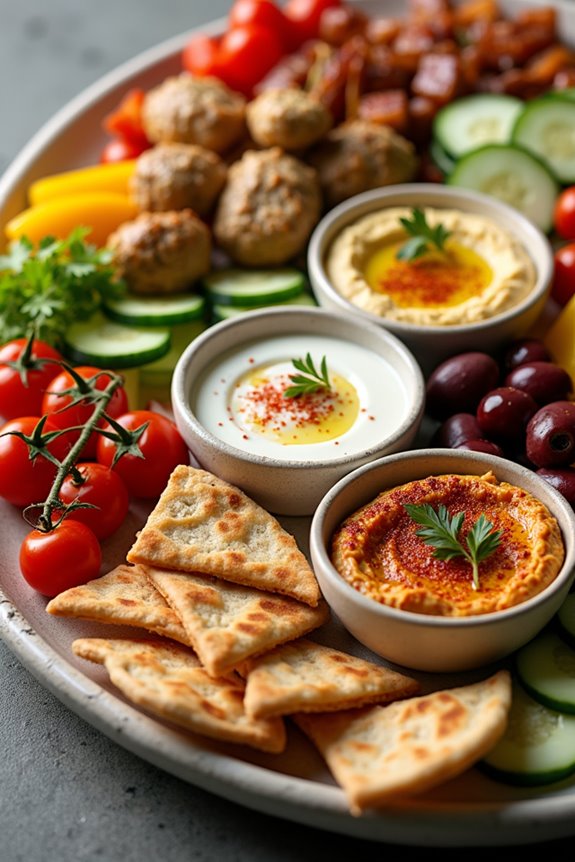
A Mediterranean Mezze Platter is a vibrant and flavorful assortment of small dishes that captures the essence of Mediterranean cuisine. This dish is perfect for gatherings and parties, allowing guests to sample a variety of tastes and textures. It’s not just about the food; it’s about the experience of sharing and enjoying a meal together. Each component of the platter adds its unique flavor, making it a delightful culinary adventure.
Creating a Mezze Platter can be as simple or as elaborate as you wish, as it allows for customization based on your preferences and dietary needs. Common elements include dips like hummus and tzatziki, fresh vegetables, olives, cheeses, and assorted breads. The key is to have a balance of flavors and colors, which won’t only please the palate but also the eyes.
Ingredients (serving size: 4-6 people)
- 1 cup hummus
- 1 cup tzatziki sauce
- 1 cup baba ganoush
- 1 cup assorted olives (green and black)
- 1 cup cherry tomatoes, halved
- 1 cucumber, sliced
- 1 bell pepper, sliced
- 1 cup feta cheese, crumbled
- 1 cup dolmas (stuffed grape leaves)
- 1 cup roasted red peppers
- 1 cup pita bread, cut into triangles
- Fresh herbs (such as parsley or mint) for garnish
- Olive oil for drizzling
Cooking Instructions
- Prepare the Dips: Begin by preparing the dips. If you’re making your own hummus, tzatziki, or baba ganoush, do so in advance to allow the flavors to meld. For hummus, blend canned chickpeas, tahini, lemon juice, garlic, and olive oil until smooth. For tzatziki, mix Greek yogurt with grated cucumber, garlic, and dill. For baba ganoush, roast eggplants, scoop out the flesh, and blend with tahini, lemon juice, and garlic.
- Arrange the Platter: Once your dips are ready, choose a large serving platter or board. Start by placing small bowls or ramekins in the center for the dips, making sure there’s enough space around them for other items. This creates an inviting focal point.
- Add Fresh Vegetables: Next, artfully arrange the cherry tomatoes, cucumber slices, and bell pepper strips around the dips. You can create a colorful pattern or simply group them together according to color for a more casual look.
- Incorporate Cheese and Olives: Sprinkle the crumbled feta cheese and assorted olives around the platter. They not only add flavor but also create visual interest. You can use toothpicks for easy serving of the olives.
- Include Dolmas and Roasted Peppers: Add the dolmas and roasted red peppers to the platter. Place them in clusters to make them easily accessible for guests. They provide a wonderful contrast in texture and flavor.
- Finish with Pita Bread: Finally, arrange the pita bread triangles either stacked neatly or fanned out along the edge of the platter. This will allow guests to easily scoop up the dips and other items.
- Garnish and Serve: Drizzle a little olive oil over the dips and scatter fresh herbs around the platter for a pop of color. This not only enhances the presentation but also adds an aromatic element to the dish. Serve immediately and enjoy!
Extra Tips
When preparing a Mediterranean Mezze Platter, feel free to get creative with the ingredients. You can include items like marinated artichokes, roasted nuts, or even different kinds of cheeses. Seasonal ingredients are a great addition to keep the platter fresh and exciting.
Additionally, consider the dietary preferences of your guests; having a mix of vegetarian and non-vegetarian options can guarantee everyone has something to enjoy. Finally, prepare the dips and vegetables in advance to save time and reduce stress when hosting your gathering.
Stuffed Grape Leaves (Dolmas)
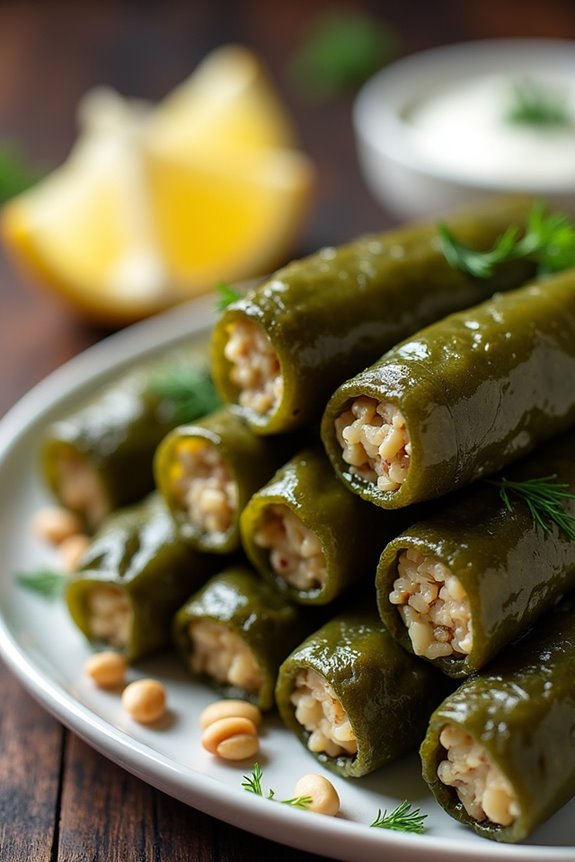
Stuffed Grape Leaves, known as Dolmas in Mediterranean cuisine, are a beloved dish that combines tender grape leaves with a savory filling, often consisting of rice, herbs, and spices. This dish isn’t only a staple in Greek and Turkish cuisine but also has a rich history across the Mediterranean region.
Dolmas can be served warm or at room temperature, making them a versatile addition to any gathering or party. They’re often enjoyed as an appetizer or side dish, and their vibrant flavors make them a favorite among many.
Preparing Stuffed Grape Leaves may seem intimidating at first, but with a bit of practice, you’ll find it to be a rewarding culinary experience. The key to perfect Dolmas is in the freshness of the grape leaves and the balance of flavors in the filling. Once you master this recipe, you can experiment with various fillings and sauces, adding your personal touch to this Mediterranean classic.
Ingredients (Serves 4-6):
- 1 jar (16 oz) grape leaves in brine, rinsed and drained
- 1 cup long-grain rice
- 1 medium onion, finely chopped
- 2 tablespoons olive oil
- 1/4 cup fresh parsley, chopped
- 1/4 cup fresh dill, chopped
- 1/4 cup pine nuts, toasted (optional)
- 1 teaspoon salt
- 1/2 teaspoon black pepper
- 1/2 teaspoon cinnamon
- 1/4 cup lemon juice
- 2 cups vegetable broth or water
- 1 tablespoon of additional olive oil for drizzling
Cooking Instructions:
- Prepare the Filling: In a large skillet, heat 2 tablespoons of olive oil over medium heat. Add the finely chopped onion and sauté until translucent, about 5 minutes. Stir in the rice, cooking for another 2-3 minutes until the rice is lightly toasted. Remove from heat and let cool slightly.
- Combine Ingredients: In a mixing bowl, combine the sautéed rice mixture with parsley, dill, pine nuts (if using), salt, pepper, and cinnamon. Mix well to guarantee all ingredients are evenly distributed.
- Prepare the Grape Leaves: Lay a grape leaf flat on a clean surface, with the stem end facing you. Place about 1 tablespoon of the filling at the base of the leaf, fold the sides over the filling, and roll it up tightly from the base to the tip, similar to rolling a burrito. Repeat this process for all grape leaves.
- Arrange in Cooking Pot: Place the stuffed grape leaves seam-side down in a large pot. Pack them tightly together in a single layer. If you have any leftover grape leaves, you can place them on top to prevent the stuffed leaves from unrolling during cooking.
- Add Liquid for Cooking: Pour the vegetable broth or water over the arranged grape leaves until they’re just covered. Drizzle with 1 tablespoon of olive oil and add the lemon juice. Place a heavy plate on top of the grape leaves to keep them submerged during cooking.
- Cook the Dolmas: Bring the liquid to a gentle simmer, then cover the pot and reduce the heat to low. Let the dolmas cook for about 45 minutes to 1 hour, until the rice is tender and the leaves are soft. Check occasionally, and add more water if necessary to keep the leaves submerged.
- Serve: Once cooked, remove the pot from heat and let the dolmas cool for a few minutes. Serve warm or at room temperature with a side of yogurt or tzatziki for dipping.
Extra Tips:
When making Stuffed Grape Leaves, be sure to use fresh or well-preserved grape leaves to avoid bitterness. If you’re using fresh leaves, blanch them in boiling water for a few minutes to soften before rolling.
Feel free to customize your filling with ground meat or different herbs based on your preference. Additionally, letting the dolmas rest for a few hours or overnight in the refrigerator can enhance their flavors, making them even more delicious when served.
Spanakopita (Spinach and Feta Pie)
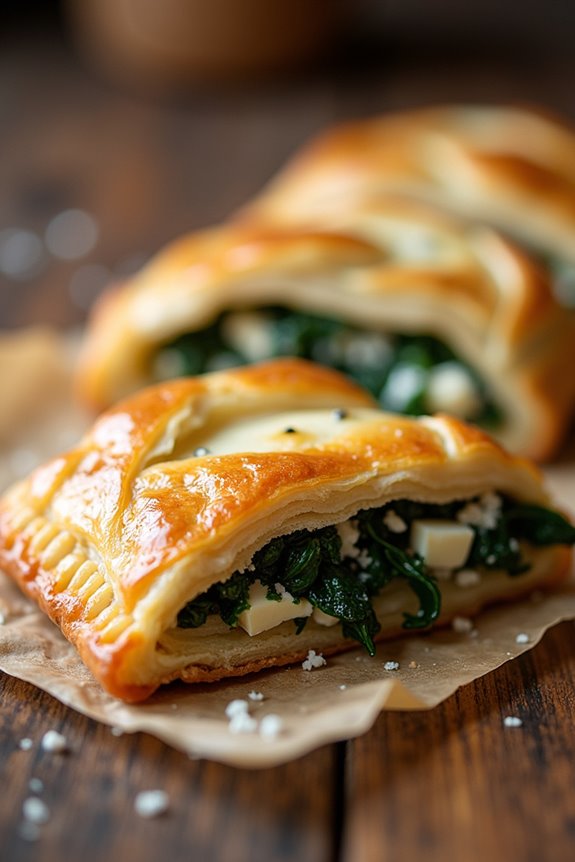
Spanakopita is a traditional Greek pastry that combines the earthy flavors of spinach with the creamy tang of feta cheese, all wrapped in layers of crispy phyllo dough. This savory pie isn’t only delicious but also a fantastic way to incorporate leafy greens into your meal. Perfect for a Mediterranean-themed party or as a delightful appetizer, spanakopita can be enjoyed warm or at room temperature, making it versatile for various occasions.
The process of making spanakopita might seem intimidating due to the use of phyllo dough, but with a little patience and practice, anyone can master this lovely dish. The contrast between the flaky exterior and the rich, flavorful filling creates a delightful experience for the palate. Serve it alongside a crisp salad or some tzatziki for a complete Mediterranean feast.
Ingredients (Serves 4-6):
- 1 package of phyllo dough (16 oz), thawed
- 1 large onion, finely chopped
- 2 tablespoons olive oil
- 1 pound fresh spinach, washed and chopped (or 1 package of frozen spinach, thawed and drained)
- 1 cup feta cheese, crumbled
- 1/2 cup ricotta cheese
- 2 large eggs, beaten
- 1/4 cup fresh dill, chopped (or 1 tablespoon dried dill)
- Salt and pepper to taste
- 1/2 cup melted butter or olive oil, for brushing
Cooking Instructions:
- Preheat the Oven: Start by preheating your oven to 375°F (190°C). This will guarantee your spanakopita bakes evenly and achieves that desired golden-brown color.
- Sauté the Onions: In a large skillet, heat 2 tablespoons of olive oil over medium heat. Add the finely chopped onion and sauté until it becomes translucent and soft, about 5 minutes. This step builds the foundation of flavor for your filling.
- Add Spinach: Once the onions are ready, add the chopped spinach to the skillet. If using fresh spinach, sauté until wilted; if using frozen spinach, cook until heated through. Remember to stir frequently to prevent sticking. Remove the mixture from heat and let it cool slightly.
- Prepare the Filling: In a mixing bowl, combine the cooled spinach and onion mixture with crumbled feta cheese, ricotta cheese, beaten eggs, chopped dill, salt, and pepper. Mix everything well until fully combined. This filling should have a creamy texture with a burst of flavor from the herbs and cheeses.
- Prepare the Phyllo Dough: Lay out one sheet of phyllo dough on a clean, dry surface. Brush it lightly with melted butter or olive oil. Place another sheet on top and brush again. Repeat this process until you have a stack of about 5-6 sheets. This will assure a flaky, crispy crust.
- Add Filling and Fold: Place a portion of the spinach filling along one edge of the layered phyllo dough, forming a log shape. Fold the sides over the filling and roll the phyllo tightly to encase the filling completely. Transfer the rolled spanakopita to a greased baking sheet, seam side down.
- Repeat and Prepare for Baking: Repeat this process with the remaining phyllo sheets and filling until everything is used. You can also form smaller triangles if you prefer bite-sized pieces. Brush the tops with more melted butter or olive oil for an extra crispy finish.
- Bake: Place the baking sheet in the preheated oven and bake for 30-40 minutes, or until the top is golden brown and crispy. Keep an eye on it toward the end of the baking time to avoid over-browning.
- Cool and Serve: Once baked, remove the spanakopita from the oven and let it cool for a few minutes. Cut into squares or triangles and serve warm or at room temperature.
Extra Tips:
When working with phyllo dough, keep the sheets covered with a damp towel to prevent them from drying out. If you’re feeling adventurous, consider adding other ingredients to the filling, such as cooked mushrooms or artichokes, for a unique twist.
Spanakopita can also be frozen before baking; simply thaw and bake when you’re ready to serve. Enjoy this delightful dish with a side of yogurt or a brisk salad for a complete Mediterranean experience!
Roasted Red Pepper Hummus
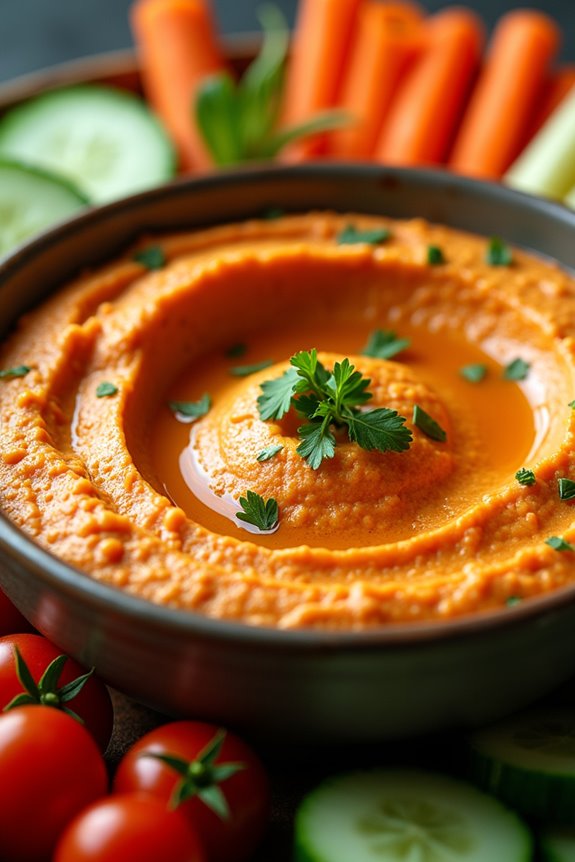
Roasted Red Pepper Hummus is a delightful Mediterranean dip that combines the earthy flavors of chickpeas with the sweet and smoky notes of roasted red peppers. This vibrant and creamy spread is perfect for gatherings, served alongside pita bread, fresh vegetables, or as part of a mezze platter.
It’s not only delicious but also packed with nutrients, making it a guilt-free treat that everyone will enjoy.
Making Roasted Red Pepper Hummus is a simple process that can elevate any party or gathering. The combination of tahini, garlic, and lemon juice adds a zesty flavor that complements the roasted peppers beautifully.
Whether you’re hosting a dinner party or enjoying a casual get-together with friends, this hummus is sure to impress and satisfy.
Ingredients (Serves 4-6)
- 1 can (15 oz) chickpeas, drained and rinsed
- 1 large roasted red pepper, peeled and chopped
- 1/4 cup tahini
- 2 tablespoons fresh lemon juice
- 2 cloves garlic, minced
- 1/4 teaspoon ground cumin
- Salt, to taste
- 2-3 tablespoons olive oil
- Water, as needed
- Fresh parsley, for garnish (optional)
- Pita bread or vegetables, for serving
Instructions
1. Prepare the Ingredients: Start by gathering all your ingredients. Make certain to drain and rinse the chickpeas thoroughly to remove any excess sodium and flavor from the canning process. If you’re using jarred roasted red peppers, confirm they’re well-drained.
2. Blend the Base: In a food processor, combine the chickpeas, roasted red pepper, tahini, lemon juice, minced garlic, and ground cumin. This combination forms the base of your hummus and delivers a balanced flavor profile.
3. Process Until Smooth: Turn on the food processor and blend the mixture until smooth. This may take a minute or two.
Stop occasionally to scrape down the sides of the bowl with a spatula to make sure everything is well mixed.
4. Adjust Consistency and Flavor: While the processor is running, gradually add olive oil and a few tablespoons of water until you achieve your desired consistency. If you prefer a creamier hummus, add more water or olive oil.
Taste the hummus and add salt as needed to enhance the flavors.
5. Serve and Garnish: Once you have a smooth and creamy consistency, transfer the hummus to a serving bowl. Optionally, drizzle a bit of olive oil on top and sprinkle with fresh parsley for a pop of color.
Serve with pita bread or fresh vegetables.
Extra Tips
For an even richer flavor, consider roasting your own red peppers by charring them on an open flame or in the oven until the skin is blistered, then allowing them to cool and peeling the skins off.
Additionally, you can customize the hummus by adding spices like smoked paprika or cayenne pepper for a bit of heat.
Store any leftovers in an airtight container in the refrigerator for up to a week, and enjoy it as a quick snack or lunch option!
Greek Salad Skewers
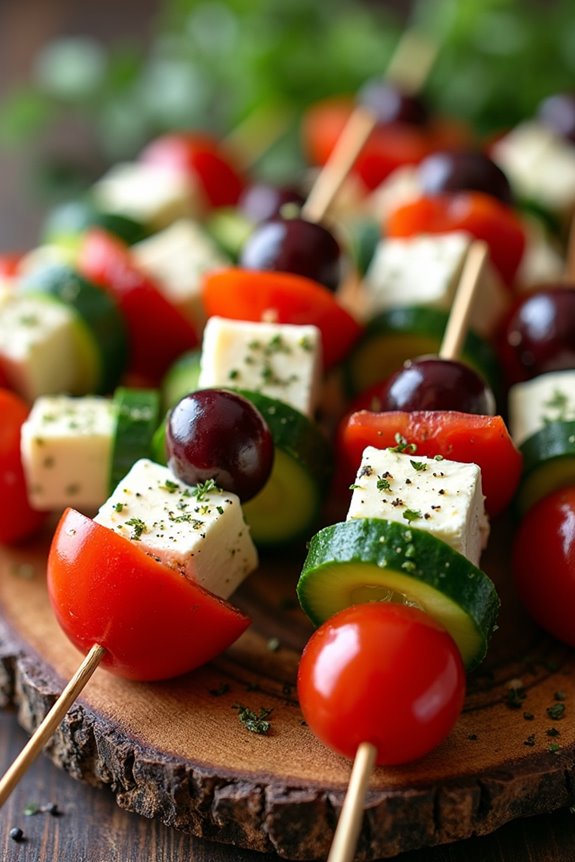
Greek Salad Skewers are a delightful and vibrant dish that brings the flavors of the Mediterranean right to your table. These colorful skewers are perfect for parties, picnics, or any casual gathering, where they can be enjoyed as finger food or a revitalizing appetizer. With the combination of juicy tomatoes, crisp cucumbers, savory olives, creamy feta cheese, and aromatic herbs, these skewers not only look stunning but also pack a punch in flavor.
The beauty of Greek Salad Skewers lies in their simplicity and ease of preparation. They require minimal cooking, making them an ideal addition to any menu. Just thread the ingredients onto skewers, drizzle with a zesty dressing, and you have a delicious dish that everyone will love. Whether you’re hosting a Mediterranean-themed party or just looking for a light snack, these skewers are sure to impress your guests.
Ingredients (Serves 4-6)
- 1 pint cherry tomatoes
- 1 cucumber, sliced into half-moons
- 1 cup Kalamata olives, pitted
- 8 ounces feta cheese, cut into cubes
- 1 teaspoon dried oregano
- ¼ cup olive oil
- 2 tablespoons red wine vinegar
- Salt and pepper, to taste
- Skewers (wooden or metal)
Cooking Instructions
- Prepare the Ingredients: Start by washing the cherry tomatoes and slicing the cucumber into half-moons. Cut the feta cheese into bite-sized cubes. Make sure the olives are pitted and ready to use. This step guarantees all your components are ready for easy assembly.
- Make the Dressing: In a small bowl, whisk together the olive oil, red wine vinegar, dried oregano, salt, and pepper until combined. This dressing will add a burst of flavor to your skewers, so confirm it’s well mixed.
- Assemble the Skewers: Take a skewer and begin threading the ingredients in this order: a cherry tomato, a cucumber slice, an olive, and a cube of feta cheese. Repeat this pattern until the skewer is filled, leaving some space at the ends for handling. This arrangement not only looks appealing but also balances the flavors in each bite.
- Drizzle with Dressing: Once all the skewers are assembled, place them on a serving platter and drizzle the prepared dressing over the top. This step enhances the flavors and makes the skewers even more appetizing.
- Chill and Serve: For the best flavor, let the skewers sit for about 15-30 minutes at room temperature or refrigerate them for up to an hour before serving. This allows the ingredients to marinate slightly, enhancing their taste.
Extra Tips
For added flair, consider garnishing your Greek Salad Skewers with fresh herbs such as basil or parsley before serving. You can also customize the ingredients by adding bell peppers or red onions for extra crunch and color.
If you’re preparing these skewers in advance, keep the dressing separate until just before serving to confirm the ingredients stay fresh and vibrant. Enjoy these skewers with a side of tzatziki sauce for an extra layer of flavor!
Grilled Lamb Kebabs
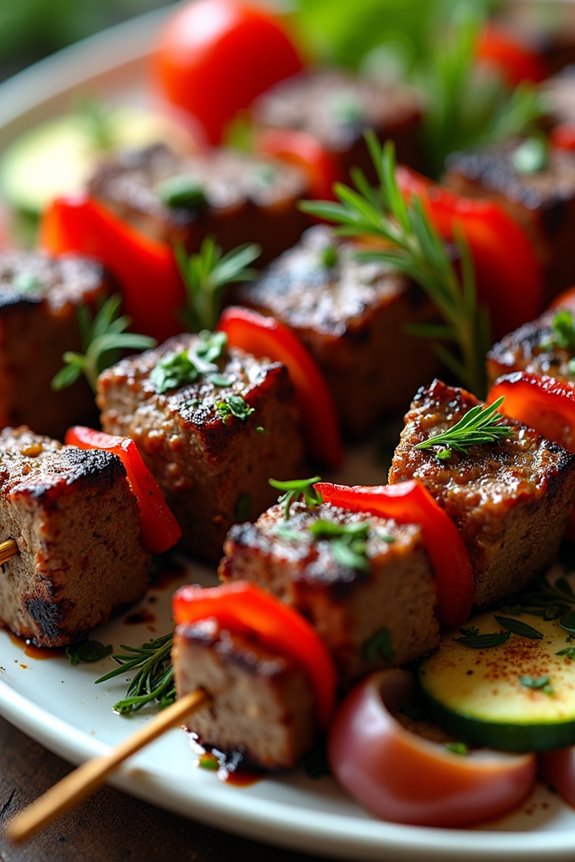
Grilled Lamb Kebabs are a mouthwatering centerpiece that brings the vibrant flavors of the Mediterranean to your table. Perfect for a summer gathering or a cozy dinner, these kebabs are marinated in a fragrant blend of spices, herbs, and yogurt, which tenderizes the meat while infusing it with a rich taste.
The combination of juicy lamb, fresh vegetables, and smoky grill marks creates a delightful experience for both the eyes and the palate.
To prepare these kebabs, you can use various cuts of lamb, but shoulder or leg is often preferred for its tenderness and flavor. The marinade plays a vital role, so allowing the meat to soak up the seasonings for a few hours or overnight will elevate the taste.
Serve these kebabs with warm pita bread, a tangy yogurt sauce, or a revitalizing salad to complete the Mediterranean feast.
Ingredients (Serves 4-6):
- 1.5 pounds lamb shoulder or leg, cut into 1-inch cubes
- 1 cup plain yogurt
- 4 cloves garlic, minced
- 2 tablespoons olive oil
- 2 tablespoons lemon juice
- 1 tablespoon ground cumin
- 1 tablespoon ground coriander
- 1 tablespoon smoked paprika
- 1 teaspoon salt
- 1 teaspoon black pepper
- 1 teaspoon red pepper flakes (optional for heat)
- 1 large onion, cut into wedges
- 1 bell pepper, cut into chunks
- 1 zucchini, sliced into thick rounds
- Skewers (soaked in water if wooden)
Cooking Instructions:
- Prepare the Marinade: In a large mixing bowl, combine yogurt, minced garlic, olive oil, lemon juice, ground cumin, ground coriander, smoked paprika, salt, black pepper, and red pepper flakes (if using). Whisk together until well blended.
- Marinate the Lamb: Add the lamb cubes into the marinade, making sure each piece is thoroughly coated. Cover the bowl with plastic wrap or transfer to a resealable bag and refrigerate for at least 2 hours, or ideally overnight to allow the flavors to penetrate the meat.
- Prep the Vegetables: While the lamb is marinating, prepare the vegetables. Cut the onion, bell pepper, and zucchini into chunks that are similar in size to the lamb pieces. This guarantees even cooking when grilling.
- Assemble the Kebabs: Once marinated, take the lamb out of the fridge. Thread the lamb and vegetables alternately onto the skewers, leaving a little space between each piece for even grilling.
- Preheat the Grill: Preheat your grill to medium-high heat, making sure it’s clean and lightly oiled to prevent sticking.
- Grill the Kebabs: Place the skewers on the grill and cook for about 10-15 minutes, turning occasionally, until the lamb is browned and reaches your desired level of doneness (medium-rare is about 135°F).
- Rest and Serve: Once cooked, remove the kebabs from the grill and let them rest for about 5 minutes. This helps retain the juices. Serve hot with yogurt sauce, pita bread, or your favorite Mediterranean sides.
Extra Tips:
For added flavor, consider adding herbs such as fresh rosemary or thyme to the marinade.
If you prefer, you can also substitute the lamb with chicken or beef, adjusting the cooking time accordingly.
Don’t hesitate to experiment with different vegetables on the skewers, such as cherry tomatoes or mushrooms, to add variety to your grilled lamb kebabs.
Remember to soak wooden skewers in water for at least 30 minutes before grilling to prevent burning.
Enjoy your Mediterranean feast!
Chicken Souvlaki With Tzatziki
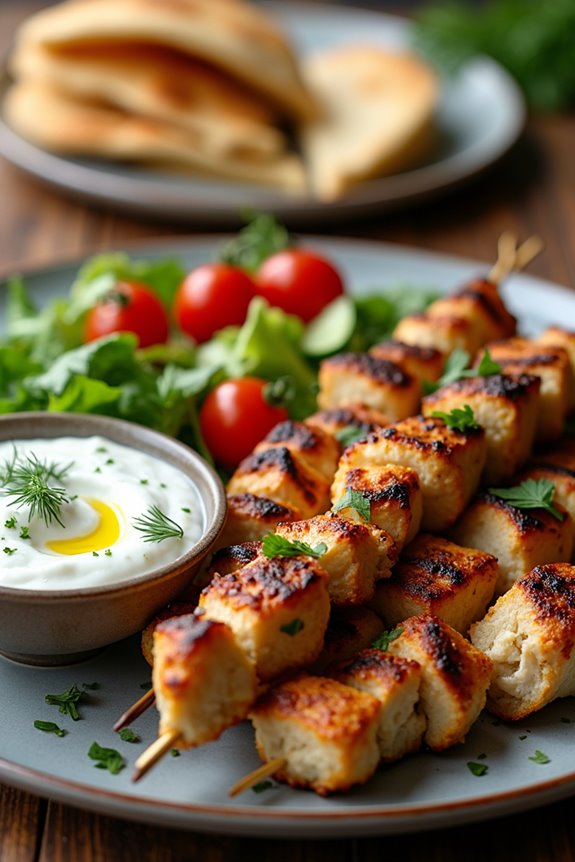
Chicken Souvlaki is a delightful Greek dish that features tender marinated chicken skewers, perfectly grilled to achieve a smoky flavor. Paired with a rejuvenating tzatziki sauce, made from yogurt, cucumber, and herbs, this dish isn’t only easy to prepare but also bursting with Mediterranean flavors.
It’s a perfect choice for a party or a casual gathering, as it can be served as a main dish or as part of a mezze platter. To make Chicken Souvlaki with Tzatziki, you’ll need to marinate the chicken for a few hours to allow the flavors to meld beautifully.
The tzatziki sauce is equally simple to whip up and can be made in advance, making your cooking process seamless. Serve the skewers with warm pita bread and a side of fresh salad for a complete and satisfying meal that will impress your guests.
Ingredients (Serves 4-6):
- 1.5 lbs boneless, skinless chicken thighs, cut into 1-inch pieces
- 1/4 cup olive oil
- 3 tablespoons lemon juice
- 3 cloves garlic, minced
- 1 teaspoon dried oregano
- 1 teaspoon ground cumin
- Salt and pepper, to taste
- 8 wooden or metal skewers (if using wooden, soak in water for 30 minutes)
For Tzatziki:
- 1 cup Greek yogurt
- 1/2 cucumber, grated and excess moisture squeezed out
- 1 clove garlic, minced
- 1 tablespoon fresh dill, chopped (or 1 teaspoon dried dill)
- 1 tablespoon olive oil
- 1 tablespoon lemon juice
- Salt, to taste
Cooking Instructions:
- Marinate the Chicken: In a large bowl, combine the olive oil, lemon juice, minced garlic, oregano, cumin, salt, and pepper. Add the chicken pieces and mix well to guarantee they’re fully coated. Cover the bowl and refrigerate for at least 1 hour, or up to 4 hours for better flavor.
- Prepare the Tzatziki Sauce: In a medium bowl, combine the Greek yogurt, grated cucumber, minced garlic, dill, olive oil, lemon juice, and a pinch of salt. Stir until well blended. Taste and adjust seasoning if necessary. Cover the sauce and refrigerate until ready to serve.
- Assemble Skewers: Preheat your grill or grill pan over medium-high heat. If using wooden skewers, confirm they’re soaked to prevent burning. Thread the marinated chicken pieces onto the skewers, leaving a little space between each piece to allow for even cooking.
- Grill the Chicken Souvlaki: Place the skewers on the preheated grill. Cook for about 12-15 minutes, turning occasionally until the chicken is cooked through and has nice grill marks. The internal temperature should reach 165°F (75°C).
- Serve: Once cooked, remove the skewers from the grill and let them rest for a few minutes. Serve the Chicken Souvlaki hot with the tzatziki sauce on the side. You can also add warm pita bread and a simple salad to complete the meal.
Extra Tips:
To enhance the flavor of your Chicken Souvlaki, consider adding some fresh herbs such as parsley or mint to the marinade. For an added depth of flavor, you can also toss in a pinch of smoked paprika.
If you prefer, the chicken can be cooked in the oven or on a stovetop grill pan if a BBQ isn’t available. Make sure to adjust the cooking time accordingly and always monitor the chicken for doneness to guarantee it’s juicy and tender. Enjoy your Mediterranean feast!
Baked Feta With Herbs and Olives
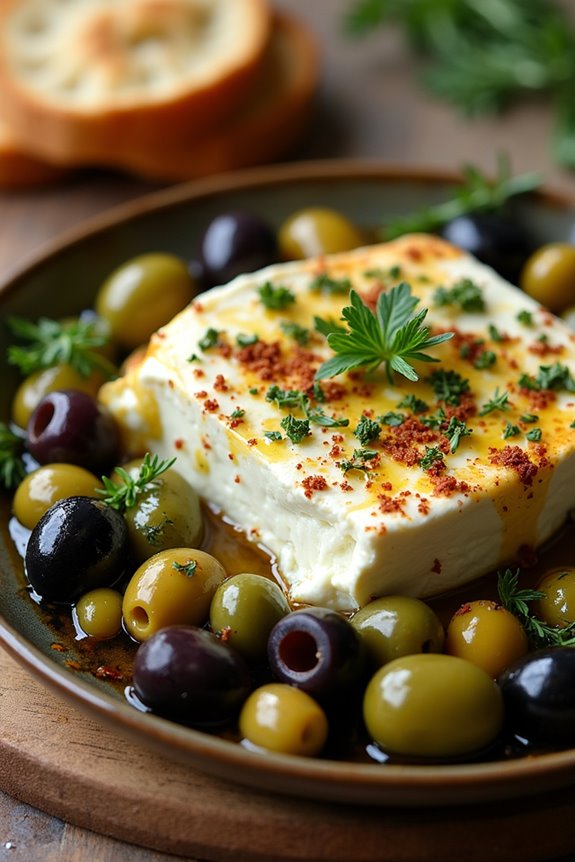
Baked Feta with Herbs and Olives is a delightful Mediterranean appetizer that’s perfect for any gathering. This dish combines the creamy texture of feta cheese with the vibrant flavors of fresh herbs and briny olives, creating a dish that’s both simple and sophisticated.
The feta cheese bakes beautifully, becoming warm and slightly melty, while the herbs infuse the dish with aromatic notes. Served with crusty bread or pita chips, this appetizer will surely impress your guests and leave them wanting more.
This recipe isn’t only easy to prepare but also allows for customization based on your favorite herbs and olives. Whether you’re hosting a summer soirée or a cozy winter gathering, Baked Feta with Herbs and Olives will bring a taste of the Mediterranean to your table.
The dish can be made in under 30 minutes, making it a convenient choice for entertaining.
Ingredients (Serves 4-6)
- 200g feta cheese
- 1/2 cup mixed olives (e.g., Kalamata, green, and black), pitted and halved
- 2 tablespoons olive oil
- 1 teaspoon dried oregano
- 1 teaspoon dried thyme
- 1 teaspoon red pepper flakes (optional)
- 2 cloves garlic, minced
- Fresh herbs for garnish (e.g., parsley, basil, or dill)
- Crusty bread or pita chips for serving
Cooking Instructions
- Preheat the Oven: Begin by preheating your oven to 400°F (200°C). This guarantees that the feta cheese will bake evenly and achieve the perfect creamy consistency.
- Prepare the Feta Cheese: Place the block of feta cheese in a small baking dish or an oven-safe skillet. If you prefer, you can crumble the feta into smaller pieces, but keeping it whole will create a beautiful presentation.
- Add the Olives: Scatter the halved olives around the feta cheese in the baking dish. The olives won’t only add flavor but also contribute to the dish’s colorful appearance.
- Drizzle with Olive Oil: Pour the olive oil over the feta cheese and olives generously. The oil will enhance the dish’s richness and help the flavors meld together during baking.
- Season the Dish: Sprinkle the dried oregano, dried thyme, and red pepper flakes over the feta and olives. Add the minced garlic on top, ensuring it’s evenly distributed for a burst of flavor.
- Bake the Feta: Place the baking dish in the preheated oven and bake for about 20 minutes, or until the feta is slightly golden and soft to the touch. Keep an eye on it to prevent burning.
- Garnish and Serve: Once baked, remove the dish from the oven and let it cool for a minute. Garnish with fresh herbs before serving. Pair it with crusty bread or pita chips for dipping.
Extra Tips
For an extra layer of flavor, consider adding slices of sun-dried tomatoes or roasted red peppers along with the olives. You can also experiment with different herbs based on your preferences—fresh rosemary or thyme can lend a delightful aroma.
Additionally, this dish can be made ahead of time; simply bake it right before your guests arrive to serve it warm and fresh. Enjoy your Mediterranean feast!
Mediterranean Quinoa Salad
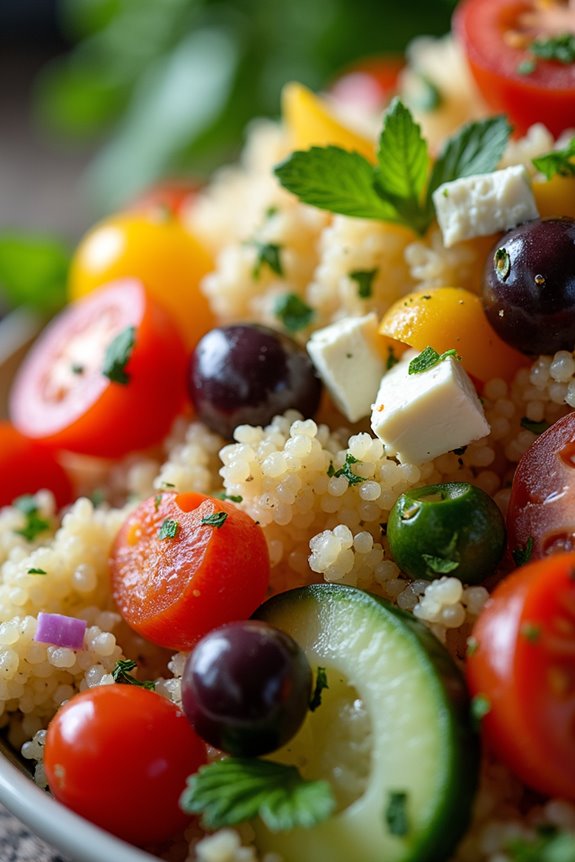
Mediterranean Quinoa Salad is a vibrant and nutritious dish that brings together the fresh flavors of the Mediterranean region. This salad is packed with protein-rich quinoa, a variety of colorful vegetables, and a tangy dressing that ties everything together.
Whether you’re serving it at a party or enjoying it as a light lunch, this salad is sure to impress your guests with its delightful taste and appealing presentation.
Not only is this salad visually stunning, but it’s also incredibly healthy. Quinoa is a complete protein, making it an excellent choice for vegetarians and health-conscious individuals.
Additionally, the combination of vegetables, herbs, and a zesty dressing offers a symphony of flavors that are both satisfying and invigorating. Let’s explore the ingredients and cooking instructions to create this Mediterranean delight for 4-6 people.
Ingredients:
- 1 cup quinoa, rinsed and drained
- 2 cups water or vegetable broth
- 1 cup cherry tomatoes, halved
- 1 cucumber, diced
- 1 bell pepper (red or yellow), diced
- 1/2 red onion, finely chopped
- 1/2 cup Kalamata olives, pitted and sliced
- 1/2 cup feta cheese, crumbled
- 1/4 cup fresh parsley, chopped
- 1/4 cup fresh mint, chopped
- Juice of 1 lemon
- 1/4 cup extra virgin olive oil
- Salt and pepper to taste
Cooking Instructions:
- Cook the Quinoa: In a medium saucepan, combine the rinsed quinoa and water (or vegetable broth). Bring to a boil over high heat. Once boiling, reduce the heat to low, cover, and let it simmer for about 15 minutes or until the quinoa is fluffy and the liquid has been absorbed.
- Remove from heat and let it sit covered for 5 minutes, then fluff with a fork.
- Prepare the Vegetables: While the quinoa is cooking, wash and chop the cherry tomatoes, cucumber, bell pepper, red onion, and olives into bite-sized pieces. Make sure to use fresh vegetables for the best flavor and texture.
- Mix the Dressing: In a small bowl, whisk together the lemon juice, olive oil, salt, and pepper. This dressing will add a rejuvenating tang to the salad.
- Combine the Ingredients: In a large mixing bowl, combine the cooked quinoa, chopped vegetables, olives, feta cheese, parsley, and mint. Pour the dressing over the mixture and gently toss everything together until well combined.
- Be careful not to mash the feta cheese.
- Taste and Adjust: Before serving, taste the salad and adjust the seasoning if necessary by adding more salt, pepper, or lemon juice according to your preference.
- Chill and Serve: For the best flavor, let the salad chill in the refrigerator for at least 30 minutes before serving. This allows the flavors to meld together beautifully.
Extra Tips:
To enhance the flavor of your Mediterranean Quinoa Salad, consider adding some roasted vegetables or grilled chicken for added protein.
Additionally, you can substitute ingredients based on your preference; for example, use goat cheese instead of feta or add other veggies like artichokes or zucchini. This salad is versatile and can be served as a side dish or a main course, making it perfect for any occasion!
Prawn and Chorizo Skewers
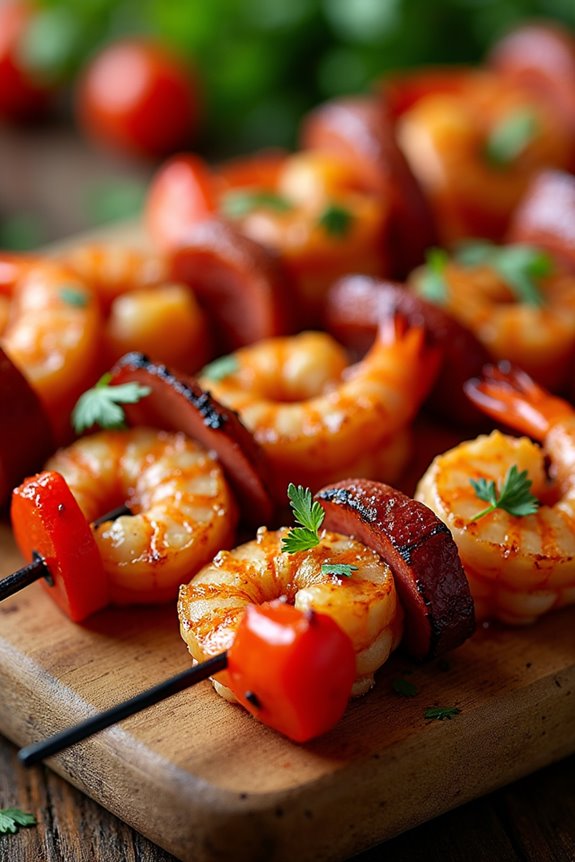
Prawn and Chorizo Skewers are a vibrant and flavorful dish that perfectly captures the essence of Mediterranean cuisine. The combination of succulent prawns and spicy chorizo creates a delightful contrast of textures and flavors that’s sure to impress your guests at any gathering.
These skewers aren’t only quick and easy to prepare but also packed with bold flavors that will transport you straight to the sun-soaked shores of the Mediterranean. Perfect for a party or a casual barbecue, Prawn and Chorizo Skewers can be served as an appetizer or a main course.
The dish is versatile, allowing you to customize it with your favorite vegetables or marinades. With a little preparation and minimal cooking time, you can have a stunning dish ready to serve, making it ideal for entertaining.
Ingredients (Serves 4-6)
- 500g large prawns, peeled and deveined
- 250g chorizo sausage, sliced into rounds
- 1 bell pepper (red or yellow), cut into bite-sized pieces
- 1 red onion, cut into wedges
- 2 cloves garlic, minced
- 2 tablespoons olive oil
- 1 teaspoon smoked paprika
- Salt and pepper, to taste
- Fresh parsley, chopped (for garnish)
- Skewers (wooden or metal)
Cooking Instructions
- Prepare the Skewers: If using wooden skewers, soak them in water for at least 30 minutes to prevent burning during cooking. This will help them hold up better on the grill. If using metal skewers, you can skip this step.
- Marinate the Prawns: In a mixing bowl, combine the prawns, minced garlic, olive oil, smoked paprika, salt, and pepper. Toss everything together until the prawns are evenly coated in the marinade. Allow the prawns to marinate for 15-20 minutes to absorb the flavors.
- Assemble the Skewers: Once the prawns are marinated, thread them onto the skewers, alternating with slices of chorizo, bell pepper pieces, and onion wedges. Continue until all ingredients are used, ensuring a good mix on each skewer for color and flavor.
- Preheat the Grill: Heat your grill or grill pan over medium-high heat. Make sure it’s well-oiled to prevent the skewers from sticking.
- Grill the Skewers: Place the assembled skewers on the grill. Cook for 2-3 minutes on each side, or until the prawns turn pink and opaque, and the chorizo is heated through. Be careful not to overcook the prawns, as they can become rubbery.
- Serve: Once cooked, remove the skewers from the grill and transfer them to a serving platter. Garnish with freshly chopped parsley for an added touch of color and flavor.
Extra Tips
For an added burst of flavor, consider brushing the skewers with a lemon-garlic butter sauce right before serving. You can also experiment with different vegetables, such as zucchini or cherry tomatoes, to further enhance the dish.
If you prefer a spicier kick, try adding a sprinkle of chili flakes to the marinade. Enjoy your Prawn and Chorizo Skewers with a revitalizing Mediterranean salad or crusty bread for a complete meal!
Olive Tapenade Crostini
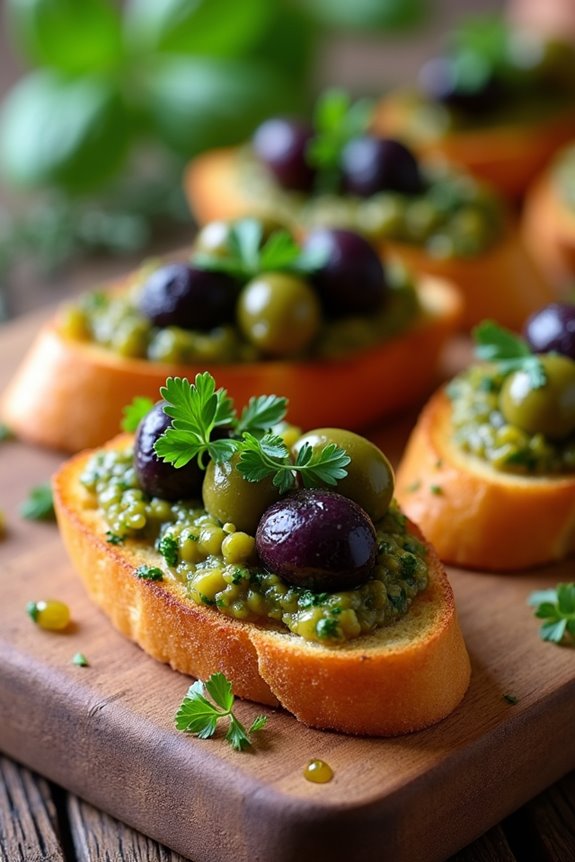
Olive Tapenade Crostini is a delightful appetizer that brings the vibrant flavors of the Mediterranean right to your dining table. This dish combines the rich, briny taste of olives with the crunch of toasted bread, creating a perfect bite-sized treat for any gathering. Ideal for parties or a casual get-together, these crostinis aren’t only simple to prepare but also visually appealing, making them a crowd-pleaser that everyone will enjoy.
The heart of this recipe lies in the olive tapenade, a savory spread made from finely chopped olives, capers, and herbs. The combination of flavors creates a robust topping that pairs beautifully with the crispy crostini. Serve this appetizer with a glass of wine, and you’re sure to impress your guests. So, roll up your sleeves and let’s get started!
Ingredients (Serves 4-6)
- 1 cup mixed olives (Kalamata and green olives), pitted
- 2 tablespoons capers, drained
- 2 cloves garlic, minced
- 1 tablespoon fresh lemon juice
- 1 tablespoon fresh parsley, chopped
- 1/4 cup extra virgin olive oil
- Salt and pepper, to taste
- 1 French baguette, sliced into 1/2-inch thick rounds
- Optional: additional herbs for garnish (e.g., thyme, basil)
Cooking Instructions
- Prepare the Olive Tapenade: In a food processor, combine the mixed olives, capers, minced garlic, lemon juice, and chopped parsley. Pulse the ingredients together until a coarse paste forms. Be careful not to over-process; you want to retain some texture in the tapenade.
- Add Olive Oil: With the food processor running, slowly drizzle in the extra virgin olive oil until the mixture reaches your desired consistency. You want it to be spreadable but not too runny. Taste the tapenade and season with salt and pepper as needed.
- Toast the Baguette Slices: Preheat your oven to 400°F (200°C). Arrange the sliced baguette rounds on a baking sheet. Brush each slice lightly with olive oil on both sides. Bake in the preheated oven for about 5-7 minutes or until the bread is golden brown and crispy, turning them halfway through.
- Assemble the Crostini: Once the crostini are toasted, remove them from the oven. Allow them to cool for a minute before spreading a generous amount of the olive tapenade on each slice. If desired, top with additional herbs for decoration and flavor.
- Serve: Arrange the assembled crostini on a serving platter. They can be served warm or at room temperature, making them perfect for any occasion.
Extra Tips
When preparing Olive Tapenade Crostini, feel free to experiment with different types of olives to suit your taste preferences. For a spicier kick, consider adding a pinch of red pepper flakes to the tapenade.
Additionally, you can prepare the tapenade a day in advance; just store it in an airtight container in the refrigerator. This allows the flavors to meld beautifully. Don’t forget to let the tapenade come to room temperature before serving for the best flavor experience!
Mini Spanakopita Bites
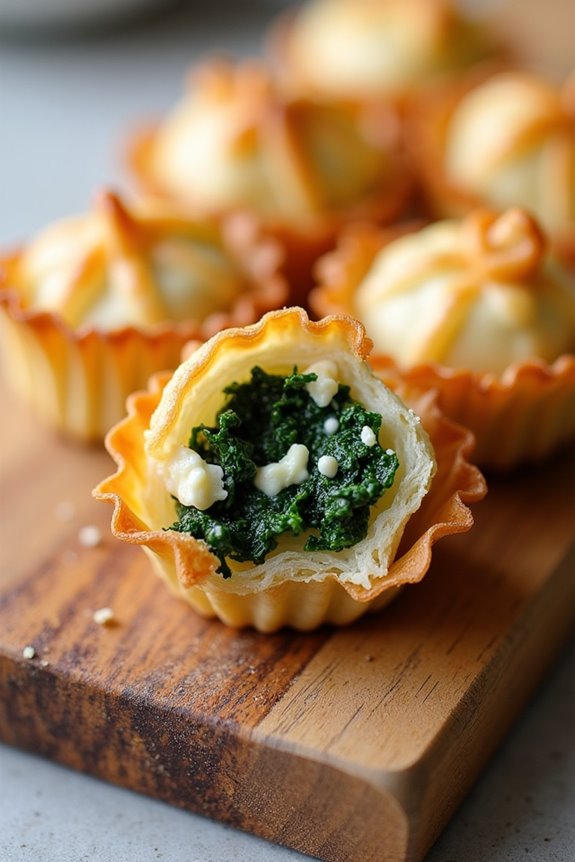
Mini Spanakopita Bites are a delightful Mediterranean appetizer that combines flaky phyllo pastry with a savory filling of spinach and feta cheese. These bite-sized treats are perfect for parties or gatherings, offering a taste of Greek cuisine that’s sure to impress your guests.
The crispy exterior contrasts beautifully with the creamy filling, making them a favorite among both vegetarians and meat-eaters alike.
Making Mini Spanakopita Bites is surprisingly easy, requiring just a few simple ingredients and some basic cooking techniques. The use of phyllo dough can seem intimidating at first, but once you get the hang of working with it, you’ll find that it adds an incredible texture and flavor to your dishes.
These delicious bites can be made ahead of time and frozen, making them a convenient option for entertaining.
Ingredients (Serves 4-6)
- 1 package of phyllo dough (16 oz), thawed
- 1 cup fresh spinach, chopped
- 1 cup feta cheese, crumbled
- 1/2 cup ricotta cheese
- 1/4 cup onion, finely chopped
- 1 clove garlic, minced
- 1/4 cup fresh dill, chopped (or 1 tsp dried dill)
- 1 egg, beaten
- 1/4 cup olive oil
- Salt and pepper to taste
Cooking Instructions
1. Preheat the Oven: Begin by preheating your oven to 375°F (190°C). This guarantees that the Mini Spanakopita Bites will bake evenly and become crispy once they’re placed in the oven.
2. Prepare the Filling: In a large mixing bowl, combine the chopped spinach, crumbled feta cheese, ricotta cheese, finely chopped onion, minced garlic, and fresh dill. Mix well to combine all the ingredients.
Add the beaten egg and season with salt and pepper, stirring until everything is thoroughly mixed.
3. Prepare the Phyllo Dough: Carefully unroll the thawed phyllo dough and cover it with a damp cloth to prevent it from drying out. Working with one sheet at a time, brush the phyllo with olive oil using a pastry brush.
Layer two sheets together for extra flakiness.
4. Cut the Phyllo: Once you have brushed the phyllo sheets with olive oil, cut them into strips that are about 3 inches wide. This will give you enough length to fold the dough over the filling.
5. Fill and Fold: Place a tablespoon of the spinach filling at one end of each strip. Fold the phyllo over the filling to form a triangle, then continue folding in triangles along the strip until you reach the end.
Seal the edge with a little bit of olive oil.
6. Bake: Arrange the filled Mini Spanakopita Bites on a baking sheet lined with parchment paper. Brush the tops lightly with more olive oil and bake in the preheated oven for 20-25 minutes or until they’re golden brown and crispy.
7. Serve: Once baked, remove the bites from the oven and let them cool for a few minutes before serving. They can be enjoyed warm or at room temperature.
Extra Tips
When working with phyllo dough, it’s important to keep it covered with a damp cloth to prevent it from drying out, as it can become brittle and hard to work with.
If you’re looking to save time, feel free to prepare the filling ahead of time and store it in the refrigerator. Additionally, these Mini Spanakopita Bites can be frozen before baking; simply pop them in the oven directly from the freezer, adding a few extra minutes to the baking time for a delicious, freshly baked treat!
Honey and Pistachio Baklava
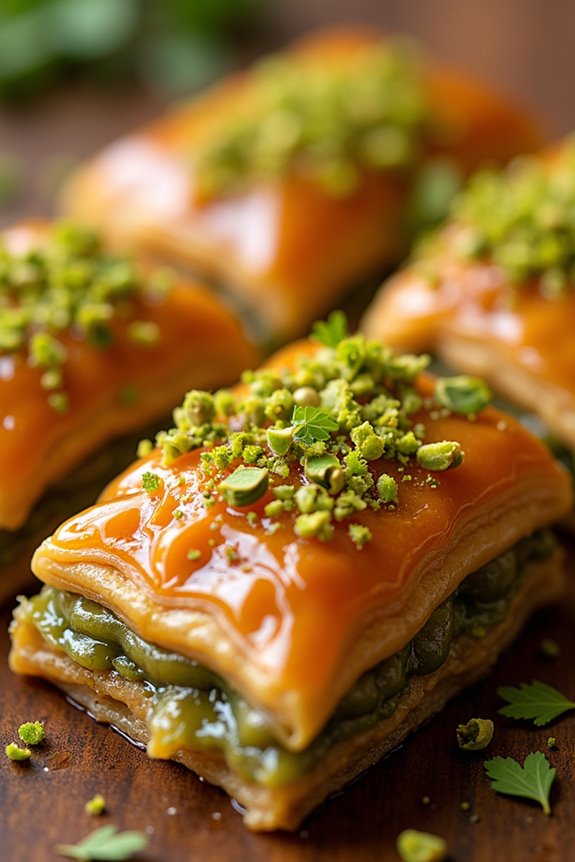
Baklava is a traditional Mediterranean pastry that boasts layers of flaky phyllo dough, a rich nut filling, and a sweet syrup that brings everything together. This delightful dessert is often served during festive occasions and gatherings, making it a perfect addition to any Mediterranean party. The combination of honey and pistachios creates a unique flavor profile that’s both sweet and slightly nutty, offering a satisfying crunch with every bite.
Making baklava may seem intimidating, but with the right ingredients and a little patience, you can create this delicious pastry at home. The key to a successful baklava lies in the layering of the phyllo dough and ensuring that the syrup is poured over the freshly baked pastry while it’s still hot. This allows the baklava to absorb all the sweet goodness, resulting in a dessert that’s as indulgent as it’s impressive.
Ingredients (Serves 4-6):
- 1 package of phyllo dough (16 oz), thawed
- 1 cup unsalted butter, melted
- 2 cups pistachios, shelled and finely chopped
- 1 cup walnuts, finely chopped
- 1 teaspoon ground cinnamon
- 1 cup honey
- 1 cup sugar
- 1 cup water
- 1 teaspoon vanilla extract
- 1 tablespoon lemon juice
Cooking Instructions:
- Prepare the Baking Dish: Preheat your oven to 350°F (175°C). Take a 9×13 inch baking dish and lightly grease it with some melted butter. This will prevent the baklava from sticking and allow for easy removal later.
- Mix the Nut Filling: In a mixing bowl, combine the finely chopped pistachios, walnuts, and ground cinnamon. This mixture will be layered between the sheets of phyllo dough, adding flavor and texture to the baklava.
- Layer the Phyllo Dough: Unroll the phyllo dough and cover it with a damp kitchen towel to prevent it from drying out. Start by placing one sheet of phyllo in the baking dish and brush it with melted butter. Repeat this process, layering and buttering each sheet, for about 8 sheets. This creates a strong base for your baklava.
- Add the Nut Mixture: Once you have a solid base, sprinkle a generous layer of the nut mixture evenly over the phyllo. Use about 1/4 of the nut mixture for this layer.
- Continue Layering: Repeat the process of layering phyllo sheets (buttering each one) and then adding the nut mixture. Alternate between phyllo layers and the nut mixture until all the nuts are used, finishing with about 8 more layers of phyllo on top.
- Cut the Baklava: Using a sharp knife, cut the baklava into diamond or square shapes. This allows the syrup to seep into the layers after baking. Make sure to cut all the way through to the bottom of the dish.
- Bake the Baklava: Place the baklava in the preheated oven and bake for 45-50 minutes, or until it’s golden brown and crisp. Keep an eye on it to prevent over-browning.
- Make the Syrup: While the baklava is baking, prepare the syrup. In a saucepan, combine honey, sugar, water, vanilla extract, and lemon juice. Bring the mixture to a boil and then reduce the heat to low, letting it simmer for about 10 minutes until slightly thickened.
- Pour the Syrup: Once the baklava is done baking, remove it from the oven and immediately pour the hot syrup evenly over the hot baklava. Allow it to soak in for several hours or overnight for the best flavor.
- Serve and Enjoy: After the baklava has cooled and absorbed the syrup, it’s ready to be served. Garnish with extra crushed pistachios if desired, and enjoy this delicious Mediterranean treat!
Extra Tips:
When making baklava, be sure to keep the phyllo dough covered while you work, as it can dry out quickly. If you want to experiment with flavors, consider adding a mix of nuts or spices to the filling. Additionally, for an extra crunch, you can toast the nuts before chopping them.
Baklava can be stored in an airtight container at room temperature for up to a week, making it a perfect make-ahead dessert for your Mediterranean party.