

When it comes to Danish pastries, it’s all about those irresistible, flaky layers. Each recipe in this collection brings something special to the table, from classic apple fillings to indulgent Nutella swirls. I’ve personally tried these delectable treats, and they’re always a hit. If you’re eager to master that perfect blend of texture and flavor, this list is just what you need.
Classic Apple Danish Pastry
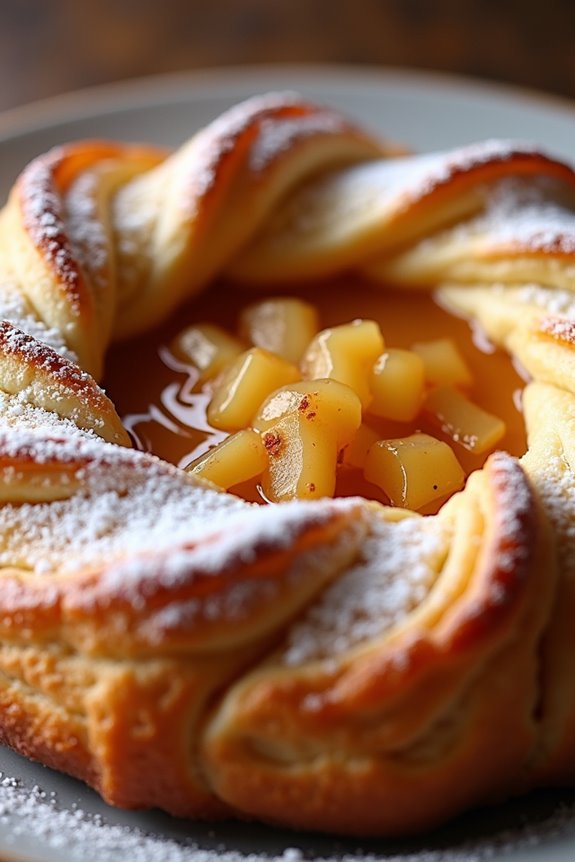
Classic Apple Danish Pastry is a delightful treat that combines flaky pastry with a sweet and tangy apple filling, making it the perfect dessert or breakfast option for any occasion. Originating from Denmark, this pastry isn’t only a favorite in Scandinavian countries but has also gained popularity worldwide.
The combination of buttery dough and warm cinnamon-spiced apples creates a comforting experience that’s hard to resist.
Making Classic Apple Danish Pastry might seem intimidating at first, but with a little patience and practice, you can create a batch that rivals your favorite bakery. The recipe involves preparing a laminated dough (similar to puff pastry), which is then filled with a delicious apple mixture and baked until golden brown. Serve these pastries warm with a dusting of powdered sugar or a drizzle of icing for an extra touch of sweetness.
Ingredients (Serves 4-6)
- 2 cups all-purpose flour
- 1/2 teaspoon salt
- 1 teaspoon sugar
- 1/2 cup unsalted butter, chilled and cubed
- 1/2 cup cold water
- 2 medium apples (such as Granny Smith or Honeycrisp), peeled, cored, and diced
- 1/4 cup sugar
- 1 teaspoon cinnamon
- 1 tablespoon lemon juice
- 1 egg (for egg wash)
- Powdered sugar (for dusting)
Cooking Instructions
- Prepare the Dough: In a large mixing bowl, combine the flour, salt, and sugar. Add the cubed butter and use a pastry cutter or your fingers to mix until the mixture resembles coarse crumbs. Gradually add cold water, mixing until the dough comes together. Don’t overwork the dough. Form it into a disk, wrap it in plastic wrap, and refrigerate for at least 30 minutes.
- Make the Filling: In a medium bowl, combine the diced apples, sugar, cinnamon, and lemon juice. Toss until the apples are well coated. Set aside to let the flavors meld while the dough chills.
- Roll Out the Dough: After chilling, remove the dough from the refrigerator and place it on a lightly floured surface. Roll it out into a rectangle approximately 1/4 inch thick. Fold the dough into thirds, like a letter, and roll it out again. Repeat this process two more times to create layers, then wrap and refrigerate for another 30 minutes.
- Shape the Pastries: Preheat your oven to 400°F (200°C). Roll out the dough to about 1/8 inch thick. Cut it into squares (about 4×4 inches). Place a spoonful of the apple filling in the center of each square. Fold the corners of the square towards the center, pinching them to seal the filling inside.
- Apply Egg Wash: Beat the egg in a small bowl and brush it over the tops of the pastries to give them a golden color while baking.
- Bake: Place the pastries on a baking sheet lined with parchment paper. Bake in the preheated oven for 15-20 minutes, or until they’re puffed and golden brown.
- Cool and Serve: Remove the pastries from the oven and let them cool slightly. Dust with powdered sugar before serving. Enjoy your Classic Apple Danish Pastry warm or at room temperature.
Extra Tips
For the best results, make sure your butter is extremely cold when making the dough to achieve maximum flakiness.
You can also experiment with different apple varieties or add nuts and raisins to the filling for added texture and flavor. If you want to save time, store-bought puff pastry can be used as a convenient alternative to homemade dough.
Additionally, serve the pastries fresh out of the oven for a delightful, warm treat.
Raspberry Cream Cheese Danish
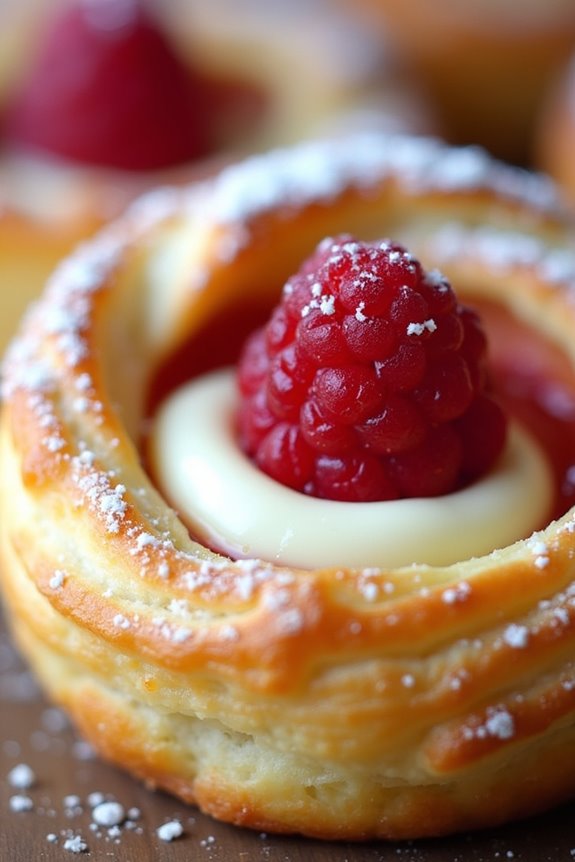
Raspberry Cream Cheese Danish is a delightful pastry that combines the buttery, flaky texture of Danish dough with a sweet and tangy raspberry filling and a rich cream cheese layer. This exquisite treat is perfect for breakfast, brunch, or as a delightful dessert. Its beautiful presentation and delicious flavor profile make it an impressive addition to any gathering or a simple indulgence to enjoy at home.
Making Raspberry Cream Cheese Danish may seem intimidating, but with the right ingredients and a bit of patience, you can create a delicious pastry that will impress your family and friends. The key to a perfect Danish lies in the dough’s layering and the balance between the sweet raspberry filling and the creamy cheese mixture. Follow the instructions carefully, and you’ll be rewarded with a deliciously satisfying pastry that’s sure to become a favorite.
Ingredients (Serves 4-6):
- 1 package (17.3 oz) frozen puff pastry, thawed
- 8 oz cream cheese, softened
- 1/4 cup granulated sugar
- 1 tsp vanilla extract
- 1 cup fresh or frozen raspberries
- 1/4 cup raspberry jam
- 1 egg (for egg wash)
- Powdered sugar (for dusting)
Cooking Instructions:
- Prepare the Puff Pastry: Preheat your oven to 400°F (200°C). On a lightly floured surface, roll out the thawed puff pastry sheets to smooth out any creases. Cut each sheet into 4 squares, so you have a total of 8 squares.
- Make the Cream Cheese Filling: In a mixing bowl, combine the softened cream cheese, granulated sugar, and vanilla extract. Mix until the mixture is smooth and creamy. Set aside.
- Prepare the Raspberry Filling: If using fresh raspberries, gently rinse them and pat dry. If using frozen, confirm they’re thawed and drained of excess moisture. In a small bowl, mix the raspberries with raspberry jam until well combined.
- Assemble the Danishes: Take one pastry square and place a spoonful of the cream cheese mixture in the center. Top it with a spoonful of the raspberry filling. Fold the corners of the pastry square towards the center to create a pocket, pinching the edges together to seal. Repeat this step with all pastry squares.
- Apply Egg Wash: In a small bowl, whisk the egg to create an egg wash. Brush the tops of the assembled Danishes with the egg wash to give them a golden, shiny finish while baking.
- Bake the Danishes: Place the assembled Danishes on a parchment-lined baking sheet and bake in the preheated oven for 15-20 minutes, or until the pastry is puffed and golden brown.
- Cool and Dust: Once baked, remove the Danishes from the oven and allow them to cool slightly. Before serving, dust them with powdered sugar for an added touch of sweetness.
Extra Tips:
For the best results, confirm that the cream cheese is at room temperature to achieve a smooth filling. If you want more flavor, consider adding a bit of lemon zest to the cream cheese mixture.
You can also experiment with different fruit fillings, such as blueberries or strawberries, for a variety of delightful Danishes. Enjoy your homemade Raspberry Cream Cheese Danish fresh out of the oven, but they can also be stored in an airtight container for up to two days!
Cinnamon Roll Danish
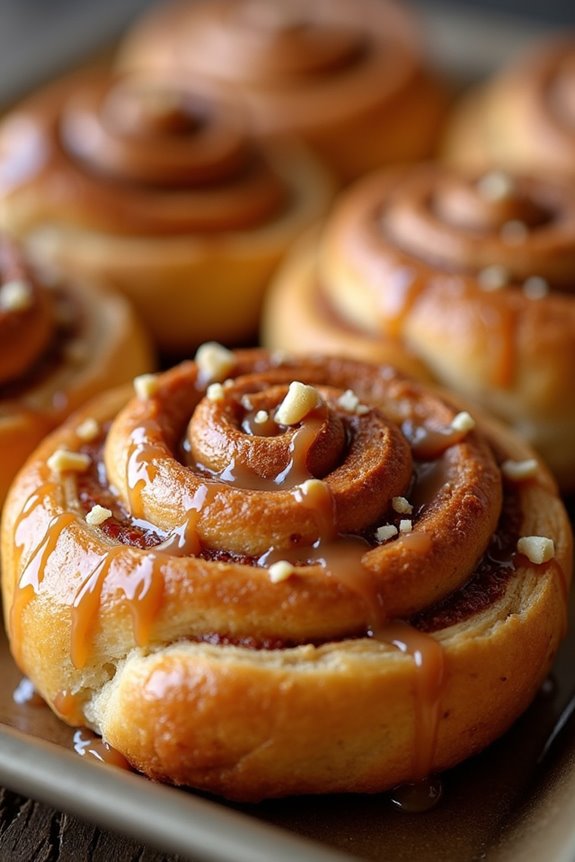
Cinnamon Roll Danish is a delightful pastry that combines the best features of classic cinnamon rolls and flaky Danish dough. This sweet treat is perfect for breakfast, brunch, or as an indulgent dessert. With a rich filling of cinnamon, sugar, and butter, and topped with a creamy glaze, each bite is sure to transport you to a cozy café in Denmark.
The buttery, layered dough is what sets this dish apart, providing a light and airy texture that complements the sweet filling beautifully.
Making Cinnamon Roll Danish at home may seem challenging, but with a little patience and the right ingredients, you can create a delicious batch that will impress your family and friends. This recipe is designed to serve 4-6 people, making it a perfect choice for a small gathering or a special weekend breakfast.
Let’s explore the ingredients and cooking instructions to bring this delicious pastry to life!
Ingredients:
- 1 package (2 sheets) of puff pastry, thawed
- 1/2 cup unsalted butter, softened
- 1 cup brown sugar, packed
- 2 tablespoons ground cinnamon
- 1/4 teaspoon salt
- 1/2 cup powdered sugar
- 1 tablespoon milk
- 1 teaspoon vanilla extract
- 1 egg, beaten (for egg wash)
- Optional: chopped nuts or raisins for added filling
Cooking Instructions:
- Preheat the Oven: Begin by preheating your oven to 400°F (200°C). This guarantees that the oven is hot enough to create a crispy, golden-brown crust on your pastries.
- Prepare the Puff Pastry: Roll out the thawed puff pastry sheets on a lightly floured surface. If the sheets are too thick, gently roll them out to about 1/8 inch thickness. Cut each sheet into rectangles, approximately 4×6 inches. You should have around 8 rectangles.
- Make the Cinnamon Filling: In a medium bowl, combine the softened butter, brown sugar, ground cinnamon, and salt. Mix until the ingredients are well blended into a smooth paste. This mixture will serve as the filling for your Danish.
- Assemble the Danish: Take each rectangle of puff pastry and spread a generous layer of the cinnamon filling onto the center of each piece, leaving a small border around the edges. If desired, sprinkle chopped nuts or raisins on top of the filling for added flavor.
- Shape the Pastries: Fold the edges of the pastry rectangles over the filling, creating a pocket. Pinch the edges to seal them securely. For a decorative touch, you can twist the sealed edges or create a braided effect.
- Apply Egg Wash: Place the shaped Danish pastries on a baking sheet lined with parchment paper. Brush the tops of the pastries with the beaten egg to give them a beautiful golden color when baked.
- Bake: Place the baking sheet in the preheated oven and bake for 15-20 minutes, or until the pastries are puffed and golden brown. Keep an eye on them to avoid over-baking.
- Make the Glaze: While the pastries are baking, prepare the glaze by whisking together the powdered sugar, milk, and vanilla extract in a small bowl until smooth.
- Glaze the Pastries: Once the pastries are done and have cooled slightly, drizzle the glaze over the top of each pastry for added sweetness and decoration.
Extra Tips:
When making Cinnamon Roll Danish, keep in mind that the puff pastry should be kept cold until you’re ready to use it, as this helps create a flaky texture.
If the dough becomes too warm, pop it back in the refrigerator for a few minutes. Also, for an enhanced flavor, consider adding a pinch of nutmeg to the cinnamon filling or experimenting with different nuts or dried fruits.
Enjoy your homemade pastries fresh out of the oven for the best taste, as they’re at their peak when warm and flaky!
Almond Pecan Danish
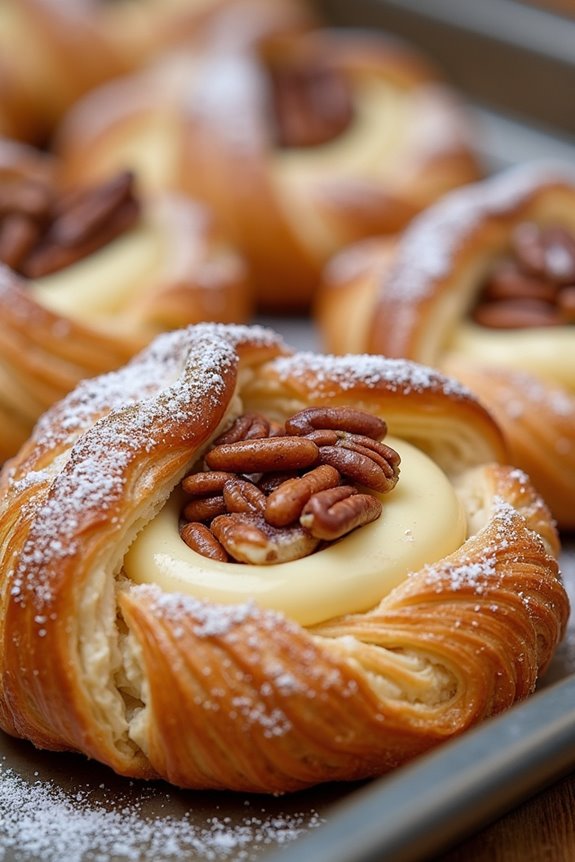
The Almond Pecan Danish is a delightful pastry that combines the rich flavors of almonds and pecans with a flaky, buttery pastry base. This treat is perfect for breakfast, brunch, or even as a sweet dessert. Its nutty flavor and creamy filling make it a favorite among pastry lovers, and the combination of textures—from the crisp pastry shell to the smooth almond filling—is truly irresistible.
Making an Almond Pecan Danish at home can be a rewarding experience. While it may seem intimidating, the process is straightforward, and with a little practice, you can create bakery-quality pastries right in your kitchen. Follow this recipe to impress your friends and family with your baking skills, and enjoy the wonderful aroma of freshly baked Danish pastries filling your home.
Ingredients (Serves 4-6):
- 1 sheet of puff pastry (thawed)
- 1/2 cup almond paste
- 1/4 cup cream cheese, softened
- 1/4 cup granulated sugar
- 1 large egg
- 1/4 cup chopped pecans
- 1 teaspoon vanilla extract
- 1/2 teaspoon almond extract
- 1 egg (for egg wash)
- Powdered sugar (for dusting)
Cooking Instructions:
- Preheat the Oven: Begin by preheating your oven to 400°F (200°C). This guarantees that your Danish pastries will bake evenly and become golden brown and flaky.
- Prepare the Puff Pastry: On a lightly floured surface, roll out the thawed puff pastry to smooth it out. Cut the pastry into rectangles (about 4×6 inches). Place them on a baking sheet lined with parchment paper, leaving space between each piece.
- Make the Filling: In a mixing bowl, combine the almond paste, softened cream cheese, granulated sugar, one egg, chopped pecans, vanilla extract, and almond extract. Mix the ingredients until smooth and well-combined, making sure there are no lumps.
- Assemble the Danishes: Take a rectangle of puff pastry and place a generous spoonful of the almond filling in the center. Fold the edges of the pastry over the filling to form a pocket, leaving some of the filling exposed on top. Repeat this process for all the pastry rectangles.
- Egg Wash: In a small bowl, beat the additional egg and brush it over the tops of the pastries to give them a beautiful golden finish when baked.
- Bake the Danishes: Place the baking sheet in the preheated oven and bake for 15-20 minutes or until the pastries are puffed up and golden brown. Keep an eye on them to prevent burning.
- Cool and Serve: Once baked, remove the Danishes from the oven and let them cool on a wire rack. Once cooled, dust the tops with powdered sugar before serving.
Extra Tips:
To enhance the flavor of your Almond Pecan Danish, consider adding a touch of cinnamon to the filling for a warm spice note. Additionally, you can experiment with different nuts or even add chocolate chips for a twist.
Make sure that your puff pastry is cold when you work with it, as this helps achieve a flakier texture. Finally, serve the Danish pastries warm for the best taste, and enjoy them fresh for the ultimate experience!
Blueberry Lemon Danish
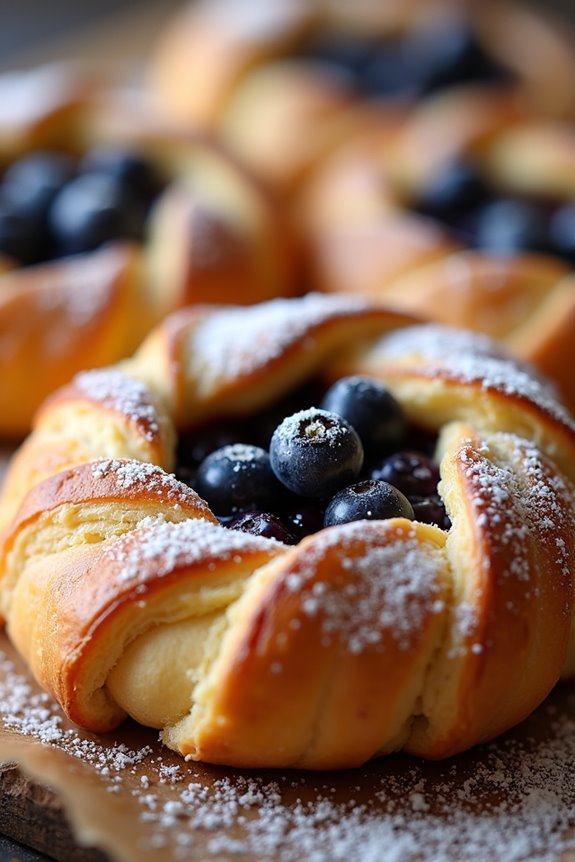
Blueberry Lemon Danish is a delightful pastry that combines the sweet-tart flavors of fresh blueberries and zesty lemon, all enveloped in a flaky, buttery dough. This pastry is perfect for breakfast, brunch, or even as a light dessert. The contrasting flavors create a revitalizing treat that’s sure to impress your family and friends.
With its elegant appearance and delicious taste, this Danish will quickly become a favorite in your recipe collection.
Making Blueberry Lemon Danish at home might sound intimidating, but with the right ingredients and a little patience, you can create a bakery-style treat in your own kitchen. The process involves preparing a rich pastry dough, making a creamy lemon filling, and baking it to golden perfection.
Serve warm or at room temperature for the best experience, and don’t forget to sprinkle with powdered sugar for that extra touch of sweetness.
Ingredients (Serves 4-6):
- 1 sheet of puff pastry (thawed)
- 1 cup fresh blueberries
- 1/4 cup granulated sugar
- 1 tablespoon cornstarch
- 1 tablespoon lemon juice
- Zest of 1 lemon
- 1 egg (for egg wash)
- 1 tablespoon water
- Powdered sugar (for dusting)
Cooking Instructions:
1. Prepare the Puff Pastry: Preheat your oven to 400°F (200°C). On a lightly floured surface, roll out the puff pastry sheet to about 1/8 inch thick. Cut the pastry into squares, approximately 4×4 inches. Place the squares on a baking sheet lined with parchment paper.
2. Make the Blueberry Filling: In a medium saucepan over medium heat, combine the fresh blueberries, granulated sugar, cornstarch, lemon juice, and lemon zest. Stir gently and cook for about 5-7 minutes until the blueberries begin to burst and the mixture thickens.
Remove from heat and let it cool slightly.
3. Assemble the Danish: Take each puff pastry square and create a border by cutting a smaller square in the center, leaving about a 1-inch border around the edges. Carefully fold the edges of the pastry squares up to form a border, pressing down gently to secure the shape.
Spoon the blueberry filling into the center of each pastry.
4. Prepare the Egg Wash: In a small bowl, whisk together the egg and water to create an egg wash. Brush the edges of the pastry with the egg wash to promote browning during baking.
5. Bake the Danish: Place the baking sheet in the preheated oven and bake for 15-20 minutes, or until the pastries are golden brown and puffed. Keep an eye on them to prevent over-baking.
6. Cool and Serve: Once baked, remove the pastries from the oven and allow them to cool on a wire rack. When they’re slightly warm, dust with powdered sugar before serving.
Extra Tips:
When making Blueberry Lemon Danish, using fresh blueberries will yield the best flavor and texture, but if they’re out of season, frozen blueberries can be a great alternative—just be sure to thaw and drain them before use.
Additionally, for an extra touch, consider adding a glaze made from powdered sugar and lemon juice over the cooled pastries for enhanced sweetness and a beautiful finish. Enjoy your homemade Danish!
Chocolate Hazelnut Danish
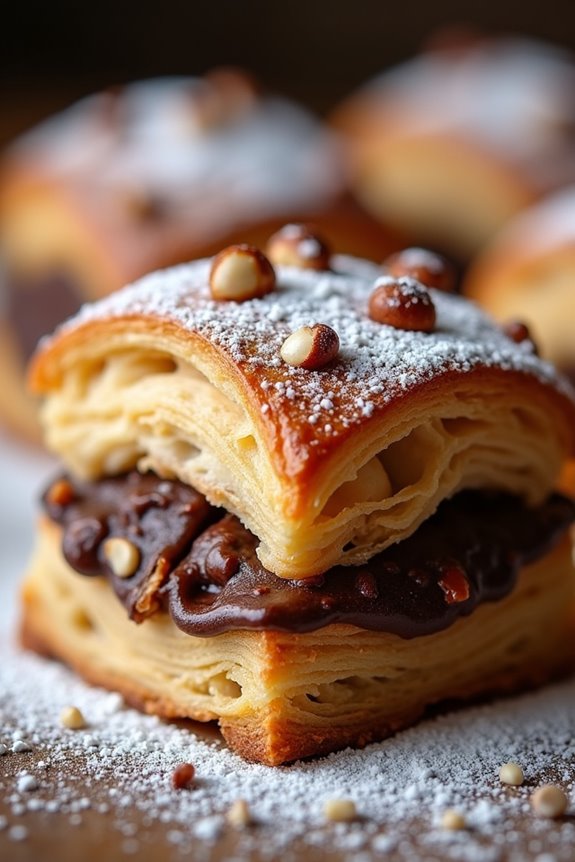
Indulge in the rich and flaky goodness of Chocolate Hazelnut Danish, a delightful pastry that marries the buttery layers of traditional Danish dough with the decadent flavors of chocolate and hazelnuts.
Perfect for breakfast, brunch, or a sweet treat any time of day, this pastry is bound to impress your family and friends. The combination of sweet chocolate and crunchy hazelnuts creates a mouthwatering filling that complements the tender, flaky exterior, making every bite a delicious experience.
Making Chocolate Hazelnut Danish may seem intimidating, but with a little patience and practice, you can create these stunning pastries at home. The recipe requires a few key ingredients and some basic pastry techniques, but the end result is worth the effort.
With its beautiful presentation and delightful taste, this pastry isn’t only a treat for your taste buds but also a feast for your eyes.
Ingredients (Serves 4-6):
- 1 sheet of puff pastry (thawed if frozen)
- 1/2 cup chocolate hazelnut spread (like Nutella)
- 1/2 cup finely chopped hazelnuts
- 1 egg (beaten, for egg wash)
- 1 tablespoon granulated sugar (for sprinkling)
- Powdered sugar (for dusting, optional)
Cooking Instructions:
- Preheat the Oven: Begin by preheating your oven to 400°F (200°C). This guarantees that your Danish pastries will bake evenly and become golden brown and flaky.
- Prepare the Puff Pastry: On a lightly floured surface, roll out the sheet of puff pastry to smooth out any creases. Use a sharp knife or pizza cutter to slice the pastry into squares, approximately 4×4 inches in size.
- Fill the Pastry: Take a tablespoon of the chocolate hazelnut spread and place it in the center of each square. Sprinkle a tablespoon of chopped hazelnuts on top of the spread for added flavor and texture.
- Fold the Pastry: To form the Danish, fold two opposite corners of the pastry square toward the center, creating a diamond shape. Press down gently to seal the edges. If desired, you can also fold all four corners toward the center for a different presentation.
- Apply Egg Wash: Using a pastry brush, apply a beaten egg wash over the top of each filled pastry. This will give the Danish a beautiful golden color when baked.
- Sprinkle Sugar: Lightly sprinkle granulated sugar over the top of each Danish to add a bit of sweetness and a crunchy texture once baked.
- Bake the Pastries: Place the prepared Danish onto a parchment-lined baking sheet and bake in the preheated oven for 15-20 minutes, or until they’re puffed and golden brown.
- Cool and Dust: Once baked, remove the Danish from the oven and allow them to cool on a wire rack for a few minutes. Before serving, dust with powdered sugar for an elegant touch.
Extra Tips:
When making Chocolate Hazelnut Danish, consider using homemade puff pastry for an even more authentic flavor and texture, although store-bought will save you time.
Confirm your puff pastry is chilled before working with it, as warm pastry can become difficult to handle. If you want to experiment with flavors, try adding a dash of cinnamon to the hazelnuts or incorporating a layer of sliced bananas for a twist on the classic recipe.
Enjoy these pastries fresh out of the oven for the best taste, as they lose their flakiness over time.
Strawberry Shortcake Danish

Strawberry Shortcake Danish is a delightful fusion of classic flavors and flaky pastry that makes for a perfect dessert or a sweet addition to your breakfast table. This delicious pastry combines the light, buttery texture of Danish dough with the fresh, vibrant taste of strawberries and a creamy filling. The layers of pastry, cream, and fruit create a treat that isn’t only visually appealing but also a feast for the taste buds.
Whether you’re serving it at a gathering or enjoying it on a quiet weekend morning, this dish is sure to impress.
Preparing Strawberry Shortcake Danish may sound intimidating, but with the right ingredients and a little bit of patience, you can create a stunning pastry that will leave everyone wanting more. The combination of the sweet strawberries, rich cream cheese filling, and flaky Danish dough makes for a delightful balance of flavors and textures.
Gather your ingredients and get ready to indulge in a sweet pastry experience like no other!
Ingredients (Serves 4-6)
- 1 sheet of puff pastry (thawed if frozen)
- 1 cup fresh strawberries, hulled and sliced
- 1/4 cup granulated sugar (for strawberries)
- 1/2 cup cream cheese, softened
- 1/4 cup powdered sugar
- 1 teaspoon vanilla extract
- 1 egg (for egg wash)
- 1 tablespoon milk (for egg wash)
- Optional: Whipped cream for serving
Cooking Instructions
- Preheat the Oven: Begin by preheating your oven to 400°F (200°C). This guarantees that the Danish pastry will bake evenly and achieve a golden, flaky texture.
- Prepare the Strawberries: In a mixing bowl, combine the sliced strawberries with granulated sugar. Toss them gently to coat the strawberries in sugar, then set them aside for about 15-20 minutes. This allows the strawberries to macerate, releasing their natural juices and enhancing their sweetness.
- Prepare the Cream Cheese Filling: In another bowl, mix the softened cream cheese, powdered sugar, and vanilla extract until smooth and creamy. This rich filling will add a delightful contrast to the fresh strawberries.
- Roll Out the Puff Pastry: On a lightly floured surface, roll out the puff pastry sheet to smooth out any creases. Cut the pastry into equal squares (about 4-6 squares depending on your preference).
- Assemble the Danish: Take each square of pastry and place a spoonful of the cream cheese mixture in the center. Top the cream cheese with a few slices of the macerated strawberries, making sure to leave some space at the edges for folding.
- Fold and Seal: Gently fold the corners of the pastry squares towards the center, overlapping them slightly to create a pocket. Pinch the edges to seal the filling inside.
- Prepare for Baking: In a small bowl, whisk together the egg and milk to create an egg wash. Brush the tops of the prepared pastries with the egg wash to give them a beautiful golden color while baking.
- Bake the Danish: Place the assembled pastries on a baking sheet lined with parchment paper and bake them in the preheated oven for 15-20 minutes, or until golden brown and puffed.
- Cool and Serve: Once baked, remove the Danish from the oven and allow them to cool slightly. Serve warm, topped with additional sliced strawberries and a dollop of whipped cream if desired.
Extra Tips
To enhance the flavor of your Strawberry Shortcake Danish, consider adding a sprinkle of lemon zest to the strawberries for a revitalizing twist.
You can also experiment with different fruits such as blueberries or raspberries, depending on what’s in season. If you prefer a sweeter pastry, drizzle some honey or a glaze made from powdered sugar and milk over the top after baking.
Enjoy your delicious creation!
Maple Bacon Danish
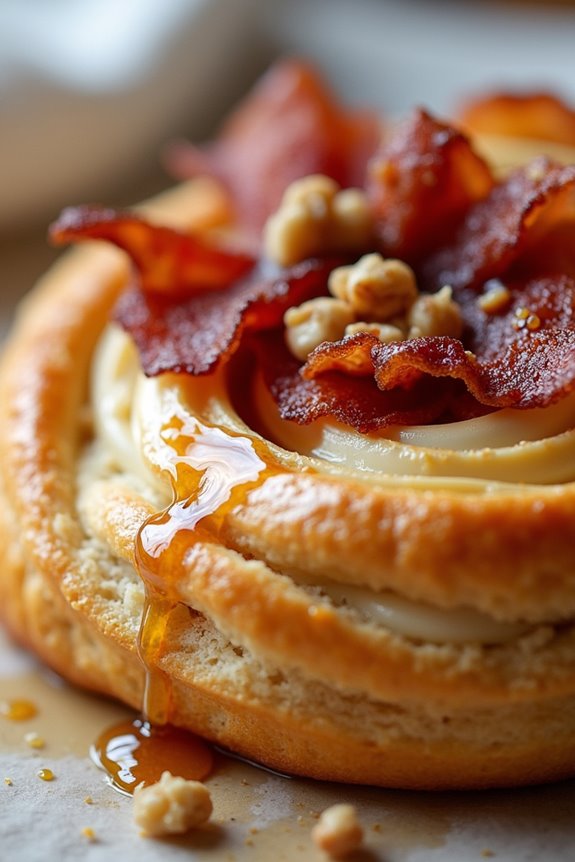
If you’re looking for a delicious and inventive way to enjoy Danish pastry, the Maple Bacon Danish is an excellent choice. Combining the flaky, buttery layers of traditional Danish pastry with the savory goodness of crispy bacon and the sweet richness of maple syrup, this dish is perfect for breakfast, brunch, or even a delightful dessert. The contrasting flavors and textures will delight your taste buds and impress anyone you serve it to.
Making Maple Bacon Danish is easier than you might think, especially if you use pre-made puff pastry as your base. This recipe will guide you through the steps to create the perfect balance of sweet and savory. With just a few ingredients and some simple techniques, you’ll be able to whip up these delightful pastries in no time, making them a great option for gatherings or a special treat for yourself.
Ingredients (Serves 4-6)
- 1 sheet of puff pastry (thawed if frozen)
- 6 slices of bacon
- 1/2 cup cream cheese (softened)
- 1/4 cup maple syrup
- 1 egg (beaten, for egg wash)
- 1 teaspoon vanilla extract
- 1 tablespoon brown sugar
- 1/2 teaspoon ground cinnamon
- Optional: chopped pecans or walnuts for topping
Cooking Instructions
- Preheat the Oven: Begin by preheating your oven to 400°F (200°C). This guarantees that your Danish pastries will bake evenly and achieve a beautiful golden-brown color.
- Cook the Bacon: In a skillet over medium heat, cook the bacon until crispy. This should take about 5-7 minutes. Once cooked, remove the bacon from the skillet and place it on a paper towel to drain excess fat. Once cooled, chop the bacon into small pieces.
- Prepare Cream Cheese Mixture: In a mixing bowl, combine the softened cream cheese, maple syrup, vanilla extract, brown sugar, and ground cinnamon. Use a hand mixer or a whisk to blend the ingredients until smooth and creamy.
- Roll Out Puff Pastry: On a lightly floured surface, roll out the thawed puff pastry sheet to smooth out any creases. Cut the sheet into 6 equal squares (about 4×4 inches each).
- Shape the Danish: Take each square of puff pastry and make a small cut on each corner, about 1 inch deep. This will allow you to fold the corners over the filling. Place a spoonful of the cream cheese mixture in the center of each square, then sprinkle the chopped bacon on top.
- Fold the Pastry: Carefully fold the corners of each pastry square over the filling, pinching them together to create a pocket. Brush the folded edges with the beaten egg to give them a nice golden color when baked.
- Bake the Danish: Place the shaped pastries on a baking sheet lined with parchment paper. Bake in the preheated oven for 15-20 minutes or until they’re puffed and golden brown.
- Serve: Once baked, remove the pastries from the oven and allow them to cool slightly before serving. Drizzle a little extra maple syrup over the top if desired, and sprinkle with chopped pecans or walnuts for added crunch.
Extra Tips
For the best results, make sure your cream cheese is softened to room temperature for easier mixing. If you prefer a sweeter option, feel free to adjust the amount of maple syrup in the cream cheese mixture.
Additionally, if you want to experiment with flavors, you can add a pinch of nutmeg or a splash of bourbon to the filling for an extra depth of flavor. Be sure to keep an eye on the pastries while they bake, as ovens can vary in temperature and you want to avoid over-baking them.
Enjoy your delightful Maple Bacon Danish!
Peach Tart Danish
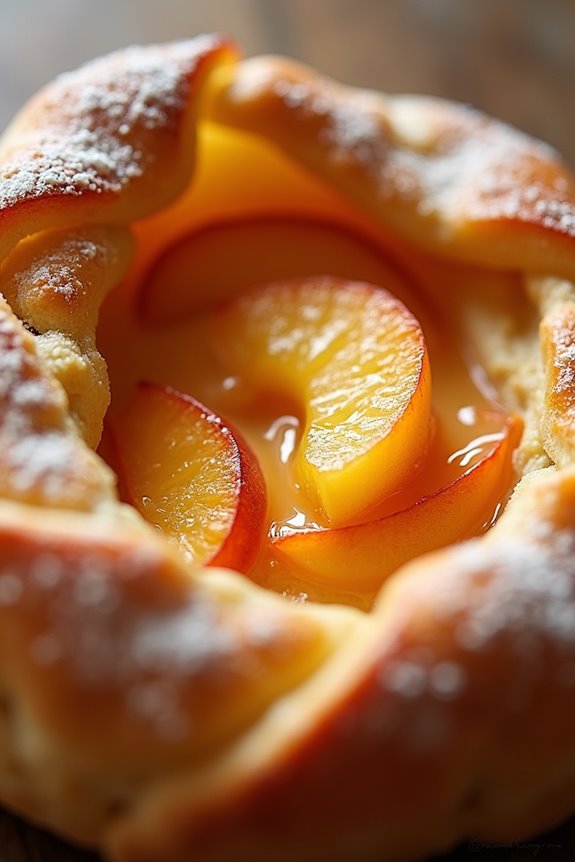
Peach Tart Danish is a delightful twist on the classic Danish pastry, combining flaky layers of dough with juicy, sweet peaches. This recipe is perfect for a summer dessert or a fancy brunch treat. The combination of the buttery pastry, fresh peaches, and a hint of almond flavor creates an irresistible dessert that will impress your family and friends.
With a golden-brown crust and a luscious peach filling, this tart is as beautiful as it’s delicious.
Making Peach Tart Danish is a fun and rewarding process. You can use store-bought puff pastry to save time or make your own if you’re feeling adventurous. The sweet peach filling is enhanced with sugar and cinnamon, while a simple glaze adds the finishing touch. Whether served warm or at room temperature, these tarts are sure to become a favorite in your dessert repertoire.
Ingredients (Serves 4-6)
- 1 sheet of puff pastry (thawed if frozen)
- 3 ripe peaches, peeled and sliced
- 1/4 cup granulated sugar
- 1 teaspoon ground cinnamon
- 1 tablespoon cornstarch
- 1 teaspoon vanilla extract
- 1 egg (beaten, for egg wash)
- 1 tablespoon milk (for egg wash)
- Powdered sugar (for dusting, optional)
Cooking Instructions
- Preheat the Oven: Begin by preheating your oven to 400°F (200°C). This guarantees that the pastry will bake evenly and achieve that golden-brown color.
- Prepare the Puff Pastry: On a lightly floured surface, roll out the thawed puff pastry sheet to smooth out any creases. Cut the pastry into a rectangle or circle, about 10 inches in diameter, and transfer it to a parchment-lined baking sheet.
- Make the Peach Filling: In a mixing bowl, combine the sliced peaches, granulated sugar, ground cinnamon, cornstarch, and vanilla extract. Toss gently to coat the peaches evenly in the mixture. The cornstarch will help thicken the juices released by the peaches during baking.
- Assemble the Tart: Spoon the peach filling onto the center of the puff pastry, leaving about a 1-2 inch border around the edges. Carefully fold the edges of the pastry over the filling, pleating as you go to create a rustic look.
- Apply the Egg Wash: In a small bowl, whisk together the beaten egg and milk. Brush the egg wash over the pastry edges to give it a beautiful, shiny finish when baked.
- Bake the Tart: Place the baking sheet in the preheated oven and bake for 25-30 minutes, or until the pastry is golden brown and puffed up. Keep an eye on it to confirm it doesn’t over-brown.
- Cool and Dust: Once baked, remove the tart from the oven and let it cool for a few minutes. If desired, dust the top with powdered sugar for an elegant finish before serving.
Extra Tips
For the best flavor, choose ripe, sweet peaches that are in season. You can also substitute peaches with other fruits like apricots or nectarines if you prefer.
If you have leftover filling, it can be served as a topping for yogurt or ice cream. Additionally, adding a sprinkle of sliced almonds on top before baking can provide a lovely crunch and enhance the almond flavor.
Enjoy your Peach Tart Danish warm or at room temperature for the best experience!
Caramel Pecan Danish
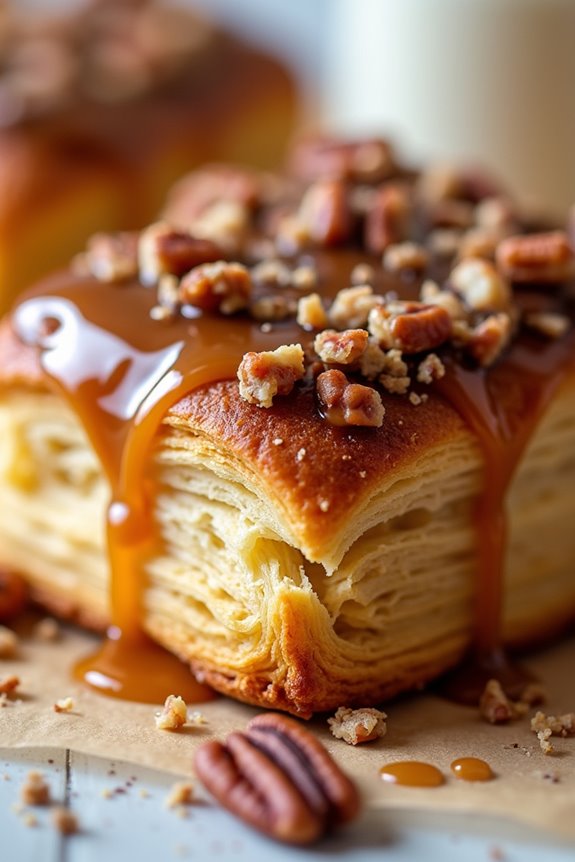
The Caramel Pecan Danish is a delightful treat that combines the flaky, buttery texture of pastry with the rich, nutty flavor of pecans and a luscious caramel drizzle. This pastry is perfect for breakfast, brunch, or as a sweet snack any time of day. Its sweet and nutty profile makes it a favorite among both adults and children alike, and it’s sure to impress your family and friends at gatherings.
Making your own Caramel Pecan Danish at home is easier than you might think. With a few simple ingredients and some basic techniques, you can whip up this delicious pastry that rivals those found in bakeries. The combination of caramel and pecans gives this Danish a unique twist that elevates it from the ordinary to the extraordinary. So, roll up your sleeves and get ready to enjoy a taste of this delightful pastry!
Ingredients (Serves 4-6):
- 1 package (17.3 ounces) frozen puff pastry, thawed
- 1 cup pecans, chopped
- 1/2 cup brown sugar
- 1/2 cup heavy cream
- 1/4 cup unsalted butter
- 1 teaspoon vanilla extract
- 1 egg, beaten (for egg wash)
- Powdered sugar (for dusting, optional)
Cooking Instructions:
- Prepare the Puff Pastry: Preheat your oven to 400°F (200°C). Roll out the thawed puff pastry on a lightly floured surface to smooth out any creases. Cut the pastry into rectangles, approximately 4×6 inches each. This will serve as the base for your Danish.
- Make the Caramel Mixture: In a medium saucepan, combine the brown sugar, heavy cream, and butter over medium heat. Stir continuously until the mixture is smooth and begins to bubble. Allow it to simmer for about 2-3 minutes until it thickens slightly. Remove from heat and stir in the vanilla extract.
- Add Pecans: Stir the chopped pecans into the caramel mixture, ensuring that they’re well-coated. This will add a crunchy texture and nutty flavor to the filling of your Danish.
- Assemble the Danish: Place a generous spoonful of the caramel pecan mixture in the center of each pastry rectangle, leaving some space around the edges. Fold the corners of the pastry over the filling towards the center to create a pocket. Pinch the edges to seal.
- Egg Wash: Brush the tops of the assembled Danish with the beaten egg to give them a golden color when baked. This step is important for achieving that lovely sheen.
- Bake: Place the Danish on a parchment-lined baking sheet and bake in the preheated oven for 15-20 minutes, or until they’re puffed and golden brown. Keep an eye on them to avoid over-baking.
- Drizzle with Caramel: While the Danish are baking, you can warm any remaining caramel sauce over low heat. Once the pastries are out of the oven and slightly cooled, drizzle the warmed caramel over the top for an extra touch of sweetness.
- Serve: Optionally, dust the Danish with powdered sugar for an elegant finish. Serve warm and enjoy!
Extra Tips: For an added twist, consider incorporating chocolate chips or a sprinkle of sea salt on top of the caramel before baking. If you have leftover caramel, store it in a jar for drizzling over ice cream or other desserts. Always keep an eye on your pastries while they bake, as oven temperatures can vary. Enjoy your homemade Caramel Pecan Danish fresh for the best taste and texture!
Coconut Cream Danish
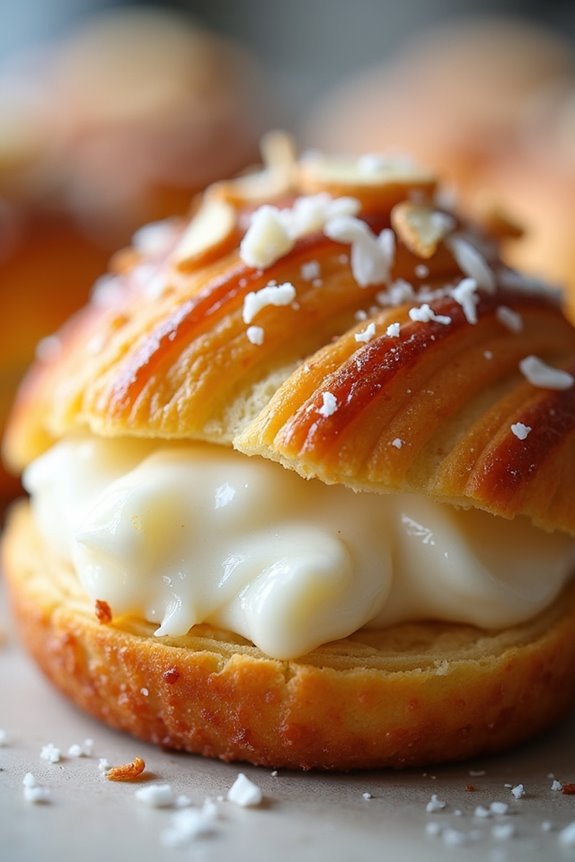
Coconut Cream Danish is a delightful pastry that combines the flaky, buttery goodness of Danish dough with a luscious, creamy coconut filling. Perfect for breakfast, brunch, or as a sweet treat, these pastries are sure to impress your family and friends with their rich flavor and beautiful presentation. The combination of fresh coconut and cream creates a tropical vibe, making every bite feel like a mini vacation.
Making Coconut Cream Danish may seem challenging, but with a bit of patience and practice, you can master this delicious recipe. The key to achieving that signature flaky texture lies in proper dough handling and chilling. Whether you’re preparing for a holiday gathering or simply indulging in a sweet moment at home, this recipe will guide you through the process of creating these sumptuous pastries that are easy to share and even easier to love.
Ingredients (Serves 4-6)
- 1 sheet of puff pastry (thawed)
- 1 cup of shredded coconut (sweetened or unsweetened)
- 1 cup of cream cheese (softened)
- 1/2 cup of powdered sugar
- 1/4 cup of coconut milk
- 1 teaspoon of vanilla extract
- 1 egg (beaten, for egg wash)
- 1/4 cup of sliced almonds (for garnish, optional)
- Extra shredded coconut (for garnish, optional)
Cooking Instructions
- Prepare the Filling: In a mixing bowl, combine the softened cream cheese, powdered sugar, coconut milk, vanilla extract, and shredded coconut. Use an electric mixer or a whisk to blend everything until smooth and well combined. This creamy mixture will be the delicious filling for your Danish pastries.
- Roll Out the Puff Pastry: On a lightly floured surface, roll out the thawed puff pastry sheet into a rectangle, approximately 12 x 18 inches. This will help create more layers in the pastry when baked. If the pastry is too thick, it won’t achieve the desired flakiness.
- Cut the Pastry: Using a sharp knife or pizza cutter, slice the rolled puff pastry into squares or rectangles (about 4×4 inches). This will be the base for your Danish pastries. Be sure to make equal-sized pieces for even baking.
- Assemble the Danish: Take each square of pastry and create a border by cutting a smaller square inside, leaving about half an inch on each side. Gently fold back the corners to create a frame. Spoon a generous amount of the coconut cream filling into the center of each pastry frame.
- Apply Egg Wash: Brush the edges of the pastry with the beaten egg to give the Danish a beautiful golden color as it bakes. This step is essential for achieving that restaurant-quality finish.
- Add Garnishes: If desired, sprinkle sliced almonds and extra shredded coconut on top of the filling for added texture and flavor. These garnishes will toast beautifully in the oven, enhancing the overall appearance.
- Bake the Pastries: Preheat your oven to 375°F (190°C). Place the assembled Danish pastries on a baking sheet lined with parchment paper. Bake for about 20-25 minutes or until the pastry is golden brown and puffed. Keep an eye on them to avoid over-baking.
- Cool and Serve: Once baked, remove the pastries from the oven and let them cool on a wire rack for a few minutes. Serve warm or at room temperature, and enjoy the delightful flavors of your homemade Coconut Cream Danish!
Extra Tips
For the best results, make sure that your cream cheese is at room temperature before mixing; this will help it blend smoothly without lumps. If you want to enhance the coconut flavor further, consider adding a touch of coconut extract to the filling.
Additionally, you can experiment with different toppings, such as a light glaze made from powdered sugar and coconut milk, or even a sprinkle of toasted coconut for a more pronounced coconut flavor. Enjoy your baking adventure!
Nutella Swirl Danish

The Nutella Swirl Danish is a delightful pastry that combines the flaky, buttery goodness of traditional Danish dough with the rich, creamy chocolate-hazelnut flavor of Nutella. This pastry is perfect for breakfast, brunch, or as a sweet treat to enjoy with your afternoon coffee.
With its beautiful swirls and golden-brown crust, it not only tastes amazing but also looks impressive, making it a great option for entertaining guests or simply indulging yourself.
Making a Nutella Swirl Danish may sound intimidating, but with a little patience and practice, you can create these heavenly pastries in your own kitchen. The dough can be made from scratch or you can opt for store-bought puff pastry for a quicker option.
Either way, the result is a flaky and delicious pastry that will have everyone asking for seconds. So, roll up your sleeves and get ready to impress with this delectable treat!
Ingredients (serving size: 4-6 people)
- 1 sheet of puff pastry (thawed)
- 1/2 cup Nutella
- 1 egg (beaten, for egg wash)
- 1 tablespoon all-purpose flour (for dusting)
- 1 tablespoon powdered sugar (for dusting, optional)
- 1 teaspoon vanilla extract (optional)
- Pinch of salt (optional)
Cooking Instructions
- Preheat the Oven: Begin by preheating your oven to 400°F (200°C). This guarantees that the pastry will bake evenly and rise beautifully.
- Prepare the Pastry: On a lightly floured surface, roll out the sheet of puff pastry to smooth any creases and make it slightly larger. This will help achieve a better texture and size for your Danish.
- Spread the Nutella: Spread the Nutella evenly over the rolled-out puff pastry, leaving a small border around the edges. If desired, you can mix in a teaspoon of vanilla extract for added flavor.
- Fold the Pastry: Carefully fold the puff pastry in half lengthwise, creating a long rectangle. Press down gently to seal the edges and make sure the Nutella is contained within.
- Cut the Pastry: Using a sharp knife or pizza cutter, cut the folded pastry into strips about 1 inch wide. Then, take each strip and twist it gently a few times to create a spiral shape.
- Shape the Danish: Arrange the twisted pastry strips in a circular shape on a parchment-lined baking sheet, overlapping them slightly to create a beautiful design. You can also create a freeform shape if you prefer.
- Apply Egg Wash: Brush the tops of the pastries with the beaten egg to give them a golden color as they bake. This step adds a lovely sheen to your finished Danish.
- Bake: Place the baking sheet in the preheated oven and bake for 15-20 minutes or until the pastries are puffed up and golden brown.
- Cool and Serve: Once baked, remove the Danish from the oven and let them cool slightly. If desired, dust with powdered sugar before serving for an extra touch of sweetness.
Extra Tips
For the best results, make sure your puff pastry is cold before working with it, as this helps create those flaky layers.
If you’re using homemade dough, give it enough time to chill in the refrigerator before rolling it out. Additionally, feel free to experiment with different fillings such as almond paste or fruit preserves to customize your Nutella Swirl Danish to your liking.
Enjoy experimenting and perfecting this delicious pastry!
Lemon Curd Danish
Lemon Curd Danish is a delightful pastry that combines the flaky, buttery texture of Danish dough with the bright, tangy flavor of homemade lemon curd. This recipe is perfect for breakfast or as a sweet treat to accompany your afternoon tea. The balance of sweet and tart makes these pastries irresistibly delicious, while the process of creating them allows for creativity and enjoyment in the kitchen.
Whether you’re entertaining guests or simply indulging yourself, these Lemon Curd Danishes are sure to impress.
Making Lemon Curd Danish is a gratifying experience, as the layers of dough puff beautifully in the oven, creating a light and airy pastry. The lemon curd filling is smooth and creamy, providing a revitalizing contrast to the rich pastry. With a little patience and attention to detail, you can master this delightful recipe and enjoy the sweet reward of your efforts.
Ingredients (serves 4-6 people):
- 1 package of puff pastry (2 sheets)
- 1 cup homemade or store-bought lemon curd
- 1 egg (for egg wash)
- 1 tablespoon water (for egg wash)
- Powdered sugar (for dusting)
Cooking Instructions:
1. Prepare the Puff Pastry: Begin by preheating your oven to 400°F (200°C). If using frozen puff pastry, remove it from the freezer and let it thaw at room temperature for about 30 minutes until it’s pliable but still cold.
Roll out the puff pastry sheets on a lightly floured surface to about 1/8 inch thick. Cut each sheet into squares, approximately 4×4 inches.
2. Form the Pastry Base: Take each square of puff pastry and place it on a parchment-lined baking sheet. Using a sharp knife, gently score a smaller square within each pastry square, about 1 inch from the edges.
Be careful not to cut all the way through; this will create a border that puffs up around the filling.
3. Add the Lemon Curd: Spoon about 1-2 tablespoons of lemon curd into the center of each scored pastry square, making sure to stay within the inner square that you created earlier.
This will guarantee the curd doesn’t spill over while baking.
4. Prepare the Egg Wash: In a small bowl, whisk together the egg and water. Use a pastry brush to lightly coat the edges of the pastry squares with the egg wash.
This will give the pastries a beautiful golden color when baked.
5. Bake the Danishes: Place the baking sheet in the preheated oven and bake for 15-20 minutes, or until the pastry is puffed and golden brown.
Keep an eye on them towards the end to prevent burning.
6. Cool and Serve: Once baked, remove the Danishes from the oven and let them cool on a wire rack for about 10 minutes. Dust with powdered sugar before serving for an added touch of sweetness.
Extra Tips: When making Lemon Curd Danish, feel free to experiment with different fillings or toppings, such as fresh berries or a drizzle of glaze.
If you’re short on time, store-bought lemon curd is a great substitute for homemade. For the best results, make sure your puff pastry is cold when handling, as this will help achieve that perfect flaky texture.
Finally, these pastries can be made ahead of time and frozen before baking; simply bake them directly from the freezer, adding a couple of extra minutes to the baking time. Enjoy your delicious Lemon Curd Danishes!
Cranberry Orange Danish
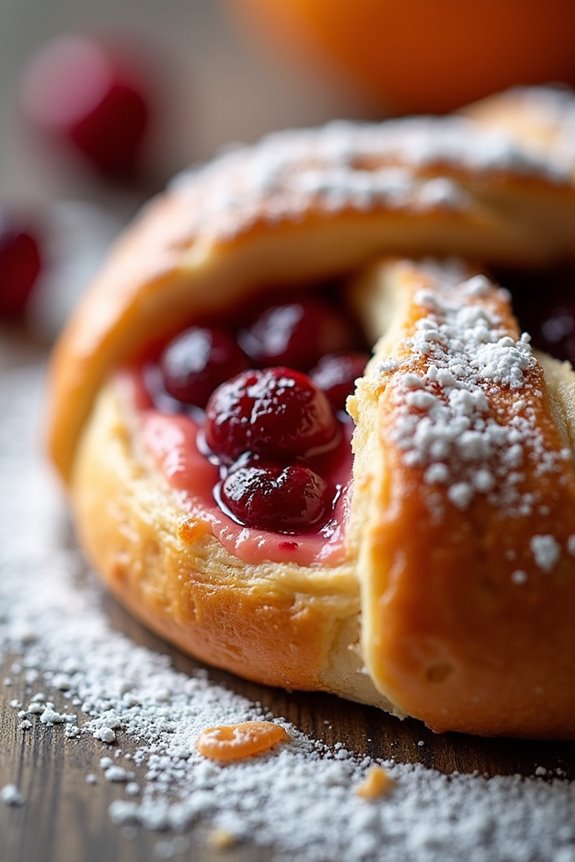
Cranberry Orange Danish is a delightful pastry that combines the tartness of cranberries with the bright, zesty flavor of oranges. This sweet treat is perfect for breakfast, brunch, or as a light dessert and is sure to impress family and friends alike. The flaky, buttery pastry is filled with a creamy orange-infused cheese mixture and topped with a sprinkle of fresh cranberries, making it not only delicious but also visually appealing.
Making Cranberry Orange Danish may seem like an intimidating task, but with a little patience and practice, you can create a bakery-worthy pastry right in your own kitchen. Using store-bought puff pastry can save time, allowing you to focus on perfecting the filling and making the glaze that adds that finishing touch. Follow along with the recipe below to craft this scrumptious treat that will have everyone coming back for more.
Ingredients (Serves 4-6)
- 1 sheet of puff pastry, thawed
- 1 cup fresh or frozen cranberries
- 1 cup cream cheese, softened
- 1/2 cup powdered sugar
- 1 tablespoon orange zest
- 2 tablespoons fresh orange juice
- 1 egg, beaten (for egg wash)
- 1 teaspoon vanilla extract
- 1 tablespoon cornstarch
- 1 tablespoon water
- Optional: additional powdered sugar for dusting
Cooking Instructions
- Preheat the Oven: Begin by preheating your oven to 400°F (200°C). This guarantees that your pastries will bake evenly and achieve that golden-brown color.
- Prepare the Puff Pastry: On a lightly floured surface, roll out the thawed puff pastry sheet to smooth out any creases. Then, cut it into 4-6 squares, depending on your desired serving size. Make sure each square is about 4-5 inches.
- Make the Cream Cheese Filling: In a mixing bowl, combine the softened cream cheese, powdered sugar, orange zest, orange juice, and vanilla extract. Mix until smooth and creamy. This filling will provide a rich, flavorful base for your Danish.
- Prepare the Cranberry Mixture: In a small saucepan over medium heat, combine the cranberries, cornstarch, and water. Cook until the cranberries begin to burst and thicken, about 5 minutes. Remove from heat and let it cool slightly. This mixture adds a tart contrast to the sweetness of the cream cheese filling.
- Assemble the Danish: Take each square of puff pastry and place about 1-2 tablespoons of the cream cheese filling in the center. Top the cream cheese with a spoonful of the cranberry mixture. Be careful not to overfill, as this may cause the pastry to burst during baking.
- Fold and Seal: Fold the corners of each pastry square towards the center, pinching the edges together to seal the filling inside. If desired, you can also fold the edges over to create a more decorative look.
- Apply Egg Wash: Brush the tops of the sealed pastries with the beaten egg. This will give your Danish a beautiful golden color when baked.
- Bake: Place the assembled pastries on a parchment-lined baking sheet and bake in the preheated oven for 15-20 minutes, or until they’re puffed and golden brown. Keep an eye on them to prevent burning.
- Cool and Glaze: Once baked, remove the pastries from the oven and let them cool for a few minutes. If desired, dust with additional powdered sugar or drizzle a simple glaze made from powdered sugar and orange juice over the top before serving.
Extra Tips
When making Cranberry Orange Danish, make sure that your puff pastry is thoroughly thawed but still cold; this will help achieve a flaky texture during baking.
Experiment with different fillings, such as using other fruits or flavor extracts, to customize the pastry to your liking. For an added crunch, sprinkle some chopped nuts on top before baking.
Serve warm for the best taste and texture, and enjoy the combination of flavors with a fresh cup of coffee or tea!
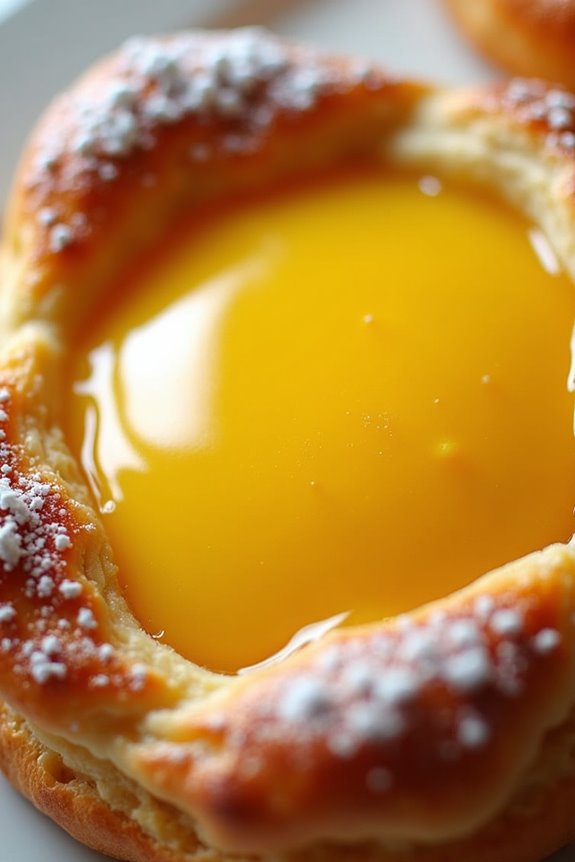
Vanilla Custard Danish
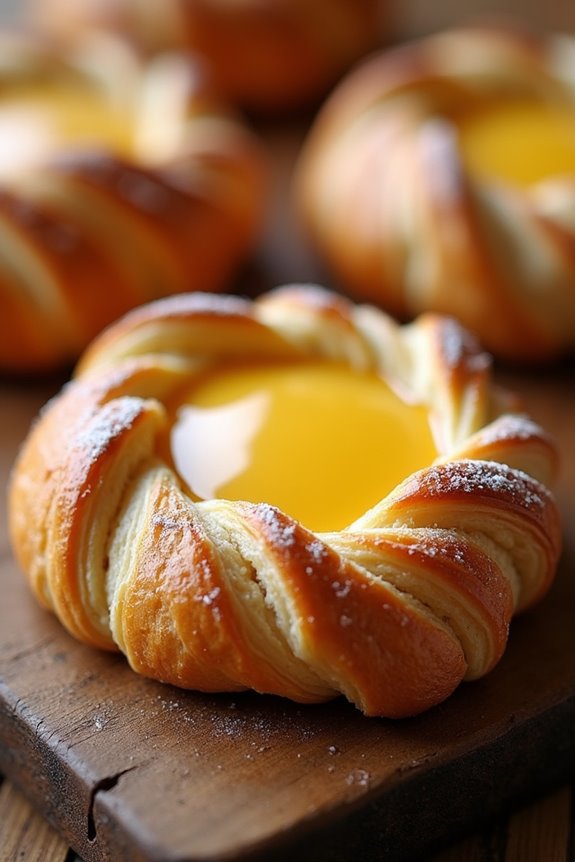
The Vanilla Custard Danish is a delightful pastry that combines the flaky, buttery layers of Danish dough with a rich, creamy vanilla custard filling. This pastry is perfect for breakfast, brunch, or as a sweet treat during the day. The contrast between the crisp pastry and the smooth custard creates a mouthwatering experience that’s hard to resist.
Whether enjoyed with a cup of coffee or tea, this Danish is sure to bring a smile to anyone’s face.
Making Vanilla Custard Danish may seem challenging at first, but with a little patience and practice, you can create this stunning pastry at home. The key to achieving the perfect Danish is ensuring that the dough is well-chilled and that you handle it gently to retain its flakiness. Once you master this recipe, you can experiment with different fillings and toppings to suit your taste.
Ingredients (Serves 4-6):
- 1 sheet of puff pastry, thawed
- 1 cup milk
- 1/2 cup heavy cream
- 1/4 cup granulated sugar
- 3 large egg yolks
- 2 tablespoons cornstarch
- 1 teaspoon vanilla extract
- 1 egg (for egg wash)
- Powdered sugar (for dusting)
Cooking Instructions:
1. Prepare the Custard Filling: In a medium saucepan, combine the milk, heavy cream, and granulated sugar. Heat the mixture over medium heat until it starts to steam, but don’t let it boil. In a separate bowl, whisk together the egg yolks and cornstarch until smooth.
Once the milk mixture is hot, gradually pour it into the egg mixture while whisking constantly to temper the eggs. This prevents them from cooking too quickly.
2. Thicken the Custard: Return the mixture to the saucepan and cook over medium heat, stirring constantly. Continue cooking until the mixture thickens and begins to bubble, about 5-7 minutes.
Once thickened, remove from heat and stir in the vanilla extract. Pour the custard into a bowl, cover it with plastic wrap directly on the surface to prevent a skin from forming, and let it cool to room temperature.
3. Prepare the Puff Pastry: Preheat your oven to 400°F (200°C). On a lightly floured surface, roll out the thawed puff pastry sheet to smooth out creases. Cut the pastry into squares (about 4×4 inches).
Use a knife to score a smaller square inside each one, approximately 1/2 inch from the edges, being careful not to cut all the way through.
4. Assemble the Danishes: Place the puff pastry squares on a baking sheet lined with parchment paper. Gently press down the scored edges to create a border. Spoon the cooled vanilla custard into the center of each pastry.
5. Egg Wash and Bake: Beat the egg in a small bowl and brush the edges of the puff pastry with the egg wash for a golden finish. Bake in the preheated oven for 15-20 minutes, or until the pastry is puffed and golden brown.
6. Cool and Serve: Allow the Danishes to cool on the baking sheet for a few minutes before transferring them to a wire rack.
Once cooled, dust with powdered sugar before serving.
Extra Tips:
For the best results, make sure your puff pastry is well-chilled before you begin working with it. If your kitchen is warm, consider placing the pastry in the refrigerator for a few minutes to keep it from becoming too soft.
Additionally, feel free to experiment with different flavors for your custard by adding citrus zest or almond extract. Serve the Danishes fresh for the best texture, but they can also be stored in an airtight container for a day or two. Reheat them briefly in the oven to restore their crispiness before serving.