

Discovering Portuguese desserts feels like uncovering hidden gems from a cherished past. Each cake, from the creamy Pastéis De Nata with its golden crust to the comforting Bolo De Bolacha, brings back fond family memories. These sweet treats each have their own story and unique flavors that are just waiting to be explored. If you’re on the hunt for your next favorite dessert, there’s a delightful world of Portuguese cakes to explore. Let’s embark on a sweet journey through these twelve irresistible recipes.
Pastéis De Nata
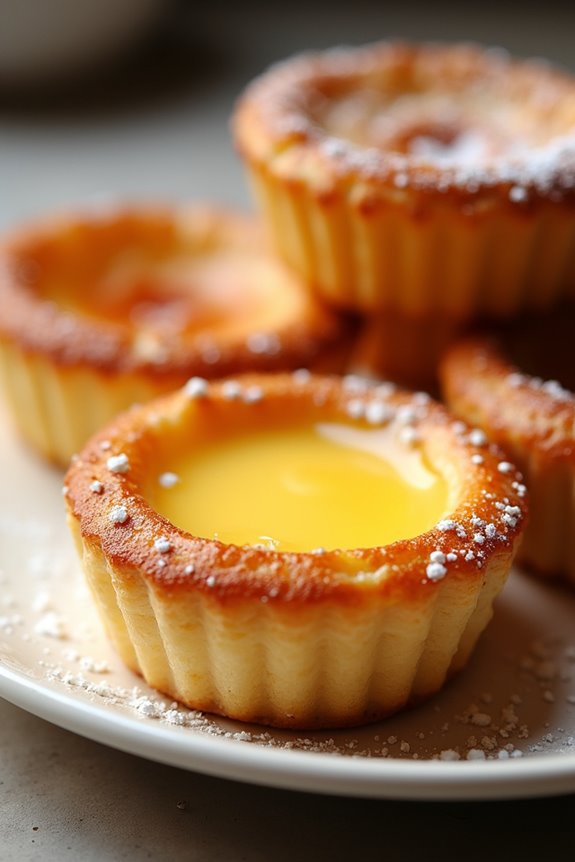
Pastéis De Nata, also known as Portuguese custard tarts, are a beloved pastry that originates from Portugal. These delightful treats feature a crisp and flaky outer crust that encases a rich and creamy custard filling. With their perfectly caramelized top and a hint of nutmeg or cinnamon, they’re a favorite among locals and visitors alike.
Often enjoyed warm with a sprinkle of powdered sugar, Pastéis De Nata have become a symbol of Portuguese culture and gastronomy, making them a must-try for anyone looking to indulge in something sweet.
Making Pastéis De Nata at home can seem overwhelming, but with the right ingredients and a little patience, you can create these delicious tarts that will impress your family and friends. The recipe below will guide you through the process step-by-step, guaranteeing you achieve the perfect balance of flaky crust and smooth custard.
So, roll up your sleeves and get ready to immerse yourself in a delightful baking experience!
Ingredients (Serves 4-6)
- 1 package of puff pastry (thawed)
- 1 cup of heavy cream
- 1 cup of whole milk
- 3/4 cup of granulated sugar
- 1/4 cup of all-purpose flour
- 6 large egg yolks
- 1 teaspoon of vanilla extract
- 1 cinnamon stick
- Zest of 1 lemon
- Powdered sugar (for serving)
- Ground cinnamon (optional, for serving)
Cooking Instructions
- Prepare the Pastry: Preheat your oven to 475°F (245°C). Roll out the thawed puff pastry on a lightly floured surface to about 1/8-inch thickness. Cut the pastry into circles that are about 4 inches in diameter. Gently press the circles into the wells of a muffin tin, making sure to cover the sides completely. This forms the base for your tarts.
- Make the Custard Filling: In a saucepan, combine the heavy cream, whole milk, sugar, flour, cinnamon stick, and lemon zest. Heat the mixture over medium heat, stirring constantly until it starts to simmer. Remove from heat and let it steep for about 10 minutes to infuse the flavors.
- Prepare the Egg Mixture: In a separate bowl, whisk together the egg yolks and vanilla extract until well combined. Slowly pour the warm milk mixture into the egg yolks, whisking continuously to temper the eggs and prevent them from scrambling.
- Strain the Custard: Once combined, strain the custard mixture through a fine-mesh sieve to remove any lumps and the cinnamon stick. This will guarantee a smooth filling for your tarts.
- Fill the Pastry Shells: Carefully pour the strained custard into each pastry shell, filling them about 3/4 full. Be cautious not to overfill, as the custard will expand while baking.
- Bake the Tarts: Place the muffin tin in the preheated oven and bake for 15-20 minutes, or until the custards are set and the tops are beautifully caramelized. Keep an eye on them to avoid burning.
- Cool and Serve: Once baked, remove the tarts from the oven and let them cool in the tin for a few minutes before transferring them to a wire rack to cool completely. Serve warm, dusted with powdered sugar and a sprinkle of ground cinnamon if desired.
Extra Tips
For the best results, it’s vital to use high-quality ingredients, especially for the puff pastry and the dairy products, as they greatly impact the flavor and texture of the Pastéis De Nata.
If you want to achieve that iconic caramelized top, you can use a kitchen torch for a quick caramelization after baking. Additionally, feel free to experiment with flavorings in your custard, such as adding a splash of orange zest or a drop of almond extract for a unique twist.
Enjoy your baking adventure!
Bolo De Bolacha
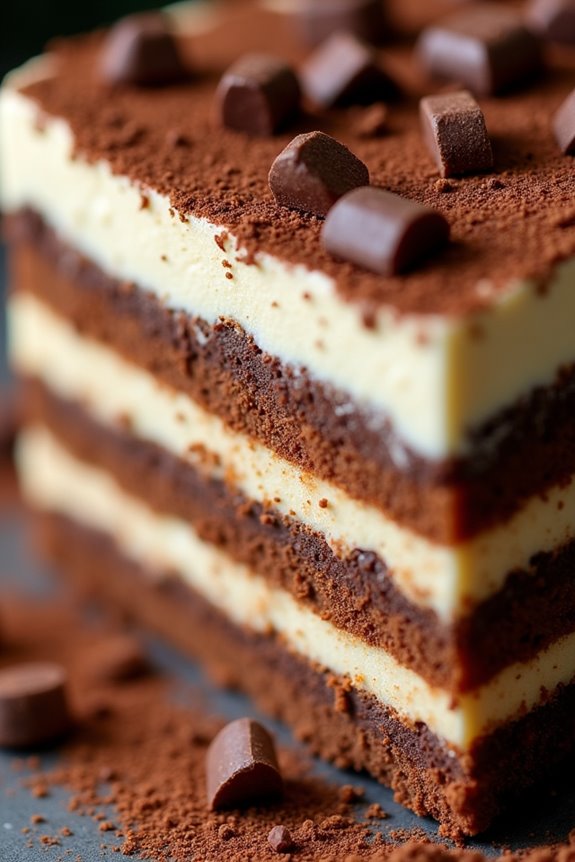
Bolo De Bolacha, or Biscuit Cake, is a popular Portuguese dessert that’s easy to prepare and incredibly delicious. This no-bake cake is made primarily with Maria biscuits and a creamy filling that often includes coffee or chocolate. Its delightful combination of textures and flavors makes it a favorite for gatherings, birthdays, and special occasions. The best part about Bolo De Bolacha is that it can be made ahead of time, allowing the flavors to meld beautifully.
To make this charming dessert, you’ll need to layer the biscuits with a rich cream mixture, which typically includes butter, sugar, and coffee. The cake is then chilled until firm, resulting in a creamy and slightly crunchy treat that melts in your mouth. Perfectly paired with a cup of coffee or tea, this cake is sure to impress your friends and family with its rich flavors and elegant presentation.
Ingredients (Serves 4-6)
- 200g Maria biscuits
- 200g unsalted butter, softened
- 200g powdered sugar
- 4 egg yolks
- 1 cup strong coffee, cooled
- 1 teaspoon vanilla extract
- Cocoa powder (for dusting)
- Chocolate shavings (optional, for garnish)
Cooking Instructions
- Prepare the Cream Mixture: In a large mixing bowl, combine the softened unsalted butter and powdered sugar. Use an electric mixer to beat the mixture until it’s light and fluffy. This process incorporates air and gives the filling its creamy texture.
- Incorporate Egg Yolks: Add the egg yolks one at a time to the butter and sugar mixture, continuing to beat well after each addition. This step is vital as it helps to emulsify the mixture and guarantees a smooth and rich filling.
- Add Coffee and Vanilla: Pour in the cooled strong coffee and vanilla extract. Mix until all the ingredients are well combined and the filling is smooth. The coffee will add a wonderful flavor to the cream, enhancing the overall taste of the cake.
- Dip the Biscuits: Quickly dip each Maria biscuit into the cooled coffee, making sure they’re soaked but not soggy. This will add moisture to the biscuits and enhance their flavor without making them too soft.
- Layer the Cake: In a rectangular or round serving dish, begin layering the dipped biscuits and the cream mixture. Start with a layer of biscuits, followed by a layer of the cream. Repeat the process until all the biscuits and cream are used, finishing with a layer of cream on top.
- Chill the Cake: Cover the dish with plastic wrap and place it in the refrigerator for at least 4 hours, or preferably overnight. Chilling allows the flavors to meld and the cake to set properly.
- Serve: Once set, remove the cake from the refrigerator. Dust the top with cocoa powder and garnish with chocolate shavings, if desired. Slice into portions and serve chilled.
Extra Tips
When making Bolo De Bolacha, it’s important to use a strong coffee to guarantee that the flavor comes through, as the coffee is a key element of the dessert.
For a variation, you can add cocoa powder to the cream mixture for a chocolatey twist, or even use flavored coffee to give it a unique taste. Additionally, if you’re concerned about raw egg consumption, you can substitute the egg yolks with a store-bought egg-free cream or pudding mix.
This dessert is very forgiving, so feel free to get creative with flavors and toppings!
Bolo De Laranja
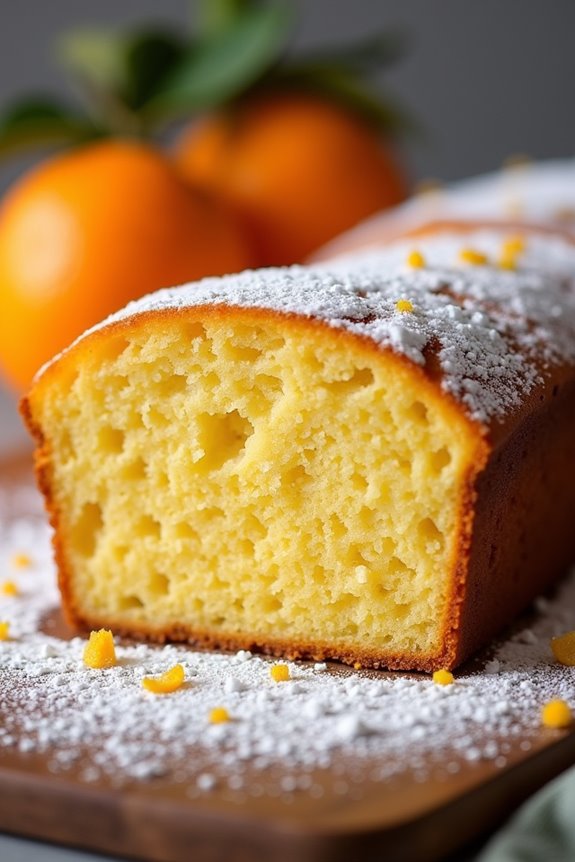
Bolo De Laranja, or Orange Cake, is a delightful Portuguese dessert that captures the vibrant essence of oranges. This moist, flavorful cake is perfect for any occasion, whether it’s a family gathering, a birthday celebration, or just a simple afternoon treat with tea. The combination of fresh orange juice and zest provides a revitalizing taste that’s hard to resist.
With its bright color and zesty aroma, Bolo De Laranja is sure to impress your guests and become a favorite in your dessert repertoire.
Making Bolo De Laranja is a straightforward process that results in a light and fluffy cake. The ingredients are simple and typically found in most kitchens. This cake isn’t only delicious but also offers a unique twist with the addition of orange, making it stand out from traditional vanilla or chocolate cakes.
Serve it plain, dusted with powdered sugar, or drizzled with a sweet orange glaze for an extra touch of sweetness.
Ingredients (Serves 4-6)
- 2 large oranges (zested and juiced)
- 1 cup granulated sugar
- 3 large eggs
- 1/2 cup vegetable oil
- 1 1/2 cups all-purpose flour
- 1 tablespoon baking powder
- 1/2 teaspoon salt
- Powdered sugar for dusting (optional)
Cooking Instructions
- Preheat the Oven: Begin by preheating your oven to 350°F (175°C). This guarantees that the oven is at the right temperature by the time your batter is ready to be baked, which is essential for achieving a perfectly risen cake.
- Prepare the Cake Pan: Grease and flour an 8-inch round cake pan or line it with parchment paper. This prevents the cake from sticking and guarantees an easy release once it’s baked.
- Mix Wet Ingredients: In a mixing bowl, combine the granulated sugar, eggs, and vegetable oil. Whisk these ingredients together until well combined and fluffy. The sugar should start to dissolve, creating a creamy texture.
- Add Orange Juice and Zest: Incorporate the freshly squeezed orange juice and zest into the egg mixture. Stir well to combine, guaranteeing the orange flavor is evenly distributed throughout the wet ingredients.
- Combine Dry Ingredients: In a separate bowl, whisk together the all-purpose flour, baking powder, and salt. This helps to evenly distribute the leavening agent and guarantees a light cake texture.
- Combine Wet and Dry Mixtures: Gradually add the dry ingredients to the wet ingredients, mixing gently with a spatula or wooden spoon until just combined. Be careful not to overmix, as this can lead to a dense cake.
- Pour Batter into Pan: Transfer the cake batter into the prepared cake pan, smoothing the top with a spatula. This guarantees even baking and a nice presentation.
- Bake the Cake: Place the cake in the preheated oven and bake for 30-35 minutes, or until a toothpick inserted into the center comes out clean. Keep an eye on the cake during the last few minutes to avoid overbaking.
- Cool the Cake: Once baked, remove the cake from the oven and allow it to cool in the pan for about 10 minutes. Then, carefully transfer it to a wire rack to cool completely.
- Serve: Once cooled, dust the top with powdered sugar if desired, slice the cake, and serve it at room temperature.
Extra Tips
For an enhanced orange flavor, consider adding a simple orange glaze made with powdered sugar and orange juice. Just mix the two together until you reach your desired consistency and drizzle it over the cooled cake.
Additionally, using organic oranges can intensify the flavor and aroma of your Bolo De Laranja. If you want to get creative, adding a handful of chopped nuts or chocolate chips to the batter can provide an interesting texture and flavor contrast. Enjoy baking this delightful cake!
Bolo De Mel
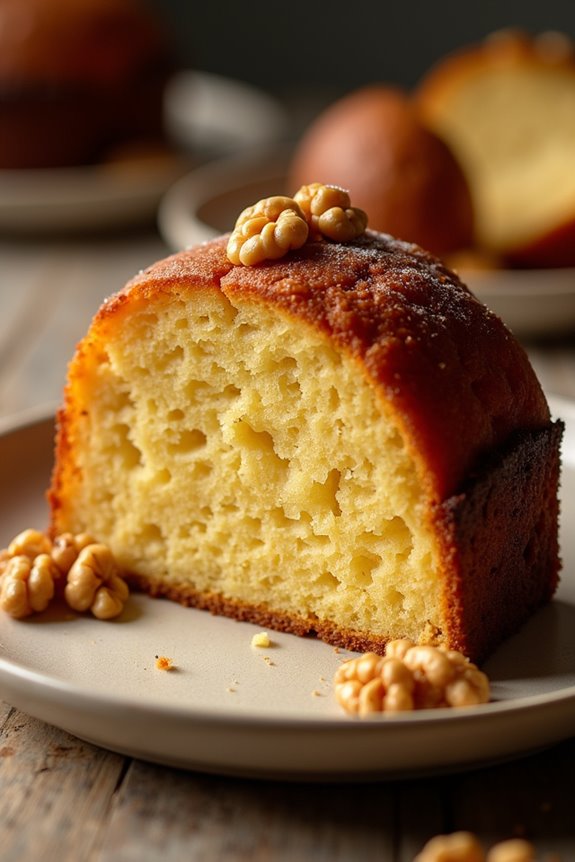
Bolo De Mel, or Honey Cake, is a traditional Portuguese dessert that embodies the rich flavors and cultural heritage of Portugal. This cake is particularly popular in the Azores and Madeira islands, where honey is a staple ingredient, giving the cake its unique sweetness and moist texture.
The combination of spices, honey, and sometimes nuts or dried fruits makes it a delightful treat, perfect for special occasions or a cozy afternoon tea. Making Bolo De Mel isn’t only a rewarding experience but also a wonderful way to introduce a taste of Portugal into your kitchen.
The cake is often enjoyed during festive seasons, and its flavors deepen over time, allowing it to be made in advance and savored later. With its warm spices and sweet honey, this cake is sure to become a favorite among family and friends.
Ingredients (Serves 4-6)
- 1 cup honey
- 1 cup brown sugar
- 1 cup unsalted butter, softened
- 4 large eggs
- 3 cups all-purpose flour
- 2 teaspoons baking powder
- 1 teaspoon baking soda
- 1 teaspoon ground cinnamon
- ½ teaspoon ground cloves
- ½ teaspoon ground nutmeg
- ½ teaspoon salt
- 1 cup chopped walnuts or almonds (optional)
Cooking Instructions
- Preheat the Oven: Begin by preheating your oven to 350°F (175°C). This step is essential as it guarantees that the cake bakes evenly and rises properly.
- Prepare the Baking Pan: Grease a 9-inch round cake pan with butter or line it with parchment paper. This will prevent the cake from sticking and make it easier to remove after baking.
- Mix Wet Ingredients: In a large mixing bowl, combine the honey, brown sugar, and softened butter. Use a hand mixer or stand mixer to beat the mixture until it’s creamy and well combined. This process incorporates air into the mixture, which is critical for a light cake.
- Add Eggs: Crack the eggs into the honey and butter mixture one at a time, mixing well after each addition. This guarantees that the eggs are fully integrated and helps to create a uniform batter.
- Combine Dry Ingredients: In a separate bowl, whisk together the flour, baking powder, baking soda, cinnamon, cloves, nutmeg, and salt. This helps to evenly distribute the leavening agents and spices throughout the flour.
- Mix Dry and Wet Ingredients: Gradually add the dry ingredients to the wet mixture, stirring gently until just combined. Be careful not to overmix, as this can lead to a dense cake.
- Add Nuts: If using, fold in the chopped walnuts or almonds into the batter. This adds texture and a lovely nutty flavor to the cake.
- Bake the Cake: Pour the batter into the prepared cake pan and smooth the top with a spatula. Place it in the preheated oven and bake for 40-50 minutes, or until a toothpick inserted into the center comes out clean.
- Cool the Cake: Once baked, remove the cake from the oven and allow it to cool in the pan for about 10 minutes. Then, transfer it to a wire rack to cool completely. This cooling period is important for the cake to set properly.
- Serve: Once cooled, slice the Bolo De Mel and serve it plain or with a dollop of whipped cream for added indulgence.
Extra Tips
When making Bolo De Mel, consider using high-quality honey for the best flavor, as it’s the star ingredient of the cake. Feel free to experiment with different spices according to your taste preferences; some people enjoy adding ginger or allspice for an extra kick.
Additionally, this cake benefits from resting for a day or two after baking, as the flavors meld beautifully over time, making it even more delicious. Store it in an airtight container to keep it moist for several days.
Bolo De Amêndoa

Bolo De Amêndoa, or Almond Cake, is a delightful Portuguese dessert that showcases the rich flavors of almonds in a moist and tender cake. This traditional recipe is perfect for special occasions or simply to treat yourself and your loved ones.
The cake is naturally gluten-free, making it a wonderful option for those with dietary restrictions, and its nutty aroma will fill your kitchen with warmth and comfort as it bakes.
The cake is often enjoyed plain, but it can also be enhanced with a dusting of powdered sugar or served alongside fresh fruits and whipped cream. With its unique texture and flavor profile, Bolo De Amêndoa is sure to impress your guests and become a favorite in your dessert repertoire.
Let’s plunge into making this delicious cake!
Ingredients (Serves 4-6)
- 1 cup (100g) ground almonds
- 1 cup (200g) granulated sugar
- 4 large eggs
- 1/2 cup (113g) unsalted butter, melted
- 1 teaspoon vanilla extract
- 1 teaspoon baking powder
- A pinch of salt
- Powdered sugar (for dusting, optional)
Cooking Instructions
- Preheat the Oven: Begin by preheating your oven to 350°F (175°C). This guarantees that the cake bakes evenly and rises properly.
- Prepare the Baking Pan: Grease an 8-inch round cake pan with butter or non-stick spray. For added security, you can line the bottom with parchment paper, which will help with easy removal of the cake after baking.
- Mix Dry Ingredients: In a medium bowl, combine the ground almonds, baking powder, and a pinch of salt. This step helps to evenly distribute the leavening agent and guarantees that the almonds blend well into the batter.
- Beat the Eggs and Sugar: In a large mixing bowl, beat the eggs and granulated sugar together using an electric mixer until the mixture is pale and fluffy. This process usually takes about 5-7 minutes and is vital for incorporating air into the batter, which will help the cake rise.
- Add Butter and Vanilla: Slowly pour in the melted butter and vanilla extract while continuing to mix. This will create a smooth batter. Be sure to let the melted butter cool slightly before adding it to avoid cooking the eggs.
- Combine Mixtures: Gradually add the dry almond mixture into the egg mixture, gently folding it in with a spatula. Take care not to overmix; you want to keep the batter light and airy.
- Bake the Cake: Pour the batter into the prepared cake pan and smooth the top with a spatula. Place the pan in the preheated oven and bake for about 25-30 minutes, or until a toothpick inserted into the center comes out clean.
- Cool and Serve: Once baked, remove the cake from the oven and let it cool in the pan for about 10 minutes. Then, carefully transfer it to a wire rack to cool completely. Dust with powdered sugar before serving, if desired.
Extra Tips
When making Bolo De Amêndoa, using freshly ground almonds can elevate the flavor and texture of your cake.
If you prefer a stronger almond taste, consider adding a few drops of almond extract. Additionally, be cautious not to overbake the cake; it should be moist and slightly springy to the touch.
For an extra touch, serve it with a scoop of vanilla ice cream or a dollop of whipped cream. Enjoy this delightful Portuguese treat!
Bolo De Chocolate
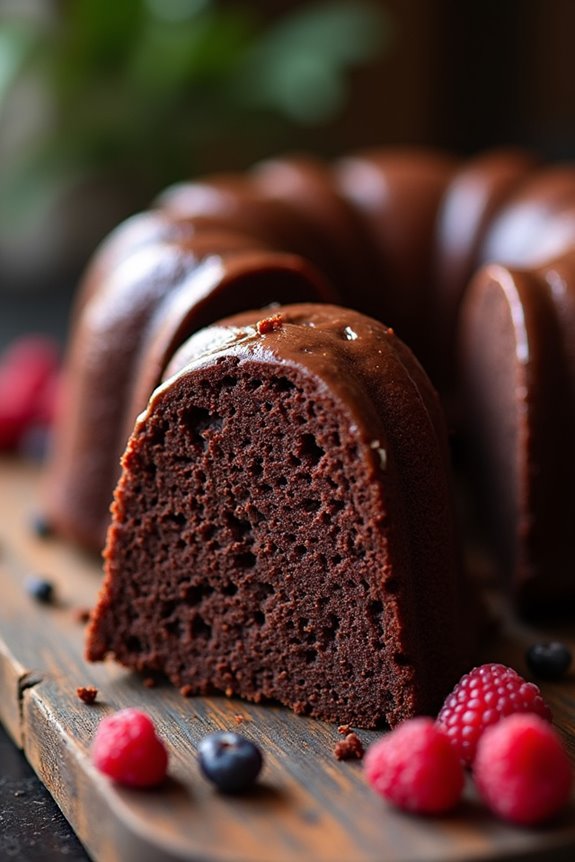
Bolo de Chocolate is a beloved Portuguese chocolate cake that’s rich, moist, and utterly irresistible. This delightful dessert is often served at birthday parties, celebrations, or as a treat to enjoy with a cup of coffee or tea. The cake is layered with a luscious chocolate ganache or frosting, making it a chocolate lover’s dream.
Whether you’re an experienced baker or a novice in the kitchen, this recipe will guide you through creating the perfect Bolo de Chocolate that’s sure to impress your family and friends.
The beauty of Bolo de Chocolate lies not only in its flavor but also in its simplicity. With basic ingredients that you likely already have in your pantry, this cake can be made in no time.
Pair it with fresh fruits or a scoop of ice cream for an extra special touch. Let’s plunge into the ingredients and steps needed to make this classic Portuguese treat for 4-6 people.
Ingredients:
- 1 ½ cups all-purpose flour
- 1 cup granulated sugar
- ½ cup unsweetened cocoa powder
- ½ cup unsalted butter, softened
- 1 cup milk
- 3 large eggs
- 1 teaspoon baking powder
- ½ teaspoon baking soda
- ¼ teaspoon salt
- 1 teaspoon vanilla extract
Cooking Instructions:
- Preheat the Oven: Begin by preheating your oven to 350°F (175°C). This will guarantee that your cake bakes evenly and rises properly.
- Prepare the Baking Pan: Grease and flour an 8-inch round cake pan. This will prevent the cake from sticking to the pan and help achieve a perfect release once baked.
- Mix Dry Ingredients: In a large mixing bowl, sift together the flour, sugar, cocoa powder, baking powder, baking soda, and salt. This helps to aerate the mixture and remove any lumps, ensuring a smooth cake batter.
- Combine Wet Ingredients: In a separate bowl, beat the eggs and then add the softened butter, milk, and vanilla extract. Mix well until all the wet ingredients are combined.
- Combine the Mixtures: Gradually add the wet mixture to the dry ingredients, stirring gently to combine. Be careful not to overmix, as this can lead to a dense cake.
- Pour into the Pan: Once the batter is smooth and well combined, pour it into the prepared baking pan. Use a spatula to spread it evenly.
- Bake the Cake: Place the pan in the preheated oven and bake for 30-35 minutes, or until a toothpick inserted in the center comes out clean. Keep an eye on the cake as baking times may vary slightly depending on your oven.
- Cool the Cake: Once baked, remove the cake from the oven and allow it to cool in the pan for about 10 minutes. Then, carefully transfer the cake to a wire rack to cool completely.
- Frost the Cake: Once the cake is cool, you can frost it with chocolate ganache or your favorite chocolate frosting. Spread evenly using a spatula and decorate as desired.
Extra Tips:
For an even richer flavor, consider adding a splash of brewed coffee to the wet ingredients. This enhances the chocolate taste without making the cake taste like coffee.
Additionally, feel free to experiment with fillings or toppings, such as nuts, chocolate chips, or fresh berries, to make your Bolo de Chocolate unique.
Don’t forget to let the cake cool completely before frosting to prevent the icing from melting. Enjoy your delicious creation!
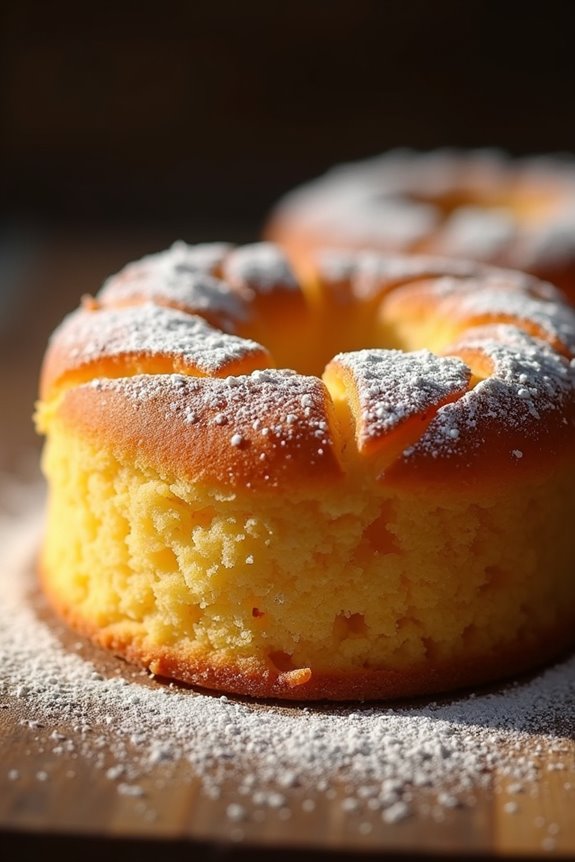
Pão De Ló

Pão De Ló is a traditional Portuguese sponge cake known for its light, airy texture and subtle sweetness. Originating from the region of Alentejo, this cake is often enjoyed on festive occasions and family gatherings. The recipe is quite simple, relying on just a few basic ingredients, which are whipped into a fluffy batter. The cake is typically served plain or dusted with powdered sugar, making it a versatile dessert that pairs well with coffee or tea.
The beauty of Pão De Ló lies in its simplicity. The cake’s texture is achieved through the careful incorporation of air into the batter, which is done by beating the eggs and sugar until they’re light and fluffy. This classic dessert isn’t only delightful in taste but also holds a special place in Portuguese culture. Whether you’re celebrating a special occasion or just looking to indulge in a slice of history, Pão De Ló is sure to satisfy your sweet tooth.
Ingredients (Serves 4-6):
- 4 large eggs
- 200g granulated sugar
- 100g all-purpose flour
- 1 tsp baking powder
- A pinch of salt
- Zest of 1 lemon (optional)
- Powdered sugar for dusting (optional)
Instructions:
- Preheat the Oven: Begin by preheating your oven to 180°C (350°F). This guarantees that the oven is hot enough to provide the right environment for your cake to rise properly.
- Prepare the Baking Pan: Grease and line an 8-inch round cake pan with parchment paper. This prevents the cake from sticking and makes for easier removal once it’s baked.
- Whisk Eggs and Sugar: In a large mixing bowl, combine the eggs and granulated sugar. Using an electric mixer, beat the mixture on high speed for about 10 minutes, or until it becomes thick, pale, and fluffy. This step is vital because it incorporates air into the batter, which gives the cake its light texture.
- Combine Dry Ingredients: In a separate bowl, sift together the flour, baking powder, and a pinch of salt. This helps to aerate the flour and remove any lumps, guaranteeing a smooth batter.
- Fold Ingredients Together: Gently fold the dry ingredients into the egg mixture using a rubber spatula. Be careful not to overmix; you want to maintain the aerated texture of the batter. If using, fold in the lemon zest for added flavor.
- Pour into Pan: Once combined, pour the batter into the prepared cake pan, smoothing the top with the spatula. This guarantees an even surface for baking.
- Bake the Cake: Place the cake in the preheated oven and bake for about 25-30 minutes, or until the top is golden brown and a toothpick inserted into the center comes out clean. Keep an eye on it to prevent overbaking.
- Cool and Serve: Once baked, remove the cake from the oven and let it cool in the pan for about 10 minutes. Then, gently turn it out onto a wire rack to cool completely. Once cooled, dust with powdered sugar if desired, and slice to serve.
Extra Tips: When making Pão De Ló, it’s essential to beat the eggs and sugar long enough to achieve the desired fluffiness; this is what gives the cake its lightness. Also, avoid opening the oven door too soon, as this can cause the cake to collapse. If you want to experiment with flavors, consider adding vanilla extract or almond extract for a different twist. Enjoy your baking!
Bolo De Coco
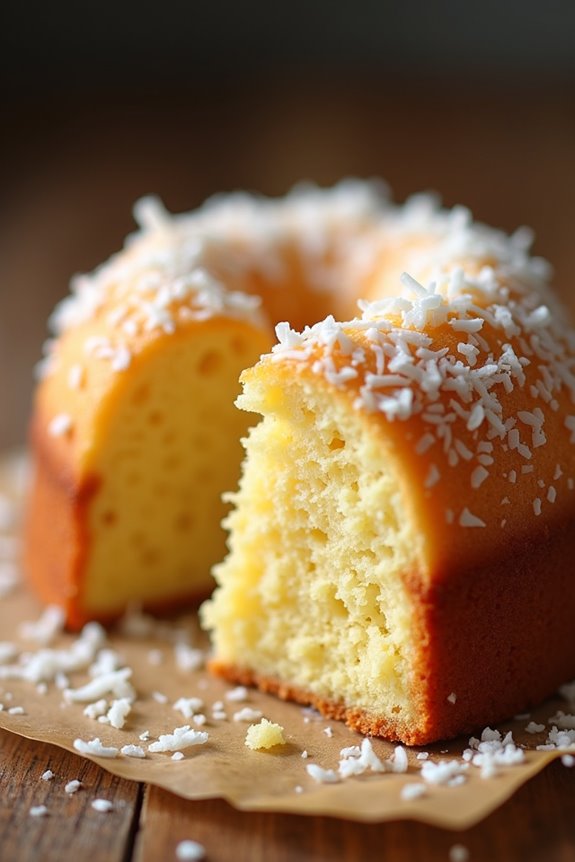
Bolo De Coco, or Coconut Cake, is a traditional and beloved dessert in Portuguese and Brazilian cuisine. This moist, rich cake is infused with coconut flavor and is often topped with a delightful coconut frosting. The combination of the soft cake and the sweet, chewy coconut topping makes it a favorite for celebrations, gatherings, or simply as a treat to enjoy with coffee.
With its simplicity and deliciousness, Bolo De Coco is guaranteed to become a staple in your baking repertoire.
In this recipe, we’ll guide you through the process of making this delectable cake from scratch. You’ll find that the ingredients are easy to come by, and the preparation is straightforward. With just a few steps, you’ll have a beautiful Bolo De Coco that can serve 4-6 people, perfect for sharing with family or friends. Let’s get started!
Ingredients
- 2 cups all-purpose flour
- 1 ½ cups granulated sugar
- 1 cup coconut milk
- ½ cup unsweetened shredded coconut
- ½ cup unsalted butter, softened
- 3 large eggs
- 1 tablespoon baking powder
- 1 teaspoon vanilla extract
- A pinch of salt
Cooking Instructions
- Preheat the Oven: Begin by preheating your oven to 350°F (175°C). This guarantees that the cake bakes evenly and rises properly once you place it in the oven.
- Prepare the Baking Pan: Grease a round 9-inch cake pan with butter or cooking spray, and lightly dust it with flour. This will help prevent the cake from sticking to the pan once baked.
- Mix Dry Ingredients: In a medium mixing bowl, whisk together the all-purpose flour, baking powder, and salt. This step helps to evenly distribute the baking powder throughout the flour, guaranteeing the cake rises well.
- Cream Butter and Sugar: In a large mixing bowl, use an electric mixer to cream together the softened butter and granulated sugar until the mixture is light and fluffy. This process incorporates air into the batter, which helps give the cake a light texture.
- Add Eggs and Vanilla: Beat in the eggs, one at a time, mixing well after each addition. Then, add the vanilla extract and mix until combined. This adds flavor and richness to the cake.
- Combine Wet and Dry Ingredients: Gradually add the dry ingredient mixture to the creamed butter and sugar, alternating with the coconut milk. Start and end with the flour mixture. Mix until just combined to avoid overmixing, which can lead to a dense cake.
- Add Shredded Coconut: Gently fold in the shredded coconut until evenly distributed throughout the batter. This adds texture and enhances the coconut flavor.
- Bake the Cake: Pour the batter into the prepared cake pan and smooth the top with a spatula. Bake in the preheated oven for 30-35 minutes, or until a toothpick inserted into the center comes out clean.
- Cool the Cake: Once baked, remove the cake from the oven and allow it to cool in the pan for about 10 minutes. Then, carefully invert it onto a wire rack to cool completely.
- Serve: Once cooled, you can serve it as is, or top it with more shredded coconut or a frosting of your choice. Enjoy your delicious Bolo De Coco!
Extra Tips
To enhance the coconut flavor in your Bolo De Coco, consider using coconut oil instead of butter for an extra tropical twist. You can also experiment with different toppings, such as drizzling with a coconut glaze or adding a layer of whipped cream.
If you have leftover cake, store it in an airtight container at room temperature for up to three days, or refrigerate it for longer freshness. Enjoy your baking!
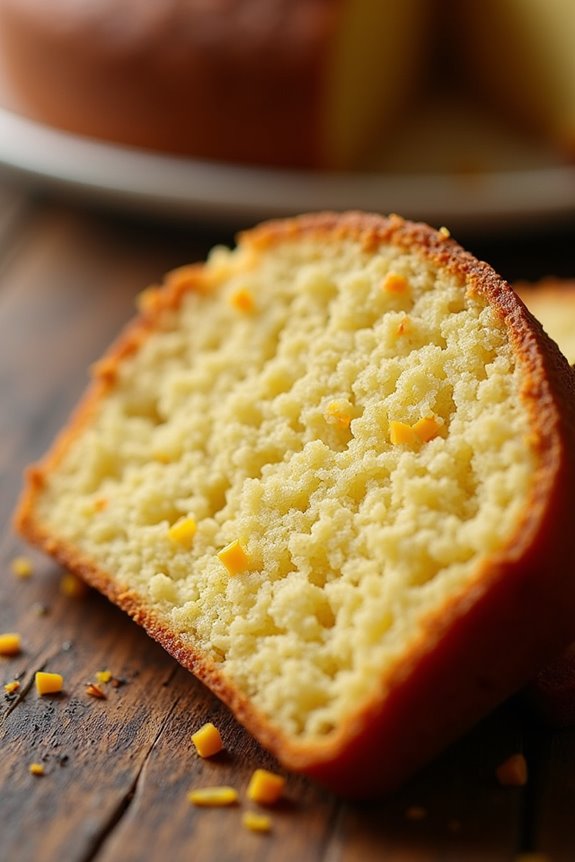
Bolo De Fubá
Bolo De Fubá is a traditional Brazilian cornmeal cake that brings a delightful taste of home to any table. Its origins can be traced back to the rural areas of Brazil, where corn was a staple ingredient. This cake is loved for its moist texture and slightly sweet flavor, making it an ideal treat for breakfast, an afternoon snack, or even dessert.
The combination of cornmeal and sugar creates a unique flavor profile that will have your taste buds dancing with joy. This cake isn’t only delicious but also simple to make, requiring minimal ingredients and effort. The process is straightforward, making it an excellent option for both novice bakers and seasoned chefs.
Whether served plain or with a dusting of powdered sugar, Bolo De Fubá is sure to please anyone who tries it. So, gather your ingredients and get ready to indulge in a slice of this Brazilian delight!
Ingredients (Serves 4-6)
- 1 cup cornmeal (fubá)
- 1 cup sugar
- 1 cup milk
- 1/2 cup vegetable oil
- 3 large eggs
- 1 tablespoon baking powder
- 1/2 teaspoon salt
- Optional: powdered sugar for dusting
Cooking Instructions
- Preheat the Oven: Begin by preheating your oven to 350°F (175°C). This guarantees that the cake will bake evenly and rise properly once it’s placed in the oven.
- Prepare the Baking Pan: Grease a round or rectangular baking pan with butter or cooking spray. This step is essential to prevent the cake from sticking to the pan after baking. You may also choose to lightly dust the pan with flour for extra confidence.
- Mix Wet Ingredients: In a large mixing bowl, combine the sugar, milk, vegetable oil, and eggs. Use a whisk or an electric mixer to blend these ingredients until the mixture is smooth and well combined.
- Combine Dry Ingredients: In a separate bowl, mix the cornmeal, baking powder, and salt. Stir these dry ingredients together to confirm that the baking powder is evenly distributed throughout the cornmeal.
- Combine Wet and Dry Mixtures: Gradually add the dry ingredient mixture to the wet mixture, stirring continuously. This will help you achieve a smooth batter without lumps. Be careful not to overmix; just combine until everything is incorporated.
- Pour Into Pan: Once your batter is ready, pour it into the prepared baking pan. Use a spatula to spread it evenly, ensuring that it reaches the edges of the pan.
- Bake the Cake: Place the pan in the preheated oven and bake for about 30-40 minutes, or until a toothpick inserted into the center comes out clean. Keep an eye on the cake as baking times can vary slightly based on your oven.
- Cool and Serve: After baking, remove the cake from the oven and let it cool in the pan for about 10 minutes. Then, transfer it to a wire rack to cool completely. Once cooled, you can dust it with powdered sugar if desired and slice it for serving.
Extra Tips
When making Bolo De Fubá, using fresh ingredients is key to achieving the best flavor and texture. If you prefer a richer taste, you can substitute half of the milk with coconut milk. This adds a subtle tropical flavor that complements the cornmeal beautifully.
Additionally, feel free to experiment by adding a pinch of cinnamon or vanilla extract to the batter for an extra layer of flavor. Enjoy your homemade Bolo De Fubá with a cup of coffee or tea for a delightful treat!
Bolo De Arroz
Bolo De Arroz, or Rice Cake, is a traditional Portuguese treat that boasts a delightful combination of flavors and textures. This moist and fluffy cake is made primarily with rice flour, which gives it a unique consistency that sets it apart from other cakes.
Often enjoyed for breakfast or as a snack, Bolo De Arroz is typically flavored with lemon and has a light sweetness, making it a perfect accompaniment to a cup of coffee or tea.
Making Bolo De Arroz is a simple yet rewarding process. The cake isn’t only delicious but also gluten-free, as it uses rice flour instead of wheat flour. This recipe is sure to impress your family and friends, making it a great addition to any gathering or celebration.
With its delightful taste and easy preparation, you’ll find yourself making this cake time and again.
Ingredients (Serves 4-6):
- 1 cup rice flour
- 1 cup sugar
- 4 large eggs
- 1/2 cup milk
- 1/2 cup vegetable oil
- 1 teaspoon baking powder
- Zest of 1 lemon
- A pinch of salt
Cooking Instructions:
- Preheat the Oven: Begin by preheating your oven to 350°F (175°C). This guarantees that your cake will bake evenly and rise properly once the batter is mixed.
- Prepare the Baking Pan: Grease a round cake pan (approximately 9 inches in diameter) with butter or cooking spray, and lightly dust it with flour to prevent sticking. This step is essential for easy removal of the cake after baking.
- Mix Wet Ingredients: In a large mixing bowl, combine the eggs, sugar, milk, and vegetable oil. Whisk these ingredients together until they’re well blended and the mixture is frothy. This aeration helps to create a light texture in the finished cake.
- Incorporate Dry Ingredients: Gradually add the rice flour, baking powder, lemon zest, and salt to the wet mixture. Stir gently until all ingredients are just combined, being careful not to overmix; a few lumps are okay.
- Pour into the Pan: Pour the batter into the prepared cake pan, smoothing the top with a spatula. This guarantees that the cake will bake evenly and have a nice presentation when it’s finished.
- Bake the Cake: Place the cake in the preheated oven and bake for approximately 30-35 minutes, or until a toothpick inserted into the center comes out clean. Keep an eye on the cake towards the end of the baking time to prevent over-baking.
- Cool and Serve: Once baked, remove the cake from the oven and let it cool in the pan for about 10 minutes. Then, carefully transfer it to a wire rack to cool completely. Once cooled, slice and serve your Bolo De Arroz.
Extra Tips:
For added flavor, consider incorporating a teaspoon of vanilla extract into the wet mixture.
You can also experiment with different citrus zests, such as orange or lime, for a unique twist on the classic recipe.
If you want a slightly denser cake, you can substitute a portion of the rice flour with almond flour.
Finally, serve the cake dusted with powdered sugar for an elegant touch!
Bolo De Noz
Bolo De Noz, or Walnut Cake, is a traditional Portuguese dessert that encapsulates the rich flavors and textures of walnuts. This moist and delectable cake is perfect for any occasion, whether it’s a family gathering, a festive celebration, or simply a sweet treat to enjoy with your afternoon coffee. The combination of ground walnuts and a hint of cinnamon makes this cake not only delicious but also aromatic and inviting.
The beauty of Bolo De Noz lies in its simplicity; it requires minimal ingredients yet delivers a delightful taste that will leave your guests asking for seconds. As you prepare this cake, the process of mixing, baking, and finally savoring the result will unfold like a warm and comforting story, showcasing the essence of Portuguese baking traditions.
Ingredients (Serves 4-6):
- 1 cup walnuts, finely ground
- 1 cup granulated sugar
- 1 cup all-purpose flour
- 3 large eggs
- 1/2 cup unsalted butter, softened
- 1 teaspoon baking powder
- 1 teaspoon vanilla extract
- 1 teaspoon ground cinnamon
- Pinch of salt
Cooking Instructions:
1. Preheat the Oven: Begin by preheating your oven to 350°F (175°C). This guarantees that your cake bakes evenly and rises perfectly once it’s in the oven.
2. Prepare the Baking Pan: Grease a round cake pan (approximately 9 inches in diameter) or line it with parchment paper. This step is essential to prevent the cake from sticking to the pan after baking.
3. Mix the Wet Ingredients: In a large mixing bowl, cream together the softened butter and granulated sugar using an electric mixer. Beat until the mixture is light and fluffy, which usually takes about 3-5 minutes.
Then, add the eggs one at a time, mixing well after each addition. Finally, add the vanilla extract and mix until fully incorporated.
4. Combine Dry Ingredients: In a separate bowl, combine the ground walnuts, all-purpose flour, baking powder, ground cinnamon, and a pinch of salt. Mix these dry ingredients well to guarantee an even distribution throughout the cake.
5. Combine Wet and Dry Mixtures: Gradually add the dry mixture to the wet mixture, stirring gently with a spatula or wooden spoon until just combined. Be careful not to overmix, as this can lead to a dense cake.
6. Pour into the Pan: Carefully pour the batter into the prepared cake pan, smoothing the top with a spatula for an even surface.
7. Bake the Cake: Place the pan in the preheated oven and bake for about 30-35 minutes, or until a toothpick inserted into the center comes out clean. Keep an eye on the cake towards the end of the baking time to avoid over-baking.
8. Cool and Serve: Once baked, remove the cake from the oven and allow it to cool in the pan for about 10 minutes. Afterward, transfer the cake to a wire rack to cool completely. Serve it plain or dusted with powdered sugar for an elegant finish.
Extra Tips: When preparing your Bolo De Noz, consider using fresh walnuts for a more intense flavor. You can also experiment with the addition of orange zest or a touch of rum for a unique twist.
If you prefer a sweeter cake, feel free to increase the sugar or add a simple syrup glaze after baking. Additionally, this cake pairs wonderfully with whipped cream or a scoop of vanilla ice cream for an indulgent dessert experience.
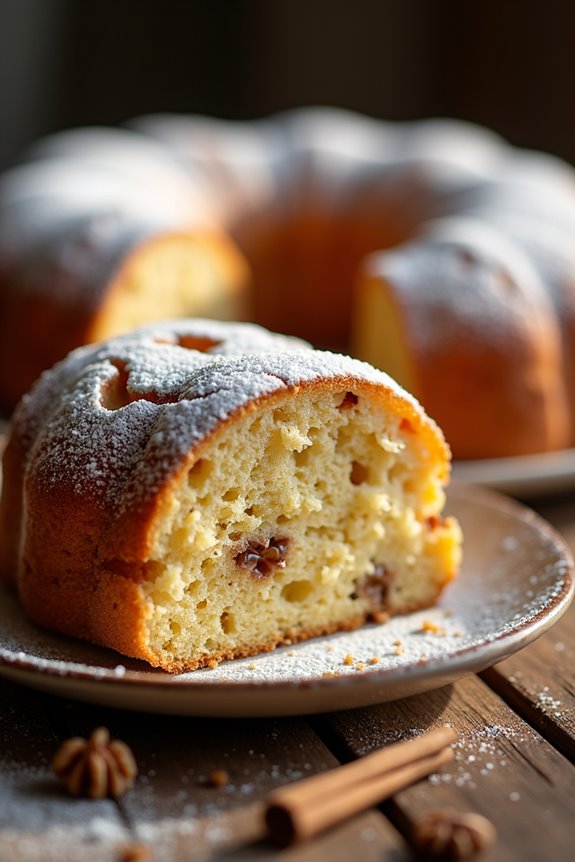
Bolo Rainha
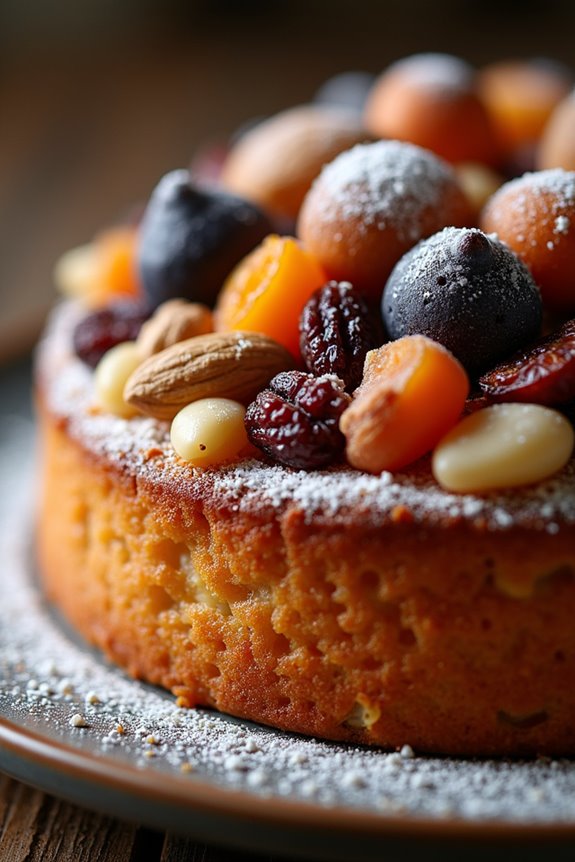
Bolo Rainha, or Queen Cake, is a traditional Portuguese treat that beautifully marries rich flavors and textures. This delightful cake is characterized by its moist, fluffy interior and is typically adorned with nuts and dried fruits, making it a perfect accompaniment for tea or coffee. The cake is often enjoyed during festive occasions but can also be a lovely addition to any gathering or family meal. The unique combination of ingredients not only makes it delicious but also visually appealing, as the toppings create a stunning presentation.
Making Bolo Rainha is a rewarding experience, as the process allows for creativity in choosing various nuts and fruits. Whether you prefer almonds, walnuts, or a mix of dried fruits like figs and raisins, this cake is highly customizable to suit your taste. The key to achieving the perfect texture lies in the careful mixing and rising of the dough. Once baked, the cake can be enjoyed warm or at room temperature, making it a versatile treat for any occasion.
Ingredients (Serves 4-6)
- 500g all-purpose flour
- 200g sugar
- 250ml milk
- 100g unsalted butter, softened
- 3 large eggs
- 10g dry yeast
- 1 teaspoon vanilla extract
- 1 teaspoon salt
- 150g mixed nuts (almonds, walnuts, hazelnuts)
- 150g mixed dried fruits (raisins, figs, apricots)
- Zest of 1 lemon
- Powdered sugar (for dusting)
Cooking Instructions
- Prepare the Yeast Mixture: In a small bowl, combine the warm milk (not hot) and sugar. Sprinkle the dry yeast over the top and let it sit for about 10 minutes, or until it becomes frothy. This step activates the yeast, which is essential for the cake to rise.
- Mix Dry Ingredients: In a large mixing bowl, sift together the all-purpose flour and salt. This guarantees that the flour is aerated and free of lumps, which contributes to a lighter cake texture.
- Combine Wet Ingredients: In a separate bowl, beat the eggs and then add the softened butter, vanilla extract, and lemon zest. Mix well until all ingredients are thoroughly combined.
- Combine Everything: Add the frothy yeast mixture and the egg mixture to the dry ingredients. Stir everything together using a wooden spoon or spatula until a sticky dough forms. This dough will be quite wet, which is normal for Bolo Rainha.
- Knead the Dough: Lightly flour your work surface and turn the dough out onto it. Knead the dough for about 5-10 minutes until it becomes smooth and elastic. This step helps develop the gluten, giving the cake its structure.
- Add Nuts and Fruits: Gently fold in the mixed nuts and dried fruits into the dough, ensuring they’re evenly distributed throughout. Be careful not to overmix, as this can toughen the dough.
- First Rise: Place the dough in a lightly greased bowl and cover it with a clean kitchen towel. Allow it to rise in a warm place for about 1-2 hours, or until it has doubled in size.
- Shape the Cake: Once the dough has risen, punch it down to release the air. Shape it into a round cake or a ring on a parchment-lined baking tray. Make a small hole in the center if desired, resembling a crown.
- Second Rise: Cover the shaped dough with the kitchen towel again and let it rise for another 30-45 minutes, until puffy.
- Bake the Cake: Preheat your oven to 180°C (350°F). Bake the cake for about 30-35 minutes or until golden brown and a toothpick inserted into the center comes out clean.
- Cool and Serve: Once baked, remove the cake from the oven and let it cool on a wire rack. Dust with powdered sugar before serving.
Extra Tips
When baking Bolo Rainha, feel free to experiment with the types of nuts and dried fruits you use to make it your own. For added flavor, consider soaking the dried fruits in a bit of rum or orange juice before mixing them into the dough.
Additionally, if you’re looking for a richer taste, you can substitute some of the milk with buttermilk. Always verify that your ingredients are at room temperature for better incorporation. Enjoy your homemade Bolo Rainha as a delightful treat for family and friends!