

When I think of Portuguese seafood, I can almost taste the ocean breeze. Each dish, from grilled sardines to prawn piri-piri, celebrates coastal traditions. I’m excited to share these recipes, bringing the sea’s flavors to your kitchen. Let’s explore these tangy delights together. Are you ready to enjoy this culinary adventure?
Grilled Sardines With Lemon and Garlic
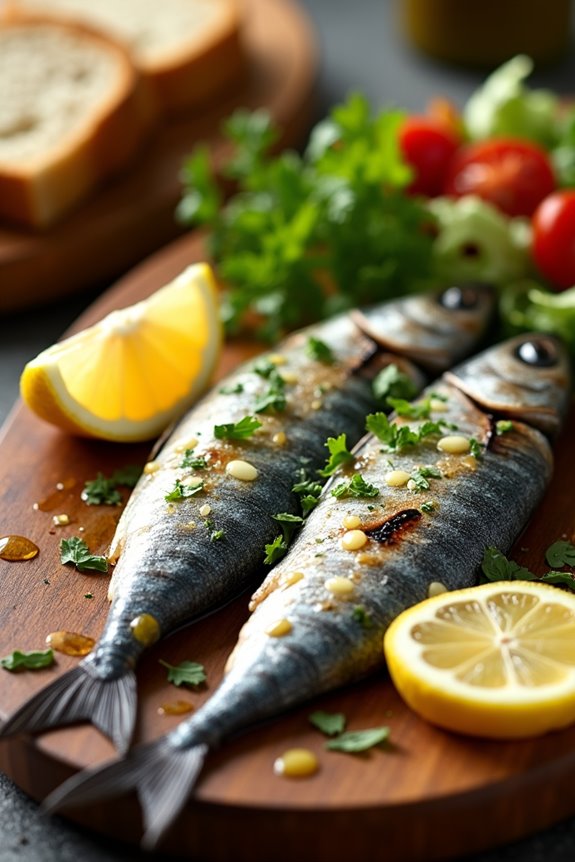
Grilled Sardines with Lemon and Garlic is a quintessential Portuguese dish that celebrates the fresh, vibrant flavors of the sea. Sardines aren’t only delicious but also packed with omega-3 fatty acids, making them a healthy choice for seafood lovers. This dish highlights the natural taste of the fish, enhanced by the zesty brightness of lemon and the aromatic allure of garlic.
Whether enjoyed as a main course or as part of a festive gathering, grilled sardines are sure to impress your guests with their simplicity and flavor.
To prepare this delightful dish, it’s important to use fresh sardines, which can often be found at local fish markets. The grilling process brings out the rich flavors of the sardines while the lemon and garlic add a delightful tanginess. Pair this dish with crusty bread and a simple salad for a complete meal that transports you straight to the sun-soaked shores of Portugal.
Ingredients (serving size: 4-6 people)
- 12 fresh sardines, cleaned and gutted
- 4 tablespoons olive oil
- 4 cloves garlic, minced
- 2 lemons (1 for juice, 1 sliced into wedges)
- Salt and pepper to taste
- Fresh parsley, chopped (for garnish)
Cooking Instructions
- Prepare the Sardines: Start by cleaning the sardines thoroughly under cold water. Make sure to remove any remaining scales and pat them dry with a paper towel. Place the cleaned sardines in a large bowl.
- Marinate the Sardines: In a separate small bowl, mix together the olive oil, minced garlic, lemon juice, salt, and pepper. Pour this marinade over the sardines, making sure they’re well coated. Allow the sardines to marinate for at least 20-30 minutes to absorb the flavors.
- Preheat the Grill: While the sardines are marinating, preheat your grill to medium-high heat. If using a charcoal grill, wait until the coals are ashen and glowing. If using a gas grill, allow it to heat for 10-15 minutes.
- Grill the Sardines: Once the grill is hot, carefully place the sardines directly on the grill grates. Grill for about 3-4 minutes on each side, or until the skin is crispy and the fish is cooked through. Be careful when flipping the sardines, as they’re delicate.
- Serve: Remove the grilled sardines from the grill and place them on a serving platter. Garnish with fresh parsley and serve with lemon wedges on the side for an extra burst of flavor.
Extra Tips
For the best results, choose sardines that are firm and shiny, indicating their freshness. If you prefer, you can also add other herbs such as thyme or oregano to the marinade for a different twist.
Additionally, consider serving the grilled sardines with a drizzle of extra virgin olive oil or a sprinkle of sea salt just before serving to enhance the flavors even more. Enjoy your culinary journey to Portugal!
Spicy Prawn Piri-Piri
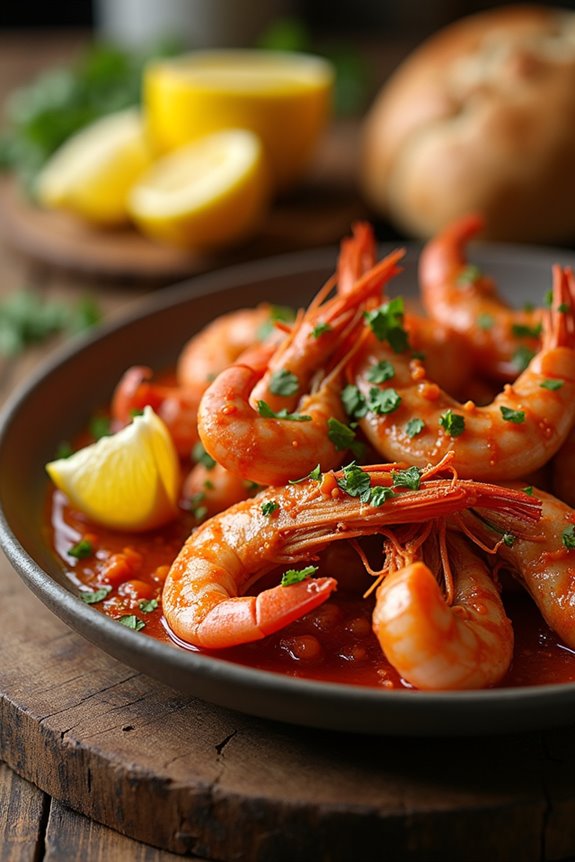
Spicy Prawn Piri-Piri is a vibrant and flavorful dish that embodies the essence of Portuguese cuisine. Originating from the coastal regions of Portugal, this dish showcases the perfect balance of spices and heat, making it a favorite among seafood lovers. The use of fresh prawns, marinated in a zesty Piri-Piri sauce, elevates the dish to an irresistible level, providing a delightful kick that tantalizes the taste buds.
Whether served as a main course or an appetizer, Spicy Prawn Piri-Piri is bound to impress your guests and leave them craving more. This recipe emphasizes the use of high-quality prawns, as their natural sweetness pairs beautifully with the spicy marinade. The Piri-Piri sauce, made from a blend of chili peppers, garlic, and other aromatic ingredients, can be adjusted to suit your desired spice level.
Serve the prawns with crusty bread or over a bed of rice to soak up the delicious sauce, and enjoy a taste of Portugal in the comfort of your home.
Ingredients (Serves 4-6):
- 1 kg (2.2 lbs) large raw prawns, deveined and shelled
- 4 tablespoons Piri-Piri sauce
- 4 cloves garlic, minced
- 1 teaspoon smoked paprika
- 1 teaspoon salt
- ½ teaspoon black pepper
- Juice of 1 lemon
- 2 tablespoons olive oil
- Fresh parsley, chopped (for garnish)
- Lemon wedges (for serving)
Cooking Instructions:
- Prepare the Prawns: Begin by cleaning the prawns thoroughly. If they aren’t already deveined, make a shallow cut along the back of each prawn and remove the intestinal tract. Rinse them gently under cold water and pat them dry with paper towels.
- Make the Marinade: In a large mixing bowl, combine the Piri-Piri sauce, minced garlic, smoked paprika, salt, black pepper, lemon juice, and olive oil. Whisk the ingredients together until well blended, creating a flavorful marinade for the prawns.
- Marinate the Prawns: Add the cleaned prawns to the bowl with the marinade. Gently toss the prawns to guarantee they’re evenly coated. Cover the bowl with plastic wrap and let the prawns marinate in the refrigerator for at least 30 minutes to allow the flavors to meld.
- Cook the Prawns: Heat a large skillet or grill pan over medium-high heat. Once hot, add the marinated prawns in a single layer. Cook for about 2-3 minutes on each side or until the prawns turn pink and opaque, indicating they’re cooked through. Be careful not to overcook them, as they can become rubbery.
- Serve: Once cooked, remove the prawns from the heat and transfer them to a serving platter. Garnish with freshly chopped parsley and serve with lemon wedges on the side. Enjoy the dish with crusty bread or over rice to soak up the flavors.
Extra Tips:
When preparing Spicy Prawn Piri-Piri, you can adjust the level of spiciness by adding more or less Piri-Piri sauce based on your preference.
For an extra flavor boost, consider grilling the prawns instead of pan-frying them for a smoky char. If you want to add some extra dimension to the dish, you can include sliced bell peppers or onions in the marinade before cooking. This not only enhances the flavor but also adds a colorful presentation to your plate.
Enjoy your culinary adventure with this delightful Portuguese seafood recipe!
Bacalhau À Brás (Codfish Brás Style)

Bacalhau À Brás is a traditional Portuguese dish that highlights the beloved bacalhau, or codfish, in a delightful and comforting way. This recipe combines shredded cod with finely chopped onions, garlic, and crispy fried potatoes, all bound together with scrambled eggs, and garnished with olives and parsley. The dish is celebrated not only for its rich flavors but also for its simplicity, making it a favorite among families and friends during gatherings.
The origins of Bacalhau À Brás can be traced back to Lisbon, where it was created by a cook named Brás. The dish has since become a staple in Portuguese cuisine, often enjoyed during festive occasions, especially around Christmas and Easter. Its unique combination of textures and flavors creates a satisfying meal that can be served as a main dish or as part of a larger feast, showcasing the versatility of codfish in Portuguese cooking.
Ingredients (Serves 4-6):
- 400g salted codfish (bacalhau), desalted and cooked
- 4 medium potatoes, peeled and cut into matchsticks
- 1 large onion, finely chopped
- 3 cloves of garlic, minced
- 6 large eggs
- 1/4 cup of fresh parsley, chopped
- 1/4 cup of black olives, pitted and sliced
- Salt and pepper to taste
- Olive oil for frying
Instructions:
- Prepare the Codfish: Begin by desalting the codfish if it’s not already done. Soak it in cold water for 24-48 hours, changing the water several times. Once desalted, boil the codfish in water for about 15 minutes until cooked. Remove from water, allow it to cool, then shred the fish into bite-sized pieces, making sure to remove any bones or skin.
- Fry the Potatoes: In a large frying pan, heat a generous amount of olive oil over medium heat. When the oil is hot, add the matchstick potatoes and fry until they’re golden and crispy, about 5-7 minutes. Remove the fried potatoes from the pan and drain them on paper towels to absorb excess oil. Season with a pinch of salt.
- Sauté Onions and Garlic: In the same pan, add a little more olive oil if necessary, and reduce the heat to medium-low. Add the chopped onions and sauté until they become translucent, about 5 minutes. Add the minced garlic and cook for another minute, until fragrant.
- Combine Ingredients: Add the shredded codfish to the pan with the onions and garlic. Gently stir to combine and cook for about 3-4 minutes, allowing the flavors to meld together. Then, carefully fold in the fried potatoes.
- Add the Eggs: In a separate bowl, whisk the eggs together until well combined. Pour the eggs over the codfish and potato mixture in the pan. Cook gently, stirring continuously to scramble the eggs with the other ingredients. Remove from heat when the eggs are just set but still soft and creamy.
- Serve: Transfer the Bacalhau À Brás to a serving dish. Garnish with chopped parsley and sliced black olives. Serve immediately while it’s warm, accompanied by crusty bread if desired.
Extra Tips:
When preparing Bacalhau À Brás, make sure that the codfish is adequately desalted to avoid an overly salty dish. For added flavor, you can include a touch of paprika or even a splash of white wine during the sautéing process of the onions and garlic.
If you want to make the dish even heartier, consider adding peas or bell peppers for extra color and nutrition. Enjoy your culinary adventure in Portuguese cuisine!
Caldeirada (Portuguese Fish Stew)
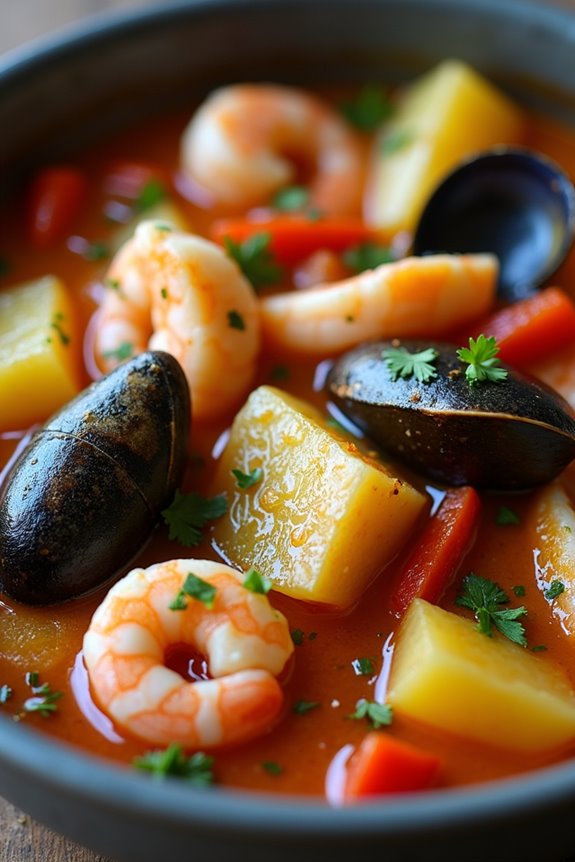
Caldeirada is a traditional Portuguese fish stew that embodies the rich maritime culture of Portugal. This hearty dish is a celebration of fresh seafood, vegetables, and aromatic spices, making it a perfect choice for family gatherings or cozy dinners.
With its origins tracing back to fishing communities, Caldeirada showcases the ocean’s bounty and highlights the significance of seasonal ingredients. Each family may have their own variation, but the essence remains the same: a comforting and flavorful stew that warms the heart.
The beauty of Caldeirada lies in its versatility. You can use a variety of fish and shellfish depending on what’s available and in season. The stew is typically flavored with onions, garlic, tomatoes, and a hint of white wine, creating a fragrant broth that complements the seafood perfectly.
Served with crusty bread or over rice, Caldeirada is a dish that not only nourishes the body but also brings people together around the table.
Ingredients (Serves 4-6)
- 1 kg (2.2 lbs) assorted fish (such as cod, hake, or snapper)
- 300 g (10.5 oz) shrimp, peeled and deveined
- 300 g (10.5 oz) mussels, cleaned
- 500 g (1.1 lbs) potatoes, peeled and sliced
- 2 large onions, chopped
- 4 cloves garlic, minced
- 3 large ripe tomatoes, chopped
- 1 red bell pepper, sliced
- 1 green bell pepper, sliced
- 1 cup white wine
- 4 cups fish stock or water
- 1 bay leaf
- 1 tsp paprika
- Salt and pepper to taste
- Fresh parsley, chopped (for garnish)
- Olive oil
Cooking Instructions
- Prepare the Ingredients: Begin by gathering all the ingredients. Chop the onions, garlic, and tomatoes, and slice the bell peppers. Clean the seafood, ensuring everything is fresh and ready for cooking. This preparation will streamline the cooking process.
- Sauté the Aromatics: In a large pot or Dutch oven, heat a generous drizzle of olive oil over medium heat. Add the chopped onions and garlic, sautéing until they become translucent and fragrant. This step is vital as it builds the base flavor for the stew.
- Add the Vegetables: Stir in the chopped tomatoes and sliced bell peppers. Cook for about 5-7 minutes, allowing the vegetables to soften and release their juices. This creates a delicious foundation for the stew.
- Incorporate the Potatoes: Add the sliced potatoes to the pot, followed by the paprika, bay leaf, salt, and pepper. Mix everything well, and cook for another 5 minutes. The potatoes will absorb the flavors and begin to cook through.
- Pour in the Wine and Stock: Carefully add the white wine to the pot, scraping up any bits stuck to the bottom. Then pour in the fish stock (or water), ensuring that all the ingredients are submerged. Bring the mixture to a gentle simmer.
- Add the Seafood: Once the broth is simmering, gently add the assorted fish, shrimp, and mussels to the pot. Stir carefully to avoid breaking the fish. Cover and simmer for about 15-20 minutes, or until the seafood is cooked through and the mussels have opened.
- Final Touches: Taste the stew and adjust seasoning with more salt and pepper if needed. Remove from heat and discard any mussels that didn’t open. Garnish with freshly chopped parsley before serving.
Extra Tips
When making Caldeirada, it’s essential to use the freshest seafood available for the best flavor. Feel free to experiment with different types of fish or shellfish according to your preference.
Additionally, allow the stew to sit for a few minutes after cooking; this will help the flavors meld together even more. Pair the dish with crusty bread for dipping into the flavorful broth, and enjoy a taste of Portuguese tradition right at home!
Octopus Salad With Olive Oil and Vinegar
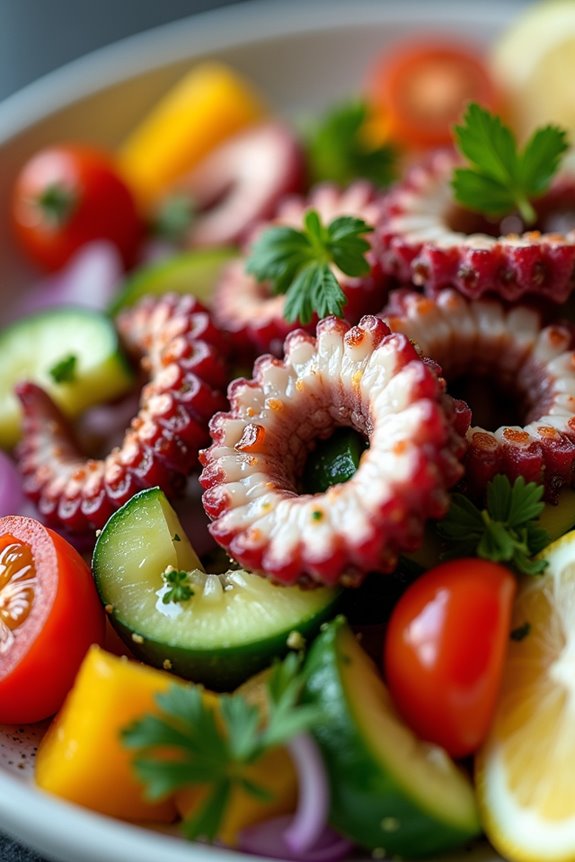
Octopus salad is a delightful and invigorating dish that highlights the rich flavors of the sea, making it a popular choice in Portuguese cuisine. This simple yet elegant salad combines tender octopus with fresh vegetables, olive oil, and vinegar, creating a dish that’s perfect as an appetizer or a light meal.
The key to a successful octopus salad is in the cooking process; the octopus should be cooked until tender but not overdone, guaranteeing it retains its delicate texture. This salad isn’t only delicious but also visually appealing, with vibrant colors and textures that make it a feast for the eyes as well as the palate.
The addition of fresh herbs, such as parsley or cilantro, along with the tanginess of vinegar and the richness of olive oil, brings all the flavors together beautifully. Serve it chilled or at room temperature for the best experience.
Ingredients (serving size: 4-6 people)
- 1 kg octopus
- 2 bay leaves
- 1 onion, halved
- 2 cloves garlic, smashed
- 1 medium cucumber, diced
- 1 bell pepper, diced
- 1 small red onion, finely chopped
- 1/2 cup cherry tomatoes, halved
- 1/4 cup fresh parsley, chopped
- 1/4 cup olive oil
- 2 tablespoons red wine vinegar
- Salt and pepper to taste
- Lemon wedges, for serving (optional)
Cooking Instructions
- Prepare the Octopus: Start by cleaning the octopus under cold running water. Remove the beak and ink sac if not already done. Place the octopus in a large pot and add enough water to cover it. Add the bay leaves and halved onion to the pot for flavor.
- Cook the Octopus: Bring the pot of water to a boil over medium-high heat. Once boiling, reduce the heat to low and let it simmer for about 40-50 minutes or until the octopus is tender. To check, pierce the thickest part with a fork; it should easily penetrate. Once cooked, remove the octopus from the water and set it aside to cool.
- Chop the Ingredients: While the octopus is cooling, prepare the vegetables. Dice the cucumber, bell pepper, and finely chop the red onion. Halve the cherry tomatoes and chop the fresh parsley. Place all the chopped vegetables into a large mixing bowl.
- Slice the Octopus: Once the octopus has cooled enough to handle, slice it into bite-sized pieces. Add the sliced octopus to the bowl with the vegetables.
- Make the Dressing: In a small bowl, whisk together the olive oil, red wine vinegar, salt, and pepper. Adjust seasoning to taste. Pour the dressing over the octopus and vegetable mixture, tossing gently to combine all ingredients.
- Chill and Serve: Cover the bowl with plastic wrap and refrigerate the salad for at least 30 minutes to allow the flavors to meld. Serve chilled or at room temperature, garnished with lemon wedges if desired.
Extra Tips
For an extra layer of flavor, consider adding some capers or olives to the salad. If you prefer a bit of heat, a pinch of red pepper flakes can be added to the dressing.
Additionally, be certain not to overcook the octopus, as this can result in a rubbery texture. Cooking it until just tender will yield the best results. Enjoy the salad as a starter or alongside crusty bread to soak up the delicious dressing!
Clams Bulhão Pato
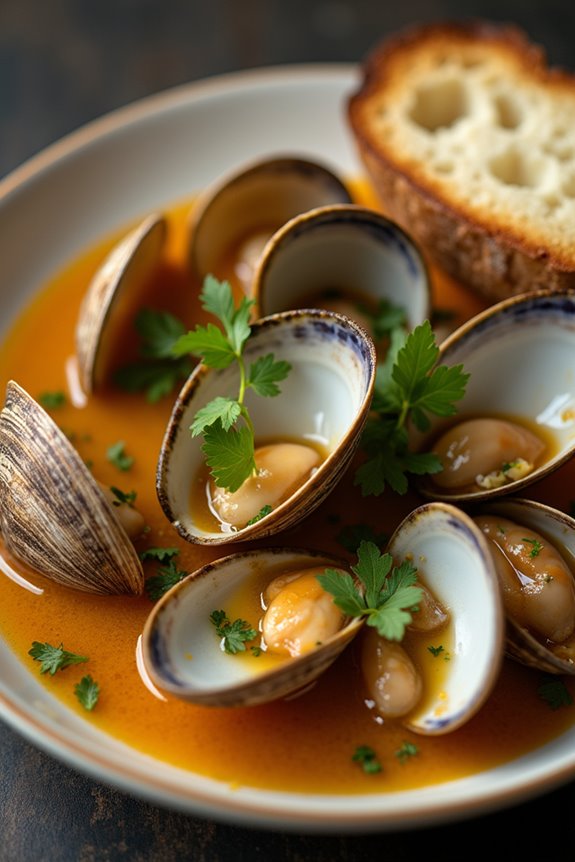
Clams Bulhão Pato is a classic Portuguese dish that highlights the natural sweetness and briny flavor of fresh clams, enhanced with aromatic herbs and zesty citrus. Named after the 19th-century poet Bulhão Pato, this dish is a celebration of simple yet robust ingredients that come together to create a rich and flavorful experience.
Traditionally served as a starter or appetizer, Clams Bulhão Pato is often accompanied by crusty bread, perfect for soaking up the savory broth.
This recipe is straightforward and quick to prepare, making it an ideal choice for both casual family dinners and festive gatherings. With each bite, you’ll enjoy the tender clams complemented by the fragrant garlic, fresh coriander, and a splash of white wine that elevates the dish.
Whether you’re a seasoned cook or trying your hand at Portuguese cuisine for the first time, Clams Bulhão Pato is sure to impress your guests and leave them wanting more.
Ingredients (Serves 4-6)
- 2 pounds fresh clams (such as littlenecks or Manila clams)
- 4 tablespoons olive oil
- 4 cloves garlic, minced
- 1 cup dry white wine
- 1 bunch fresh coriander, chopped
- Juice of 1 lemon
- Zest of 1 lemon
- Salt and pepper to taste
- Crusty bread, for serving (optional)
Cooking Instructions
- Clean the Clams: Start by rinsing the clams under cold water to remove any sand or grit. Soak them in a bowl of cold water for about 30 minutes to allow any remaining sand to settle at the bottom. Rinse again before cooking.
- Sauté the Garlic: In a large, heavy-bottomed pot or skillet, heat the olive oil over medium heat. Add the minced garlic and sauté for 1-2 minutes until fragrant, being careful not to let it brown.
- Add the Clams: Once the garlic is aromatic, add the cleaned clams to the pot. Stir well to coat the clams in the garlic-infused oil.
- Pour in the Wine: Add the dry white wine to the pot and increase the heat to medium-high. Cover the pot and let the clams steam for about 5-7 minutes, or until they open up. Discard any clams that remain closed.
- Season and Garnish: Once the clams are cooked, turn off the heat and add the chopped coriander, lemon juice, and lemon zest. Season with salt and pepper to taste, stirring gently to combine all the ingredients.
- Serve: Transfer the clams and their broth into a serving bowl or platter. Serve immediately with crusty bread on the side for dipping into the flavorful broth.
Extra Tips
For an added depth of flavor, consider using a splash of seafood stock in place of some of the white wine.
Additionally, feel free to experiment with different herbs, such as parsley or oregano, to find your preferred flavor profile. Always verify that you discard any clams that don’t open during cooking, as they may not be safe to eat.
Enjoy your Clams Bulhão Pato with a chilled glass of Portuguese white wine for a truly authentic experience!
Seafood Rice (Arroz De Marisco)
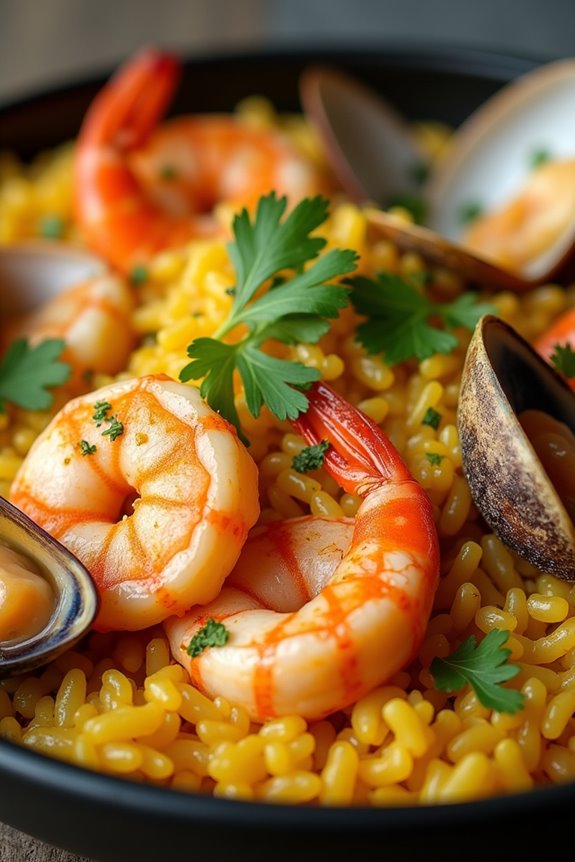
Seafood Rice, or Arroz De Marisco, is a traditional Portuguese dish that showcases the rich flavors of the ocean. This savory rice dish is often enjoyed during family gatherings and special occasions, bringing together a variety of fresh seafood, such as shrimp, clams, mussels, and fish, all cooked harmoniously in a fragrant broth. The rice absorbs the essence of the seafood and spices, creating a comforting meal that’s both hearty and flavorful.
This dish isn’t only a feast for the palate but also a visual delight, as the vibrant colors of the seafood contrast beautifully with the golden rice. The preparation may seem intimidating, but with a good plan and the right ingredients, you can create an impressive seafood rice that will have your guests raving. Whether you serve it on a sunny patio or a cozy dining room, Arroz De Marisco is sure to be a crowd-pleaser.
Ingredients (serving size: 4-6 people)
- 2 cups of short-grain rice (preferably Bomba or Arborio)
- 1 lb of large shrimp, peeled and deveined
- 1 lb of mussels, cleaned and debearded
- 1 lb of clams, cleaned
- 1 lb of white fish fillets, cut into bite-sized pieces (such as cod or haddock)
- 1 medium onion, finely chopped
- 3 cloves of garlic, minced
- 1 red bell pepper, diced
- 1 large tomato, diced
- 4 cups of fish or seafood broth
- 1 cup of dry white wine
- 1 teaspoon of smoked paprika
- 1 teaspoon of saffron threads
- 1/4 cup of fresh parsley, chopped
- Salt and pepper to taste
- Olive oil for cooking
- Lemon wedges for serving
Cooking Instructions
- Prepare the Broth: In a large pot, heat 1 tablespoon of olive oil over medium heat. Add the chopped onion and minced garlic, sautéing until they’re translucent and fragrant. Pour in the fish or seafood broth and white wine, then bring the mixture to a gentle simmer. Add the saffron threads and smoked paprika, stirring to combine. Keep the broth warm over low heat.
- Sauté the Vegetables: In a large, heavy-bottomed skillet or paella pan, add 2 tablespoons of olive oil and heat over medium heat. Once hot, add the diced red bell pepper and sauté for about 3-4 minutes until softened. Then, add the diced tomato and continue cooking for another 2-3 minutes until the mixture is well combined.
- Add the Rice: Stir in the short-grain rice, ensuring that it’s well coated with the vegetable mixture. Toast the rice for about 2 minutes, stirring occasionally. This step enhances the flavor and helps the rice maintain its texture during cooking.
- Incorporate the Broth: Gradually ladle in the warm broth mixture, stirring gently to combine. Season with salt and pepper to taste. Allow the rice to simmer uncovered for about 15-20 minutes, stirring occasionally until the rice is almost cooked and has absorbed most of the liquid.
- Add the Seafood: Gently nestle the shrimp, mussels, clams, and fish pieces into the rice. Cover the skillet with a lid or aluminum foil, and let it cook for an additional 5-10 minutes, or until the seafood is cooked through and the mussels and clams have opened up.
- Finish and Serve: Once the seafood is cooked and the rice is fully tender, remove the skillet from heat. Stir in the chopped parsley for a fresh touch. Let the dish rest, covered, for a few minutes before serving. Serve with lemon wedges on the side for an extra burst of flavor.
Extra Tips
When preparing Seafood Rice, using the freshest seafood available will greatly enhance the dish’s taste. If you can, opt for a mix of seafood that includes shellfish and firm white fish for varied textures.
Additionally, be careful not to overcook the seafood, as it can become rubbery. For added depth, consider incorporating a splash of lemon juice or a sprinkle of chili flakes for a hint of heat. Enjoy your culinary journey into Portuguese cuisine!
Fried Anchovies With Garlic and Parsley

Fried Anchovies with Garlic and Parsley is a delightful dish that showcases the fresh and vibrant flavors of Portuguese cuisine. This dish features small anchovies that are coated in a light batter and fried until they’re crispy and golden brown. The addition of garlic and parsley enhances the flavor, making it an irresistible appetizer or side dish. Perfect for seafood lovers, this recipe is simple to prepare and can be enjoyed by friends and family alike.
In Portugal, anchovies are a staple, often enjoyed in various forms, from marinated to grilled. This particular recipe highlights their delicate taste while adding a fragrant twist through the use of garlic and parsley. Whether served with a squeeze of lemon or alongside a revitalizing salad, Fried Anchovies with Garlic and Parsley are sure to impress. Gather your ingredients and let’s plunge into this delicious seafood experience!
Ingredients (Serves 4-6):
- 500g fresh anchovies, cleaned and filleted
- 1 cup all-purpose flour
- 1/2 teaspoon salt
- 1/4 teaspoon black pepper
- 1/2 cup water (or as needed)
- Vegetable oil for frying
- 4 cloves garlic, minced
- 1/4 cup fresh parsley, chopped
- Lemon wedges for serving
Cooking Instructions:
- Prepare the Anchovies: Start by cleaning the anchovies if they aren’t pre-cleaned. Rinse them under cold water and pat them dry with paper towels. This step is vital to guarantee that the batter adheres well and the anchovies fry up crispy.
- Make the Batter: In a mixing bowl, combine the all-purpose flour, salt, and black pepper. Gradually add water while whisking to form a smooth batter. The consistency should be similar to that of pancake batter—thick enough to coat the fish but not too heavy.
- Heat the Oil: In a large skillet or frying pan, pour vegetable oil to a depth of about 1 inch. Heat the oil over medium-high heat until it reaches around 180°C (350°F). You can test the oil by dropping a small amount of batter into it; if it sizzles and rises to the surface, the oil is ready.
- Coat the Anchovies: Dip each anchovy fillet into the batter, ensuring they’re well coated. Allow any excess batter to drip off before placing them in the hot oil.
- Fry the Anchovies: Carefully place the battered anchovies into the hot oil, a few at a time to avoid overcrowding. Fry them for about 2-3 minutes on each side, or until they’re golden brown and crispy. Use a slotted spoon to turn them gently.
- Drain and Add Flavor: Once fried, remove the anchovies from the oil and place them on a plate lined with paper towels to absorb excess oil. While they’re still hot, sprinkle the minced garlic and chopped parsley over the top, tossing gently to combine.
- Serve: Transfer the fried anchovies to a serving platter and serve immediately with lemon wedges on the side for an added zesty flavor.
Extra Tips:
For an even more flavorful dish, consider marinating the anchovies in olive oil, lemon juice, and herbs for a few hours before frying. This will infuse them with additional flavor.
Also, verify that the oil is at the right temperature before frying to achieve that perfect crispy texture.
Finally, you can experiment with different seasonings in the batter, such as paprika or cayenne pepper, for a spicy twist. Enjoy your culinary adventure with these delicious Fried Anchovies with Garlic and Parsley!
Stuffed Squid With Rice
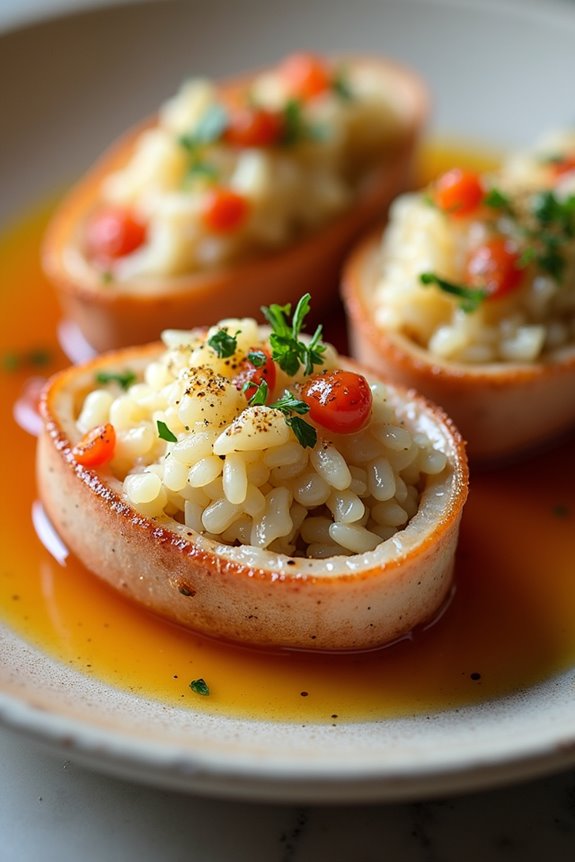
Stuffed squid, or “Choco Recheado,” is a delightful Portuguese seafood dish that beautifully combines tender squid with seasoned rice, creating a savory and satisfying meal. This dish is often served as a main course during festive occasions or family gatherings, showcasing the rich culinary heritage of Portugal. The combination of fresh seafood and the aromatic filling makes it a favorite among seafood lovers, and it’s bound to impress anyone at your dinner table.
Preparing stuffed squid may seem intimidating at first, but with a little patience and attention to detail, you’ll find it to be a rewarding experience. The key is to guarantee that the squid is cleaned properly and that the stuffing is well-seasoned. By following this recipe, you’ll create a dish that’s not only delicious but also visually appealing, making it perfect for special occasions or a cozy family dinner.
Ingredients (Serves 4-6)
- 8 medium-sized squid, cleaned and with tentacles reserved
- 1 cup cooked rice (white or brown)
- 1 medium onion, finely chopped
- 2 cloves garlic, minced
- 1 medium tomato, diced
- 1/4 cup fresh parsley, chopped
- 1/4 cup olive oil
- 1/2 teaspoon paprika
- Salt and pepper, to taste
- 1/2 cup fish or vegetable broth
- 1/2 lemon, juiced
- 1/4 cup grated cheese (optional)
Cooking Instructions
- Prepare the Squid: Clean the squid thoroughly, removing the insides and cartilage. Rinse them under cold water and set aside. Make sure to keep the tentacles for the stuffing. Pat the squid dry with a paper towel.
- Make the Filling: In a large skillet, heat half of the olive oil over medium heat. Add the chopped onion and minced garlic, sautéing until the onion becomes translucent. Stir in the diced tomato, paprika, and chopped tentacles of the squid. Cook for about 5 minutes until everything is well combined and the tomato softens.
- Combine Rice and Seasoning: In a large bowl, mix the cooked rice with the sautéed mixture. Add the chopped parsley, lemon juice, salt, and pepper. If using, add the grated cheese. Stir until all ingredients are evenly incorporated.
- Stuff the Squid: Using a spoon, carefully fill each squid with the rice mixture, leaving a little space at the top for the squid to expand while cooking. Use toothpicks to seal the opening of each squid to prevent the filling from falling out.
- Cook the Stuffed Squid: In the same skillet, add the remaining olive oil over medium heat. Place the stuffed squid in the skillet and cook for about 3-4 minutes on each side until they’re golden and cooked through. Pour in the fish or vegetable broth, cover, and let it simmer for an additional 10 minutes.
- Serve: Once cooked, remove the squid from the skillet and let them rest for a few minutes. Slice the squid into rings if desired, and serve hot with a drizzle of the remaining broth from the skillet.
Extra Tips
When cooking stuffed squid, it’s essential not to overstuff them, as they may burst while cooking. Keeping a close eye on the cooking time will help maintain their tenderness.
You can also customize the filling with various ingredients such as olives, capers, or even nuts for added flavor and texture. Pair the dish with a fresh salad or crusty bread to soak up the delicious juices. Enjoy your meal with a glass of Portuguese wine for a complete culinary experience!
Fish Tacos With Portuguese Flair

Fish tacos are a delightful fusion of flavors, and when you add a Portuguese twist, you elevate the experience to a whole new level. This recipe incorporates traditional Portuguese ingredients such as fresh fish, piri-piri sauce, and a zesty slaw, creating a dish that’s both vibrant and satisfying. The combination of crispy fish, spicy sauce, and crunchy slaw wrapped in warm tortillas makes for a perfect meal to enjoy on a sunny day or a casual gathering with friends.
The key to these Fish Tacos With Portuguese Flair is using fresh fish, ideally something like cod or haddock, which are popular in Portuguese cuisine. The fish is marinated in a mixture of piri-piri sauce and spices, giving it a flavorful kick that pairs beautifully with the creamy slaw. Serve these tacos with lime wedges and a sprinkle of fresh cilantro for an extra burst of flavor.
Ingredients (Serves 4-6 people):
- 1 pound fresh cod or haddock fillets
- 2 tablespoons piri-piri sauce
- 1 teaspoon smoked paprika
- 1 teaspoon garlic powder
- 1 teaspoon salt
- 1/2 teaspoon black pepper
- 1/4 cup all-purpose flour
- 1/4 cup cornmeal
- Vegetable oil for frying
- 8-10 small corn or flour tortillas
- 2 cups shredded cabbage (green or purple)
- 1/2 cup shredded carrots
- 1/4 cup mayonnaise
- 1 tablespoon lime juice
- Fresh cilantro for garnish
- Lime wedges for serving
Cooking Instructions:
- Marinate the Fish: Start by cutting the fish fillets into bite-sized pieces. In a bowl, combine the piri-piri sauce, smoked paprika, garlic powder, salt, and black pepper. Add the fish pieces to the marinade, ensuring they’re well-coated. Cover and let marinate in the refrigerator for at least 30 minutes to allow the flavors to penetrate the fish.
- Prepare the Slaw: While the fish is marinating, prepare the slaw. In a mixing bowl, combine the shredded cabbage and carrots. In a separate small bowl, mix the mayonnaise and lime juice. Pour the dressing over the cabbage and carrots, tossing to combine. Set aside to let the flavors meld.
- Dredge the Fish: After marinating, remove the fish from the refrigerator. In a shallow dish, mix together the flour and cornmeal. Dredge each piece of marinated fish in the flour mixture, ensuring they’re evenly coated for a crispy finish.
- Fry the Fish: Heat vegetable oil in a large frying pan over medium-high heat. Once hot, carefully add the coated fish pieces to the pan, frying in batches if necessary to avoid overcrowding. Cook for about 3-4 minutes on each side, or until golden brown and crispy. Use a slotted spoon to remove the fish and place it on a paper towel-lined plate to drain excess oil.
- Warm the Tortillas: In a separate skillet or directly over the stove flame, warm the tortillas for a few seconds on each side until they’re pliable. This step enhances the flavor and texture of the tacos.
- Assemble the Tacos: To assemble, place a few pieces of fried fish on each tortilla and top with the prepared slaw. Garnish with fresh cilantro and serve with lime wedges on the side for squeezing over the tacos.
Extra Tips:
When preparing Fish Tacos With Portuguese Flair, consider using a variety of fish for different textures and flavors. You can also experiment with additional toppings such as avocado slices, pico de gallo, or a drizzle of extra piri-piri sauce for those who enjoy heat.
If you’re short on time, consider baking the fish instead of frying for a healthier alternative while still retaining great flavor. Be sure to serve these tacos immediately for the best taste and texture!