

There’s something magical about Norwegian cuisine that feels like a warm hug on a chilly day.
From the heartiness of Raspeballer to the unique charm of Lutefisk, these recipes bring a touch of Norway’s rich heritage into your kitchen.
Each dish is like a cozy evening spent in front of a fireplace, capturing the essence of the fjords.
Let’s explore these delightful recipes and bring a taste of Norway to your table.
Raspeballer (Potato Dumplings)
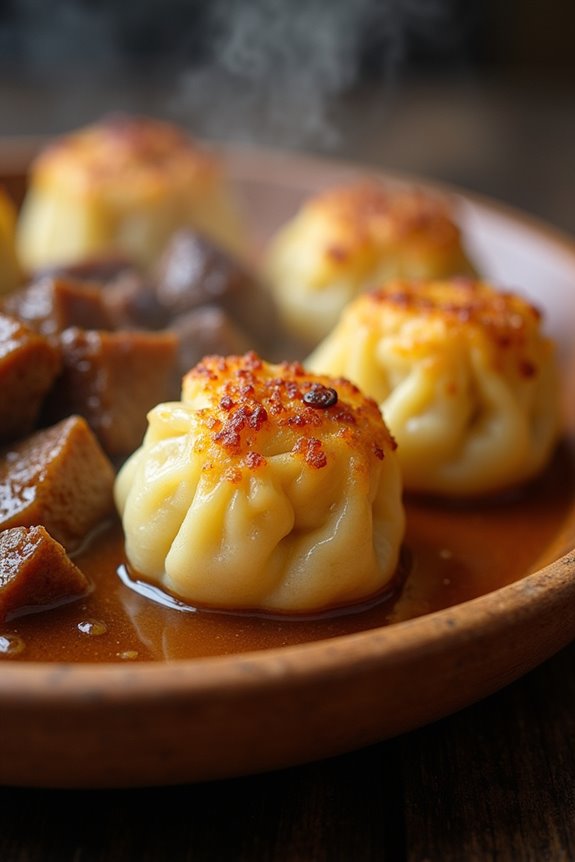
Raspeballer, also known as potato dumplings, is a cherished traditional dish in Norway that showcases the heartiness of Norwegian cuisine. Made primarily from potatoes, this dish is a comforting staple that can be served with a variety of accompaniments, such as meat or gravy. The dumplings are often enjoyed during gatherings and family meals, embodying the warmth of Norwegian culture and the simplicity of its ingredients.
The preparation of Raspeballer is quite straightforward, but it does require some patience and attention to detail to guarantee the dumplings achieve the perfect consistency. The key to a successful batch lies in using the right type of potatoes and achieving the right balance between texture and flavor. Once you master this recipe, you’ll be able to enjoy a truly authentic taste of Norway.
Ingredients (Serves 4-6)
- 1 kg (2.2 lbs) starchy potatoes
- 200 g (7 oz) all-purpose flour
- 1 tsp salt
- 1/4 tsp ground white pepper (optional)
- 1/2 tsp baking powder (optional)
- 200 g (7 oz) meat (such as salted pork, beef, or lamb, cut into small pieces)
- Water (for boiling)
Cooking Instructions
- Prepare the Potatoes: Start by peeling the potatoes and cutting them into quarters. Place them in a large pot of salted water and boil them until they’re fork-tender, which usually takes about 20 minutes. Once cooked, drain the potatoes and allow them to cool slightly.
- Mash the Potatoes: After the potatoes have cooled enough to handle, mash them thoroughly using a potato masher or a ricer. Guarantee there are no lumps, as a smooth consistency will help create the perfect dumplings.
- Make the Dough: In a large mixing bowl, combine the mashed potatoes, flour, salt, and optional white pepper and baking powder. Mix until the ingredients are just combined, being careful not to overwork the dough, which can make the dumplings tough. The dough should be soft but firm enough to hold its shape.
- Shape the Dumplings: Take a portion of the dough and flatten it in your palm. Place a piece of meat in the center, then fold the dough over to encase the meat completely, rolling it gently into a ball shape. Repeat this process until all the dough and meat is used.
- Boil the Dumplings: Fill a large pot with water and bring it to a gentle boil. Carefully drop the dumplings into the boiling water, ensuring not to overcrowd the pot. Allow them to simmer for about 15-20 minutes, or until they float to the surface and are cooked through.
- Serve: Once cooked, use a slotted spoon to remove the dumplings from the pot. Serve them hot with your choice of gravy or alongside meats and vegetables for a complete meal.
Extra Tips
When making Raspeballer, it’s essential to choose starchy potatoes such as Russet or Yukon Gold, as they yield the best texture for the dumplings. If you find the dough too sticky, you can gradually add more flour until it reaches the desired consistency.
Additionally, you can experiment with different fillings, such as smoked fish or vegetables, for a unique twist on this traditional dish. Enjoy your Raspeballer with a side of rich gravy for an authentic Norwegian experience!
Kjøttkaker (Norwegian Meatballs)
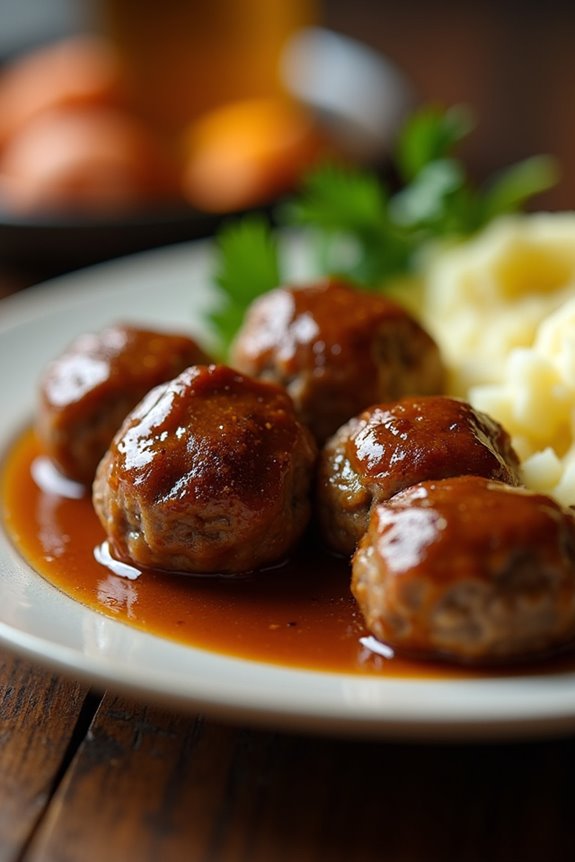
Kjøttkaker, or Norwegian meatballs, are a beloved traditional dish in Norway, often served with rich gravy and a side of potatoes or vegetables. These tender meatballs are typically made from a mix of ground beef and pork, seasoned with a blend of spices, and shaped into hearty balls.
They’re a comforting meal that brings families together, especially during colder months or festive occasions. Making Kjøttkaker is relatively straightforward, and the result is a satisfying dish that captures the essence of Norwegian home-cooked meals.
The meatballs are simmered in a delicious gravy that enhances their flavor and creates a delightful sauce for serving. Whether you’re sharing this dish with family or friends, Kjøttkaker is sure to impress anyone who enjoys traditional Norwegian cuisine.
Ingredients (Serves 4-6):
- 500g ground beef
- 500g ground pork
- 1 medium onion, finely chopped
- 1/2 cup breadcrumbs
- 1/2 cup milk
- 1 egg
- 1 teaspoon salt
- 1/2 teaspoon black pepper
- 1/2 teaspoon ground nutmeg
- 1 tablespoon butter (for frying)
For the gravy:
- 4 tablespoons butter
- 4 tablespoons all-purpose flour
- 4 cups beef broth
- Salt and pepper to taste
Cooking Instructions:
1. Prepare the Meatball Mixture: In a large mixing bowl, combine the ground beef and ground pork. Add the finely chopped onion, breadcrumbs, milk, egg, salt, black pepper, and nutmeg.
Mix everything together thoroughly using your hands or a spoon until well combined.
2. Shape the Meatballs: With your hands, form the mixture into equal-sized meatballs, about the size of a golf ball. Place them on a plate or tray as you shape them to keep them organized.
3. Cook the Meatballs: Heat the butter in a large frying pan over medium heat. Once melted and hot, add the meatballs to the pan, ensuring they aren’t overcrowded. Fry them for about 5-7 minutes on each side until they’re browned and cooked through.
Remove the meatballs from the pan and set aside.
4. Make the Gravy: In the same frying pan, add 4 tablespoons of butter and allow it to melt. Then, whisk in the flour until it forms a paste (roux) and cook for 1-2 minutes. Gradually add the beef broth while continuously whisking to avoid lumps.
Bring the gravy to a simmer, allowing it to thicken for about 5 minutes.
5. Combine Meatballs and Gravy: Once the gravy has thickened, return the meatballs to the pan. Gently coat them in the gravy and let them simmer together for an additional 10 minutes on low heat, allowing the flavors to meld.
6. Serve: Serve the Kjøttkaker hot, drizzled with gravy, alongside boiled or mashed potatoes and seasonal vegetables, if desired.
Extra Tips:
When making Kjøttkaker, feel free to experiment with the spices to suit your taste preferences. Some people enjoy adding a pinch of allspice or ground ginger for a unique twist.
For a heartier meal, serve the meatballs with traditional accompaniments like lingonberry sauce or pickled vegetables. Leftovers can be stored in the refrigerator and are just as delicious when reheated the next day!
Lutefisk (Lye Fish)

Lutefisk is a traditional Norwegian dish that’s steeped in history and culture, often enjoyed during the holiday season, especially around Christmas. This unique dish is made from dried fish, typically cod, that has been soaked in a lye solution, giving it a distinct texture and flavor.
The preparation of lutefisk is an intricate process that requires patience and care, as both the soaking and cooking methods are vital to achieving the desired result. When served, lutefisk is often accompanied by a variety of traditional sides, making it a hearty and memorable meal.
To prepare lutefisk, one must first understand its preparation involves both an initial curing process and a subsequent cooking phase. The lye treatment breaks down the fish proteins, which gives lutefisk its characteristic jelly-like consistency.
While some may be hesitant to try lutefisk due to its unusual texture, those who appreciate it often describe the experience as deeply satisfying and nostalgic. Served with melted butter, mustard, or a sprinkle of fresh herbs, lutefisk can be a delightful dish for adventurous eaters.
Ingredients (Serves 4-6):
- 2 pounds dried cod fish
- 1 cup cold water
- 1/2 cup lye (sodium hydroxide)
- 2 quarts cold water (for soaking)
- 1/2 cup unsalted butter (for serving)
- 1/4 cup mustard (for serving)
- Fresh parsley (for garnish)
- Boiled potatoes (for serving)
- Peas (for serving)
Cooking Instructions:
- Prepare the Lye Solution: In a well-ventilated area, mix 1 cup of cold water with 1/2 cup of lye in a glass or ceramic bowl. Stir carefully until the lye is fully dissolved. Make sure to wear gloves and avoid direct contact with the lye, as it’s caustic.
- Soak the Fish: Place the dried cod fish in a non-reactive container and pour the lye solution over it. Confirm the fish is fully submerged. Cover and let it soak for 2-3 days in a cool place, changing the water daily to prevent excessive lye absorption.
- Rinse the Fish: After soaking, carefully remove the fish from the lye solution and rinse it thoroughly under cold running water for at least 30 minutes to remove any remaining lye. This step is vital to guarantee the fish is safe to eat.
- Soak in Fresh Water: Once rinsed, place the fish in a large bowl of cold water and let it soak for an additional 2-3 days, changing the water daily. This process helps to neutralize the fish and improve its flavor.
- Cook the Lutefisk: Preheat your oven to 375°F (190°C). Place the soaked lutefisk in an oven-safe dish and cover it with aluminum foil. Bake for about 30-40 minutes, or until the fish is tender and flaky.
- Serve: Remove the lutefisk from the oven and serve immediately. Drizzle melted butter over the top, and offer mustard on the side. Garnish with fresh parsley and serve with boiled potatoes and peas for a traditional Norwegian meal.
Extra Tips: When preparing lutefisk, it’s essential to confirm that the lye is handled with care, as it can be harmful if not treated properly.
If you’re new to lutefisk, consider preparing a smaller batch to get accustomed to the process. Additionally, pairing lutefisk with the right sides, like creamy sauces or traditional accompaniments, can enhance the experience and offer a delightful contrast to the fish’s unique texture.
Fårikål (Lamb and Cabbage Stew)
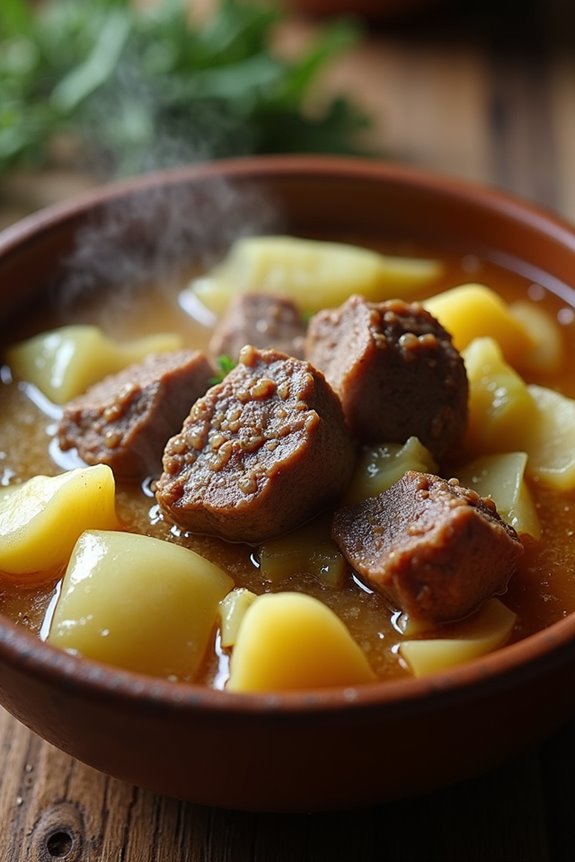
Fårikål, often referred to as Norway’s national dish, is a hearty and comforting stew made primarily of lamb and cabbage. This traditional dish has been enjoyed by Norwegians for generations, especially during the autumn months when the ingredients are at their freshest. The simplicity of the ingredients is what makes this stew so delightful; the flavors meld beautifully over a slow cook, creating a warm and satisfying meal that evokes a sense of home.
The key to a successful fårikål lies in the quality of the lamb and the cabbage. Using bone-in cuts of lamb guarantees that the stew is rich in flavor and the meat remains tender. The cabbage, on the other hand, provides a subtle sweetness that balances out the savory notes of the lamb. This dish is perfect for gatherings, as it can serve 4 to 6 people and is often accompanied by boiled potatoes and a good bread for dipping into the rich broth.
Ingredients (Serves 4-6):
- 1.5 kg lamb (preferably shoulder or leg, cut into chunks)
- 1 large head of green cabbage (approximately 1 kg), cut into wedges
- 6 whole black peppercorns
- 4-5 whole allspice berries
- 2 teaspoons salt (to taste)
- Water (enough to cover the ingredients)
- Fresh parsley (for garnish, optional)
Cooking Instructions:
- Prepare the Ingredients: Begin by cutting the lamb into large chunks, making sure that each piece has some bone to enhance the flavor of the stew. Next, wash the cabbage and slice it into wedges. Set these aside as you prepare to layer your ingredients in the pot.
- Layer the Pot: In a large, heavy-bottomed pot or Dutch oven, start by placing half of the cabbage wedges at the bottom. This will create a bed for the lamb pieces. On top of the cabbage, arrange the chunks of lamb evenly, ensuring that they aren’t overcrowded. Sprinkle the black peppercorns, allspice berries, and salt over the meat.
- Add Remaining Ingredients: Once the lamb is layered, place the remaining cabbage wedges on top of the lamb. This layering technique allows the flavors to infuse properly as the stew cooks. After layering, fill the pot with enough water to just cover the ingredients, taking care not to overfill.
- Cook the Stew: Cover the pot with a lid and bring it to a gentle boil over medium heat. Once boiling, reduce the heat to low and let it simmer for about 2 to 2.5 hours. During this time, the lamb will become tender, and the cabbage will soften while imparting its flavor into the broth. Occasionally check to ascertain the stew isn’t boiling too vigorously; a gentle simmer is ideal.
- Final Touches and Serve: After the cooking time has elapsed, taste the broth and adjust the seasoning with more salt if necessary. Carefully ladle the fårikål into bowls, ensuring each serving has a good mix of lamb and cabbage. Garnish with freshly chopped parsley if desired, and serve hot alongside boiled potatoes and crusty bread.
Extra Tips: When making fårikål, choose a well-marbled cut of lamb for the best flavor and tenderness. If you prefer a thicker broth, you can remove some of the liquid at the end of cooking and reduce it in a separate pot. Additionally, letting the stew sit for a few hours or even overnight in the refrigerator can enhance the flavors even further, making it a fantastic make-ahead option for gatherings.
Enjoy this traditional Norwegian dish with your loved ones, and savor the warmth it brings!
Risengrynsgrøt (Rice Pudding)
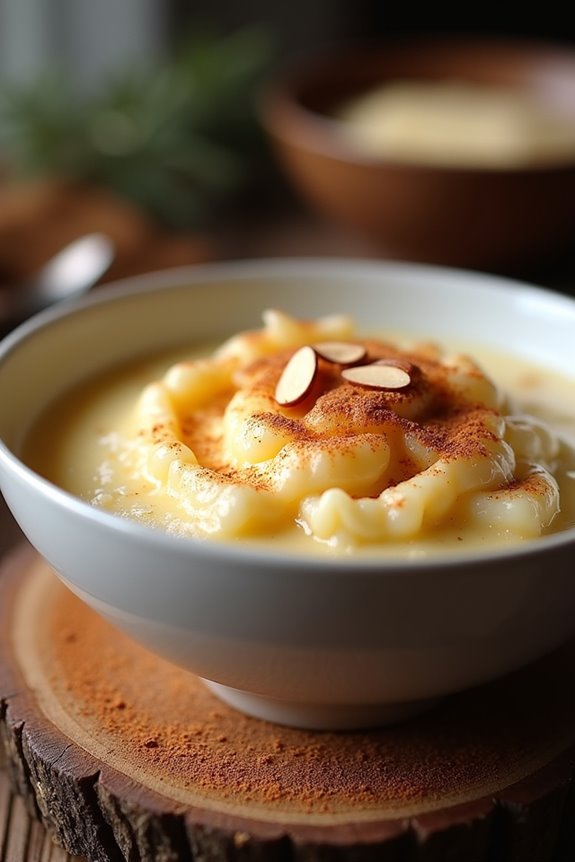
Risengrynsgrøt is a beloved traditional Norwegian dish that embodies the essence of comfort food. This creamy rice pudding is often enjoyed during the colder months and is a staple at Christmas celebrations. The dish is typically served warm, topped with cinnamon and sugar, and sometimes accompanied by a dollop of raspberry sauce or a sprinkle of almonds.
Making risengrynsgrøt is a simple process that allows the flavors to shine through the quality ingredients. The base of this dish consists of short-grain rice, which is cooked slowly in milk until tender and creamy. The result is a rich, velvety pudding that can be enjoyed on its own or dressed up with various toppings. This recipe serves 4-6 people, making it perfect for family gatherings or cozy nights in.
Ingredients:
- 1 cup short-grain rice (such as Arborio)
- 4 cups whole milk
- 1/4 teaspoon salt
- 1/2 cup sugar
- 1 teaspoon vanilla extract (optional)
- Ground cinnamon (for serving)
- Sugar (for serving)
- Slivered almonds or raisins (optional, for garnish)
Cooking Instructions:
- Rinse the Rice: Begin by rinsing the short-grain rice under cold water in a fine mesh strainer. This helps remove excess starch and prevents the rice from becoming too sticky during cooking.
- Cook the Rice: In a large saucepan, combine the rinsed rice, 1 cup of water, and a pinch of salt. Bring to a boil over medium heat. Once boiling, reduce the heat to low, cover the pan, and let it simmer for about 10 minutes, or until the water has been absorbed and the rice is tender.
- Add Milk: Gradually pour in the 4 cups of whole milk, stirring gently to combine. Increase the heat to medium-low, and continue to cook while stirring frequently. This guarantees that the rice doesn’t stick to the bottom of the pan and allows the milk to thicken.
- Sweeten the Mixture: Once the mixture comes to a gentle simmer, add the 1/2 cup of sugar and 1 teaspoon of vanilla extract, if using. Stir well to dissolve the sugar and allow the pudding to cook for an additional 25-30 minutes. Keep stirring occasionally to prevent burning and encourage even cooking.
- Check Consistency: After about 30 minutes, the risengrynsgrøt should be thick and creamy. If it’s too thick, you can add a splash of milk to reach your desired consistency. Once done, remove from heat and let it cool slightly before serving.
- Serve: Spoon the warm rice pudding into bowls. Sprinkle with ground cinnamon and sugar to taste, and add slivered almonds or raisins if desired for garnish.
Extra Tips:
When making risengrynsgrøt, patience is key. Stirring frequently will help achieve a creamy texture and prevent the rice from sticking to the pot.
If you prefer a richer flavor, consider using a combination of whole milk and heavy cream. Additionally, you can prepare the pudding ahead of time and reheat it gently before serving, adding a little milk if it has thickened too much during cooling.
Enjoy this delightful dish with your favorite toppings for an authentic Norwegian experience!
Klippfisk (Dried and Salted Cod)
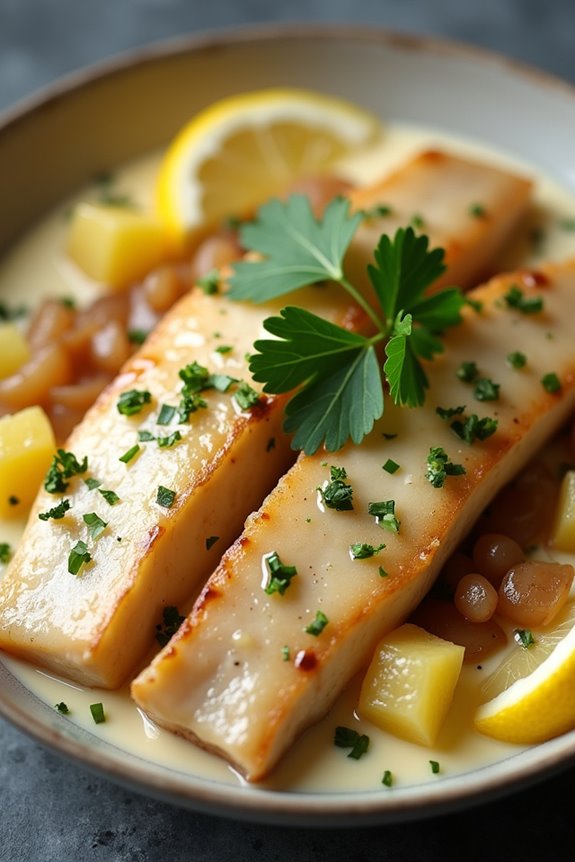
Klippfisk, or dried and salted cod, is a beloved staple in traditional Norwegian cuisine. This method of preserving fish dates back centuries, allowing fishermen to store their catch without refrigeration, while also enhancing the fish’s flavor.
Klippfisk isn’t only a versatile ingredient but also a symbol of Norway’s strong maritime heritage. Today, it’s enjoyed in a variety of dishes, from simple preparations to more elaborate meals that highlight its unique taste and texture.
To prepare Klippfisk, the salted cod must first be soaked to rehydrate and reduce its saltiness. This process can take up to 24 hours, depending on the thickness of the fish. Once properly soaked, the cod can be cooked in a number of ways, often paired with potatoes, vegetables, and rich sauces. The following recipe will guide you through making a traditional Klippfisk dish that serves 4-6 people, bringing a taste of Norway to your table.
Ingredients:
- 1 kg Klippfisk (dried and salted cod)
- 2 large potatoes, peeled and diced
- 1 large onion, sliced
- 2 tablespoons olive oil
- 2 cloves garlic, minced
- 1 cup heavy cream
- 1 teaspoon black pepper
- 1 teaspoon white pepper
- Fresh parsley, chopped (for garnish)
- Lemon wedges (for serving)
Cooking Instructions:
- Soak the Klippfisk: Begin by soaking the Klippfisk in cold water for 24 hours. Change the water several times during this period to guarantee that the salt is adequately leached from the fish. This step is essential for reducing the saltiness and making the fish palatable.
- Prepare the Ingredients: After the soaking period, drain the Klippfisk and cut it into manageable pieces. In a separate pot, peel and dice the potatoes, and slice the onion. Set these ingredients aside for later use.
- Cook the Potatoes: In a large pot, bring salted water to a boil and add the diced potatoes. Cook for about 10-15 minutes, or until they’re tender but not falling apart. Once cooked, drain the potatoes and set them aside.
- Sauté the Onion and Garlic: In a large skillet, heat the olive oil over medium heat. Add the sliced onion and sauté until it becomes translucent, about 5 minutes. Then, add the minced garlic and cook for an additional minute, until fragrant.
- Add the Klippfisk: Gently add the soaked and cut Klippfisk pieces to the skillet with the onions and garlic. Cook for about 5-10 minutes, turning the fish occasionally until it’s heated through and begins to flake.
- Combine with Cream and Potatoes: Pour the heavy cream into the skillet and add the cooked potatoes. Stir gently to combine all the ingredients, and season with black and white pepper. Allow the mixture to simmer for about 5 minutes, letting the flavors meld together.
- Serve: Once everything is heated through, transfer the Klippfisk to a serving platter. Garnish with freshly chopped parsley and serve with lemon wedges on the side for an added zesty touch.
Extra Tips:
When preparing Klippfisk, guarantee you soak the fish thoroughly to achieve the desired flavor and texture. You can vary the seasoning according to your taste; some may prefer to add herbs like dill or thyme.
Additionally, Klippfisk can be served with a side of boiled vegetables or a fresh salad to complement the dish. Enjoy your authentic Norwegian meal!
Koldtbord (Cold Table)
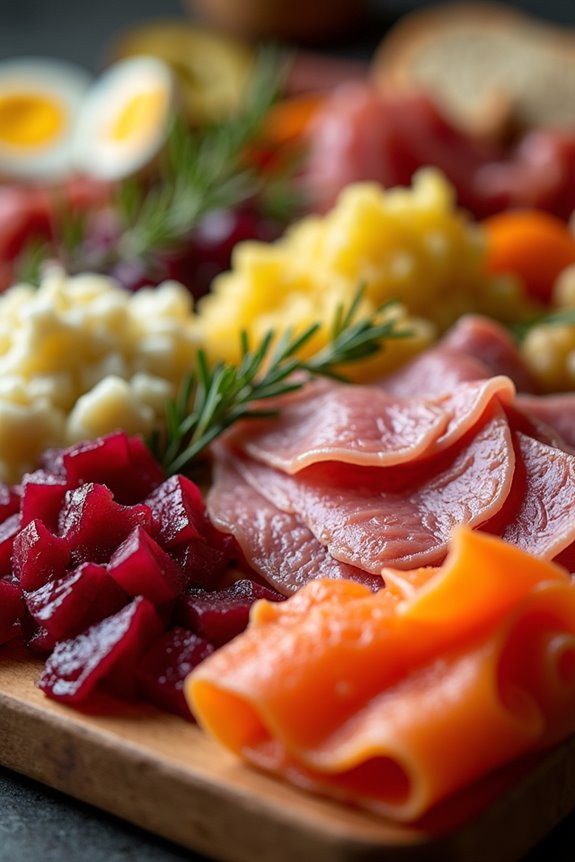
Koldtbord, or Cold Table, is a traditional Norwegian smorgasbord that showcases a delightful variety of cold dishes, perfect for gatherings and celebrations. This dish allows for creativity and personalization, as it can include an assortment of cured meats, fish, cheeses, salads, and pickled vegetables.
The beauty of Koldtbord lies in its presentation and the ability to cater to diverse tastes, making it a popular choice for festive occasions and family gatherings in Norway.
Preparing a Koldtbord isn’t only about the individual components but also how they come together as a cohesive meal. It often features a mix of flavors and textures, from the rich and savory to the tangy and invigorating. Each element is beautifully arranged on a large platter or table, encouraging guests to help themselves and create their own combinations.
This social aspect enhances the dining experience, making it a memorable occasion for everyone involved.
Ingredients (Serves 4-6)
- 200g cured ham (e.g., spekeskinke)
- 200g smoked salmon
- 200g roast beef, thinly sliced
- 150g pickled herring
- 150g cheese (e.g., Jarlsberg or Gouda)
- 4 boiled eggs, quartered
- 1 cucumber, thinly sliced
- 1 small red onion, finely chopped
- 200g potato salad
- 100g beetroot salad
- 100g mixed pickles
- Fresh dill for garnish
- Rye bread or flatbread, for serving
Cooking Instructions
- Prepare the Ingredients: Start by gathering all the ingredients and verifying they’re fresh. Rinse the pickled herring under cold water to reduce the saltiness, and slice the cucumber and onion thinly. Quarter the boiled eggs and set them aside.
- Arrange the Meats: On a large serving platter or board, begin by laying out the cured ham, smoked salmon, and roast beef. Arrange them in a visually appealing manner, perhaps fanning out the slices to create an inviting display.
- Add the Fish: Next, place the pickled herring strategically on the platter. You can either leave it whole or cut it into bite-sized pieces for easier serving. Verify it’s spaced well with the meats to create balance on the board.
- Incorporate the Cheese: Cut the cheese into cubes or slices and add them to the platter. You can also use a cheese knife to create interesting shapes, adding to the visual texture of the Koldtbord.
- Include the Salads: Spoon the potato salad and beetroot salad onto the platter, creating small mounds or using separate bowls if preferred. This helps in keeping the flavors distinct while still being part of the overall presentation.
- Finish with Vegetables: Scatter the cucumber slices and finely chopped red onion around the board. Add the quartered boiled eggs and mixed pickles to fill in any gaps and enhance the variety of colors.
- Garnish and Serve: Finally, sprinkle fresh dill over the entire arrangement for a touch of color and flavor. Provide rye bread or flatbread on the side for guests to enjoy with the various meats and salads.
Extra Tips
When preparing a Koldtbord, consider using seasonal ingredients for a fresh taste. Feel free to customize the components based on preferences or dietary restrictions, such as adding vegetarian options or different types of fish.
Presentation is key, so take your time arranging the items aesthetically on the platter. For added depth of flavor, include a selection of dips like mustard or horseradish sauce, which can complement the meats beautifully. Enjoy the process, and don’t hesitate to invite friends and family to help assemble the dish!
Brunost (Brown Cheese)

Brunost, or brown cheese, is a quintessential part of Norwegian cuisine that has gained popularity beyond its borders. Made from whey, milk, and cream, this unique cheese has a distinctive caramel flavor and a smooth texture that can be enjoyed in various ways. Traditionally, it’s sliced thinly and served on crispbread, toast, or pancakes, making it a delightful breakfast or snack option. Its rich history dates back centuries, and today, it remains a beloved staple in many Norwegian households.
The process of making brunost at home can be quite rewarding. While many people opt to purchase this cheese from stores, making your own allows for customization of flavor and texture. The traditional method involves simmering whey until it thickens and caramelizes, resulting in the sweet, nutty flavor that brunost is known for. With a bit of patience and the right ingredients, you can create this delicious cheese that embodies the essence of Norwegian culinary heritage.
Ingredients (serving size: 4-6 people)
- 2 liters of whey (can be homemade or store-bought)
- 200 ml of cream (heavy or light, as per preference)
- 250 grams of sugar
- 1 teaspoon of salt
- 1 teaspoon of baking soda
- Optional: spices like cardamom or cinnamon for added flavor
Cooking Instructions
- Gather Ingredients: Start by collecting all your ingredients and equipment. You’ll need a large pot to cook the whey and a wooden spoon for stirring. Make sure you have a container ready for storing the finished brunost.
- Prepare the Whey: If using homemade whey, confirm it’s strained and free of any curds. Pour the whey into the large pot and bring it to a gentle simmer over medium heat. This process will take some time, so be patient.
- Simmer and Stir: Once the whey starts simmering, reduce the heat to low. Keep stirring the whey occasionally to prevent it from sticking to the bottom of the pot. Continue this process for about 1-2 hours until the whey reduces considerably and thickens.
- Add Ingredients: When the whey has reduced, add the cream, sugar, and salt to the pot. Stir well to combine all the ingredients. You may also choose to add spices like cardamom or cinnamon at this stage for additional flavor.
- Caramelization: Continue to cook the mixture over low heat, stirring often. This step is essential as it allows the sugars to caramelize, giving the brunost its signature flavor. Cook until the mixture turns a deep brown color and thickens to a spreadable consistency (about 30-45 minutes).
- Add Baking Soda: Once the desired color and thickness are achieved, remove the pot from heat and quickly stir in the baking soda. This will cause the mixture to bubble and foam, which is normal. Stir until the baking soda is fully incorporated.
- Cool and Store: Pour the mixture into a mold or container and let it cool to room temperature. Once cooled, it can be refrigerated for a few hours until it firms up.
- Serve: Slice the brunost thinly and serve it on crispbread, toast, or pancakes. Enjoy this sweet and savory cheese as part of your meal!
Extra Tips
When making brunost, be patient with the caramelization process; rushing it can result in a burnt taste. If you find the mixture is too thick or is sticking too much, you can add a little bit of water or cream to adjust the consistency.
Additionally, experimenting with different spices can yield exciting flavor variations—don’t be afraid to try out your favorites! Always store brunost in an airtight container in the refrigerator, where it can last for up to a month.
Lefse (Soft Flatbread)

Lefse is a traditional Norwegian soft flatbread that has been cherished for generations. This delightful bread is made primarily from potatoes, flour, and butter, resulting in a soft, pliable texture that pairs beautifully with a variety of toppings.
Often enjoyed during festive occasions and family gatherings, lefse can be served with butter and sugar, or even used as a wrap for savory fillings. Making lefse is a labor of love, but the outcome is a delicious treat that embodies the essence of Norwegian cuisine.
The process of making lefse involves cooking, mashing, and rolling dough into thin rounds before cooking them on a hot griddle. While it may sound intimidating, the steps are straightforward, and with a little practice, you’ll be able to create perfectly cooked lefse that your family and friends will adore.
Whether you’re new to Norwegian cooking or looking to connect with your heritage, this recipe is a wonderful way to indulge in a beloved classic.
Ingredients (Serves 4-6)
- 2 cups mashed potatoes (about 2 large potatoes)
- 1/4 cup butter, softened
- 1/4 cup heavy cream
- 1/4 teaspoon salt
- 2 cups all-purpose flour (plus extra for rolling)
Cooking Instructions
- Prepare the Mashed Potatoes: Begin by peeling and chopping the potatoes into even-sized pieces. Boil them in salted water until tender, about 15-20 minutes. Drain well and mash until smooth. Allow the mashed potatoes to cool to room temperature.
- Combine the Ingredients: In a large mixing bowl, combine the cooled mashed potatoes, softened butter, heavy cream, and salt. Mix well until all ingredients are thoroughly combined. Gradually add the flour, mixing until a soft dough forms. The dough should be slightly sticky but manageable.
- Chill the Dough: Wrap the dough in plastic wrap and refrigerate for at least 30 minutes. Chilling helps the dough to firm up, making it easier to roll out into thin rounds.
- Roll out the Lefse: On a well-floured surface, divide the dough into 6-8 equal portions. Take one portion and roll it out into a thin circle, about 1/8 inch thick. Use a rolling pin and sprinkle flour as needed to prevent sticking.
- Cook the Lefse: Preheat a griddle or non-stick skillet over medium heat. Carefully transfer the rolled-out dough onto the hot surface. Cook for about 1-2 minutes on each side, until lightly browned and cooked through. Adjust the heat as necessary to prevent burning.
- Cool and Serve: Once cooked, transfer the lefse to a clean kitchen towel and cover to keep warm. Repeat the rolling and cooking process for the remaining portions of dough. Serve warm with butter and sugar, or your favorite fillings.
Extra Tips
When making lefse, make certain that your mashed potatoes are as dry as possible to avoid a sticky dough. If your potatoes are too wet, you may need to adjust the amount of flour used.
Additionally, using a lefse grill or a smooth, hot surface is ideal for cooking; however, a regular non-stick skillet will work just fine. Don’t be afraid to experiment with different toppings, such as cinnamon sugar or savory meats, to find your favorite way to enjoy this traditional dish!
Kransekake (Almond Ring Cake)
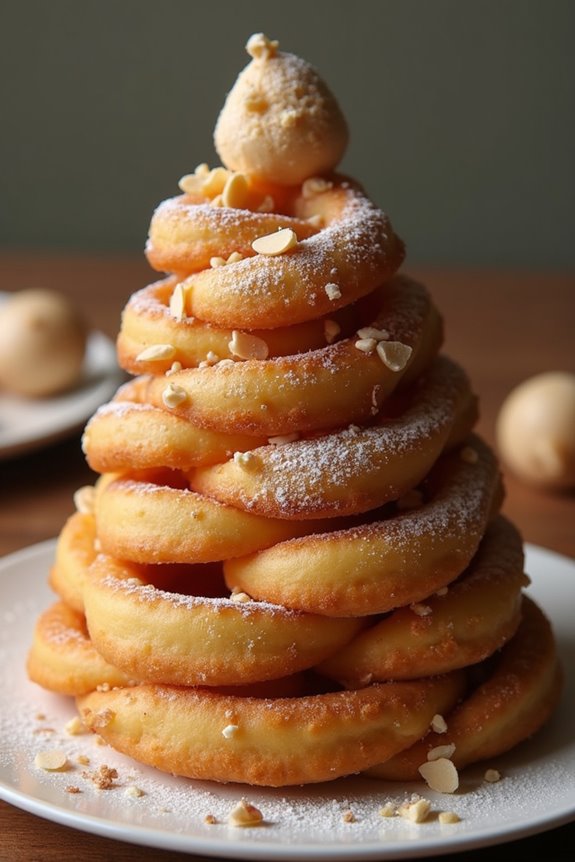
Kransekake, often referred to as the “cake of rings,” is a traditional Norwegian dessert that’s especially popular during festive occasions such as weddings, Christmas, and New Year’s celebrations. This elegant cake is made primarily from almond flour, sugar, and egg whites, resulting in a chewy, sweet treat that’s both visually stunning and delicious.
The cake consists of concentric rings of varying sizes, stacked upon one another to create a beautiful tower. Decorated with icing and sometimes filled with marzipan, Kransekake isn’t only a dessert but also a centerpiece for any celebration.
Making Kransekake can be a rewarding experience, as it requires some attention to detail and precision to achieve the perfect texture and shape. While the recipe may seem intimidating, with a bit of practice, anyone can master this traditional dish.
It’s important to use finely ground almond flour for the best results, as this will guarantee that your cake has the right consistency. Once baked and assembled, the Kransekake is sure to impress your guests and bring a touch of Norwegian culture to your table.
Ingredients (serving size: 4-6 people)
- 250g almond flour
- 250g powdered sugar
- 2 large egg whites
- 1 teaspoon almond extract
- 1/4 teaspoon salt
- 200g icing sugar (for decoration)
- Water (as needed for icing)
Cooking Instructions
- Preheat the Oven: Start by preheating your oven to 180°C (350°F). This guarantees that the cake bakes evenly and achieves a nice golden color.
- Prepare the Dough: In a large mixing bowl, combine the almond flour, powdered sugar, and salt. Mix well to combine the dry ingredients. In a separate bowl, whisk the egg whites until frothy but not stiff. Gradually add the egg whites and almond extract to the dry mixture, stirring until a smooth, pliable dough forms.
- Shape the Rings: Divide the dough into several equal portions. Roll each portion into long, thin ropes, about 1 cm in diameter. Shape these ropes into rings, placing them on a baking sheet lined with parchment paper. Make sure to leave enough space between each ring, as they’ll expand slightly while baking.
- Bake: Place the baking sheet in the preheated oven and bake for approximately 15-20 minutes, or until the rings are lightly golden and firm to the touch. Keep an eye on them, as they can brown quickly. Once baked, remove from the oven and allow the rings to cool completely on a wire rack.
- Assemble the Cake: Once the rings are completely cooled, stack them from the largest ring at the bottom to the smallest at the top, forming a tower. You can use a small amount of icing to help hold the layers together if necessary.
- Decorate: Mix the icing sugar with a few drops of water to create a thick icing. Drizzle or pipe the icing over the cake in decorative patterns. You can also add additional decorations such as edible glitter or marzipan figures if desired.
Extra Tips
When making Kransekake, it’s essential to measure your ingredients accurately for the best results. Using a kitchen scale can help assure that you get the right measurements, especially for the almond flour and powdered sugar.
Additionally, if you have trouble shaping the rings, you can use silicone molds designed for Kransekake to help maintain the shape. Finally, keep in mind that Kransekake is best enjoyed fresh, so try to make it close to the time of serving for peak taste and texture.
Rømmegrøt (Sour Cream Porridge)
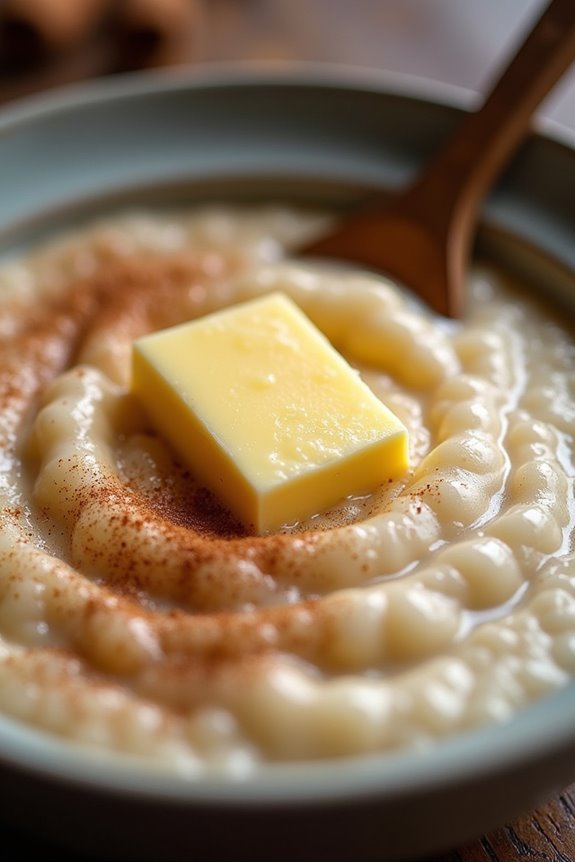
Rømmegrøt is a traditional Norwegian dish that has been cherished for generations, often served during festive occasions such as Christmas and midsummer celebrations. This creamy and rich porridge is made primarily from sour cream, flour, and milk. Its unique flavor is complemented by a sprinkle of sugar and a dash of cinnamon, making it an indulgent treat that warms the heart and soul.
Cooking Rømmegrøt isn’t only a culinary endeavor but also a way to connect with Norwegian heritage. The dish embodies simplicity and comfort, showcasing the beauty of using just a few quality ingredients to create something truly special. Whether you’re preparing it for a family gathering or simply indulging in a nostalgic taste of Norway, Rømmegrøt is sure to delight.
Ingredients (Serves 4-6)
- 2 cups sour cream
- ½ cup all-purpose flour
- 3 cups whole milk
- ¼ teaspoon salt
- 2 tablespoons sugar (optional)
- Ground cinnamon (for serving)
- Butter (for serving)
Cooking Instructions
- Prepare the Base: In a large saucepan, combine the sour cream and flour. Use a whisk to blend the ingredients together until smooth and well combined. This mixture forms the base of your porridge and will help create a creamy texture.
- Cook the Base: Place the saucepan over medium heat. Stir the mixture continuously for about 5-7 minutes until it begins to bubble and thicken. Be careful to avoid burning the bottom. This step is essential as it allows the flour to cook properly and develop a rich flavor.
- Add Milk: Gradually pour in the milk while continuing to stir. This helps in incorporating the milk evenly without lumps forming. Keep the heat at medium and continue stirring until the mixture comes to a gentle boil.
- Simmer the Porridge: Reduce the heat to low and let the porridge simmer for about 10-15 minutes, stirring occasionally. This allows the flavors to meld together and the porridge to reach the desired creamy consistency. If it gets too thick, you can add a bit more milk to adjust the consistency.
- Season and Serve: Once the porridge has reached the desired thickness, remove it from the heat. Stir in the salt and sugar if using. Serve the Rømmegrøt warm, topped with a pat of butter, a sprinkle of ground cinnamon, and additional sugar if desired.
Extra Tips
When preparing Rømmegrøt, it’s important to use high-quality sour cream for the best flavor and texture. If you prefer a lighter version, you can substitute some of the sour cream with Greek yogurt.
Additionally, be mindful of the heat during cooking; too high of a temperature can cause the mixture to scorch, while too low may not thicken properly. Serve it fresh for the best taste, and don’t hesitate to experiment with toppings like dried fruits or nuts for added texture and flavor.