

There’s nothing quite like the satisfaction of whipping up your own batch of hummus at home. The creamy texture and burst of fresh flavors are simply unbeatable. With ingredients like rich tahini and zesty lemon, these recipes invite you to try delightful twists on the classic. Whether you’re in the mood for something spicy or a touch smoky, there’s a hummus here just for you. Let’s get inspired and elevate your snack game with these irresistible hummus recipes!
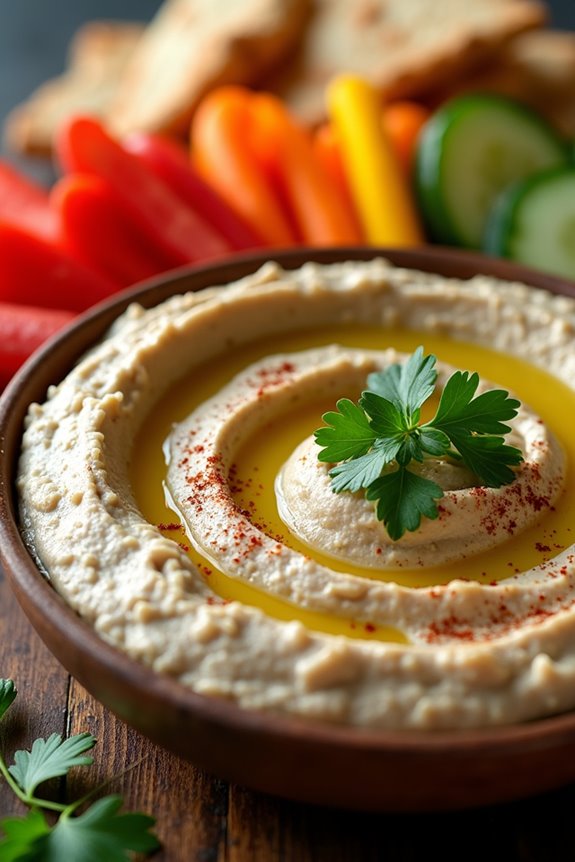
Classic Creamy Chickpea Hummus
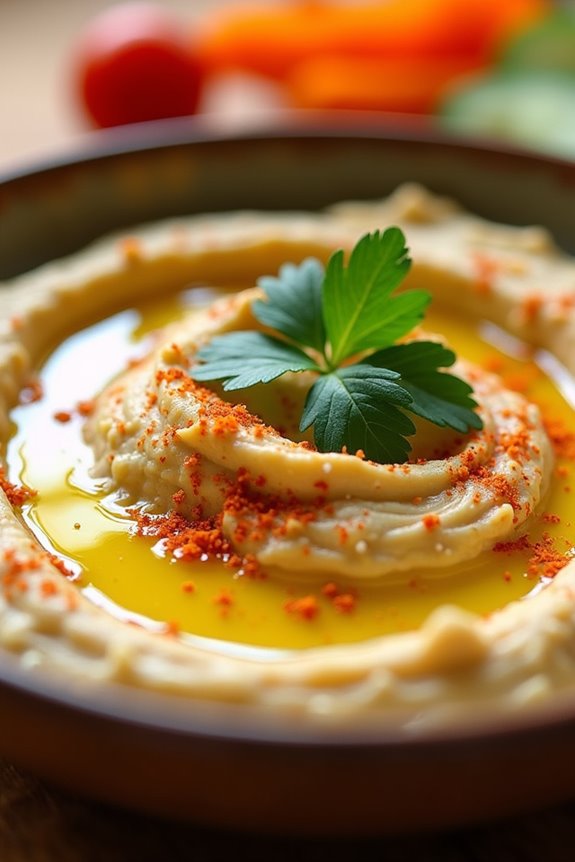
Classic Creamy Chickpea Hummus is a timeless dish that embodies the essence of Mediterranean cuisine. This smooth, flavorful dip isn’t only delicious but also packed with nutrients, making it a perfect addition to any meal or snack.
Whether served with warm pita bread, fresh vegetables, or simply enjoyed on its own, this hummus is sure to delight your taste buds and impress your guests.
The key to achieving the perfect creamy texture lies in using quality ingredients and taking the time to blend them well. With its rich taste of tahini, garlic, and lemon juice combined with the earthiness of chickpeas, this hummus is a staple in many households.
Preparing it at home allows you to customize the flavors to your liking and guarantees that it’s fresh and free from preservatives.
Ingredients (serving size: 4-6 people)
- 1 can (15 oz) chickpeas, drained and rinsed
- 1/4 cup tahini
- 2 tablespoons olive oil
- 2 tablespoons lemon juice (freshly squeezed)
- 1-2 cloves garlic, minced
- 1/2 teaspoon ground cumin
- Salt to taste
- Water (as needed for consistency)
- Paprika (for garnish)
- Fresh parsley (for garnish)
Cooking Instructions
1. Prepare the Chickpeas: Start by draining and rinsing the canned chickpeas under cold water. This helps remove excess sodium and canned flavors, providing a cleaner taste for your hummus.
2. Combine Ingredients: In a food processor, combine the rinsed chickpeas, tahini, olive oil, lemon juice, minced garlic, ground cumin, and a pinch of salt. These ingredients form the base of your hummus, contributing to its creamy texture and flavor.
3. Blend Until Smooth: Process the mixture on high speed until it becomes smooth and creamy. You may need to stop occasionally to scrape down the sides of the bowl to make sure everything is well incorporated.
This step is essential for achieving that velvety consistency.
4. Adjust Consistency: If the hummus is too thick, add cold water a tablespoon at a time while continuing to blend until you reach your desired consistency. The water helps create a lighter texture, making it easier to scoop and spread.
5. Taste and Adjust Seasoning: Once blended, taste the hummus and adjust the seasoning as needed. You can add more salt, lemon juice, or garlic according to your preference.
This is the time to make it uniquely yours!
6. Serve and Garnish: Transfer the hummus to a serving bowl. Drizzle a little olive oil on top and sprinkle with paprika and fresh parsley for a beautiful presentation.
This not only enhances the flavor but also makes the dish visually appealing.
Extra Tips
For the best flavor, consider using dried chickpeas instead of canned ones. Soak them overnight and cook them until tender, as this will give your hummus a fresher taste.
Additionally, for a creamier texture, you can peel the chickpeas before blending. Finally, feel free to experiment with different flavors by adding roasted garlic, sun-dried tomatoes, or spices like smoked paprika for a unique twist on this classic recipe.
Enjoy your homemade hummus with various dipping options for a delicious Mediterranean experience!
Roasted Red Pepper Hummus
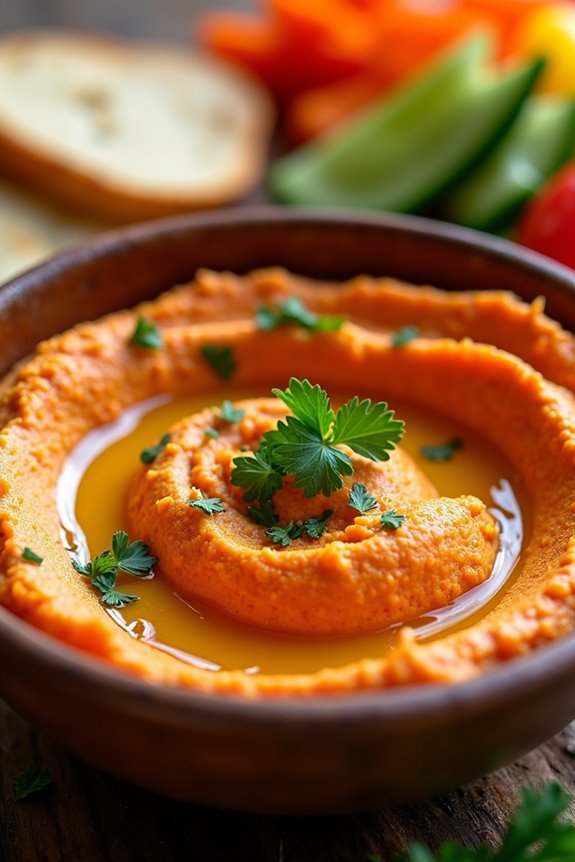
Roasted red pepper hummus is a delightful twist on the classic chickpea dip, bringing a smoky sweetness that elevates the traditional flavors. This vibrant appetizer isn’t only simple to prepare but also packed with nutrients, making it a perfect addition to any Mediterranean-inspired meal.
Whether you’re serving it at a party, enjoying it as a snack, or using it as a spread in sandwiches, this roasted red pepper hummus is sure to impress family and friends alike.
To achieve the best flavor, using fresh roasted red peppers is recommended, but jarred roasted peppers work just as well for convenience. This recipe blends together chickpeas, tahini, garlic, lemon juice, and spices, resulting in a creamy and luscious texture.
Serve it with warm pita bread, fresh vegetables, or use it as a sandwich spread for a deliciously satisfying treat that everyone will love.
Ingredients (Serves 4-6)
- 1 can (15 ounces) chickpeas, drained and rinsed
- 1 large roasted red pepper (or 1 jarred roasted red pepper, drained)
- ¼ cup tahini
- 2 tablespoons olive oil
- 2 tablespoons lemon juice
- 1 garlic clove, minced
- ½ teaspoon ground cumin
- ¼ teaspoon smoked paprika
- Salt and pepper to taste
- Water (as needed for consistency)
- Fresh parsley (for garnish)
Cooking Instructions
- Prepare the Chickpeas: Begin by draining and rinsing the canned chickpeas under cold water. This helps remove excess sodium and any canning liquid, ensuring a cleaner flavor for your hummus.
- Roast the Red Pepper (if using fresh): If you’re using a fresh red pepper, roast it over an open flame, in the oven, or on a grill until the skin is charred and blistered. Once cooled, peel off the skin, remove the seeds, and set aside. If using jarred roasted red peppers, simply drain them and set aside.
- Blend the Ingredients: In a food processor, combine the rinsed chickpeas, roasted red pepper, tahini, olive oil, lemon juice, minced garlic, ground cumin, and smoked paprika. This combination will create a flavorful base for your hummus.
- Process Until Smooth: Pulse the ingredients together until they start to blend. Then, scrape down the sides of the bowl and continue processing until the mixture is smooth and creamy. You may need to add a little water, a tablespoon at a time, to reach your desired consistency.
- Season to Taste: Once the hummus is smooth, taste it and adjust the seasoning with salt and pepper as needed. If you prefer a more tangy flavor, feel free to add a bit more lemon juice.
- Serve: Transfer the hummus to a serving bowl, drizzle with a little olive oil, and sprinkle with fresh parsley for garnish. Serve with pita bread, pita chips, or sliced vegetables for dipping.
Extra Tips
For a unique twist, consider adding additional spices like cayenne pepper for heat or a dash of lemon zest for extra brightness.
If you prefer a creamier texture, blending in a bit of Greek yogurt can also enhance the richness of the hummus. Additionally, feel free to experiment with garnishes such as toasted pine nuts, sesame seeds, or even a sprinkle of za’atar to elevate the presentation and flavor profile.
Enjoy your roasted red pepper hummus!
Garlic and Herb Hummus

Garlic and Herb Hummus is a delightful twist on the classic Middle Eastern spread. This creamy and flavorful dip is perfect for entertaining, as it pairs wonderfully with pita bread, fresh vegetables, or even as a spread on sandwiches. The combination of roasted garlic and fresh herbs elevates the traditional chickpea base, creating a robust flavor profile that’s both comforting and invigorating.
Whether you’re hosting a party or simply indulging in a snack for yourself, this hummus is sure to impress.
Making Garlic and Herb Hummus is a straightforward process that allows you to customize the flavors to your liking. Using fresh ingredients not only enhances the taste but also brings a vibrant color to the dish. This recipe is ideal for serving 4-6 people, making it a perfect addition to any gathering.
Get ready to blend your way to a delicious and healthy snack that everyone will enjoy!
Ingredients
- 1 can (15 oz) chickpeas, drained and rinsed
- 1/4 cup tahini
- 3 tablespoons olive oil
- 2-3 cloves garlic, roasted
- 1/4 cup fresh parsley, chopped
- 2 tablespoons fresh basil, chopped
- 1 tablespoon lemon juice
- 1/2 teaspoon ground cumin
- Salt and pepper to taste
- Water, as needed for consistency
Cooking Instructions
- Prepare the Garlic: Start by roasting the garlic. Preheat your oven to 400°F (200°C). Wrap the garlic cloves in aluminum foil and drizzle with a little olive oil. Roast for about 20-25 minutes until soft and caramelized. Allow to cool before handling.
- Combine Ingredients: In a food processor, combine the drained chickpeas, tahini, roasted garlic (squeezed out of the skins), olive oil, fresh parsley, fresh basil, lemon juice, and ground cumin.
- Blend Until Smooth: Pulse the mixture to combine all the ingredients, then blend continuously until smooth. If the hummus is too thick, gradually add water, one tablespoon at a time, until you reach your desired consistency.
- Season to Taste: Taste the hummus and add salt and pepper according to your preference. Blend again to mix the seasoning evenly throughout the mixture.
- Serve: Transfer your Garlic and Herb Hummus to a serving bowl. Drizzle with a little extra olive oil on top and sprinkle with additional herbs if desired. Serve with pita bread, vegetable sticks, or use as a spread.
Extra Tips
For an extra flavor boost, consider adding a pinch of smoked paprika or a dash of cayenne pepper for spice. If you prefer a chunkier texture, reserve some whole chickpeas to fold in after blending.
This hummus can be stored in an airtight container in the refrigerator for up to a week, allowing the flavors to meld beautifully over time. Enjoy experimenting with different herbs and spices to find your perfect blend!
Spicy Harissa Hummus

If you’re looking to add a flavorful twist to your traditional hummus, Spicy Harissa Hummus is the perfect recipe for you. This vibrant dish combines the creamy texture of chickpeas with the bold and spicy flavors of harissa, a North African chili paste. Ideal for serving as a dip at gatherings or as a spread in sandwiches, this hummus offers a delightful kick that will tantalize your taste buds and impress your guests.
Making Spicy Harissa Hummus isn’t only easy but also quick, taking about 10 minutes from start to finish. With a few pantry staples and the right spices, you can whip up this delicious dip in no time. Serve it with pita bread, fresh vegetables, or use it as a spread on wraps for a spicy twist to your meals. Let’s delve into the ingredients and steps to create this flavorful dish.
Ingredients (Serves 4-6):
- 1 can (15 oz) chickpeas, drained and rinsed
- 1/4 cup tahini
- 2 tablespoons harissa paste (adjust to taste)
- 2 tablespoons lemon juice
- 2 tablespoons olive oil, plus extra for drizzling
- 2 cloves garlic, minced
- 1/2 teaspoon ground cumin
- Salt, to taste
- Water, as needed for consistency
- Fresh parsley, chopped (for garnish)
- Paprika (for garnish)
Cooking Instructions:
- Prepare the Ingredients: Begin by gathering all your ingredients. Make sure your chickpeas are drained and rinsed thoroughly under cold water to remove excess sodium. This step is essential for achieving a smooth texture in your hummus.
- Blend the Base: In a food processor, combine the drained chickpeas, tahini, harissa paste, lemon juice, olive oil, minced garlic, ground cumin, and a pinch of salt. Secure the lid and pulse the mixture until everything is well combined.
- Adjust the Consistency: After the initial blend, check the texture of the hummus. If it seems too thick, slowly add water, one tablespoon at a time, while continuing to blend. You want a creamy, smooth consistency, so keep blending until you reach your desired texture.
- Taste and Adjust: Once you’ve achieved the right consistency, taste the hummus. You can adjust the flavor by adding more harissa for spice, lemon juice for acidity, or salt to enhance the overall taste. Blend again briefly to mix any additional ingredients.
- Serve and Garnish: Transfer the Spicy Harissa Hummus into a serving bowl. Drizzle a bit of olive oil on top, then sprinkle with chopped parsley and a dash of paprika for an added pop of color.
- Enjoy: Serve your hummus warm or at room temperature, accompanied by pita bread, fresh vegetable sticks, or crackers for dipping.
Extra Tips:
For an even bolder flavor, consider roasting your garlic before blending it into the hummus. Roasted garlic adds a sweet, mellow depth that complements the spiciness of the harissa beautifully.
Additionally, feel free to experiment with the harissa paste amount depending on your heat preference, and remember to store any leftovers in an airtight container in the refrigerator for up to a week. Enjoy your homemade Spicy Harissa Hummus!
Avocado and Cilantro Hummus
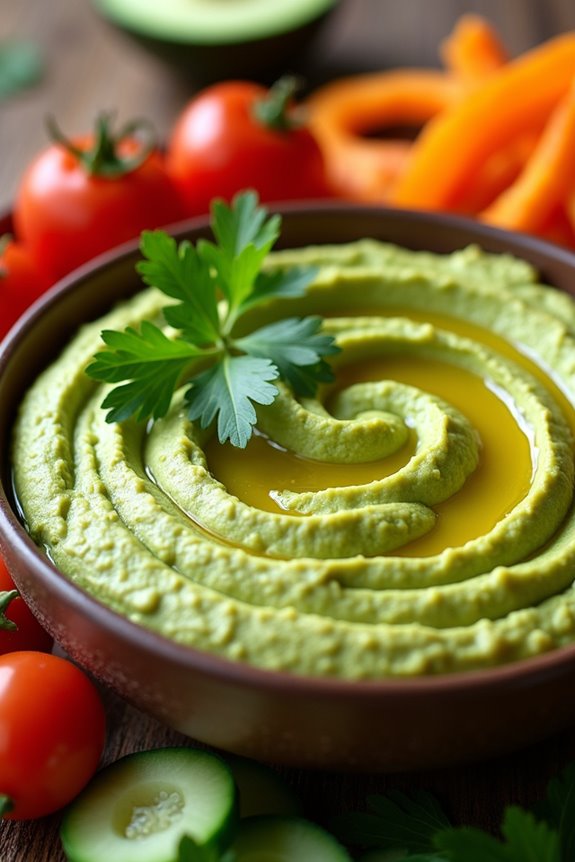
Avocado and Cilantro Hummus is a vibrant twist on the classic Middle Eastern dip, combining the creamy texture of ripe avocados with the fresh, zesty flavor of cilantro. This unique version brings a rich, smooth consistency that pairs perfectly with pita bread, fresh vegetables, or as a spread on sandwiches.
The addition of lime juice not only enhances the flavor but also keeps the avocado from browning, guaranteeing that your hummus maintains its beautiful green color. This delightful dip isn’t only easy to prepare but also packed with healthy fats, making it a nutritious option for snacking or entertaining.
Whether you’re hosting a gathering or simply craving a delicious and healthy treat, this Avocado and Cilantro Hummus will surely impress your guests and satisfy your taste buds. The creamy avocado melds seamlessly with the tahini and chickpeas, creating a dip that’s both satisfying and delicious.
Ingredients (Serves 4-6):
- 1 ripe avocado, peeled and pitted
- 1 cup canned chickpeas (drained and rinsed)
- 1/4 cup tahini
- 1/4 cup fresh cilantro leaves
- 2 tablespoons lime juice
- 1-2 garlic cloves, minced
- 1/2 teaspoon cumin
- Salt and pepper, to taste
- 2-3 tablespoons water (as needed for consistency)
- Olive oil, for drizzling (optional)
Cooking Instructions:
- Prepare the Ingredients: Start by gathering all your ingredients together. Make sure the avocado is ripe for ideal creaminess. Peel and pit the avocado, and rinse the canned chickpeas under cold water to remove excess sodium and preservatives.
- Blend the Base: In a food processor, combine the avocado, chickpeas, tahini, fresh cilantro leaves, lime juice, minced garlic, and cumin. This combination will provide a rich base for your hummus.
- Process Until Smooth: Pulse the food processor a few times to break down the ingredients, then blend continuously until the mixture is smooth and creamy. You may need to scrape down the sides of the bowl to guarantee everything is evenly mixed.
- Adjust the Consistency: Check the consistency of the hummus. If it’s too thick, add water one tablespoon at a time until you reach your desired texture. The hummus should be smooth but not runny.
- Season to Taste: After achieving the desired consistency, taste the hummus and season with salt and pepper as needed. Feel free to add more lime juice for extra brightness if desired.
- Serve: Transfer the hummus to a serving bowl. Drizzle a little olive oil on top for added richness if you like. Serve it with pita chips, fresh vegetables, or use it as a spread.
Extra Tips:
To elevate the flavor of your Avocado and Cilantro Hummus, consider roasting the garlic before adding it to the mix; this will give a sweeter, more mellow flavor.
Additionally, if you’re a fan of spice, a pinch of cayenne pepper or a drizzle of sriracha can add a delightful kick. Store any leftovers in an airtight container in the refrigerator, and place a piece of plastic wrap directly on the surface of the hummus to minimize browning. Enjoy this fresh, healthy dip at your next gathering or as a light snack!
Beetroot Hummus With Feta
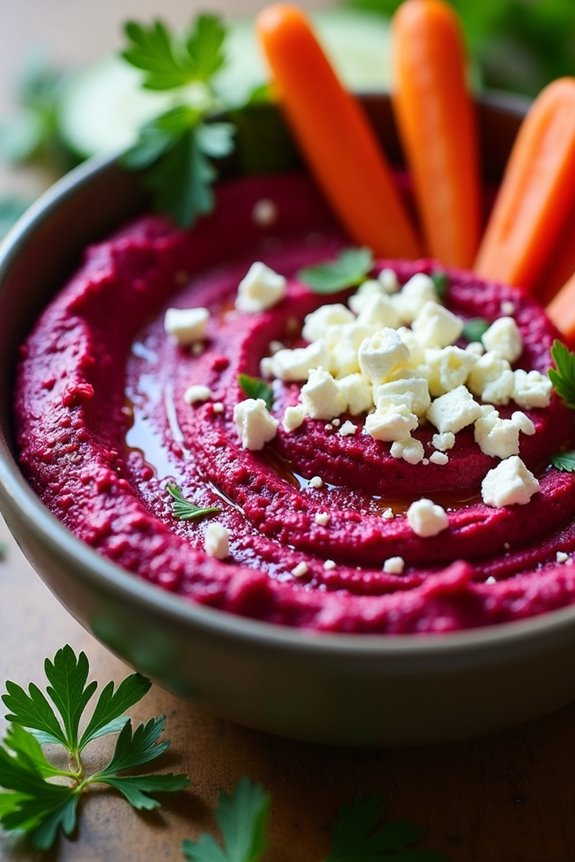
Beetroot Hummus with Feta is a vibrant and nutritious twist on the traditional Middle Eastern dip. This colorful dish not only boasts the earthy sweetness of roasted beets but also includes the creaminess of feta cheese, which amplifies its flavor profile. Perfect for serving at gatherings or enjoying as a healthy snack at home, this hummus is sure to impress both the eyes and palate.
The combination of ingredients creates a beautiful balance of flavors. The beets add a delightful sweetness and a stunning magenta color, while the feta provides a salty, creamy contrast that elevates the dish. This Beetroot Hummus isn’t only visually appealing but also packed with nutrients, making it a wholesome addition to your appetizer spread or a delicious accompaniment to fresh vegetables and pita bread.
Ingredients (Serves 4-6):
- 2 medium-sized beetroots, roasted and peeled
- 1 can (15 oz) chickpeas, drained and rinsed
- 1/4 cup tahini
- 2 tablespoons olive oil
- 2 tablespoons lemon juice (freshly squeezed)
- 2 cloves garlic, minced
- 1/2 teaspoon cumin
- Salt and pepper to taste
- 1/2 cup feta cheese, crumbled
- Fresh parsley for garnish (optional)
- Extra olive oil for drizzling (optional)
Cooking Instructions:
- Roast the Beetroots: Preheat your oven to 400°F (200°C). Wrap the beetroots individually in aluminum foil and place them on a baking sheet. Roast for about 45-60 minutes, or until they’re tender when pierced with a fork. Once cooked, let them cool slightly, then peel and chop them into smaller pieces.
- Prepare the Chickpeas: While the beetroots are roasting, rinse and drain the canned chickpeas. If you prefer a smoother hummus, you may choose to remove the skins from the chickpeas, although this is optional.
- Blend the Ingredients: In a food processor, combine the roasted beetroots, chickpeas, tahini, olive oil, lemon juice, minced garlic, and cumin. Blend everything together until smooth. You may need to scrape down the sides of the bowl occasionally to confirm all ingredients are well combined.
- Season the Hummus: Taste the mixture and add salt and pepper according to your preference. Blend again to incorporate the seasoning. If the hummus is too thick, you can add a tablespoon or two of water until you reach your desired consistency.
- Add the Feta: Gently fold in the crumbled feta cheese, reserving a small amount for garnishing later. If you prefer a creamier hummus, you can blend the feta into the mixture, but a chunky texture provides a nice contrast.
- Serve: Transfer the hummus to a serving bowl, drizzle with extra olive oil if desired, and sprinkle the reserved feta on top. Garnish with fresh parsley for a pop of color.
Extra Tips:
For the best flavor, use fresh, high-quality ingredients. Opting for homemade roasted beets instead of store-bought can make a significant difference in taste.
Additionally, feel free to customize your hummus by adding spices like smoked paprika or even a hint of chili for a kick. Serve with a variety of dippers, such as pita chips, fresh vegetables, or even spread it on sandwiches for a colorful addition!
Smoky Eggplant Hummus
Smoky Eggplant Hummus is a delightful twist on the traditional chickpea-based hummus, featuring the rich and earthy flavors of roasted eggplant. This creamy dip is infused with the irresistible smokiness from the eggplant, combined with tahini, garlic, and lemon juice, making it a perfect accompaniment for pita bread, fresh vegetables, or as a spread on sandwiches.
This dish not only tantalizes the taste buds but also provides a healthy option for snacking or entertaining guests. Roasting the eggplant adds depth to the flavor profile, while the blending process creates a silky smooth texture that’s both satisfying and nutritious. Packed with fiber and healthy fats, Smoky Eggplant Hummus is a fantastic option for those looking to enjoy Mediterranean cuisine while keeping their meals light and wholesome.
Whether you’re hosting a gathering or simply craving a snack, this hummus is sure to impress.
Ingredients (Serves 4-6):
- 2 medium eggplants
- 1/4 cup tahini
- 2 tablespoons olive oil, plus more for drizzling
- 2 garlic cloves, minced
- Juice of 1 lemon
- 1 teaspoon smoked paprika
- Salt, to taste
- Fresh parsley, for garnish
- Pita bread or vegetables, for serving
Cooking Instructions:
- Roast the Eggplants: Preheat your oven to 400°F (200°C). Pierce the eggplants a few times with a fork, then place them on a baking sheet lined with parchment paper. Roast in the oven for about 30-40 minutes or until the skin is charred and the flesh is tender. Remove from the oven and let them cool slightly.
- Prepare the Eggplant: Once the eggplants are cool enough to handle, cut them in half lengthwise and scoop out the flesh into a bowl, discarding the skin. Make sure to collect all the soft, smoky flesh to use in your hummus.
- Blend the Ingredients: In a food processor, combine the roasted eggplant flesh, tahini, olive oil, minced garlic, lemon juice, smoked paprika, and a pinch of salt. Blend until smooth and creamy. You can add a little water if you prefer a thinner consistency.
- Taste and Adjust: After blending, taste the hummus and adjust the seasoning by adding more salt or lemon juice according to your preference. Blend again to incorporate any additional ingredients.
- Serve: Transfer the Smoky Eggplant Hummus to a serving bowl. Drizzle with olive oil on top and garnish with fresh parsley. Serve with warm pita bread or an assortment of fresh vegetable sticks.
Extra Tips:
For an extra layer of flavor, consider adding a pinch of cumin or a dash of hot sauce to the hummus before blending.
If you want a more pronounced smokiness, you can roast the eggplants over an open flame on a grill or stovetop instead of baking them. This method will enhance the smoky flavor even further.
Additionally, store any leftover hummus in an airtight container in the refrigerator; it can last for about 3-5 days, making it a great meal prep option!
Lemon Tahini Hummus
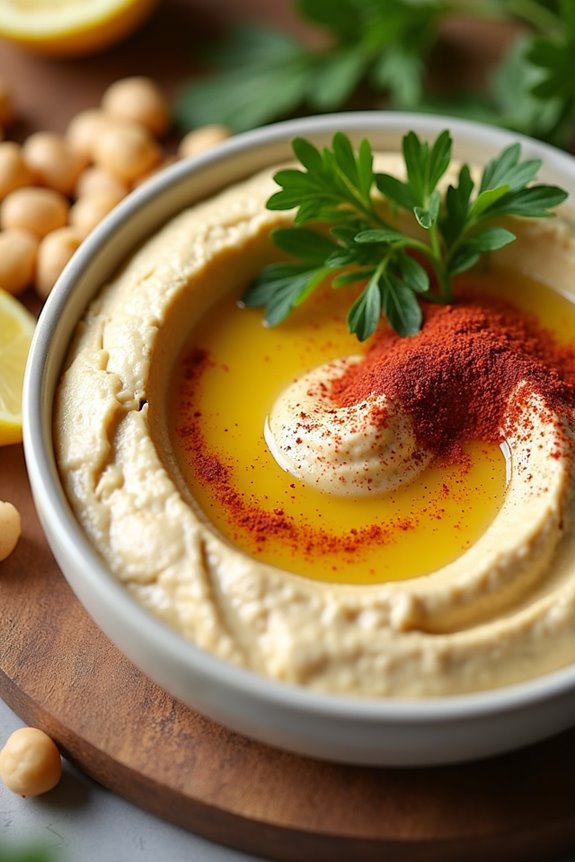
Lemon Tahini Hummus is a delightful twist on the classic Middle Eastern spread, blending the nutty flavor of tahini with the bright, zesty notes of fresh lemon juice. This vibrant hummus is perfect for dipping vegetables, spreading on sandwiches, or serving as an appetizer at gatherings.
The combination of creamy chickpeas, rich tahini, and a burst of lemon makes it a revitalizing addition to any Mediterranean-inspired meal. Making Lemon Tahini Hummus isn’t only easy but also allows for customization based on personal taste. You can adjust the amount of lemon juice and tahini to create a flavor profile that suits your palate.
This recipe is designed to serve 4-6 people, making it ideal for a small gathering or a family snack. Get ready to whip up a batch of this delicious hummus that will have everyone coming back for more!
Ingredients (serving size of 4-6 people):
- 1 can (15 oz) chickpeas, drained and rinsed
- 1/4 cup tahini
- 1/4 cup fresh lemon juice (about 1-2 lemons)
- 2 tablespoons olive oil
- 1-2 cloves garlic, minced
- 1/2 teaspoon ground cumin
- 1/2 teaspoon salt (adjust to taste)
- 2-3 tablespoons water (or more as needed)
- Paprika or sumac for garnish
- Fresh parsley for garnish (optional)
Cooking Instructions:
- Prepare the chickpeas: Start by draining and rinsing the canned chickpeas thoroughly under cold water. This helps remove excess sodium and improves the flavor of your hummus. If you prefer a creamier texture, you can remove the skins from the chickpeas, but this step is optional.
- Blend the ingredients: In a food processor, combine the rinsed chickpeas, tahini, fresh lemon juice, olive oil, minced garlic, ground cumin, and salt. Pulse the ingredients together for about 30 seconds until they start to break down.
- Add water: While the food processor is running, gradually add 2-3 tablespoons of water until the hummus reaches your desired consistency. If you prefer a thinner hummus, you can add more water, one tablespoon at a time. Scrape down the sides of the bowl as necessary to verify everything is well blended.
- Taste and adjust: After blending, taste the hummus and adjust the seasoning if needed. You may want to add more salt, lemon juice, or garlic based on your preference. Blend again for a few seconds to incorporate any adjustments.
- Serve: Transfer the hummus to a serving dish, and use the back of a spoon to create a swirl on the surface. Drizzle a little olive oil over the top and sprinkle with paprika or sumac for a pop of color. Garnish with fresh parsley if desired.
Extra Tips:
For a unique twist on your Lemon Tahini Hummus, consider adding roasted red peppers or sun-dried tomatoes for additional flavor.
If you want to enhance the nutritional value, try incorporating a handful of fresh spinach or kale during the blending process. This not only adds a beautiful green hue but also boosts the health benefits.
Store any leftovers in an airtight container in the refrigerator for up to a week, and give it a quick stir before serving again, as it may thicken over time. Enjoy your homemade hummus with pita chips, fresh veggies, or as a spread in wraps!
Spinach and Kale Hummus
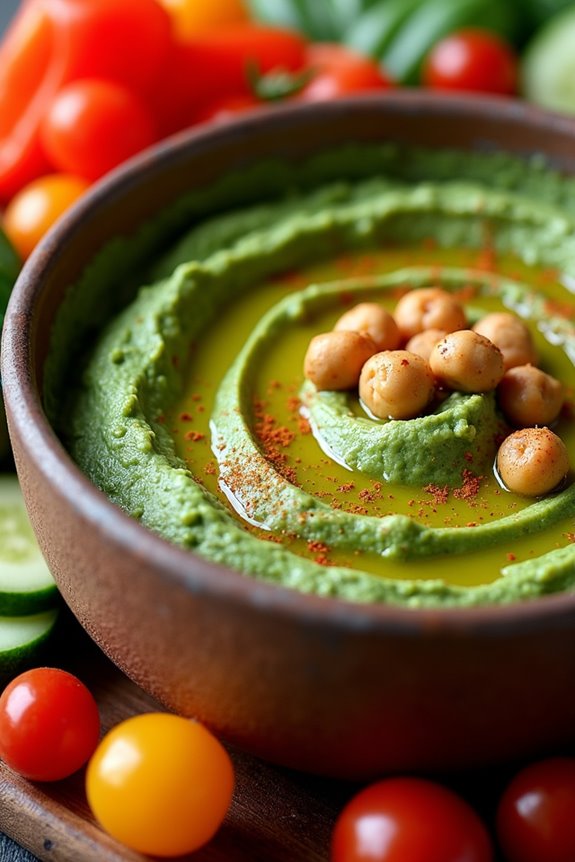
Spinach and Kale Hummus is a vibrant twist on the traditional hummus recipe, combining the nutritional powerhouse of greens with the creamy texture of chickpeas. This delightful dip not only packs a punch of flavor but also provides a healthy option that can be enjoyed with your favorite snacks or as a spread in sandwiches.
The earthy notes of the spinach and kale blend harmoniously with the tahini and garlic, creating a deliciously rich hummus that’s sure to impress your family and friends.
Making Spinach and Kale Hummus is a breeze, making it an ideal choice for quick snacks or party appetizers. This recipe isn’t only simple to prepare but also allows you to customize the flavors to suit your preferences.
Whether you serve it with pita chips, fresh veggies, or slather it on bread, this hummus is a versatile addition to any meal. Let’s explore the ingredients and preparation for this nutritious and tasty dish!
Ingredients (Serves 4-6):
- 1 cup canned chickpeas, drained and rinsed
- 1 cup fresh spinach, packed
- 1 cup fresh kale, stems removed and packed
- 1/4 cup tahini
- 2 tablespoons olive oil
- 2 tablespoons lemon juice
- 1-2 cloves garlic, minced
- 1/2 teaspoon ground cumin
- Salt and pepper to taste
- Water, as needed for consistency
Cooking Instructions:
- Prepare the Greens: Start by washing the spinach and kale thoroughly to remove any dirt or grit. Remove the tough stems from the kale leaves. You want only the tender parts of the leaves for a smoother texture in your hummus. Set the greens aside to drain.
- Blend the Chickpeas: In a food processor, add the drained chickpeas, tahini, olive oil, lemon juice, minced garlic, and ground cumin. Process these ingredients together for about 30 seconds until they’re well combined and start to form a paste. This step lays the foundation for the flavor of your hummus.
- Incorporate the Greens: Gradually add the fresh spinach and kale to the food processor. Pulse the mixture several times to begin incorporating the greens into the chickpea mixture. You may need to scrape down the sides of the bowl to make sure everything is blending evenly.
- Adjust Consistency: Once the greens are well mixed in, check the consistency of your hummus. If it appears too thick, add water a tablespoon at a time while continuing to blend until you reach your desired creaminess. Taste the hummus and season with salt and pepper to your liking.
- Serve: Once the hummus is smooth and creamy, transfer it to a serving bowl. You can drizzle a little extra olive oil on top and garnish with a sprinkle of paprika or a few whole chickpeas for presentation. Serve with pita chips, fresh vegetables, or as a spread in wraps.
Extra Tips:
For an added depth of flavor, consider roasting the garlic before adding it to the hummus. Simply wrap a whole head of garlic in foil and roast it in the oven until soft and caramelized—this will impart a sweeter and more mellow taste to your dip.
Additionally, feel free to experiment with different herbs like parsley or cilantro for a unique twist, or add a pinch of red pepper flakes if you prefer a little heat in your hummus. Enjoy your healthy and delicious Spinach and Kale Hummus!
Olive Tapenade Hummus
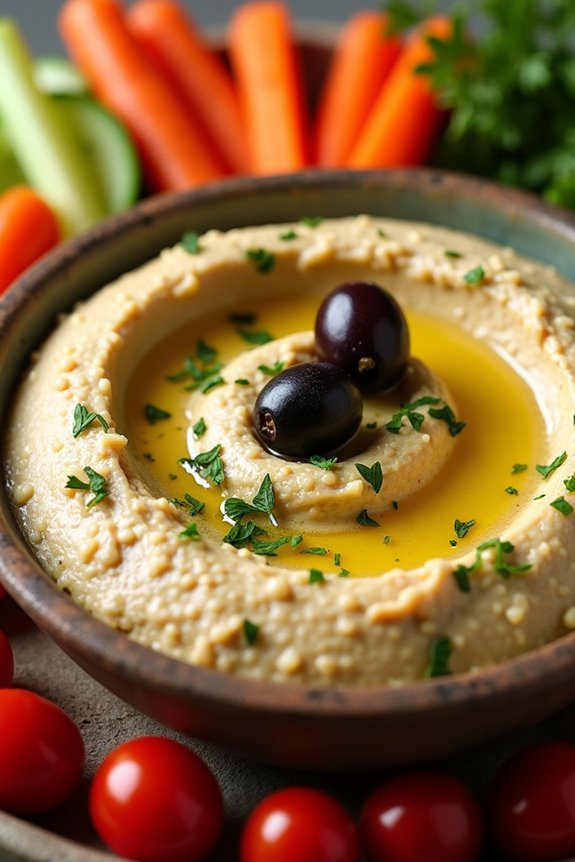
Olive Tapenade Hummus is a deliciously unique twist on traditional hummus, combining the creamy texture of chickpeas with the rich and briny flavors of olives. This Mediterranean-inspired dish is perfect for entertaining guests or as a delightful snack for yourself.
With its vibrant flavors and smooth consistency, it’s sure to impress anyone who tries it. The combination of tahini, garlic, and lemon juice with the tapenade creates a harmonious blend that elevates the classic hummus to new heights.
Making Olive Tapenade Hummus isn’t only simple but also allows you to customize the ingredients to suit your taste. You can use various types of olives, such as Kalamata or green olives, and even add herbs like parsley or basil for an extra layer of flavor.
Serve it with pita chips, fresh vegetables, or spread it on sandwiches for a tasty and healthy addition to your meals. Let’s explore the recipe and bring this Mediterranean delight to your kitchen.
Ingredients (Serves 4-6)
- 1 can (15 oz) chickpeas, drained and rinsed
- 1/2 cup olive tapenade
- 1/4 cup tahini
- 2 tablespoons lemon juice
- 1-2 cloves garlic, minced
- 2 tablespoons extra virgin olive oil
- Salt to taste
- Water (as needed for consistency)
- Optional: Fresh herbs for garnish (e.g., parsley, thyme)
Cooking Instructions
- Prepare the Chickpeas: Begin by draining and rinsing the canned chickpeas under cold water. This helps to remove excess sodium and improves the taste of your hummus. You may choose to peel the chickpeas for an extra smooth texture, but this step is optional.
- Blend the Base Ingredients: In a food processor, combine the rinsed chickpeas, olive tapenade, tahini, lemon juice, and minced garlic. Pulse the mixture until it starts to come together. You want a rough blend to start, as this will allow you to incorporate the olive oil more effectively in the next step.
- Incorporate the Olive Oil: With the food processor running, slowly drizzle in the extra virgin olive oil. This will help emulsify the hummus, making it creamy and smooth. Continue blending until the mixture is well combined and reaches your desired consistency.
- Adjust Consistency and Seasoning: If the hummus is too thick, add a tablespoon of water at a time until you achieve your desired texture. Taste your hummus and season with salt as needed. You can also add more lemon juice or garlic depending on your flavor preferences.
- Serve and Garnish: Transfer the Olive Tapenade Hummus to a serving bowl. Drizzle with a little extra olive oil on top and garnish with fresh herbs, if desired. Serve with pita chips, fresh vegetables, or spread onto your favorite sandwiches.
Extra Tips
To enhance the flavor of your Olive Tapenade Hummus, consider using roasted garlic instead of raw, as it adds a sweeter, more mellow taste.
Additionally, feel free to experiment with different types of olives to find your perfect flavor profile. If you want to add some heat, a pinch of red pepper flakes can be a great addition, giving the hummus a subtle kick.
Finally, remember that homemade hummus can be stored in an airtight container in the refrigerator for up to a week, allowing you to enjoy this delightful dish multiple times!