

As Thanksgiving approaches, I find myself inspired by the comforting flavors of Scandinavian cuisine. Picture a roast turkey enhanced with Nordic herb butter and a side of tangy lingonberry sauce. Each dish offers a cozy warmth, combining tradition with a fresh twist. I’m excited to share these recipes that will surely make your holiday feast unforgettable. Let’s explore what makes these Scandinavian-inspired dishes so delightful.
Nordic Herb Butter Roasted Turkey
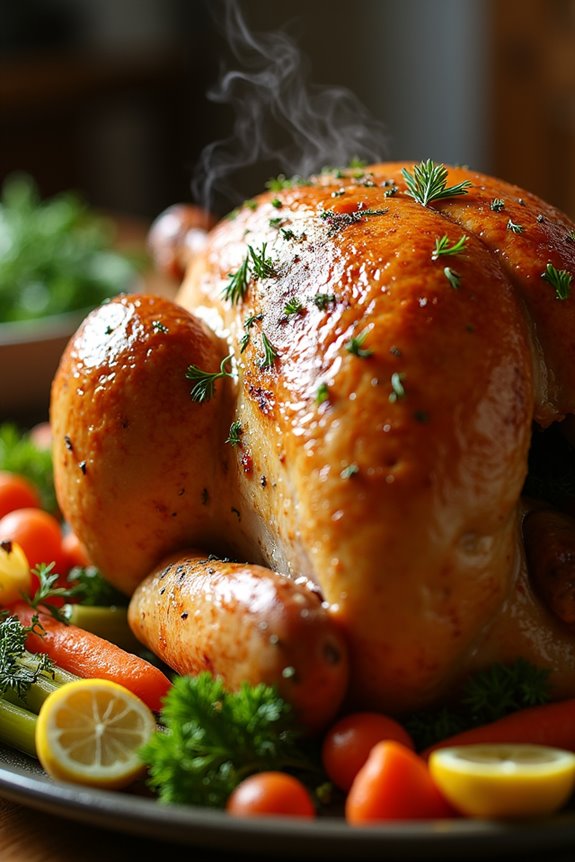
Thanksgiving is a time for gathering with loved ones and enjoying a hearty meal, and what better centerpiece than a beautifully roasted turkey? The Nordic Herb Butter Roasted Turkey takes inspiration from Scandinavian flavors, combining fresh herbs and rich butter to create a succulent and aromatic bird that’s sure to delight your guests.
With its crispy skin and tender meat, this dish elevates the traditional turkey to a new level, making it a perfect choice for your festive table. This recipe infuses the turkey with the essence of Nordic cuisine through the use of herbs such as dill, thyme, and parsley, blended into a luscious butter that’s then spread under the skin for maximum flavor.
Roasting the turkey to golden perfection not only enhances its appearance but also locks in moisture, ensuring each slice is juicy and satisfying. Preparing this dish will surely become a cherished Thanksgiving tradition in your home.
Ingredients (Serves 4-6)
- 1 whole turkey (about 10-12 pounds)
- 1 cup unsalted butter, softened
- 3 tablespoons fresh dill, chopped
- 3 tablespoons fresh thyme, chopped
- 3 tablespoons fresh parsley, chopped
- 4 cloves garlic, minced
- Zest of 1 lemon
- Salt and black pepper, to taste
- 2 cups low-sodium chicken broth
- 1 onion, quartered
- 1 lemon, quartered
- 2 cups carrots, chopped
- 2 cups celery, chopped
Cooking Instructions
- Prepare the Turkey: Start by preheating your oven to 325°F (165°C). Remove the turkey from its packaging, and take out the giblets and neck from the cavity. Pat the turkey dry with paper towels, which will help achieve a crispy skin during roasting.
- Make the Herb Butter: In a mixing bowl, combine the softened butter, chopped dill, thyme, parsley, minced garlic, and lemon zest. Mix well until all ingredients are fully integrated. This herb butter will provide flavor and moisture to the turkey.
- Season the Turkey: Carefully lift the skin of the turkey from the breast using your fingers, creating a pocket. Spread half of the herb butter mixture under the skin and the remaining butter all over the outside of the turkey. Season generously with salt and black pepper.
- Stuff the Turkey: Stuff the cavity of the turkey with the quartered onion and lemon. This will infuse additional flavor while roasting. Don’t pack it too tightly, as the heat needs to circulate.
- Prepare the Roasting Pan: In a large roasting pan, arrange the chopped carrots and celery to create a vegetable bed for the turkey. Place the turkey on top of the vegetables. Pour the chicken broth into the pan, which will help keep the turkey moist during roasting.
- Roast the Turkey: Place the roasting pan in the preheated oven and roast the turkey for about 3 to 3.5 hours, or until the internal temperature reaches 165°F (74°C) in the thickest parts of the breast and thigh. Baste the turkey with the pan juices every 30 minutes for an evenly browned skin.
- Rest and Carve: Once the turkey is done roasting, remove it from the oven and let it rest for at least 20-30 minutes before carving. This resting period allows the juices to redistribute, ensuring a moist turkey when sliced.
Extra Tips
For an even more flavorful turkey, consider brining it the night before with a mixture of water, salt, and herbs. This will enhance the moisture and taste of the meat.
Additionally, using a meat thermometer is essential for accurately checking the doneness of your turkey, ensuring you achieve the perfect balance of juiciness and safety. Finally, don’t forget to save the drippings from the roasting pan to make a delicious gravy, which perfectly complements the turkey and rounds out your Thanksgiving feast.
Swedish Lingonberry Sauce
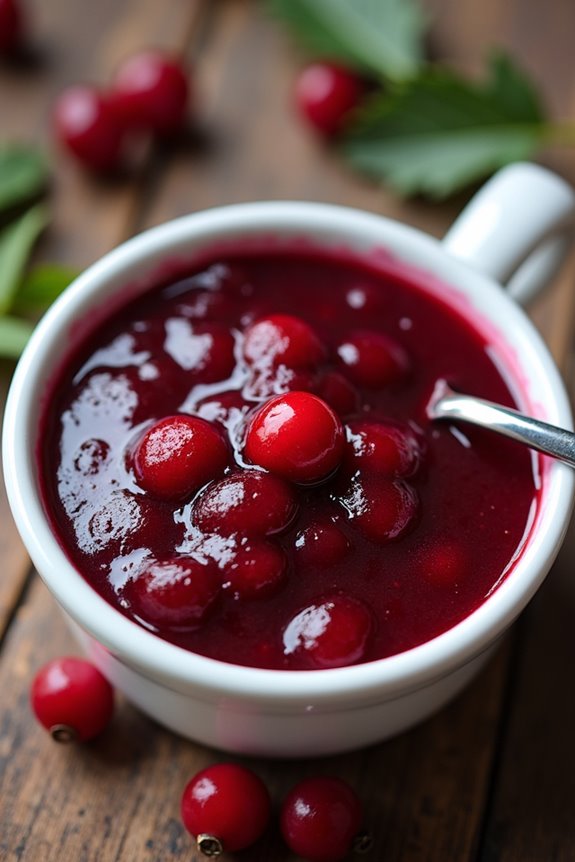
Swedish Lingonberry Sauce is a traditional condiment that brings a delightful sweetness and tartness to any Thanksgiving feast. Often served alongside roasted meats, particularly turkey or game, this vibrant sauce is a staple in Scandinavian cuisine. The unique flavor profile of lingonberries, which are closely related to cranberries, adds a revitalizing tang that complements the richness of holiday dishes beautifully.
Not only is this sauce easy to prepare, but it also provides a vibrant pop of color to your Thanksgiving table.
This simple recipe for Swedish Lingonberry Sauce highlights the natural flavors of the berries while balancing sweetness and acidity. With just a few ingredients and minimal cooking time, you’ll create a delicious accompaniment that can be enjoyed not only during Thanksgiving but also throughout the year.
Let’s plunge into the ingredients and steps to make this delightful sauce for 4-6 people.
Ingredients
- 2 cups fresh or frozen lingonberries
- 1 cup granulated sugar
- 1/2 cup water
- 1 tablespoon lemon juice
- 1 teaspoon vanilla extract (optional)
Cooking Instructions
- Prepare the Lingonberries: If using fresh lingonberries, rinse them thoroughly under cold water to remove any debris. If using frozen lingonberries, there’s no need to thaw them; you can use them directly from the freezer.
- Combine Ingredients in a Saucepan: In a medium-sized saucepan, combine the lingonberries, granulated sugar, water, and lemon juice. If you’re using vanilla extract, add it at this stage for an extra layer of flavor.
- Cook the Mixture: Place the saucepan over medium heat and bring the mixture to a gentle boil. Stir occasionally to help dissolve the sugar and prevent the berries from sticking to the bottom of the pan.
- Simmer the Sauce: Once the mixture reaches a boil, reduce the heat to low and let it simmer for about 10-15 minutes. During this time, the lingonberries will burst, releasing their juices and creating a thick sauce. Stir occasionally to guarantee even cooking.
- Check the Consistency: After simmering, check the consistency of the sauce. It should be slightly thickened but still pourable. If you prefer a thicker sauce, continue to simmer for an additional 5 minutes or until desired consistency is reached.
- Cool and Store: Remove the saucepan from the heat and let the lingonberry sauce cool to room temperature. Once cooled, transfer it to a clean jar or container. It can be served immediately or stored in the refrigerator for up to two weeks.
Extra Tips
When preparing Swedish Lingonberry Sauce, feel free to adjust the sweetness by adding more or less sugar according to your taste preferences.
Additionally, if you don’t have access to lingonberries, you can substitute them with cranberries, though the flavor will be slightly different. This sauce can also be made ahead of time, making it a perfect addition to your Thanksgiving meal prep—just reheat it gently before serving.
Enjoy this delightful sauce and watch it become a cherished part of your holiday traditions!
Creamy Potato and Leek Gratin

Creamy Potato and Leek Gratin is a delightful dish that embodies the essence of Scandinavian comfort food, making it a perfect addition to your Thanksgiving table. This rich and creamy gratin combines layers of tender potatoes and sweet, aromatic leeks, all enveloped in a luscious sauce.
It’s not just a side dish; it’s a warm embrace on a chilly autumn evening, celebrating the harvest season with every bite. This dish isn’t only easy to prepare but also offers a wonderful opportunity to bring the flavors of Scandinavia to your Thanksgiving feast.
The combination of creamy textures and savory flavors creates a harmonious balance that pairs well with roasted meats and other traditional dishes. Whether you’re looking to impress your guests or simply indulge in a comforting meal, Creamy Potato and Leek Gratin is bound to be a hit at your gathering.
Ingredients (Serves 4-6)
- 1.5 lbs (about 700g) Yukon Gold potatoes, peeled and thinly sliced
- 2 medium leeks, cleaned and sliced (white and light green parts only)
- 2 cups heavy cream
- 1 cup grated Gruyère cheese
- 1/2 cup grated Parmesan cheese
- 3 cloves garlic, minced
- 1 tablespoon fresh thyme leaves (or 1 teaspoon dried thyme)
- Salt and pepper, to taste
- 2 tablespoons unsalted butter, for greasing the baking dish
- Fresh chives, for garnish (optional)
Cooking Instructions
1. Preheat the Oven: Begin by preheating your oven to 375°F (190°C). This guarantees that the gratin will cook evenly and develop a beautiful golden crust on top.
2. Prepare the Baking Dish****: Take a 2-quart baking dish and grease it thoroughly with unsalted butter. This will prevent the gratin from sticking and allow for an easy serving.
3. Sauté the Leeks: In a skillet over medium heat, add a bit of butter or olive oil and sauté the sliced leeks until they become soft and translucent, about 5-7 minutes. This step enhances the flavors of the leeks, making them sweeter and more aromatic.
4. Layer the Ingredients: In the greased baking dish, start layering the sliced potatoes followed by a layer of sautéed leeks. Sprinkle some minced garlic, thyme, salt, and pepper over each layer.
Repeat until all potatoes and leeks are used, finishing with a layer of potatoes on top.
5. Make the Cream Mixture: In a bowl, combine the heavy cream, Gruyère cheese, and half of the Parmesan cheese. Whisk together until well mixed. Pour this creamy mixture over the layered potatoes and leeks, guaranteeing it seeps down into the layers.
6. Add Cheese Topping: Sprinkle the remaining Parmesan cheese over the top of the gratin. This will create a deliciously crispy crust as it bakes.
7. Bake the Gratin: Cover the baking dish with aluminum foil and place it in the preheated oven. Bake for 45 minutes. Then, remove the foil and bake for an additional 20-25 minutes, or until the top is golden brown and the potatoes are tender when pierced with a fork.
8. Garnish and Serve: Once done, let the gratin cool for a few minutes before garnishing with freshly chopped chives, if desired. Serve warm alongside your Thanksgiving meal.
Extra Tips
For an added depth of flavor, consider incorporating some crispy bacon or pancetta into the layers for a savory twist. You can also experiment with different cheeses like cheddar or Fontina for unique flavor profiles.
If you’re making this dish ahead of time, you can prepare it up to the baking step and refrigerate it. Just remember to add a few extra minutes to the baking time if you’re starting with a cold dish. Enjoy your creamy, comforting gratin!
Danish Red Cabbage Salad
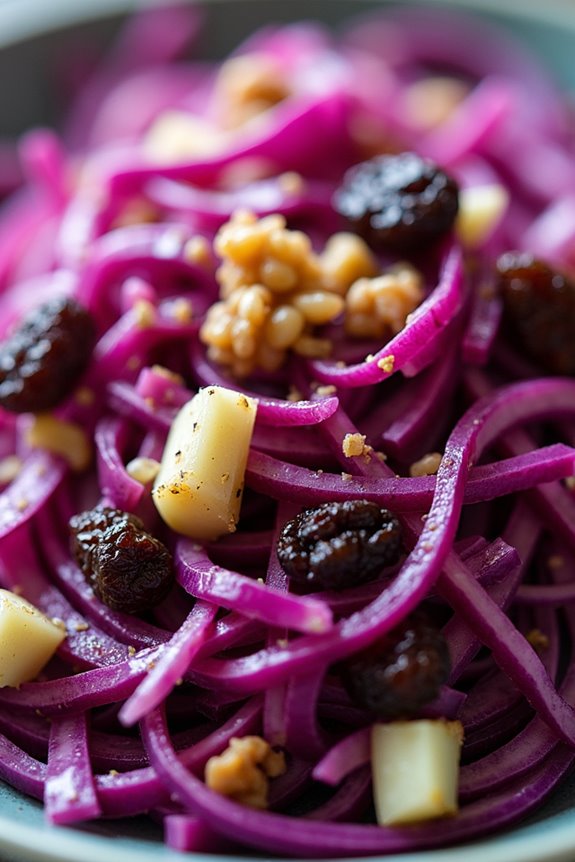
Danish Red Cabbage Salad is a vibrant and tangy side dish that beautifully complements any Thanksgiving feast, especially with its Nordic roots. This salad, known as “Rødkål” in Denmark, showcases the rich, sweet flavor of red cabbage paired with a balance of spices and a hint of sweetness from apples and vinegar. The colorful presentation and crunch of the cabbage make it an appealing addition to your holiday spread, providing a revitalizing counterpoint to heavier dishes.
The beauty of this salad lies not only in its taste but also in its simplicity. It can be prepared ahead of time, allowing the flavors to meld beautifully as it sits, making it a perfect option for busy holiday preparations. This recipe serves 4-6 people, making it an ideal choice for small gatherings or larger festive dinners.
Ingredients
- 1 medium head of red cabbage, finely shredded
- 1 large apple, cored and diced (preferably a tart variety)
- 1 medium onion, thinly sliced
- 1 cup apple cider vinegar
- 1/2 cup sugar
- 1 teaspoon ground cinnamon
- 1/2 teaspoon ground cloves
- 1/2 teaspoon ground allspice
- Salt and pepper to taste
- 1/4 cup raisins (optional)
- 1/4 cup chopped walnuts (optional)
Cooking Instructions
- Prepare the Cabbage: Start by removing the outer leaves of the red cabbage. Cut the cabbage into quarters, remove the core, and then finely shred the cabbage using a sharp knife or a food processor. Place the shredded cabbage into a large mixing bowl.
- Add the Apple and Onion: Next, take the apple, core it, and dice it into small pieces. Then, slice the onion thinly. Add both the diced apple and sliced onion to the bowl with the cabbage, ensuring they’re evenly distributed.
- Make the Dressing: In a small saucepan over medium heat, combine the apple cider vinegar, sugar, ground cinnamon, ground cloves, and ground allspice. Stir the mixture until the sugar is completely dissolved. Allow it to come to a gentle simmer, then remove it from heat.
- Combine Ingredients: Pour the warm dressing over the cabbage, apple, and onion mixture. Toss everything together thoroughly to ensure the cabbage and fruits are well-coated in the dressing.
- Season and Rest: Season the salad with salt and pepper to taste. If using, add the raisins and chopped walnuts for extra texture and flavor. Cover the bowl with plastic wrap and let the salad sit in the refrigerator for at least 1 hour before serving, allowing the flavors to meld.
- Serve: Once chilled, give the salad another toss and adjust seasoning if necessary. Serve it cold or at room temperature as a delightful side dish during your Thanksgiving meal.
Extra Tips
When making Danish Red Cabbage Salad, consider adjusting the sweetness by adding more or less sugar according to your taste preference. You can also experiment with different types of apples to find a flavor that you love.
For an added crunch, feel free to toss in some toasted nuts or seeds right before serving. This salad can also be made a day in advance, as the flavors deepen over time, making it a great make-ahead option for your Thanksgiving feast.
Norwegian Root Vegetable Mash
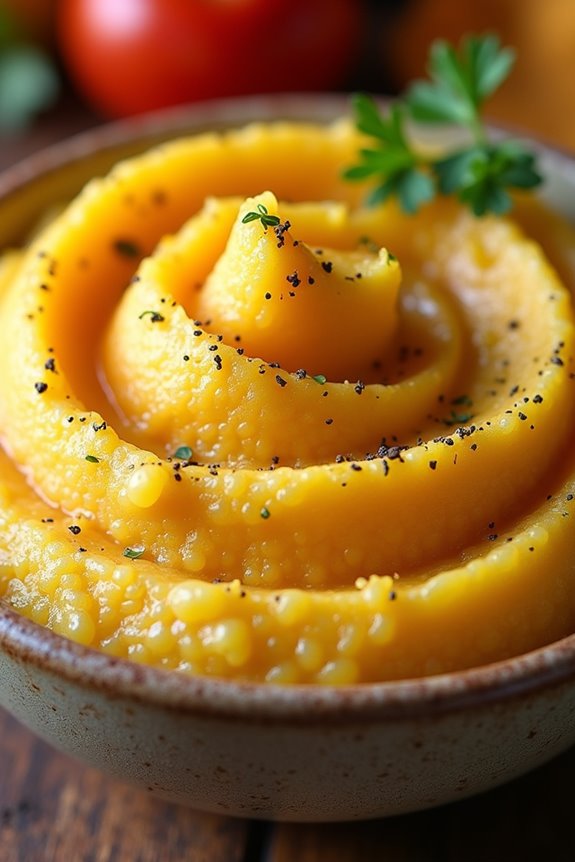
Norwegian Root Vegetable Mash is a delightful and hearty dish that embodies the flavors of Scandinavian cuisine, making it a perfect addition to any Thanksgiving table. This comforting mash features a blend of root vegetables, including potatoes, carrots, and parsnips, which are known for their earthy sweetness and creamy texture when cooked and mashed together.
The dish isn’t only delicious but also a colorful representation of the season, showcasing the vibrant hues of fall produce. This mash is often elevated with the addition of butter and cream, providing a rich and indulgent mouthfeel that pairs beautifully with roasted meats, gravies, or even as a stand-alone vegetarian option.
The combination of flavors and textures in Norwegian Root Vegetable Mash is sure to please your guests and add a touch of Scandinavian charm to your Thanksgiving feast.
Ingredients (Serves 4-6):
- 2 large russet potatoes, peeled and cubed
- 2 large carrots, peeled and sliced
- 2 large parsnips, peeled and sliced
- 1/2 cup heavy cream
- 4 tablespoons unsalted butter
- Salt, to taste
- Freshly ground black pepper, to taste
- Chopped fresh parsley (for garnish, optional)
Cooking Instructions:
- Prepare the Vegetables: Begin by peeling and chopping the potatoes, carrots, and parsnips into uniform pieces. This guarantees even cooking. Place all the chopped root vegetables into a large pot.
- Boil the Vegetables: Fill the pot with enough water to cover the vegetables by about an inch. Add a generous pinch of salt to the water. Bring the pot to a boil over medium-high heat. Once boiling, reduce the heat to medium and let the vegetables cook for about 20 minutes or until they’re tender and easily pierced with a fork.
- Drain and Steam Dry: Once the vegetables are tender, carefully drain them in a colander. Allow them to sit for a few minutes to steam dry, which will help the mash achieve a creamy consistency without being watery.
- Mash the Vegetables: Return the drained vegetables to the pot (off the heat). Add the butter and heavy cream. Using a potato masher or a hand mixer, mash the vegetables until smooth and creamy. Adjust the consistency with more cream or butter if desired.
- Season the Mash: Taste the mash and season with additional salt and freshly ground black pepper to your liking. Mix well to guarantee the seasoning is evenly distributed.
- Serve: Transfer the Norwegian Root Vegetable Mash to a serving bowl. If desired, garnish with chopped fresh parsley for a pop of color. Serve warm as a delightful side dish to complement your Thanksgiving meal.
Extra Tips:
When making Norwegian Root Vegetable Mash, feel free to experiment with different root vegetables such as turnips or sweet potatoes for added sweetness and flavor complexity.
You can also enhance the dish by adding roasted garlic or fresh herbs like thyme or dill for a unique twist. Finally, for a lighter version, consider substituting half of the heavy cream with vegetable broth, which will keep the dish flavorful while reducing the richness.
Finnish Mushroom and Barley Stuffing
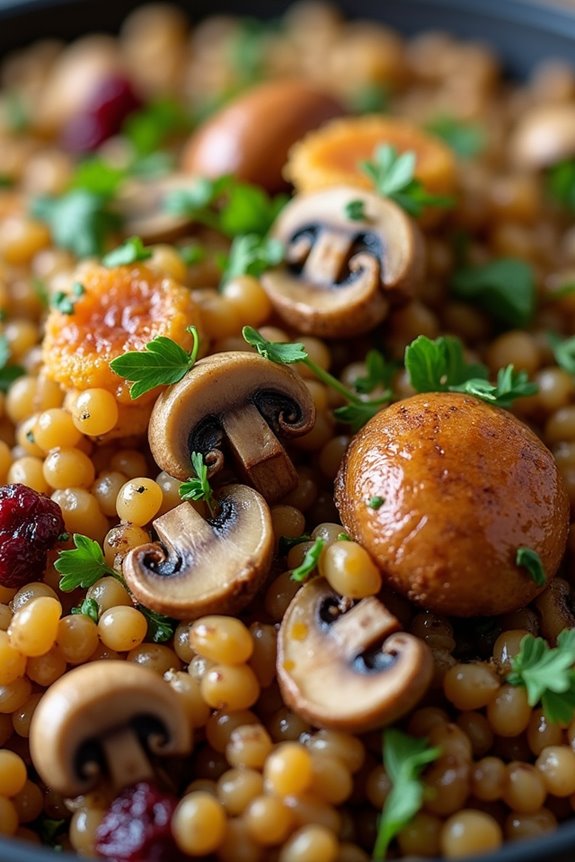
Finnish Mushroom and Barley Stuffing is a hearty and flavorful side dish that embodies the essence of Scandinavian cuisine. This stuffing combines the earthy flavors of mushrooms with the nutty texture of barley, making it a perfect complement to any Thanksgiving turkey or roasted dish. The use of fresh herbs and aromatic vegetables adds depth and warmth to the stuffing, creating a delightful experience for your taste buds.
This recipe isn’t only delicious but also showcases the simplicity and wholesome ingredients typical of Finnish cooking. Ideal for a gathering of 4-6 people, this stuffing can be prepared ahead of time and baked just before serving, allowing you to enjoy a stress-free holiday meal. Follow this recipe to create a truly unique and satisfying side that will impress all your guests.
Ingredients (serving size: 4-6 people)
- 1 cup pearl barley
- 2 cups vegetable broth
- 1 tablespoon olive oil
- 1 medium onion, finely chopped
- 2 cloves garlic, minced
- 8 ounces mushrooms, chopped (such as cremini or button)
- 1 teaspoon dried thyme
- 1 teaspoon dried sage
- 1/2 teaspoon salt
- 1/4 teaspoon black pepper
- 1/4 cup fresh parsley, chopped
- 1/4 cup walnuts, chopped (optional)
- 1/4 cup dried cranberries (optional)
Cooking Instructions
- Prepare the Barley: Rinse the pearl barley under cold water to remove any debris. In a medium saucepan, combine the rinsed barley and vegetable broth. Bring to a boil, then reduce the heat to low, cover, and simmer for about 30-40 minutes, or until the barley is tender and has absorbed most of the liquid. Once cooked, remove from heat and let it cool slightly.
- Sauté the Vegetables: In a large skillet, heat the olive oil over medium heat. Add the chopped onion and sauté for about 5 minutes, or until it becomes translucent. Then, add the minced garlic and chopped mushrooms. Cook for an additional 5-7 minutes, stirring occasionally, until the mushrooms are soft and their moisture has evaporated.
- Combine Ingredients: In a large mixing bowl, combine the cooked barley, sautéed mushrooms, onions, and garlic. Add the dried thyme, dried sage, salt, and black pepper. Mix well until all ingredients are evenly incorporated. If using, fold in the chopped walnuts and dried cranberries for added texture and sweetness.
- Transfer to Baking Dish: Preheat your oven to 350°F (175°C). Transfer the stuffing mixture into a greased baking dish, spreading it evenly. If desired, you can cover the dish with aluminum foil to retain moisture while baking.
- Bake: Place the baking dish in the preheated oven and bake for 20-25 minutes, or until the top is slightly golden and the stuffing is heated through. If you prefer a crispier top, remove the foil during the last 10 minutes of baking.
- Garnish and Serve: Once baked, remove the stuffing from the oven and let it cool for a few minutes. Garnish with freshly chopped parsley before serving. Enjoy your Finnish Mushroom and Barley Stuffing alongside your Thanksgiving feast!
Extra Tips
When cooking Finnish Mushroom and Barley Stuffing, feel free to customize it to your taste by adding other vegetables like celery or carrots for additional flavor and texture.
You can also substitute the walnuts with pecans or omit them entirely if you prefer a nut-free version. For a more robust flavor, consider using a mix of wild mushrooms or adding a splash of white wine while sautéing the mushrooms.
This stuffing can also be made a day ahead and stored in the refrigerator; just reheat it in the oven before serving!
Sweet Potato and Carrot Rösti
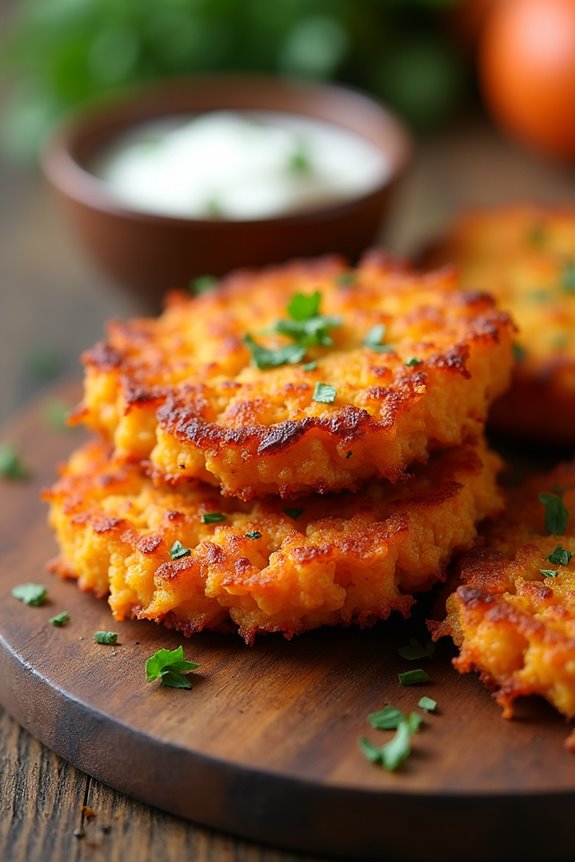
Sweet Potato and Carrot Rösti is a delightful twist on the classic Swiss potato dish, perfect for adding a touch of Scandinavian flair to your Thanksgiving table. This colorful and nutritious dish combines the sweet, earthy flavors of sweet potatoes with the subtle sweetness of carrots, creating a crispy, golden exterior and a tender interior that’s bound to please everyone.
Rösti can be enjoyed as a side dish or even as a main vegetarian option, making it versatile enough for any festive occasion. This recipe is simple to prepare and highlights the natural sweetness of the ingredients, making it a perfect accompaniment to your Thanksgiving feast.
The addition of herbs and spices elevates the dish, while the frying process gives the rösti its signature crunchy texture. Serve it alongside cranberry sauce or a dollop of sour cream for a delightful contrast that will have your guests coming back for seconds.
Ingredients (Serves 4-6)
- 2 medium sweet potatoes, peeled and grated
- 2 medium carrots, peeled and grated
- 1 small onion, finely chopped
- 2 large eggs
- 1/4 cup all-purpose flour
- 1 teaspoon salt
- 1/2 teaspoon black pepper
- 1/2 teaspoon smoked paprika
- 2 tablespoons fresh parsley, chopped (optional)
- 3 tablespoons olive oil (for frying)
Cooking Instructions
- Prepare the Vegetables: Start by peeling and grating the sweet potatoes and carrots. Use a box grater or a food processor for this step. Once grated, place them in a clean kitchen towel and squeeze out any excess moisture to prevent the rösti from becoming too soggy.
- Mix the Ingredients: In a large mixing bowl, combine the grated sweet potatoes and carrots with the finely chopped onion. Add the eggs, flour, salt, black pepper, smoked paprika, and parsley (if using). Mix everything together until well combined. The mixture should hold together when pressed.
- Heat the Oil: In a large non-stick skillet or frying pan, heat the olive oil over medium heat. You want to ascertain the oil is hot enough to create a crispy exterior but not so hot that it burns the rösti.
- Form the Rösti: Take a handful of the vegetable mixture and form it into a patty, about 1/2 inch thick. Carefully place it into the hot skillet. Repeat this process with the remaining mixture, ensuring not to overcrowd the pan.
- Cook the Rösti: Fry the patties for about 4-5 minutes on each side, or until they’re golden brown and crispy. Use a spatula to gently flip them over. If they start to brown too quickly, reduce the heat slightly.
- Drain and Serve: Once cooked, transfer the rösti to a plate lined with paper towels to absorb any excess oil. Serve warm, garnished with additional parsley if desired.
Extra Tips
For an added flavor boost, consider incorporating grated cheese such as Parmesan or cheddar into the mixture before cooking. You can also experiment with different herbs like thyme or dill for a unique twist.
If you’re preparing this dish ahead of time, you can make the rösti and store them in the refrigerator for up to a day before frying. Just remember to reheat them in the skillet for a few minutes on each side to regain their crispiness before serving.
Enjoy your Sweet Potato and Carrot Rösti as a delicious and colorful addition to your Thanksgiving spread!
Traditional Scandinavian Meatballs
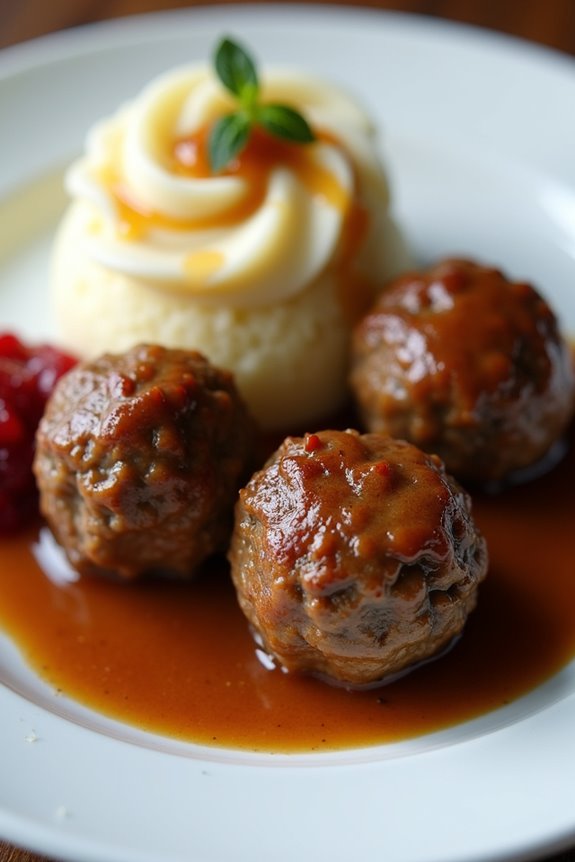
Scandinavian meatballs, known as “Köttbullar” in Sweden, are a beloved dish that brings warmth and comfort to any Thanksgiving table. These savory little morsels are seasoned with a blend of spices and served with a rich gravy, often accompanied by lingonberry sauce and creamy mashed potatoes. The combination of flavors and textures makes them a crowd-pleaser, perfect for family gatherings or festive occasions.
While the recipe may have roots in Scandinavian tradition, it has become a staple in homes around the world. The preparation of these meatballs is simple yet rewarding. Using a mix of ground meats, breadcrumbs, and aromatic spices, each bite delivers a delightful taste of Scandinavian heritage.
Whether served as an appetizer or as part of the main course, traditional Scandinavian meatballs can elevate any Thanksgiving feast. They’re easy to prepare ahead of time, allowing you to enjoy the festivities without being stuck in the kitchen.
Ingredients (Serves 4-6 people):
- 1 pound ground beef
- 1 pound ground pork
- 1 small onion, finely chopped
- 1/2 cup breadcrumbs
- 1/4 cup milk
- 1 large egg
- 1 teaspoon salt
- 1/2 teaspoon black pepper
- 1/4 teaspoon ground allspice
- 1/4 teaspoon ground nutmeg
- 2 tablespoons butter (for frying)
- 2 tablespoons olive oil (for frying)
- 1 cup beef broth (for gravy)
- 1 tablespoon flour (for thickening gravy)
- Lingonberry sauce (for serving, optional)
Cooking Instructions:
- Prepare the Meat Mixture: In a large mixing bowl, combine the ground beef and ground pork. Add the finely chopped onion, breadcrumbs, milk, egg, salt, black pepper, allspice, and nutmeg. Mix thoroughly with your hands or a spoon until all ingredients are well incorporated.
- Shape the Meatballs: Once the mixture is combined, take a small amount (about 1-2 tablespoons) of the mixture and roll it into a ball shape. Repeat until all the meat mixture is used, placing the meatballs on a plate or tray.
- Cook the Meatballs: In a large skillet, heat the butter and olive oil over medium heat. Once hot, add the meatballs in batches, making sure not to overcrowd the pan. Fry the meatballs for about 5-7 minutes, turning occasionally, until they’re browned on all sides and cooked through. Use a meat thermometer to confirm they reach an internal temperature of 160°F (70°C).
- Make the Gravy: After the meatballs are cooked and removed from the skillet, drain excess fat, leaving about 1 tablespoon in the pan. Add the flour to the skillet and whisk for about 1 minute to create a roux. Gradually pour in the beef broth while continuously whisking to prevent lumps. Bring the gravy to a simmer and cook until slightly thickened, about 3-5 minutes. Season with salt and pepper to taste.
- Serve: Place the cooked meatballs back into the skillet with the gravy, gently coating them. Serve hot with a side of creamy mashed potatoes and lingonberry sauce for a delightful Scandinavian experience.
Extra Tips:
When preparing traditional Scandinavian meatballs, feel free to customize the spices to suit your taste; some people enjoy adding a pinch of garlic powder or parsley for an extra layer of flavor.
To save time, you can prepare the meatballs ahead of Thanksgiving and freeze them before cooking. Just be sure to thaw them overnight in the refrigerator before frying. Additionally, for a unique twist, consider serving the meatballs in a warm, crusty bread roll as a delicious meatball sandwich option!
Caramelized Brussels Sprouts With Hazelnuts
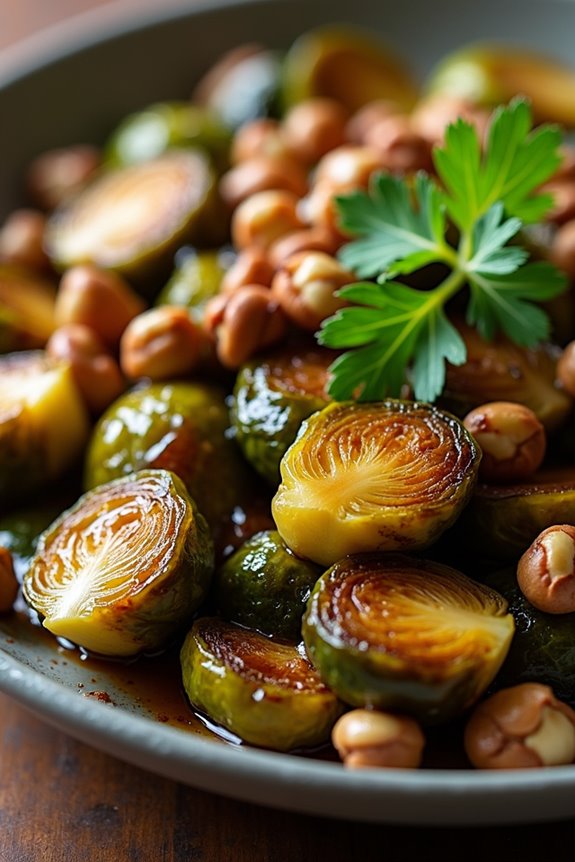
Caramelized Brussels Sprouts with Hazelnuts is a delightful side dish that elevates any Thanksgiving feast with its rich flavors and satisfying textures. The combination of caramelized Brussels sprouts, crunchy hazelnuts, and a hint of sweetness creates a dish that isn’t only visually appealing but also packed with nutrients.
This recipe is perfect for those who want to introduce a Scandinavian twist to their Thanksgiving table, showcasing the flavors of the season while keeping the dish simple and accessible.
Brussels sprouts are often misunderstood, but when prepared correctly, they can be a standout dish. Caramelization enhances their natural sweetness and provides a beautiful golden brown color, while the toasted hazelnuts add a nutty crunch that perfectly complements the tender sprouts.
Whether you’re hosting a large gathering or enjoying a cozy dinner, this dish is sure to impress your guests and leave them asking for seconds.
Ingredients (Serves 4-6):
- 1.5 pounds Brussels sprouts, trimmed and halved
- 4 tablespoons olive oil
- 2 tablespoons maple syrup
- Salt and pepper to taste
- 1 cup hazelnuts, roughly chopped
- 2 tablespoons balsamic vinegar
- Fresh parsley, chopped (for garnish)
Cooking Instructions:
- Preheat the Oven: Begin by preheating your oven to 425°F (220°C). A hot oven is vital for achieving the perfect caramelized texture on the Brussels sprouts.
- Prepare the Brussels Sprouts: Rinse the Brussels sprouts under cold water and trim the ends. Cut each sprout in half to facilitate even cooking and to allow the cut sides to caramelize beautifully.
- Toss with Oil and Maple Syrup: In a large mixing bowl, combine the halved Brussels sprouts with olive oil, maple syrup, salt, and pepper. Toss until the sprouts are evenly coated. The maple syrup will add a delicious sweetness that balances the savory flavors.
- Roast the Brussels Sprouts: Spread the coated Brussels sprouts in a single layer on a baking sheet. Roast in the preheated oven for about 20-25 minutes, stirring halfway through, until they’re golden brown and tender. The edges should be crispy and caramelized.
- Toast the Hazelnuts: While the Brussels sprouts are roasting, place the chopped hazelnuts on a dry skillet over medium heat. Toast them for 5-7 minutes, stirring frequently, until they’re fragrant and lightly golden. Be careful not to burn them.
- Combine and Add Balsamic Vinegar: Once the Brussels sprouts are done roasting, remove them from the oven and transfer them to a serving bowl. Add the toasted hazelnuts and drizzle with balsamic vinegar. Toss everything together gently to combine.
- Garnish and Serve: Finally, sprinkle fresh chopped parsley on top for a pop of color and freshness. Serve warm as a delightful side dish at your Thanksgiving gathering.
Extra Tips:
For an added layer of flavor, consider incorporating garlic by adding a few minced cloves to the Brussels sprouts before roasting. If you prefer a more savory note, you can replace the maple syrup with honey or omit it entirely for a more earthy taste.
Additionally, feel free to experiment with other nuts, such as walnuts or pecans, for a different twist. Always keep an eye on the roasting process, as oven temperatures can vary, and you want to avoid burning the Brussels sprouts or hazelnuts.
Enjoy this delicious side dish and the compliments that will surely follow!
Glazed Carrots With Dill
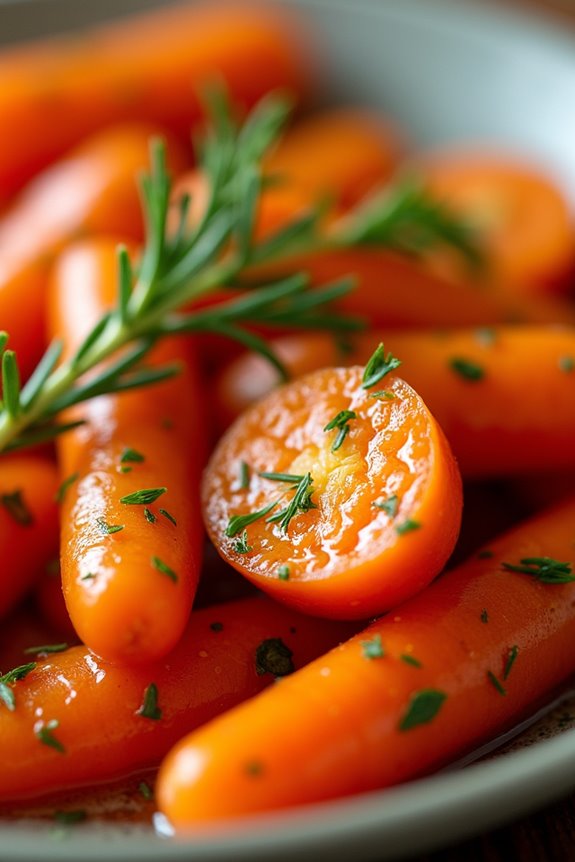
Glazed Carrots with Dill is a delightful side dish that brings a touch of Scandinavian flair to your Thanksgiving table. The natural sweetness of the carrots is enhanced by a buttery glaze, while the fresh dill adds a herbaceous note that perfectly complements the dish’s flavors. This recipe isn’t only simple to prepare but also visually appealing, making it an excellent addition to your holiday spread.
Whether you’re celebrating Thanksgiving or simply looking to enjoy a comforting meal, glazed carrots are a versatile side that pairs well with a variety of main courses. The vibrant color and sweet taste will appeal to both children and adults alike, making it a family favorite. With just a few ingredients and minimal effort, you can create this delicious dish that will impress your guests.
Ingredients (serving size: 4-6 people):
- 1 pound of baby carrots (or regular carrots, peeled and sliced)
- 2 tablespoons of unsalted butter
- 2 tablespoons of brown sugar
- 1 teaspoon of salt
- ½ teaspoon of black pepper
- 2 tablespoons of fresh dill, chopped
- 1 tablespoon of lemon juice (optional)
Cooking Instructions:
- Prepare the Carrots: If using regular carrots, peel and slice them into uniform pieces, about 1/4-inch thick. If using baby carrots, you can leave them whole or halve them lengthwise if they’re larger. This guarantees even cooking throughout.
- Boil the Carrots: In a large pot, bring salted water to a boil. Add the prepared carrots to the boiling water and cook for about 5-7 minutes, or until they’re tender but still slightly firm. You want them to retain some crunch for the best texture.
- Drain and Set Aside: Once the carrots are cooked, carefully drain them in a colander and set them aside. Allow them to cool for a couple of minutes so they’re easier to handle.
- Prepare the Glaze: In the same pot over medium heat, add the unsalted butter and allow it to melt completely. Once melted, stir in the brown sugar, salt, and black pepper. Continue to cook for about 1-2 minutes until the sugar has dissolved, forming a syrupy glaze.
- Coat the Carrots: Add the drained carrots back into the pot with the glaze. Gently toss the carrots in the glaze to ascertain they’re evenly coated. Cook for another 2-3 minutes, allowing the flavors to meld.
- Finish with Dill: Remove the pot from the heat and stir in the chopped fresh dill and lemon juice (if using). Toss everything together to make sure the dill is evenly distributed.
- Serve: Transfer the glazed carrots to a serving dish and garnish with a few extra sprigs of dill, if desired. Serve warm alongside your Thanksgiving feast.
Extra Tips:
For an extra layer of flavor, consider adding a pinch of nutmeg or a dash of balsamic vinegar to the glaze. You can also experiment with different herbs, such as thyme or parsley, if dill isn’t your preference.
If you want to prepare the dish in advance, you can blanch the carrots and make the glaze ahead of time, then combine and heat them just before serving. Enjoy this colorful and delicious side dish that celebrates both the flavors of the season and Scandinavian culinary traditions!
Apple and Cardamom Crumble
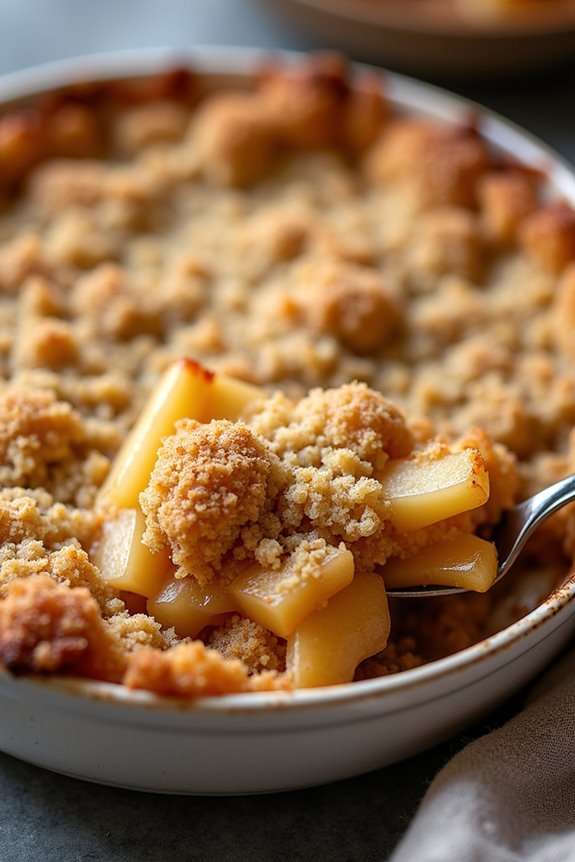
As the leaves turn golden and the air grows crisp, there’s nothing quite like a warm dessert to bring comfort and delight to your Scandinavian Thanksgiving table. The Apple and Cardamom Crumble is a delightful twist on the traditional crumble, infusing sweet, tender apples with aromatic cardamom that adds depth and warmth. This dessert not only celebrates the seasonal bounty of apples but also embraces the unique flavors that Scandinavian cuisine is renowned for.
Preparing this crumble is simple and rewarding. The combination of tart apples and the fragrant spice creates a perfect harmony, while the buttery crumble topping adds a satisfying crunch. Whether you serve it warm with a scoop of vanilla ice cream or a dollop of whipped cream, this dish is sure to impress your family and friends during your Thanksgiving gathering. Let’s plunge into the recipe!
Ingredients (serves 4-6 people):
- 4 medium-sized apples (such as Granny Smith or Honeycrisp), peeled, cored, and sliced
- 1 tablespoon lemon juice
- 1 teaspoon ground cardamom
- 1/2 cup granulated sugar
- 1/2 teaspoon cinnamon
- 1 cup all-purpose flour
- 1/2 cup rolled oats
- 1/2 cup brown sugar
- 1/2 cup unsalted butter, melted
- A pinch of salt
Cooking Instructions:
- Preheat the Oven: Start by preheating your oven to 350°F (175°C). This guarantees that the crumble will bake evenly and the topping will become golden and crisp.
- Prepare the Apples: In a large mixing bowl, combine the sliced apples with the lemon juice, ground cardamom, granulated sugar, and cinnamon. Toss the mixture gently until the apples are well-coated. The lemon juice helps prevent the apples from browning and enhances their flavor.
- Transfer to Baking Dish: Pour the apple mixture into a greased 9-inch baking dish, spreading it out evenly. This allows for even cooking and guarantees that every bite is filled with the delicious apple filling.
- Make the Crumble Topping: In another bowl, mix together the flour, rolled oats, brown sugar, melted butter, and a pinch of salt. Use your hands or a fork to combine the ingredients until you achieve a crumbly texture. The melted butter helps bind the mixture while creating a crunchy topping.
- Assemble the Dish: Sprinkle the crumble topping evenly over the apple mixture in the baking dish. Verify that it’s spread out well, covering the apples completely to protect them as they bake.
- Bake: Place the baking dish in the preheated oven and bake for 30-35 minutes, or until the topping is golden brown and the apples are bubbly. Keep an eye on it to prevent over-browning.
- Cool and Serve: Once baked, remove the crumble from the oven and let it cool for a few minutes before serving. This allows the juices to settle, making it easier to serve.
Extra Tips:
For an extra depth of flavor, consider adding a handful of chopped nuts, such as walnuts or almonds, to the crumble topping for added crunch and richness.
Additionally, you can experiment with different types of apples to find the perfect balance of sweetness and tartness that you enjoy.
Finally, serving the Apple and Cardamom Crumble warm with a scoop of vanilla ice cream or a drizzle of heavy cream can elevate this simple dessert to a luxurious treat!
Cardamom-Spiced Pumpkin Pie

As the leaves turn golden and the air turns crisp, it’s time to embrace the warmth of autumn with a delightful dessert that combines the comforting flavors of pumpkin and the exotic aroma of cardamom. This Cardamom-Spiced Pumpkin Pie is a unique twist on the traditional pumpkin pie, adding a fragrant spice that elevates this classic dish to new heights.
The creamy pumpkin filling, infused with cardamom, cinnamon, and nutmeg, sits in a flaky, buttery crust that will have your guests coming back for seconds. This pie not only celebrates the essence of Thanksgiving but also pays homage to Scandinavian culinary traditions, where spices play a significant role in desserts.
Perfect for gatherings or cozy family dinners, this Cardamom-Spiced Pumpkin Pie is sure to impress with its vibrant flavor profile and stunning presentation. Serve it with a dollop of whipped cream or a scoop of vanilla ice cream for an extra indulgent treat.
Ingredients (Serves 4-6):
- 1 pre-made pie crust (9-inch)
- 1 can (15 oz) pure pumpkin puree
- 1 cup heavy cream
- 3/4 cup brown sugar
- 1/2 cup granulated sugar
- 3 large eggs
- 2 teaspoons ground cardamom
- 1 teaspoon ground cinnamon
- 1/2 teaspoon ground nutmeg
- 1/2 teaspoon salt
- 1 teaspoon vanilla extract
Cooking Instructions:
- Preheat the Oven: Begin by preheating your oven to 425°F (220°C). This high heat will help set the crust and create a golden-brown finish.
- Prepare the Pie Crust: If using a frozen pie crust, let it thaw according to package instructions. Place the crust into a 9-inch pie dish and crimp the edges as desired. Prick the bottom with a fork to prevent bubbling during baking.
- Mix the Filling: In a large mixing bowl, combine the pumpkin puree, heavy cream, brown sugar, granulated sugar, eggs, ground cardamom, ground cinnamon, ground nutmeg, salt, and vanilla extract. Whisk the ingredients together until smooth and well-blended, ensuring there are no lumps.
- Pour the Filling: Carefully pour the pumpkin filling into the prepared pie crust. Use a spatula to spread it evenly, making sure it fills the crust to the edges.
- Bake the Pie: Place the pie in the preheated oven and bake for 15 minutes at 425°F (220°C). Then, reduce the temperature to 350°F (175°C) and continue baking for an additional 35-40 minutes, or until the filling is set and a toothpick inserted in the center comes out clean.
- Cool the Pie: Once baked, remove the pie from the oven and let it cool on a wire rack for at least 2 hours. This allows the filling to firm up and makes it easier to slice.
- Serve and Enjoy: Once cooled, slice the pie into wedges and serve with a dollop of whipped cream or a scoop of vanilla ice cream, if desired.
Extra Tips:
When making Cardamom-Spiced Pumpkin Pie, it’s essential to use fresh spices for the best flavor—freshly ground cardamom can make a notable difference.
Additionally, feel free to experiment with the spice levels; if you’re a fan of cardamom, you might want to add a bit more for a bolder flavor. Also, allow the pie to cool completely before slicing to achieve clean, beautiful pieces.
Store any leftovers covered in the refrigerator for up to three days. Enjoy the process and the delightful aromas that fill your kitchen!